This is the multi-page printable view of this section. .
HugeGraph ToolChain
- 1: Graph visualization
- 2: Graph Visualization with Hubble: Standalone Quick Start
- 3: Graph import
- 4: HugeGraph-Loader Quick Start
- 5: Graph export and migration
- 6: Tools Quick Start
- 7: HugeGraph-Spark-Connector Quick Start
HugeGraph Toolchain includes the Java and Go clients, Loader, Hubble, Tools, Spark Connector, and SeaTunnel Sink/Source. Choose an entry by the task you need to complete, then open the component guide for its configuration and commands.
| Task | Start here | Best for |
|---|---|---|
| Visualize graphs | Hubble | Viewing and managing graphs in a Web UI |
| Import graph data | Loader, SeaTunnel Sink, Spark Connector | Importing data directly or connecting an existing pipeline |
| Export or migrate graph data | Tools, SeaTunnel Source | Backup, export, cross-graph migration, and continuous reads |
Testing Guide: For running toolchain tests locally, please refer to HugeGraph Toolchain Local Testing Guide
DeepWiki provides real-time updated project documentation with more comprehensive and accurate content, suitable for quickly understanding the latest project information.
Source repository: apache/hugegraph-toolchain
1 - Graph visualization
Hubble provides a Web interface for HugeGraph data, schema, queries, and imports. Start with a standalone deployment without PD, then read the distributed differences when needed.
- Hubble basics with standalone RocksDB: startup, sample graphs, modeling, imports, and queries.
- Hubble with an HStore cluster: PD discovery, GraphSpaces, and cluster operations.
1.1 - Manage an HStore Cluster with Hubble
This guide highlights the key differences between HStore + PD distributed deployments and standalone RocksDB.
For general graph modeling, data import, and query workflows, see the Hubble standalone guide.
Content aligns with the Toolchain, Server, PD, and Store master branches (all currently 1.8.0).
The main repository’s docker/docker-compose-hstore.yml
provides complete orchestration for PD, Store, Server, and Hubble. Follow the adjacent
Docker README to prepare .env and generate the local Hubble configuration,
then launch services from docker/ without maintaining separate Compose files.
The guidance below focuses on connectivity and operations; ensure prerequisite credentials and service readiness from the README are met.
Docker latest is a moving tag. Screenshots assist in UI navigation; verify deployed versions via image digests and build details.
Metrics and permission APIs vary by version.
The screenshots show the HugeGraph Hubble interface in action; features and workflows are identical in both English and Chinese.
Connect to a distributed cluster
Hubble still manages graph data through the Server graph API. In distributed mode, it discovers Servers through PD and collects cluster information from PD and Store. Hubble does not read or write graph data directly in Store.
flowchart LR
    H[Hubble] -->|Graph API| S[Server]
    S -->|Graph reads and writes| T[Store]
    H -.->|Discovery and cluster information| P[PD]
    H -.->|Node metrics| T
Generate Hubble configuration. Prepare
.envin the main repository’sdocker/directory following the Docker README.The script reads
HG_PD_AUTH_SECRET_KEYfrom.envand writes its value asoperations.pd.passwordinto the generated filedocker/conf/hubble/hstore.local.properties. Edit this generated file to adjust connection or operations settings (do not overwrite the tracked.exampletemplate), ensuringoperations.pd.passwordmatches the PD secret. Compose mounts this file read-only into the container; do not edit inside the container. Both.envand the generated file contain secrets and should not be committed to Git. Re-running the script overwrites the generated file, requiring custom settings to be reapplied.Start the services. Use the same
docker/directory and confirm Server registration and Store readiness.
For separately deployed services, follow the PD deployment guide and
HStore deployment guide. A source or binary Hubble deployment instead uses the package’s
conf/hugegraph-hubble.properties. These settings match the official minimal topology; use backend-reachable addresses for other deployments:
| Setting | Purpose | Bundled value |
|---|---|---|
pd.enabled | Explicitly enable PD mode; server.direct_url is not used in this mode. | false |
cluster | Cluster name used for Server discovery; it must match the registration. | hg |
pd.peers | PD gRPC addresses, separated by commas. | 127.0.0.1:8686 |
pd.server | PD REST address for cluster operations, not a list of gRPC peers. | 127.0.0.1:8620 |
Distinguish between the two ports: 8686 is for gRPC and 8620 is for REST. Do not interchange them, and use container service names or reachable IPs
rather than 127.0.0.1 for cross-container traffic.
The bundled package sets pd.enabled=false. If omitted, the fallback default is true, so declare this setting explicitly in both standalone and distributed
setups.
After editing configuration: restart the Hubble process for source or binary deployments; for Docker Compose, recreate the Hubble container from docker/
to reload the mounted configuration (retaining the project name and all -f arguments):
In the Hubble UI, you do not need to configure a Server host and port for each graph.
Organize graphs and permissions with GraphSpaces
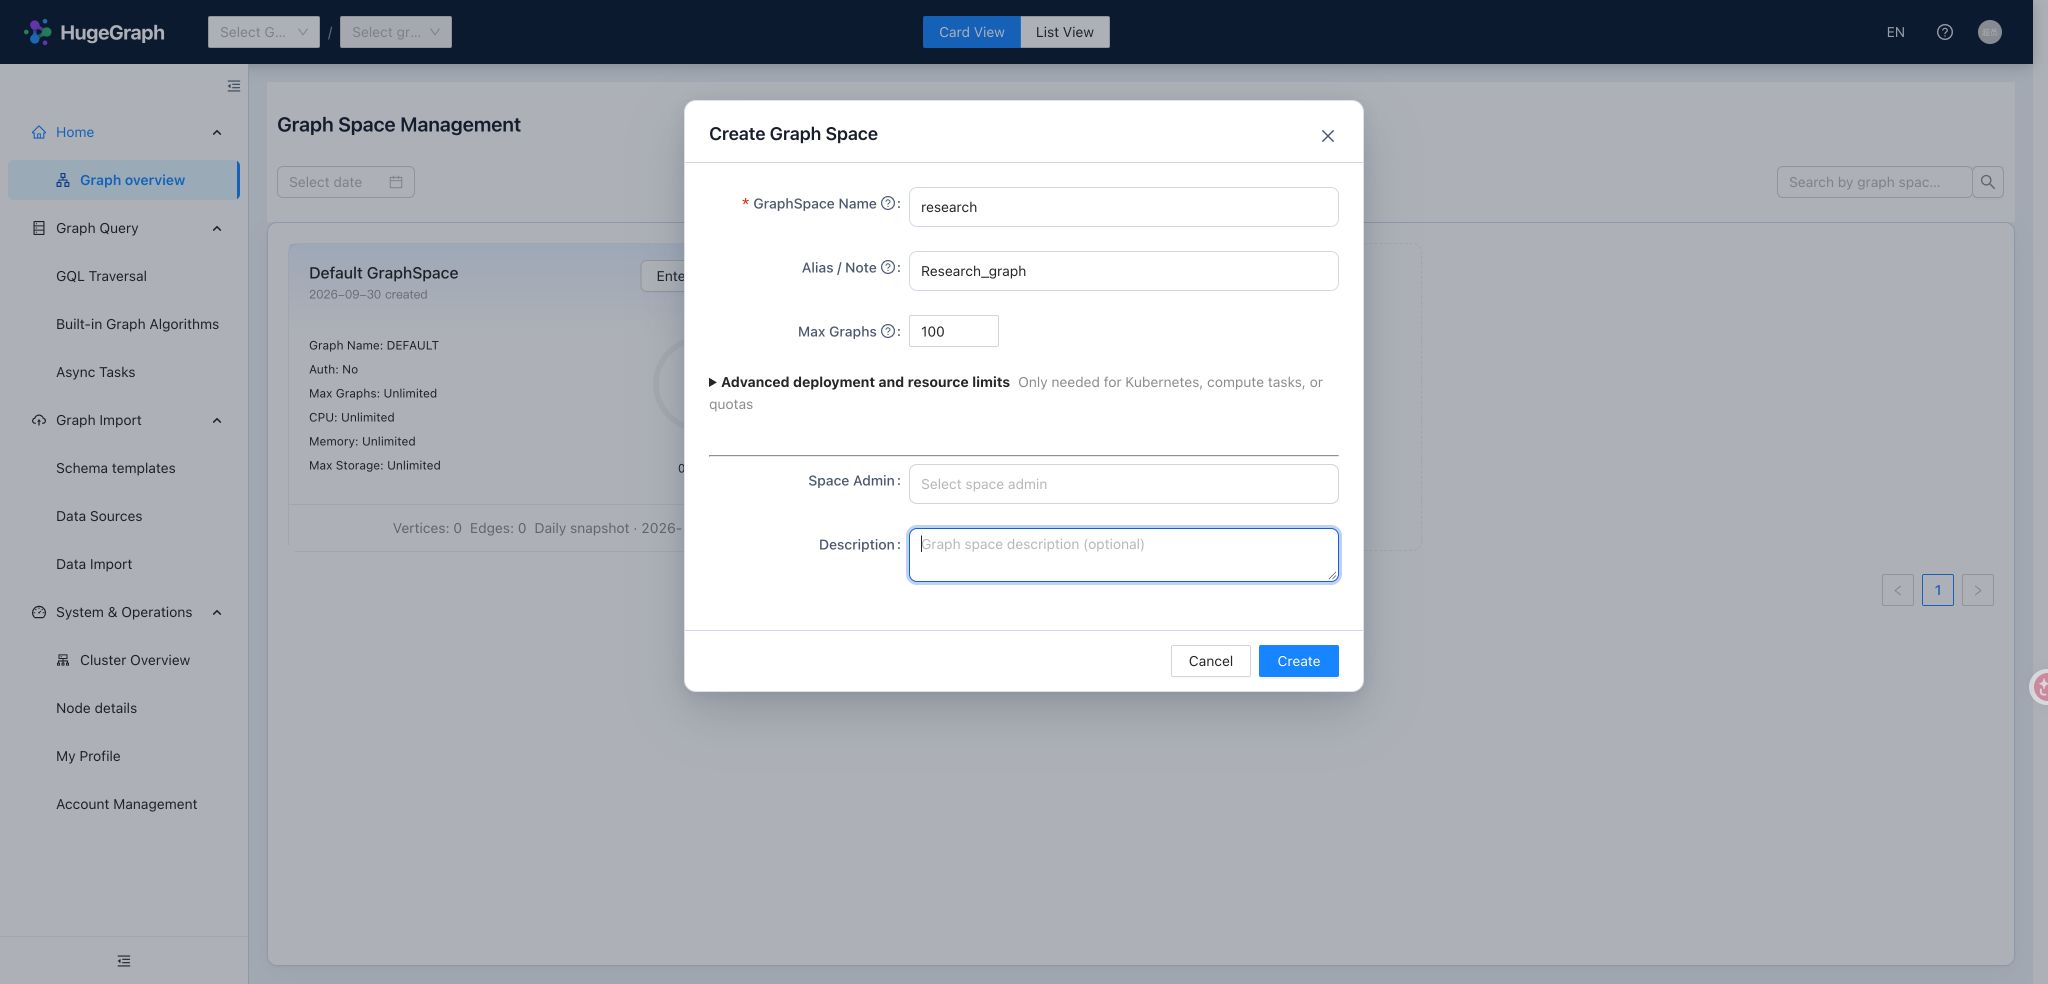
A GraphSpace groups graphs, Schema templates, and access permissions. For example, create sales and research spaces
so each team can work with its own graphs. Modeling, importing, and querying within a space follow the standalone guide.
Create and adjust a GraphSpace
With Server authentication enabled, creating, editing, and deleting GraphSpaces require super administrator access.
Start with a globally unique GraphSpace name, an optional display alias, and the maximum graph count.
For example, use research as the API identifier and “Research_graph” as the display alias.
The name cannot change after creation. The alias and description can change; aliases do not participate in URLs or permission matching.
Choose GraphSpace administrators from existing accounts.
“Advanced deployment and resource limits” includes CPU and memory limits for graph query/write services and asynchronous compute tasks, plus the storage capacity limit. These deployment quotas neither report current usage nor resize existing containers.
Defaults are 100 graphs, 64 CPU cores and 128 GB of memory for each of the graph and compute services, and 1000000 GB of storage. Keep the defaults for a container trial. Configure Kubernetes namespaces, Operator images, and algorithm images only for the corresponding deployment or compute use.
Select a space before opening a graph. Check the current graph after switching spaces, especially when spaces contain identically named graphs. The list reflects account access. If a space is missing, check membership permissions before creating more graphs.
Reuse Schema templates
User-defined Schema templates require PD mode and persist reusable Groovy Schema within a GraphSpace.
When several business graphs share vertex labels, edge labels, and indexes, save the model as a template and select it when creating subsequent graphs.
For example, a user template in research can be reused for new graphs in that space. After switching spaces, select a template belonging to the new space.
User templates differ from the built-in sample templates in the main guide: built-in templates help explore preset models, while user templates preserve your own models for future use. A template is not an import of data; loading sample data is a separate graph creation choice. With Server authentication enabled, creating a user template requires write access to its space. Updating or deleting it also requires ownership or the corresponding administrative permission. Anonymous mode does not enforce per-user permissions or template ownership checks. Standalone mode does not provide user template management.
Assign access to a GraphSpace
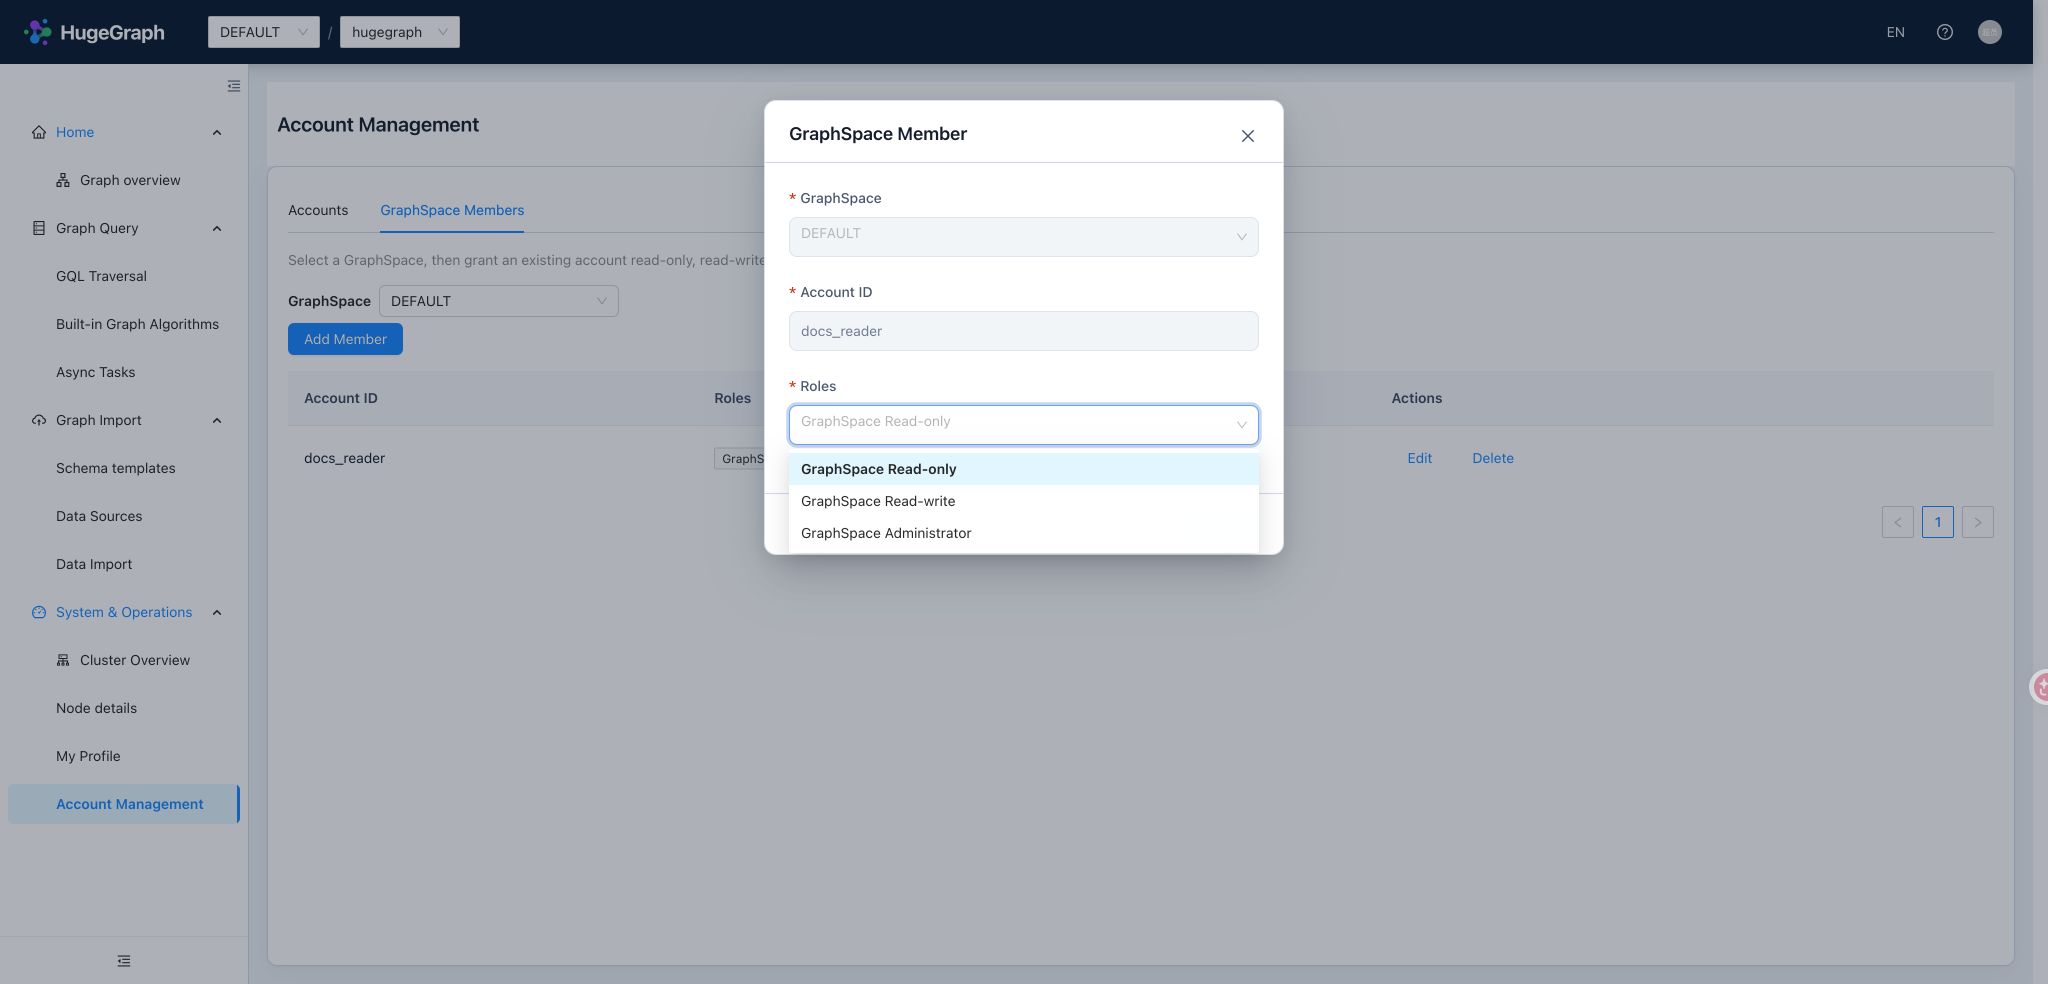
For account creation, login, and personal details, see the standalone guide. Distributed mode adds “Manage GraphSpace members” to assign permissions between existing accounts and selected spaces. Servers supporting permission presets provide these common choices:
| Preset | Intended user | Scope |
|---|---|---|
| GraphSpace read-only | Users who inspect and query graph data | Selected spaces. |
| GraphSpace read-write | Users who model, import, and maintain graph data | Selected spaces. |
| GraphSpace administrator | Owners managing a space’s members and graph resources | Selected spaces; does not grant GraphSpace creation/editing or cluster operations access. |
| Super administrator | Operators managing accounts, GraphSpaces, and the cluster | Global; assign according to responsibilities. |
An account may have different access in different spaces, such as read-write in research and read-only in sales.
Accounts and space memberships are managed separately; removing a member does not delete the global account.
After creating an account, continue directly to assigning space access. When changing an existing membership, check the selected space and preset
and preserve permissions still needed in other spaces. Enabling pd.enabled grants no permissions;
legacy custom roles on older Servers are not interchangeable with these presets.
See Server authentication and authorization.
Locate problems through the cluster overview
The overview presents Server → PD → Store in one topology. Switch to the node list to filter by type, status, or name. PD Leader, online Store count, graphs, partitions, replicas, and data size help identify cluster scale and nodes requiring attention. Partitions and replicas describe data distribution. Data size is observed usage, distinct from a GraphSpace’s configured storage limit.
Start with cluster and source status, then inspect an affected node. UP indicates a successful collection from the source;
DEGRADED indicates a cluster or partial source issue, and DOWN indicates that the corresponding probe failed.
Graphs may remain queryable when topology is available but some metrics are missing.
The UI distinguishes unsupported, unavailable, stale, and failed collections and includes observation times.
An empty value is not zero, and an older value is not a current observation.
Read node details
| Node | Main observations | Use |
|---|---|---|
| Server | Availability, JVM/CPU/memory, and backend metrics | Check the query/write entrypoint and resource pressure. |
| PD | Leader/Follower role, status, and runtime metrics supplied upstream | Check the metadata/scheduling entrypoint; do not infer a role when Leader information is absent. |
| Store | Partition and Leader partition counts, system/disk metrics, Raft group and enabled group counts | Inspect storage nodes and replica service and compare distribution across nodes. |
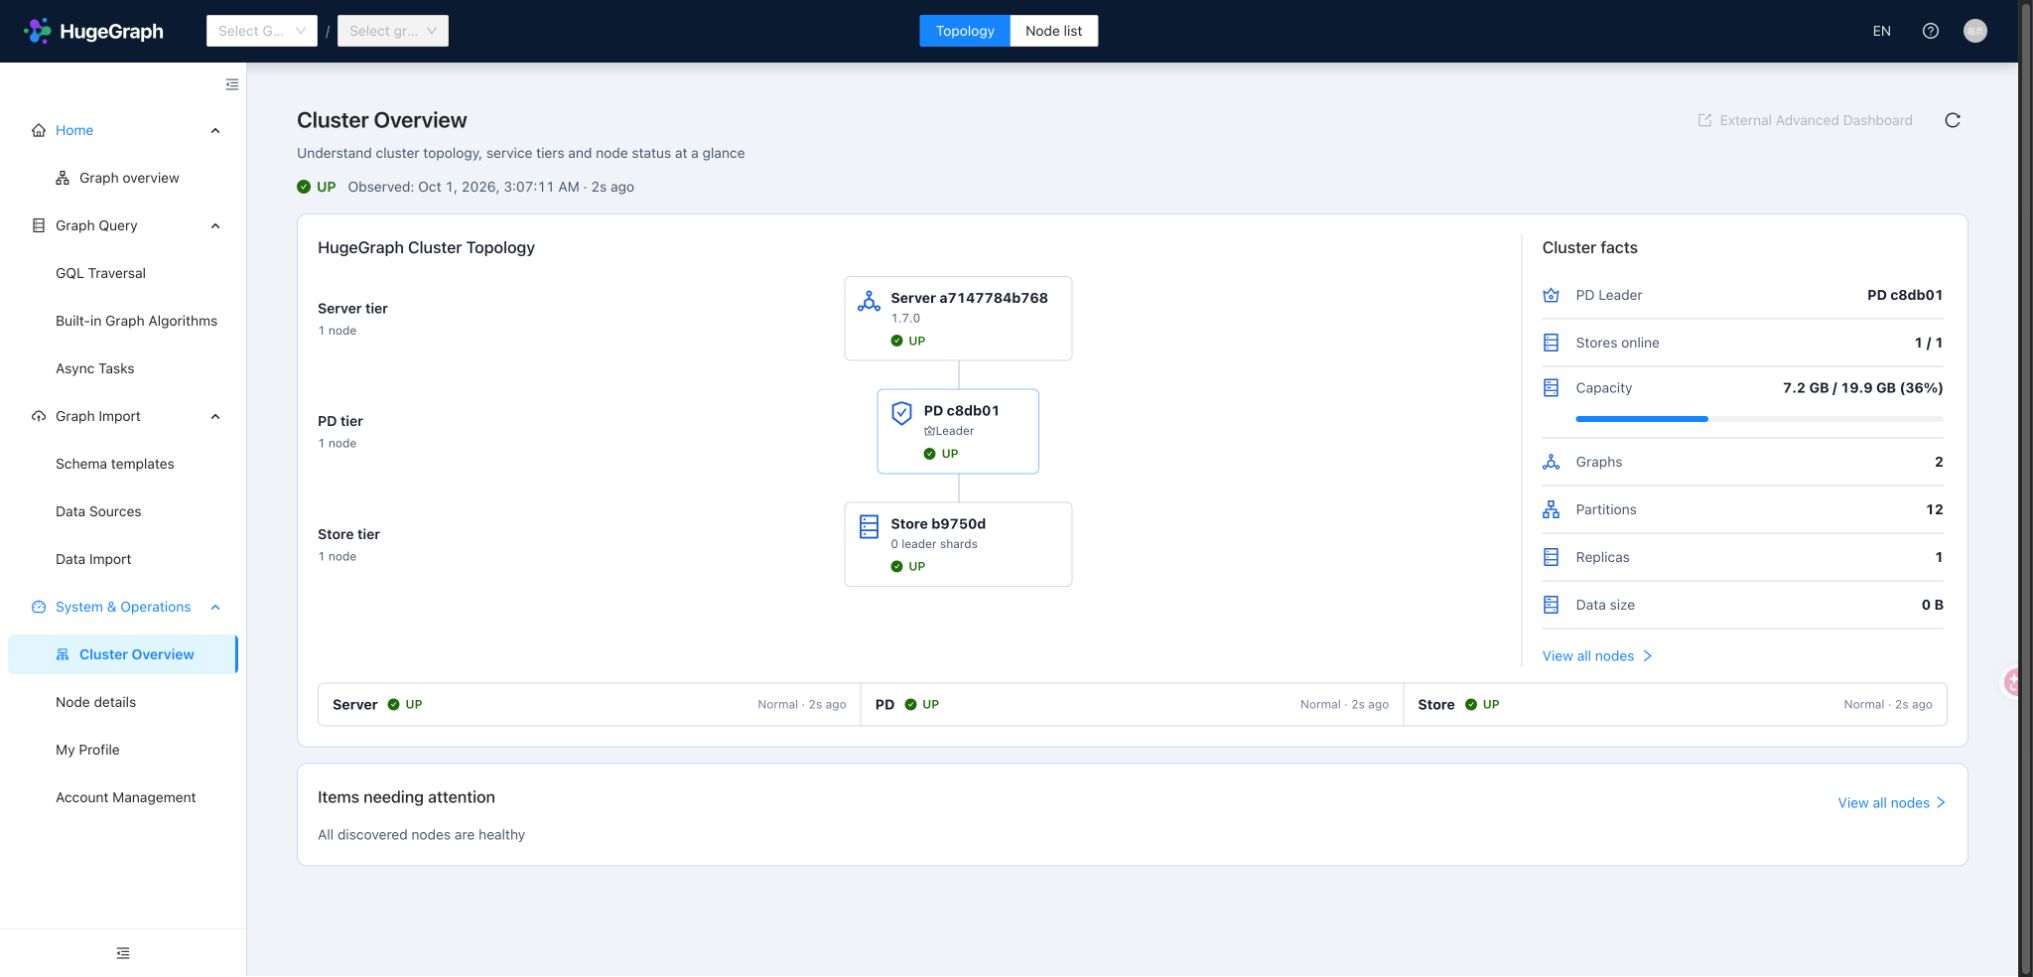
Start with cluster health and affected sources
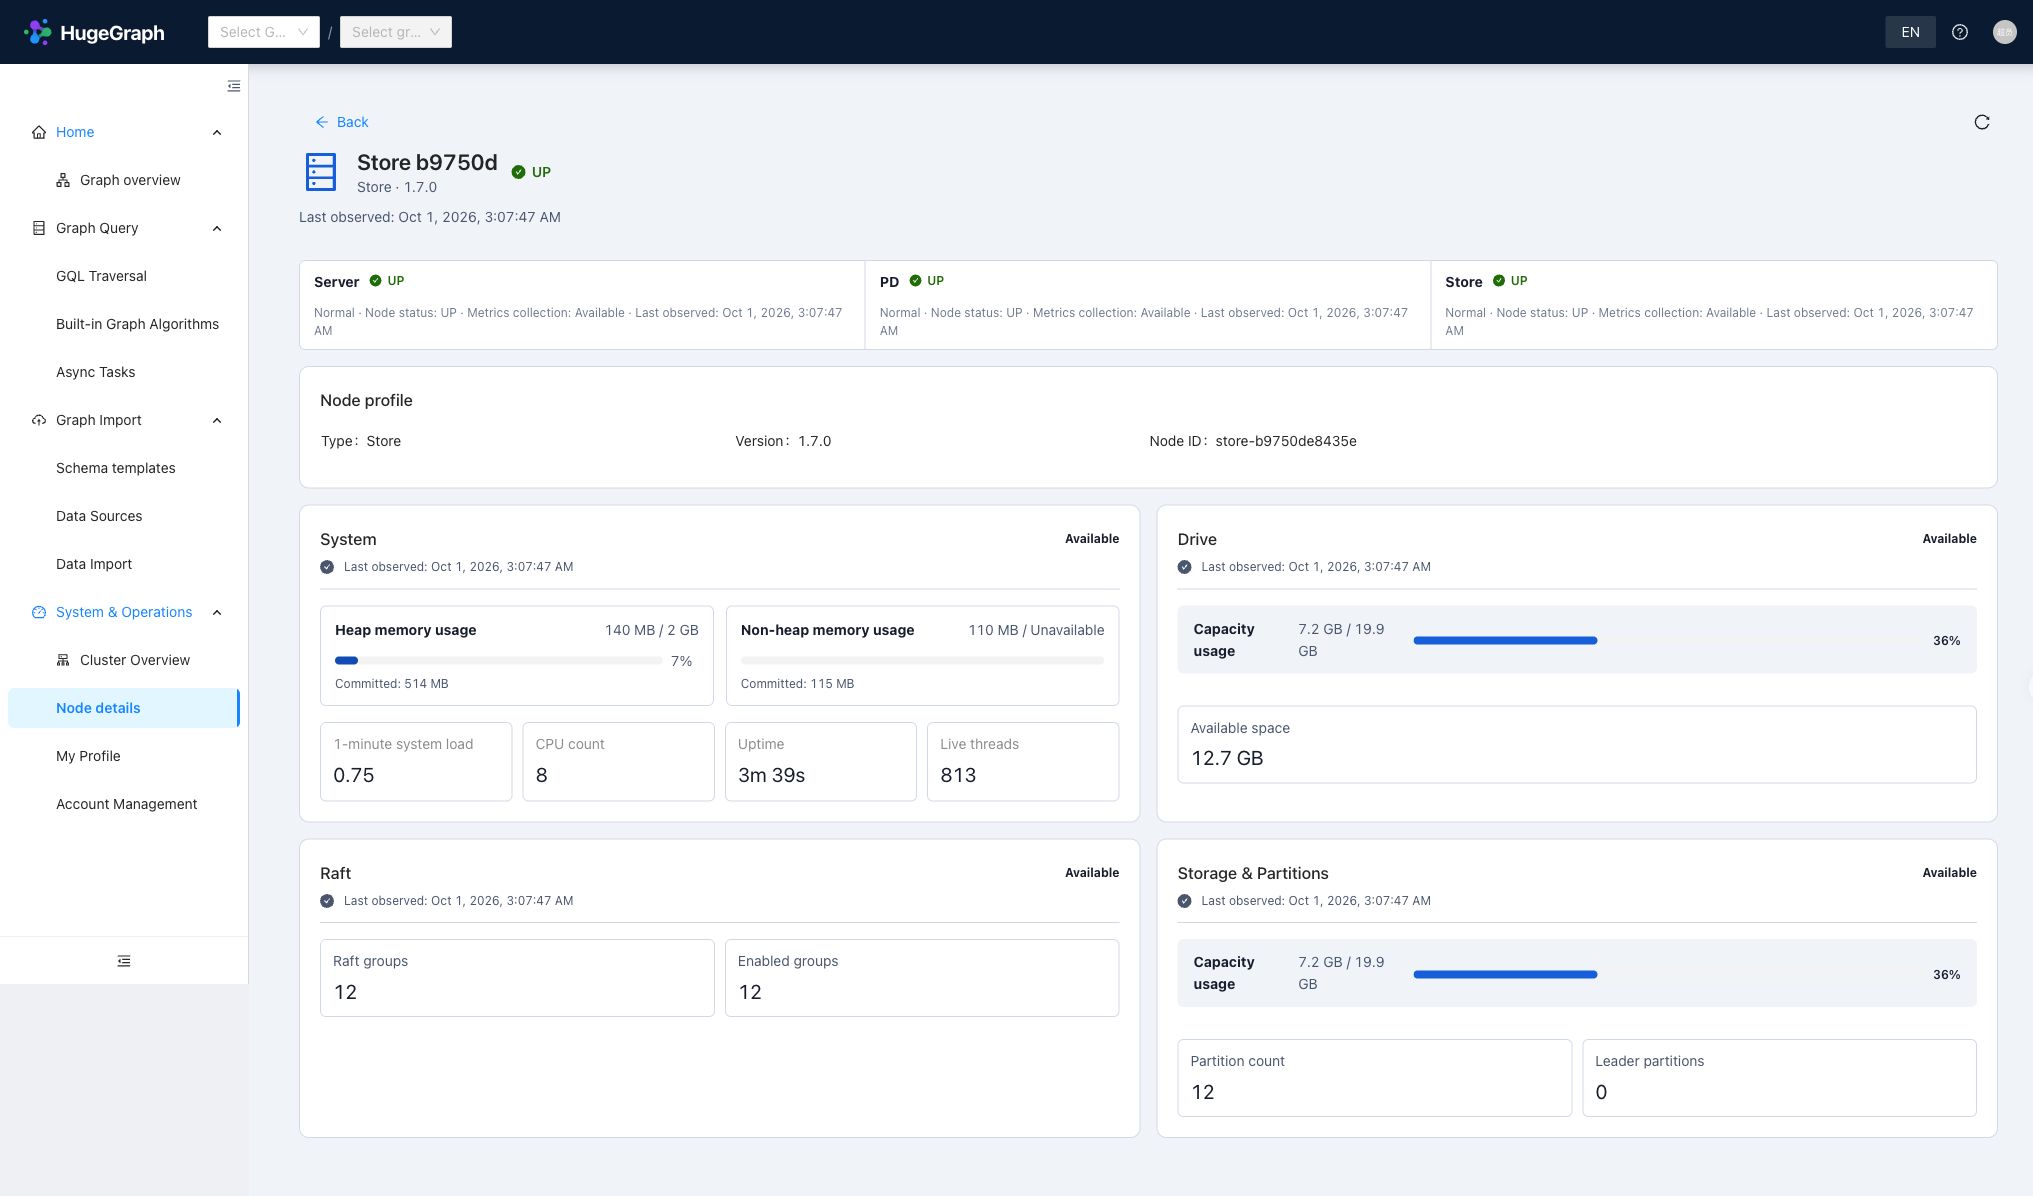
Inspect the affected Store node
The PD Leader and Store Leader partitions serve different purposes: PD coordinates cluster metadata, while a Store leads the respective data partition’s Raft group. Hubble displays upstream observations and does not replace a full Raft replica consistency check. Available metrics vary by component version.
With Server authentication enabled, cluster operations require a super administrator (ADMIN level).
GraphSpace administrators and ordinary members do not inherit cluster access.
Use container isolation, a trusted HTTPS entrypoint, Server authentication, and network allowlists; avoid publishing Hubble or component ports directly.
Configure operations access
Hubble’s backend uses the PD/Store operations credentials, separately from the Server account used to log in through the browser.
For Compose, edit the generated host file docker/conf/hubble/hstore.local.properties; other deployments use the Hubble package configuration.
The script-generated PD password must match the secret in .env. Configure the Store service account when Store authentication is enabled.
Do not include passwords in documentation, screenshots, or committed configuration:
| Setting | Bundled default | Configuration |
|---|---|---|
operations.pd.username / operations.pd.password | Username hubble, empty password | Match PD operations REST authentication. |
operations.store.username / operations.store.password | Username hubble, empty password | Set the service account when upstream Store REST authentication is enabled. |
operations.store.allowed_targets | [http://127.0.0.1:8520,http://[::1]:8520] | List trusted Store metric origins. |
For example, when a containerized Store advertises store:8520, set:
For multi-node clusters, list every trusted target origin. Each entry must use http or https with an explicit port and no path, credentials, or wildcard,
matching the Store metric target returned by PD. Adding an origin here only authorizes access—it does not register or discover nodes.
If topology renders but node metrics are missing, check Hubble backend connectivity and credentials to PD REST, verify the Store REST and metric addresses
returned by PD, and ensure targets are in operations.store.allowed_targets. A partially available overview indicates metrics collection was blocked for
specific sources, not that graph APIs are down.
2 - Graph Visualization with Hubble: Standalone Quick Start
Hubble is the HugeGraph Web management and graph visualization interface. Use a single workspace to manage schema, import data, run queries, and switch smoothly between graph, table, and JSON results. This guide uses standalone RocksDB Server + Hubble, without requiring PD or Store.
For use with an HStore distributed cluster, read the foundational operations here first, then consult the
distributed supplement.
This guide aligns with the Toolchain and Server master branches (currently based on 1.8, unreleased). Docker latest is a moving tag; use released versions for production deployments.
The screenshots show the HugeGraph Hubble interface in action; features and workflows are identical in both English and Chinese.
Do not expose unauthenticated Hubble or Server instances directly to the public internet. In production, use HTTPS, container isolation, authentication and authorization, and network allowlists.
Jump directly to a task below. If this is your first visit, start with the standalone deployment:
Start the two services and load the People & Software Demo Graph.
Run Gremlin and inspect graph, table, or JSON results.
Prepare CSV, map fields, and verify the imported records.
Start the standalone pair
Use the main repository’s docker/docker-compose.yml instead of writing custom Compose files. It already integrates RocksDB Server and Hubble with networking, health checks, and data volumes; see the adjacent README for deployment details.
Prepare the official Compose configuration.
If you already have the repository locally, navigate directly to its
docker/directory. Compose automatically mountsconf/hubble/standalone.properties, which pre-configurespd.enabled=falseandserver.direct_url=http://server:8080. Because both services communicate over a shared Docker network, you do not need to configure Server endpoints per graph. Start Compose directly fromdocker/so relative file paths resolve correctly.Hubble publishes on host loopback port
8088by default (controlled byHUBBLE_PUBLISH_HOST, defaulting to127.0.0.1), whereas Server publishes8080across all interfaces. For a local trial, set Server’sportsin Compose to127.0.0.1:8080:8080to prevent exposing unauthenticated ports beyond loopback (setHUBBLE_PUBLISH_HOST=0.0.0.0if remote access to Hubble is required).Start and check the services.
Choose an unused project name for this trial and keep these variables in the same terminal session:
Open Hubble.
Once services are healthy, open http://127.0.0.1:8088. When
HUGEGRAPH_ADMIN_PASSWORDis unset in.env, Server permits anonymous access and Hubble opens the homepage directly. If authentication is enabled, configure an admin password and JWT secret in.envas described in the Docker README, then sign in with a Server account (Hubble has no independent user database). Profile and account management options appear only when authentication is enabled and the account holds requisite permissions.
Use latest to explore recent features; pin a released image version or digest for production. Official release archives are on the
download page.
Screenshots help locate controls. Verify actual versions from the deployed image digests and build information.
Compose’s server-data and hubble-data retain graph data and Hubble metadata respectively. For further persistence and production settings,
see the Server deployment guide.
Home: find the right starting point
Home groups the workspace into graph overview, data preparation, and graph queries. Use it to understand the workflow,
then return to any section through the sidebar. The top graph selector determines the target of queries, schema operations, and async tasks;
check the current graph after changing pages. Standalone mode has only the DEFAULT GraphSpace and needs no PD configuration.
| Section | Purpose |
|---|---|
| Graph Overview and details | Select a graph, load samples, inspect its size, then model or query it |
| Schema configuration | Define properties, vertex/edge labels, and indexes |
| GQL Traversal | Write queries and explore graph, table, and JSON results |
| Built-in Algorithms | Explore neighbors, paths, and similarity with parameter forms |
| Async Tasks | Track background queries, schema changes, and index operations |
| Data Source Management | Upload files or configure external readers |
| Data Import | Map source fields to the graph model and run or schedule ingestion |
| Profile and Account Management | Update personal details/passwords and manage accounts or space members according to permissions |
| Operations | Inspect Server nodes; PD mode also includes cluster overview and PD/Store nodes |
Interface at a glance
Compare the graph overview, schema, and query workspaces below. Click a screenshot to view the original.
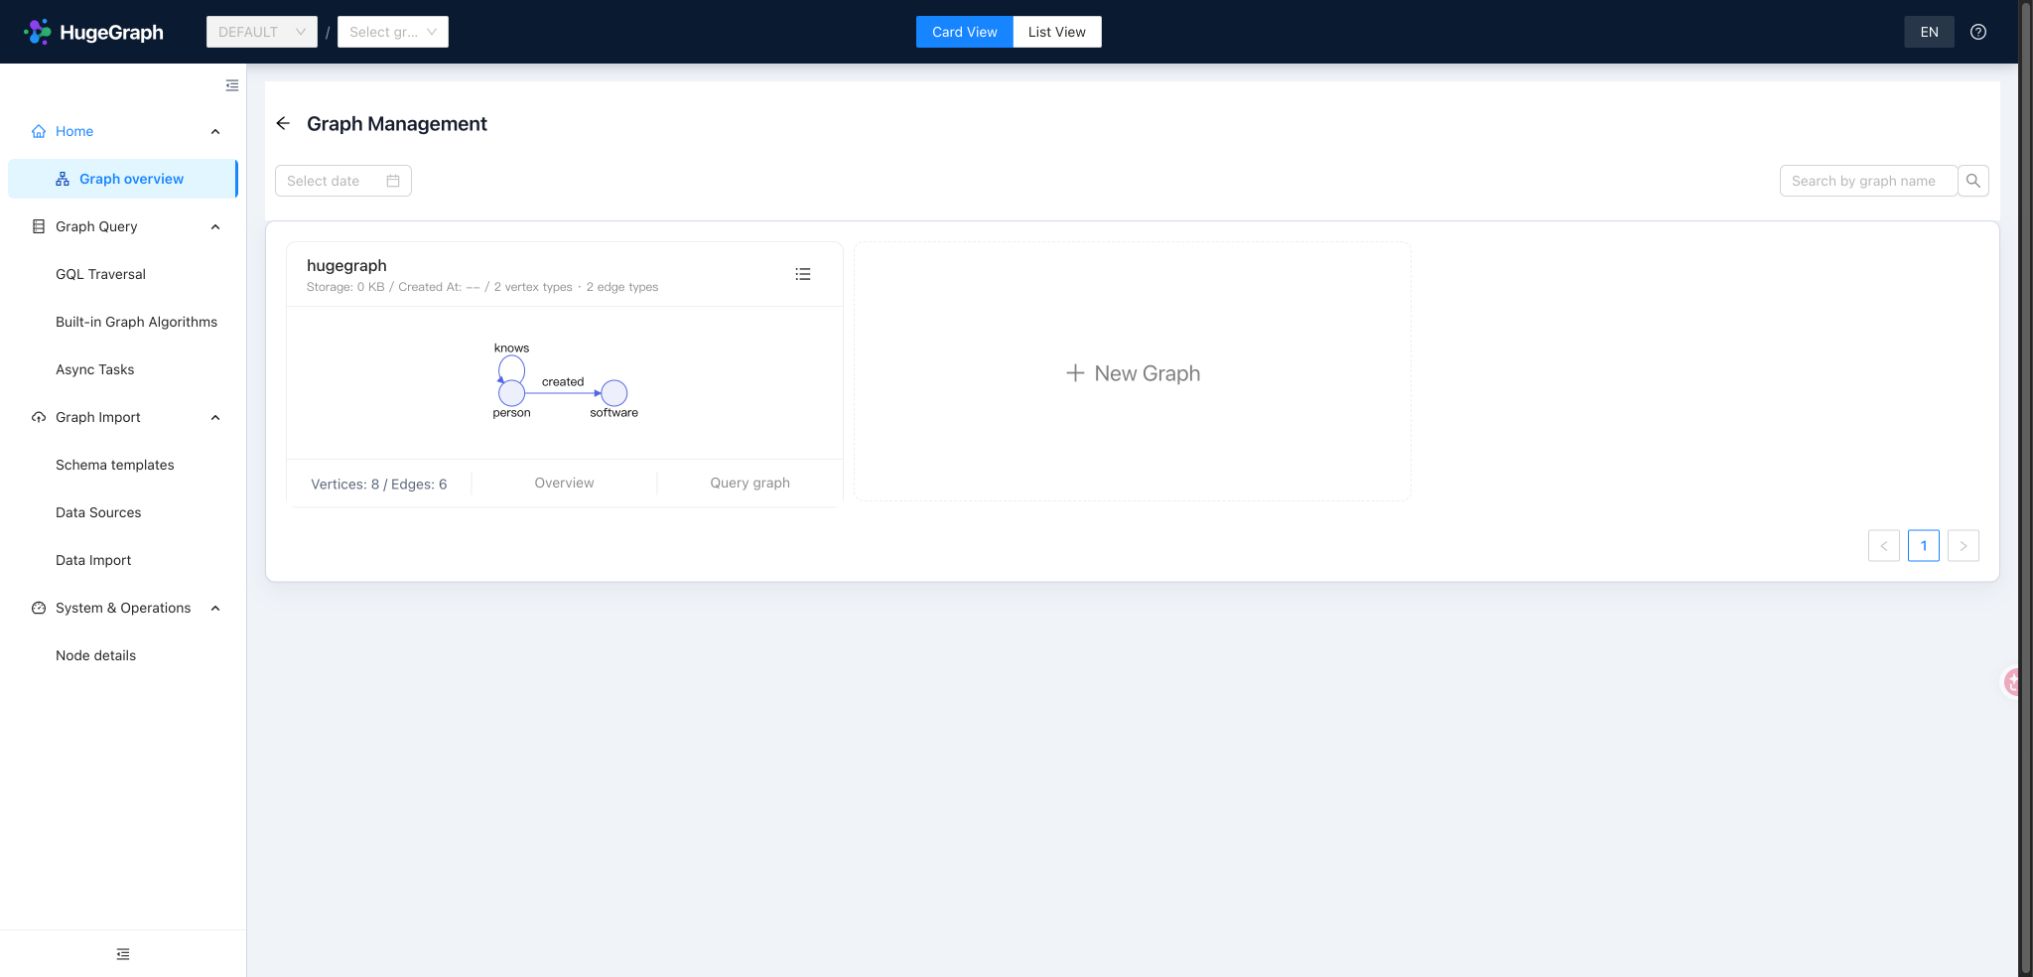
Graph overview: select a graph and inspect sample data
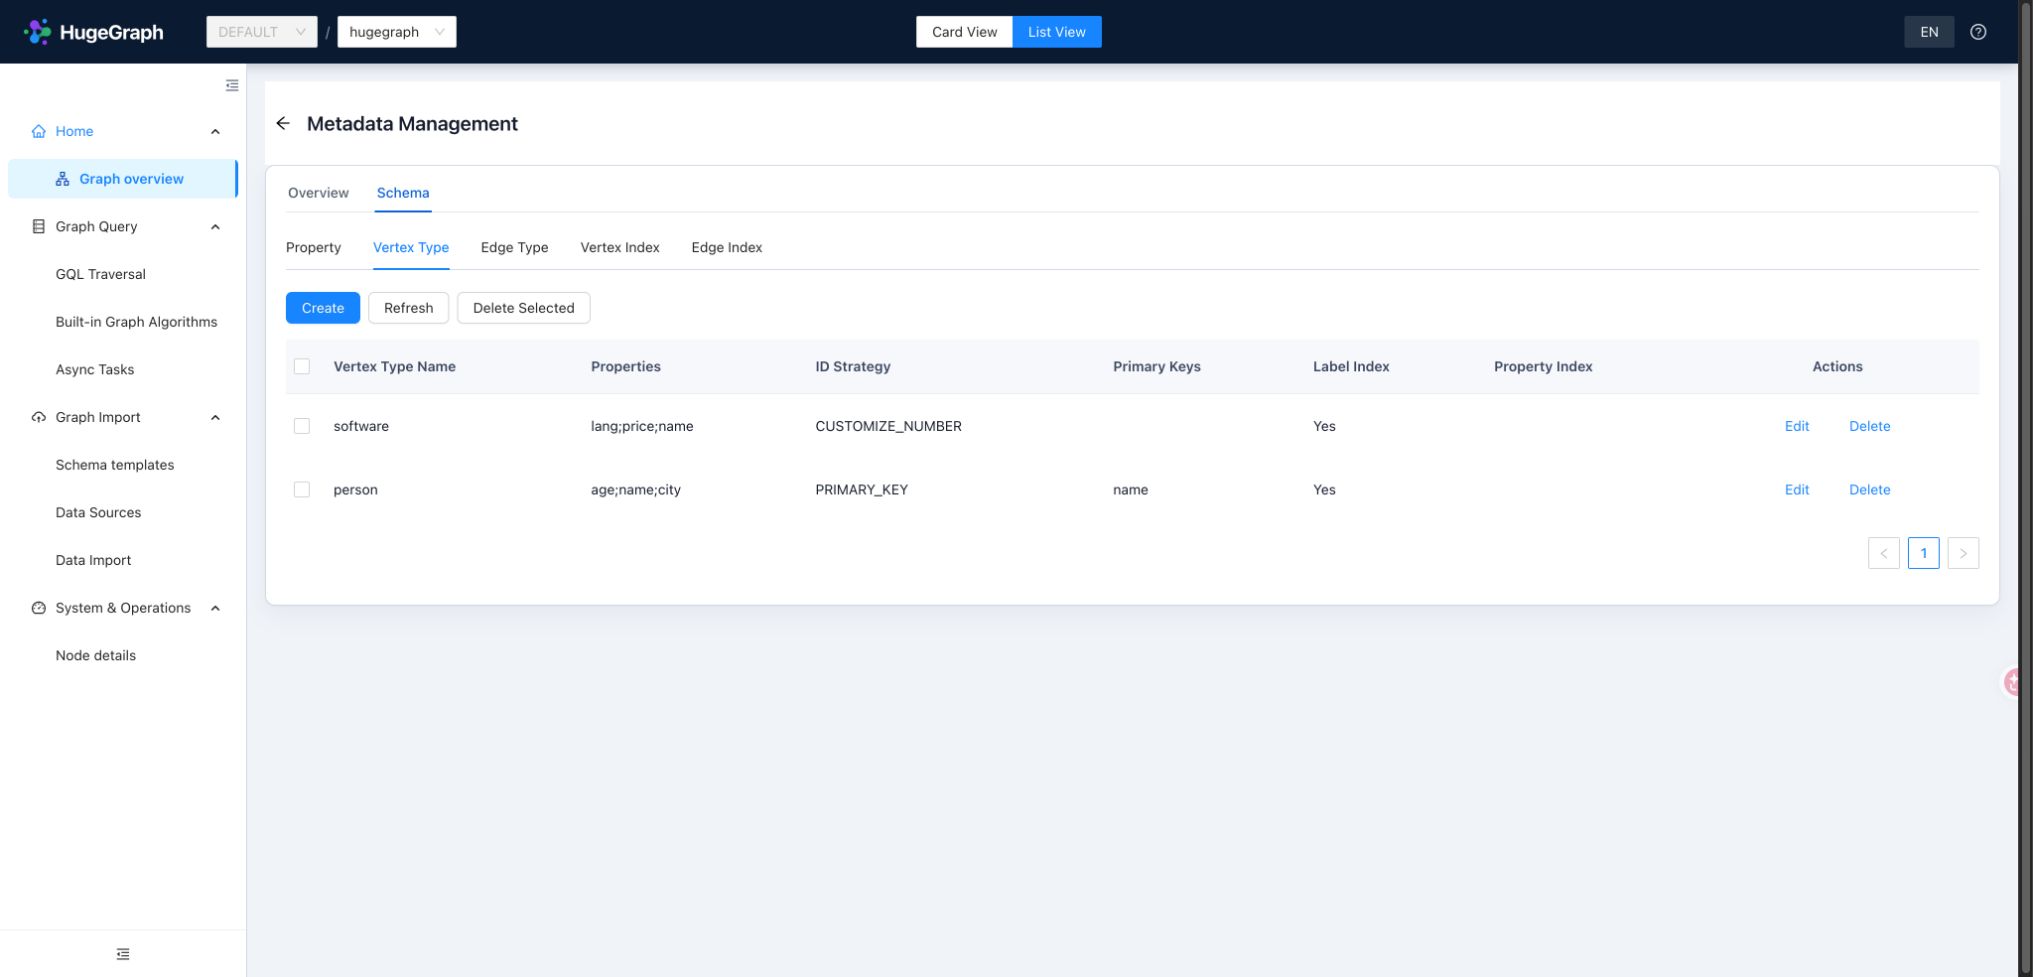
Schema: inspect vertex labels, primary keys, and ID strategies
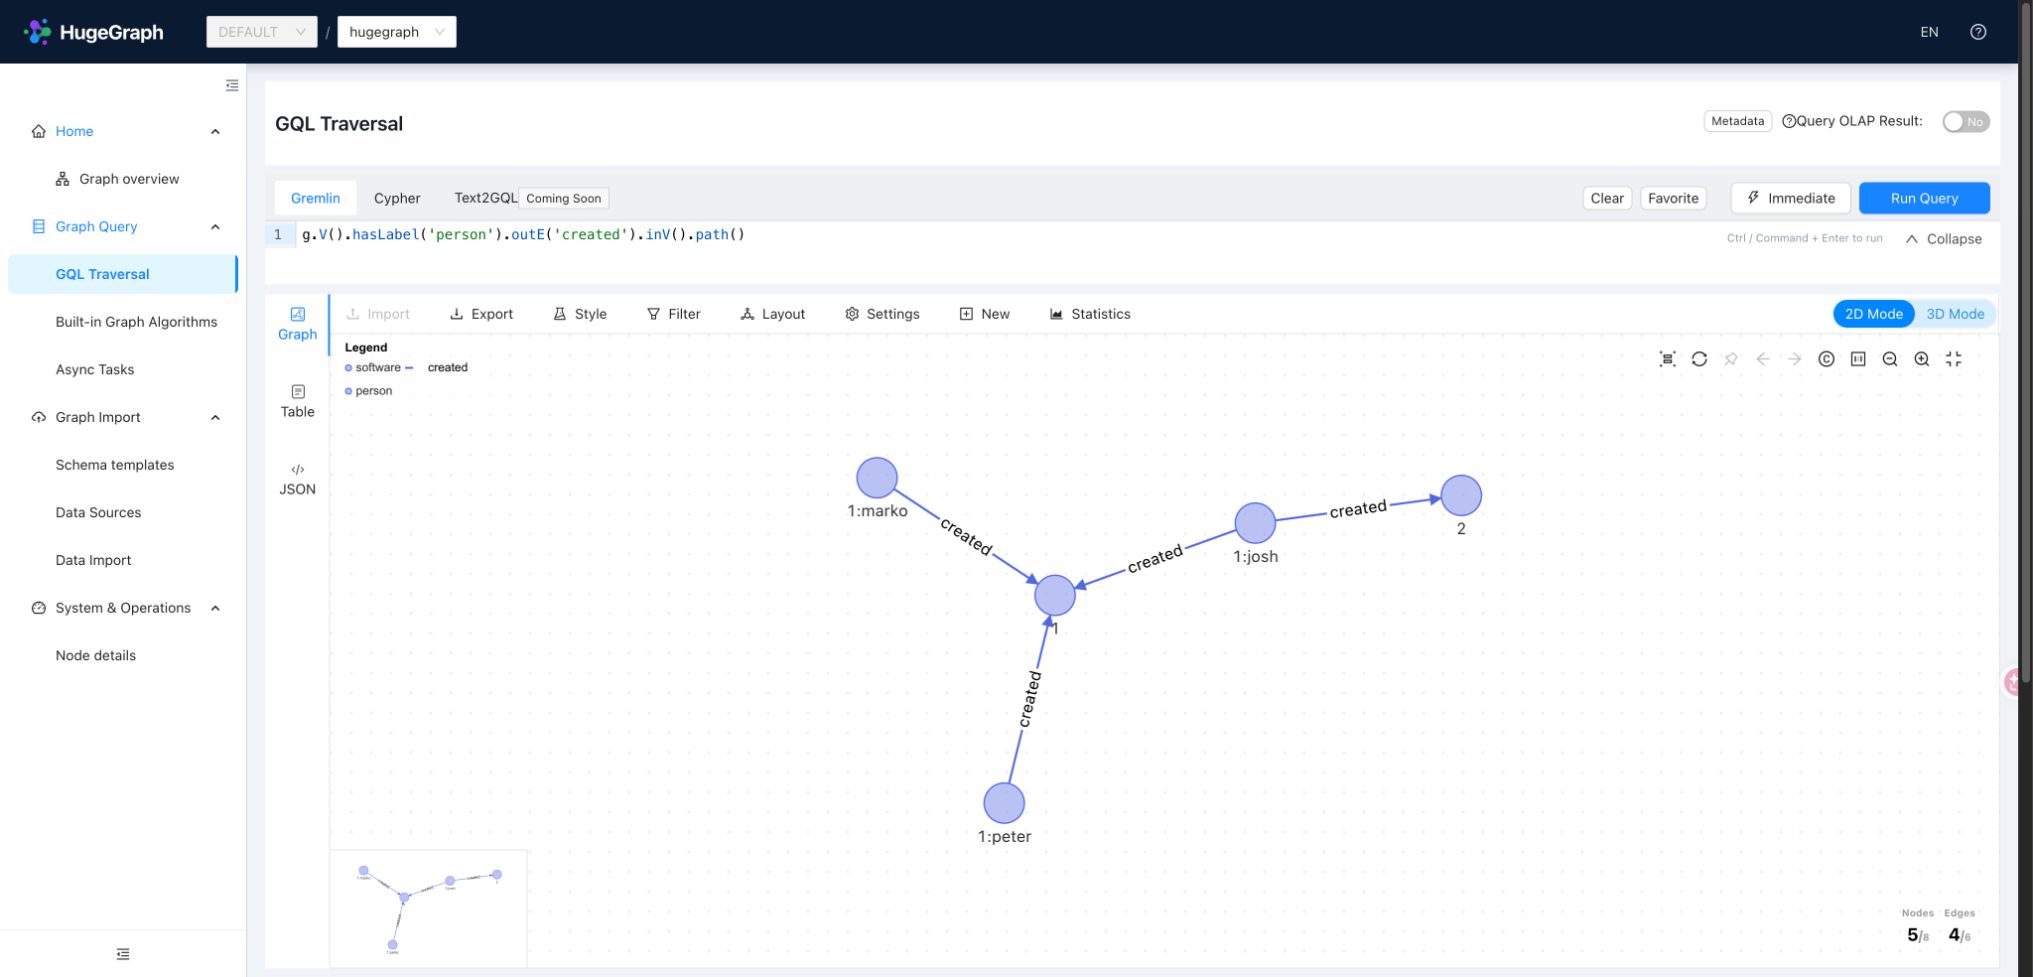
Graph query: run Gremlin and explore graph results
Graph Overview and details: get to know a graph
Select the default graph hugegraph in Graph Overview. Click the graph card or details to view its schema structure and data statistics,
or quickly jump to modeling, data import, or query pages.
Load the People & Software Demo Graph from the graph card’s More actions menu. The sample automatically provisions the required schema and imports sample records without clearing existing data. For your initial trial, load it into an empty graph to avoid name collisions. The remaining examples use this graph to explore connections between people and software.
To create a new graph, click the create button on the overview page and provide a graph name, optional alias, and schema template or sample data. Connection details are managed globally by the Hubble backend, so you do not re-enter Server host or credentials per graph. User-defined schema templates require PD mode; see the distributed supplement.
Schema modeling: define the shape of your data
Schema defines allowable properties, vertex labels, and edge labels, while determining vertex ID strategies and query index rules. Under Schema configuration, use the list view to manage definitions or the graph view to inspect vertex-edge topology visually.
| Definition | What to decide |
|---|---|
| Properties | Data type and cardinality; distinguish numbers from text |
| Vertex labels | Properties, nullable properties, ID strategy, and primary keys |
| Edge labels | Source/target labels, properties, frequency, and sort keys |
| Vertex / edge indexes | Index type and fields that match filtering and range queries |
In the person/software sample: person derives its ID from the primary key name, with nullable age and city;
software uses custom numeric IDs; the created edge label links people to software. This matches the
Loader example.
When modeling your own graph, create elements in order: Properties → Vertex labels → Edge labels → Indexes. Deleting labels or creating/rebuilding indexes typically submits background asynchronous tasks; verify their completion in Async Tasks.
GQL workspace: query and explore relationships
Open GQL Traversal and confirm hugegraph is selected. The workspace puts the query editor and graph display together,
with immediate or async execution, query favorites, and reusable execution history. Start with this Gremlin query:
Inspect person properties in table or JSON view. To visualize the people-to-software relationships, run:
Graph results support 2D / 3D. Click a vertex or edge to inspect its ID, label, and properties; double-click a vertex to expand its neighbors. Layout, styling, and filtering help highlight relevant relationships, while export helps share results. Use New to create elements, or edit existing data when authorized. Layout adjustments, styling, and display bounds only affect the local canvas; adding or editing elements via the UI or executing Gremlin write statements modifies underlying Server graph data.
Press Ctrl / Command + Enter to execute queries quickly. Immediate execution is ideal for interactive exploration; submit long or resource-intensive
queries as background async tasks. Cypher is available when supported by the backend Server.
The keyboard shortcut acts on whichever input currently has focus: generating a query from
the natural language prompt, or running statements in the code editor.
Text2GQL natural-language queries
Describe your query requirement in the Natural language input. Text2GQL combines the current graph schema to generate read-only Gremlin or Cypher and execute it automatically. Generated statements can be edited freely (read-only safety checks still apply before execution). In Async mode, both generated and handwritten queries can be submitted as background tasks. Inputs automatically restore the graph’s most recent query prompt without running it, and the execution history retains original natural-language questions.
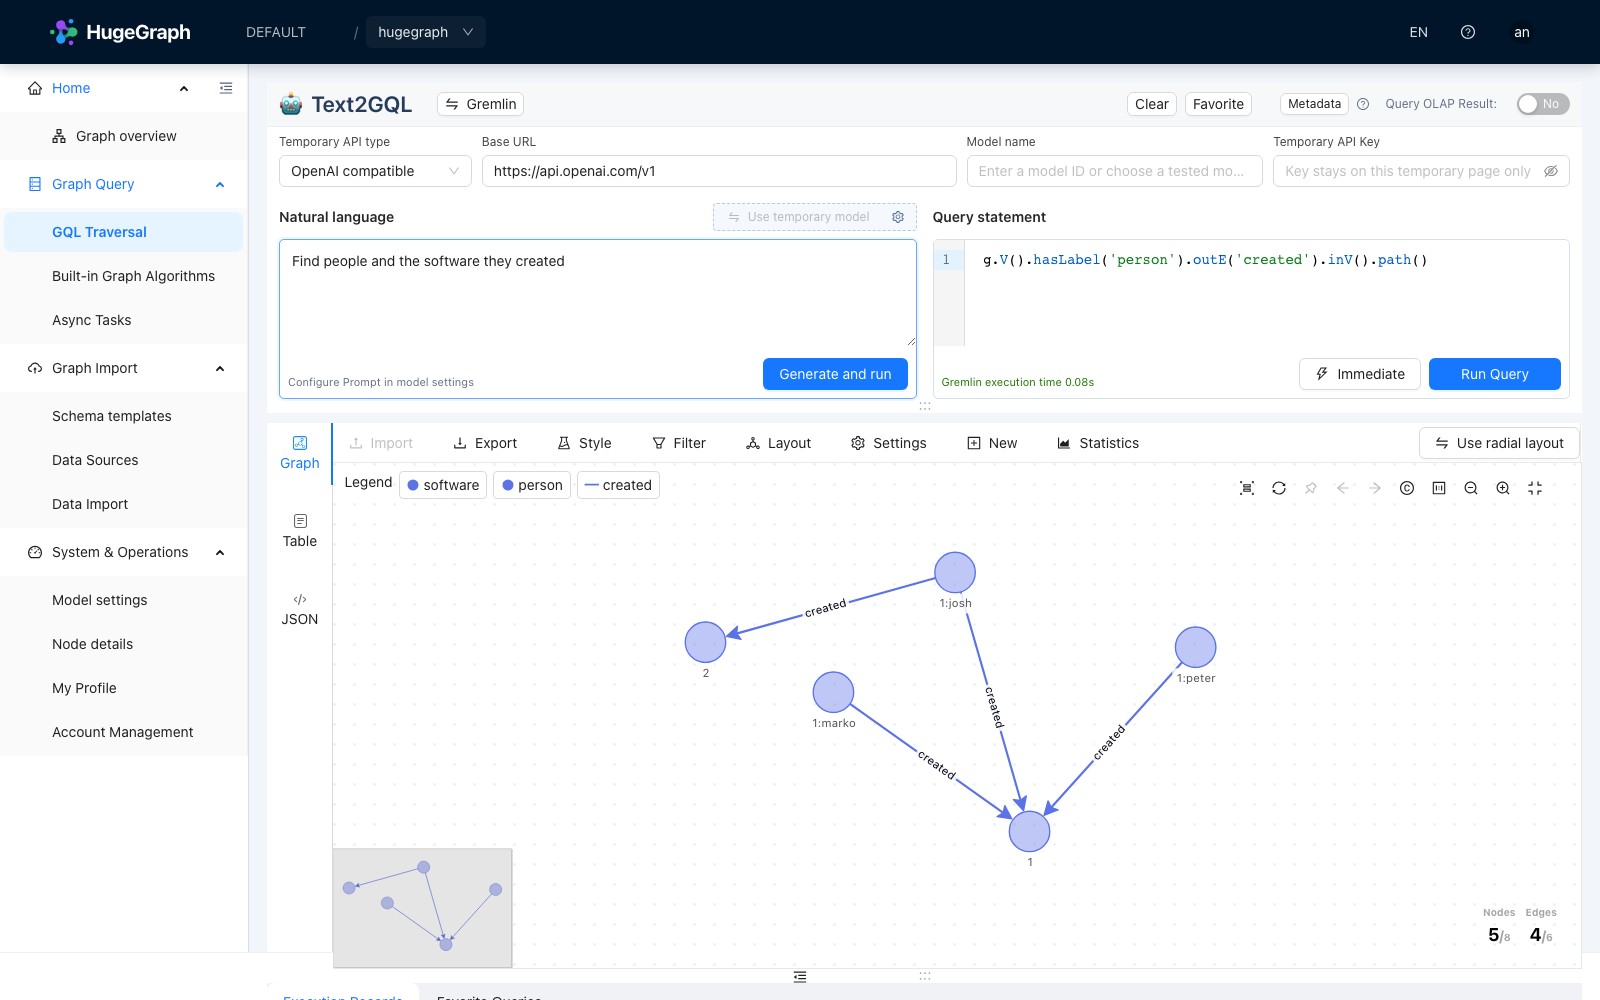
Unconfigured model; handwritten query
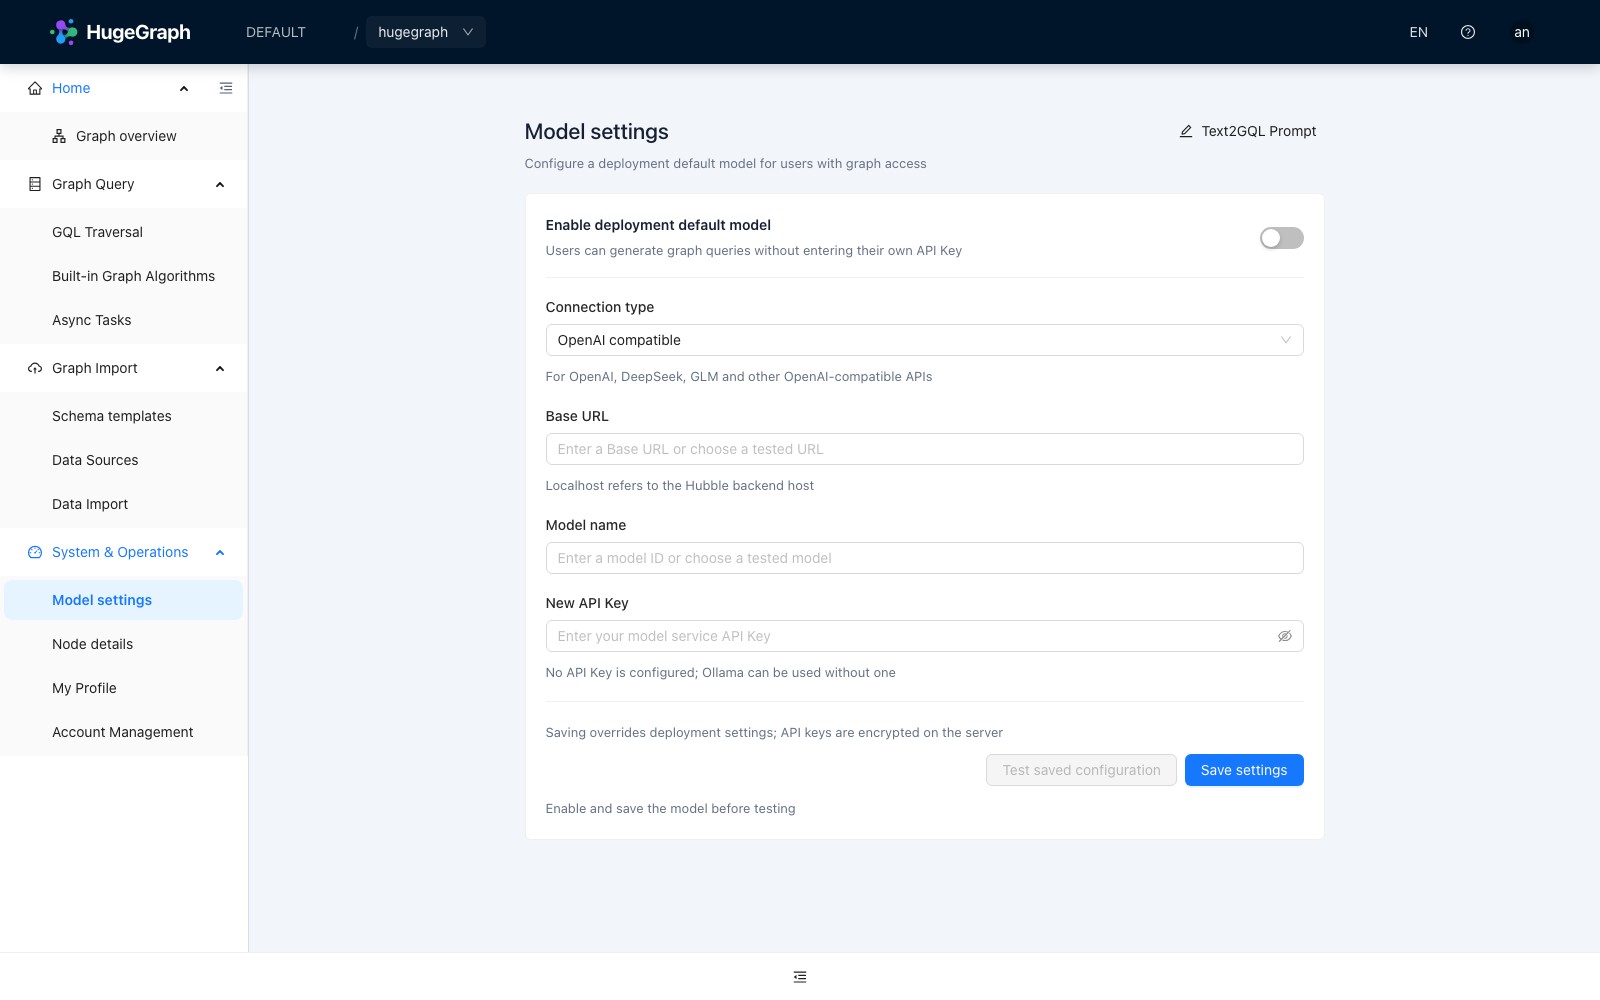
Model settings
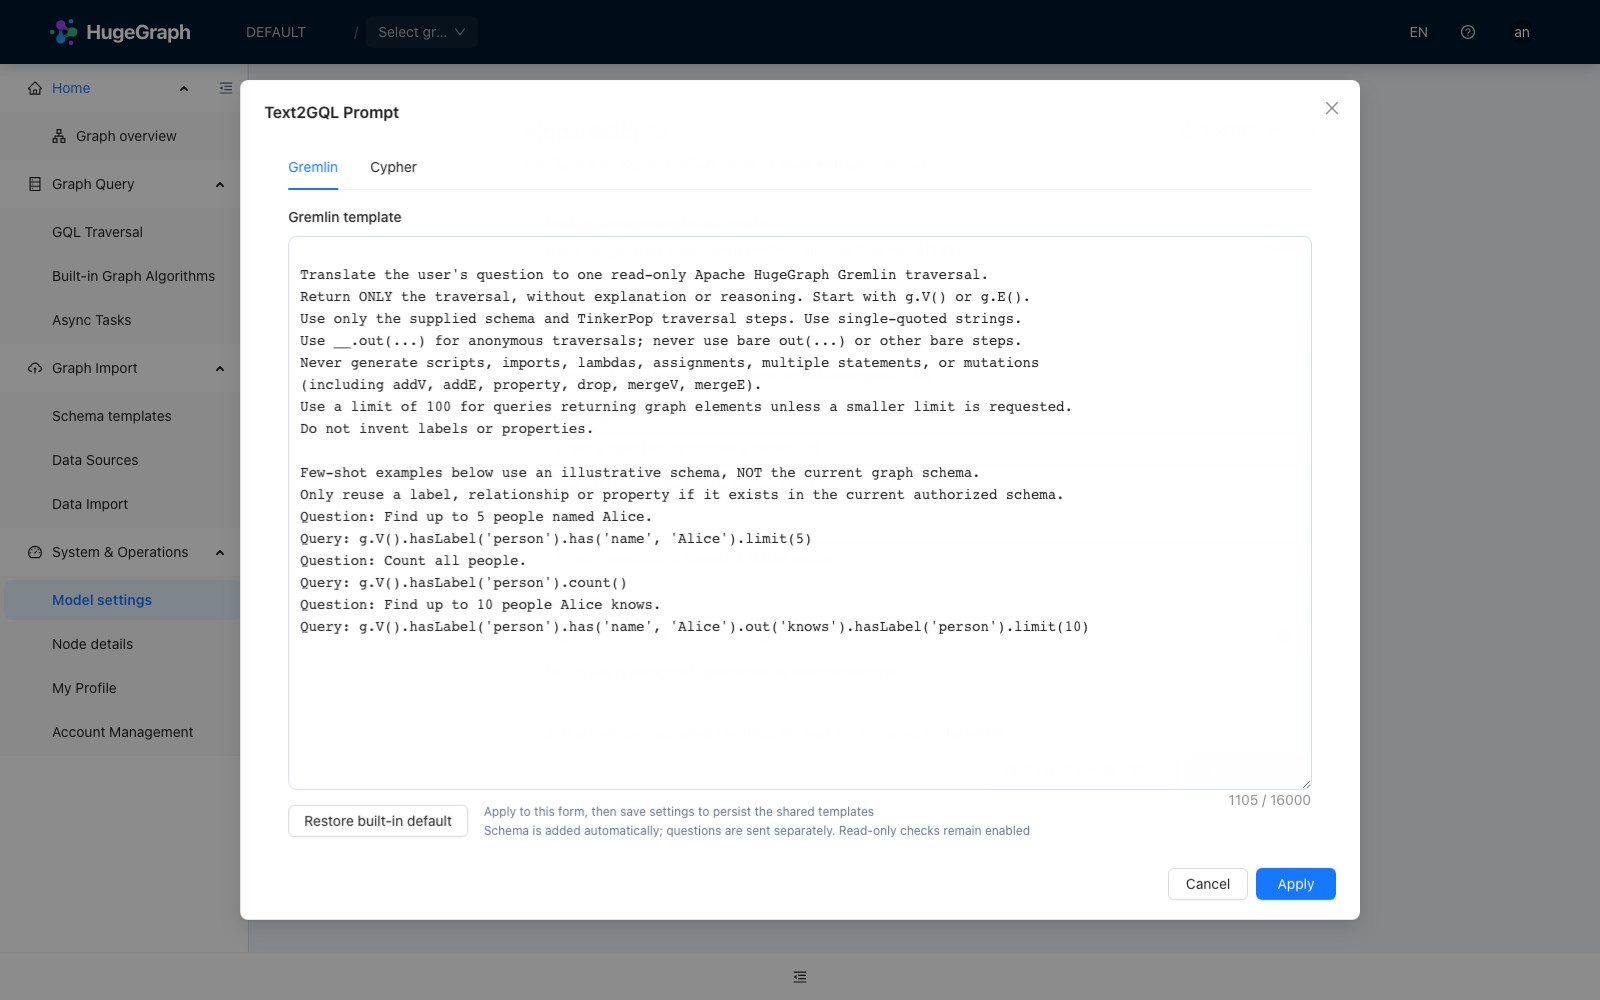
Text2GQL Prompt
The screenshots show an unconfigured model. The graph results come from handwritten Gremlin; connect a working model before generating natural-language queries.
| Model source | Configuration and storage |
|---|---|
| Use built-in model | Configure under System & Operations → Model settings; Keys are encrypted in H2 and never returned to the browser |
| Use temporary model | Enter the API type, Base URL, model name, and temporary API Key on the query page; the Key clears on refresh |
Choose OpenAI compatible for OpenAI, DeepSeek, GLM, and similar services, or Ollama (local) for local Ollama; unauthenticated Ollama needs no Key.
The Base URL must be reachable from Hubble’s backend; container localhost refers to that container. Public endpoints require HTTPS, while plain HTTP is
accepted only for loopback or private-network models; when changing the Base URL in Model settings, supply a new Key or explicitly clear the saved Key.
Administrators with model-settings management permission manage shared settings. When Server authentication is disabled, anyone who can access the
deployment can manage them.
Under model settings, click Text2GQL Prompt in the header to customize Gremlin and Cypher generation rules and few-shot examples. Click Apply and then save model settings to persist templates to the H2 database for both built-in and temporary models. The current graph schema is appended automatically during generation.
When backing up the Hubble H2 database, always back up the master-key file (data/text2gql-master.key by default); losing it prevents decrypting saved Keys.
Query generation sends only the prompt, graph schema, and necessary error-correction context to the model provider—it never transmits graph query results.
Browsers can remember frequently used Base URLs and model names, but temporary API Keys remain in memory only and clear on page refresh.
Input footers show model generation time and query request time separately. Async submission time excludes background execution.
Built-in algorithms: explore with parameter forms
Use Built-in Algorithms when you prefer a form to writing traversal code. Search for an algorithm and supply its parameters. Neighbor exploration answers what surrounds a vertex, path algorithms connect two vertices, and similarity/ranking algorithms compare or select vertices. Start with a known vertex ID and limit direction, edge labels, depth, and result size before attempting broader computation.
Forms provide parameter guidance and documentation links, and restore common parameters when navigating away and back.
Results use graph or algorithm-specific panels. Consult the help and documentation links beside the algorithm title for definitions and parameters.
While the parameter form is focused, Ctrl / Command + Enter runs the current algorithm.
OLAP batch algorithms require external compute services such as Computer or Vermeer. The two containers in this example provide online graph operations, not those compute services.
For example, select K-neighbor (GET) with source=1:marko, max_depth=1, and limit=20.
After parameter validation, use the run button on the card or the form shortcut to explore one-hop neighbors.
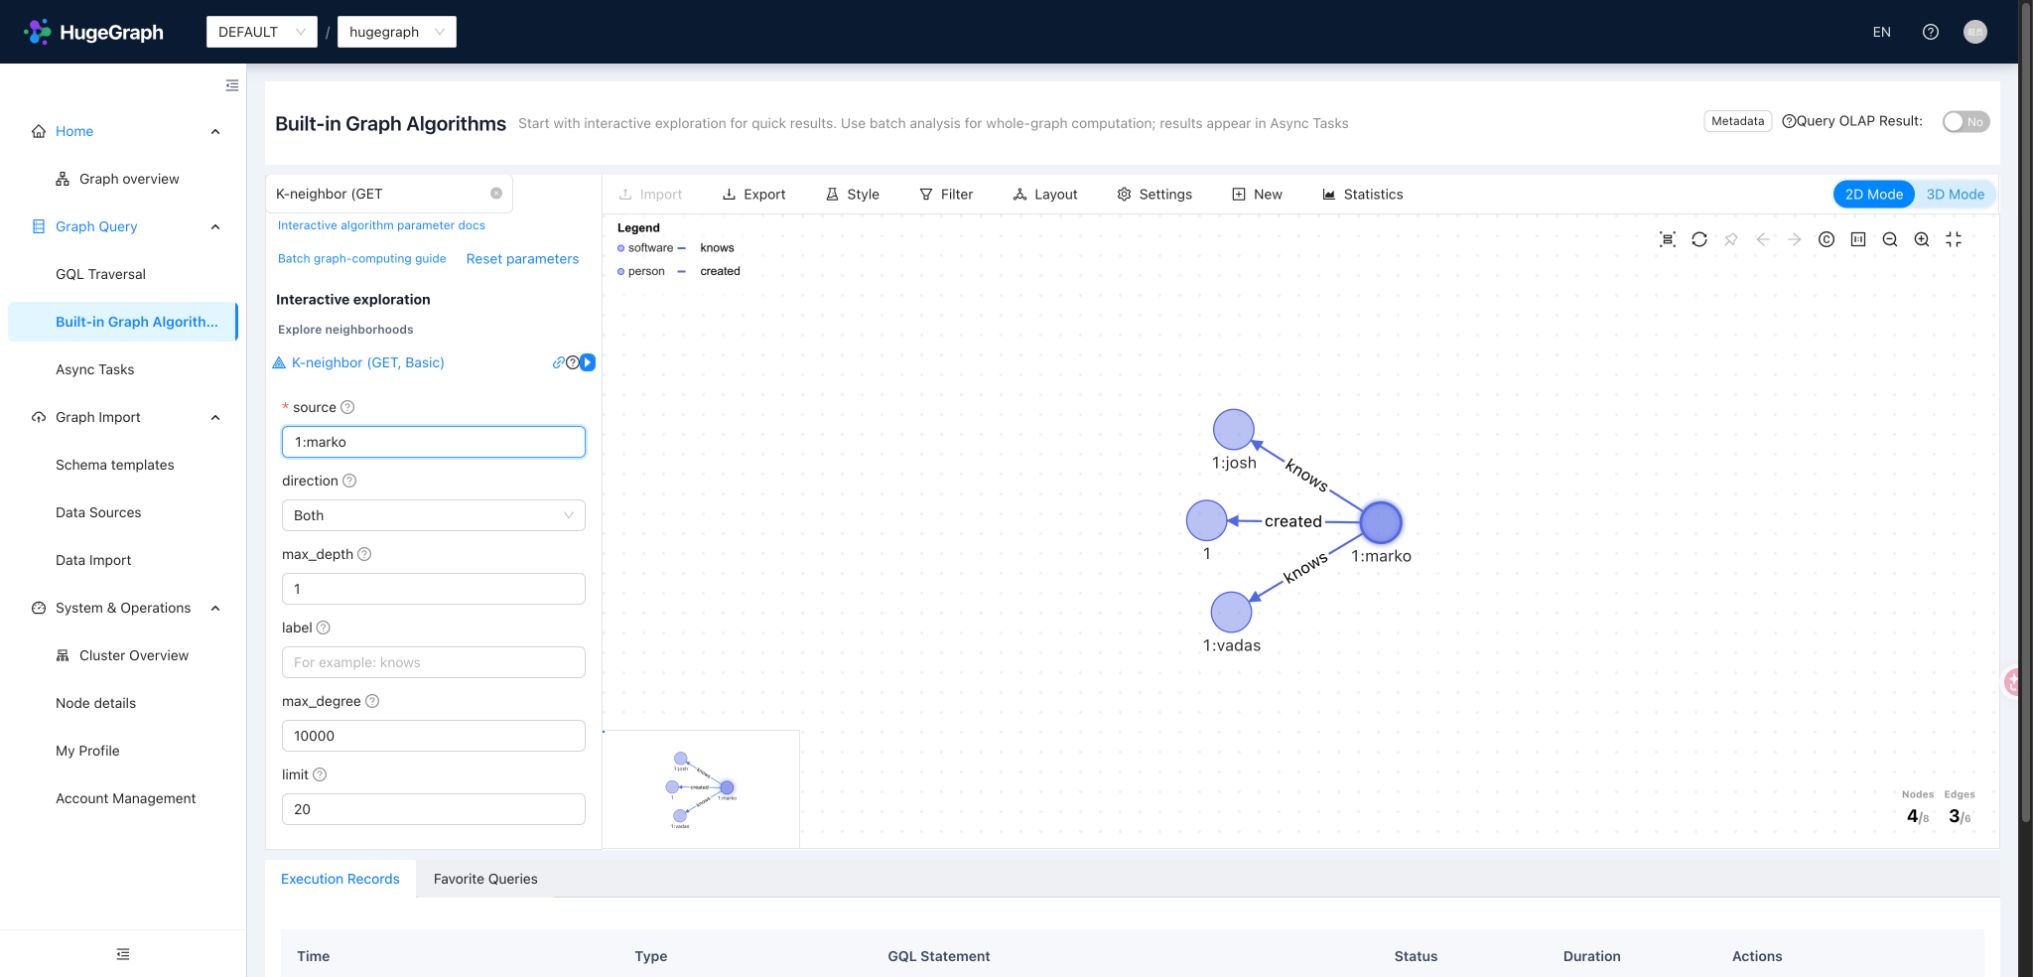
Async Tasks: confirm background results
Async Tasks lists background work for the current graph, including async queries and some schema/index operations. Filter by task type and status, inspect IDs, creation times, and execution states, open successful query results, or expand failure information. Completed task records can be deleted where the interface permits. These tasks are separate from import execution history.
For example, submit g.V().count() asynchronously, confirm success in the list, then inspect the returned count.
A successful submission means the request was accepted, not that computation or indexing has finished.
Use task errors and Server logs together when diagnosing failures.
Data Source Management: prepare the input
A data source defines where data comes from and how to parse it, and can be referenced by import tasks. Hubble supports FILE, HDFS, JDBC, and Kafka, each with its own path, connection, or subscription settings. FILE is an easy starting point: upload a file, configure its format, delimiter, encoding, and header, and check column names before mapping. Hubble configuration controls upload limits and permitted extensions.
Save this UTF-8 file as people.csv for the person example:
Create a FILE data source and upload it. Select CSV (comma separation and UTF-8 by default), with column names name,age,city.
Header, delimiter, and encoding belong to the data source, not mapping settings. The source fields must match the file.
Data Import: turn fields into a queryable graph
Data Import converts source rows into vertices and edges. Its four configuration sections identify the target, select fields,
map them to the graph, and choose execution timing. Use the preceding data source to create a person import into DEFAULT / hugegraph:
- Basic Information Select the target graph, new data source, and a task name.
- Source Fields Select
name,age, andcity, moving them to the selected field list. - Mapping Fields Add a
personvertex mapping; use Auto Match for same-name properties, then verify types. - Schedule Choose one-time execution and confirm to submit the task.
person uses PRIMARY_KEY, so do not select a separate ID column. Custom ID strategies require an ID column;
AUTOMATIC lets Server generate IDs, while PRIMARY_KEY derives them from mapped primary-key properties.
Edge mappings need source/target fields that follow the corresponding vertex ID rules.
The task list manages configuration and execution entry points; execution history in task details shows each instance’s state, count, and errors. Periodic schedules and real-time Kafka tasks are also available; choose an execution mode compatible with the source. After completion, verify the result in the GQL workspace:
The result should include both new people. Import counts are not necessarily counts of newly created vertices: reruns may update existing elements, and header processing can affect reader counts. If the import fails, check source fields, numeric types, nullable properties, and target schema. Use Hubble for small trials and HugeGraph Loader for production bulk ingestion.
Profile and account permissions
Hubble uses Server authentication and accounts, with no separate user database. Anonymous mode hides Profile and Account Management. After authentication is enabled, Profile shows the current account’s details and permissions and allows changing your password. Editing details such as a nickname requires Server support for the personal-profile API. Changing a password ends the current session; sign in again with the new password.
Standalone account management
In standalone mode, the administrator can create, inspect, edit, delete, and batch-create accounts. Ordinary standalone accounts created through Hubble receive read, write, delete, and execute permissions across all graphs; they are not read-only or isolated to one graph. Configure finer resource permissions through Server authentication and authorization rather than relying on GraphSpace presets.
GraphSpace permissions in PD mode
With a Server supporting default-role APIs, global accounts and space access can be managed separately. The administrator manages global accounts; a space administrator manages members only within authorized spaces. Ordinary members do not receive account-management or operations entry points. The following presets are for PD mode, and are not universally editable on older or standalone Servers:
| Preset | Scope and purpose |
|---|---|
SUPER_ADMIN | Global account, GraphSpace, and operations management; grant or revoke super-administrator access |
GS_ADMIN | Manage authorized spaces and their members, without granting other-space or global super-administrator access |
GS_READ_WRITE | Read and write graph data within authorized spaces, without managing global accounts |
GS_READ_ONLY | Read graph data within authorized spaces, without writes |
An account may have different permissions in different spaces. Select a space before adding an existing account or changing member permissions. Before replacing custom permissions with a preset, inspect the grants that need to be retained; complex permissions may not match a single preset. After changes, refresh permission context or sign in again and verify menus and space selection. Server still validates every request. Older Servers may hide or disable unsupported operations; a visible button alone does not establish resource authorization. See the distributed supplement for space management.
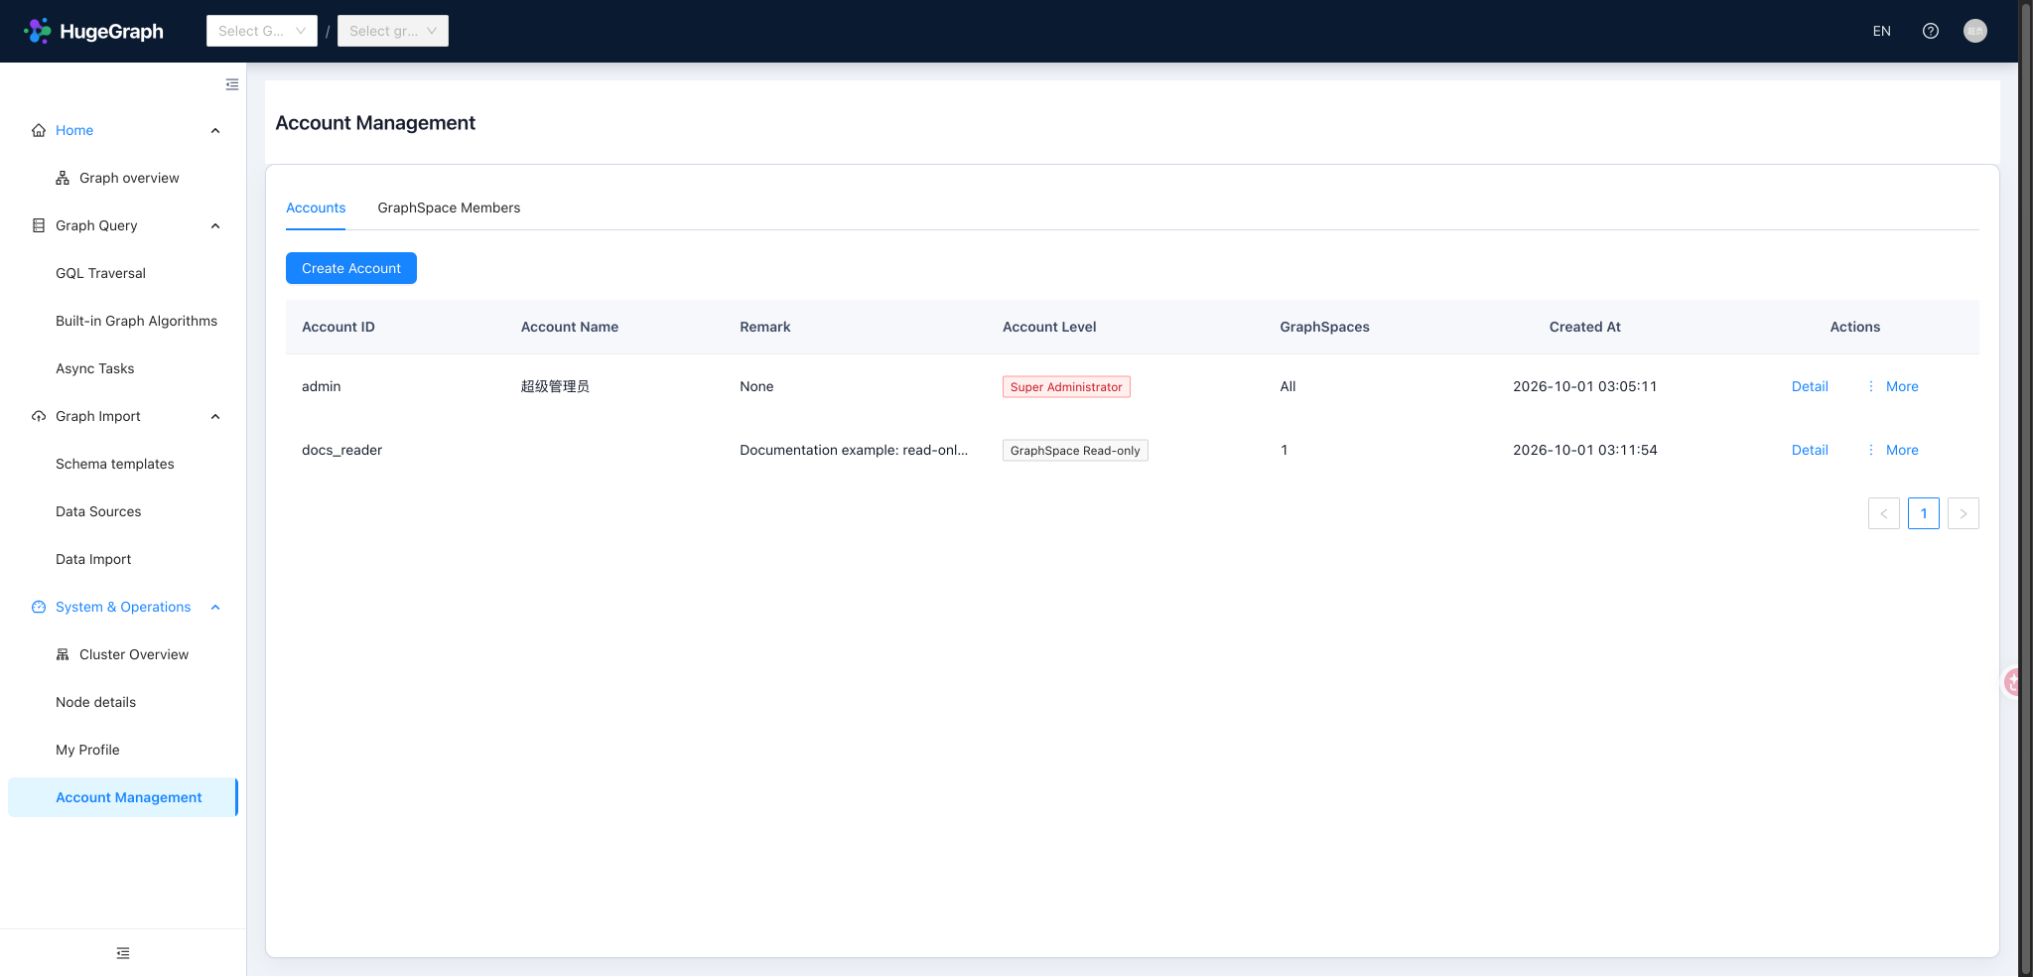
Operations: inspect the standalone Server
Standalone Operations provides Node Information for Server only, with no PD/Store nodes or cluster overview. Search nodes, filter health status, and open node details to inspect available version, system, JVM, and Server-backend metrics. When metrics are unavailable or stale, use collection state and the last successful observation time; a missing value is neither zero nor proof of health.
Anonymous mode can read operations information. With authentication enabled, operations are available only to administrators with the capability. This is an observation and diagnosis interface, not a start/stop or scaling console. The distributed supplement covers cluster overview and the PD/Store node hierarchy.
Keyboard shortcuts and graph interactions
Use the topbar shortcut-help button to see key bindings. Their scope differs: typing ? in an input does not trigger global help.
| Action | Key or gesture | Scope |
|---|---|---|
| Open / close shortcut help | ? | Outside inputs and editors |
| Execute query | Ctrl with Enter / Command with Enter | Query editor |
| Run current algorithm | Ctrl with Enter / Command with Enter | Algorithm parameter form |
| Toggle graph fullscreen | F | Click to focus the graph canvas first; not a global binding |
| Inspect element details | Click a vertex or edge | Graph result |
| Expand neighboring relationships | Double-click a vertex | Graph result |
Diagnose connection and result issues
| Symptom | Check first |
|---|---|
| The Hubble page does not open | Check container status and docker compose -p "$HUBBLE_DEMO_PROJECT" -f docker-compose.yml logs hubble |
| The page opens but graphs are unavailable | Server health, a server.direct_url reachable from Hubble, and a shared network |
| Login appears or write actions are missing | Server authentication and account permissions; Hubble has no independent authentication switch |
| Expected data is missing | Current graph, sample load result, matching labels/properties; distinguish canvas display from stored data |
| No cluster overview | This example has no PD; see the distributed supplement |
Configuration can affect displayed query size. gremlin.suffix_limit defaults to 250 and supplies .limit(N) appended to applicable Gremlin queries;
it is not a universal hard limit. gremlin.vertex_degree_limit (100) and gremlin.edges_total_limit (500) constrain expansion.
FILE uploads allow csv,txt by default, with 1 GB per file and 10 GB total. Override upload_file.* settings when needed.
Stop the trial or build from source
When finished, run this in the main repository’s docker/ directory:
This removes the project’s containers, network, named volumes, and anonymous volume, losing the sample data and Hubble import tasks.
To retain data, omit --volumes when taking the deployment down and reuse the same project name when starting it again.
Building current master requires JDK 17, Maven 3.9+, Python 3.9+, and stable Node.js 24 (at least 24.22.0), with pnpm 12.14.0 selected through Corepack. Maven no longer installs Node/Yarn automatically.
Follow the Java 17 migration instructions to install the Server SDK in an isolated Maven repository.
Follow the Hubble source-build procedure to install Python dependencies and build Client, Loader, and Hubble with that same repository (skipping tests).
Open the resulting
hugegraph-hubble/apache-hugegraph-hubble-*directory, configure Server connection settings inconf/hugegraph-hubble.properties, then start:
Current master uses a new H2 metadata database. Retain the old Hubble distribution and its data, and use a separate data directory for the new version. Old metadata has no automatic migration and cannot be reused directly.
The bundled configuration binds to localhost:8088. bin/stop-hubble.sh requests graceful shutdown before forcing termination on timeout.
For development and testing, see the Toolchain local test guide.
3 - Graph import
Choose an import tool when you need to write file, database, or message data into HugeGraph. Use Loader for a direct import, SeaTunnel Sink when an existing Source, Transform, and Sink pipeline should be reused, or Spark Connector from a Spark job.
3.1 - Import Graph Data with SeaTunnel Sink
SeaTunnel connects data sources such as databases and Kafka to HugeGraph. The connector has two parts: Source reads data and Sink writes data[1][2], with SeaTunnel transform components available between them. To export or migrate data from HugeGraph, see the SeaTunnel Source export and migration guide.
Version requirement: This guide targets SeaTunnel 3.0+. All examples use the
mappingsconfiguration available in SeaTunnel 3.0+.
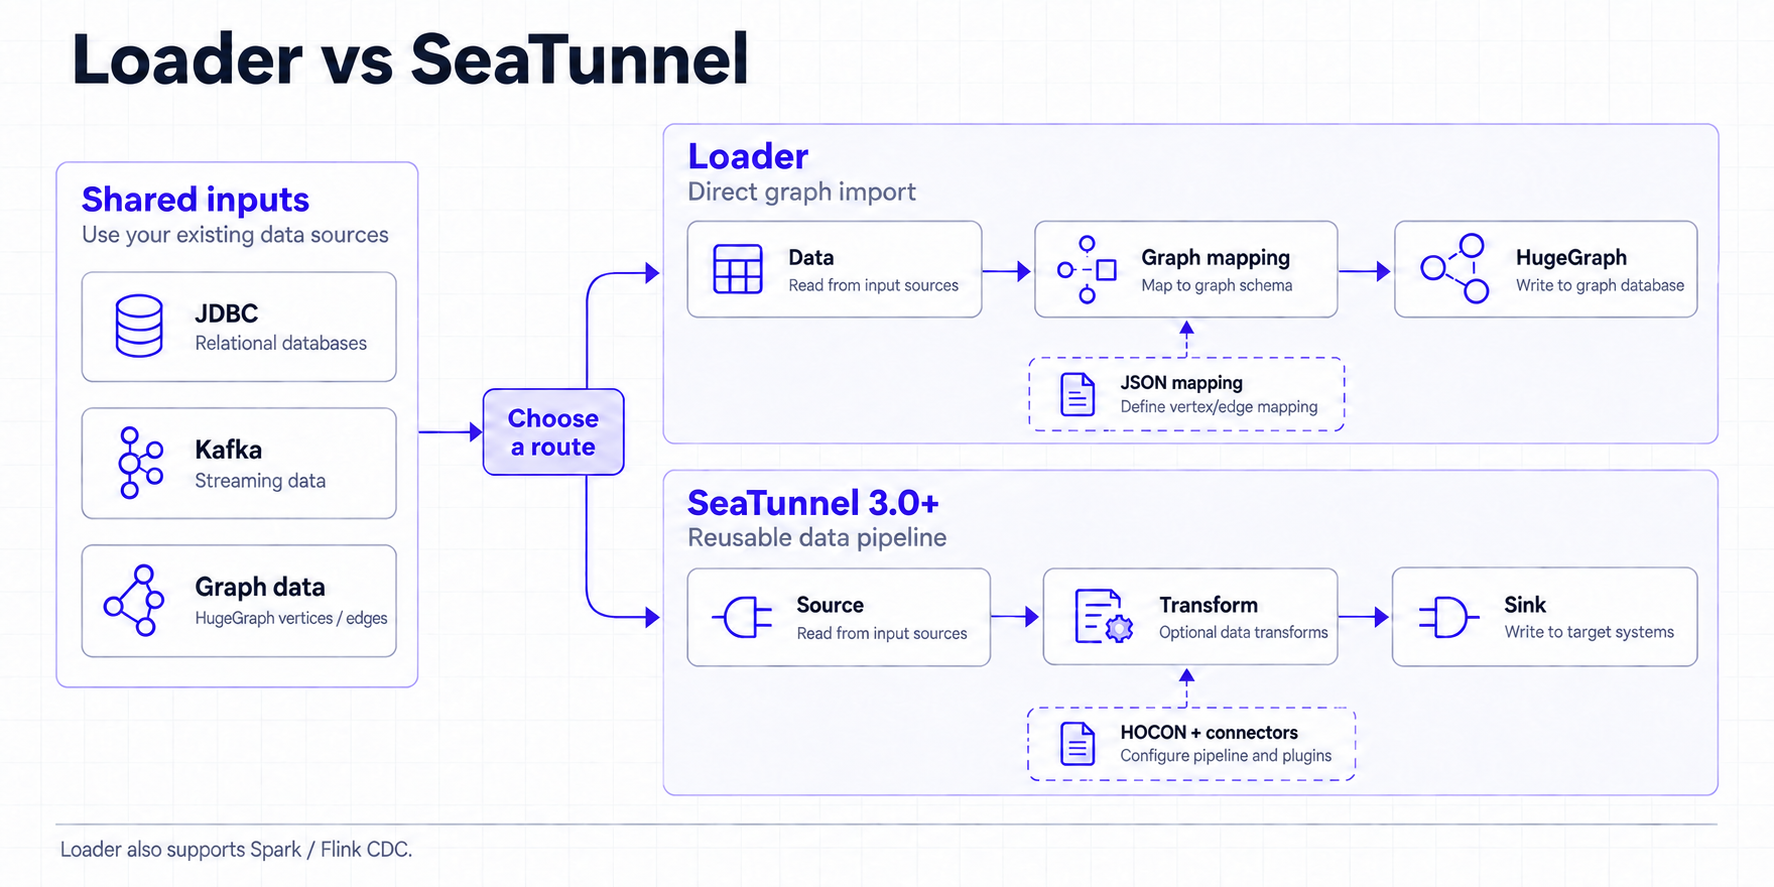
Click a diagram to view the original size.
1 Loader, Tools, and SeaTunnel
HugeGraph-Loader is suited to direct imports from common data sources. HugeGraph-Tools focuses on standalone graph management, backup, and export. SeaTunnel organizes a job as Source → Transform → Sink, so you can reuse existing connectors, transforms, and data pipelines.
Table legend
✅ Supported natively; ⚠️ conditional support or requires an extra component/external platform; ❌ not provided
| Comparison | Loader | Tools | SeaTunnel |
|---|---|---|---|
| Task coverage | ✅ Direct graph imports | ✅ Backup, restore, and export | ✅ Import, export, and migration with composable Source, Transform, and Sink stages |
| Job configuration | JSON mapping file describing the source, vertices, and edges | Command-line options and operations | HOCON job file[3] combining Source, Transform, and Sink |
| Default deployment | ✅ Standalone CLI; ⚠️ Spark Loader can extend it | ✅ Standalone CLI | ✅ Standalone; ✅ distributed |
| Execution engine | ⚠️ Mainly CLI; Spark Loader is a separate extension | ❌ Does not provide a Spark/Flink execution engine | ✅ HugeGraph Source and Sink support Zeta, Spark, and Flink[1][2][7][8][9][10] |
| Frontend and observability | ❌ No built-in frontend; inspect CLI logs | ❌ No built-in frontend; inspect CLI logs | ✅ Built-in Web UI job panel for task status and runtime information |
| Input and output | ⚠️ Focused on graph imports and common files, JDBC, Kafka, and similar sources | ⚠️ Focused on graph data and backup files in common storage | ✅ Dozens of connectors, including JDBC, Kafka, and SQL-CDC |
| Scheduling and resource management | ❌ No unified cross-task scheduling or resource allocation | ❌ No unified cross-task scheduling or resource allocation | ⚠️ Can integrate with DolphinScheduler for scheduling and task management |
| Simplicity | ✅ Focused and simple; a future binary CLI will make quick use easier | ✅ Direct commands for standalone operations | ⚠️ More runtime components, suited to long-lived data pipelines |
| High-throughput import | ✅ Supports bypass-server and other optimizations; measured peaks can reach 1-2 million records/s with specific backends and hardware, so benchmark the actual setup | ⚠️ Focuses on backup and export rather than bulk-import throughput | ✅ Scales throughput through parallelism, distributed engines, and connectors |
SeaTunnel covers Loader’s graph-import and Tools’ export and migration scenarios in one expandable pipeline, and it also supports SQL-CDC and dozens of input and output types. Loader and Tools normally run on one machine, while SeaTunnel supports both standalone and distributed deployments and scales with data and task volume. Tools’ schedule-backup can create a crontab entry, but it does not provide unified workflow orchestration and resource management.
Existing Spark/Flink daily jobs
Both HugeGraph Source and Sink list SeaTunnel Engine (Zeta), Spark, and Flink as supported engines in SeaTunnel 3.0+. If you express the daily job as a SeaTunnel job and submit it to that engine, records can move directly from Source to Transform to Sink without an intermediate file. If you keep the existing Spark/Flink DAG, SeaTunnel does not automatically take over its in-memory DataFrame or stream. Adapt it into a SeaTunnel job or expose the data through a Source connector
Loader and Tools are focused, direct, and quick to start. Use Loader for a direct graph import; use Tools for backup, restore, export, or daily operations. If a SeaTunnel job already exists, adding HugeGraph to that pipeline is usually simpler. For higher import throughput, Loader’s bypass-server path and other import optimizations are a better fit; measured peaks of 1-2 million records/s require a specific backend, data set, and hardware configuration and are not a general performance guarantee. For new SeaTunnel jobs, use 3.0+ and mappings. Recheck the connector configuration when using another version.
2 Prepare the environment
2.1 Get SeaTunnel 3.0+
Use JDK 11 and set JAVA_HOME; the official deployment guide
lists Java 8 and 11 as prerequisites. Choose a 3.0+ binary distribution from the
official release page[4] and verify its checksum or signature using the files linked there.
The commands below use 3.0.0 as an example; set SEATUNNEL_VERSION to the release you downloaded.
The binary distribution does not include connector plugins. In config/plugin_config, select the connectors needed by the examples:
Install the matching released plugins using the upstream plugin installation instructions[5]:
Run the remaining commands from this installation directory and keep the engine and connector plugins at the same version.
This guide uses the bundled Zeta engine in local mode[6][7]. Check that connectors/ contains HugeGraph, JDBC, and Kafka
as needed[11][12]. The JDBC examples also require the MySQL driver JAR in lib/, with driver class com.mysql.cj.jdbc.Driver.
2.2 Prepare HugeGraph and data sources
Start HugeGraph Server and create a graph for testing. The examples use the hugegraph graph in the DEFAULT graph space. Adjust these names to match the server configuration; graph space names are case-sensitive. If authentication is enabled, provide username and password in the HugeGraph Source and Sink configurations.
The following graph model is shared by the JDBC and Kafka examples. mappings creates missing PropertyKey, VertexLabel, and EdgeLabel definitions by default; existing schema definitions must be compatible.
| Graph element | Name and properties |
|---|---|
| Properties | name is Text; age and since are Int |
| Vertex | person, primary key name, properties name and age |
| Edge | knows, from person to person, property since |
The mysql, kafka, and hugegraph host names in the examples are placeholders. Replace them with addresses reachable from the SeaTunnel runtime. Inside a container, 127.0.0.1 points to that container; services on the same Docker network can use their service names. Set host to a host name or IP address, and set the port separately.
3 Import from a relational database (sql2graph)
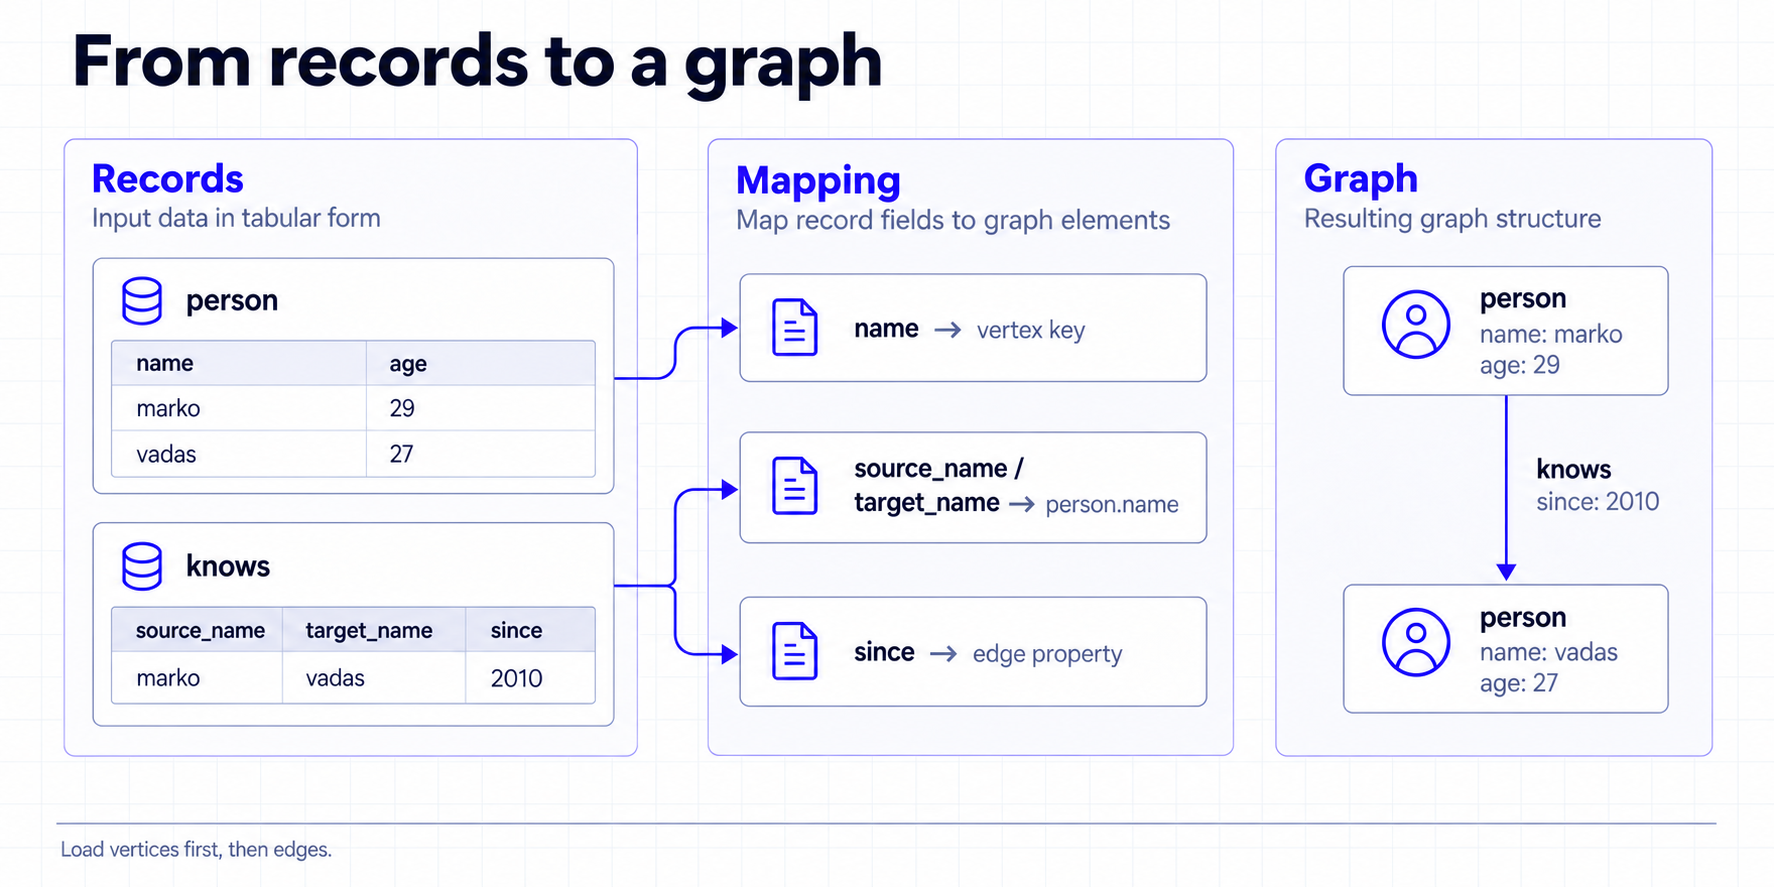
Use two jobs for this import: write the person table as vertices first, then write the knows table as edges. Both edge endpoints will already exist when the edge job runs.
3.1 Import vertices
Prepare the sample data in the MySQL demo database and grant the configured account read access:
Save the following as config/sql2graph-person.conf and replace the database user name and password:
Check the result in Hubble or Gremlin. You should find marko and vadas with their ages:
idFields = ["name"] uses the name to generate the primary key. Importing the same name again writes to the same vertex. properties lists the source fields to write.
3.2 Import edges
Prepare the relation table. Its two endpoint fields correspond to person.name from the vertex job:
After the vertex job succeeds, run the edge job:
The following query should return a knows edge from marko to vadas with since set to 2010:
sourceConfig and targetConfig identify the endpoint fields. fieldMapping maps them to the vertex primary key name, and properties = ["since"] writes only the edge property. The example enables check_vertex = true and disables per-record fallback after a batch failure (batch_failure_fallback = false), so a missing endpoint or write failure causes the job to fail.
If the relation table has only numeric foreign keys while the graph uses names as primary keys, join the names in SQL before passing the records to the Sink. See MySQL CDC Source[13] for MySQL CDC integration.
4 Import from Kafka (kafka2graph)
Kafka is useful for a continuous stream of events. Create the user-events topic and publish the following JSON message. Each message becomes one person vertex:
Save the following as config/kafka2graph.conf:
Use the Gremlin query from section 3.1 to check the data. The streaming job keeps running. checkpoint.interval saves job state every 10 seconds, while sink.flush.interval asks Zeta to flush every 5 seconds so a small number of messages does not wait for a full batch.
HugeGraph Sink writes with at-least-once semantics, so recovery can replay records. PRIMARY_KEY sends the same name to the same vertex, but it does not make every update exactly-once. Scheduled flushing is provided by Zeta and does not apply to Spark or Flink engines.
5 Common configuration and troubleshooting
The following table applies to the SeaTunnel 3.0+ version used by this guide:
| Configuration | Purpose |
|---|---|
host, port | Set the HugeGraph host and port |
graph_name, graph_space | Select an existing graph and graph space |
mappings | Define how input fields become vertices or edges |
properties | List the source fields written by each mapping |
schema_save_mode | mappings creates missing schema by default; existing schema must still be compatible |
batch_size | Number of records per batch; default 500 |
env.sink.flush.interval | Zeta scheduled flush interval in milliseconds |
check_vertex | Check edge endpoints; the edge job in this guide sets it to true |
batch_failure_fallback[2] | Defaults to true, so a failed batch falls back to record-by-record retries, capped by max_insert_errors; the examples explicitly set false so a batch failure stops the job |
max_insert_errors | Number of failed records that record-by-record fallback may skip; default 500, -1 for unlimited, and only applies when batch_failure_fallback is enabled |
Use these checks when a job fails:
mappingsis unknown or HugeGraph Source is missing: Check that the engine and HugeGraph connector come from the same SeaTunnel 3.0+ build.- Connection failure: Check the host, port, graph space, authentication details, and whether the SeaTunnel runtime can reach the service.
- Schema incompatibility: Check the ID strategy, property types, and edge endpoints. Automatic creation does not change an existing
PRIMARY_KEYlabel intoCUSTOMIZE_STRING. - Small Kafka batches do not appear promptly: Confirm that the job uses Zeta and set
sink.flush.intervalinenv. In this version,batch_interval_msis retained only for compatibility and cannot replace it.
6 Choosing a tool
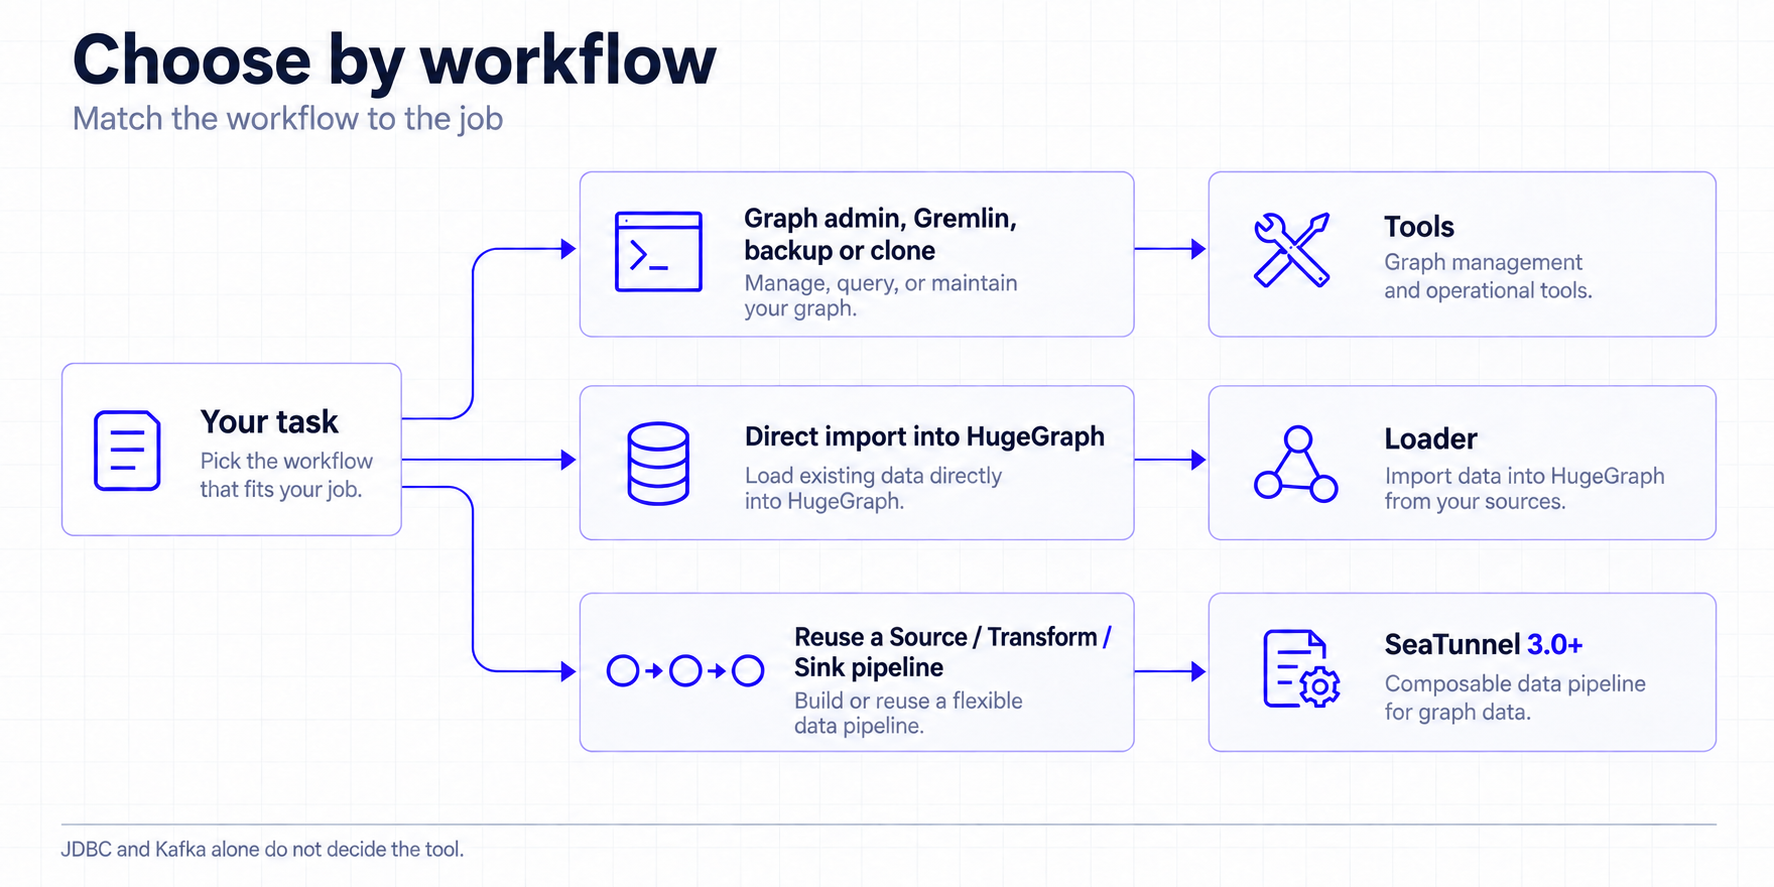
Choose a tool based on the work to complete. Use Tools for graph management, Gremlin, backup, or cloning. Use Loader for a direct graph import. Choose SeaTunnel when you need to reuse a Source, Transform, and Sink pipeline. For SeaTunnel graph reads and migrations, prepare the environment using the SeaTunnel 3.0+ version used by this guide.
7 References
HugeGraph connectors
[1] HugeGraph Source
[2] HugeGraph Sink
Configuration and deployment
[3] HOCON job configuration
[4] SeaTunnel 3.0+ release download
[5] Connector plugin installation
[6] SeaTunnel local deployment
Execution engines
[7] SeaTunnel Engine Overview
[8] SeaTunnel Spark Engine
[9] SeaTunnel Flink Engine
[10] Connector V2 multi-engine support
Data source connectors
[11] JDBC Source
[12] Kafka Source
[13] MySQL CDC Source
4 - HugeGraph-Loader Quick Start
This guide aligns with the Toolchain master branch (currently based on 1.8, unreleased). Released packages and Docker latest may differ; check your version before using unreleased features.
Quick start: local file import
Walk through a minimal import workflow: import two people and one relationship, then verify the data in Hubble.
First install Loader and start HugeGraph Server.
The commands below run from the Loader directory, importing into the default graph hugegraph.
For an authenticated Server, append --username and --password (or --token).
Create the data files.
These CSV files have no header row. The mapping in the next step supplies the column names.
Create the schema and mapping.
Dedicated
docs_*names keep this example separate from the built-inpersondata. File paths are relative to the directory where you run Loader.Run the import.
Keep the same working directory. Change the host and port if Server runs elsewhere.
A first successful run imports two vertices and one edge. Check the success and failure counts in the summary.
Query the result in Hubble.
Connect Hubble to the same Server and graph, then run these queries separately in the Gremlin workspace.
The first query returns Alice with age
29and Bob with age31. The second returnsdocs-smoke-bob.
For other inputs, continue with the mapping reference. The bundled full example also includes software vertices and edge properties.
1 HugeGraph-Loader Overview
HugeGraph-Loader converts source data into graph vertices and edges and imports them into HugeGraph in batches.
Currently supported data sources include:
- Local disk file or directory, supports TEXT, CSV and JSON format files, supports compressed files
- HDFS file or directory supports compressed files
- Mainstream relational databases, such as MySQL, PostgreSQL, Oracle, SQL Server
- Kafka topic
- An existing HugeGraph graph, used to copy data from one graph into another
Local disk files and HDFS files support resumable uploads.
Note: HugeGraph-Loader requires HugeGraph Server service, please refer to HugeGraph-Server Quick Start to download and start Server
Concurrent imports: Loader on the master branch supports LOADING owner protection on the same Server instance when the Server’s
GET .../mode/ownersreturnsprotocol: 1. Servers without this endpoint retain legacy import behavior without this protection; see the compatibility notes below.
Testing Guide: For running HugeGraph-Loader tests locally, please refer to HugeGraph Toolchain Local Testing Guide
2 Get HugeGraph-Loader
HugeGraph-Loader is available in the following three ways:
- Use docker image (Convenient for Test/Dev)
- Download the compiled tarball
- Clone source code then compile and install
2.1 Use Docker image (Convenient for Test/Dev)
We can deploy the loader service using docker run -itd --name loader hugegraph/loader:latest. For the data that needs to be loaded, it can be copied into the loader container either by mounting -v /path/to/data/file:/loader/file or by using docker cp.
Alternatively, to start the loader using docker-compose, the command is docker-compose up -d. An example of the docker-compose.yml is as follows:
This combination is for local anonymous testing; the Server API is published only on the local host.
The specific data loading process can be referenced under 4.5 User Docker to load data
Note:
The docker image of hugegraph-loader is a convenience release to start hugegraph-loader quickly, but not official distribution artifacts. You can find more details from ASF Release Distribution Policy.
Pin a published version tag or image digest in production.
latestis mutable and does not guarantee alignment withmaster.
2.2 Download the compiled archive
Choose a published Toolchain archive from the download page and extract it.
A release may not include all master functionality; use the source build below for the implementation described here.
2.3 Clone source code to compile and install
Building Loader from the master branch requires Java 17, Maven 3.6.3+, and Python 3.9+. Clone the repository and build:
To build against candidate Server SDKs during development, refer to the Java 17 migration guide.
For Oracle input, obtain a JDBC driver JAR compatible with your Oracle/JDK versions and place it in the extracted Loader lib/ directory.
The startup script loads JARs there; installing a driver only in the local Maven repository does not put it on Loader’s runtime classpath.
3 How to use
To import a dataset, prepare the schema, data and mapping, then run Loader.
- Write graph schema
- Prepare data files
- Write input source map files
- Execute command import
3.1 Construct graph schema
Define the vertex labels, edge labels and properties needed to represent your data before writing the schema.
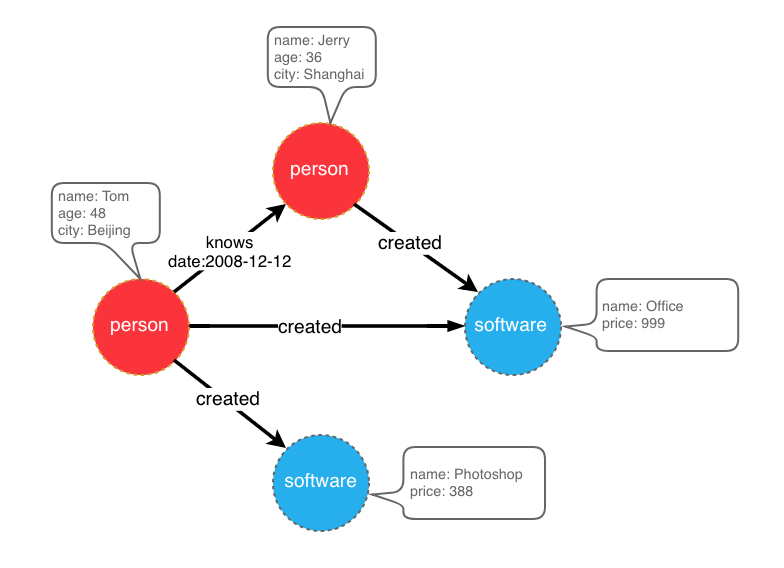
The example below uses person and software vertices, connected by knows and created edges.
People have names, ages and cities; software has a name and price. Each edge records a date.
graph model example
Save the schema definitions in schema.groovy.
See HugeGraph Client for the schema API.
3.2 Prepare data
The data sources currently supported by HugeGraph-Loader include:
- local disk file or directory
- HDFS file or directory
- Partial relational database
- Kafka topic
- An existing HugeGraph graph
3.2.1 Data source structure
3.2.1.1 Local disk file or directory
Set the input path to a local file or a directory. A single input source accepts one directory, not a list of directories.
For data split across part-0, part-1 and other files, place those files in one directory and set the mapping’s path to that directory.
Supported file formats include:
- TEXT
- CSV
- JSON
TEXT uses a configurable delimiter. Each data row represents a record; its columns supply IDs, labels or properties.
Column names can come from a header row or from the mapping’s header setting.
An example is as follows:
CSV is a TEXT file with commas , as delimiters. When a column value itself contains a comma, the column value needs to be enclosed in double quotes, for example:
The JSON file requires that each line is a JSON string, and the format of each line needs to be consistent.
3.2.1.2 HDFS file or directory
Users can also specify HDFS files or directories as data sources, all of the above requirements for local disk files or directories apply here. In addition, since HDFS usually stores compressed files, loader also provides support for compressed files, and local disk file or directory also supports compressed files.
Currently supported compressed file types include: GZIP, BZ2, XZ, LZMA, SNAPPY_RAW, SNAPPY_FRAMED, Z, DEFLATE, LZ4_BLOCK, LZ4_FRAMED, ORC, and PARQUET.
3.2.1.3 Mainstream relational database
The loader also supports some relational databases as data sources, and currently supports MySQL, PostgreSQL, Oracle, and SQL Server.
Loader does not follow foreign keys to query other tables while parsing a row. Each input row must provide the values needed to construct its graph elements. Prepare any joins in the source query first.
Consider three tables named person, software and created.
If person and software use PRIMARY_KEY IDs with name as the primary key, each edge needs its endpoints’ names.
The created table contains only p_id and s_id; Loader will not query the names from those IDs. Use either of these ID designs.
- Keep
PRIMARY_KEYand use each vertex table’sidcolumn as its primary key property. Loader can then build endpoint IDs fromp_id,s_idand the vertex labels. - Use custom IDs, taking each vertex table’s
idcolumn as the vertex ID. The edge mapping can usep_idands_iddirectly.
Both designs let edge rows supply endpoint IDs without another lookup.
3.2.2 Prepare vertex and edge data
3.2.2.1 Vertex Data
The vertex data file consists of data line by line. Generally, each line is used as a vertex, and each column is used as a vertex attribute. The following description uses CSV format as an example.
- person vertex data (the data itself does not contain a header)
- software vertex data (the data itself contains the header)
3.2.2.2 Edge data
The edge data file consists of data line by line. Generally, each line is used as an edge. Some columns are used as the IDs of the source and target vertices, and other columns are used as edge attributes. The following uses JSON format as an example.
- knows edge data
- created edge data
3.3 Write data source mapping file
3.3.1 Mapping file overview
The mapping file uses JSON. Each item in structs contains one input and its vertices and edges mappings.
input describes the data location, format and delimiter. Vertex and edge mappings define labels, IDs, properties and field conversions.
Loader 0.11.0 introduced mapping format 2.0; earlier mappings use format 1.0. This page uses 2.0 unless stated otherwise.
Two versions of the mapping file are given directly here (the above graph model and data file are described)
The 1.0 version of the mapping file is centered on the vertex and edge, and sets the input source; while the 2.0 version is centered on the input source, and sets the vertex and edge mapping. Some input sources (such as a file) can generate both vertices and edges. If you write in the 1.0 format, you need to write an input block in each of the vertex and edge mapping blocks. The two input blocks are exactly the same; and the 2.0 version only needs to write input once. Therefore, compared with version 1.0, version 2.0 can save some repetitive writing of input.
In the bin directory of hugegraph-loader-{version}, there is a script tool mapping-convert.sh that can directly convert the mapping file of version 1.0 to version 2.0. The usage is as follows:
A struct-v2.json will be generated in the same directory as struct.json.
The bin directory also ships utf8-bom-to-utf8.sh, which strips the UTF-8 BOM from a single data file, or from every file under a directory. It is useful when a CSV or TEXT file exported by a Windows tool fails to parse because its first header column carries an invisible BOM:
3.3.2 Input Source
Input sources are currently divided into five categories: FILE, HDFS, JDBC, KAFKA and GRAPH, which are distinguished by the type node. We call them local file input sources, HDFS input sources, JDBC input sources, KAFKA input sources and GRAPH input source, which are described below.
3.3.2.1 Local file input source
- id: The id of the input source. This field is used to support some internal functions. It is not required (it will be automatically generated if it is not filled in). It is strongly recommended to write it, which is very helpful for debugging;
- skip: whether to skip the input source, because the JSON file cannot add comments, if you do not want to import an input source during a certain import, but do not want to delete the configuration of the input source, you can set it to true to skip it, the default is false, not required;
- input: input source map block, composite structure
- type: an input source type, file or FILE must be filled;
- path: the path of the local file or directory, an absolute path or a path relative to the Loader process working directory (not the mapping file). An absolute path is recommended; required;
- file_filter: filter files with compound conditions from
path, compound structure, currently only supports configuration extensions, represented by child nodeextensions, the default is “*”, which means to keep all files; - format: the format of the local file, the optional values are CSV, TEXT and JSON, which must be uppercase, the default is CSV, optional;
- header: column names; if omitted, the first data line supplies them. With an explicit header, an identical first line is still skipped by default (see has_header). JSON does not require a header; optional;
- has_header: for CSV and TEXT, the first line of every file is dropped when it is identical to the header, so a header repeated in each part file of a directory is not imported as data. Set this to
falseto turn that check off when the first line of a file is real data that happens to equal the header, optional; - delimiter: The column delimiter of the file line. The default depends on
format: a comma","for CSV and a tab"\t"for TEXT; a CSV file accepts no other delimiter. TheJSONfile does not need to be specified, optional; - charset: the encoded character set of the file, the default is
UTF-8, optional; - date_format: custom date format, the default value is yyyy-MM-dd HH:mm:ss, optional; if the date is presented in the form of a timestamp, this item must be written as
timestamp(fixed writing); - extra_date_formats: a list of fallback date formats, tried when a value does not match
date_format, empty by default, optional; - time_zone: Set which time zone the date data is in, the default value is
GMT+8, optional; - skipped_line: The line to be skipped, compound structure, currently only the regular expression of the line to be skipped can be configured, described by the child node
regex. The default regex is(^#|^//).*|, which skips lines starting with#or//and empty lines; to keep such lines, setregexto a pattern that matches nothing, optional; - compression: The compression format of the file, the optional values are NONE, GZIP, BZ2, XZ, LZMA, SNAPPY_RAW, SNAPPY_FRAMED, Z, DEFLATE, LZ4_BLOCK, LZ4_FRAMED, ORC and PARQUET, the default is NONE, which means a non-compressed file, optional; for ORC and PARQUET the header is matched case-insensitively;
- list_format: When a column of the file (non-JSON) is a collection structure (the Cardinality of the PropertyKey in the corresponding figure is Set or List), you can use this item to set the start character, separator, and end character of the column, compound structure :
- start_symbol: The start character of the collection structure column (the default value is the empty string
"", JSON format currently does not support specification) - elem_delimiter: the delimiter of the collection structure column (the default value is
|, and it must differ fromdelimiter; JSON format currently only supports native,delimiter) - end_symbol: the end character of the collection structure column (the default value is the empty string
"", the JSON format does not currently support specification) - ignored_elems: the elements dropped after the column is split, the default value is
[""], so empty elements are ignored
- start_symbol: The start character of the collection structure column (the default value is the empty string
3.3.2.2 HDFS input source
The nodes and meanings of the above local file input source are basically applicable here. Only the different and unique nodes of the HDFS input source are listed below.
- type: input source type, must fill in hdfs or HDFS, required;
- path: the path of the HDFS file or directory, it must be the absolute path of HDFS, required;
- core_site_path: the path of the core-site.xml file of the HDFS cluster, the key point is to specify the address of the NameNode (
fs.default.name) and the implementation of the file system (fs.hdfs.impl), required; - hdfs_site_path: the path of the hdfs-site.xml file of the HDFS cluster, optional;
- dir_filter: when
pathis a directory, decides which sub-directories are walked into, compound structure, optional:- include_regex: only directories whose name matches this regular expression are read, empty by default, which places no restriction;
- exclude_regex: directories whose name matches this regular expression are skipped, empty by default;
- kerberos_config: how to authenticate against a Kerberos-secured HDFS cluster, compound structure, optional:
- enable: whether to authenticate with Kerberos, the default is false;
- krb5_conf: the path of the krb5.conf file, required when
enableis true; - principal: the Kerberos principal, required when
enableis true; - keytab: the path of the keytab file, required when
enableis true;
3.3.2.3 JDBC input source
As mentioned above, it supports multiple relational databases, but because their mapping structures are very similar, they are collectively referred to as JDBC input sources, and then use the vendor node to distinguish different databases.
- type: input source type, must fill in jdbc or JDBC, required;
- vendor: database type, optional options are [MySQL, PostgreSQL, Oracle, SQLServer], case-insensitive, required;
- driver: the JDBC driver class, optional; when it is left out, the default driver of the
vendorlisted in the tables below is used; - url: the url of the database that jdbc wants to connect to, required;
- database: the name of the database to be connected, required;
- schema: The name of the schema to be connected, different databases have different requirements, and the details are explained below;
- table: the name of the table to be connected, at least one of
tableorcustom_sqlis required; - custom_sql: custom SQL statement, at least one of
tableorcustom_sqlis required; - username: username to connect to the database, required;
- password: password for connecting to the database, required;
- where: an extra condition appended to the generated
selectstatement, written without thewherekeyword, optional; - batch_size: The size of one page when obtaining table data by page, the default is 500, optional;
MYSQL
| Node | Fixed value or common value |
|---|---|
| vendor | MYSQL |
| driver | com.mysql.cj.jdbc.Driver |
| url | jdbc:mysql://127.0.0.1:3306 |
schema: nullable, if filled in, it must be the same as the value of database
POSTGRESQL
| Node | Fixed value or common value |
|---|---|
| vendor | POSTGRESQL |
| driver | org.postgresql.Driver |
| url | jdbc:postgresql://127.0.0.1:5432 |
schema: nullable, default is “public”
ORACLE
| Node | Fixed value or common value |
|---|---|
| vendor | ORACLE |
| driver | oracle.jdbc.driver.OracleDriver |
| url | jdbc:oracle:thin:@127.0.0.1:1521 |
schema: nullable, the default value is the username in upper case
SQLSERVER
| Node | Fixed value or common value |
|---|---|
| vendor | SQLSERVER |
| driver | com.microsoft.sqlserver.jdbc.SQLServerDriver |
| url | jdbc:sqlserver://127.0.0.1:1433 |
schema: required
3.3.2.4 Kafka input source
- type: input source type,
kafkaorKAFKA, required; - bootstrap_server: the list of kafka bootstrap servers, required;
- topic: the topic to subscribe to, required;
- group: group of Kafka consumers, required;
- from_beginning: sets
auto.offset.resettoearliestwhen true, orlatestwhen false (default). It applies only when no valid committed offset exists; otherwise consumption resumes from the committed offset. Optional; - format: format of each message, options are CSV, TEXT and JSON, must be uppercase, required;
- header: column name of each column of a message; no header line is read from the topic, so it has to be given for CSV and TEXT, while JSON messages do not need it;
- delimiter: delimiter of the message columns, used by TEXT only, since CSV always splits on
,, optional; - charset: encoding charset of the messages, default is UTF-8, optional;
- date_format: customized date format, default value is yyyy-MM-dd HH:mm:ss, optional; if the date is presented in the form of timestamp, this item must be written as timestamp (fixed);
- extra_date_formats: a customized list of another date formats, empty by default, optional; each item in the list is an alternate date format to the date_format specified date format;
- time_zone: set which time zone the date data is in, default is GMT+8, optional;
- skipped_line: current master
KafkaReaderdoes not implement this filter. Kafka messages go directly to the parser, so configuring this field does not skip blank or comment messages; preprocess them upstream or in the consumer to avoid parse failures; - batch_size: the maximum number of records fetched in one poll (
max.poll.records), default is 500, optional; - early_stop: the record pulled from Kafka broker at a certain time is empty, stop the task, default is false, only for debugging, optional;
3.3.2.5 GRAPH input Source
The GRAPH input source reads vertices and edges out of another HugeGraph graph, reached through HugeGraph-PD, and writes them into the target graph. When a mapping file contains a GRAPH input source, every input source in it that is not skipped has to be a GRAPH input source as well, and the loader puts the target graph into RESTORING mode for the duration of the import.
- type: Data source type; must be filled in as
graphorGRAPH(required); - graphspace: Source graphSpace name (required);
- graph: Source graph name (required);
- username: HugeGraph username; the
--usernamecommand-line option is used when this is empty; - password: HugeGraph password; the
--passwordcommand-line option is used when this is empty; - selected_vertices: the vertex labels to copy, each item written as
{"label": "...", "properties": [...], "query": {...}}, wherepropertiesnarrows the copied properties andqueryis an optional filter passed to the source graph; - ignored_vertices: the vertex labels to skip, each item written as
{"label": "...", "properties": [...]}; - selected_edges: the edge labels to copy, items have the same shape as in
selected_vertices; - ignored_edges: the edge labels to skip, items have the same shape as in
ignored_vertices; - pd-peers: HugeGraph-PD node addresses of the source cluster; the
--pd-peersoption is used when this is empty; - meta-endpoints: Meta service endpoints of the source cluster; the
--meta-endpointsoption is used when this is empty; - cluster: Source cluster name; the
--clusteroption is used when this is empty; - batch_size: Batch size for reading data from the source graph; default is 500;
3.3.3 Vertex and Edge Mapping
The nodes of vertex and edge mapping (a key in the JSON file) have a lot of the same parts. The same parts are introduced first, and then the unique nodes of vertex map and edge map are introduced respectively.
Nodes of the same section
- label:
labelto which the vertex/edge data to be imported belongs, required; - skip: whether to skip this vertex/edge mapping while the input source and the other mappings stay active, the default is false, optional;
- field_mapping: Map the column name of the input source column to the attribute name of the vertex/edge, optional;
- value_mapping: map the data value of the input source to the attribute value of the vertex/edge, optional;
- selected: select some columns to insert, other unselected ones are not inserted, cannot exist at the same time as
ignored, optional; - ignored: ignore some columns so that they do not participate in insertion, cannot exist at the same time as
selected, optional; - null_values: You can specify some strings to represent null values, such as “NULL”. If the vertex/edge attribute corresponding to this column is also a nullable attribute, the value of this attribute will not be set when constructing the vertex/edge, optional ;
- update_strategies: If the data needs to be updated in batches in a specific way, you can specify a specific update strategy for each attribute (see below for details), optional;
- unfold: Whether to unfold the column, each unfolded column will form a row with other columns, which is equivalent to unfolding into multiple rows; for example, the value of a certain column (id column) of the file is
[1,2,3], The values of other columns are18,Beijing. When unfold is set, this row will become 3 rows, namely:1,18,Beijing,2,18,Beijingand3,18, Beijing. Note that this will only expand the column selected as id. Default false, optional;
Update strategy supports 8 types: (requires all uppercase)
- Value accumulation:
SUM - Take the greater of the two numbers/dates:
BIGGER - Take the smaller of two numbers/dates:
SMALLER - Set property takes union:
UNION - Set attribute intersection:
INTERSECTION - List attribute append element:
APPEND - List/Set attribute delete element:
ELIMINATE - Override an existing property:
OVERRIDE
Note: If the newly imported attribute value is empty, the existing old data will be used instead of the empty value. For the effect, please refer to the following example
Note : After adopting the batch update strategy, the number of disk read requests will increase significantly, and the import speed will be several times slower than that of pure write coverage (at this time HDD disk [IOPS](https://en.wikipedia .org/wiki/IOPS) will be the bottleneck, SSD is recommended for speed)
Unique Nodes for Vertex Maps
- id: Specify a column as the id column of the vertex. When the vertex id policy is
CUSTOMIZE, it is required; when the id policy isPRIMARY_KEY, it must be empty;
Unique Nodes for Edge Maps
- source: Select certain columns of the input source as the id column of source vertex. When the id policy of the source vertex is
CUSTOMIZE, a certain column must be specified as the id column of the vertex; when the id policy of the source vertex isWhen PRIMARY_KEY, one or more columns must be specified for splicing the id of the generated vertex, that is, no matter which id strategy is used, this item is required; - target: Specify certain columns as the id columns of target vertex, similar to source, so I won’t repeat them;
- unfold_source: Whether to unfold the source column of the file, the effect is similar to that in the vertex map, and will not be repeated;
- unfold_target: Whether to unfold the target column of the file, the effect is similar to that in the vertex mapping, and will not be repeated;
3.4 Execute command import
With the schema, data and mapping ready, run Loader with the options below.
3.4.1 Parameter description
| Parameter | Default value | Required or not | Description |
|---|---|---|---|
-f or --file | Y | Path to configure script | |
-g or --graph | hugegraph | Graph name | |
--graphspace | DEFAULT | Graph space name | |
-s or --schema | Schema file path; optional when the Schema already exists | ||
-h or --host or -i | localhost | Address of HugeGraphServer | |
-p or --port | 8080 | Port number of HugeGraphServer | |
--username | null | When HugeGraphServer enables permission authentication, the username of the current graph | |
--password | null | When HugeGraphServer enables permission authentication, the password of the current graph | |
--create-graph | false | Whether to automatically create the graph if it does not exist | |
--token | null | When HugeGraphServer has enabled authorization authentication, the token of the current graph | |
--protocol | http | Protocol for sending requests to the server, optional http or https | |
--pd-peers | PD service node addresses | ||
--pd-token | Token for accessing PD service | ||
--meta-endpoints | Meta information storage service addresses | ||
--direct | false | Store direct mode is disabled in current master; imports still use Server API. Keep the default | |
--route-type | NODE_PORT | Route selection method (optional values: NODE_PORT / DDS / BOTH) | |
--cluster | hg | Cluster name | |
--trust-store-file | When the request protocol is https, the client’s certificate file path | ||
--trust-store-password | When the request protocol is https, the client certificate password | ||
--clear-all-data | false | Whether to clear the original data on the server before importing data | |
--clear-timeout | 240 | Timeout for clearing the original data on the server before importing data | |
--incremental-mode | false | Whether to use the breakpoint resume mode; only input sources FILE and HDFS support this mode. Enabling this mode allows starting the import from where the last import stopped | |
--failure-mode | false | When failure mode is true, previously failed data will be imported. Generally, the failed data file needs to be manually corrected and edited before re-importing | |
--batch-insert-threads | CPUs | Batch insert thread pool size (CPUs is the number of logical cores available to the current OS) | |
--single-insert-threads | 8 | Size of single insert thread pool | |
--max-conn | 4 * CPUs | The maximum number of HTTP connections between HugeClient and HugeGraphServer; while it is left at its default, it is raised automatically to 4 * --batch-insert-threads | |
--max-conn-per-route | 2 * CPUs | The maximum number of HTTP connections for each route between HugeClient and HugeGraphServer; while it is left at its default, it is raised automatically to 2 * --batch-insert-threads | |
--batch-size | 500 | The number of data items in each batch when importing data | |
--max-parse-errors | 1 | The maximum number of data parsing errors allowed (per line); the program exits when this value is reached | |
--max-insert-errors | 500 | The maximum number of data insertion errors allowed (per row); the program exits when this value is reached | |
--timeout | 60 | Timeout (seconds) for insert result return | |
--shutdown-timeout | 10 | Waiting time for multithreading to stop (seconds) | |
--retry-times | 3 | Maximum number of retries after a timeout | |
--retry-interval | 10 | Interval before retry (seconds) | |
--check-vertex | false | Whether to check if the vertices connected by the edge exist when inserting the edge | |
--print-progress | true | Whether to print the number of imported items in real time on the console | |
--dry-run | false | Enable this mode to only parse data without importing; usually used for testing | |
--help or -help | false | Print help information | |
--parser-threads or --parallel-count | max(2,CPUs/2) | Number of parallel read pipelines; --parallel-count is deprecated | |
--start-file | 0 | Start file index for partial loading | |
--end-file | -1 | End file index for partial loading | |
--scatter-sources | false | Scatter multiple sources for I/O optimization | |
--cdc-flush-interval | 30000 | The flush interval for Flink CDC | |
--cdc-sink-parallelism | 1 | The sink parallelism for Flink CDC | |
--max-read-errors | 1 | The maximum number of read error lines before exiting | |
--max-read-lines | -1L | The maximum number of read lines, task stops when reached | |
--test-mode | false | Whether the loader works in test mode | |
--use-prefilter | false | Whether to filter vertex in advance | |
--short-id | Map a customized vertex ID to a shorter generated ID, written as label:field:type, where type is one of boolean, byte, int, long, float, double, text, blob, date and uuid; repeat the option to cover several labels | ||
--vertex-edge-limit | -1L | The maximum number of vertex’s edges | |
--sink-type | true | spark-loader only: true writes through the HugeGraph server API, false generates HFiles and bulk-loads them into HBase | |
--vertex-partitions | 64 | The number of partitions of the HBase vertex table, used with --sink-type false | |
--edge-partitions | 64 | The number of partitions of the HBase edge table, used with --sink-type false | |
--vertex-table-name | HBase vertex table name, used with --sink-type false | ||
--edge-table-name | HBase edge table name, used with --sink-type false | ||
--hbase-zk-quorum | HBase ZooKeeper quorum, used with --sink-type false | ||
--hbase-zk-port | HBase ZooKeeper port, used with --sink-type false | ||
--hbase-zk-parent | HBase ZooKeeper parent, used with --sink-type false | ||
--restore | false | Set graph mode to RESTORING | |
--backend | hstore | The backend store type when creating graph if not exists | |
--serializer | binary | The serializer type when creating graph if not exists | |
--scheduler-type | distributed | The task scheduler type when creating graph if not exists | |
--batch-failure-fallback | true | Whether to fallback to single insert when batch insert fails |
The mapping file option --file (-f) is required; other options use their defaults. A valid minimal invocation is:
The launcher also accepts JCommander’s native @file syntax. Put each option and value on separate lines in loader.args:
This is equivalent to the minimal invocation above. Relative path values resolve from the Loader process working directory.
If the argument file contains credentials, restrict it to mode 0600 with chmod 0600 loader.args.
The @file form keeps credential values out of process arguments.
Loader must be able to create and write the mapping-prefix directory used for progress output.
Copy a mapping mounted from a read-only Kubernetes ConfigMap to a writable volume before running Loader.
3.4.2 Breakpoint Continuation Mode
For a long import, use a progress file to resume after an interruption.
Set --incremental-mode to true to resume from a progress file. Loader records progress when it closes normally after a successful import
or a normal stop; an unexpected failure may prevent this write.
The progress file is in ${struct} and named load-progress_${timestamp}, where ${struct} is the mapping-file prefix and ${timestamp} is the
import start time, formatted as yyyyMMdd-HHmmss. For example, an import started at 2019-10-10 12:30:30 with mapping file struct-example.json
writes struct-example/load-progress_20191010-123030. When the directory holds several progress files, the resumed import reads the last one in name
order, which is the most recent one.
Note: A progress file is written after a successful import or a normal stop (including an error limit), regardless of
--incremental-modeor--print-progress. An import aborted by an unexpected failure may not write one.
After stopping an import with Ctrl+C or kill, set --incremental-mode true to continue from the recorded position.
A forced stop with kill -9 cannot save progress.
Invalid data or connection failures can exhaust --max-read-errors, --max-parse-errors or --max-insert-errors.
Correct the rows in the failure files, then use --failure-mode true to retry them. This leaves the original data files unchanged.
Rows that still fail are recorded again and deduplicated when the failure file closes. Failure mode lifts these three limits and scans the entire file.
Each input source, that is each item of structs in the mapping file, gets its own failure file. The file is named after the id of that input source with the suffix .error and is stored in the ${struct}/failure-data directory.
Every failed line is written as a pair of lines: a tip line starting with #### READ ERROR:, #### PARSE ERROR: or #### INSERT ERROR:, followed by the original data line. When the input source has a header, that header is written as JSON to a sibling ${id}.header file, so the failure file can be read back with the right columns.
For example, if the mapping file has an input source with id 1 holding a vertex mapping person and an input source with id 3 holding an edge mapping knows, each of which has some error lines, you will see the following files in the ${struct}/failure-data directory when the Loader exits:
- 1.error: the failed lines of input source 1, each preceded by its tip line
- 1.header: the header of input source 1, written only when that input source has a header
- 3.error: the failed lines of input source 3
- 3.header: the header of input source 3
A
.errorfile that turns out to be empty is deleted when the Loader exits, so only the input sources that really had failed lines leave a file behind. In incremental mode new failures are appended to the existing file, otherwise the file is rewritten from scratch.
3.4.3 logs directory file description
The log and error data during program execution will be written into the hugegraph-loader.log file.
3.4.4 Execute command
Run bin/hugegraph-loader.sh and pass in parameters
The script runs the JVM under JAVA_HOME when that variable is set, and java from the PATH otherwise. It passes the contents of the JVM_OPTS environment variable, then -Xmx10g and the class path built from lib/, to that JVM, so JVM_OPTS is the place to add JVM flags. Logging is configured by conf/log4j2.xml.
3.4.5 Minimal Local-File Import
Follow the local-file import steps at the start of this page.
3.4.6 Concurrent imports and LOADING ownership
In the master branch, Loader implements a LOADING ownership protocol coordinated with Server’s /mode/owners endpoint.
When the deployed Server provides this endpoint and returns protocol: 1, Loader enables ownership protection automatically; released Server 1.7.0 and older versions continue using the legacy mode switching flow.
graph TD
    A["Graph Mode: NONE"] -->|First Loader acquires owner| B["LOADING Mode (Acquires Token)"]
    B -->|Concurrent Loaders join| B
    B -->|Loader finishes & releases| B
    B -->|Last Loader releases| C["Restores to NONE"]
    B -.->|Abnormal exit / kill -9| D["Manual Release / Recovery / Restart"]
    D -.->|"Last owner released, or recover/restart"| A
D -.->|"Other owners still active"| B- Probe and Acquire: Loader probes
/mode/owners. The first Loader obtains an ownership handle (instance/epoch/token), transitioning graph mode fromNONEtoLOADING; concurrent Loaders can join. - Data Import: Loaders holding valid handles execute concurrent imports while preserving
LOADINGmode. - Graceful Release: When an import completes, Loader drains its workers and releases its handle. When the last owner releases,
graph mode automatically returns to
NONE. - Failure Recovery: If abnormal exit (e.g.
kill -9) leaves an orphaned owner, stop and drain all related imports and graph writes, then perform administrator recovery via the RESTful API recovery endpoint or restart the Server. Manualreleaseapplies only when the caller still holds its token (e.g. a direct REST client).
Compatibility and Operational Notes
- Legacy Compatibility: During ordinary imports, only an unsupported-route
404status on/mode/ownersfalls back to the legacy enumLOADING/NONEflow (maintains compatibility with Server 1.7, without multi-loader protection). Network or permission errors, or a404for a missing graph, do not trigger fallback. - Restore and Graph Source Imports: Retain the
RESTORINGflow without ownership probes or automatic resets. After a restore import completes, manually reset graph mode toNONEbefore starting ordinary imports. Do not run restore, graph-source, Spark connector, or older Loader imports while owned imports are active. - Scope & Lifecycle: Ownership is bound to the target Server instance without cross-node synchronization or automatic lease expiry.
For embedded programmatic integrations, callers must invoke
HugeGraphLoader.shutdown()to attempt a single graceful release. If release fails, the handle is not retried; the owner may remain active on the Server, and the administrator recovery step above may be required.
4 Complete example
The Loader distribution includes this dataset in example/file/.
See the source files.
4.1 Prepare data
Vertex file: example/file/vertex_person.csv
Vertex file: example/file/vertex_software.txt
Edge file: example/file/edge_knows.json
Edge file: example/file/edge_created.json
4.2 Write schema
person uses name as its primary key. Tom’s age and city are removed by null_values, so both properties must be nullable.
software uses custom numeric IDs: mapping id supplies the vertex ID and created.target_id supplies the edge’s target ID.
Run this example in an empty graph without these schema labels; ifNotExist() does not replace incompatible existing definitions.
4.3 Write the input source mapping file example/file/struct.json
4.4 Command to import
After the import is complete, statistics similar to the following will appear:
4.5 Use Docker to load data
4.5.1 Use docker exec to load data directly
4.5.1.1 Prepare data
For a first import, use the built-in example dataset.
For custom data, first copy the files into the Loader container.
Prepare the data, schema and mapping as described in sections 4.1 to 4.3, then copy them with docker cp.
The following example stores the files in hugegraph-dataset.
Copy the files into the container.
4.5.1.2 Data loading
Run this command to import the built-in dataset.
For custom data, set -f to your mapping file and -s to your schema file.
You can refer to 3.4.1-Parameter description for the rest of the parameters.
If loading a custom dataset, following the previous example, you would use:
Also update every input.path in the custom struct.json to its actual container path, such as /loader/dataset/vertex_person.csv.
Changing only -f and -s does not change where Loader looks for data files.
If
loaderandserverare in the same Docker network, you can specify-h {server_container_name}; otherwise, you need to specify the IP of theserverhost (in our example,server_container_nameisserver).
Then we can see the result:
Query the imported data with Hubble or curl.
These requests use the GraphSpace-aware Server API. For an older Server, omit /graphspaces/DEFAULT from the path.
If you want to check the import result of edges, you can use curl --compressed "http://localhost:8080/graphspaces/DEFAULT/graphs/hugegraph/graph/edges".
4.5.2 Enter the docker container to load data
You can also open a shell in the container and run the same import commands.
Open the shell with docker exec -it loader bash, then run the import.
The results of the execution will be similar to those shown in 4.5.1.
4.6 Import data by spark-loader
The current master API sink uses Spark 3.5.8, Scala 2.12 and Java 17 on the driver and executors.
The POM’s Spark 3.2.2 dependency supplies compile-time APIs; it is not the runtime engine.
Set SPARK_HOME and JAVA_HOME, then use the distribution’s shaded Loader JAR with its launcher.
Create the schema first and make data files readable by the executors. CSV and TEXT inputs need headerless UTF-8 data and an explicit mapping header.
Other charsets and has_header: true are rejected. Load vertex data before edge data when the edges depend on those vertices.
Replace the mapping path below with your prepared vertex mapping.
Pass Spark options such as --master, --conf and --jars to the launcher alongside Loader options.
Additional JDBC drivers need explicit --jars; copying them into lib/ does not distribute them to executors.
Query the target graph to verify counts and properties; the API sink’s insertion counters do not report distributed writes.
This path rejects --incremental-mode true and --failure-mode true. Standalone Spark supports client deployment only.
HBase bulkload (--sink-type false) is unsupported on Spark 3.5.8 / Java 17; keep an existing bulkload deployment on its separately validated
released Loader/JVM/Spark/HBase environment.
For details, see the Spark migration guide.
4.7 Import data by flink-cdc-loader
The current master integration targets Flink 2.2.1, MySQL CDC 3.6.0-2.2 and Java 17.
Older examples using Flink 1.13.5 and CDC 2.2.1 belong to the previous implementation.
Set FLINK_HOME; the submission JVM, JobManager and TaskManager must all use Java 17.
Keep Flink’s module-access options and exactly one shaded Loader JAR in the distribution’s lib/.
Each mapping needs a MySQL JDBC input with url, database, table, username and password.
Set MySQL binlog_row_image=FULL. UPDATE events require explicit, nonempty update_strategies and unchanged graph IDs;
changes to vertex IDs, edge endpoints or sort keys are rejected. CDC also rejects --dry-run true and --use-prefilter true.
Without a separator, all arguments go to Loader. To set Flink options, put them before -- and Loader options after it.
For a prepared mapping at mysql-cdc.json, submit with one sink writer.
Each mapping uses a single source reader and sink writer. --cdc-sink-parallelism defaults to 1; other values are rejected.
After --, Loader’s -p means the Server port. Checkpoint flushing does not provide transactional graph writes or an exactly-once guarantee.
Validate edge CDC and broader mappings in your test environment before deploying to production.
For more details, see the Flink CDC documentation.
5 - Graph export and migration
Choose an export or migration tool when you need to back up, export, or move data between graphs. Tools is suited to standalone operations and backups; SeaTunnel Source connects graph reads to an expandable data pipeline.
5.1 - Export and Migrate Graph Data with SeaTunnel Source
If you need to copy data from one HugeGraph graph to another, use graph2graph: HugeGraph Source reads vertices and edges from the source graph (graph A), and HugeGraph Sink writes them to the target graph (graph B), with an optional Transform in between. The data path is graph A → HugeGraph Source → (optional Transform) → HugeGraph Sink → graph B. If you need to export graph data to a file, JDBC, Kafka, or another system, use graph2any, where a downstream Sink receives the records read by HugeGraph Source. This page covers both job types.
Version requirement: This guide targets SeaTunnel 3.0+
SeaTunnel 3.0+ provides HugeGraph Source, with schema auto-discovery and multi-label reads. See the official Source documentation for parallel-scan backend requirements and configuration limits.
Before starting, complete the shared environment and configuration steps on the import page. They cover JDK, HOCON, plugin installation, and the sample graph model.
1 Migrate a HugeGraph graph (graph2graph)
The following example migrates person vertices and knows edges from a source graph. Use a separate target graph. This section uses CUSTOMIZE_STRING to preserve vertex IDs. Do not reuse the person label created earlier with PRIMARY_KEY.
These two jobs migrate only the selected labels and properties. They do not copy every source schema setting, such as indexes and TTLs. Pause writes to the source graph during the migration so both jobs read a consistent point in time. Afterward, compare vertex and edge counts and sample properties.
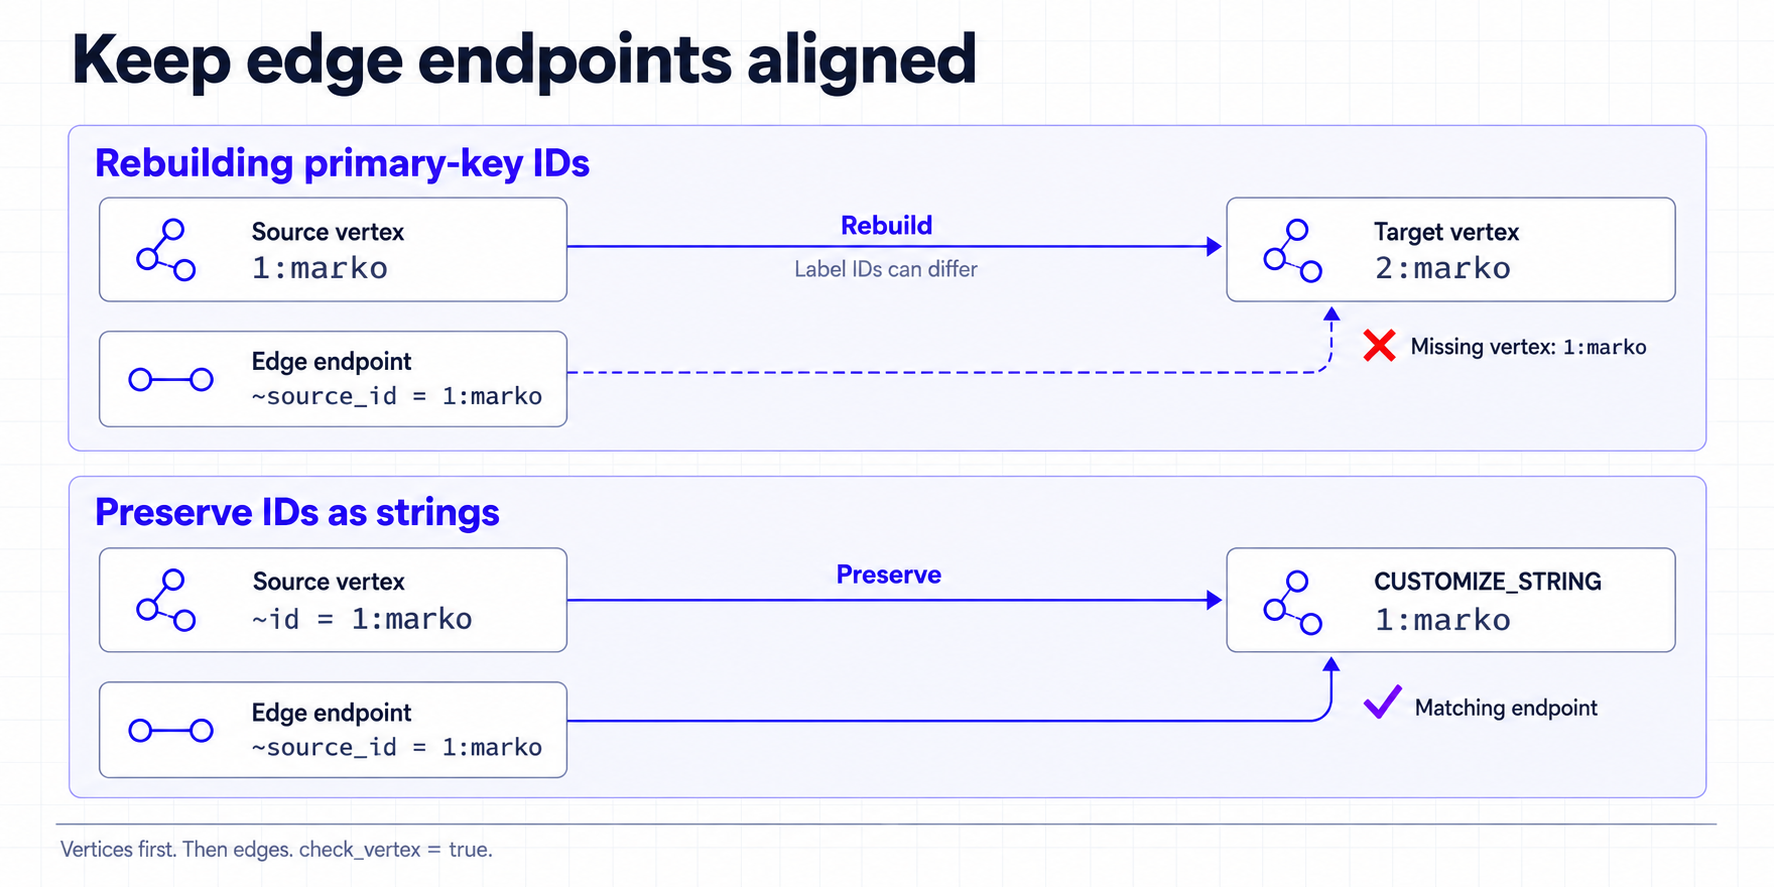
1.1 Migrate vertices first
Source adds a ~id column for the original ID, and Sink stores it as a string. Do not declare ~id in schema.fields; manually declaring this reserved column is rejected.
1.2 Migrate edges second
After the vertex job succeeds, use the ~source_id and ~target_id columns added by Source to locate endpoints. Because the previous job preserved the original IDs, these columns can refer directly to vertices in the target graph.
This example checks endpoints and makes write errors fail the job. The default check_vertex = false does not guarantee a consistent result: a missing endpoint can create a dangling edge, so a successful job is not a substitute for checking the migrated graph.
Why preserve IDs? A HugeGraph
PRIMARY_KEYID contains the internal ID of the vertex label, and that internal ID can differ between graphs. For example, a source vertex can be1:marko, while regenerating the primary key in the target graph can produce2:marko. Reusing the source edge endpoints after regenerating vertex IDs can connect edges to the wrong vertices. This example stores the original ID as a string, which changes the target graph’s ID strategy
When Source reads every label, omit label to read all labels of label_type (default VERTEX). It produces one output table per label. Bind each Sink mapping to its table with sourceTable, for example sourceTable = "default.person"; use the full table name shown in the Writer log for the exact value. Do not reuse the single-label configuration from this section. See the HugeGraph Source documentation for other limitations.
2 Export to another system (graph2any)
graph2any uses HugeGraph Source[1] to read vertices or edges and sends them to a downstream Sink. The example below exports person vertices to local JSON files; to export to JDBC, Kafka, or another system, replace LocalFile[2] and its options.
Save this as config/graph2file-person.conf and run it from the SeaTunnel installation directory:
To export edges, change the Source label to an edge label, set label_type = "EDGE", and declare the edge properties in schema.fields. Source also outputs the reserved columns ~source_id, ~source_label, ~target_id, and ~target_label; write them to the file or pass them to downstream transforms as needed.
This page covers row reads and writes. It does not copy source indexes, TTLs, or other schema settings. For the complete Source options and shared environment guidance, return to the SeaTunnel graph import guide[3].
3 References
Connectors
[1] HugeGraph Source
[2] LocalFile Sink
Related guide
6 - Tools Quick Start
1 HugeGraph-Tools Overview
HugeGraph-Tools manages graphs and tasks and provides backup and restore commands. It also retains deployment commands for legacy Server/Studio versions.
Testing Guide: For running HugeGraph-Tools tests locally, please refer to HugeGraph Toolchain Local Testing Guide
2 Get HugeGraph-Tools
HugeGraph-Tools is included in the Toolchain distribution. You can download the distribution or build it from source.
- Download the compiled tarball
- Clone source code then compile and install
2.1 Download the compiled archive
The following example uses the released HugeGraph-Toolchain 1.7.0 package. Check the download page for releases.
2.2 Clone source code to compile and install
Choose one source below. Both build the released 1.7.0 Tools; install Maven and JDK 11 first. The archive route also requires wget.
Each example ends in the generated Tools directory, where bin/hugegraph help lists the available commands.
The build also writes hugegraph-tools/target/apache-hugegraph-tools-incubating-1.7.0.tar.gz relative to the source root.
2.3 Build current source
To use unreleased features from the master branch, build Tools from source (master is currently based on 1.8; requires JDK 17, Maven 3.6.3+, and Python 3.9+):
Clone Toolchain source
Build matching Server SDK
Run the script below to download Server source and install the SDK into an isolated Maven repository:
See the Java 17 migration guide for details.
Package Tools
Keep the SDK repository while using this source build. The master build directory does not contain incubating.
3 How to use
3.1 Function overview
From the extracted or generated Tools directory, run bin/hugegraph help for the command list,
or bin/hugegraph help <sub-command> for one command. The commands cover these tasks.
- Graph management type, graph-mode-set, graph-mode-get, graph-list, graph-get, graph-clear, graph-create, graph-clone and graph-drop
- Asynchronous task management type, task-list, task-get, task-delete, task-cancel and task-clear
- Gremlin type, gremlin-execute and gremlin-schedule
- Backup/Restore type, backup, restore, migrate, schedule-backup and dump
- Authentication data backup/restore type, auth-backup and auth-restore
- Legacy Server/Studio deployment, deploy, clear, start-all and stop-all
3.2 [options]-Global Variable
Set these global connection options on the command line or through the environment variables below.
--graphselects the graph, defaulthugegraph.--urlsets the Server address, defaulthttp://127.0.0.1:8080.--usersupplies the username when Server authentication is enabled.--passwordsupplies that user’s password.--timeoutsets the connection timeout, default 30 seconds.--trust-store-fileselects the HTTPS truststore. An empty value uses the built-inconf/hugegraph.truststore.--trust-store-passwordsupplies its password. An empty value uses the built-in truststore password.--throw-modedefaults tofalse, which prints errors and exits. Set it totrueto throw exceptions, mainly for tests.
The scheme in
--urlselects the protocol. Usehttps://...for HTTPS and set truststore options only with that scheme. Supply both--userand--password, or omit both.
Use export to set an option for the current shell and the commands launched from it.
| Global Variable | Environment Variable | Example |
|---|---|---|
| –url | HUGEGRAPH_URL | export HUGEGRAPH_URL=http://127.0.0.1:8080 |
| –graph | HUGEGRAPH_GRAPH | export HUGEGRAPH_GRAPH=hugegraph |
| –user | HUGEGRAPH_USERNAME | export HUGEGRAPH_USERNAME=admin |
| –password | HUGEGRAPH_PASSWORD | export HUGEGRAPH_PASSWORD=test |
| –timeout | HUGEGRAPH_TIMEOUT | export HUGEGRAPH_TIMEOUT=30 |
| –trust-store-file | HUGEGRAPH_TRUST_STORE_FILE | export HUGEGRAPH_TRUST_STORE_FILE=/tmp/trust-store |
| –trust-store-password | HUGEGRAPH_TRUST_STORE_PASSWORD | export HUGEGRAPH_TRUST_STORE_PASSWORD=xxxx |
Both forms below count vertices in the same graph; choose either form. The example uses a local Server without authentication. For an authenticated Server, also provide the username and password described above.
You can also set these variables in bin/hugegraph.
bin/hugegraph also reads JAVA_HOME (a warning is printed when it is not set, and it is needed for https) and JAVA_OPTIONS (JVM options; when it is empty the script uses -Xms512m plus an -Xmx computed from the free memory of the machine).
3.3 Graph Management Type, graph-mode-set, graph-mode-get, graph-list, graph-get, graph-clear, graph-create, graph-clone and graph-drop
- graph-mode-set, set graph restore mode
- –graph-mode or -m, required, specifies the mode to be set, legal values include [NONE, RESTORING, MERGING, LOADING]
- graph-mode-get, get graph restore mode
- graph-list, list all graphs in a HugeGraph-Server
- graph-get, get a graph and its storage backend type
- graph-clear, clear all schema and data of a graph
- –confirm-message or -c, required, delete confirmation information, manual input is required, double confirmation to prevent accidental deletion, “I’m sure to delete all data”, including double quotes
- graph-create, create a new graph with configuration file
- –name or -n, optional, the name of the new graph, default is g
- –file or -f, the path to the graph configuration file, the content of the file is sent to HugeGraph-Server as the config of the new graph
- graph-clone, clone an existing graph
- –name or -n, optional, the name of the cloned graph, default is g
- –clone-graph-name, optional, the name of the source graph to clone from, default is hugegraph
- graph-drop, drop a graph (different from graph-clear, this completely removes the graph)
- –confirm-message or -c, required, confirmation message “I’m sure to drop the graph”, including double quotes
graph-create, graph-clone, graph-clear and graph-drop raise –timeout to at least 300 seconds.
Before restoring into a new graph, set its mode to
RESTORING. To merge into an existing graph, useMERGING.
3.4 Asynchronous task management Type,task-list、task-get、task-delete、task-cancel and task-clear
- task-list,List the asynchronous tasks in a graph, which can be filtered according to the status of the tasks
- –status,Optional, specify the status of the task to view, i.e. filter tasks by status, legal values include [UNKNOWN, NEW, QUEUED, RESTORING, RUNNING, SUCCESS, CANCELLED, FAILED] (case insensitive)
- –limit,Optional, specify the number of tasks to be obtained, the default is -1, which means to obtain all eligible tasks, a value passed explicitly must be positive
- task-get,Get detailed information about an asynchronous task
- –task-id,Required, specifies the ID of the asynchronous task
- task-delete,Delete information about an asynchronous task
- –task-id,Required, specifies the ID of the asynchronous task
- task-cancel,Cancel the execution of an asynchronous task
- –task-id,Required, the ID of the asynchronous task to cancel
- task-clear,Clean up completed asynchronous tasks
- –force,Optional. When set, it means to clean up all asynchronous tasks. Unfinished ones are canceled first, and then all asynchronous tasks are cleared. By default, only completed asynchronous tasks are cleaned up
3.5 Gremlin Type,gremlin-execute and gremlin-schedule
⚠️ SEC Reminder: The execution of Gremlin depends on the actual logic of the statements, which may involve scenarios such as large-scale data modification and high-risk system calls with potential implicit hazards. Please use this tool only in secure and trusted network environments. It is imperative to configure and secure HugeGraph-Server with the Authentication System (Auth) and an IP Whitelist to restrict execution requests on the server side. Never hand over the tool or expose the execution entry to unauthorized personnel.
- gremlin-execute, send Gremlin statements to HugeGraph-Server to execute query or modification operations, execute synchronously, and return results after completion
- –file or -f, specify the script file to execute, UTF-8 encoding, mutually exclusive with –script
- –script or -s, specifies the script string to execute, mutually exclusive with –file
- –aliases or -a, Gremlin alias settings, the format is: key1=value1,key2=value2,…
- –bindings or -b, Gremlin binding settings, the format is: key1=value1,key2=value2,…
- –language or -l, the language of the Gremlin script, the default is gremlin-groovy
–file and –script are mutually exclusive, one of them must be set
- gremlin-schedule, send Gremlin statements to HugeGraph-Server to perform query or modification operations, asynchronous execution, and return the asynchronous task id immediately after the task is submitted
- –file or -f, specify the script file to execute, UTF-8 encoding, mutually exclusive with –script
- –script or -s, specifies the script string to execute, mutually exclusive with –file
- –bindings or -b, Gremlin binding settings, the format is: key1=value1,key2=value2,…
- –language or -l, the language of the Gremlin script, the default is gremlin-groovy
–file and –script are mutually exclusive, one of them must be set
3.6 Backup/Restore Type
- backup, back up the schema or data in a certain graph out of the HugeGraph system, and store it on the local disk or HDFS in the form of JSON
- –format, the backup format, optional values include [json, text], the default is json
- –all-properties, whether to back up all properties of vertices/edges, only valid when –format is text, default false
- –label, the vertex label or edge label to be backed up, only applied when –format is text; when it is set, –huge-types must name exactly one type and that type must be vertex or edge, otherwise the command fails
- –properties, properties of vertices/edges to be backed up, separated by commas, only valid when –format is text, valid only when backing up vertices or edges
- –compress, whether to compress data during backup, the default is true
- –directory or -d, the directory to store schema or data, the default is ‘./{graphName}’ for local directory, and ‘{fs.default.name}/{graphName}’ for HDFS
- –huge-types or -t, the data types to be backed up, separated by commas, the optional value is ‘all’ or a combination of one or more [vertex, edge, vertex_label, edge_label, property_key, index_label], ‘all’ Represents all 6 types, namely vertices, edges and all schemas, ‘schema’ represents the 4 schema types [vertex_label, edge_label, property_key, index_label]
- –log or -l, specify the log directory, the default is ./logs
- –retry, specify the number of failed retries, the default is 3
- –thread-num or -T, the number of threads to use, default is Math.min(10, Math.max(4, CPUs / 2))
- –split-size or -s, specifies the size of splitting vertices or edges when backing up, the default is 1048576, and it must be at least 1048576 (1M)
- -D, use the mode of -Dkey=value to specify dynamic parameters, and specify HDFS configuration items when backing up data to HDFS, for example: -Dfs.default.name=hdfs://localhost:9000
If –timeout is less than 120 seconds, backup (and the backup step of migrate) uses 120 seconds
- restore, restore schema or data stored in JSON format to a new graph (RESTORING mode) or merge into an existing graph (MERGING mode)
- –directory or -d, the directory to store schema or data, the default is ‘./{graphName}’ for local directory, and ‘{fs.default.name}/{graphName}’ for HDFS
- –clean, whether to delete the directory specified by –directory after the recovery map is completed, the default is false
- –huge-types or -t, data types to restore, separated by commas, optional value is ‘all’ or a combination of one or more [vertex, edge, vertex_label, edge_label, property_key, index_label], ‘all’ Represents all 6 types, namely vertices, edges and all schemas, ‘schema’ represents the 4 schema types [vertex_label, edge_label, property_key, index_label]
- –log or -l, specify the log directory, the default is ./logs
- –retry, specify the number of failed retries, the default is 3
- –thread-num or -T, the number of threads to use, default is Math.min(10, Math.max(4, CPUs / 2))
- -D, use the mode of -Dkey=value to specify dynamic parameters, which are used to specify HDFS configuration items when restoring graphs from HDFS, for example: -Dfs.default.name=hdfs://localhost:9000
restoreaccepts backups made with--format json. restore requires the graph to be in RESTORING or MERGING mode (set it with graph-mode-set first), otherwise the command fails - migrate, migrate the currently connected graph to another HugeGraphServer
- –target-graph, the name of the target graph, the default is hugegraph
- –target-url, the HugeGraphServer where the target graph is located, the default is http://127.0.0.1:8081
- –target-user, the username used to access the target graph
- –target-password, the password to access the target map
- –target-timeout, the timeout for accessing the target map
- –target-trust-store-file, access the truststore file used by the target graph
- –target-trust-store-password, the password to access the truststore used by the target map
- –directory or -d, during the migration process, the directory where the schema or data of the source graph is stored. For a local directory, the default is ‘./{graphName}’; for HDFS, the default is ‘{fs.default.name}/ {graphName}’
- –huge-types or -t, the data types to be migrated, separated by commas, the optional value is ‘all’ or a combination of one or more [vertex, edge, vertex_label, edge_label, property_key, index_label], ‘all’ Represents all 6 types, namely vertices, edges and all schemas, ‘schema’ represents the 4 schema types [vertex_label, edge_label, property_key, index_label]
- –log or -l, specify the log directory, the default is ./logs
- –retry, specify the number of failed retries, the default is 3
- –thread-num or -T, the number of threads to use, default is Math.min(10, Math.max(4, CPUs / 2))
- –split-size or -s, specify the size of the vertex or edge block when backing up the source graph during the migration process, the default is 1048576, and it must be at least 1048576 (1M)
- -D, use the mode of -Dkey=value to specify dynamic parameters, which are used to specify HDFS configuration items when the data needs to be backed up to HDFS during the migration process, for example: -Dfs.default.name=hdfs://localhost: 9000
- –graph-mode or -m, the mode to set the target graph when restoring the source graph to the target graph, legal values include [RESTORING, MERGING], the default is RESTORING. The target graph is switched to this mode during the migration and switched back to its original mode afterwards
- –keep-local-data, whether to keep the backup of the source map generated in the process of migrating the map, the default is false, that is, the backup of the source map is not kept after the default migration map ends
- schedule-backup, periodically back up the graph and keep a certain number of the latest backups (currently only supports local file systems)
- –directory or -d, required, specifies the directory of the backup data
- –backup-num, optional, specifies the number of latest backups to save, defaults to 3
- –interval, an optional item, specifies the backup cycle, the format is the same as the Linux crontab format, the default is “0 0 * * *” (every day at 00:00)
schedule-backup adds a crontab entry that runs
backup -t allinto{directory}/{graph}/hugegraph-backup-{yyMMddHHmm}/and keeps only the latest –backup-num backups. A relative –directory is resolved against the hugegraph-tools home directory, and{directory}/{graph}must not exist yet - dump, export all vertices and edges in the graph, using the
vertex vertex-edge1 vertex-edge2...JSON format by default. To customize the format, implement aFormattersubclass such asCustomFormatterunderhugegraph-tools/src/main/java/org/apache/hugegraph/formatter, then select it when running the command:bin/hugegraph dump -f CustomFormatter- –formatter or -f, specify the formatter to use, the default is JsonFormatter
- –directory or -d, the directory where schema or data is stored, the default is ‘./{graphName}’ for local directory, and ‘{fs.default.name}/{graphName}’ for HDFS
- –log or -l, specify the log directory, the default is ./logs
- –retry, specify the number of failed retries, the default is 3
- –thread-num or -T, the number of threads to use, default is Math.min(10, Math.max(4, CPUs / 2))
- –split-size or -s, specifies the size of splitting vertices or edges when backing up, the default is 1048576, and it must be at least 1048576 (1M)
- -D, use the mode of -Dkey=value to specify dynamic parameters, and specify HDFS configuration items when backing up data to HDFS, for example: -Dfs.default.name=hdfs://localhost:9000
3.7 Authentication data backup/restore type
- auth-backup, backup authentication data to a specified directory
- –types or -t, types of authentication data to back up, separated by commas, optional value is ‘all’ or a combination of one or more [user, group, target, belong, access], ‘all’ represents all 5 types; ‘belong’ requires ‘user’ and ‘group’ to be included, ‘access’ requires ‘group’ and ’target’ to be included
- –directory, directory to store backup data, the default is ‘./auth-backup-restore’ for local directory, and ‘{fs.default.name}/auth-backup-restore’ for HDFS (this option has no -d short form)
- –retry, specify the number of failed retries, the default is 3
- -D, use the mode of -Dkey=value to specify dynamic parameters, and specify HDFS configuration items when backing up data to HDFS, for example: -Dfs.default.name=hdfs://localhost:9000
- auth-restore, restore authentication data from a specified directory
- –types or -t, types of authentication data to restore, separated by commas, optional value is ‘all’ or a combination of one or more [user, group, target, belong, access], ‘all’ represents all 5 types; ‘belong’ requires ‘user’ and ‘group’ to be included, ‘access’ requires ‘group’ and ’target’ to be included
- –directory, directory where backup data is stored, the default is ‘./auth-backup-restore’ for local directory, and ‘{fs.default.name}/auth-backup-restore’ for HDFS (this option has no -d short form)
- –retry, specify the number of failed retries, the default is 3
- –strategy, conflict handling strategy, optional values are [stop, ignore], default is stop. stop means stop restoring when encountering conflicts, ignore means ignore conflicts and continue restoring
- –init-password, initial password to set when restoring users, required when –types includes user
- -D, use the mode of -Dkey=value to specify dynamic parameters, which are used to specify HDFS configuration items when restoring data from HDFS, for example: -Dfs.default.name=hdfs://localhost:9000
3.8 Install the deployment type
Note: These deployment commands only apply to legacy versions (Server 0.6.10.10.4 and Studio 0.6.10.10.0),
and do not support current HugeGraph Server or Hubble.
For modern deployments, follow Server Quick Start
and Hubble Quick Start.
The options below are retained only for maintaining legacy environments.
- deploy, one-click download, install and start HugeGraph-Server and HugeGraph-Studio
- -v, required, specifies the HugeGraph-Server and HugeGraph-Studio version to install, must be one of the versions listed in bin/version-map.yaml (0.6, 0.7, 0.8, 0.9, 0.10), which maps it to the matching server and studio release versions
- -p, required, specifies the installed HugeGraph-Server and HugeGraph-Studio directories
- -u, optional, specifies the link to download the HugeGraph-Server and HugeGraph-Studio compressed packages
- clear, clean up HugeGraph-Server and HugeGraph-Studio directories and tarballs (refuses to run while a matching server or studio process is still alive, and prompts before each removal)
- -p, required, specifies the directory of HugeGraph-Server and HugeGraph-Studio to be cleaned
- start-all, start HugeGraph-Server and HugeGraph-Studio with one click
- -v, required, specifies the installed HugeGraph-Server and HugeGraph-Studio version to start, same values as deploy
- -p, required, specifies the directory where HugeGraph-Server and HugeGraph-Studio are installed
- stop-all, close HugeGraph-Server and HugeGraph-Studio with one click
deploy, start-all, clear and stop-all are handed by
bin/hugegraphstraight to the shell scriptsbin/deploy.sh,bin/start-all.sh,bin/clear.shandbin/stop-all.sh, so the global options and environment variables in 3.2 do not apply to them.
deploy -uoverrides the download URL and saves it in~/hugegraph-download-url-prefix. Later runs without-ureuse the saved URL. Without either setting, the script useshttps://github.com/hugegraph.
3.9 Specific command parameters
The help output below lists each subcommand and its options.
3.10 Specific command example
1. gremlin statement
2. Show task status
3. Set and show graph mode
4. Cleanup Graph
5. Backup Graph
6. Periodic Backup Graph
7. Recovery Graph
8. Graph Migration
7 - HugeGraph-Spark-Connector Quick Start
1 HugeGraph-Spark-Connector Overview
HugeGraph-Spark-Connector uses the Spark DataFrame API to write bulk data to HugeGraph. The current implementation provides vertex and edge writers.
Reading from HugeGraph is not implemented yet: the table only implements SupportsWrite, so spark.read.format(...) is not supported. The connector supports the CUSTOMIZE and PRIMARY_KEY vertex id strategies; the AUTOMATIC strategy is rejected.
2 Environment Requirements
- Java 8+
- Maven 3.6+
- Spark 3.2.x (the module is built against Spark 3.2.2 with
providedscope, so your Spark runtime must supply the Spark jars) - Scala 2.12 (built with Scala 2.12.11)
3 Building
3.1 Build without executing tests
3.2 Build with default tests
Both commands produce a fat jar at hugegraph-spark-connector/target/hugegraph-spark-connector-${revision}-jar-with-dependencies.jar (Spark itself is not bundled). Pass it to spark-submit --jars when you do not manage the dependency through Maven.
4 Usage
Add the dependency to pom.xml, replacing ${revision} with the release version you use:
The format string must be the full class name org.apache.hugegraph.spark.connector.DataSource; the connector does not register a short name with Spark’s DataSourceRegister service loader. When HugeGraphServer has authentication enabled, add .option("username", ...) and .option("token", ...) to the examples below.
4.1 Schema Definition Example
If we have a graph, the schema is defined as follows:
4.2 Vertex Sink (Scala)
4.3 Edge Sink (Scala)
4.4 Vertex Sink with PRIMARY_KEY id strategy (Scala)
For a vertex label that uses primaryKeys(...), do not set the id option: the id is spliced from the primary key columns. Columns that are not part of the schema can be dropped with ignored-fields.
4.5 Edge Sink with mixed id strategies (Scala)
source-name and target-name follow the id strategy of their own vertex label. Below, person uses a customized string id (one column) while software uses a primary key (its name column):
Note on save modes: SaveMode.Overwrite and SaveMode.Append both insert the rows. The overwrite path does not delete existing data from the graph first.
5 Configuration Parameters
Option keys are matched case-insensitively and trimmed. data-type and label are always required; source-name and target-name are required when data-type is edge; all other options have defaults.
5.1 Client Configs
Client Configs are used to configure hugegraph-client.
| Parameter | Default Value | Description |
|---|---|---|
host | localhost | Address of HugeGraphServer. A bare host name or IP, or a full http:// / https:// prefix |
port | 8080 | Port of HugeGraphServer |
graph | hugegraph | Graph name |
protocol | http | Protocol for sending requests to the server, optional http or https |
username | null | Username of the current graph when HugeGraphServer enables permission authentication. When unset, the graph name is used as the username |
token | null | Token of the current graph when HugeGraphServer has enabled authorization authentication |
timeout | 60 | Timeout (seconds) for inserting results to return |
max-conn | CPUS * 4 | The maximum number of HTTP connections between HugeClient and HugeGraphServer |
max-conn-per-route | CPUS * 2 | The maximum number of HTTP connections for each route between HugeClient and HugeGraphServer |
trust-store-file | null | The client’s certificate file path when the request protocol is https. When unset under https, the connector reads conf/hugegraph.truststore under the directory given by the JVM system property connector.home.path, which must then be set |
trust-store-token | null | The client’s certificate password when the request protocol is https. When unset under https, hugegraph is used |
5.2 Graph Data Configs
Graph Data Configs describe how DataFrame columns map to vertices or edges.
| Parameter | Default Value | Description |
|---|---|---|
data-type | Required. Graph data type, must be vertex or edge | |
label | Required. Label to which the vertex/edge data to be imported belongs | |
id | Specify a column as the id column of the vertex. When the vertex id policy is CUSTOMIZE, it is required; when the id policy is PRIMARY_KEY, it must be empty. The AUTOMATIC id policy is not supported | |
source-name | Required when data-type is edge. Select certain columns of the input source as the id column of source vertex. When the id policy of the source vertex is CUSTOMIZE, a certain column must be specified as the id column of the vertex; when the id policy of the source vertex is PRIMARY_KEY, one or more columns must be specified for splicing the id of the generated vertex, that is, no matter which id strategy is used, this item is required. Multiple columns are separated by , (the delimiter option does not apply here) | |
target-name | Required when data-type is edge. Specify certain columns as the id columns of target vertex, similar to source-name | |
selected-fields | Select some columns to insert, other unselected ones are not inserted, cannot exist at the same time as ignored-fields | |
ignored-fields | Ignore some columns so that they do not participate in insertion, cannot exist at the same time as selected-fields | |
batch-size | 500 | The number of data items in each batch when importing data. Applied per Spark task: each partition writer flushes its buffer to the server once it holds this many vertices/edges, and again at commit for the remainder |
5.3 Common Configs
Common Configs contains some common configurations.
| Parameter | Default Value | Description |
|---|---|---|
delimiter | , | Separator of selected-fields and ignored-fields. source-name and target-name are always split on , |
6 Notes and Limitations
- Each Spark write task opens its own HugeClient, switches the graph to
LOADINGmode before writing and sets it back toNONEat commit or abort. - Vertex ids are limited to 128 bytes (UTF-8). This applies to customized string ids and to ids spliced from primary keys.
- The
AUTOMATICvertex id strategy is not supported; the write fails with anIllegalArgumentExceptionwhen the writer is created. - Properties with
SETorLISTcardinality are not supported yet; onlySINGLEcardinality values are converted. - Date properties: string values must use the format
yyyy-MM-dd HH:mm:ssand are parsed in theGMT+8time zone; numeric values are treated as epoch milliseconds. - Boolean properties given as strings accept
true,1,yes,yandfalse,0,no,n(case-insensitive). - Rows whose customized string id, or any primary key value, is an empty string are skipped. A null id or primary key value raises an error instead.
7 License
The same as HugeGraph, hugegraph-spark-connector is also licensed under Apache 2.0 License.