这是本节的多页打印视图。 .
Documentation
- 1: Apache HugeGraph 介绍
- 2: 下载 Apache HugeGraph
- 3: 快速上手
- 3.1: HugeGraph (OLTP)
- 3.1.1: HugeGraph Server 快速上手
- 3.1.2: HugeGraph-PD 快速上手
- 3.1.3: HugeGraph-Store 快速上手
- 3.2: HugeGraph ToolChain
- 3.2.1: 使用 Hubble 实现图可视化:单机快速上手
- 3.2.2: 图可视化
- 3.2.2.1: 使用 Hubble 管理 HStore 分布式集群
- 3.2.3: HugeGraph-Loader 快速上手
- 3.2.4: 图导入
- 3.2.4.1: 使用 SeaTunnel Sink 导入图数据
- 3.2.5: Tools 快速上手
- 3.2.6: 图导出/迁移
- 3.2.6.1: 使用 SeaTunnel Source 导出与迁移图数据
- 3.2.7: HugeGraph-Spark-Connector 快速上手
- 3.3: HugeGraph-AI
- 3.3.1: HugeGraph-LLM
- 3.3.2: HugeGraph-ML
- 3.3.3: HugeGraph-LLM 使用流程
- 3.3.4: 配置参考
- 3.3.5: HugeGraph-LLM REST API
- 3.3.6: Vermeer Python 客户端
- 3.4: HugeGraph 图计算(OLAP)
- 3.4.1: HugeGraph-Vermeer 快速上手
- 3.4.2: HugeGraph-Computer 快速上手
- 3.4.3: HugeGraph-Computer 配置参考
- 3.5: HugeGraph Client
- 3.5.1: HugeGraph-Java-Client
- 3.5.2: HugeGraph Python 客户端快速上手
- 3.5.3: HugeGraph Go 客户端快速入门
- 3.1: HugeGraph (OLTP)
- 4: HugeGraph-Server 配置
- 4.1: Server 启动指南
- 4.2: Server 完整配置手册
- 4.3: HugeGraph 内置用户权限与扩展权限配置及使用
- 4.4: 配置 HugeGraphServer 使用 https 协议
- 4.5: 配置 RocksDB 后端
- 4.6: 配置 HStore 分布式后端
- 4.7: 配置 HBase 后端
- 5: 客户端与 API
- 5.1: HugeGraph RESTful API
- 5.1.1: Graphspace API
- 5.1.2: Schema API
- 5.1.3: PropertyKey API
- 5.1.4: VertexLabel API
- 5.1.5: EdgeLabel API
- 5.1.6: IndexLabel API
- 5.1.7: Rebuild API
- 5.1.8: Vertex API
- 5.1.9: Edge API
- 5.1.10: Traverser API
- 5.1.11: Rank API
- 5.1.12: Variable API
- 5.1.13: Graphs API
- 5.1.14: Task API
- 5.1.15: Gremlin API
- 5.1.16: Cypher API
- 5.1.17: Authentication API
- 5.1.18: Metrics API
- 5.1.19: Other API
- 5.2: HugeGraph Java Client
- 5.3: Gremlin-Console
- 5.1: HugeGraph RESTful API
- 6: 使用指南
- 6.1: HugeGraph 架构概览
- 6.2: HugeGraph 设计理念
- 6.3: HugeGraph Plugin 机制及插件扩展流程
- 6.4: HugeGraph工具链本地测试指南
- 6.5: Backup Restore
- 6.6: HugeGraph Docker 集群部署指南
- 6.7: FAQ
- 6.8: 报告安全问题
- 7: 查询语言
- 7.1: HugeGraph Gremlin
- 7.2: HugeGraph Examples
- 8: PERFORMANCE
- 9: 贡献指南
- 9.1: 参与 HugeGraph 社区
- 9.2: 订阅社区邮件列表
- 9.3: 验证 Apache 发版
- 9.4: 在 IDEA 中配置 Server 开发环境
- 9.5: Apache HugeGraph Committer 指南
- 10: CHANGELOGS
- 11: Apache 贡献者协议
Apache HugeGraph 文档
Apache HugeGraph 包含图数据库、图计算和图 AI 组件。HugeGraph 核心引擎负责属性图管理、事务处理与实时查询,Computer 和 Vermeer 运行图算法,HugeGraph-AI 提供 GraphRAG、图机器学习和 Python 客户端。
按场景快速导航
| 我想要… | 从这里开始 |
|---|---|
| 运行图查询 (OLTP) | HugeGraph Server 快速上手 |
| 运行图算法 (OLAP) | HugeGraph Computing |
| 构建 Graph + AI 应用 | HugeGraph-AI |
| 批量导入数据 | HugeGraph Loader、SeaTunnel |
| 可视化管理图 | Hubble Web UI |
生态系统一览
- Vermeer 为默认图计算入口;Computer 用于 Java BSP 作业。
核心组件
- HugeGraph 核心引擎(OLTP):通过 HugeGraph Server 提供 REST API,并支持 Gremlin 和 Cypher 查询
- HugeGraph Toolchain:包含 Java/Go Client、Loader、Hubble、Spark Connector 和 Tools;Python Client 位于 HugeGraph-AI,Rust Client 正在开发中
- HugeGraph Computer:仓库内包含分布式 Computer 引擎和内存计算引擎 Vermeer
- HugeGraph-AI:包含 GraphRAG、图机器学习、Python Client 和 Vermeer Python Client
部署模式
| 模式 | 核心组件 | 适用场景 | 数据规模 |
|---|---|---|---|
| 单机模式 | Server + RocksDB | 开发、测试、Graph AI 和中小规模生产环境 | ≤ 2 TB |
| 分布式模式 | Server + PD + Store(HStore) | 生产环境、水平扩展和多副本部署 | ≤ 1 PB |
各组件的适用范围和启动方式见系统介绍及对应快速上手文档。
1 - Apache HugeGraph 介绍
什么是 Apache HugeGraph?
Apache HugeGraph 是一套易用、高效、通用的开源全栈图系统(GitHub),覆盖图数据库(OLTP 实时查询)、图计算(OLAP 大规模分析)与图 AI(GraphRAG / 图机器学习)三大领域。
HugeGraph 支持百亿以上的顶点和边的快速存储与查询,具备出色的 OLTP 性能。其图引擎兼容 Apache TinkerPop 3 框架,同时支持 Gremlin 和 Cypher(OpenCypher 标准)查询语言。
典型应用场景: 深度关系探索、关联分析、路径搜索、特征抽取、社区检测、知识图谱等。
适用领域: 网络安全、电信反欺诈、金融风控、广告推荐、社交网络、智能问答等。
生态系统全景
HugeGraph Server(OLTP 图引擎)
HugeGraph Server 是图数据库的 OLTP 引擎和服务入口,负责属性图建模、事务处理、查询执行和 API 接入。图数据实际保存在配置的 RocksDB、HStore 或 HBase 后端中。
- 属性图与 Schema:支持 VertexLabel、EdgeLabel、PropertyKey 和 IndexLabel 管理
- 查询语言:支持 Gremlin(TinkerPop 3)和 Cypher(OpenCypher)
- REST API:提供 Schema、图数据、查询、任务和运维接口
- 索引与查询:支持精确查询、范围查询和复合条件查询
- 存储后端:1.7.0 至
master主要支持 RocksDB(单机)、HStore(分布式)和 HBase
主要模块包括 hugegraph-core、存储后端模块和 hugegraph-api。Core 实现图模型、事务和查询逻辑,后端模块负责连接具体存储系统,API 模块负责 HTTP 接入。当前 REST 资源路径包含图空间与图名称,例如:
单机部署通常使用 RocksDB。分布式部署使用 HStore,由 PD 管理集群元数据和分区调度,Store 保存图数据及其副本。HBase 可作为独立的后端存储。
HugeGraph Toolchain
HugeGraph Toolchain 提供客户端、数据导入、可视化管理、Spark 集成和命令行运维工具,覆盖图应用从接入数据到日常管理的主要环节。
| 模块 | 用途 |
|---|---|
| Client | 封装 Schema 管理、图数据读写、Gremlin 和 Traverser API;支持 Java、Python 和 Go,Rust 客户端正在开发中 |
| Loader | 从本地文件、HDFS、JDBC、Kafka 或其他图读取数据,转换为顶点和边后批量导入 HugeGraph |
| Hubble | 提供图连接、Schema、数据导入、Gremlin 查询和图形化结果展示的 Web 管理界面 |
| Spark Connector | 在 Spark 作业中批量读写 HugeGraph,适合大数据离线处理 |
| SeaTunnel Sink | 通过 SeaTunnel 3.0+ 将数据导入 HugeGraph;导出与迁移请查看 Source 文档 |
| Tools | 提供部署、图管理、备份恢复和 Gremlin 执行等命令行能力 |
图计算引擎(OLAP)
HugeGraph-Computer 仓库提供两种互补的 OLAP 图计算引擎。通用图算法任务默认建议从 Vermeer 开始;需要 Java BSP/Pregel 计算模型时,可使用 Computer:
- Vermeer(默认入口):使用 Go 编写,采用 master-worker 架构,以内存计算为主,提供 REST API、gRPC 和 Web UI,适合快速执行中小规模图分析任务。
- Computer:使用 Java 编写,实现 BSP/Pregel 分布式计算模型,可运行在 Kubernetes、YARN 或本地进程中。数据超过内存阈值时可以落盘,适合更大规模的图计算任务。
两者都可以读取 HugeGraph 数据,但运行架构、资源需求、配置和算法接口不同。
HugeGraph-AI(Graph + AI)
HugeGraph-AI 连接图技术与大语言模型、图机器学习框架。仓库使用 Python 3.10 或更高版本,并通过 uv 管理工作区,主要包含以下模块:
- hugegraph-llm:提供 GraphRAG、知识图谱构建、自然语言查询和 Text2Gremlin
- hugegraph-ml:提供节点分类、图分类、图嵌入、链接预测和欺诈检测等模型
- hugegraph-python-client:通过 Python 管理 Schema、图数据和 Gremlin 查询
- vermeer-python-client:通过 Python 调用 Vermeer 图计算服务
部署模式
| 模式 | 核心组件 | 适用场景 | 数据规模 |
|---|---|---|---|
| 单机模式(OLTP) | Server + RocksDB | 开发、测试、Graph AI 和中小规模生产环境 | ≤ 2 TB |
| 分布式模式(OLTP) | Server + PD + Store(HStore) | 生产环境、水平扩展和多副本部署 | ≤ 1 PB |
图计算属于 OLAP 任务,容量和资源需求取决于所选引擎、图结构与算法,不沿用上表的 OLTP 存储容量口径。
选择入口
| 需求 | 文档 |
|---|---|
| 启动图数据库并执行查询 | Server 快速上手 |
| 批量导入数据 | Loader、SeaTunnel |
| 使用 Web 界面管理图 | Hubble |
| 运行图算法 | HugeGraph Computing |
| 构建 GraphRAG 或图机器学习应用 | HugeGraph-AI |
社区
- GitHub Issues
- 开发者邮件列表:dev@hugegraph.apache.org
- 邮件列表订阅方法
- 安全问题:security@hugegraph.apache.org
- 微信公众号:Apache HugeGraph

2 - 下载 Apache HugeGraph
指南:
- 推荐使用已发布的软件包。Server 1.7.0 建议使用 Java 11,其他 JDK 的支持范围见 Server 启动指南;Toolchain、AI、Vermeer 等组件的运行环境请按各自版本的快速入门核对。
- 验证下载版本, 请使用相应的哈希 (SHA512)、签名和 项目签名验证 KEYS
- 检查哈希 (SHA512)、签名的说明在 版本验证 页面, 也可参考 ASF 验证说明
- 注: HugeGraph 所有组件版本号已保持一致,
client/loader/hubble/common等 maven 仓库版本号同理, 依赖引用可参考 maven 示例- 兼容说明: HugeGraph 于 2026 年 1 月毕业后,下载路径已从
/incubator/hugegraph迁移到/hugegraph。历史版本的发布文件名可能仍包含-incubating-。- 从源码构建请参考 编译构建说明
文件名中的 src 表示源码包,需要按对应组件的指南编译,不能直接按二进制包的目录执行启动脚本。源码主线可能包含尚未发布的配置和接口;使用下表中的发布包或指定版本的容器镜像时,应核对文档里的适用版本说明。
最新版本
| 组件 | 类型 | 下载 (ASF 镜像) | ASC | SHA512 |
|---|---|---|---|---|
| Server | 二进制 | apache-hugegraph-incubating-1.7.0.tar.gz | ASC | SHA512 |
| Toolchain | 二进制 | apache-hugegraph-toolchain-incubating-1.7.0.tar.gz | ASC | SHA512 |
| Server | 源码 | apache-hugegraph-incubating-1.7.0-src.tar.gz | ASC | SHA512 |
| Toolchain | 源码 | apache-hugegraph-toolchain-incubating-1.7.0-src.tar.gz | ASC | SHA512 |
| AI | 源码 | apache-hugegraph-ai-incubating-1.7.0-src.tar.gz | ASC | SHA512 |
| Computer | 源码 | apache-hugegraph-computer-incubating-1.7.0-src.tar.gz | ASC | SHA512 |
源码归档是 Apache 软件基金会的正式发布物;二进制软件包是基于源码构建的便利用品。所有文件均通过 ASF 镜像分发,签名与校验和托管在 downloads.apache.org。GitHub 自动生成的源码归档不是 ASF 正式发布版本。
归档版本
注:
- 请大家尽早迁移到最新 Release 版本上, 社区将不再维护
1.0.0前的旧版本 (非 ASF 版本)1.3.0是最后一个兼容 Java8 的主版本, 请尽早使用/迁移运行时为 Java11 (低版本 Java 有潜在更多的 SEC 风险和性能影响)- 从版本
1.5.0开始,需要 Java11 运行时环境
1.5.0
| 组件 | 类型 | 下载 (ASF 镜像) | ASC | SHA512 |
|---|---|---|---|---|
| Server | 二进制 | apache-hugegraph-incubating-1.5.0.tar.gz | ASC | SHA512 |
| Toolchain | 二进制 | apache-hugegraph-toolchain-incubating-1.5.0.tar.gz | ASC | SHA512 |
| Server | 源码 | apache-hugegraph-incubating-1.5.0-src.tar.gz | ASC | SHA512 |
| Toolchain | 源码 | apache-hugegraph-toolchain-incubating-1.5.0-src.tar.gz | ASC | SHA512 |
| AI | 源码 | apache-hugegraph-ai-incubating-1.5.0-src.tar.gz | ASC | SHA512 |
| Computer | 源码 | apache-hugegraph-computer-incubating-1.5.0-src.tar.gz | ASC | SHA512 |
1.3.0
| 组件 | 类型 | 下载 (ASF 镜像) | ASC | SHA512 |
|---|---|---|---|---|
| Server | 二进制 | apache-hugegraph-incubating-1.3.0.tar.gz | ASC | SHA512 |
| Toolchain | 二进制 | apache-hugegraph-toolchain-incubating-1.3.0.tar.gz | ASC | SHA512 |
| Server | 源码 | apache-hugegraph-incubating-1.3.0-src.tar.gz | ASC | SHA512 |
| Toolchain | 源码 | apache-hugegraph-toolchain-incubating-1.3.0-src.tar.gz | ASC | SHA512 |
| AI | 源码 | apache-hugegraph-ai-incubating-1.3.0-src.tar.gz | ASC | SHA512 |
| Common | 源码 | apache-hugegraph-commons-incubating-1.3.0-src.tar.gz | ASC | SHA512 |
1.2.0
| 组件 | 类型 | 下载 (ASF 镜像) | ASC | SHA512 |
|---|---|---|---|---|
| Server | 二进制 | apache-hugegraph-incubating-1.2.0.tar.gz | ASC | SHA512 |
| Toolchain | 二进制 | apache-hugegraph-toolchain-incubating-1.2.0.tar.gz | ASC | SHA512 |
| Server | 源码 | apache-hugegraph-incubating-1.2.0-src.tar.gz | ASC | SHA512 |
| Toolchain | 源码 | apache-hugegraph-toolchain-incubating-1.2.0-src.tar.gz | ASC | SHA512 |
| Computer | 源码 | apache-hugegraph-computer-incubating-1.2.0-src.tar.gz | ASC | SHA512 |
| Common | 源码 | apache-hugegraph-commons-incubating-1.2.0-src.tar.gz | ASC | SHA512 |
1.0.0
| 组件 | 类型 | 下载 (ASF 镜像) | ASC | SHA512 |
|---|---|---|---|---|
| Server | 二进制 | apache-hugegraph-incubating-1.0.0.tar.gz | ASC | SHA512 |
| Toolchain | 二进制 | apache-hugegraph-toolchain-incubating-1.0.0.tar.gz | ASC | SHA512 |
| Computer | 二进制 | apache-hugegraph-computer-incubating-1.0.0.tar.gz | ASC | SHA512 |
| Server | 源码 | apache-hugegraph-incubating-1.0.0-src.tar.gz | ASC | SHA512 |
| Toolchain | 源码 | apache-hugegraph-toolchain-incubating-1.0.0-src.tar.gz | ASC | SHA512 |
| Computer | 源码 | apache-hugegraph-computer-incubating-1.0.0-src.tar.gz | ASC | SHA512 |
| Common | 源码 | apache-hugegraph-commons-incubating-1.0.0-src.tar.gz | ASC | SHA512 |
3 - 快速上手
根据需要选择 Server、Toolchain、图计算或 HugeGraph-AI 的快速上手文档。各组件独立发布,安装前请核对对应仓库的运行环境和版本。
3.1 - HugeGraph (OLTP)
本目录包含 HugeGraph Server 单机快速上手,以及分布式部署所需的 PD 和 Store 入门文档。
DeepWiki 项目概览;涉及安装、配置和运行行为时,请以对应版本的 HugeGraph 文档及代码为准。
首次使用可从 Server 单机快速上手 开始。该页将 ASF 已发布的 1.7.0 下载包与 master 源码构建分开说明。若使用 HStore 分布式存储,还需配置 PD 和 Store。
GitHub 访问: https://github.com/apache/hugegraph
3.1.1 - HugeGraph Server 快速上手
1 HugeGraph Server 概述
apache/hugegraph 是 HugeGraph 图数据库的主仓库,包含 hugegraph-server、hugegraph-pd、hugegraph-store 等一级模块。本页介绍其中的 hugegraph-server 模块及其运行服务。
hugegraph-server 模块包含 hugegraph-core、hugegraph-api、hugegraph-dist 和存储适配等子模块。Core 实现属性图模型、事务与 TinkerPop 接口,API 提供 HTTP 服务并将客户端请求交给 Core 处理。图数据由 RocksDB(单机默认)、HStore(分布式)或 HBase 后端保存。
版本说明:本文区分已发布版本与开发主线。下载示例使用 ASF 发布的 HugeGraph 1.7.0 安装包;源码构建、配置默认值和启动行为以 apache/hugegraph 的 master 分支为准。主线源码构建出的包不是 ASF 发布包,即使包内版本号相同也不代表与 1.7.0 发布包相同。本文介绍 RocksDB、HStore 和 HBase;其他旧后端请参考 HugeGraph 1.5.x 文档。
名称说明:
HugeGraph表示整个项目或主仓库,hugegraph-server表示仓库中的 Server 模块,HugeGraphServer是服务进程的 Java 类名。下文的 Server 服务指运行中的图数据库服务。
flowchart TD
    A{选择安装来源}
    A -->|已发布版本| R["HugeGraph 1.7.0 tar 包"]
    R --> V[SHA-512 校验]
    V --> X[解压并使用随包配置]
    A -->|开发主线| M["master 源码"]
    M --> B["mvn package -DskipTests"]
    B --> C[确认 conf/graphs 中的 RocksDB 配置]
    C --> I[bin/init-store.sh]
    I --> S["bin/start-hugegraph.sh -p true"]
S --> Q["请求 /versions 和图顶点接口"]主仓库模块概览使用短名称;server、core、api、dist、pd 和 store 对应带 hugegraph- 前缀的模块。上方保留功能说明,dist 负责发行打包。
---
markmap:
  spacingHorizontal: 40
---
# HugeGraph
## server
- core
- api
- dist
## pd
## store
2 依赖
2.1 安装 Java 11 (JDK 11)
HugeGraph 1.7.0 中的 hugegraph-server 模块使用 Java 11 编译,运行和源码构建均需使用 Java 11 或更高版本。
在继续阅读前,请先执行 java -version 命令确认 JDK 版本。
1.7.0 起不再支持 Java 8。
bin/hugegraph-server.sh在低于 Java 11 的环境下会直接拒绝启动。
安全检查默认开启,会安装
HugeSecurityManager,它要求 Java 11 到 23。JDK 24 移除了 Security Manager(JEP 486),因此在 Java 24 及更高版本上必须关闭该检查后再启动服务:bin/start-hugegraph.sh -s false。
源码构建还需要 Maven 3.5.0 或更高版本。
3 部署
有四种方式可以部署 Server 服务:
- Docker 容器 用于测试或开发,快速启动 Server 服务。
- ASF 发布包 下载已发布的 tar 包,校验后安装。
- master 源码 构建开发主线,产物不等同于 ASF 发布包。
- 旧版一键部署工具(已过时) 仅供了解旧版部署方式。
3.1 使用 Docker 容器 (便于测试)
可参考 Docker 部署方式。
可以使用 docker run -itd --name=server -p 8080:8080 -e PASSWORD=xxx hugegraph/hugegraph:1.7.0 快速启动一个使用 RocksDB 后端的 Server 实例。
可选项:
- 可以使用
docker exec -it server bash进入容器执行运维或调试操作。 - 可以使用
docker run -itd --name=server -p 8080:8080 -e PRELOAD="true" hugegraph/hugegraph:1.7.0在启动时预加载一个内置样例图。可通过RESTful API进行验证,具体步骤可参考 5.1.4。 - 可以使用
-e PASSWORD=xxx开启鉴权模式并设置 admin 密码,具体步骤可参考 Config Authentication。
如果使用 Docker Desktop,则可以按如下方式设置相关选项:
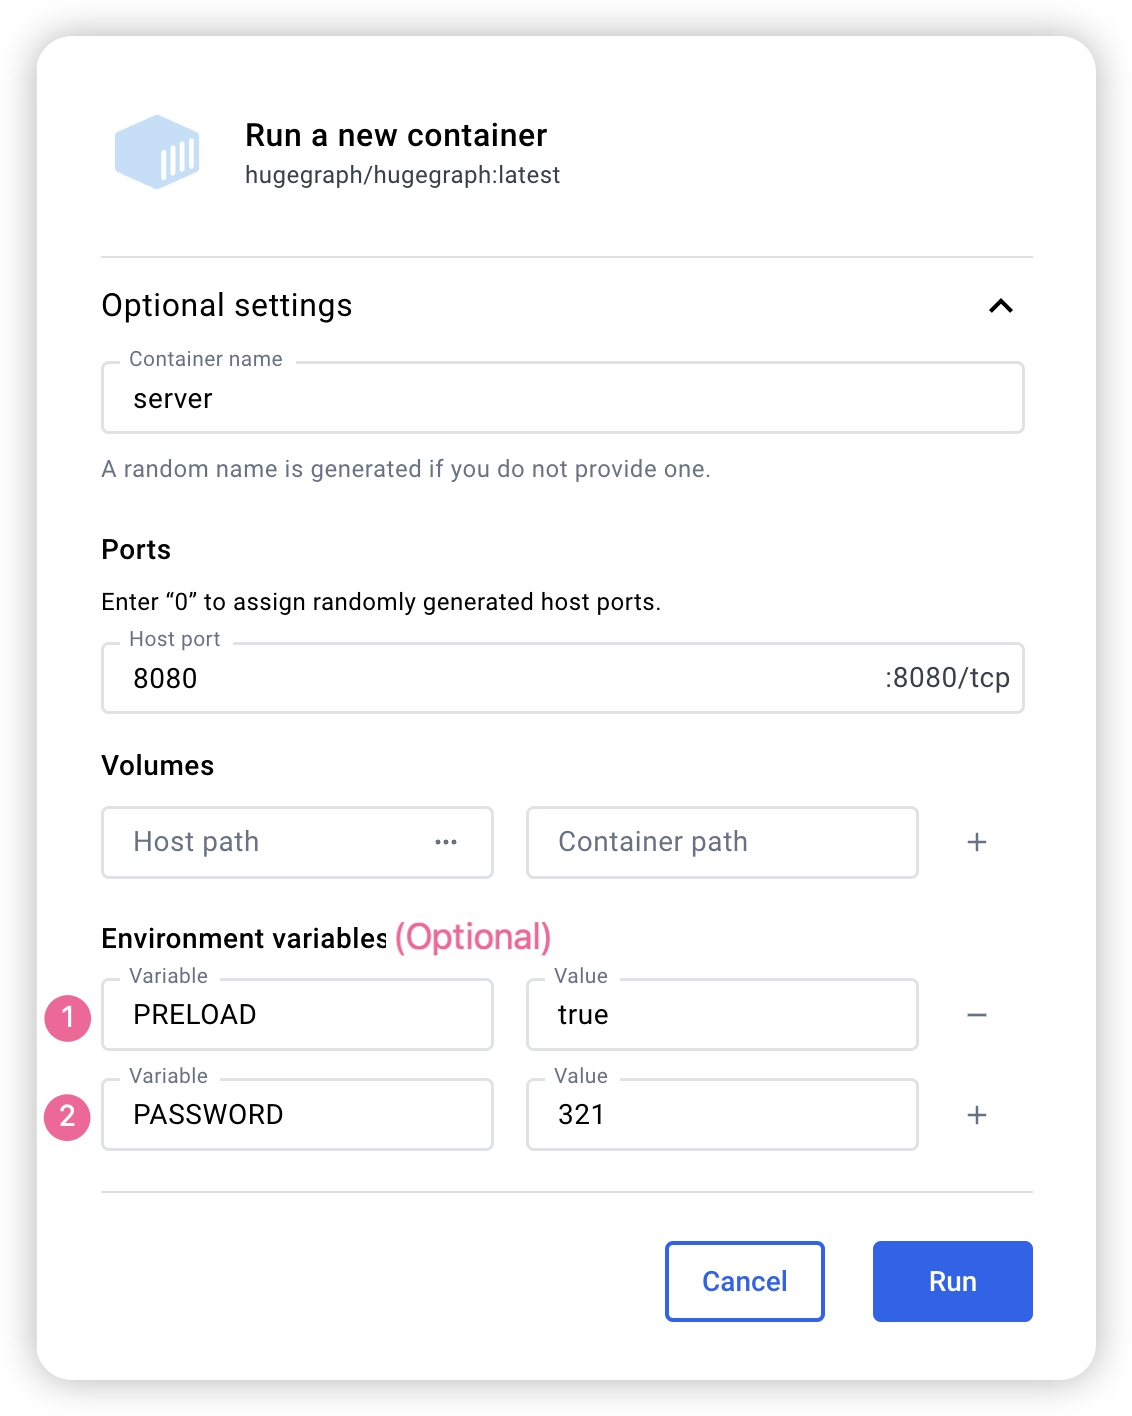
Docker Compose 文件使用桥接网络(hg-net),适用于 Linux 和 Mac(Docker Desktop)。如需运行 3 节点分布式集群,请为 Docker Desktop 分配至少 12 GB 内存(设置 → 资源 → 内存)。Linux 上 Docker 直接使用宿主机内存。
如果希望通过一个配置文件统一管理 HugeGraph 的多个服务实例,则可以使用 docker compose。 docker/ 目录下提供了四个 compose 文件:
| 拓扑 | compose 文件 | 服务 |
|---|---|---|
| 单机(推荐从这里开始) | docker-compose.yml | 1 个 RocksDB Server + 1 个 Hubble |
| 最小 HStore(当前主线) | docker-compose-hstore.yml | 1 PD + 1 Store + 1 Server + 1 Hubble;需使用主线构建的本地镜像 |
| HA 参考(当前主线) | docker-compose-3pd-3store-3server.yml | 3 PD + 3 Store + 3 Server + 1 Hubble;需使用主线构建的本地镜像 |
| 最小 HStore 拓扑的源码构建覆盖文件 | docker-compose.dev.yml | (需与 docker-compose-hstore.yml 一起使用) |
单机拓扑将 Server 暴露在 8080 端口,Hubble 暴露在 127.0.0.1:8088。HUGEGRAPH_VERSION 决定 Server、PD 和 Store 的镜像 tag,Hubble 由 HUBBLE_IMAGE 单独选择。
单机 docker-compose.yml 示例使用 HugeGraph 1.7.0 版本镜像 hugegraph/hugegraph:1.7.0;该文件引用的 docker/conf/hubble/standalone.properties 已随源码提供。Compose 文件从 HUGEGRAPH_ADMIN_PASSWORD 读取管理员密码,从 HUGEGRAPH_AUTH_TOKEN_SECRET 读取 JWT 密钥,通常放在 docker/.env 文件中。HUGEGRAPH_ADMIN_PASSWORD 非空即开启鉴权,Hubble 会自动识别该模式。若直接使用 docker run,则改为传入 -e PASSWORD=xxx。HStore Compose 文件属于当前主线,不能与 1.7.0 的 PD/Store/Server 发布镜像混用,见下文。
JWT 密钥的版本差异:当前主线构建的 Server 镜像会把 HUGEGRAPH_AUTH_TOKEN_SECRET 映射到 HG_SERVER_AUTH_TOKEN_SECRET,并写入 Server 启动配置;跨重建时应在 .env 中保留同一密钥。1.7.0 镜像的 Docker 入口脚本只处理 PASSWORD 等旧变量,不会读取 HG_SERVER_AUTH_TOKEN_SECRET。如需在 1.7.0 中固定 JWT 密钥,须将 auth.token_secret 持久写入该版本的 conf/graphs/hugegraph.properties;若保留默认随机密钥,不应假定已有 JWT 在 Server 重启后仍有效。
完整的部署指南请参阅 docker/README.md。
HugeGraph 的 Docker 镜像主要用于便捷地快速启动 HugeGraph,并不是 ASF 官方发布物料包。你可以从 ASF Release Distribution Policy 中了解更多细节。
推荐使用
release tag(如1.7.0/1.x.0) 以获取稳定版。使用latesttag 可以使用开发中的最新功能。
3.2 下载已发布的 tar 包
以下示例针对 HugeGraph 1.7.0。使用其他版本时,请先在 ASF 下载目录 确认该版本及对应文件名;不要把 master 源码构建包当作已发布的二进制包。
SHA-512 校验通过后再解压。也可按 Apache 发布流程验证 PGP 签名:
只应信任通过 Apache 项目渠道核实的发布者密钥;签名验证可与 SHA-512 校验一起使用。
3.3 从 master 源码构建
下面的命令构建的是开发主线,不是 1.7.0 发布包。
源码编译前请确保本机有安装 wget/curl 命令
下载 HugeGraph 源代码
编译打包生成 tar 包
构建成功时日志中会出现:
执行成功后,根目录 target/ 下会生成主线聚合包(当前仓库版本属性为 1.7.0):
该文件名中的版本号来自源码的 revision 属性;它不会把主线构建变成 ASF 发布物料。构建过程还会在仓库根目录生成 apache-hugegraph-1.7.0/ 聚合目录,其中的 Server 子目录名由 Server 模块的 final.name 决定,例如当前为 apache-hugegraph-server-1.7.0。若只保留了 tar 包,则先执行 tar zxf target/apache-hugegraph-1.7.0.tar.gz 再进入该目录。
默认构建会打包 rocksdb、hbase 和 hstore 三个后端模块,并把它们记录在 hugegraph-dist jar 内的 backend.properties 资源的 backends 配置项中。若只需要包含 RocksDB 的精简发布包,可加上 -Drocksdb-only:
3.4 使用 tools 工具部署 (Outdated)
已过时 仅指此一键部署入口。
HugeGraph-Tools 提供一键部署命令,可以下载、解压、配置并启动 Server 服务和 HugeGraph-Hubble。HugeGraph-Toolchain 发布包中已包含这些工具。
注:
${version}为版本号,最新版本号可参考 Download 页面,或直接从 Download 页面点击链接下载
HugeGraph-Tools 的总入口脚本是 bin/hugegraph,用户可以使用 help 子命令查看其用法,这里只介绍一键部署的命令。
{hugegraph-version} 表示要部署的 Server 服务及 HugeGraphStudio 版本,可在 conf/version-mapping.yaml 中查看版本信息。{install-path} 指定安装目录,{download-path-prefix} 可选,用于指定 tar 包下载地址。例如部署 0.6 版本时,可以执行 bin/hugegraph deploy -v 0.6 -p services。
4 配置
Server 的 tar 包随包提供 conf/rest-server.properties、conf/gremlin-server.yaml 和 conf/graphs/hugegraph.properties;源码构建包从 hugegraph-server/hugegraph-dist/src/assembly/static/conf/ 装配这些文件。解压后在 Server 安装目录内编辑配置,无需另行生成。发行包版本之间可能有默认值差异,下面涉及的默认值和启动行为按 master 主线说明。
单机 RocksDB 快速上手只需确认 conf/graphs/hugegraph.properties 使用 backend=rocksdb、serializer=binary。正常 Server 初始化会扫描 conf/graphs/ 并加载本地图配置,无需额外设置 graph.load_from_local_config=true。该选项默认值为 false,控制构造阶段的提前加载和 reload() 时是否重新扫描本地配置。
5 启动
5.1 使用启动脚本启动
启动流程分为首次启动和非首次启动两种情况。首次启动前需要先初始化后端数据库,然后再启动服务。
如果服务曾被手动停止,或因其他原因需要再次启动,由于后端数据库已持久化存在,通常可以直接启动服务。
HugeGraphServer 启动时会连接后端存储并检查其版本信息。如果后端尚未初始化,或者已初始化但版本不匹配(例如存在旧版本数据),HugeGraphServer 会启动失败并给出错误信息。
如果需要外部访问 HugeGraphServer,请修改 rest-server.properties 的 restserver.url 配置项(默认为 http://127.0.0.1:8080),修改成机器名或 IP 地址。
由于各种后端所需的配置(hugegraph.properties)及启动步骤略有不同,下面逐一对各后端的配置及启动做介绍。
生产环境启动 Server 前必须完成鉴权配置
按照 Server 鉴权配置 启用认证与授权并设置非默认强管理员密码;同时启用 IP 白名单,为业务用户配置最小权限。
5.1.1 分布式存储 (HStore)
要使用分布式存储引擎,需要先部署 HugeGraph-PD 和 HugeGraph-Store,详见 HugeGraph-PD 快速入门 和 HugeGraph-Store 快速入门。
umask 077 保护新建的 .env,但 set-hubble-pd-password.sh 会将生成的 .local.properties 权限设为 0644,本机其他用户也能读取其中的 PD 密钥。下面示例仅适用于本机用户均可信的环境;共享主机必须先按 Hubble 运行用户设置文件属主与读取权限,确保 Hubble 可读且其他非授权用户不可读。不提交文件不能替代文件权限保护。
分布式存储是 HugeGraph 1.5.0 之后推出的新特性,它基于 HugeGraph-PD 和 HugeGraph-Store 组件实现了分布式的数据存储和计算。
确保 PD 和 Store 服务均已启动后
- 修改 Server 服务的
hugegraph.properties配置:
发布包中自带该后端的模板文件 conf/graphs/hstore.properties.template,可将其复制覆盖 conf/graphs/hugegraph.properties 后修改 pd.peers。
此例的 rest-server.properties 使用 cluster=hg,图配置使用 pd.cluster=hg,与下方主线 Compose 拓扑选用同一集群名。它们位于不同配置文件,分别供 Server 进程和图配置使用;按部署实际选择集群名,不要把两个键当成同一个配置项。类似地,两个文件中的 pd.peers 也属于各自的配置范围;本例都填写同一组 PD RPC 地址。
任务调度器由后端决定,无需配置 task.scheduler_type:hstore 使用分布式调度器,其余后端使用本地调度器。为兼容旧配置,该键仍可存在,但会被忽略并打印一条警告日志。
- 修改 Server 服务的
rest-server.properties配置:
以下地址示例适用于在同一台主机运行多个 Server 进程;127.0.0.1 仅用于本机场景。跨主机部署时,将 restserver.url、gremlinserver.url、pd.peers、Gremlin host 和 rpc.server_host 替换为各节点可路由的 IP 或 DNS;rpc.server_host 公布的地址和端口必须能被其他节点互达。
如果配置多个 Server 节点,需要为每个节点修改 rest-server.properties 配置文件,例如:
节点 1(主节点):
节点 2(工作节点):
同时,还需要修改每个节点的 gremlin-server.yaml 中的端口配置:
节点 1:
节点 2:
启动 Server:
使用分布式存储引擎的启动顺序为:
- 启动 HugeGraph-PD
- 启动 HugeGraph-Store
- 启动 Server 服务
HStore 的元数据和存储由 PD、Store 管理,init-store 会跳过该后端。开启鉴权时,执行 init-store 仍会创建内置的 admin 账号。如果该账号已由存储侧持有,可在 rest-server.properties 中设置 init_store.enabled=false 以整体跳过这一步,Docker 的 HStore 拓扑即采用这种方式。
验证服务是否正常启动:
停止服务的顺序应该与启动顺序相反:
- 停止 Server 服务
- 停止 HugeGraph-Store
- 停止 HugeGraph-PD
Docker HStore 高可用集群(当前主线)
docker-compose-3pd-3store-3server.yml 使用当前主线的 HG_PD_*、HG_STORE_* 和 HG_SERVER_* 环境变量;1.7.0 发布镜像不支持这套配置。先从同一份主线源码构建 PD、Store 和 Server 镜像,并使用相同的本地 local 标签:
先在 docker/ 目录创建认证环境并生成 HStore Hubble 配置。用自己设置的管理员密码替换示例文本;因 .env 使用单引号包裹,密码不能含单引号或换行。脚本生成 JWT 与 PD 随机密钥,并将 PD 密钥写入两个 HStore Compose 会挂载的未跟踪 .local.properties 文件:
然后在 docker/ 目录启动 HA 拓扑。HUGEGRAPH_VERSION=local 令 PD、Store 和 Server 使用刚构建的本地镜像;该 Compose 文件的 pull_policy: missing 会优先使用已存在的本地标签。Hubble 仍由 HUBBLE_IMAGE 独立选择:
HG_PD_AUTH_SECRET_KEY 应只为新数据目录生成一次;重启或复用已有数据目录时,继续使用原值。不要提交 .env 或生成的 conf/hubble/*.local.properties。服务通过 hg-net 桥接网络上的容器主机名通信。Server 拓扑要求共享 JWT 密钥;不要只设置管理员密码而遗漏 HUGEGRAPH_AUTH_TOKEN_SECRET。完整的环境变量说明见 Docker 集群指南 和仓库 docker/README.md。
验证集群:
当前主线的 PD /v1/stores REST 接口需要 HTTP Basic 认证;此处用生成后已加载的 HG_PD_AUTH_SECRET_KEY 作为 hg 用户密码。
运行时日志可通过 docker logs <container-name>(如 docker logs hg-pd0)直接查看,无需进入容器。
完整的环境变量参考、端口表和故障排查指南请参阅 docker/README.md。
5.1.2 RocksDB / ToplingDB
从 master 构建的单机最小流程如下。此例启用内置样例数据,以便后续请求能验证图数据读写路径。
- 检查 Java 环境,确认满足主线构建要求。
- 构建 master 源码;下方命令使用该构建包中的 Server 子目录。
- 确认 RocksDB 配置,再进入构建产物中的 Server 子目录。
- 初始化存储,然后启动服务并加载样例图,命令见下方。
- 请求
/versions和样例图顶点接口,检查实际返回内容。
RocksDB 是一个嵌入式的数据库,不需要手动安装部署,要求 GCC 版本 >= 4.3.0(GLIBCXX_3.4.10),如不满足,需要提前升级 GCC
主线包内的 conf/graphs/hugegraph.properties 默认已设置 backend=rocksdb 和 serializer=binary。使用默认数据目录时无需修改;若改过后端或数据路径,先确认配置,再初始化存储。
初始化数据库(首次启动,或在 conf/graphs/ 下添加了新图配置后):
启动 Server 并加载内置样例图:
启动脚本会按 rest-server.properties 中的 restserver.url 轮询 /graphs,超时或进程失败时以非零状态退出。随后先检查服务版本,再读取样例顶点:
第一条请求应返回包含 versions 的 JSON;第二条应返回包含 vertices 的 JSON,且样例数据中可见 marko、lop 等顶点。仅检查进程存在或 HTTP 状态码,不足以证明图后端和业务请求正常。
ToplingDB (Beta): 作为 RocksDB 的高性能替代方案,配置方式请参考: ToplingDB 快速上手
5.1.3 HBase
用户需自行安装 HBase,要求版本 2.0 以上,下载地址
5.1.4 启动 server 的时候创建示例图
在启动脚本时携带 -p true 参数,表示开启 preload,即创建示例图。
并且使用 RESTful API 请求 HugeGraphServer 得到如下结果:
代表创建示例图成功。
5.1.5 启动脚本的参数
bin/start-hugegraph.sh 支持以下参数。每个参数都需要带值,即写作 -d false,不能只写 -d。
| 参数 | 取值 | 默认值 | 作用 |
|---|---|---|---|
-d | true、false | true | 守护进程模式。-d false 时脚本留在前台,并把 SIGTERM/SIGINT 转发给服务进程 |
-g | zgc 或 ZGC | 不填则用 G1GC | 选择垃圾回收器。只接受 ZGC,其他取值会直接终止启动;ZGC 需要 Java 11 及以上 |
-m | true、false | false | 安装基于 crontab 的监控任务(bin/start-monitor.sh),仅用于虚拟机和物理机部署 |
-p | true、false | false | 预加载示例图,见 5.1.4 |
-s | true、false | true | 开启安全检查(HugeSecurityManager)。要求 Java 11 到 23,且 conf/java-security.properties 可读 |
-j | JVM 参数 | 空 | 追加到服务命令行的额外 JVM 参数 |
-t | 秒 | 30 | 判定启动失败前等待服务响应的时长 |
-y | true、false | false | 开启 OpenTelemetry agent 上报链路追踪 |
bin/stop-hugegraph.sh 支持 -m true|false(默认 true),用于控制停止服务时是否同时移除 crontab 监控任务。
5.2 使用 Docker
在 3.1 使用 Docker 容器 中,我们已经介绍了如何使用 docker 部署 Server 服务。还可以通过切换后端存储或设置参数,在 Server 启动时加载样例图。
5.2.1 启动 server 的时候创建示例图
在 Docker 启动时设置环境变量 PRELOAD=true,即可在启动脚本执行过程中加载样例数据。
使用
docker run使用
docker run -itd --name=server -p 8080:8080 -e PRELOAD=true hugegraph/hugegraph:1.7.0使用
docker-compose创建
docker-compose.yml,具体文件如下,在环境变量中设置 PRELOAD=true。其中,example.groovy是一个预定义的脚本,用于预加载样例数据。如果有需要,可以通过挂载新的example.groovy脚本改变预加载的数据。使用命令
docker compose up -d启动容器
使用 RESTful API 请求 HugeGraphServer 得到如下结果:
代表创建示例图成功。
6 访问 Server
6.1 服务启动状态校验
jps 查看服务进程
curl 请求 RESTful API
返回包含 versions 的 JSON(HTTP 2xx)可确认 REST API 已响应。jps 中出现 HugeGraphServer 只表示进程存在;要确认图后端可用,请按单机流程加载样例图后请求顶点接口。
6.2 请求 Server
HugeGraphServer 的 RESTful API 包括多种类型的资源,典型的包括 graph、schema、gremlin、traverser 和 task
graph包含vertices、edgesschema包含vertexlabels、propertykeys、edgelabels、indexlabelsgremlin包含各种Gremlin语句,如g.v(),可以同步或者异步执行traverser包含各种高级查询,包括最短路径、交叉点、N 步可达邻居等task包含异步任务的查询和删除
6.2.1 获取 hugegraph 的顶点及相关属性
说明
对于顶点、边等列表请求,Server 可以压缩响应。使用
curl --compressed可自动解压:默认监听地址为
127.0.0.1,其他机器无法直接访问。
调整 Server 监听地址
若将地址调整为 0.0.0.0,Server 将监听所有网卡。生产环境必须启用认证与授权、IP 白名单及最小权限授权,并保留和保护审计日志;不得将 Gremlin、Cypher 等接口直接暴露到公网。
响应体如下:
详细的 API 请参考 RESTful-API 文档。
另外也可以通过访问 localhost:8080/swagger-ui/index.html 查看 API。
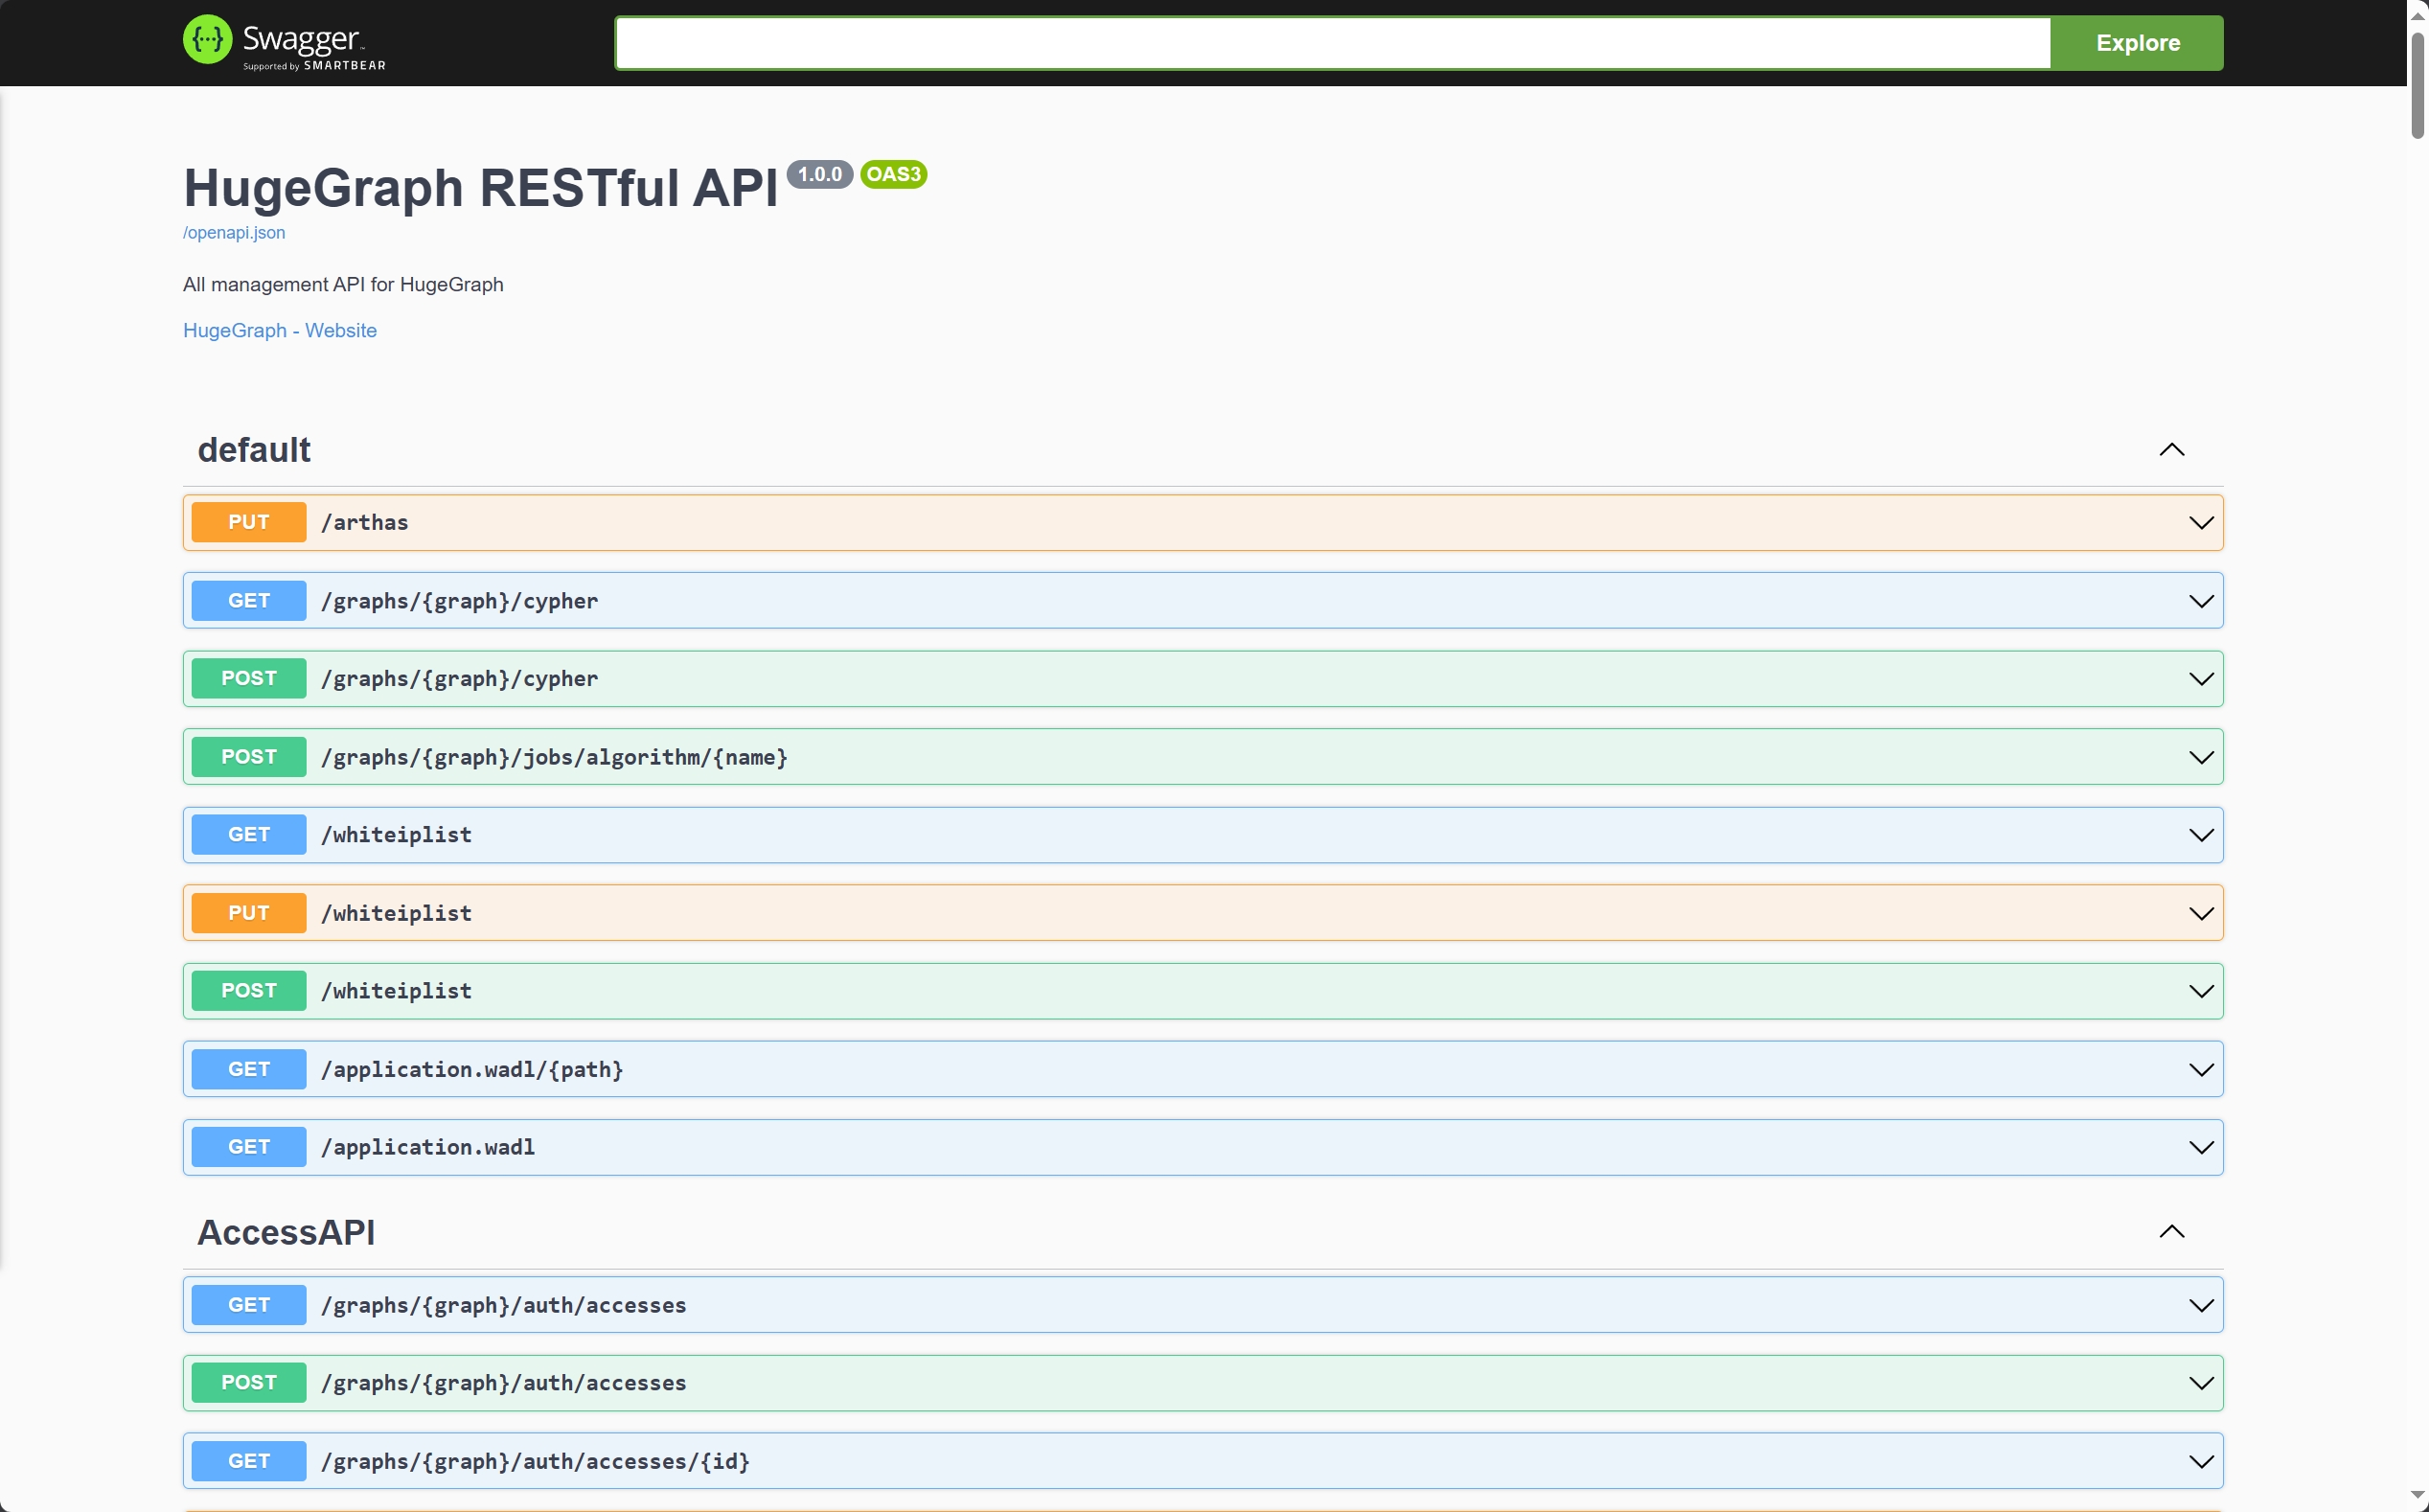
在使用 Swagger UI 调试 HugeGraph 提供的 API 时,如果 HugeGraph Server 开启了鉴权模式,可以在 Swagger 页面输入鉴权信息。
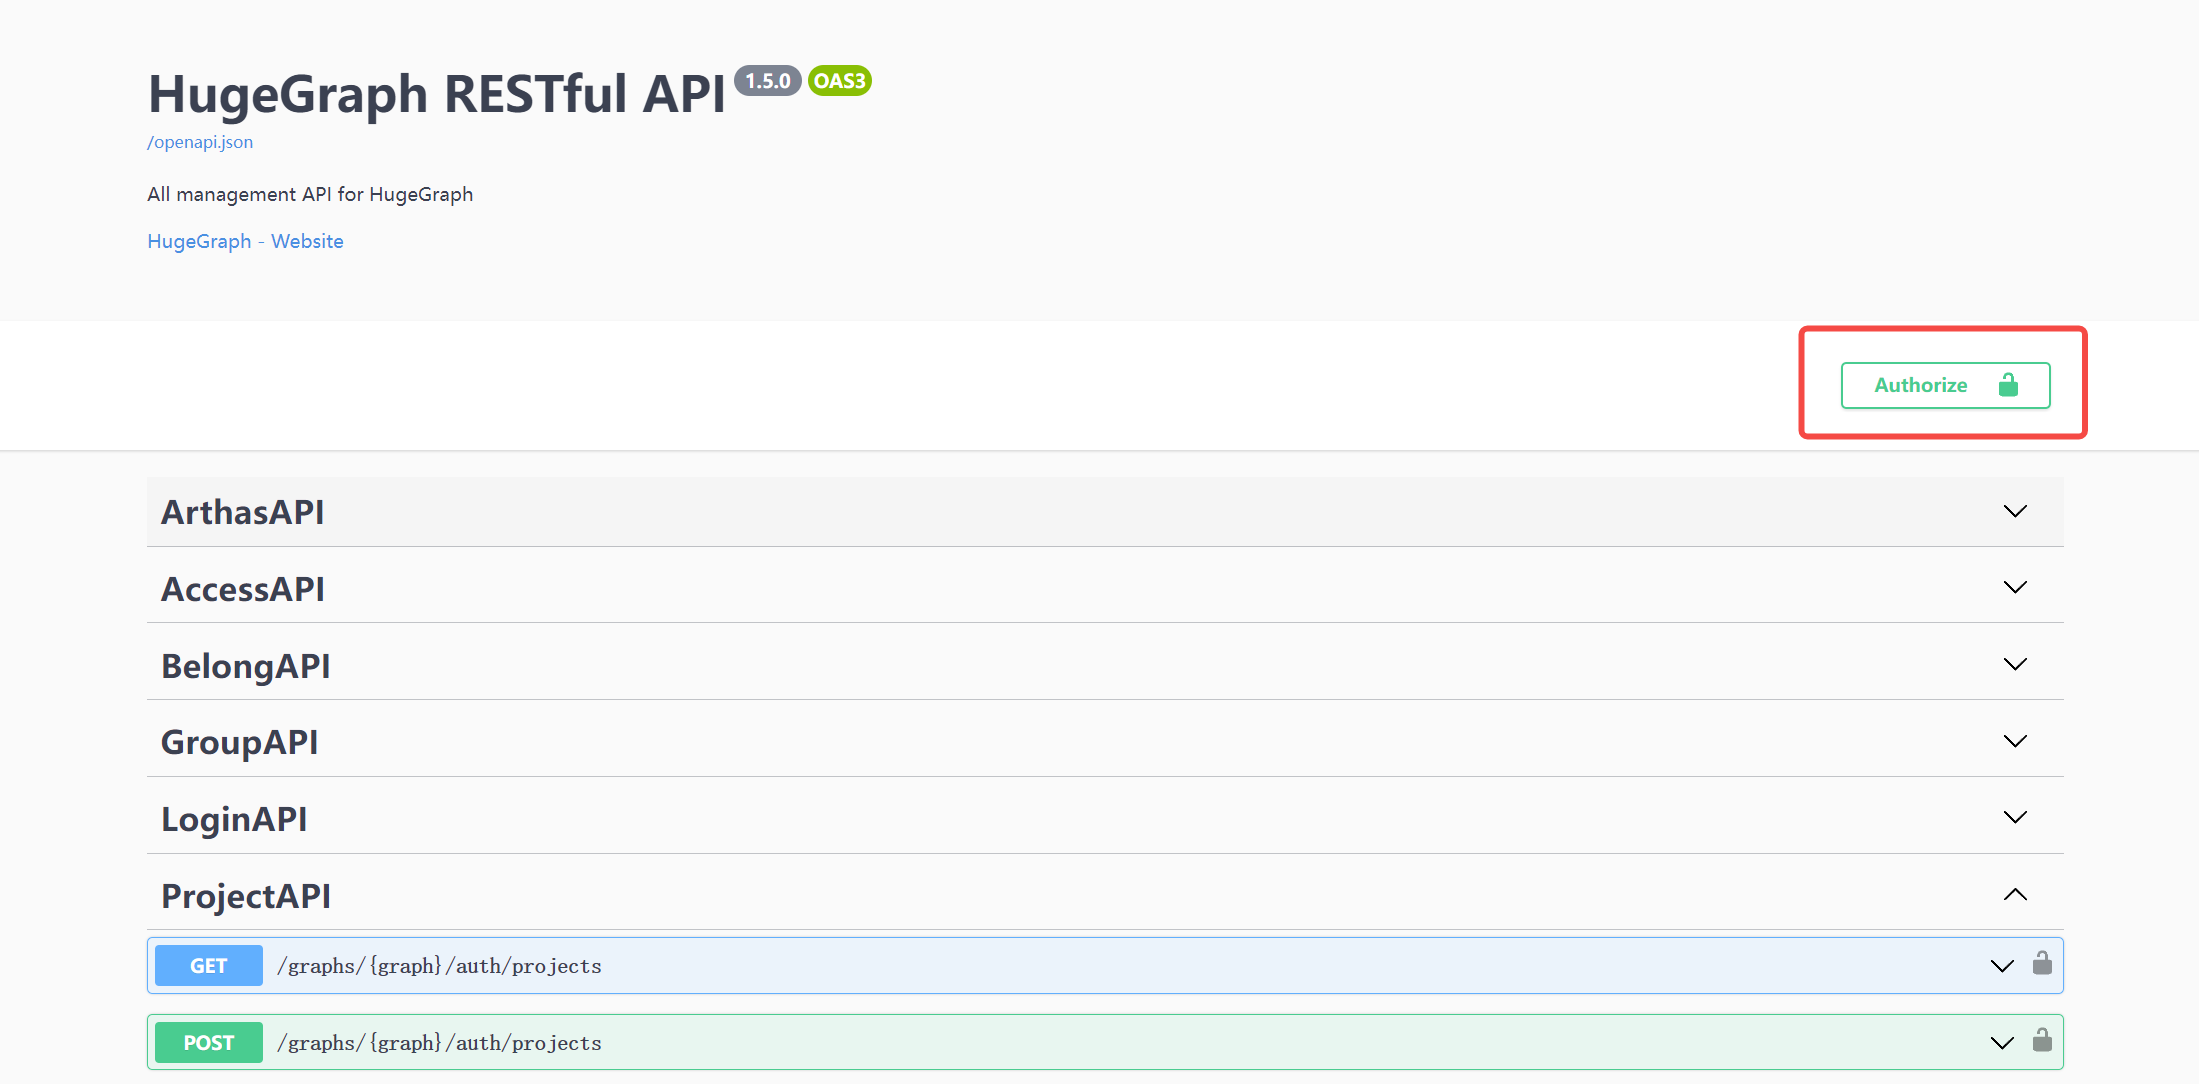
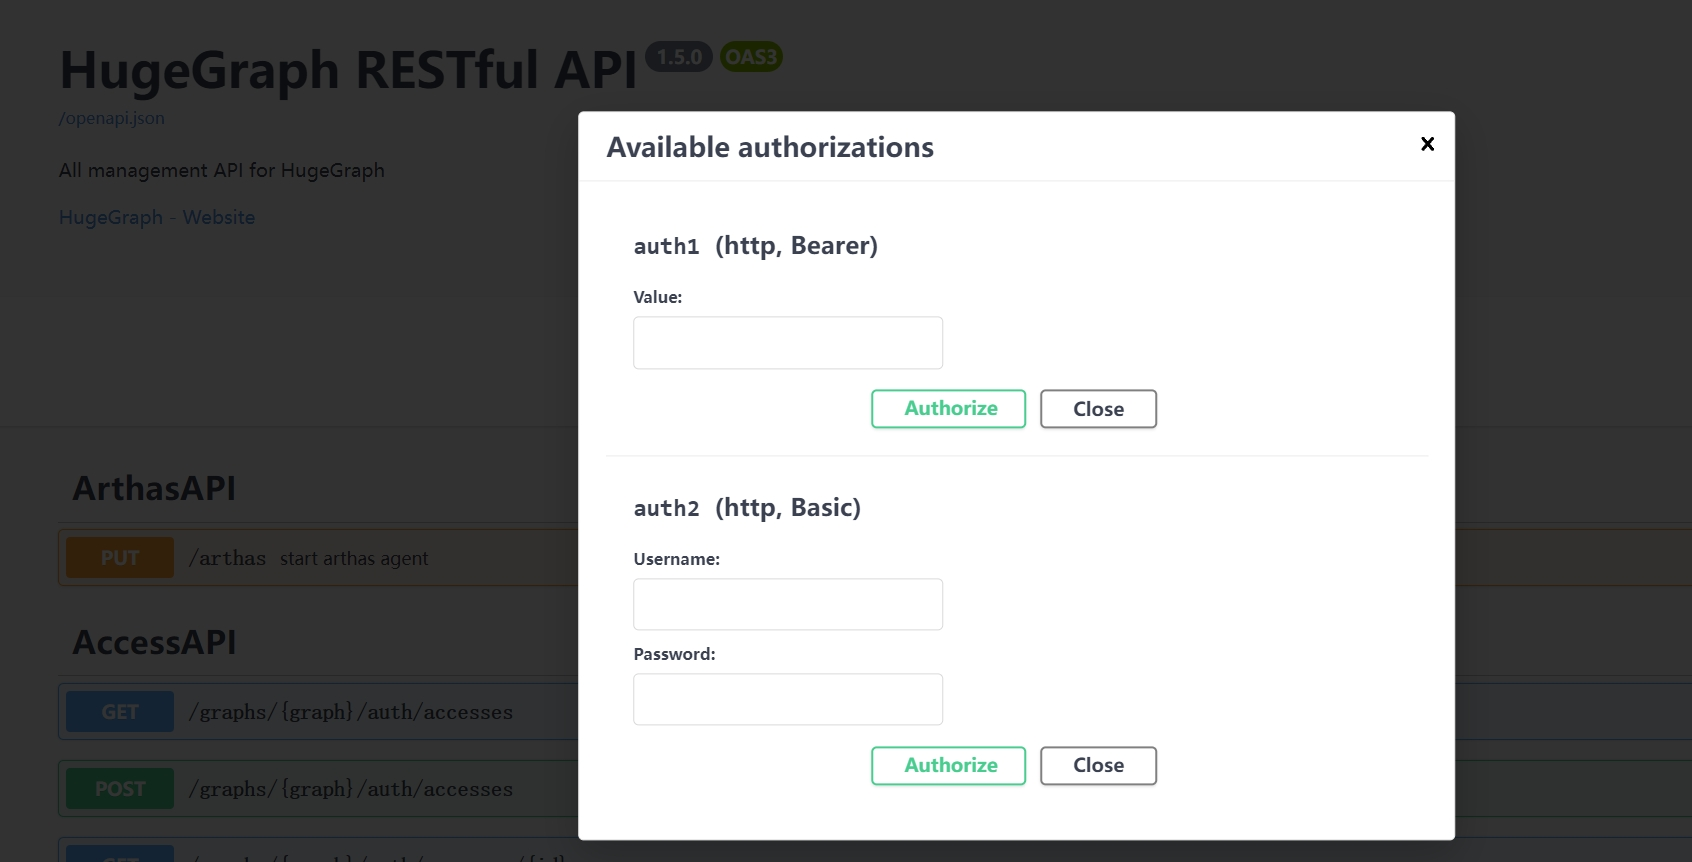
当前 HugeGraph 支持基于 Basic 和 Bearer 两种形式设置鉴权信息。
7 停止 Server
8 使用 IntelliJ IDEA 调试 Server
3.1.2 - HugeGraph-PD 快速上手
1 HugeGraph-PD 概述
HugeGraph-PD(Placement Driver)是 HugeGraph 分布式版本的元数据管理组件,负责管理图数据的分布和存储节点的协调。它在分布式 HugeGraph 中扮演着核心角色,维护集群状态并协调 HugeGraph-Store 存储节点。
PD 将集群元数据保存在 pd.data-path 下的内嵌 RocksDB 中,并通过 Raft 在各 PD 节点之间复制,因此 3 节点或 5 节点的 PD 集群在少数节点宕机时仍可继续提供服务。在此基础上,PD 还负责注册和激活 Store 节点、分配与再平衡分区、跟踪 Store 心跳,并响应来自 Store 和 Server 的服务发现请求。
PD 监听三个端口:
| 端口 | 默认值 | 配置项 | 使用方 |
|---|---|---|---|
| gRPC | 8686 | grpc.port | Store 和 Server 客户端 |
| REST | 8620 | server.port | 管理接口、健康检查、监控指标 |
| Raft | 8610 | raft.address | 仅其他 PD 节点 |
2 依赖
2.1 前置条件
- 操作系统:Linux 或 macOS(Windows 尚未经过完整测试)
- Java 版本:≥ 11
- Maven 版本:≥ 3.5.0
3 部署
有两种方式可以部署 HugeGraph-PD 组件:
- 方式 1:下载 tar 包
- 方式 2:源码编译
3.1 下载 tar 包
Apache 下载页目前提供 1.7.0 的完整二进制包,其中包含 PD、Store 和 Server;没有单独列出 PD 二进制包。下载前请在 官方 Apache HugeGraph 下载页核对版本、签名和 SHA512。1.7.0 是孵化期发布的历史版本,归档文件和解压目录仍带 incubating:
3.2 源码编译
只编译 PD 发布包及其依赖模块:
解压后的发布目录只包含三个子目录:bin(启停脚本)、conf(application.yml、application.yml.template、log4j2.xml、verify-license.json)和 lib(hg-pd-service jar 包)。
3.3 Docker 部署
HG_PD_* 环境变量和 /v1/ready 是当前主线源码提供的功能;server 的 1.7.0 发布源码标签尚无这些 Docker 环境变量映射或 readiness API。本文下面的 Docker 示例仅适用于从当前主线源码构建并标记为 local 的镜像;使用 1.7.0 发布资产时,应以该版本随包配置和说明为准:
单独运行当前主线构建的 PD 时,先设置部署专用密钥,并把示例地址替换为容器可达的真实地址:
| 变量 | 必填 | 默认值 | 对应配置项 | 描述 |
|---|---|---|---|---|
HG_PD_GRPC_HOST | 是 | 无 | grpc.host | 本节点对外公布的 gRPC 主机名/IP;容器网络中应使用容器主机名。 |
HG_PD_RAFT_ADDRESS | 是 | 无 | raft.address | 本节点 Raft 地址。 |
HG_PD_RAFT_PEERS_LIST | 是 | 无 | raft.peers-list | 所有 PD 节点的 Raft 地址,含本节点。 |
HG_PD_INITIAL_STORE_LIST | 是 | 无 | pd.initial-store-list | 预期的 Store gRPC 地址。 |
HG_PD_AUTH_SECRET_KEY | 是 | 无 | auth.secret-key | REST Basic 密码;所有 PD REST 客户端都必须使用同一密钥。 |
HG_PD_GRPC_PORT | 否 | 8686 | grpc.port | gRPC 服务端口。 |
HG_PD_REST_PORT | 否 | 8620 | server.port | REST API 端口。 |
HG_PD_DATA_PATH | 否 | /hugegraph-pd/pd_data | pd.data-path | 元数据存储路径。 |
HG_PD_INITIAL_STORE_COUNT | 否 | 1 | pd.initial-store-count | 集群可用所需的最小 Store 数量。 |
HG_PD_ACTUATOR_EXPOSURE | 否 | health,metrics,prometheus | management.endpoints.web.exposure.include | 公开的 Actuator 端点白名单;不允许设置为 *。 |
当前主线 entrypoint 要求以上五个必填变量,生成 SPRING_APPLICATION_JSON 覆盖项后再启动 PD;其他配置继续从镜像内的 conf/application.yml 读取。JAVA_OPTS 会透传给 JVM。旧变量 GRPC_HOST、RAFT_ADDRESS、RAFT_PEERS、PD_INITIAL_STORE_LIST 仍可用,但会输出弃用警告。
PD 镜像的 Docker HEALTHCHECK 每 15 秒检查 /v1/health,它只表示 REST 监听器有响应,不代表 Raft 已形成多数派。Compose 示例中的健康检查也使用这个存活接口;需要在启动 Store 前另行检查 /v1/ready。容器以前台方式运行,Java 退出会让容器退出;只有配置了 Docker 重启策略时容器才会自动重启。Docker 日志可通过 docker logs <container-name> 查看。
当前主线 Compose 的完整启动和最小拓扑见 Store 页面及 docker/README.md。Compose 文件的服务配置来自主线源码;若启动包含 Hubble 的完整拓扑,先按 docker/README.md 生成未跟踪的 Hubble 配置文件。
4 配置
PD 启动脚本读取安装目录中的 conf/application.yml。请使用与安装包版本相同的源文件,不要把发布版和主线配置混用: 1.7.0 发布标签配置;当前主线配置。主线 application.yml 将 auth.secret-key 留空,REST 受保护接口在未设置密钥时会拒绝请求;application.yml.template 不由 PD 启动脚本读取。
4.1 配置项参考
以下表格核对的是 server 主线提交 2f827d6e8c9c62ae858f2fc122b3a192d015e2f4 中的 hg-pd-dist 配置和 Java 默认注入值,不是 1.7.0 发布标签的全部行为。1.7.0 二进制包请使用其标签对应的原始配置;主线源码构建包则以 主线配置文件 为准。
gRPC 与 REST
| 配置项 | 主线目录值 | 内置默认值 | 描述 |
|---|---|---|---|
grpc.host | 127.0.0.1 | 无,必填 | 本 PD 对外公布的 gRPC 地址。Store 和 Server 会连到这个地址,因此分布式部署时必须填可访问的 IPv4 地址或主机名,不能用 127.0.0.1 或 0.0.0.0。 |
grpc.port | 8686 | 无,必填 | gRPC 端口。 |
server.port | 8620 | 无,必填 | REST API 端口,同时也是 Raft 成员信息中公布的 REST 端口。 |
application.yml.template 中还有 grpc.netty-server.max-inbound-message-size: 100MB,但 PD 在代码中把 gRPC 服务端的入站消息上限固定为 1 GB,该配置项实际不生效。
Raft
| 配置项 | 主线目录值 | 内置默认值 | 描述 |
|---|---|---|---|
raft.address | 127.0.0.1:8610 | 无,必填 | 本节点的 Raft 地址,格式为 host:port。每个节点必须不同,且必须出现在 raft.peers-list 中。 |
raft.peers-list | 127.0.0.1:8610 | 无,必填 | 逗号分隔的全部 PD 节点 Raft 地址(含本节点)。所有节点上必须完全一致。 |
raft.enable | 未设置 | true | 为 true 时元数据写入经过 Raft 状态机;为 false 时 PD 直接写本地存储,不做复制。 |
raft.ip-whitelist.enabled | 未设置 | true | 为 true 时 Raft RPC 端口只接受由 raft.peers-list 解析出的地址的连接,其他连接会被断开并记录 Blocked connection from <ip>。peer 列表变更时白名单会重新解析,但主机名不变而 IP 变化的情况(例如容器重启)仍需重启 PD。 |
raft.snapshotInterval | 未设置 | 300 | Raft 快照生成间隔(秒)。 |
raft.rpc-timeout | 未设置 | 10000 | Raft RPC 的连接、请求和安装快照超时时间(毫秒)。 |
PD 核心
| 配置项 | 主线目录值 | 内置默认值 | 描述 |
|---|---|---|---|
pd.data-path | ./pd_data | 无,必填 | 元数据目录。rocksdb/ 子目录存放 RocksDB 数据,pd_raft/ 子目录存放 Raft 日志、元信息和快照。 |
pd.patrol-interval | 1800 | 300 | 巡检周期(秒)。巡检会检查各 Store 上的分区健康状况并平衡分区数量。 |
pd.initial-store-count | 1 | 3 | 活跃 Store 节点的最小数量。低于该值时集群状态变为 Cluster_Not_Ready,整个集群视为不可用。建议设为实际部署的 Store 数量。 |
pd.initial-store-list | 127.0.0.1:8500 | 空 | 逗号分隔的 Store gRPC 地址(ip:port),列表中的 Store 注册后自动激活。条目也可以带分组 id,写作 store_address/group_id。 |
pd.cluster_id | 未设置 | 1 | 集群 id,用于区分不同的 PD 集群。 |
Store 管理
| 配置项 | 主线目录值 | 内置默认值 | 描述 |
|---|---|---|---|
store.keepAlive-timeout | 未设置 | 300 | 心跳超时时间(秒)。超过该时间未收到心跳,Store 视为临时不可用,其分区 leader 转移到其他副本。 |
store.max-down-time | 172800 | 1800 | 超过该时间(秒)后 Store 视为永久不可用,其副本重新分配到其他机器。 |
store.monitor_data_enabled | true | false | 是否持久化 Store 监控采样数据。 |
store.monitor_data_interval | 1 minute | 1 minute | 采样间隔,格式为 <数字> <单位>,单位为 second、minute、hour、day、month、year 之一;省略数字时按 1 计。 |
store.monitor_data_retention | 1 day | 1 day | 监控数据保留时长,格式同上。 |
分区
| 配置项 | 主线目录值 | 内置默认值 | 描述 |
|---|---|---|---|
partition.default-shard-count | 1 | 3 | 每个分区的副本数。生产集群建议设为 3。 |
partition.store-max-shard-count | 12 | 24 | 单个 Store 最多承载的分区副本数。 |
初始分区数由这两个配置项和 pd.initial-store-list 的长度推导得出:
服务发现、License 与监控
| 配置项 | 主线目录值 | 内置默认值 | 描述 |
|---|---|---|---|
discovery.heartbeat-try-count | 未设置 | 3 | 客户端注册后连续丢失多少次心跳就删除其注册信息。 |
license.verify-path | ./conf/verify-license.json | 无,配置键必填 | PD 发行目录随包提供该 JSON 文件;当前主线代码没有读取此配置项的运行时位置。 |
license.license-path | ./conf/hugegraph.license | 无,配置键必填 | 目标路径不会随包带入 license 文件;内部 gRPC putLicense 会把上传内容写到此处。当前主线的 REST GET /v1/license 返回空对象,不因文件缺失而阻止 PD 启动。 |
auth.secret-key | 空 | 空 | 当前主线的 PD REST Basic 密码;合法用户名为 hg、store、hubble、vermeer。Docker 镜像要求设置;裸机 PD 可在密钥为空时启动,但受保护 REST 请求都会被拒绝。 |
management.metrics.export.prometheus.enabled | true | Spring Boot 默认值 | 是否暴露 /actuator/prometheus。 |
management.endpoints.web.exposure.include | health,metrics,prometheus | Spring Boot 默认只暴露 health | Actuator 暴露白名单;这些端点不经过 PD REST Basic 拦截器。 |
logging.config | file:./conf/log4j2.xml | 无 | Log4j2 配置文件,会写出 logs/hugegraph-pd.log、logs/hugegraph-pd_raft.log 和 logs/audit-hugegraph-pd.log。 |
线程池
| 配置项 | 内置默认值 | 描述 |
|---|---|---|
thread.pool.grpc.core | 600 | 处理 gRPC 请求的线程池核心线程数。 |
thread.pool.grpc.max | 1000 | 该线程池的最大线程数。 |
thread.pool.grpc.queue | 无上限 | 该线程池的队列容量。 |
job.uninterruptibleThreadPool.core | 0 | 元数据后台任务线程池的核心线程数。小于等于 0 时取可用处理器数的一半。 |
job.uninterruptibleThreadPool.max | 256 | 该线程池的最大线程数。 |
job.uninterruptibleThreadPool.queue | 无上限 | 该线程池的队列容量。 |
4.2 单节点配置
在主线源码构建的发布目录中,以 conf/application.yml 为基础,只需按节点改写 gRPC/Raft 地址和数据路径,并设置 auth.secret-key。以下值仅适用于开发测试;单节点 PD 不提供多数派容错,partition.default-shard-count: 1 表示每个分区只有一个副本。
可以用 openssl rand -hex 24 生成部署密钥;使用 Docker 时通过 HG_PD_AUTH_SECRET_KEY 传入。1.7.0 发布标签的认证行为不同,详见“REST API 认证”。
4.3 三节点集群配置
生产环境请部署 3 个或 5 个 PD 节点,节点数取奇数以保证 Raft 总能形成多数派。3 节点集群可容忍 1 个节点故障。raft.peers-list 必须列出全部节点,并且在所有节点上逐字节一致;grpc.host 和 raft.address 每个节点各不相同。
节点 1(192.168.1.10):
节点 2(192.168.1.11)和节点 3(192.168.1.12)使用同一份配置,只把 grpc.host 和 raft.address 换成自己的地址:
若要在同一台机器上启动 3 个 PD 节点做测试,需为每个节点分别指定 pd.data-path 和各自的端口,例如 raft 端口 8610/8611/8612、gRPC 端口 8686/8687/8688、REST 端口 8620/8621/8622。
在 Docker 桥接网络中,同样的配置来自环境变量,并使用容器主机名而非 IP 地址:
5 启动与停止
5.1 启动 PD
在 PD 安装目录下执行:
脚本要求 PATH 或 JAVA_HOME 中有 11 及以上版本的 JDK;如果发现已有 Java 进程在使用本安装目录的 conf 目录,脚本会直接退出,不做任何事。
支持的参数:
| 参数 | 取值 | 默认值 | 描述 |
|---|---|---|---|
-d | true、false | true | 守护进程模式,详见下文。 |
-g | zgc、ZGC | 不设置 | 垃圾回收器。不带该参数即使用默认的 G1GC;填其他值(包括 g1)会导致启动中止。 |
-j | JVM 参数 | 空 | 额外的 JVM 参数,例如 -j "-Xmx8g -Xms8g"。 |
-y | true、false | false | 挂载 OpenTelemetry Java agent。首次使用时会把 agent 下载到 plugins/ 并校验 MD5,trace 通过 gRPC 上报到 http://127.0.0.1:4317。 |
-d 参数控制守护进程模式:
-d true(默认):以后台守护进程方式运行,脚本立即返回。-d false:以前台模式运行,脚本通过exec替换为 Java 进程,容器/进程管理器的进程即为 Java 本身。在 Docker 或进程管理器(systemd、supervisord)下运行时请使用此参数,以便在崩溃时自动检测并重启服务。
每个参数都有对应的环境变量:DAEMON、GC_OPTION、USER_OPTION 和 OPEN_TELEMETRY。设置 JAVA_OPTIONS 会完全替换脚本计算出的堆参数,否则脚本会根据可用内存在 512 MB 到 32 GB 之间选择堆大小。设置 STDOUT_MODE=true 时 JVM 输出保留在 stdout,不再重定向到 logs/hugegraph-pd-stdout.log,Docker 镜像正是这样做的。
启动成功后,可以在 logs/hugegraph-pd-stdout.log 中看到类似以下的日志:
进程号会写入 bin/pid。
5.2 停止 PD
在 PD 安装目录下执行:
脚本读取 bin/pid,向该进程发送终止信号,最多等待 30 秒直到进程退出,然后删除 pid 文件。如果 bin/pid 不存在,脚本会提示并正常退出。
6 分布式集群的启动顺序
请按以下顺序启动各组件:
- 全部 PD 节点。它们组成 Raft 组并选出 leader。对每个节点检查
GET /v1/ready;仅当 HTTP 状态为200且响应中的ready为true时,再启动 Store。GET /v1/health只检查 REST 监听器是否存活。 - 全部 Store 节点。每个 Store 通过 gRPC 向 PD 注册,PD 会自动激活
pd.initial-store-list中列出的 Store。等到GET /v1/stores中每个 Store 的state都是Up再继续。 - 全部 Server 节点。Server 读取
pd.peers,并依赖 PD 报告至少有一个存活的 Store 才能完成分区分配。
sequenceDiagram
    participant 运维者
    participant PD
    participant Store
    participant Server
    运维者->>PD: GET /v1/ready(逐个检查 PD)
    PD-->>运维者: 200 且 ready=true
    运维者->>Store: 启动 Store
    Store->>PD: gRPC 注册与心跳
    运维者->>PD: GET /v1/stores(Basic 认证)
    PD-->>运维者: 每个目标 Store 状态为 Up
    运维者->>Server: 启动 Server
    Server->>PD: gRPC 查询分区与服务发现
    Server->>Store: gRPC 访问图数据
主线 Compose 中 Store 的 depends_on: condition: service_healthy 只等待 PD /v1/health 存活检查,Server 同样只等待 Store REST 存活检查;Server entrypoint 还会轮询 PD /v1/stores,直到有 Store 报告 Up 才启动 HugeGraph。docker compose up --wait 因而不能替代 PD Raft 就绪与 Store 注册状态检查。
停止时顺序相反:先停 Server,再停 Store,最后停 PD。
7 验证
7.1 REST API 认证
当前主线除 /actuator/*、/v1/health、/v1/ready 和 /v1/prom/targets/* 之外,所有 PD REST 路径都要求 HTTP Basic Authorization。用户名必须是内部服务名 hg、store、hubble、vermeer 之一,密码必须等于 auth.secret-key;无密钥或密码不匹配时会返回 HTTP 401。用启动 PD 时的同一密钥检查 Store 列表:
bin/wait-storage.sh 通过 PD_AUTH_USER、PD_AUTH_PASSWORD 配置同一凭据。1.7.0 发布标签的认证实现只检查用户名是否属于内部服务名,不比较密码;不要把该旧版行为套用到当前主线源码构建包。
生产环境分别保护 Server 与 PD 端口
生产环境的 Server 图 API 必须按 Server 认证与授权配置启用 Auth、IP 白名单和最小权限授权,并保留、保护 Server audit-*.log。这些设置不保护 PD:当前主线 PD REST 使用 auth.secret-key;1.7.0 的认证实现仅检查用户名是否属于内部服务名,不比较密码。Raft 端口应保持 raft.ip-whitelist.enabled 并只允许配置的 peer,PD REST 与 gRPC 端口也必须限制在受信网络内。PD 的 /v1/health、/v1/ready 和 Actuator 探针无需 Basic 认证,须由网络策略限制可达范围;主线默认日志配置生成的 logs/audit-hugegraph-pd.log 也须纳入日志保护。
7.2 健康检查
GET /v1/health 不需要凭据,返回 200 且响应体为空,只表示 PD REST 监听器已启动:
Spring Boot actuator 端点同样可用,输出更直观:
/actuator/health 的 {"status":"UP"} 也不代表 PD Raft 集群已有可用 leader。主线新增的 GET /v1/ready 会在 PD Raft 节点已激活并能看到 leader 时返回 HTTP 200 和 ready:true;尚未就绪时返回 HTTP 503 和 ready:false:
7.3 集群与成员状态
查看 PD 成员以及当前的 Raft leader:
响应中包含 pdList、选出的 pdLeader、numOfService、numOfNormalService 和 stateCountMap。健康的 3 节点 PD 集群中,numOfService 和 numOfNormalService 都应为 3,且恰好有一个成员的 role 为 Leader。
GET /v1/cluster 在成员列表之外还返回 Store 列表、图列表和集群整体状态;GET / 返回一份简要汇总(leader 地址、集群状态、成员数、Store 数、图数量、分区数)。
7.4 Store 状态
也可以通过 PD API 查看 Store 节点状态:
如果响应中 state 为 Up,说明对应的 Store 节点运行正常。下面的示例只有一个 Store 节点。在一个健康的 3 节点部署中,storeId 列表应包含 3 个 ID,且 stateCountMap.Up、numOfService 和 numOfNormalService 都应为 3。
7.5 其他 REST 接口
下表中的路径均相对于 http://<pd-host>:8620,除注明外都需要 7.1 中的 Basic 认证头。
| 方法与路径 | 描述 |
|---|---|
GET / | 集群简要统计:leader、状态、成员数、Store 数、图数量、分区数 |
GET /v1/health | 存活检查;HTTP 200 不代表 Raft 就绪,无需认证 |
GET /v1/ready | Raft readiness;HTTP 200 且 ready:true 表示本节点已激活并看到 leader,无需认证(当前主线) |
GET /v1/cluster | 集群完整统计:PD 成员、Store、图、分区 |
GET /v1/members | PD 成员列表,含角色和选出的 leader |
POST /v1/members/change | 修改 Raft peer 列表,请求体 {"peerList": "..."} |
GET /v1/stores | 已注册的 Store 节点及其状态和统计信息 |
GET /v1/store/{storeId} | 单个 Store 节点 |
POST /v1/store/{storeId} | 修改 Store 状态,请求体 {"storeState": "..."} |
DELETE /v1/store/{storeId} | 从集群中移除 Store |
POST /v1/store/log | Store 状态变更日志,请求体 {"startTime": "...", "endTime": "..."} |
GET /v1/storesAndStats | Store 原始元数据,用于调试 |
GET /v1/store_monitor/{storeId} | Store 监控采样数据(文本) |
GET /v1/store_monitor/json/{storeId} | Store 监控采样数据(JSON) |
GET /v1/shards | 所有分区的所有副本,含 store id、角色、状态和进度 |
GET /v1/shardGroups | Shard 分组 |
GET /v1/shardGroupsCache | PD 内存缓存中的 shard 分组 |
GET /v1/shardLeaders | 按 Store raft 地址分组的分区 leader |
GET /v1/balanceLeaders | 在各 Store 之间重新平衡分区 leader |
GET /v1/partitions | 分区列表及其状态和统计信息 |
GET /v1/highLevelPartitions | 分区列表,含各图的 key 数量和数据大小 |
GET /v1/partitionsAndStats | 分区原始元数据,用于调试 |
POST /v1/partitions/log | 分区变更日志,请求体 {"startTime": "...", "endTime": "..."} |
GET /v1/resetPartitionState | 重置所有分区的状态 |
GET /v1/graphs | 图列表 |
GET /v1/graph/** | 按名称查询单个图 |
POST /v1/graph/** | 修改图的分区数,请求体 {"partitionCount": N} |
GET /v1/graph/partitionSizeRange | 集群允许的分区数上下限 |
GET /v1/graph-spaces | 图空间列表 |
GET /v1/graph-spaces/** | 单个图空间 |
POST /v1/graph-spaces/** | 修改图空间 |
POST /v1/registry | 注册一个服务实例用于服务发现 |
POST /v1/registryInfo | 查询已注册的实例 |
GET /v1/allInfo | 所有已注册的实例 |
GET /v1/license | 旧接口,当前主线返回空对象 |
GET /v1/license/machineInfo | License 校验看到的 IP 和 MAC 地址 |
GET /v1/task/patrolStores | 立即执行 Store 巡检任务 |
GET /v1/task/patrolPartitions | 立即执行分区巡检任务 |
GET /v1/task/balancePartitions | 在各 Store 之间重新平衡分区 |
GET /v1/task/splitPartitions | 立即执行自动分区拆分 |
GET /v1/task/balanceLeaders | 重新平衡分区 leader |
GET /v1/task/compact | 让 Store 节点对其分区的 RocksDB 文件做 compaction |
GET /v1/prom/targets/{appName} | Prometheus 服务发现目标,无需认证 |
GET /v1/prom/targets-all | 所有应用类型的 Prometheus 目标 |
GET /v1/prom/sd_config | Prometheus HTTP 服务发现配置 |
GET /actuator/health | Spring Boot 健康检查,无需认证 |
GET /actuator/metrics | Spring Boot 监控指标,无需认证 |
GET /actuator/prometheus | Prometheus 抓取端点,无需认证 |
两个 log 接口接受形如 {"startTime": "...", "endTime": "..."} 的时间范围,yyyy-MM-dd HH:mm:ss 和 yyyy-MM-dd 都是可接受的格式。
PD 以 hg 前缀注册自己的指标,因此 /actuator/prometheus 除标准 JVM 指标外还会暴露 hg_up、hg_graphs、hg_stores 和 hg_terms,在存在图之后还会有按图统计的分区和大小指标。
3.1.3 - HugeGraph-Store 快速上手
1 HugeGraph-Store 概述
HugeGraph-Store 是 HugeGraph 分布式版本的存储节点组件,负责实际存储和管理图数据。它与 HugeGraph-PD 协同工作,共同构成 HugeGraph 的分布式存储引擎,提供高可用性和水平扩展能力。
每个 Store 节点使用 RocksDB 保存图数据,并通过 Raft(JRaft)进行复制:每个分区是一个独立的 Raft 组,因此分区在丢失少数副本时仍可继续工作。Store 节点之间并不直接感知彼此,它们向 PD 注册,由 PD 下发分区分配,并通过心跳上报状态。HugeGraph-Server 先从 PD 查询分区位置,再通过 gRPC 访问 Store。
2 依赖
2.1 前置条件
- 操作系统:Linux 或 macOS(Windows 尚未经过完整测试)
- Java 版本:≥ 11(编译期强制校验,
bin/start-hugegraph-store.sh启动时会再次检查) - Maven 版本:≥ 3.5.0
- 如需进行多节点部署,请先部署 HugeGraph-PD
3 部署
有两种方式可以部署 HugeGraph-Store 组件:
- 方式 1:下载 tar 包
- 方式 2:源码编译
3.1 下载 tar 包
Apache 下载页目前提供 1.7.0 的完整二进制包,其中包含 PD、Store 和 Server;没有单独列出 Store 二进制包。下载前请在 官方 Apache HugeGraph 下载页核对版本、签名和 SHA512。1.7.0 是孵化期发布的历史版本,归档文件和解压目录仍带 incubating:
3.2 源码编译
如果只想单独编译 Store 而不是整个仓库,需要先编译 hugegraph-struct,因为 Store 依赖它:
生成的目录只包含 bin/、conf/ 和 lib/hg-store-node-{version}.jar。
3.3 Docker 部署
HG_STORE_* 环境变量映射是当前主线源码提供的功能;server 的 1.7.0 发布源码标签尚无这些映射。本文下面的 Docker 示例仅适用于从当前主线源码构建并使用同一个本地标签的 PD、Store 和 HStore Server 镜像:
首次启动前,按 docker/README.md 的认证环境步骤 在 docker/ 创建 .env。
该步骤使用 umask 077 并拒绝覆盖已有文件;若 .env 已存在,应保留原文件并编辑补全缺少的项。不要为已初始化的数据目录重新生成 HG_PD_AUTH_SECRET_KEY。此文件由仓库 .gitignore 忽略,仍不要提交。
每次在新 shell 执行 Compose 或 PD REST 命令前,都从 docker/ 目录加载同一文件:
后续重启或调用 PD REST 时,先按上面的方式加载同一个密钥;不要为已初始化的数据目录重新生成新值。HUGEGRAPH_VERSION=local 和 HUGEGRAPH_PULL_POLICY=never 是此 Compose 命令的参数,每次运行 Compose 生命周期命令时都要显式带上。
若要启动 Compose 文件中的 Hubble 服务,需使用拓扑对应的未跟踪配置文件。最小拓扑 docker-compose-hstore.yml 使用 conf/hubble/hstore.local.properties;
HA 拓扑 docker-compose-3pd-3store-3server.yml 使用 conf/hubble/hstore-ha.local.properties。
上述 README 初始化步骤会用共享 PD 密钥生成两份文件。若文件缺失或需更新,先从 docker/ 目录载入已有 .env,再执行对应命令:
多节点拓扑中的服务名是 pd0–pd2、store0–store2 和 server0–server2。该主线 Compose 文件也应使用上述本地构建的同标签镜像,不能将 HUGEGRAPH_VERSION=1.7.0 发布镜像与主线 Compose 文件混用。
单独运行当前主线构建的 Store 时,将示例地址换成 Store 与 PD 均可路由的实际地址:
当前主线 Docker 环境变量:
| 变量 | 必填 | 默认值 | 对应配置项 | 描述 |
|---|---|---|---|---|
HG_STORE_PD_ADDRESS | 是 | 无 | pdserver.address | PD gRPC 地址,多个地址用逗号分隔。 |
HG_STORE_GRPC_HOST | 是 | 无 | grpc.host | 本节点对外公布的 gRPC 主机名/IP;容器网络中应使用容器主机名。 |
HG_STORE_RAFT_ADDRESS | 是 | 无 | raft.address | 本节点的 Raft 地址。 |
HG_STORE_GRPC_PORT | 否 | 8500 | grpc.port | gRPC 服务端口。 |
HG_STORE_REST_PORT | 否 | 8520 | server.port | REST API 端口。 |
HG_STORE_DATA_PATH | 否 | /hugegraph-store/storage | app.data-path | 数据存储路径。 |
当前主线 entrypoint 将这些变量写入 SPRING_APPLICATION_JSON,覆盖镜像内 conf/application.yml;其余配置仍从该文件和 application-pd.yml 读取,然后以前台方式启动 Java。旧变量 PD_ADDRESS、GRPC_HOST、RAFT_ADDRESS 仍可用,但会输出弃用警告。
PD 和 Store 的 Docker HEALTHCHECK 都检查 /v1/health,只说明本地 REST 监听器有响应。Compose 的 depends_on 也以此作为启动门槛,因此还需单独检查 PD /v1/ready 与 PD /v1/stores 中的 Store Up 状态。Store 镜像默认设置 STDOUT_MODE=true;其 Dockerfile 只声明 EXPOSE 8520,从 Docker 网络外访问 gRPC 8500 或 Raft 8510 时需另行发布端口。
4 配置
Store 从 conf/ 读取两个配置文件。1.7.0 发布标签的源文件见 application.yml 和 application-pd.yml;当前主线文件见 application.yml 和 application-pd.yml。主线默认配置把 spring.profiles.include: pd 加载的 RocksDB 设置放在第二个文件中;启动脚本指定 application.yml。
application.yml,主配置文件(PD 地址、各端口、Raft、数据路径)application-pd.yml,由application.yml中的spring.profiles.include: pd引入,包含 RocksDB 内存设置和 Actuator 暴露配置
4.1 application.yml
以下配置参考表核对的是 server 主线提交 2f827d6e8c9c62ae858f2fc122b3a192d015e2f4 的发行目录值和 Java 默认注入值;1.7.0 发布包请使用其版本标签对应的配置文件,不要跨版本覆盖。
4.2 application-pd.yml
此文件只保存 rocksdb 参数和 Actuator 暴露设置。
生产环境分别保护 Server 与 Store 端口
生产环境的 Server 图 API 必须按 Server 认证与授权配置启用 Auth、IP 白名单和最小权限授权,并保留、保护 Server audit-*.log。这些设置不保护 Store:主线默认配置暴露所有 Actuator 端点,且没有 PD 式 Basic 认证保护;必须将 Store REST、gRPC 和 Raft 端口限制在集群与受信运维网络内。
4.3 配置项参考
下表中「当前主线目录值」来自前述两个主线配置文件,「代码默认值」是配置项缺失时节点使用的回退值;目录中未列出的配置项应以代码默认值为准。
核心
| 配置项 | 当前主线目录值 | 代码默认值 | 说明 |
|---|---|---|---|
pdserver.address | localhost:8686 | 必填 | PD gRPC 地址,多个地址用逗号分隔。Store 在此注册并获取分区分配。必须填写 PD 的 grpc.port,不是 PD 的 REST 端口。 |
grpc.host | 127.0.0.1 | 必填 | 本节点对外公布的 gRPC 地址。应设置为可路由的 IP 或主机名,127.0.0.1 只适用于单机部署。 |
grpc.port | 8500 | 必填 | gRPC 端口,Server 和 Store 客户端连接此端口。 |
grpc.netty-server.max-inbound-message-size | 1000MB | gRPC 默认值 | 单个入站 gRPC 消息的最大大小,由 grpc-spring-boot-starter 的 Netty 服务端读取。 |
grpc.server.wait-time | 未设置 | 3600 | 扫描流等待客户端消费一页数据的秒数,超时后服务端中止该流。 |
server.port | 8520 | 必填 | REST 和 Actuator 端口,同时以 rest.port 标签上报给 PD。 |
Raft
| 配置项 | 当前主线目录值 | 代码默认值 | 说明 |
|---|---|---|---|
raft.address | 127.0.0.1:8510 | 必填 | 本节点的 Raft 服务地址,格式为 host:port,必须能被其他 Store 节点访问。这里不需要配置 peer 列表:分区 Raft 组的成员由 PD 下发。 |
raft.disruptorBufferSize | 1024 | 0 | Raft 任务队列大小。设为 0 时按 rocksdb.total_memory_size 推导:将该内存量的 GB 数取最接近的 2 的幂,再乘以 32。 |
raft.max-log-file-size | 600000000000 | 50000000000 | Raft 日志的最大字节数。 |
raft.snapshotInterval | 1800 | 300 | 生成 Raft 快照的时间间隔,单位秒。 |
raft.snapshotLogIndexMargin | 未设置 | 0 | 距上次快照的最小 applied index 差值,达到后才真正生成快照。设为 0 关闭该判断。 |
raft.rpc-timeout | 未设置 | 10000 | Raft RPC 超时时间,单位毫秒。 |
raft.metrics | 未设置 | true | 采集 JRaft 节点指标,可通过 /metrics/raft 读取。 |
raft.useRocksDBSegmentLogStorage | 未设置 | true | 使用 RocksDB 分段日志存储保存 Raft 日志。 |
raft.maxSegmentFileSize | 未设置 | 67108864 | 分段日志文件大小,单位字节(64 MB)。 |
raft.maxReplicatorInflightMsgs | 未设置 | 256 | 每个 follower 的最大在途复制请求数。 |
raft.maxEntriesSize | 未设置 | 256 | 单次 AppendEntries 请求包含的最大条目数。 |
raft.maxBodySize | 未设置 | 524288 | 单次 AppendEntries 请求的最大字节数。 |
ave-logEntry-size-ratio | 未设置 | 0.95 | 估算日志条目平均大小时的平滑系数。注意该配置项位于顶层,不在 raft 下。 |
存储与标签
| 配置项 | 当前主线目录值 | 代码默认值 | 说明 |
|---|---|---|---|
app.data-path | ./storage | store | RocksDB 数据目录。用逗号分隔多个路径可将分区分散到多块磁盘。 |
app.raft-path | 已注释 | 空 | Raft 日志和快照目录。为空时回退到 app.data-path。 |
app.fake-pd | 未设置 | false | 内置 PD 模式,仅用于单机测试,不要用于生产。 |
app.placeholder-size | 未设置 | 10 | 启动时在每个数据路径下创建的 placeholder 占位文件大小,单位 GB,便于紧急情况下释放空间。设为 0 关闭。 |
app.label.<name> | 未设置 | 无 | 随 store 心跳上报给 PD 的自定义键值标签。节点会自动追加 rest.port。 |
RocksDB
| 配置项 | 当前主线目录值 | 代码默认值 | 说明 |
|---|---|---|---|
rocksdb.total_memory_size | 32000000000 | 51539607552 | 本节点所有 RocksDB 实例共享的内存预算。缺失或为 0 时使用 JVM 最大堆内存。 |
rocksdb.write_buffer_size | 32000000 | 33554432 | memtable 大小,单位字节。缺失或为 0 时取 total_memory_size / 1000。 |
rocksdb.min_write_buffer_number_to_merge | 16 | 16 | 落盘前合并的 memtable 数量。 |
rocksdb.write_buffer_ratio | 未设置 | 0.66 | total_memory_size 中分配给写缓存的比例,其余作为 block cache。 |
org/apache/hugegraph/rocksdb/access/RocksDBOptions.java 中定义的其他选项都可以加在同一个 rocksdb: 块下,例如 rocksdb.max_background_jobs、rocksdb.level0_file_num_compaction_trigger 或 rocksdb.bloom_filter_bits_per_key。
线程池
| 配置项 | 代码默认值 | 说明 |
|---|---|---|
thread.pool.grpc.core | 600 | 处理 gRPC 请求的核心线程数。 |
thread.pool.grpc.max | 1000 | gRPC 最大线程数。 |
thread.pool.grpc.queue | 2147483647 | gRPC 任务队列容量。 |
thread.pool.scan.core | 128 | 处理扫描的核心线程数。设为 0 时取 CPU 核数的 4 倍。 |
thread.pool.scan.max | 1000 | 扫描最大线程数。 |
thread.pool.scan.queue | 0 | 扫描任务队列容量。 |
gRPC 回调队列(1.8.0)
Store 使用无界队列处理 gRPC 回调,避免队列满时丢弃取消或完成通知,导致请求无法正常结束。thread.pool.grpc.queue 仍可写在配置中,但不再限制这个队列的容量。
thread.pool.grpc.core 和 thread.pool.grpc.max 仍用于配置线程池。由于回调可以继续排队,积压通常不会触发线程数从 core 增长到 max;只增大 max 无法提高回调处理能力。
持续过载仍会使队列积压并增加内存占用。应限制客户端并发,并根据节点资源调整扫描和查询工作线程池;不要依赖 thread.pool.grpc.queue 限流。1.7.0 仍使用配置的 gRPC 队列容量。
查询下推
| 配置项 | 代码默认值 | 说明 |
|---|---|---|
query.push-down.threads | 1500 | 下推查询的线程池大小。 |
query.push-down.fetch_batch | 20000 | 单次请求拉取的行数。 |
query.push-down.fetch_timeout | 300000 | 拉取超时时间,单位毫秒。 |
query.push-down.memory_limit_count | 50000 | 排序等内存操作的行数上限。 |
query.push-down.index_size_limit_count | 50000 | 索引 sst 文件大小上限,单位 kB。 |
后台任务
| 配置项 | 代码默认值 | 说明 |
|---|---|---|
job.interruptableThreadPool.core | 128 | TTL 清理线程池的核心线程数。设为 0 时取 CPU 核数。 |
job.interruptableThreadPool.max | 256 | TTL 清理线程池的最大线程数。设为 0 时取 CPU 核数的 4 倍。 |
job.interruptableThreadPool.queue | 2147483647 | TTL 清理线程池的队列容量。 |
job.uninterruptibleThreadPool.core | 0 | 存储引擎不可中断任务线程池的核心线程数。设为 0 时取 CPU 核数。 |
job.uninterruptibleThreadPool.max | 256 | 不可中断任务线程池的最大线程数。 |
job.uninterruptibleThreadPool.queue | 2147483647 | 不可中断任务线程池的队列容量。 |
job.cleaner.batch.size | 10000 | TTL 清理任务每批删除的 key 数量。 |
job.start-time | 0 | 每日 TTL 清理执行的小时数(0 到 23)。超出该范围时回退为 19。 |
内置 PD 模式
仅用于单机开发调试,通过 app.fake-pd: true 开启。此时节点自行扮演 PD 角色,并忽略 pdserver.address。
| 配置项 | 代码默认值 | 说明 |
|---|---|---|
fake-pd.store-list | '' | 伪集群中各 Store 节点的 gRPC 地址。 |
fake-pd.peers-list | '' | 同一批节点的 Raft 地址。 |
fake-pd.partition-count | 3 | 分区数量。 |
fake-pd.shard-count | 3 | 每个分区的副本数。 |
诊断
| 配置项 | 代码默认值 | 说明 |
|---|---|---|
arthas.telnetPort | 8566 | 调用 /v1/arthasstart 后 Arthas 的 telnet 端口。 |
arthas.httpPort | 8565 | Arthas HTTP 端口。 |
arthas.ip | 0.0.0.0 | Arthas 监听地址。 |
arthas.disabledCommands | jad | 需要禁用的 Arthas 命令。 |
4.4 各节点需要区分的配置
对于多节点部署,需要为每个 Store 节点修改以下配置:
grpc.host和grpc.port(其他组件访问本节点的地址)raft.address(Raft 协议地址)server.port(REST 端口)app.data-path(数据存储路径)
pdserver.address 在所有节点上保持一致,它列出的是整个 PD 集群。
5 启动与停止
5.1 启动 Store
确保 PD 服务已经启动,然后在 Store 安装目录下执行:
启动脚本支持四个参数:
| 参数 | 取值 | 默认值 | 说明 |
|---|---|---|---|
-d | true、false | true | 守护进程模式,见下文。 |
-g | ZGC、zgc | 未设置 | 垃圾回收器。不传该参数即使用默认的 G1。除 ZGC 和 zgc 之外的任何取值都会直接退出,包括 g1,尽管脚本自身的用法提示里写了它。 |
-j | JVM 参数字符串 | 空 | 附加的 JVM 参数,例如 -j "-Xmx16g -Xms8g"。 |
-y | true、false | false | 挂载 OpenTelemetry Java agent(首次使用时下载到 plugins/),并将 trace 导出到 127.0.0.1:4317。 |
守护进程模式:
-d true(默认):以后台守护进程方式运行,脚本立即返回,并把 Java 进程号写入bin/pid。-d false:以前台模式运行,脚本通过exec替换为 Java 进程,容器或进程管理器的进程即为 Java 本身。在 Docker 或进程管理器(systemd、supervisord)下运行时请使用此参数,以便在崩溃时自动检测并重启服务。
JVM 内存方面,如果没有自行设置 JAVA_OPTIONS:-Xms512m,-Xmx 取空闲内存的一半并限制在 512 MB 到 2048 MB 之间。脚本还会加上 -XX:MetaspaceSize=256M、OOM 时把堆转储写入 logs/,以及滚动的 GC 日志 logs/gc.log。生产节点通常需要大得多的堆,请显式指定,例如 -j "-Xmx32g -Xms32g"。
当 ulimit -n 或 ulimit -u 低于 1024 时脚本会拒绝启动;在 x86_64 和 arm64 上,如果能成功下载并校验对应的动态库,脚本会预加载 jemalloc。
启动成功后,可以在 logs/hugegraph-store-server.log 中看到类似以下的日志:
5.2 停止 Store
在 Store 安装目录下执行:
脚本读取 bin/pid,向该进程发送信号,最多等待 30 秒直至进程退出,然后删除 pid 文件。如果 bin/pid 不存在,脚本直接退出且不做任何操作。
5.3 重启 Store
该脚本依次 source 停止脚本和启动脚本,并转发 5.1 中的参数。
5.4 启动顺序
- 先启动全部 PD 节点。每个 Store 的
grpc.host:grpc.port都应出现在 PD 的pd.initial-store-list中,否则 PD 只会把该节点登记为Pending而不会置为Up,分区分配也就无法完成。当前主线应先对每个 PD 检查/v1/ready返回 HTTP200且ready:true;/v1/health只是存活检查。 - 再启动 Store。Store 早于 PD 启动并不致命:心跳线程会持续重试注册,并在 PD 可用之前打印
store heartbeat error: PD UNREACHABLE。 - 最后启动 HugeGraph-Server,此时所有 Store 节点都应上报
state: "Up"。Server 需要分区就绪之后才能初始化或打开图。
主线 Compose 用 depends_on: condition: service_healthy 等待本地健康检查,但 PD 和 Store 的 Docker 健康检查都只访问 /v1/health,不能证明 Raft 多数派或 Store 注册已就绪。Server entrypoint 会等待 PD 至少报告一个 Up 的 Store;运维时仍应检查 PD /v1/ready 和 /v1/stores。
6 多节点部署示例
以下是一个三节点部署的配置示例:
6.1 三节点配置参考
- 3 PD 节点
- raft 端口:8610, 8611, 8612
- rpc 端口:8686, 8687, 8688
- rest 端口:8620, 8621, 8622
- 3 Store 节点
- raft 端口:8510, 8511, 8512
- rpc 端口:8500, 8501, 8502
- rest 端口:8520, 8521, 8522
6.2 Store 节点配置
对于三个 Store 节点,每个节点的主要配置差异如下:
节点 A:
节点 B:
节点 C:
所有节点都应该指向相同的 PD 集群:
同时每个 PD 节点都应列出三个 Store 的 gRPC 地址:
6.3 Docker 分布式集群配置
3 节点 Store 集群包含在 docker/docker-compose-3pd-3store-3server.yml 中。每个 Store 节点拥有独立的主机名和环境变量:
每个节点的容器内端口都是 8500/8510/8520,只有映射到宿主机的端口不同。PD 节点相应地设置 HG_PD_INITIAL_STORE_LIST: store0:8500,store1:8500,store2:8500。
Store 节点仅在所有 PD 节点通过健康检查后才会启动,其中 docker-compose 中的 healthcheck 实际访问的是 PD 的 REST 接口 /v1/health(也可以通过 Actuator 暴露的 /actuator/health 进行手动检查),并通过 depends_on: condition: service_healthy 强制执行依赖关系。
运行时日志可通过 docker logs <container-name>(如 docker logs hg-store0)直接查看,无需进入容器。
完整的部署指南请参阅 docker/README.md。
7 验证 Store 服务
确认 Store 服务是否正常运行:
如果返回 {"status":"UP"},表示 Store 本地应用健康检查通过;它本身不证明已在 PD 注册为 Up。
GET /v1/health 是 Docker 镜像和 compose 文件使用的轻量检查接口,它返回 HTTP 200 且响应体为空,因此应使用 curl -fsS 并检查退出码,而不是检查输出内容:
7.1 Store REST 接口
Store 节点在 server.port 上提供以下只读接口:
| 方法 | 路径 | 描述 |
|---|---|---|
| GET | /v1/health | 存活探测,HTTP 200 且响应体为空 |
| GET | /actuator/health | Spring Boot Actuator 健康检查,返回 {"status":"UP"} |
| GET | /actuator/prometheus | Prometheus 抓取接口 |
| GET | / | 节点概览,包含 leaderCount 和 partitionCount |
| GET | /-/state | 运维设置的节点状态标志,取值为 STARTING、ONLINE、STOPPING;此标志不表示 PD 注册状态 |
| GET | /-/echo?name=<text> | 回显检查 |
| GET | /-/scan | 当前扫描流的状态 |
| GET | /v1/partitions | 本节点上的所有 Raft 组及分区指标。加上 ?flags=accurate 可获取精确的 key 数量,但更慢。 |
| GET | /v1/partition/{id} | 按分区 id 查询单个 Raft 组,包含角色、leader、peers 和已提交索引 |
| GET | /metrics/system | 主机 CPU 和内存指标 |
| GET | /metrics/drive | 数据路径所在磁盘的指标 |
| GET | /metrics/raft | JRaft 节点指标,需要 raft.metrics: true |
主线发行目录的 Store 配置将 management.endpoints.web.exposure.include 设为 "*",并启用 Prometheus;Actuator 端点没有 PD REST Basic 认证保护,请限制 Store REST 端口的网络可达范围。
节点还提供一批会修改状态或执行重负载操作的运维接口:PUT /-/state、GET /-/cleaner、GET /v1/partition/dump/{id}、GET /v1/partition/clean/{id}、POST /v1/compat?id=<partition>、GET /v1/arthasstart、POST /raft/options,以及 /fix/* 和 /test/* 两组接口。请仅在排查问题时使用,并且不要把 REST 端口暴露到不可信网络。
7.2 通过 PD 检查注册结果
也可以通过 PD API 查看集群中的 Store 节点状态:
对于当前主线源码构建包,PD REST 用户名必须是 hg、store、hubble、vermeer 之一,密码必须与 PD 的 auth.secret-key 相同;HG_PD_AUTH_SECRET_KEY 会同时配置 Compose 中的 PD 和 Server。/v1/health、/v1/ready、/actuator/* 和 /v1/prom/targets/* 不需要认证。1.7.0 发布标签的实现只校验用户名,不比较密码;不要把这一旧行为用于主线源码构建包。
如果 Store 配置成功,上述接口响应中应包含当前节点的状态信息,其中 state 为 Up 表示节点运行正常。如果节点长期停留在 Pending,通常是因为它没有出现在 PD 的 pd.initial-store-list 中。
下方示例仅展示 1 个 Store 节点的返回结果。如果 3 个节点都已正确配置并正在运行,则响应中的 storeId 列表应包含 3 个 ID,且 stateCountMap.Up、numOfService 和 numOfNormalService 都应为 3。
7.3 最小图读写验证
确认 Store 已在 PD 中显示为 Up 后,再启动配置为 HStore 后端、连接同一 PD 集群的 Server。Server 配置步骤见 Server 快速上手。确认 GET /versions 可访问且默认图 hugegraph 已加载后,可以创建一个属性键、顶点标签和顶点,再读取该顶点:
最后一个响应应包含顶点 ID pd-store-demo-1 和属性 pd_store_demo_name。若 Server 开启了认证,以上请求还需按其认证配置增加凭据。
3.2 - HugeGraph ToolChain
测试指南:如需在本地运行工具链测试,请参考 HugeGraph 工具链本地测试指南
HugeGraph Toolchain 包含 Java/Go 客户端、Loader、Hubble、Tools、Spark Connector 和 SeaTunnel Sink/Source。先按任务选择入口,再查看对应组件的配置与命令。
| 任务 | 推荐入口 | 适合场景 |
|---|---|---|
| 图可视化 | Hubble | 在 Web 界面查看和管理图 |
| 图导入 | Loader、SeaTunnel Sink、Spark Connector | 直接导入数据,或接入已有数据管道 |
| 图导出/迁移 | Tools、SeaTunnel Source | 备份、导出、跨图迁移和持续读取 |
DeepWiki 提供实时更新的项目文档,内容更全面准确,适合快速了解项目最新情况。
3.2.1 - 使用 Hubble 实现图可视化:单机快速上手
Hubble 是 HugeGraph 的 Web 管理与图可视化界面。你可以在同一个工作台中管理图的 Schema、导入数据、执行查询, 并在图、表格和 JSON 视图之间切换。本文用 单机 RocksDB Server + Hubble 走通这些操作,不需要 PD 或 Store。
如果使用 HStore,请先阅读本文的通用操作,再看 HStore 分布式补充。
本文以 Toolchain master(当前为 1.8.0)为准;Docker latest 是可变标签,使用时应核对实际版本。
不要直接对外暴露 Hubble 或 Server。生产环境使用 HTTPS、容器部署、 认证与授权和访问白名单。
启动单机组合
直接使用主仓库 docker/docker-compose.yml, 无需另外编写一份 Compose。文件已经组合了 RocksDB Server 与 Hubble,并配置网络、健康检查和数据卷; 部署细节见同目录的 README。
如果已有主仓库,直接进入它的 docker/ 目录。Compose 挂载该目录下的
conf/hubble/standalone.properties,
其中 pd.enabled=false、server.direct_url=http://server:8080:两个服务在同一 Docker 网络中通信,不需要填写每图 Server 地址。
不要只下载 YAML 后从其他目录启动,否则相对配置文件路径可能不存在。
Hubble 默认只在宿主机回环地址开放 8088;Server 默认发布 8080。仅本机试用时,将 Compose 中 Server 的
ports 改为 127.0.0.1:8080:8080,避免对其他机器开放匿名接口。
为本次试用选一个未被使用的项目名,后续命令在同一终端沿用这些变量;另开终端时恢复本次项目名。
服务健康后,打开 http://127.0.0.1:8088。全新目录未配置 HUGEGRAPH_ADMIN_PASSWORD 时,Server 允许匿名访问,
Hubble 直接进入首页。需要认证时,按 Docker README 配置 .env 中的管理员密码与 JWT 密钥,使用 Server 账号登录;
Hubble 没有独立账号库。个人中心与账号管理只在相应认证和权限条件下显示,不要覆盖已有 .env。
latest 便于体验当前功能,正式部署应固定镜像版本或 digest。镜像是便捷分发物,正式发布包见 下载页。
算法与账号配图使用 Toolchain 1.8.0 构建的 Hubble 与 Server 1.7.0。Hubble 的 /about 当前返回静态值 3.0.0,
不能据此判断构建版本;此组合只说明这些配图的运行环境,不保证 latest 始终对应这些版本。界面入口仍取决于 Server 提供的能力。
Compose 的 server-data 和 hubble-data 分别保存图数据与 Hubble 元数据;更多持久化与生产配置见
Server 部署指南。
首页:找到当前任务的入口
首页按“图概览 → 图导入 → 图查询”组织工作入口,适合第一次使用时了解整体流程。
左侧导航可随时返回各栏目;顶部的图选择器决定查询、Schema 和异步任务的操作对象,切换页面后也要留意当前图。
单机模式只有 DEFAULT 图空间,不需要额外配置 PD。
| 栏目 | 主要用途 |
|---|---|
| 图概览与图详情 | 选择图、加载示例、查看数据规模,再进入建模或查询 |
| Schema / 元数据配置 | 定义属性、顶点类型、边类型及索引 |
| GQL 图遍历 | 编写查询,在图、表格和 JSON 中探索结果 |
| 内置图算法 | 用参数表单探索邻居、路径和相似关系 |
| 异步任务 | 跟踪后台查询、Schema 和索引操作 |
| 数据源管理 | 上传文件或配置外部数据的读取方式 |
| 数据导入 | 将源端字段映射到图模型,执行或调度导入 |
| 个人中心与账号管理 | 查看个人资料、修改密码,按权限管理账号及空间成员 |
| 系统运维 | 查看 Server 节点;PD 模式还提供集群概览和 Store / PD 节点 |
界面速览
先通过画廊认识图概览、Schema 和查询三个工作区。点击截图可放大;下文各操作章节保留大图,便于对照具体步骤。
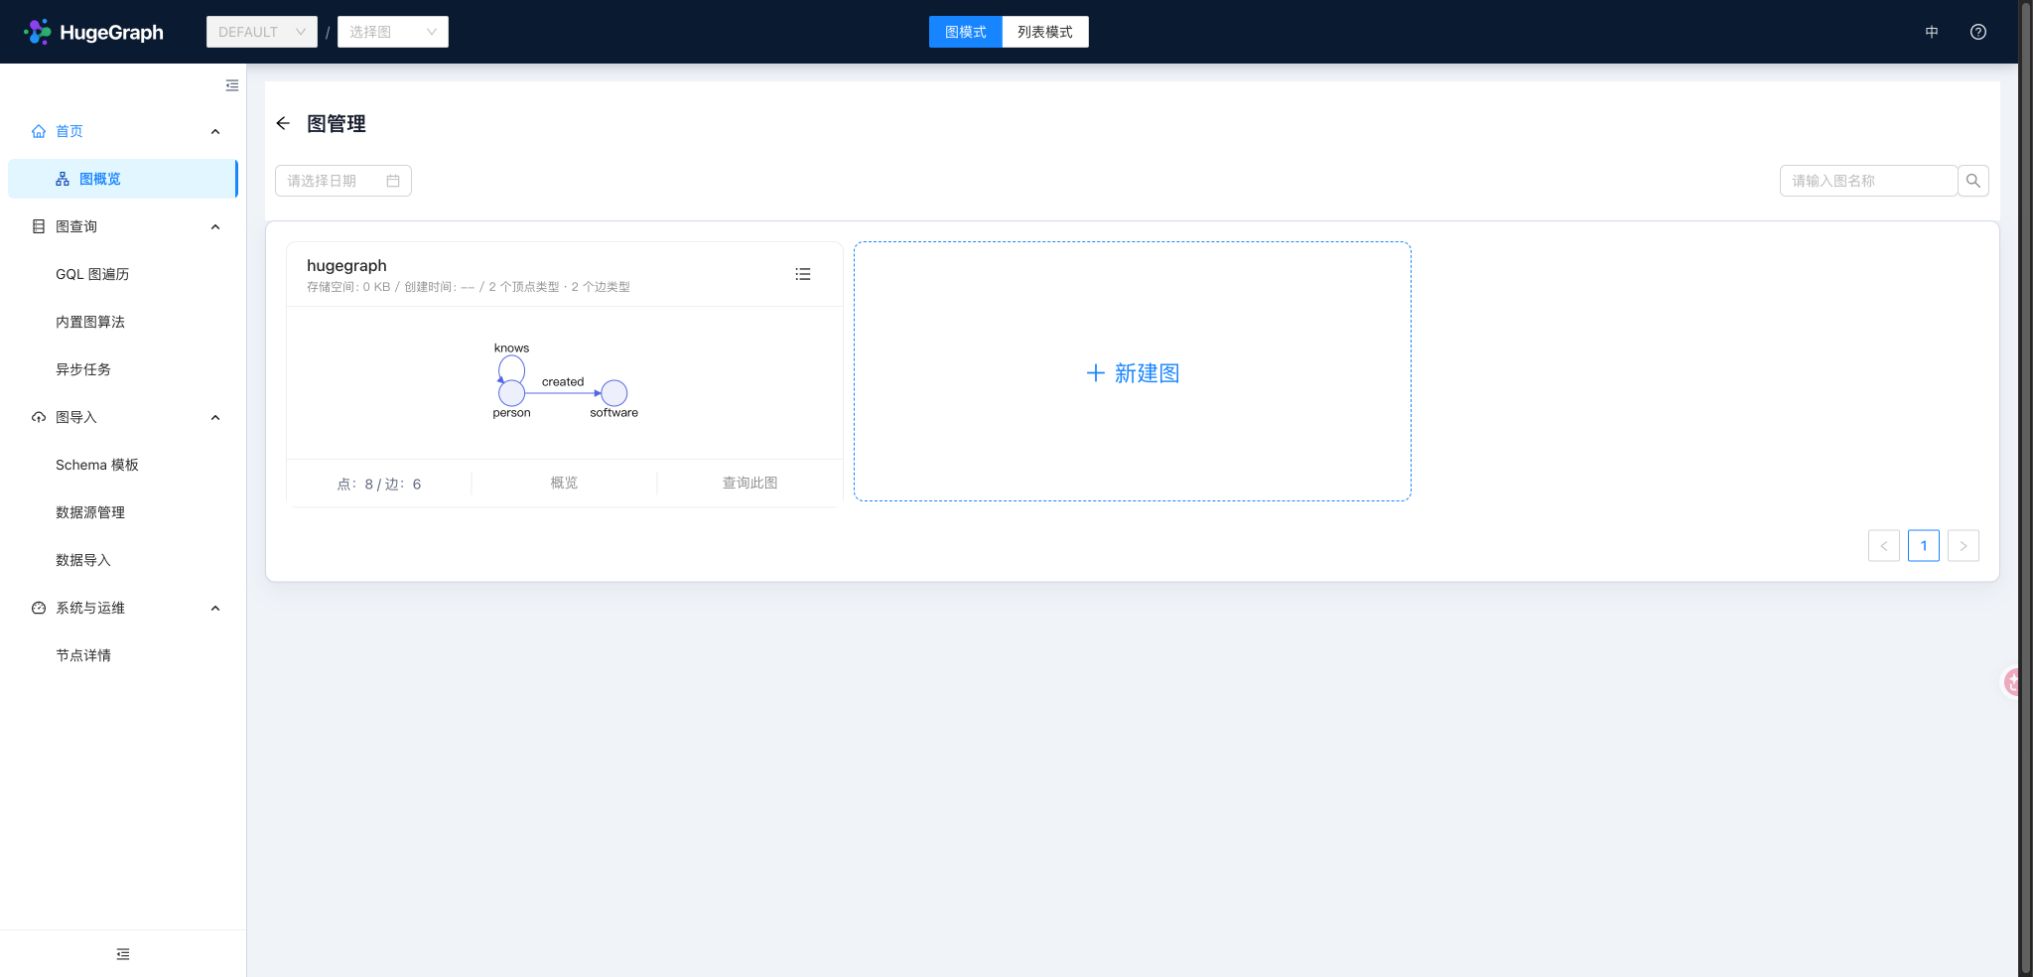
图概览:选择图并查看示例数据
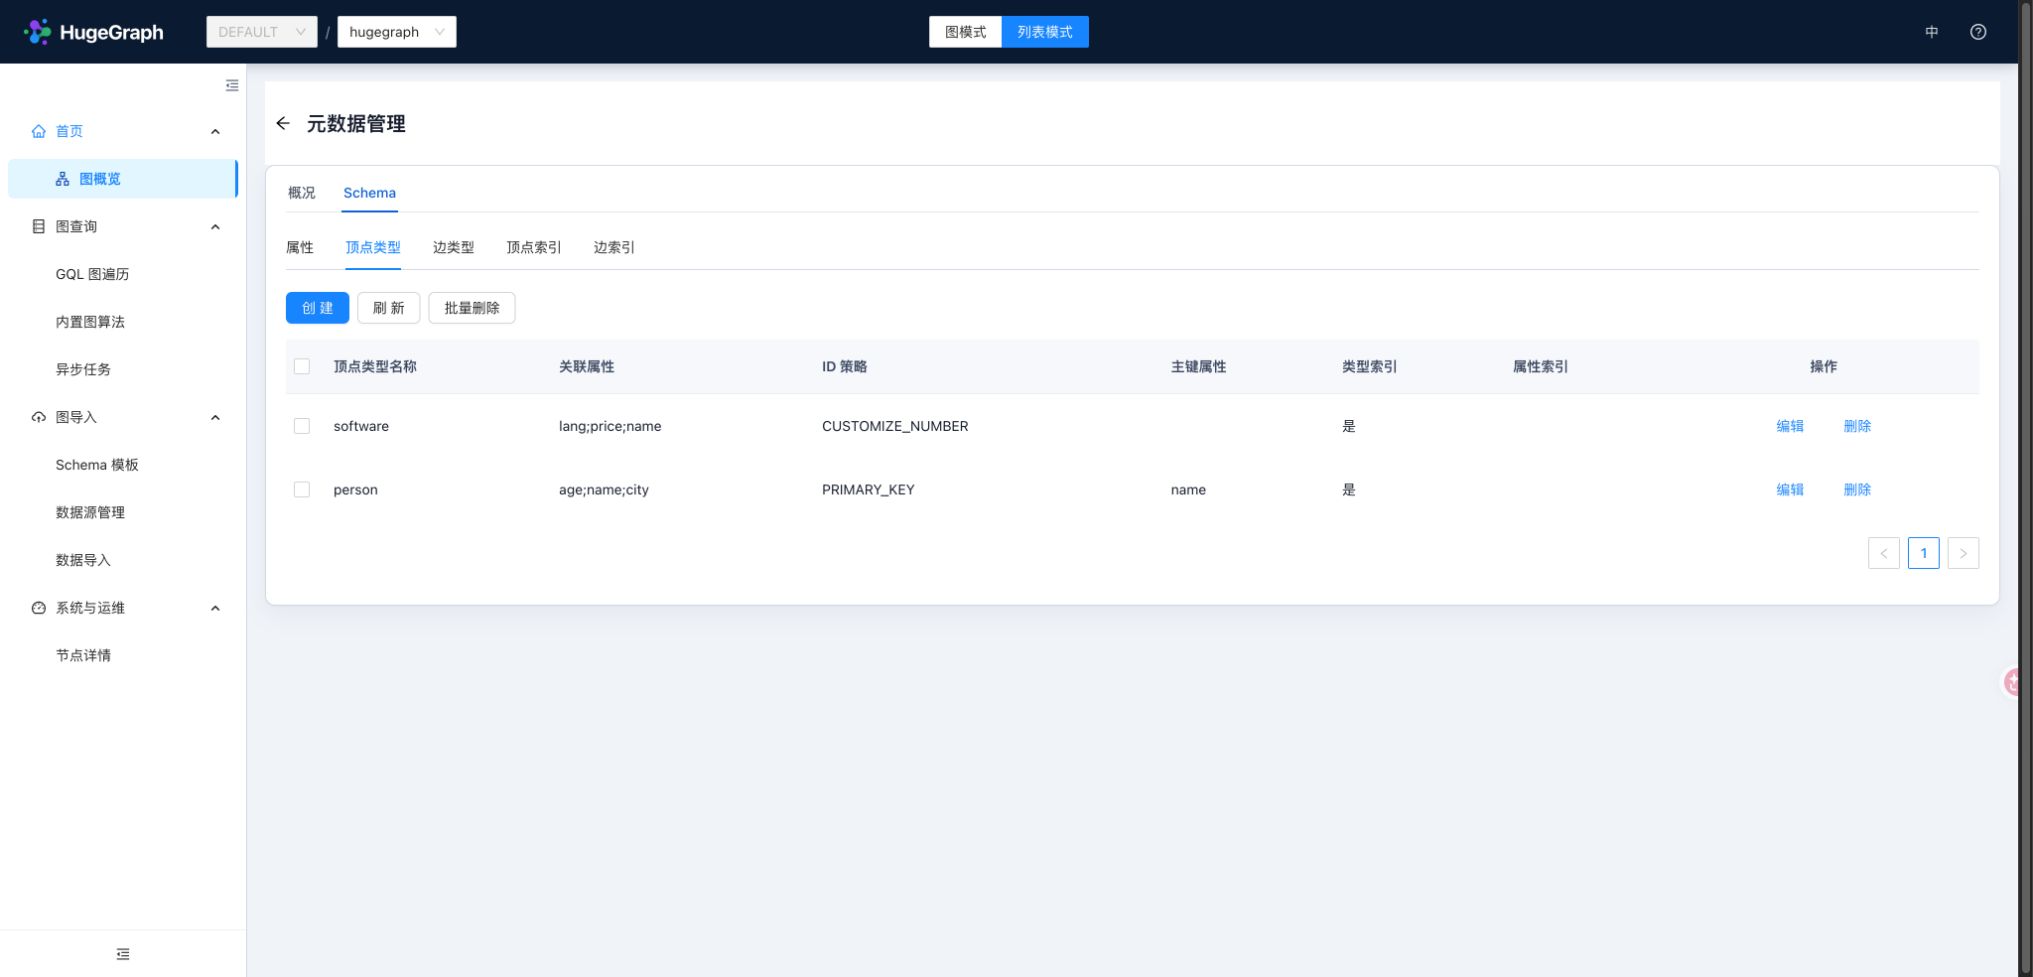
Schema:查看顶点类型、主键与 ID 策略
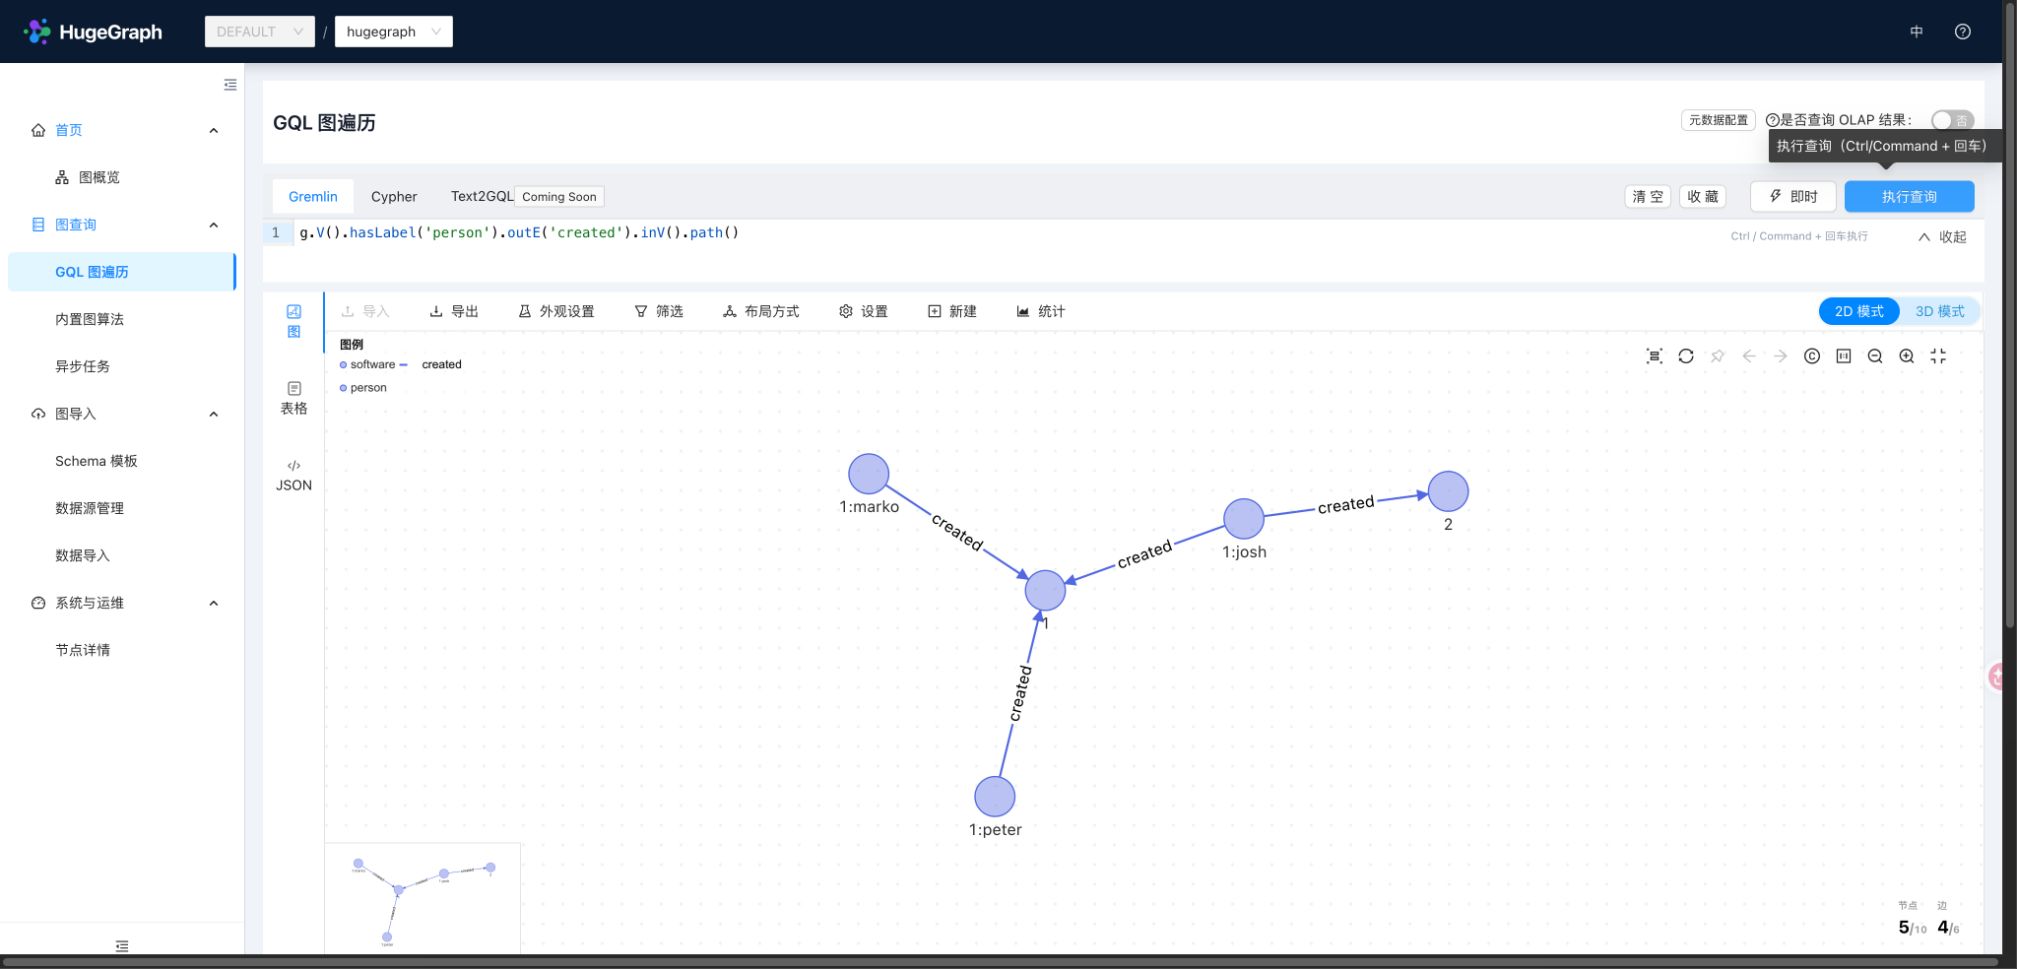
图查询:执行 Gremlin 并探索图结果
图概览与图详情:先认识一张图
从【图概览】选择默认图 hugegraph。图概览提供图的入口与操作菜单;进入详情后,
可以查看 Schema 和数据统计,并跳转到建模、数据准备或查询。统计提供整体规模信息,导入或修改数据后可重新更新。
在图的【更多操作】菜单中加载【人物与软件 Demo 图】。示例会补齐对应 Schema 和缺失的数据,不清空已有图; 初次体验请使用空图,避免同名 Schema 与示例定义冲突。本文后续都使用这张图,探索人物和软件之间的关系。
新建图入口取决于 Server 的建图能力。表单填写图名称、可选别名及模板或示例数据,不填写每图 Server 主机与账号; Server 连接统一来自 Hubble 配置。用户自建 Schema 模板属于 PD 模式,见 分布式补充。
Schema 建模:定义数据的形状
Schema 决定哪些属性和关系可以写入图,以及顶点 ID 和查询索引如何生成。 从【元数据配置】进入,列表视图方便维护定义,图视图帮助理解顶点与边的结构。
| 定义 | 建模时关注什么 |
|---|---|
| 属性 | 数据类型、单值或多值,避免把数值读成文本 |
| 顶点类型 | 属性、可空属性、ID 策略与主键 |
| 边类型 | 起点和终点类型、属性、边的频次及排序键 |
| 顶点索引 / 边索引 | 索引类型与字段,匹配实际过滤和范围查询 |
在人物与软件示例中,person 通过 name 主键生成 ID,age 与 city 可以为空;
software 使用自定义数值 ID,created 连接人物与软件。它们对应 Loader 完整示例。
建立自己的模型时,按“属性 → 顶点类型 → 边类型 → 索引”准备。关联属性和索引信息可以帮助检查类型的依赖关系。 删除类型和创建、重建索引可能提交后台任务;操作被接受后,还需到【异步任务】确认最终状态。
GQL 工作台:查询与探索人物关系
进入【GQL 图遍历】,确认当前图为 hugegraph。工作台将查询编辑器与结果区放在一起,
可选择立即执行或异步执行,收藏常用语句,也可以从执行记录加载查询。
先在 Gremlin 编辑器执行人物属性查询:
这条查询适合在表格或 JSON 视图核对属性。要观察人物与软件的关系,执行:
图结果支持 2D / 3D 展示。点击顶点或边查看 ID、类型和属性,双击顶点展开邻居; 布局、样式和筛选工具帮助突出重点,导出功能便于分享结果。【新增】用于创建元素,有权限时也可以编辑已有数据。 调整布局、颜色或显示范围只改变画布;新增、编辑和 Gremlin 写入才会改变 Server 中的数据。
Ctrl / Command + Enter 执行查询。立即执行适合小规模探索;长查询可交给后台任务,避免一次返回整张大图。
Cypher 页签只在 Server 支持时提供。Text2GQL 当前是界面预览,未连接模型或查询服务,不能直接生成可执行查询。
内置图算法:用表单探索关系
不想从头编写遍历语句时,可以进入【内置图算法】,搜索算法并填写参数。 邻居探索用于回答“这个点附近有什么”,路径算法用于寻找两个点的连接,相似度和排序算法用于比较或筛选顶点。 从一个已知顶点 ID 开始,先限定方向、边类型、深度与返回规模,再观察结果,会比直接运行大范围计算更容易理解。
算法表单提供参数说明及文档入口;常用参数可以在页面间往返时恢复。
运行结果按算法显示为图或相应的结果面板;需要理解具体定义和参数时,使用算法标题旁的说明与文档链接。
表单聚焦时也可用 Ctrl / Command + Enter 运行当前算法。
OLAP 批量算法需要 Computer 或 Vermeer 等外部计算环境。本例的两个容器用于在线图操作,不包含这些计算服务。
例如选择 K-neighbor(GET),设置 source=1:marko、max_depth=1、limit=20,
参数校验通过后点击卡片右侧运行按钮,或在参数表单内使用快捷键,即可观察一跳邻居。
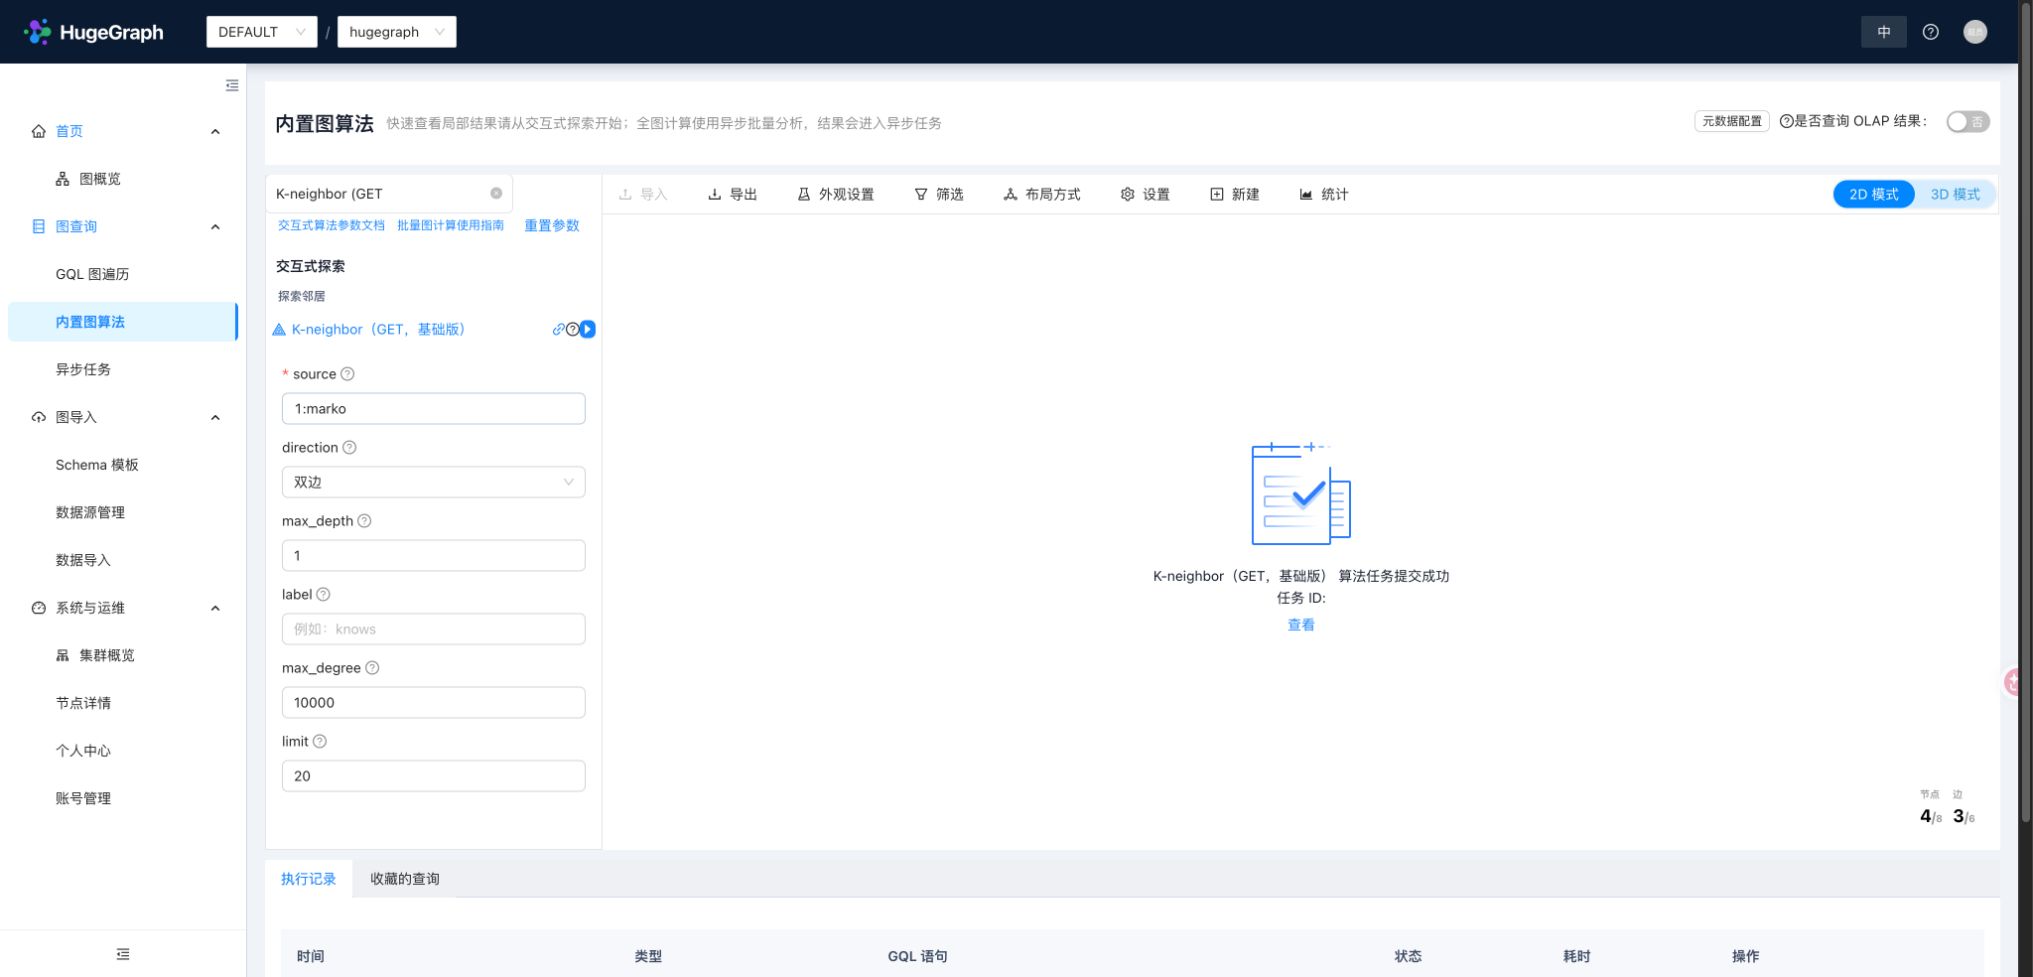
异步任务:确认后台操作的最终结果
【异步任务】集中显示当前图的后台任务,包括异步查询及部分 Schema、索引操作。 可以按任务类型和状态筛选,查看任务 ID、创建时间与执行状态;成功查询可打开结果,失败任务可展开错误信息。 已结束的任务可按界面提供的操作删除记录,任务列表与导入任务的执行历史是两个不同入口。
例如把 g.V().count() 以异步方式提交后,先在列表确认成功,再查看返回的数量。
“提交成功”只表示请求被接受,不表示计算或索引已完成。排查失败时,结合任务错误和 Server 日志定位原因。
数据源管理:把原始数据准备好
数据源负责“从哪里读、怎样解析”,可以被导入任务引用。Hubble 支持 FILE、HDFS、JDBC 和 Kafka; 不同来源需要对应的路径、连接或订阅配置。FILE 最适合先体验:上传文件后,配置格式、分隔符、编码和表头, 检查读取的列名,再进入映射。上传限制和允许的扩展名由 Hubble 配置决定。
为人物示例保存一个 UTF-8 文件 people.csv:
创建 FILE 数据源并上传它,选择 CSV(逗号分隔、默认 UTF-8),列名为 name,age,city。
表头、分隔符和编码属于数据源配置,不在后面的映射步骤设置;源字段应与文件内容一致。
数据导入:从字段映射到可查询的图
【数据导入】把数据源中的行转换为顶点和边。任务创建采用四段配置,先明确目标,再选择字段和映射,最后决定执行时机。
沿用上面的数据源,在 DEFAULT / hugegraph 中创建人物导入任务:
| 配置 | 本例如何填写 |
|---|---|
| 基础信息 | 选择目标图与刚创建的数据源,填写可识别的任务名 |
| 源端字段 | 选择 name、age、city,移到已选字段列表 |
| 映射字段 | 添加 person 顶点映射,用【自动匹配】关联同名属性后核对类型 |
| 调度信息 | 选择执行一次;确认后任务随即提交执行 |
person 使用 PRIMARY_KEY,不设置独立 ID 列。自定义 ID 策略需要指定 ID 列;
AUTOMATIC 由 Server 生成 ID,PRIMARY_KEY 根据映射的主键属性生成 ID。边映射还需指定起点、终点字段并匹配对应顶点的 ID 规则。
任务列表用于管理配置和执行入口,详情中的执行历史用于查看每次实例的状态、导入量与错误。 Hubble 还提供周期调度和 Kafka 实时执行,调度方式需与数据源类型匹配。 完成后返回 GQL 工作台验证:
结果应包含两条新人物记录。导入量统计不应直接当作新增顶点数;重跑可能更新已有元素,表头处理也会影响读取统计。 失败时先检查源字段、数值类型、可空属性及目标 Schema。Hubble 导入适合小规模体验, 大批量正式导入请使用 HugeGraph Loader。
个人中心与账号权限
Hubble 使用 Server 的认证和账号,没有独立用户库。匿名访问时不显示【个人中心】与【账号管理】; 开启认证后,个人中心展示当前账号资料与权限信息,可修改自己的密码。昵称等资料编辑依赖 Server 对个人资料接口的支持。 修改密码后会退出当前会话,需要重新登录。
单机账号管理
单机模式由管理员管理账号,可创建、查看、编辑或删除账号,并支持批量创建。 通过 Hubble 新建的普通单机账号会获得覆盖所有图的读、写、删除和执行权限,不能把它当作只读账号或单图隔离账号。 需要更细的资源权限时,应按 Server 认证与授权配置,而不是依赖空间预设。
PD 模式的空间权限
连接支持默认角色接口的 Server 后,账号与空间访问可以分别管理。管理员管理全局账号, 空间管理员只管理已授权空间的成员;普通成员不会获得账号管理或运维入口。 以下四种预设属于 PD 模式,不表示旧版本或单机 Server 都提供同样的权限编辑能力:
| 预设 | 范围与用途 |
|---|---|
SUPER_ADMIN | 全局管理账号、图空间和运维;可授予或撤销超级管理员 |
GS_ADMIN | 管理已授权图空间及其成员,不授予其他空间或全局超级管理员权限 |
GS_READ_WRITE | 在已授权空间执行图数据读写操作,不管理全局账号 |
GS_READ_ONLY | 在已授权空间读取图数据,不进行写入 |
同一账号在不同空间可以有不同权限。成员管理先选择空间,再添加已有账号或调整权限; 把已有自定义权限替换为预设前,先核对需要保留的授权,避免把复杂权限误认为单一预设。 权限变更后刷新权限上下文或重新登录,确认菜单和目标空间已更新;最终请求仍由 Server 校验。 旧 Server 未提供相应接口时,页面按能力隐藏或禁用操作,不应只凭按钮是否可见推断资源权限。 更完整的空间管理见 分布式补充。
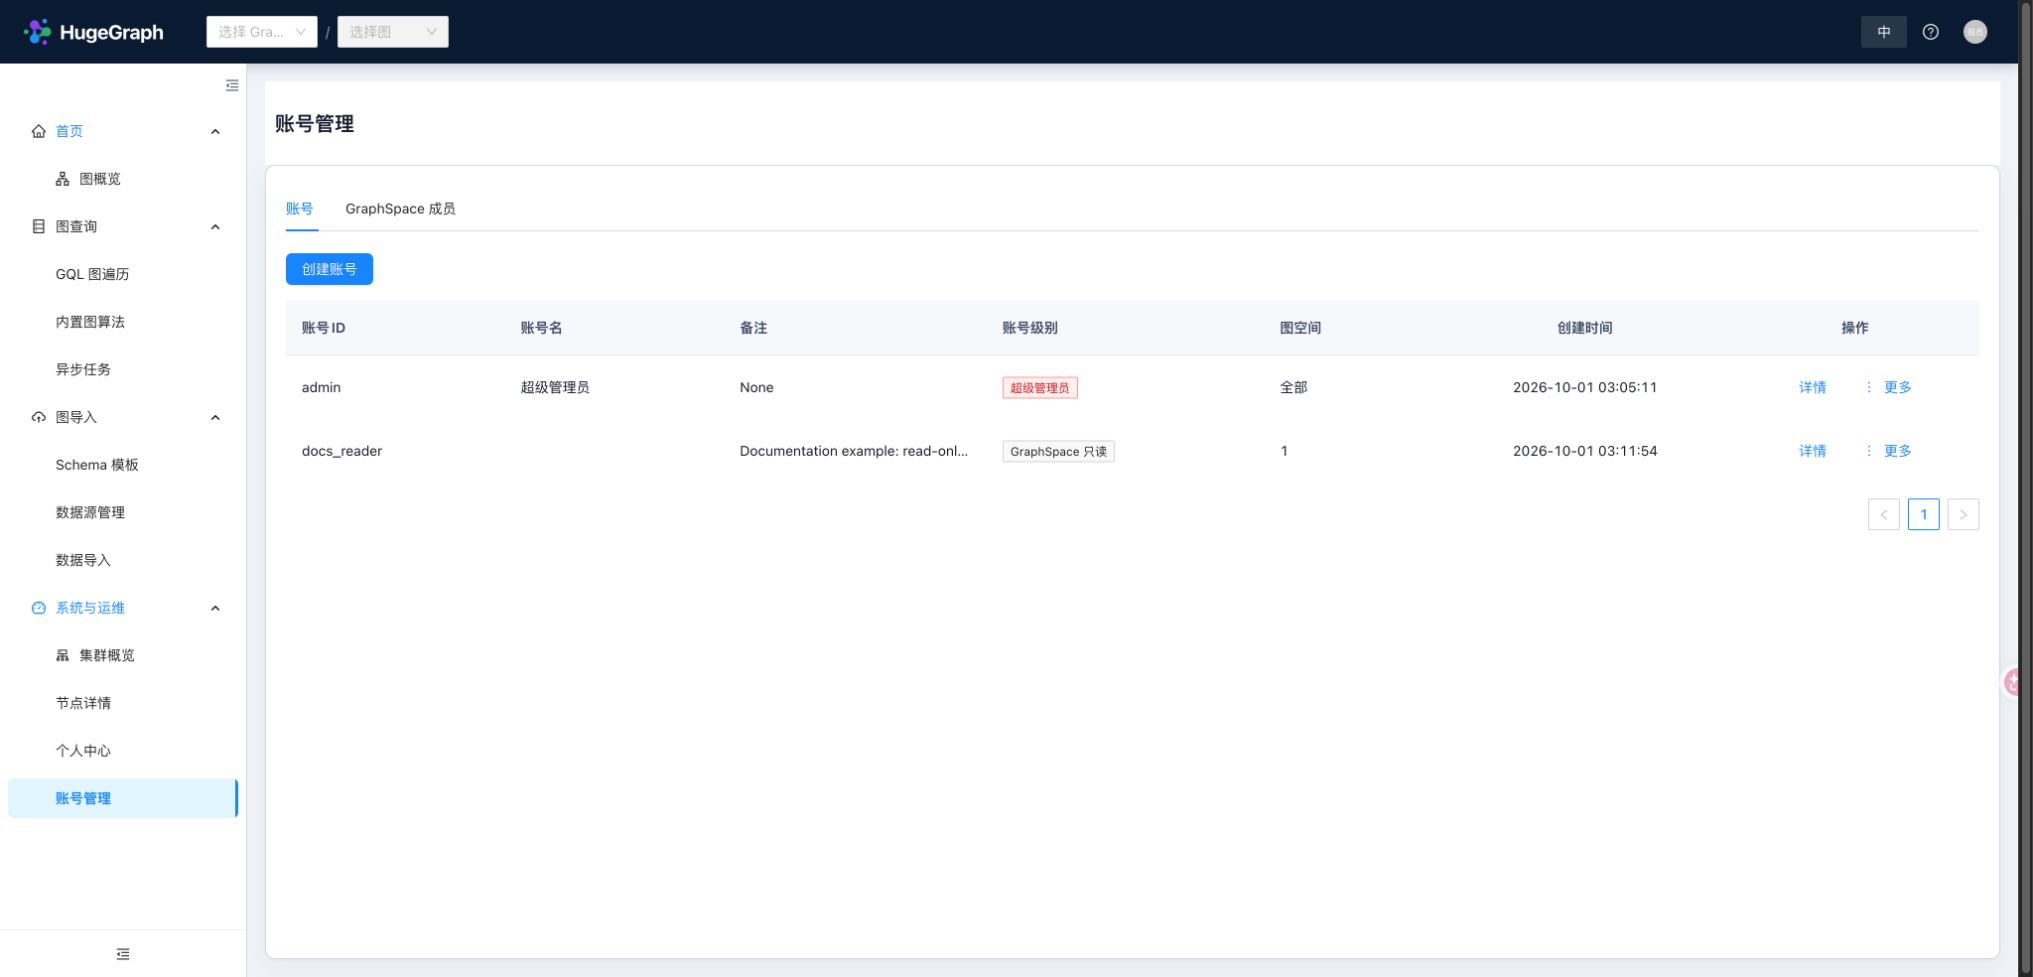
系统运维:检查单机 Server
单机模式的【系统运维】提供【节点信息】,只显示 Server,不显示 PD / Store 节点或集群概览。 节点列表可搜索、筛选健康状态并进入详情;详情用于查看可用的版本、系统、JVM、Server 后端等指标。 指标缺失或标记过期时,应结合采集状态与最近成功时间判断,不能把空值当作零或健康。
匿名模式可以查看运维信息;开启认证后,运维入口仅对有运维权限的管理员显示。 此处用于观测和排查,不是启动、停止或扩缩容控制台。PD 模式的集群概览与节点层级见分布式补充。
快捷键与画布操作
顶部的快捷键帮助入口随时可查看按键说明。以下快捷键有不同的作用范围,输入框中不会触发全局 ? 帮助。
| 操作 | 按键或动作 | 生效位置 |
|---|---|---|
| 打开 / 关闭快捷键说明 | ? | 输入框和编辑器之外 |
| 执行查询 | Ctrl 加 Enter / Command 加 Enter | 查询编辑器 |
| 运行当前算法 | Ctrl 加 Enter / Command 加 Enter | 算法参数表单 |
| 切换图全屏 | F | 先点击聚焦图画布;不是全局按键 |
| 查看元素详情 | 单击顶点或边 | 图结果 |
| 展开相邻关系 | 双击顶点 | 图结果 |
排查连接与结果问题
| 现象 | 先检查 |
|---|---|
| Hubble 页面打不开 | 检查容器状态及 docker compose -p "$HUBBLE_DEMO_PROJECT" -f docker-compose.yml logs hubble |
| 页面打开但无法访问图 | Server 是否健康,server.direct_url 是否能从 Hubble 容器访问,两个容器是否在同一网络 |
| 出现登录页或没有写操作入口 | Server 的认证模式和当前账号权限;Hubble 不单独开启认证 |
| 查询没有预期数据 | 顶部当前图、示例是否加载成功、标签和属性是否一致;区分画布展示与 Server 数据 |
| 没有集群概览 | 本例没有 PD;集群功能见分布式补充 |
查询显示规模受配置影响。gremlin.suffix_limit 默认 250,用于对适用的 Gremlin 查询追加 .limit(N),
不是所有查询的硬上限;gremlin.vertex_degree_limit(100)与 gremlin.edges_total_limit(500)限制展开规模。
FILE 上传默认允许 csv,txt,单文件 1 GB、总量 10 GB;需要覆盖时修改 upload_file.* 配置。
停止试用环境或从源码构建
不再需要示例时,在主仓库的 docker/ 目录执行:
这会删除该项目的容器、网络、命名卷与匿名卷,示例图和 Hubble 导入任务也会丢失。
若想保留数据,下线时省略 --volumes,以后用同一项目名启动。
需要与 master 精确一致的产物时,使用 JDK 11 和 Maven 从 Toolchain 构建。 Maven 插件会安装所需的 Node/Yarn,无需预先安装;以下命令不执行测试:
打包配置默认绑定本机 localhost:8088。bin/stop-hubble.sh 会先请求正常停机,超时后才强制终止。
需要开发与测试说明时,参考 Toolchain 本地测试指南。
3.2.2 - 图可视化
Hubble 为 HugeGraph 提供图数据、Schema、查询和导入的 Web 界面。先从不依赖 PD 的单机组合入手, 再按需要了解分布式集群的差异。
- Hubble 基础与单机 RocksDB:启动、示例图、建模、导入与查询。
- Hubble 与 HStore 分布式集群:PD 发现、图空间与集群运维。
3.2.2.1 - 使用 Hubble 管理 HStore 分布式集群
本篇补充 HStore + PD 部署与单机 RocksDB 的差异。建模、导入和查询的通用操作见
Hubble 基础与单机指南。
内容以 Toolchain master 为准。
主仓库的 docker/docker-compose-hstore.yml
已提供 PD、Store、Server 与 Hubble 的组合。按同目录 Docker README
准备 .env 和生成的 Hubble 本地配置,再从 docker/ 目录启动;不要另维护一份部署 YAML。
下文配置用于解释连接差异,不能替代 README 中 PD 凭据及服务就绪的要求。
图中使用 Toolchain 1.8.0 构建的 Hubble 与 Server、PD、Store 1.7.0。Hubble 的 /about 当前返回静态值 3.0.0,
不能据此判断构建版本;此组合只对应本篇配图的运行环境,latest 标签会变化。不同版本可提供的指标和权限接口有所区别。
连接分布式集群
Hubble 仍通过 Server 的图 API 管理数据。区别在于,分布式模式通过 PD 发现 Server, 同时从 PD 和 Store 获取集群信息;Hubble 不直接读写 Store 中的图数据。
使用官方 Compose 时,先按 Docker README 在主仓库的 docker/ 目录准备 .env,再生成它挂载的 Hubble 配置:
脚本读取 .env 中已载入的 HG_PD_AUTH_SECRET_KEY,将 PD 运维密码写入宿主机的 docker/conf/hubble/hstore.local.properties。
如需调整连接地址或运维配置,编辑这个生成文件,并保留生成的 operations.pd.password,使其与 PD 使用的密钥一致。
不要覆盖为跟踪的 .example 模板。Compose 将它只读挂载到容器的 /hubble/conf/hugegraph-hubble.properties,
不要进入容器修改。生成文件和 .env 都不应提交;以后重新运行脚本会覆盖生成文件,需要重新应用自定义配置。
在同一 docker/ 目录启动组合,并确认 Server 已注册、Store 已就绪:
若分别部署服务,参照 PD 部署指南 和
HStore 部署指南;源码或二进制包启动的 Hubble 则编辑其
conf/hugegraph-hubble.properties。以下连接项与官方最小拓扑一致,其他部署请使用 Hubble 后端实际可达的地址:
| 配置 | 用途 | 随包配置值 |
|---|---|---|
pd.enabled | 显式启用 PD 模式;此时不使用 server.direct_url。 | false |
cluster | 用于 Server 服务发现的集群名称,应与注册信息一致。 | hg |
pd.peers | PD gRPC 地址;多个地址用逗号分隔。 | 127.0.0.1:8686 |
pd.server | 集群运维使用的 PD REST 地址,不是 gRPC peer 列表。 | 127.0.0.1:8620 |
不要把 8686 和 8620 混用,也不要在跨容器连接时保留 127.0.0.1。
随包文件显式设置 pd.enabled=false,而该键缺失时 Java 默认值是 true,因此两种部署都应显式设置它。
源码或二进制包部署在修改配置后重启 Hubble。Compose 部署在修改或重新生成宿主机配置后,从 docker/ 目录重建 Hubble 容器,
使只读挂载重新载入文件(沿用启动时的项目名及所有 -f 参数):
页面无需逐图填写 Server 主机和端口。
用图空间组织图与权限
GraphSpace(图空间)将图、Schema 模板和访问权限组织在同一个范围内。例如,分别为业务团队创建 sales 与 research,
让各团队只看到并操作自己的图。进入图空间后,图的建模、导入和查询仍沿用基础指南的流程。
创建与调整图空间
开启 Server 认证时,创建、编辑和删除图空间要求超级管理员权限。创建时先填写全局唯一的 GraphSpace 名称、
可选的显示别名及最大图数;例如用 research 作 API 标识,用“研究图谱”作显示名。GraphSpace 名称创建后不可修改,
别名和描述可随后调整,别名不参与 URL 或权限匹配。图空间管理员从已有账号中选择。
“高级部署与资源限制”包含图查询/写入服务、异步计算任务的 CPU 与内存上限,以及存储容量限制。 这些值用于部署和配额场景,不是当前资源用量,也不代表提交表单后会立即扩容 Docker 容器。 默认最大图数为 100;图服务与计算任务分别为 64 核、128 GB,存储上限为 1000000 GB。 普通容器试用可先保留默认值;Kubernetes 命名空间、Operator 和算法镜像仅在对应部署或计算场景中填写。
选择图空间后,再进入其中的图。切换空间时应重新确认当前图,尤其是不同空间中存在同名图时。 列表只显示账号可访问的空间;看不到预期空间时,先检查成员权限,不要反复新建图。
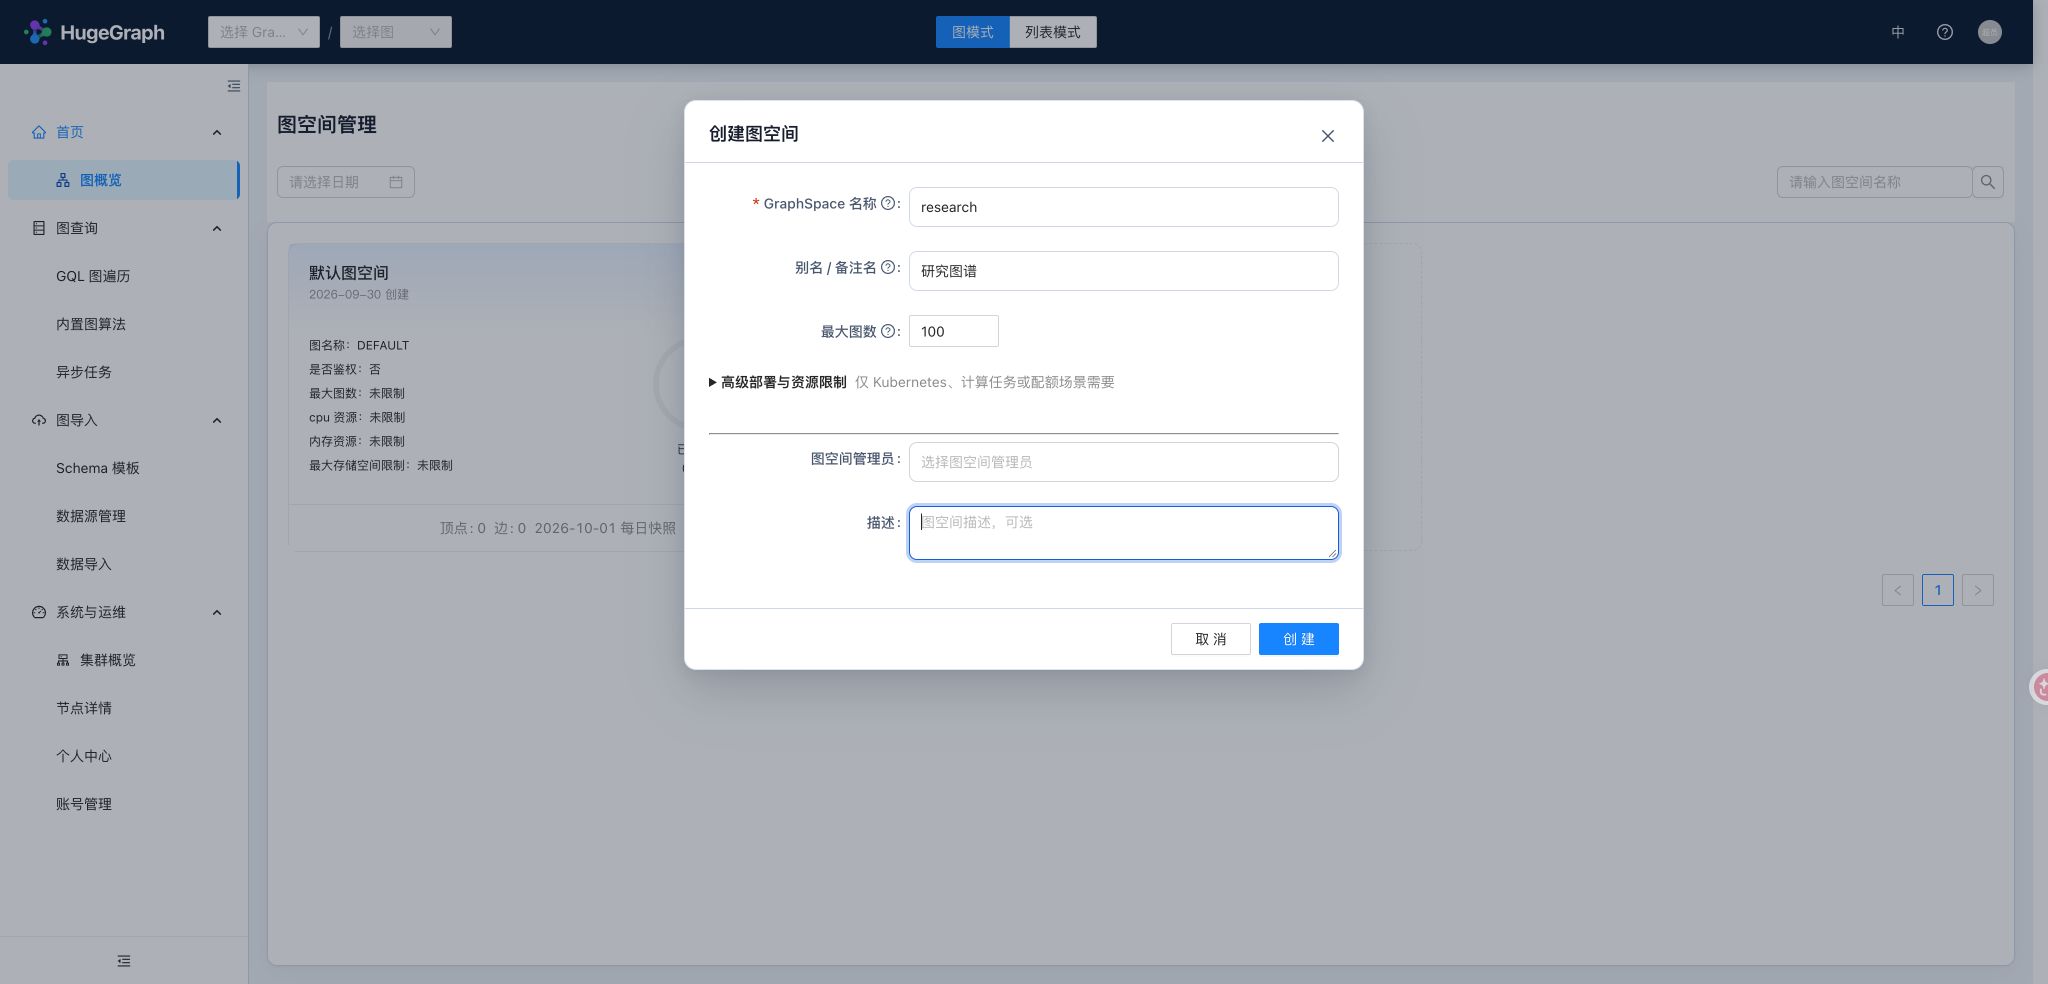
复用 Schema 模板
用户 Schema 模板仅适用于 PD 模式,按图空间持久化保存 Groovy Schema。
当一组业务图需要同样的顶点类型、边类型和索引时,可以先保存模板,再在创建图时选择它,减少重复建模。
例如 research 中的用户模板用于该空间后续创建的图;切换到另一个空间后,应重新选择该空间的模板。
用户模板与主篇的内置示例模板不同:内置模板用于快速体验预设模型,用户模板用于保存自己的模型并长期复用。 模板本身不等于导入数据;是否加载示例数据是创建图时的另一个选择。 开启 Server 认证时,创建用户模板需要所在空间的写权限,更新或删除还要求模板所有者或相应管理权限。 匿名模式不进行按用户的权限与模板所有者检查。 单机模式不提供用户模板管理。
给用户分配图空间权限
账号创建、登录和个人资料管理见基础指南; 分布式模式额外提供“管理 GraphSpace 成员”,在已有账号与指定空间之间分配权限。 支持权限预设的 Server 提供以下常用选择:
| 预设 | 适用对象 | 作用范围 |
|---|---|---|
| GraphSpace 只读 | 查看、查询图数据的使用者 | 所选空间。 |
| GraphSpace 读写 | 建模、导入和维护图数据的使用者 | 所选空间。 |
| GraphSpace 管理员 | 管理该空间的成员与图资源的负责人 | 所选空间,不因此获得创建/编辑图空间或集群运维权限。 |
| 超级管理员 | 管理账号、图空间及集群的运维人员 | 全局,应按实际职责分配。 |
同一账号可在不同空间拥有不同权限,例如对 research 读写、对 sales 只读。
账号与空间成员分开管理,移除成员不会删除全局账号。创建账号后可以立即继续分配空间权限;调整已有成员时,确认当前空间及预设,保留其他空间仍需要的权限。
仅启用 pd.enabled 不会授予权限,旧 Server 的自定义角色也不能直接当作这些预设处理。
认证配置见 Server 认证与授权。
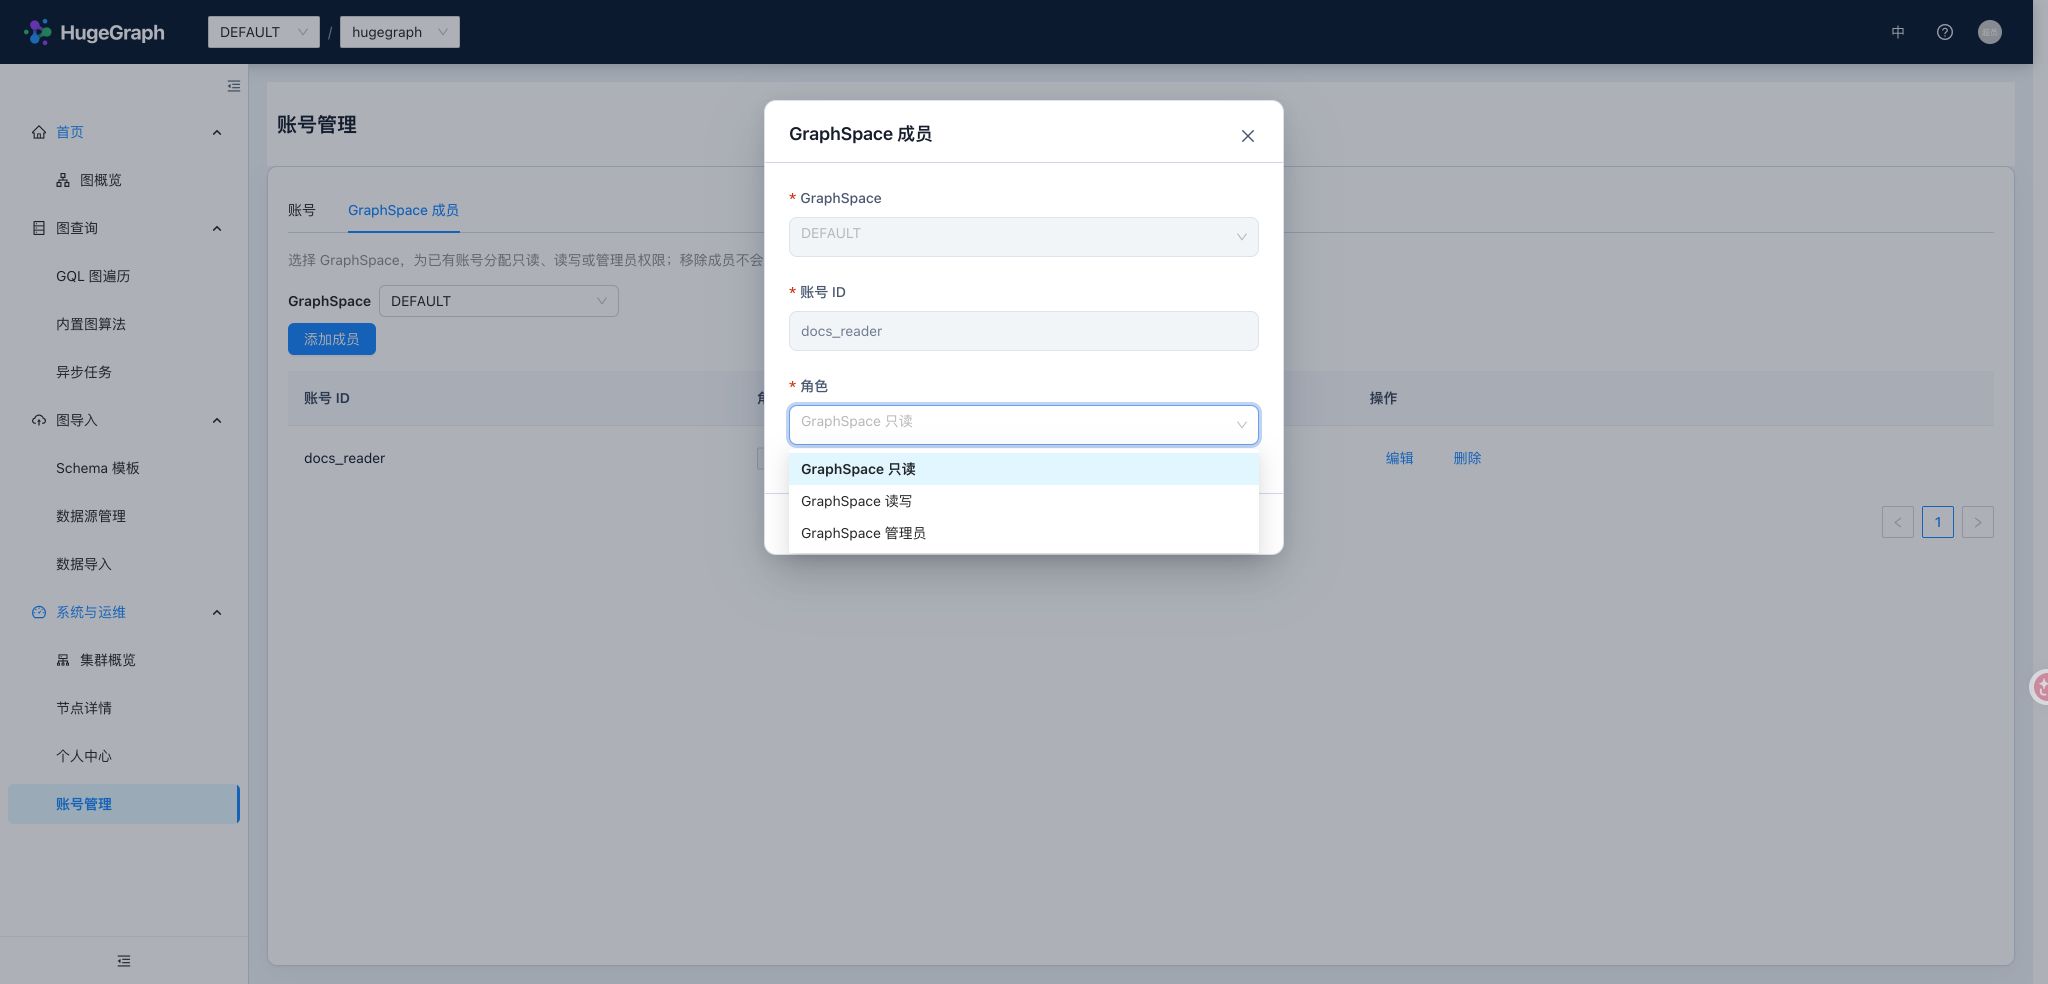
从集群概览定位异常
集群概览用一张拓扑展示 Server → PD → Store,可切换节点列表按类型、状态或名称筛选。 概览中的 PD Leader、在线 Store 数、图数、分区数、副本数和数据量,帮助判断当前连接的规模及哪些节点需要关注。 分区和副本描述数据分布;数据量是采集到的用量,不是图空间配置的存储上限。
先看集群和来源状态,再进入异常节点:UP 表示本次采集的来源正常;DEGRADED 表示集群或部分来源异常;
DOWN 表示相应探测未成功。拓扑可用而指标部分缺失时,仍可能正常查询图。
页面会区分不支持、不可用、数据过期和采集失败,并显示采集时间;空值不是零,历史值也不等于当前状态。
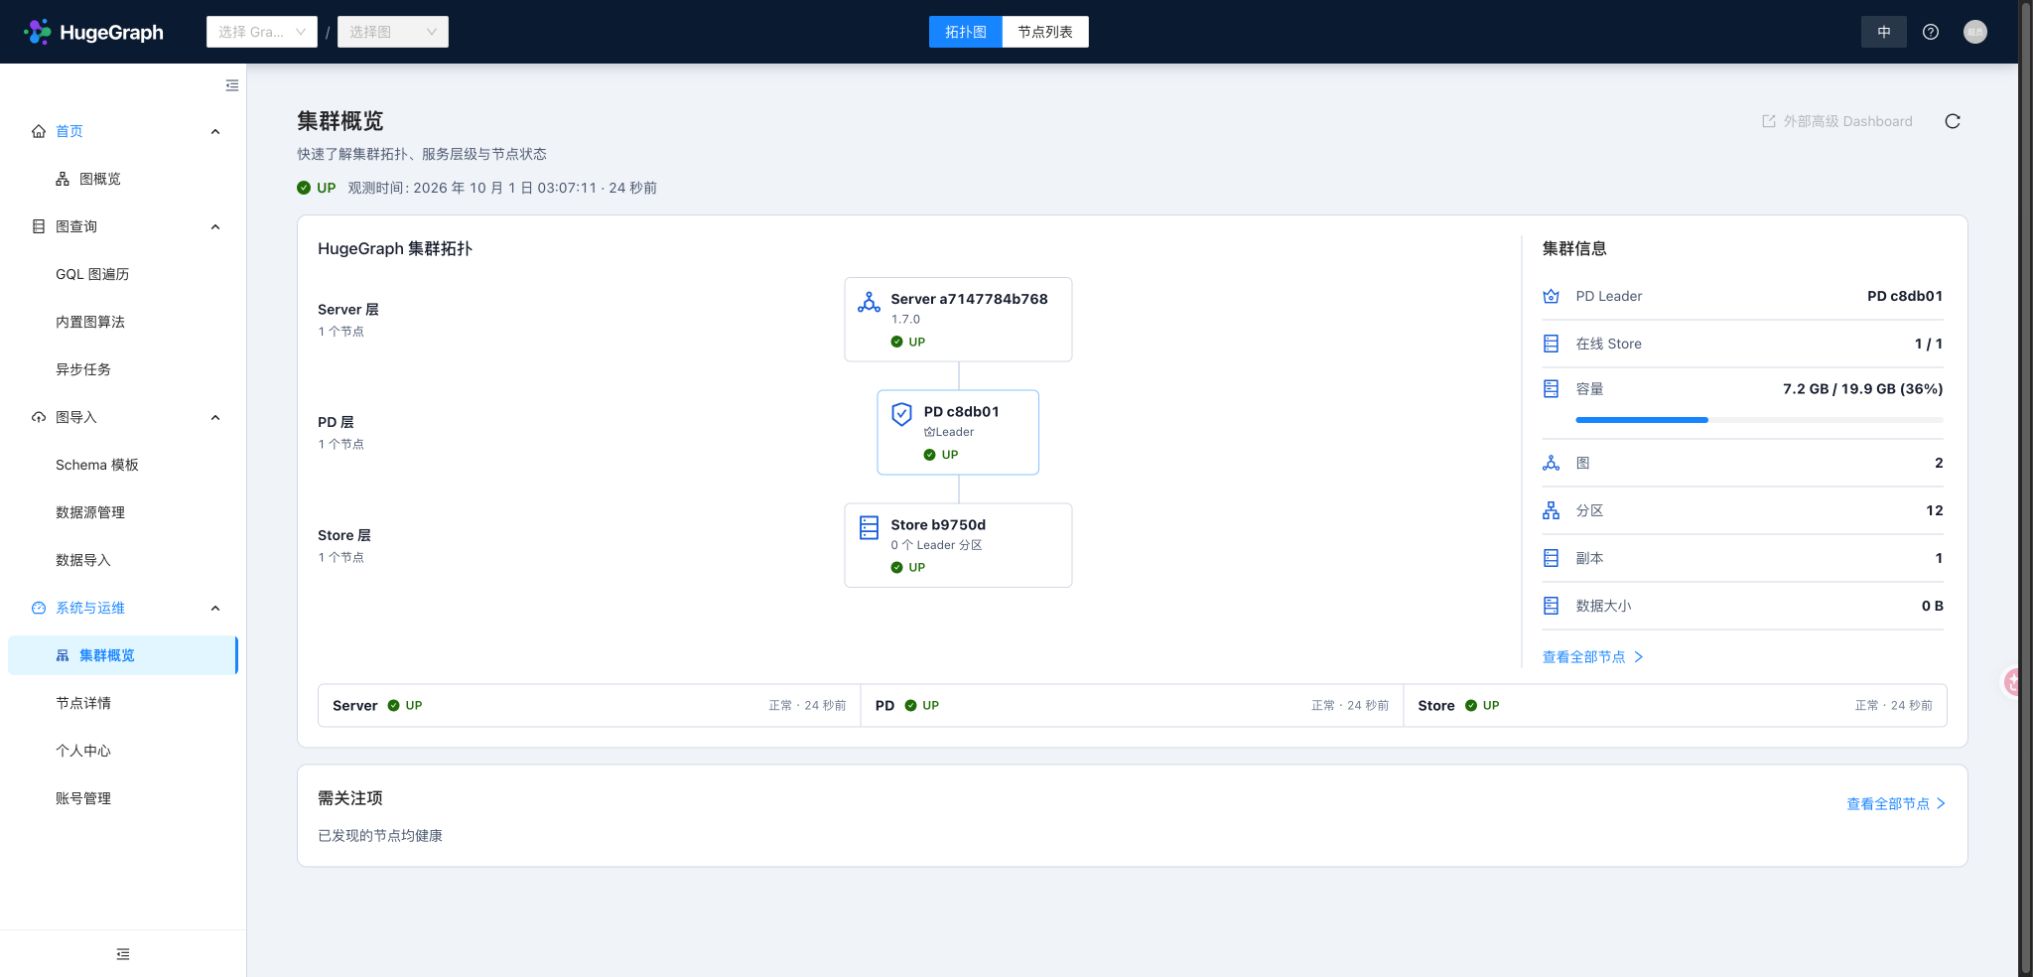
节点详情读什么
| 节点 | 主要关注信息 | 如何使用 |
|---|---|---|
| Server | 节点可用性、JVM/CPU/内存及后端指标 | 判断查询与写入入口是否可达,并检查资源压力。 |
| PD | Leader/Follower 角色、状态及上游可提供的运行指标 | 确认元数据与调度入口;Leader 信息缺失时不推断角色。 |
| Store | 分区数、Leader 分区数、系统/磁盘指标,以及 Raft 组数和启用组数 | 检查存储节点及副本服务,结合其他节点比较分布。 |
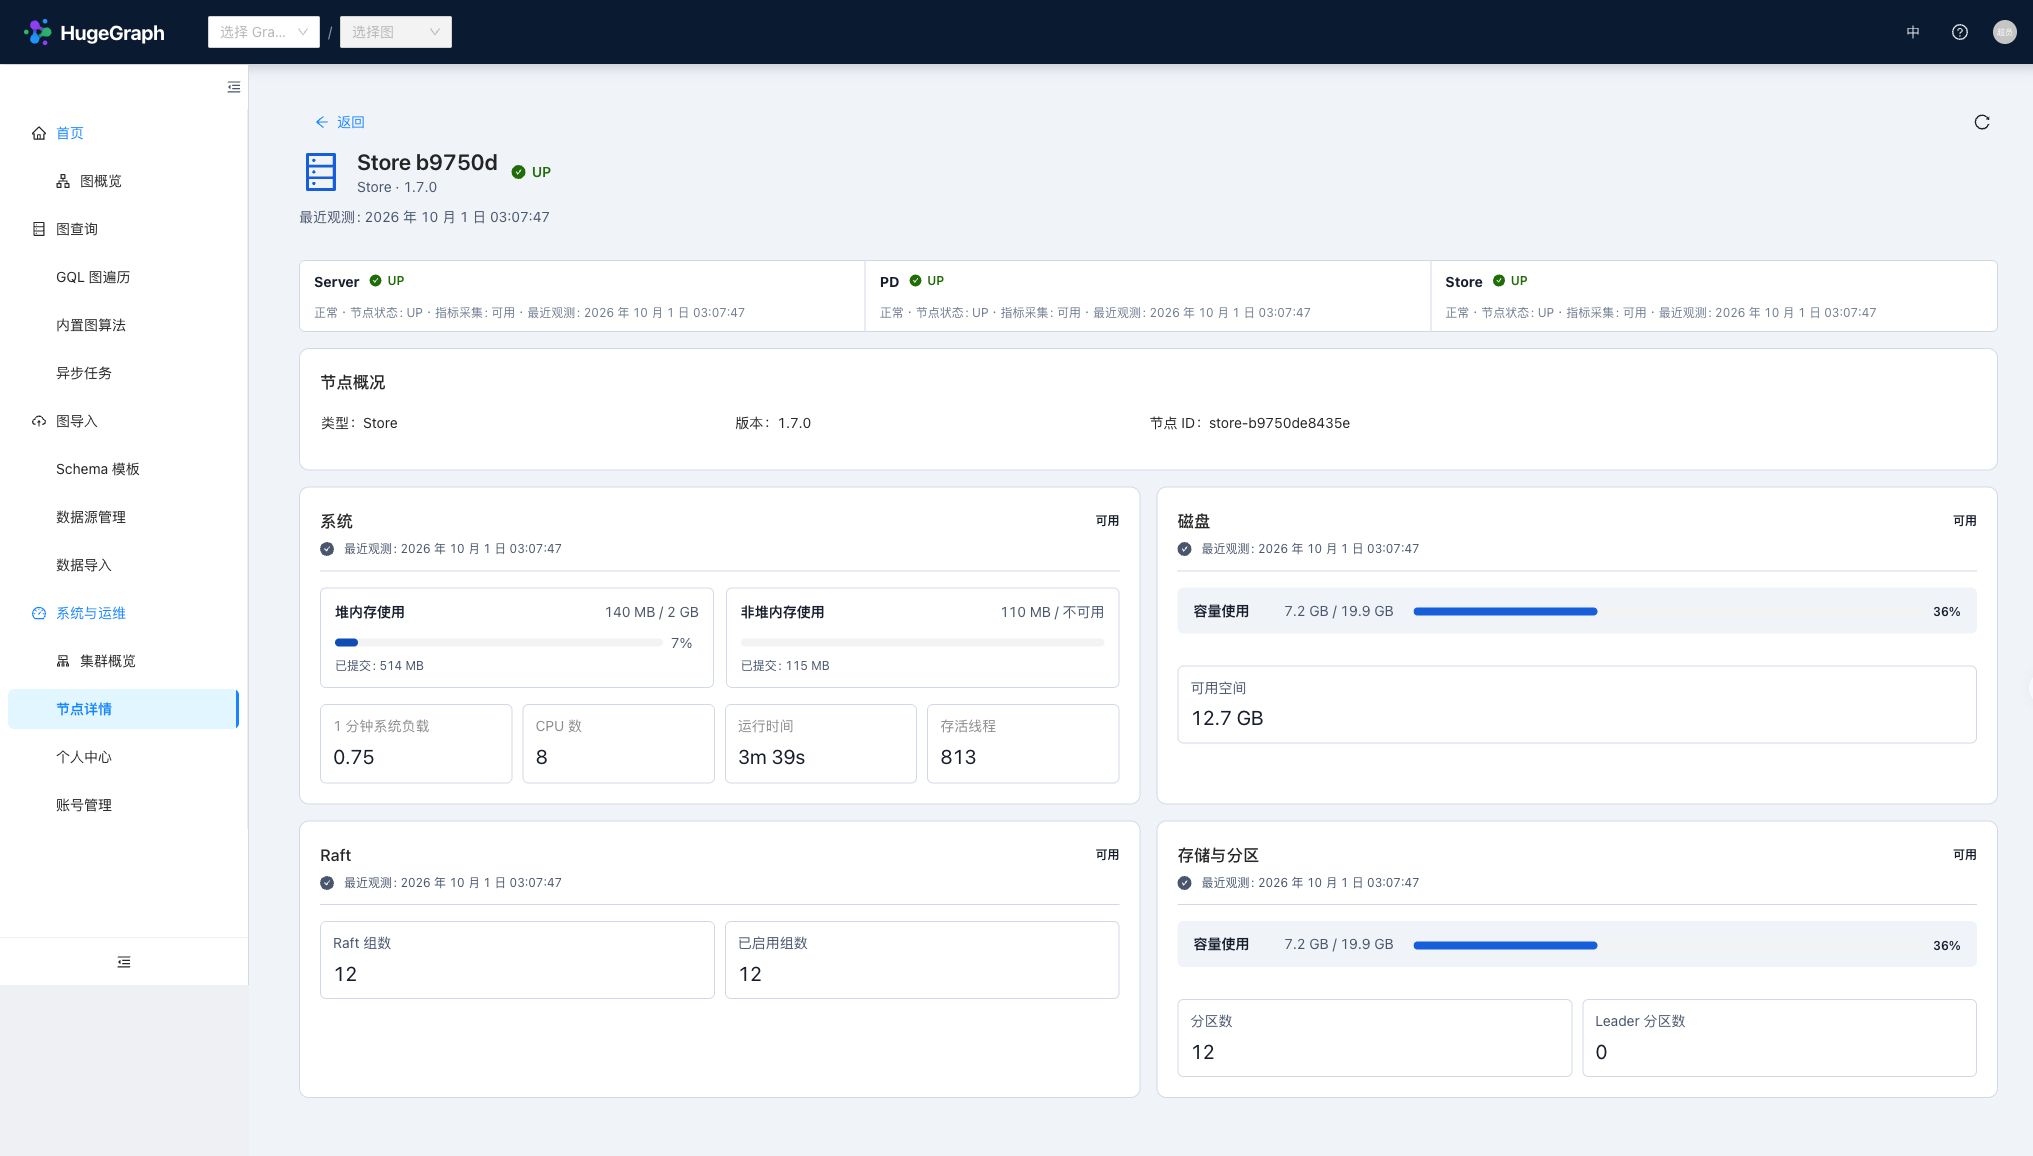
PD Leader 与 Store 的 Leader 分区不是同一概念:前者协调集群元数据,后者负责相应数据分区的 Raft 组。 Hubble 展示上游提供的观测值,不代替完整的 Raft 副本一致性检查;各版本可用的指标不同。
开启 Server 认证时,集群运维读取要求超级管理员(ADMIN 级别),空间管理员和普通成员不会因此获得集群读取权限。
部署时使用容器隔离、可信 HTTPS 入口、Server 认证与网络白名单,避免直接公开 Hubble 和组件端口。
配置运维访问
PD/Store 的运维凭据由 Hubble 后端使用,与浏览器登录 Server 的账号分开。
Compose 部署修改上文生成的宿主机 docker/conf/hubble/hstore.local.properties;其他部署修改 Hubble 包内配置文件。
其中 PD 密码由脚本生成并与 .env 中的密钥保持一致,Store 启用认证时再配置对应服务账号。不要把密码写进文档、截图或提交的配置:
| 配置 | 随包默认值 | 设置方式 |
|---|---|---|
operations.pd.username / operations.pd.password | 用户名 hubble,密码为空 | 与 PD 运维 REST 认证匹配。 |
operations.store.username / operations.store.password | 用户名 hubble,密码为空 | 上游 Store REST 启用认证时配置对应服务账号。 |
operations.store.allowed_targets | [http://127.0.0.1:8520,http://[::1]:8520] | 列出信任的 Store 指标来源。 |
例如容器中的 Store 上报 store:8520,将白名单配置为:
多节点时列出每个允许访问的来源。每项必须是带显式端口的 http 或 https origin,不能带路径、凭据或通配符,
并且应与 PD 返回的 Store 指标目标一致。仅在白名单里添加地址不会建立节点发现信息。
若拓扑可见但指标不完整,依次检查 Hubble 后端到 PD REST 的连通性与认证、PD 返回的 Store REST/指标目标, 以及目标是否与白名单一致。概览的部分可用状态表示某些来源尚未成功采集,不等同于所有图 API 都不可用。
3.2.3 - HugeGraph-Loader 快速上手
本文以 Toolchain master(当前版本为 1.8.0)为准。发布版和 Docker latest 可能与源码不同;使用时请核对版本,未发布的版本请按下文从源码构建。
1 HugeGraph-Loader 概述
HugeGraph-Loader 是 HugeGraph 的数据导入组件,能够将多种数据源的数据转化为图的顶点和边并批量导入到图数据库中。
目前支持的数据源包括:
- 本地磁盘文件或目录,支持 TEXT、CSV 和 JSON 格式的文件,支持压缩文件
- HDFS 文件或目录,支持压缩文件
- 主流关系型数据库,如 MySQL、PostgreSQL、Oracle、SQL Server
- Kafka topic
- 已有的 HugeGraph 图,用于把数据从一个图复制到另一个图
本地磁盘文件和 HDFS 文件支持断点续传。
后面会具体说明。
注意:使用 HugeGraph-Loader 需要依赖 HugeGraph Server 服务,下载和启动 Server 请参考 HugeGraph-Server 快速上手
测试指南:如需在本地运行 Loader 测试,请参考 工具链本地测试指南
2 获取 HugeGraph-Loader
可以通过以下三种方式获取 HugeGraph-Loader:
- 使用 Docker 镜像 (便于测试)
- 下载已编译的压缩包
- 克隆源码编译安装
2.1 使用 Docker 镜像 (便于测试)
我们可以使用 docker run -itd --name loader hugegraph/loader:latest 部署 loader 服务。对于需要加载的数据,则可以通过挂载 -v /path/to/data/file:/loader/file 或者 docker cp 的方式将文件复制到 loader 容器内部。
或者使用 docker-compose 启动 loader, 启动命令为 docker-compose up -d, 样例的 docker-compose.yml 如下所示:
以下组合用于本地匿名试用,Server API 只发布到本机。
具体的数据导入流程可以参考 4.5 使用 docker 导入
注意:
hugegraph-loader 的 docker 镜像是一个便捷版本,用于快速启动 loader,并不是官方发布物料包方式。你可以从 ASF Release Distribution Policy 中得到更多细节。
生产环境应固定已发布的版本标签或镜像 digest。
latest是可变标签,不能据此判断其与master一致。
2.2 下载已编译的压缩包
从 下载页面 选择已发布的 Toolchain 压缩包并解压。
发布包不一定包含 master 的全部功能;需要本文对应实现时,使用下一节的源码构建方式。
2.3 克隆源码编译安装
克隆 master 分支:
编译生成 tar 包:
如需读取 Oracle 数据,按所用 Oracle/JDK 版本准备兼容的 JDBC 驱动 JAR,并放入解压后 Loader 的 lib/ 目录。
启动脚本会加载该目录中的 JAR;仅将驱动安装到 Maven 本地仓库并不会让运行中的 Loader 找到它。
3 使用流程
使用 HugeGraph-Loader 的基本流程分为以下几步:
- 编写图模型
- 准备数据文件
- 编写输入源映射文件
- 执行命令导入
3.1 编写图模型
这一步是建模的过程,用户需要对自己已有的数据和想要创建的图模型有一个清晰的构想,然后编写 schema 建立图模型。
比如想创建一个拥有两类顶点及两类边的图,顶点是"人"和"软件",边是"人认识人"和"人创造软件",并且这些顶点和边都带有一些属性,比如顶点"人"有:“姓名”、“年龄"等属性, “软件"有:“名字”、“售卖价格"等属性;边"认识"有:“日期"属性等。
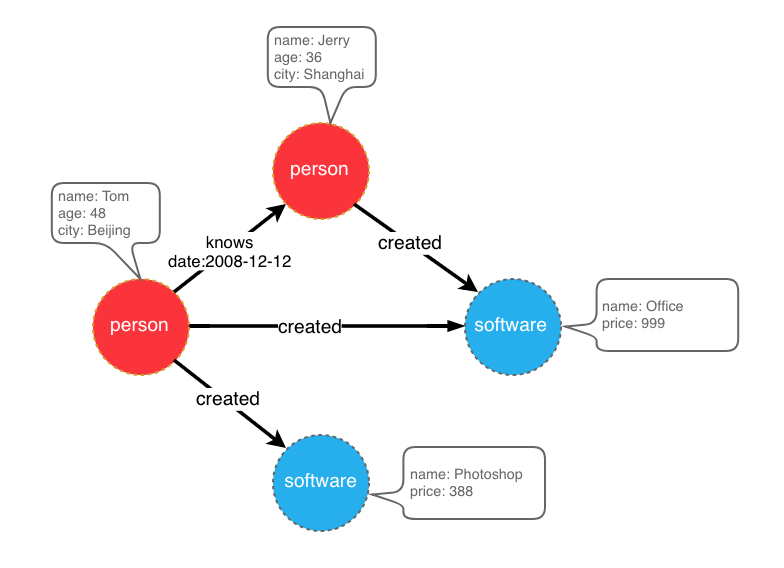
示例图模型
在设计好了图模型之后,我们可以用groovy编写出schema的定义,并保存至文件中,这里命名为schema.groovy。
关于 schema 的详细说明请参考 HugeGraph Java Client 中对应部分。
3.2 准备数据
目前 HugeGraph-Loader 支持的数据源包括:
- 本地磁盘文件或目录
- HDFS 文件或目录
- 部分关系型数据库
- Kafka topic
- 已有的 HugeGraph 图
3.2.1 数据源结构
3.2.1.1 本地磁盘文件或目录
用户可以指定本地磁盘文件作为数据源,如果数据分散在多个文件中,也支持以某个目录作为数据源,但暂时不支持以多个目录作为数据源。
比如:我的数据分散在多个文件中,part-0、part-1 … part-n,要想执行导入,必须保证它们是放在一个目录下的。然后在 loader 的映射文件中,将path指定为该目录即可。
支持的文件格式包括:
- TEXT
- CSV
- JSON
TEXT 是自定义分隔符的文本文件,第一行通常是标题,记录了每一列的名称,也允许没有标题行(在映射文件中指定)。其余的每行代表一条记录,会被转化为一个顶点/边;行的每一列对应一个字段,会被转化为顶点/边的 id、label 或属性;
示例如下:
CSV 是分隔符为逗号,的 TEXT 文件,当列值本身包含逗号时,该列值需要用双引号包起来,如:
JSON 文件要求每一行都是一个 JSON 串,且每行的格式需保持一致。
3.2.1.2 HDFS 文件或目录
用户也可以指定 HDFS 文件或目录作为数据源,上面关于本地磁盘文件或目录的要求全部适用于这里。除此之外,鉴于 HDFS 上通常存储的都是压缩文件,loader 也提供了对压缩文件的支持,并且本地磁盘文件或目录同样支持压缩文件。
目前支持的压缩文件类型包括:GZIP、BZ2、XZ、LZMA、SNAPPY_RAW、SNAPPY_FRAMED、Z、DEFLATE、LZ4_BLOCK、LZ4_FRAMED、ORC 和 PARQUET。
3.2.1.3 主流关系型数据库
loader 还支持以部分关系型数据库作为数据源,目前支持 MySQL、PostgreSQL、Oracle 和 SQL Server。
但目前对表结构要求较为严格,如果导入过程中需要做关联查询,这样的表结构是不允许的。关联查询的意思是:在读到表的某行后,发现某列的值不能直接使用(比如外键),需要再去做一次查询才能确定该列的真实值。
举个例子:假设有三张表,person、software 和 created
如果在建模(schema)时指定 person 或 software 的 id 策略是 PRIMARY_KEY,选择以 name 作为 primary keys(注意:这是 hugegraph 中 vertexlabel 的概念),在导入边数据时,由于需要拼接出源顶点和目标顶点的 id,必须拿着 p_id/s_id 去 person/software 表中查到对应的 name,这种需要做额外查询的表结构的情况,loader 暂时是不支持的。这时可以采用以下两种方式替代:
- 仍然指定 person 和 software 的 id 策略为 PRIMARY_KEY,但是以 person 表和 software 表的 id 列作为顶点的主键属性,这样导入边时直接使用 p_id 和 s_id 和顶点的 label 拼接就能生成 id 了;
- 指定 person 和 software 的 id 策略为 CUSTOMIZE,然后直接以 person 表和 software 表的 id 列作为顶点 id,这样导入边时直接使用 p_id 和 s_id 即可;
关键点就是要让边能直接使用 p_id 和 s_id,不要再去查一次。
3.2.2 准备顶点和边数据
3.2.2.1 顶点数据
顶点数据文件由一行一行的数据组成,一般每一行作为一个顶点,每一列会作为顶点属性。下面以 CSV 格式作为示例进行说明。
- person 顶点数据(数据本身不包含 header)
- software 顶点数据(数据本身包含 header)
3.2.2.2 边数据
边数据文件由一行一行的数据组成,一般每一行作为一条边,其中有部分列会作为源顶点和目标顶点的 id,其他列作为边属性。下面以 JSON 格式作为示例进行说明。
- knows 边数据
- created 边数据
3.3 编写数据源映射文件
3.3.1 映射文件概述
输入源的映射文件用于描述如何将输入源数据与图的顶点类型/边类型建立映射关系,以JSON格式组织,由多个映射块组成,其中每一个映射块都负责将一个输入源映射为顶点和边。
具体而言,每个映射块包含一个输入源和多个顶点映射与边映射块,输入源块对应上面介绍的本地磁盘文件或目录、HDFS 文件或目录和关系型数据库,负责描述数据源的基本信息,比如数据在哪,是什么格式的,分隔符是什么等。顶点映射/边映射与该输入源绑定,可以选择输入源的哪些列,哪些列作为 id、哪些列作为属性,以及每一列映射成什么属性,列的值映射成属性的什么值等等。
以最通俗的话讲,每一个映射块描述了:要导入的文件在哪,文件的每一行要作为哪一类顶点/边,文件的哪些列是需要导入的,以及这些列对应顶点/边的什么属性等。
注意:0.11.0 版本以前的映射文件与 0.11.0 以后的格式变化较大,为表述方便,下面称 0.11.0 以前的映射文件(格式)为 1.0 版本,0.11.0 以后的为 2.0 版本。并且若无特殊说明,“映射文件”表示的是 2.0 版本的。
这里直接给出两个版本的映射文件(描述了上面图模型和数据文件)
映射文件 1.0 版本是以顶点和边为中心,设置输入源;而 2.0 版本是以输入源为中心,设置顶点和边映射。有些输入源(比如一个文件)既能生成顶点,也能生成边,如果用 1.0 版的格式写,就需要在 vertex 和 edge 映射块中各写一次 input 块,这两次的 input 块是完全一样的;而 2.0 版本只需要写一次 input。所以 2.0 版相比于 1.0 版,能省掉一些 input 的重复书写。
在 hugegraph-loader-{version} 的 bin 目录下,有一个脚本工具 mapping-convert.sh 能直接将 1.0 版本的映射文件转换为 2.0 版本的,使用方式如下:
会在 struct.json 的同级目录下生成一个 struct-v2.json。
bin 目录下还提供了 utf8-bom-to-utf8.sh,用于去掉单个数据文件、或目录下所有文件开头的 UTF-8 BOM。当 Windows 工具导出的 CSV 或 TEXT 文件因为首列表头带有不可见的 BOM 而解析失败时,可以用它处理:
3.3.2 输入源
输入源目前分为五类:FILE、HDFS、JDBC、KAFKA 和 GRAPH,由type节点区分,我们称为本地文件输入源、HDFS 输入源、JDBC 输入源和 KAFKA 输入源,图数据源,下面分别介绍。
3.3.2.1 本地文件输入源
- id: 输入源的 id,该字段用于支持一些内部功能,非必填(未填时会自动生成),强烈建议写上,对于调试大有裨益;
- skip: 是否跳过该输入源,由于 JSON 文件无法添加注释,如果某次导入时不想导入某个输入源,但又不想删除该输入源的配置,则可以设置为 true 将其跳过,默认为 false,非必填;
- input: 输入源映射块,复合结构
- type: 输入源类型,必须填 file 或 FILE;
- path: 本地文件或目录的路径,绝对路径或相对于 Loader 进程当前工作目录的相对路径,必填;为避免工作目录不同导致找不到文件,建议使用绝对路径;
- file_filter: 从
path中筛选复合条件的文件,复合结构,目前只支持配置扩展名,用子节点extensions表示,默认为”*",表示保留所有文件; - format: 本地文件的格式,可选值为 CSV、TEXT 及 JSON,必须大写,默认为 CSV,选填;
- header: 文件各列的列名,如不指定则以数据文件第一行作为 header;显式指定时,首行若与 header 完全相同,默认仍会跳过,详见 has_header;JSON 文件不需要指定 header,选填;
- has_header: 对 CSV 和 TEXT 格式,如果某个文件的首行与 header 完全相同,该行会被丢弃,这样目录下每个分片文件重复的表头不会被当作数据导入。如果分片文件的首行是恰好与 header 相同的真实数据,可以设为
false关闭这个检查,选填; - delimiter: 文件行的列分隔符。默认值取决于
format:CSV 为逗号",",TEXT 为制表符"\t";CSV 只接受逗号。JSON文件不需要指定,选填; - charset: 文件的编码字符集,默认
UTF-8,选填; - date_format: 自定义的日期格式,默认值为 yyyy-MM-dd HH:mm:ss,选填;如果日期是以时间戳的形式呈现的,此项须写为
timestamp(固定写法); - extra_date_formats: 备用日期格式列表,当某个值不符合
date_format时会逐个尝试,默认为空,选填; - time_zone: 设置日期数据是处于哪个时区的,默认值为
GMT+8,选填; - skipped_line: 想跳过的行,复合结构,目前只能配置要跳过的行的正则表达式,用子节点
regex描述。默认正则为(^#|^//).*|,即跳过以#或//开头的行以及空行;如果需要保留这类行,把regex改为一个不匹配任何行的表达式即可,选填; - compression: 文件的压缩格式,可选值为 NONE、GZIP、BZ2、XZ、LZMA、SNAPPY_RAW、SNAPPY_FRAMED、Z、DEFLATE、LZ4_BLOCK、LZ4_FRAMED、ORC 和 PARQUET,默认为 NONE,表示非压缩文件,选填;ORC 和 PARQUET 的 header 匹配不区分大小写;
- list_format: 当文件 (非 JSON ) 的某列是集合结构时(对应图中的 PropertyKey 的 Cardinality 为 Set 或 List),可以用此项设置该列的起始符、分隔符、结束符,复合结构:
- start_symbol: 集合结构列的起始符 (默认值是空字符串
"", JSON 格式目前不支持指定) - elem_delimiter: 集合结构列的分隔符 (默认值是
|, 且不能与delimiter相同; JSON 格式目前只支持原生,分隔) - end_symbol: 集合结构列的结束符 (默认值是空字符串
"", JSON 格式目前不支持指定) - ignored_elems: 拆分之后要丢弃的元素,默认值是
[""],即忽略空元素
- start_symbol: 集合结构列的起始符 (默认值是空字符串
3.3.2.2 HDFS 输入源
上述本地文件输入源的节点及含义这里基本都适用,下面仅列出 HDFS 输入源不一样的和特有的节点。
- type: 输入源类型,必须填 hdfs 或 HDFS,必填;
- path: HDFS 文件或目录的路径,必须是 HDFS 的绝对路径,必填;
- core_site_path: HDFS 集群的 core-site.xml 文件路径,重点要指明 NameNode 的地址(
fs.default.name),以及文件系统的实现(fs.hdfs.impl),必填; - hdfs_site_path: HDFS 集群的 hdfs-site.xml 文件路径,选填;
- dir_filter: 当
path是目录时,决定递归进入哪些子目录,复合结构,选填:- include_regex: 只读取目录名匹配该正则的目录,默认为空,即不作限制;
- exclude_regex: 跳过目录名匹配该正则的目录,默认为空;
- kerberos_config: 访问开启了 Kerberos 认证的 HDFS 集群时的配置,复合结构,选填:
- enable: 是否使用 Kerberos 认证,默认为 false;
- krb5_conf: krb5.conf 文件路径,
enable为 true 时必填; - principal: Kerberos principal,
enable为 true 时必填; - keytab: keytab 文件路径,
enable为 true 时必填;
3.3.2.3 JDBC 输入源
前面说到过支持多种关系型数据库,但由于它们的映射结构非常相似,故统称为 JDBC 输入源,然后用vendor节点区分不同的数据库。
- type: 输入源类型,必须填 jdbc 或 JDBC,必填;
- vendor: 数据库类型,可选项为 [MySQL、PostgreSQL、Oracle、SQLServer],不区分大小写,必填;
- driver: JDBC driver 类名,选填;不填时使用
vendor对应的默认 driver,见下面各表; - url: jdbc 要连接的数据库的 url,必填;
- database: 要连接的数据库名,必填;
- schema: 要连接的 schema 名,不同的数据库要求不一样,下面详细说明;
- table: 要连接的表名,
custom_sql和table参数必须填其中一个; - custom_sql: 自定义 SQL 语句,
custom_sql和table参数必须填其中一个; - username: 连接数据库的用户名,必填;
- password: 连接数据库的密码,必填;
- where: 附加到生成的 select 语句上的过滤条件,不需要写 where 关键字,选填;
- batch_size: 按页获取表数据时的一页的大小,默认为 500,选填;
MYSQL
| 节点 | 固定值或常见值 |
|---|---|
| vendor | MYSQL |
| driver | com.mysql.cj.jdbc.Driver |
| url | jdbc:mysql://127.0.0.1:3306 |
schema: 可空,若填写必须与 database 的值一样
POSTGRESQL
| 节点 | 固定值或常见值 |
|---|---|
| vendor | POSTGRESQL |
| driver | org.postgresql.Driver |
| url | jdbc:postgresql://127.0.0.1:5432 |
schema: 可空,默认值为“public”
ORACLE
| 节点 | 固定值或常见值 |
|---|---|
| vendor | ORACLE |
| driver | oracle.jdbc.driver.OracleDriver |
| url | jdbc:oracle:thin:@127.0.0.1:1521 |
schema: 可空,默认值为大写形式的用户名
SQLSERVER
| 节点 | 固定值或常见值 |
|---|---|
| vendor | SQLSERVER |
| driver | com.microsoft.sqlserver.jdbc.SQLServerDriver |
| url | jdbc:sqlserver://127.0.0.1:1433 |
schema: 必填
3.3.2.4 Kafka 输入源
- type:输入源类型,必须填
kafka或KAFKA,必填; - bootstrap_server:kafka bootstrap server 列表,必填;
- topic:订阅的 topic,必填;
- group:Kafka 消费者组,必填;
- from_beginning:设置 Kafka 的
auto.offset.reset;true对应earliest,false对应latest,默认为false。该策略仅在消费组没有已提交 offset,或已提交 offset 不再有效时生效;已有有效 offset 时会从该 offset 继续读取; - format:每条消息的格式,可选值为 CSV、TEXT 及 JSON,必须大写,必填;
- header:消息各列的列名;loader 不会从 topic 中读取表头行,因此 CSV 和 TEXT 格式必须指定,JSON 消息则不需要;
- delimiter:消息的列分隔符,仅 TEXT 格式使用,CSV 固定以
,分隔,选填; - charset:消息的编码字符集,默认 UTF-8,选填;
- date_format:自定义的日期格式,默认值为 yyyy-MM-dd HH:mm:ss,选填;如果日期是以时间戳的形式呈现的,此项须写为 timestamp(固定写法);
- extra_date_formats:自定义的其他日期格式列表,默认为空,选填;列表中每一项都是一个 date_format 指定日期格式的备用日期格式;
- time_zone:置日期数据是处于哪个时区的,默认值为 GMT+8,选填;
- skipped_line:当前 master 的 KafkaReader 未实现该过滤,配置此字段不会跳过 Kafka 消息;每条消息仍会直接交给所选格式的解析器,空行或注释行可能因此触发解析错误。需要过滤时请在写入 Kafka 前或消费侧预处理;
- batch_size:单次拉取的最大记录数(
max.poll.records),默认为 500,选填; - early_stop:某次从 Kafka broker 拉取的记录为空,停止任务,默认为 false,仅用于调试,选填;
3.3.2.5 GRAPH 输入源
GRAPH 输入源从另一个 HugeGraph 图(通过 HugeGraph-PD 访问)读取顶点和边,并写入目标图。当映射文件中出现 GRAPH 输入源时,该文件中所有未被跳过的输入源都必须是 GRAPH 类型,并且导入期间 loader 会把目标图切换为 RESTORING 模式。
- type:输入源类型,必须填
graph或GRAPH,必填; - graphspace:源图空间名称,必填;
- graph: 源图名称,必填;
- username:HugeGraph 用户名;为空时使用命令行参数
--username; - password:HugeGraph 密码;为空时使用命令行参数
--password; - selected_vertices:要复制的顶点 label 列表,每一项形如
{"label": "...", "properties": [...], "query": {...}},其中properties限定要复制的属性,query是传给源图的可选过滤条件; - ignored_vertices:要跳过的顶点 label 列表,每一项形如
{"label": "...", "properties": [...]}; - selected_edges:要复制的边 label 列表,每一项结构与
selected_vertices相同; - ignored_edges:要跳过的边 label 列表,每一项结构与
ignored_vertices相同; - pd-peers:源集群的 HugeGraph-PD 节点地址;为空时使用
--pd-peers; - meta-endpoints:源集群 Meta 服务端点;为空时使用
--meta-endpoints; - cluster:源集群名称;为空时使用
--cluster; - batch_size:批量读取源图数据的批次大小,默认为500;
3.3.3 顶点和边映射
顶点和边映射的节点(JSON 文件中的一个 key)有很多相同的部分,下面先介绍相同部分,再分别介绍顶点映射和边映射的特有节点。
相同部分的节点
- label: 待导入的顶点/边数据所属的
label,必填; - skip: 是否跳过该顶点/边映射,输入源和其他映射不受影响,默认为 false,选填;
- field_mapping: 将输入源列的列名映射为顶点/边的属性名,选填;
- value_mapping: 将输入源的数据值映射为顶点/边的属性值,选填;
- selected: 选择某些列插入,其他未选中的不插入,不能与
ignored同时存在,选填; - ignored: 忽略某些列,使其不参与插入,不能与
selected同时存在,选填; - null_values: 可以指定一些字符串代表空值,比如"NULL”,如果该列对应的顶点/边属性又是一个可空属性,那在构造顶点/边时不会设置该属性的值,选填;
- update_strategies: 如果数据需要按特定方式批量更新时可以对每个属性指定具体的更新策略 (具体见下),选填;
- unfold: 是否将列展开,展开的每一列都会与其他列一起组成一行,相当于是展开成了多行;比如文件的某一列(id 列)的值是
[1,2,3],其他列的值是18,Beijing,当设置了 unfold 之后,这一行就会变成 3 行,分别是:1,18,Beijing,2,18,Beijing和3,18,Beijing。需要注意的是此项只会展开被选作为 id 的列。默认 false,选填;
更新策略支持 8 种 : (需要全大写)
- 数值累加 :
SUM - 两个数字/日期取更大的:
BIGGER - 两个数字/日期取更小:
SMALLER - Set属性取并集:
UNION - Set属性取交集:
INTERSECTION - List属性追加元素:
APPEND - List/Set属性删除元素:
ELIMINATE - 覆盖已有属性:
OVERRIDE
注意: 如果新导入的属性值为空,会采用已有的旧数据而不会采用空值,效果可以参考如下示例
注意 : 采用了批量更新的策略后, 磁盘读请求数会大幅上升, 导入速度相比纯写覆盖会慢数倍 (此时HDD磁盘IOPS会成为瓶颈, 建议采用SSD以保证速度)
顶点映射的特有节点
- id: 指定某一列作为顶点的 id 列,当顶点 id 策略为
CUSTOMIZE时,必填;当 id 策略为PRIMARY_KEY时,必须为空;
边映射的特有节点
- source: 选择输入源某几列作为源顶点的 id 列,当源顶点的 id 策略为
CUSTOMIZE时,必须指定某一列作为顶点的 id 列;当源顶点的 id 策略为PRIMARY_KEY时,必须指定一列或多列用于拼接生成顶点的 id,也就是说,不管是哪种 id 策略,此项必填; - target: 指定某几列作为目标顶点的 id 列,与 source 类似,不再赘述;
- unfold_source: 是否展开文件的 source 列,效果与顶点映射中的类似,不再赘述;
- unfold_target: 是否展开文件的 target 列,效果与顶点映射中的类似,不再赘述;
3.4 执行命令导入
准备好图模型、数据文件以及输入源映射关系文件后,接下来就可以将数据文件导入到图数据库中。
导入过程由用户提交的命令控制,用户可以通过不同的参数控制执行的具体流程。
3.4.1 参数说明
| 参数 | 默认值 | 是否必传 | 描述信息 |
|---|---|---|---|
-f 或 --file | Y | 配置脚本的路径 | |
-g 或 --graph | hugegraph | 图名称 | |
--graphspace | DEFAULT | 图空间 | |
-s 或 --schema | schema 文件路径;已有 Schema 时可以不传 | ||
-h 或 --host 或 -i | localhost | HugeGraphServer 的地址 | |
-p 或 --port | 8080 | HugeGraphServer 的端口号 | |
--username | null | 当 HugeGraphServer 开启了权限认证时,当前图的 username | |
--password | null | 当 HugeGraphServer 开启了权限认证时,当前图的 password | |
--create-graph | false | 是否在图不存在时自动创建 | |
--token | null | 当 HugeGraphServer 开启了权限认证时,当前图的 token | |
--protocol | http | 向服务端发请求的协议,可选 http 或 https | |
--pd-peers | PD 服务节点地址 | ||
--pd-token | 访问 PD 服务的 token | ||
--meta-endpoints | 元信息存储服务地址 | ||
--direct | false | 当前 master 未启用 Store 直连,仍经 Server API 导入;保留默认值 | |
--route-type | NODE_PORT | 路由选择方式(可选值:NODE_PORT / DDS / BOTH) | |
--cluster | hg | 集群名 | |
--trust-store-file | 请求协议为 https 时,客户端的证书文件路径 | ||
--trust-store-password | 请求协议为 https 时,客户端证书密码 | ||
--clear-all-data | false | 导入数据前是否清除服务端的原有数据 | |
--clear-timeout | 240 | 导入数据前清除服务端的原有数据的超时时间 | |
--incremental-mode | false | 是否使用断点续导模式,仅输入源为 FILE 和 HDFS 支持该模式,启用该模式能从上一次导入停止的地方开始导入 | |
--failure-mode | false | 失败模式为 true 时,会导入之前失败了的数据,一般来说失败数据文件需要在人工更正编辑好后,再次进行导入 | |
--batch-insert-threads | CPUs | 批量插入线程池大小 (CPUs 是当前 OS 可用逻辑核个数) | |
--single-insert-threads | 8 | 单条插入线程池的大小 | |
--max-conn | 4 * CPUs | HugeClient 与 HugeGraphServer 的最大 HTTP 连接数;保持默认值时会自动提升到 4 * --batch-insert-threads | |
--max-conn-per-route | 2 * CPUs | HugeClient 与 HugeGraphServer 每个路由的最大 HTTP 连接数;保持默认值时会自动提升到 2 * --batch-insert-threads | |
--batch-size | 500 | 导入数据时每个批次包含的数据条数 | |
--max-parse-errors | 1 | 最多允许多少行数据解析错误,达到该值则程序退出 | |
--max-insert-errors | 500 | 最多允许多少行数据插入错误,达到该值则程序退出 | |
--timeout | 60 | 插入结果返回的超时时间(秒) | |
--shutdown-timeout | 10 | 多线程停止的等待时间(秒) | |
--retry-times | 3 | 发生超时时的最大重试次数 | |
--retry-interval | 10 | 重试之前的间隔时间(秒) | |
--check-vertex | false | 插入边时是否检查边所连接的顶点是否存在 | |
--print-progress | true | 是否在控制台实时打印导入条数 | |
--dry-run | false | 打开该模式,只解析不导入,通常用于测试 | |
--help 或 -help | false | 打印帮助信息 | |
--parser-threads 或 --parallel-count | max(2,CPUs/2) | 并行读取管线数;--parallel-count 已弃用 | |
--start-file | 0 | 用于部分(分片)导入的起始文件索引 | |
--end-file | -1 | 用于部分导入的截止文件索引 | |
--scatter-sources | false | 分散(并行)读取多个数据源以优化 I/O 性能 | |
--cdc-flush-interval | 30000 | Flink CDC 的数据刷新间隔 | |
--cdc-sink-parallelism | 1 | Flink CDC 写入端(Sink)的并行度 | |
--max-read-errors | 1 | 程序退出前允许的最大读取错误行数 | |
--max-read-lines | -1L | 最大读取行数限制;一旦达到此行数,导入任务将停止 | |
--test-mode | false | 是否开启测试模式 | |
--use-prefilter | false | 是否预先过滤顶点 | |
--short-id | 将自定义顶点 ID 映射为更短的生成 ID,格式为 label:field:type,其中 type 可选 boolean、byte、int、long、float、double、text、blob、date、uuid;可以重复指定以覆盖多个 label | ||
--vertex-edge-limit | -1L | 单个顶点的最大边数限制 | |
--sink-type | true | 仅 spark-loader 使用:true 通过 HugeGraph server API 写入,false 生成 HFile 并直接 bulkload 到 HBase | |
--vertex-partitions | 64 | HBase 顶点表的预分区数量,配合 --sink-type false 使用 | |
--edge-partitions | 64 | HBase 边表的预分区数量,配合 --sink-type false 使用 | |
--vertex-table-name | HBase 顶点表名称,配合 --sink-type false 使用 | ||
--edge-table-name | HBase 边表名称,配合 --sink-type false 使用 | ||
--hbase-zk-quorum | HBase Zookeeper 集群地址,配合 --sink-type false 使用 | ||
--hbase-zk-port | HBase Zookeeper 端口号,配合 --sink-type false 使用 | ||
--hbase-zk-parent | HBase Zookeeper 根路径,配合 --sink-type false 使用 | ||
--restore | false | 将图模式设置为恢复模式 (RESTORING) | |
--backend | hstore | 自动创建图(如果不存在)时的后端存储类型 | |
--serializer | binary | 自动创建图(如果不存在)时的序列化器类型 | |
--scheduler-type | distributed | 自动创建图(如果不存在)时的任务调度器类型 | |
--batch-failure-fallback | true | 批量插入失败时是否回退至单条插入模式 |
映射文件选项 --file(-f)是必填项,其他选项使用默认值。有效的最简调用为:
启动脚本也支持 JCommander 原生的 @file 语法。在 loader.args 中把每个选项及其值分别写在单独一行:
这与上面的最简调用等价。参数中的相对路径以 Loader 进程的工作目录为基准。
若参数文件包含凭据,使用 chmod 0600 loader.args 把权限限制为 0600;@file 调用让这些值不出现在进程参数中。
Loader 必须能够创建并写入以映射文件前缀命名的进度目录。
从只读 Kubernetes ConfigMap 挂载映射文件时,先把映射复制到可写卷中再运行 Loader。
3.4.2 断点续导模式
通常情况下,Loader 任务都需要较长时间执行,如果因为某些原因导致导入中断进程退出,而下次希望能从中断的点继续导,这就是使用断点续导的场景。
设置 --incremental-mode 为 true 即可从进度文件续导。Loader 在导入成功或正常停止后关闭时写入进度;意外失败可能阻止该写入。
进度文件位于 ${struct} 目录下,文件名形如 load-progress_${timestamp} ,${struct} 为映射文件的前缀,${timestamp} 为导入开始
的时刻,格式为 yyyyMMdd-HHmmss。比如:在 2019-10-10 12:30:30 开始的一次导入任务,使用的映射文件为 struct-example.json,则进度文件的路径为与 struct-example.json
同级的 struct-example/load-progress_20191010-123030。当目录下存在多个进度文件时,续导会读取按文件名排序的最后一个,也就是最新的那个。
注意:导入成功或正常停止(包括达到错误上限)后会写入进度文件,与
--incremental-mode或--print-progress是否打开无关。 意外失败导致导入中止时,可能不会写入进度文件。
如果数据文件格式都是合法的,是用户自己停止(CTRL + C 或 kill,kill -9 不支持)的导入任务,也就是说没有错误记录的情况下,下一次导入只需要设置为断点续导即可。
但如果是因为太多数据不合法或者网络异常,达到了 –max-read-errors、–max-parse-errors 或 –max-insert-errors 的限制,Loader 会把这些失败的原始行记录到 失败文件中,用户对失败文件中的数据行修改后,设置 –failure-mode 为 true 即可把这些"失败文件"也当作输入源进行导入(不影响正常的文件的导入), 当然如果修改后的数据行仍然有问题,则会被再次记录到失败文件中(不用担心会有重复行,关闭文件时会去重)。失败模式下上述三个错误上限会被解除,因此会扫描整个失败文件。
每个输入源(即映射文件 structs 中的每一项)都会有自己的失败文件,文件名为该输入源的 id 加后缀 .error,保存在 ${struct}/failure-data 目录下。
每一条失败记录写为两行:一行以 #### READ ERROR:、#### PARSE ERROR: 或 #### INSERT ERROR: 开头的提示行,紧接着是原始数据行。当输入源有 header 时,header 会以 JSON 形式写入同目录下的 ${id}.header 文件,以便失败文件能按正确的列重新读取。
比如映射文件中 id 为 1 的输入源包含顶点映射 person,id 为 3 的输入源包含边映射 knows,它们各有一些错误行,当 Loader 退出后,在 ${struct}/failure-data 目录下会看到如下文件:
- 1.error: 输入源 1 的失败数据行,每行前面都有对应的提示行
- 1.header: 输入源 1 的 header,仅当该输入源有 header 时才会生成
- 3.error: 输入源 3 的失败数据行
- 3.header: 输入源 3 的 header
内容为空的
.error文件会在 Loader 退出时删除,因此只有真正出现失败行的输入源才会留下文件。增量模式下新的失败行会追加到已有文件,其他模式下该文件会被重新写入。
3.4.3 logs 目录文件说明
程序执行过程中各日志及错误数据会写入 hugegraph-loader.log 文件中。
3.4.4 执行命令
运行 bin/hugegraph-loader.sh 并传入参数
脚本在设置了 JAVA_HOME 时使用其中的 JVM,否则使用 PATH 上的 java。它会把 JVM_OPTS 环境变量的内容,以及 -Xmx10g 和由 lib/ 生成的 classpath 一起传给 JVM,因此需要追加 JVM 参数时可以设置 JVM_OPTS。日志由 conf/log4j2.xml 配置。
3.4.5 最小本地文件导入示例
先确保 HugeGraph Server 已启动,当前用户可以访问 DEFAULT 图空间中的 hugegraph 图,并有权限创建 Schema 和写入数据。若 Server 已启用认证,在命令中增加对应的 --username、--password 或 --token。本例只需本地文件,不依赖 Kafka、HDFS 或 JDBC。
进入解压后的 Loader 安装目录,再创建数据、Schema 和 2.0 格式的映射文件:
people.csv 没有表头行,列名由映射文件的 header 提供。映射文件中的本地路径相对于运行命令时的工作目录。仍在 Loader 安装目录中执行导入;如果 Server 在其他容器中,请把 --host 改为 Loader 能访问到的 Server 地址。
本例用独立的 docs_smoke_person 标签和 docs_* 属性,避免与预置的 person 样例数据冲突。成功时统计中应显示顶点写入成功数为 2、边写入成功数为 0。也可以在 Hubble 的 Gremlin 工作台查询 g.V().hasLabel('docs_smoke_person').values('docs_name'),结果应包含 docs-smoke-alice 和 docs-smoke-bob。
4 完整示例
下面给出的是 hugegraph-loader 包中 example 目录下的例子。(GitHub 地址)
4.1 准备数据
顶点文件:example/file/vertex_person.csv
顶点文件:example/file/vertex_software.txt
边文件:example/file/edge_knows.json
边文件:example/file/edge_created.json
4.2 编写 schema
person 使用 name 作为主键;Tom 的 age 和 city 会被 null_values 去掉,因此这两个属性必须允许为空。
software 使用自定义数值 ID,映射中的 id 和 created.target_id 分别对应顶点 ID 及边的目标 ID。
请在未包含同名 Schema 的空图中执行,避免 ifNotExist() 保留已有的不兼容定义。
4.3 编写输入源映射文件example/file/struct.json
4.4 执行命令导入
导入结束后,会出现类似如下统计信息:
4.5 使用 docker 导入
4.5.1 使用 docker exec 直接导入数据
4.5.1.1 数据准备
如果仅仅尝试使用 loader, 我们可以使用内置的 example 数据集进行导入,无需自己额外准备数据
如果使用自定义的数据,则在使用 loader 导入数据之前,我们需要将数据复制到容器内部。
首先我们可以根据 4.1-4.3 的步骤准备数据,将准备好的数据通过 docker cp 复制到 loader 容器内部。
假设我们已经按照上述的步骤准备好了对应的数据集,存放在 hugegraph-dataset 文件夹下,文件结构如下:
将文件复制到容器内部
4.5.1.2 数据导入
以内置的 example 数据集为例,我们可以使用以下的命令对数据进行导入。
如果需要导入自己准备的数据集,则只需要修改 -f 配置脚本的路径 以及 -s schema 文件路径即可。
其他的参数可以参照 3.4.1 参数说明
如果导入用户自定义的数据集,按照刚才的例子,则使用:
自定义数据集的 struct.json 还需将每个 input.path 改为容器内实际路径,例如 /loader/dataset/vertex_person.csv。
只修改 -f 和 -s 不会改变数据文件的解析路径。
如果
loader和server位于同一 docker 网络,则可以指定-h {server_container_name}, 否则需要指定server的宿主机的 ip (在我们的例子中,server_container_name为server).
然后我们可以观察到结果:
也可以使用 curl 或者 hubble观察导入结果,此处以 curl 为例:
以下使用支持 GraphSpace 的 Server API;旧版 Server 的路径需去掉 /graphspaces/DEFAULT。
如果想检查边的导入结果,可以使用 curl --compressed "http://localhost:8080/graphspaces/DEFAULT/graphs/hugegraph/graph/edges"
4.5.2 进入 docker 容器进行导入
除了直接使用 docker exec 导入数据,我们也可以进入容器进行数据导入,基本流程与 4.5.1 相同
使用 docker exec -it loader bash进入容器内部,并执行命令
执行的结果如 4.5.1 所示
4.6 使用 spark-loader 导入
Spark 版本:Spark 3+,其他版本未测试。当前源码使用 Spark 3.2.2 和 Scala 2.12;其他组合需自行验证。
spark-loader 的参数分为两部分,注意:因二者参数名缩写存在重合部分,请使用参数全称。两种参数之间无需保证先后顺序。
- hugegraph 参数(参考:hugegraph-loader 参数说明 )
- Spark 任务提交参数(参考:Submitting Applications)
示例:
bin/hugegraph-spark-loader.sh 通过 ${SPARK_HOME}/bin/spark-submit 提交 org.apache.hugegraph.loader.spark.HugeGraphSparkLoader,因此 SPARK_HOME 必须指向一个 Spark 安装目录。lib/ 下的所有 jar 都会加入 classpath。Spark 应用名默认为 hugegraph-spark-loader,可以通过 APP_NAME 环境变量修改。
bin/get-params.sh 负责拆分命令行:只有下列参数会交给 loader,其余参数原样传给 spark-submit。该拆分只识别参数全称,因此 -f、-g 这类缩写不会被识别。
--file 单独处理:使用 --deploy-mode cluster 时,映射文件会通过 --files 分发到 executor,loader 只收到它的文件名;其他情况下路径原样传入。
该模式下 loader 只读取 FILE、HDFS 和 JDBC 输入源,KAFKA 和 GRAPH 输入源会被拒绝。
默认情况下(--sink-type true),每个 Spark 分区各自创建一个 HugeClient,通过 HugeGraph server API 写入顶点和边。使用 --sink-type false 时,loader 会生成 HFile 并直接 bulkload 到 HBase,此时表名和 ZooKeeper 配置取自 --vertex-table-name、--edge-table-name、--hbase-zk-quorum、--hbase-zk-port、--hbase-zk-parent、--vertex-partitions 和 --edge-partitions。
4.7 使用 flink-cdc-loader 导入
当前源码使用 Flink 1.13.5、flink-connector-mysql-cdc 2.2.1 和 Scala 2.12;其他组合需自行验证。
bin/hugegraph-flinkcdc-loader.sh 通过 ${FLINK_HOME}/bin/flink run 提交 org.apache.hugegraph.loader.flink.HugeGraphFlinkCDCLoader,因此必须设置 FLINK_HOME。该任务用 Flink CDC 捕获 MySQL 的变更事件并应用到图上,从而让图与源表保持同步。
映射文件格式与命令行 loader 相同,但每个输入源都必须是 MySQL 的 JDBC 输入源:loader 从中读取 url、database、table、username 和 password,并从 url 解析出主机和端口。顶点和边映射的用法不变。3.4.1 中的 --cdc-flush-interval 和 --cdc-sink-parallelism 只在该模式下生效。
命令行同样由 bin/get-params.sh 按 4.6 的方式拆分,非 loader 参数会传给 flink run。
示例:
3.2.4 - 图导入
需要把文件、数据库或消息数据写入 HugeGraph 时,从这里选择工具。直接导入可使用 Loader;已有 Source、Transform、Sink 管道时使用 SeaTunnel Sink;Spark 作业可使用 Spark Connector。
3.2.4.1 - 使用 SeaTunnel Sink 导入图数据
SeaTunnel 可以把数据库、Kafka 等数据源接入 HugeGraph。连接器分为两部分:Source 负责读取,Sink 负责写入[1][2],中间可以接 SeaTunnel 的数据转换组件。需要从 HugeGraph 导出或迁移数据时,请查看SeaTunnel Source 导出与迁移文档。
版本要求:本文面向 SeaTunnel 3.0+。 所有示例使用 SeaTunnel 3.0+ 提供的
mappings配置。
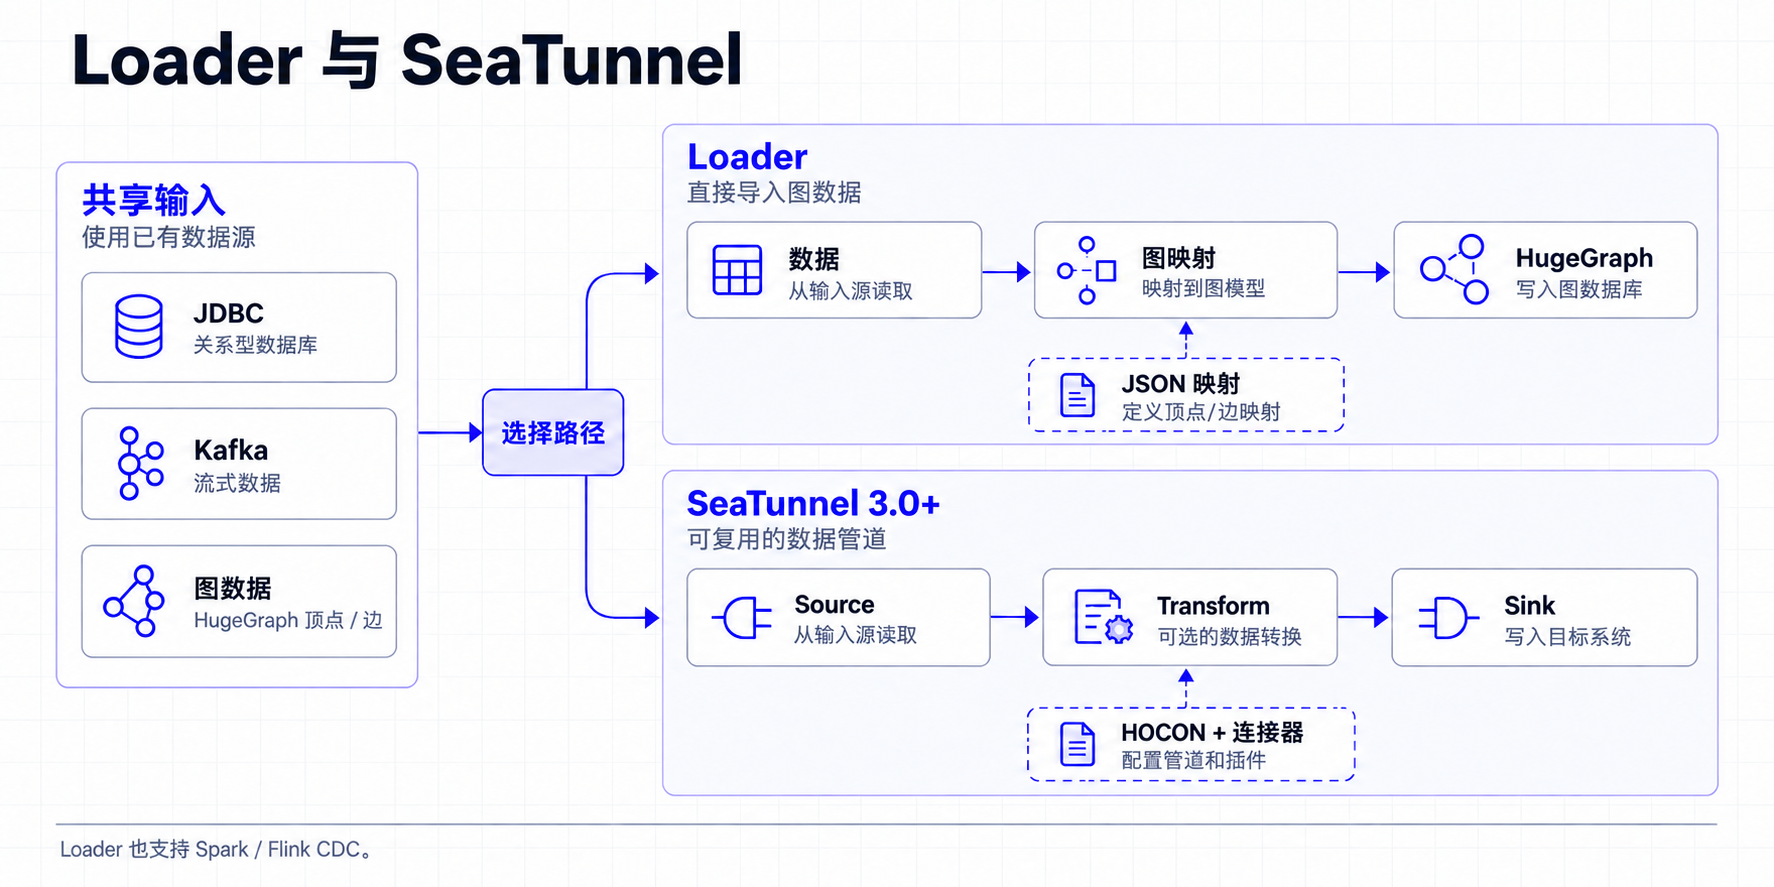
点击配图可查看原图。
1 与 Loader 和 Tools 的区别
HugeGraph-Loader 适合把常见数据直接导入 HugeGraph;HugeGraph-Tools 主要用于单机图管理、备份和导出;SeaTunnel 则把任务组织成 Source → Transform → Sink,适合复用已有的连接器、转换步骤和数据处理管道。
表格标记
✅ 原生支持;⚠️ 有条件支持,或需要额外组件/外部平台;❌ 不提供该能力
| 对比点 | Loader | Tools | SeaTunnel |
|---|---|---|---|
| 任务覆盖 | ✅ 直接导入图数据 | ✅ 备份、恢复和导出 | ✅ 导入、导出与迁移,可组合 Source、Transform、Sink |
| 任务配置 | JSON 映射文件,描述输入源、顶点和边 | 命令行参数和运维命令 | HOCON 作业文件[3],组合 Source、Transform 和 Sink |
| 默认部署 | ✅ 单机 CLI;⚠️ 可借助 Spark Loader 扩展 | ✅ 单机 CLI | ✅ 单机;✅ 分布式 |
| 执行引擎 | ⚠️ 以 CLI 为主,Spark Loader 是独立扩展 | ❌ 不提供 Spark/Flink 执行引擎 | ✅ HugeGraph Source/Sink 支持 Zeta、Spark、Flink[1][2][7][8][9][10] |
| 前端与可观测性 | ❌ 无内置前端,查看 CLI 日志 | ❌ 无内置前端,查看 CLI 日志 | ✅ 内置 Web UI 作业面板,方便查看任务状态和运行情况 |
| 输入与输出 | ⚠️ 围绕图导入,支持常见文件、JDBC、Kafka 等 | ⚠️ 围绕图数据和备份文件,支持常见存储 | ✅ 数十种连接器,含 JDBC、Kafka、SQL-CDC 等 |
| 调度与资源管理 | ❌ 无统一的跨任务调度和资源分配机制 | ❌ 无统一的跨任务调度和资源分配机制 | ⚠️ 可结合 DolphinScheduler 做调度和任务管理 |
| 易用性 | ✅ 专注导入,配置简单;后续提供二进制 CLI 后更方便快速使用 | ✅ 命令直接,适合单机运维 | ⚠️ 配置和运行组件较多,适合长期数据管道 |
| 高性能导入 | ✅ 支持 bypass-server 等优化;特定后端和硬件条件下,实测峰值可达 100~200 万条/秒,需按实际场景压测 | ⚠️ 重点是备份和导出,不以批量导入吞吐为主要目标 | ✅ 依靠并行度、分布式引擎和连接器扩展吞吐 |
SeaTunnel 覆盖 Loader 的图导入和 Tools 的导出、迁移场景,可以把两类任务放进同一条可扩展管道,还支持 SQL-CDC 和数十种输入输出类型。默认情况下,Loader 和 Tools 都在单机运行;SeaTunnel 同时支持单机和分布式部署,可随着数据量和任务数量扩展。Tools 的 schedule-backup 可以创建 crontab 任务,但它不负责统一的任务编排和资源管理。
已有 Spark/Flink 每日任务
HugeGraph Source 和 Sink 在 SeaTunnel 3.0+ 中都支持 SeaTunnel Engine(Zeta)、Spark 和 Flink。若把每日任务改成 SeaTunnel 作业,并用对应引擎提交,数据可以在 Source → Transform → Sink 之间直接传递,不需要先落盘再交给 Loader。若保留现有 Spark/Flink DAG,SeaTunnel 不会自动接管内存中的 DataFrame 或 Stream,需要改造成 SeaTunnel 作业,或让 Source 读取已有系统中的数据
Loader 和 Tools 的优势是专注、直接、上手快。需要直接导入图数据时可先用 Loader;需要备份、恢复、导出或日常运维时可用 Tools。如果已经有 SeaTunnel 作业,通常在原管道中接入 HugeGraph 更方便。需要更高导入吞吐时,Loader 的 bypass-server 和其他导入优化更合适;Loader 在特定后端、数据规模和硬件条件下实测峰值可达 100~200 万条/秒,不能直接当作通用性能承诺,仍需单独压测。新建 SeaTunnel 任务使用 3.0+ 和 mappings。使用其他版本时,请重新核对连接器配置。
2 准备环境
2.1 获取 SeaTunnel 3.0+
使用 JDK 11 并设置 JAVA_HOME;官方部署文档
列出的前置要求为 Java 8 或 11。从官方下载页[4]
选择 3.0+ 二进制发行包,并使用页面提供的校验文件或签名验证下载包。
下面以 3.0.0 为例,请将 SEATUNNEL_VERSION 改为实际下载的发行版本。
二进制发行包不包含连接器插件。在 config/plugin_config 中选择示例需要的连接器:
按官方插件安装说明[5] 安装同版本的已发布插件:
后续命令均在该安装目录执行,引擎和连接器插件保持相同版本。
本文使用自带的 Zeta 引擎和 local 模式[6][7]。确认 connectors/ 中有 HugeGraph,以及所需的 JDBC 或 Kafka 插件[11][12]。
JDBC 示例还需将 MySQL 驱动 JAR 放入 lib/,驱动类为 com.mysql.cj.jdbc.Driver。
2.2 准备 HugeGraph 和数据源
先启动 HugeGraph Server,创建可用于测试的图。本文示例使用 hugegraph 图、DEFAULT 图空间,请按服务端实际配置修改;图空间名称区分大小写。启用了身份验证时,在 HugeGraph Source 和 Sink 中填写 username、password。
下面的图模型贯穿 JDBC 和 Kafka 示例。mappings 默认会创建缺失的 PropertyKey、VertexLabel 和 EdgeLabel;已有图模型必须与配置兼容。
| 图元素 | 名称与属性 |
|---|---|
| 属性 | name 为 Text,age 和 since 为 Int |
| 顶点 | person,主键为 name,属性为 name、age |
| 边 | knows,从 person 指向 person,属性为 since |
所有示例中的 mysql、kafka、hugegraph 都是占位主机名,需替换为 SeaTunnel 运行环境可访问的地址。容器中的 127.0.0.1 指向容器自身;同一 Docker 网络可使用服务名。host 只填主机名或 IP,端口单独填写。
3 从关系库导入(sql2graph)
用两个任务完成导入:先把 person 表写成顶点,再把 knows 表写成边。这样写边时,两个端点都已经存在。
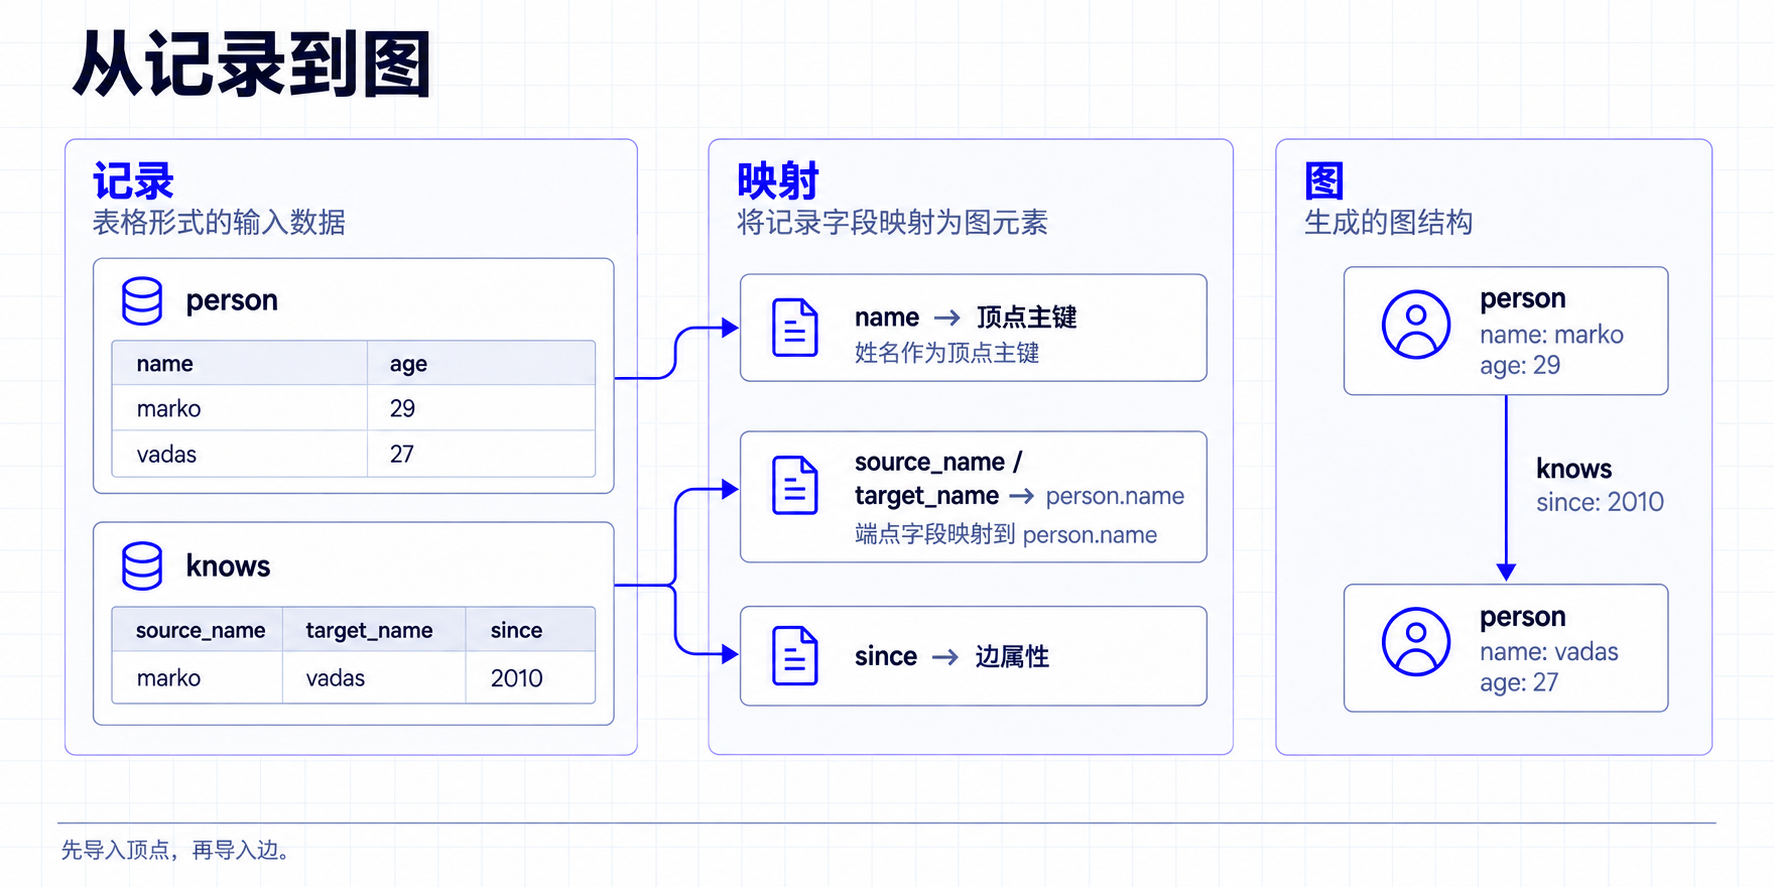
3.1 导入顶点
在 MySQL 的 demo 数据库中准备示例数据,并让配置中的账号有读取权限:
保存为 config/sql2graph-person.conf,将数据库账号和密码替换为实际值:
在 Hubble 或 Gremlin 中检查结果,应能查到 marko 和 vadas 及其年龄:
idFields = ["name"] 表示使用名字生成主键。重复导入同一个 name 会写到同一个顶点;properties 指定要写入的源字段。
3.2 导入边
准备关系表,其中两个端点字段对应前面导入的 person.name:
确认顶点任务成功后,再执行边任务:
下面的查询应返回 marko 到 vadas 的 knows 边,属性 since 为 2010:
sourceConfig 和 targetConfig 指定端点字段,fieldMapping 将它们对应到顶点主键 name,properties = ["since"] 只写边属性。示例启用 check_vertex = true,并关闭失败后逐条跳过的回退(batch_failure_fallback = false);端点不存在或写入失败时,任务会报错。
如果关系表只有数字外键,而图的主键使用姓名,请先在 SQL 中关联出姓名,再交给 Sink。MySQL CDC 接入方式见 MySQL CDC Source[13]。
4 从 Kafka 导入(kafka2graph)
Kafka 适合持续接收事件。先创建 user-events topic,再写入以下 JSON 消息,每条消息对应一个 person 顶点:
保存为 config/kafka2graph.conf:
用第 3.1 节的 Gremlin 查询检查数据。流式任务会持续运行;checkpoint.interval 每 10 秒保存一次任务状态,sink.flush.interval 让 Zeta 每 5 秒触发一次刷新,避免少量消息一直等到批次填满。
HugeGraph Sink 是 at-least-once(至少一次) 写入,故障恢复可能重放记录。使用 PRIMARY_KEY 能让相同 name 落到同一个顶点,但不等于所有更新操作都具备 exactly-once 语义。定时刷新由 Zeta 提供,不适用于 Spark 或 Flink 引擎。
5 常用配置与排错
下表适用于本文使用的 SeaTunnel 3.0+ 版本:
| 配置 | 用途 |
|---|---|
host、port | 分别指定 HugeGraph 主机和端口 |
graph_name、graph_space | 选择已创建的图与图空间 |
mappings | 定义输入字段如何生成顶点或边 |
properties | 每个 mapping 内要写入的源字段列表 |
schema_save_mode | mappings 默认自动创建缺失的 Schema;已有 Schema 仍需兼容 |
batch_size | 单批记录数,默认 500 |
env.sink.flush.interval | Zeta 定时刷新间隔,单位毫秒 |
check_vertex | 写边时检查端点,本文的边任务设为 true |
batch_failure_fallback[2] | 默认 true,批量失败后逐条重试,最多跳过 max_insert_errors 条失败记录;本文示例显式设为 false,让批量失败直接终止任务 |
max_insert_errors | 逐条回退时允许跳过的失败记录数;默认 500,-1 表示不限制,仅在开启 batch_failure_fallback 时生效 |
遇到问题时可按下面检查:
- 不识别
mappings或找不到 HugeGraph Source:检查引擎与 HugeGraph connector 是否来自同一次 3.0+ 构建。 - 连接失败:检查主机、端口、图空间、认证信息,以及 SeaTunnel 所在环境能否访问服务。
- Schema 不兼容:检查标签的 ID 策略、属性类型和边端点。自动创建不会把已有
PRIMARY_KEY标签改成CUSTOMIZE_STRING。 - Kafka 少量数据未及时出现:确认使用 Zeta,并在
env中设置sink.flush.interval。此版本的batch_interval_ms仅为兼容保留,不能代替它。
6 选型小结
选工具时,先看要完成的工作:图管理、Gremlin、备份或克隆可用 Tools;直接导入图可先看 Loader;需要复用 Source、Transform、Sink 管道时选 SeaTunnel。使用 SeaTunnel 的图读取和迁移能力时,请按本文使用的 3.0+ 版本准备环境。
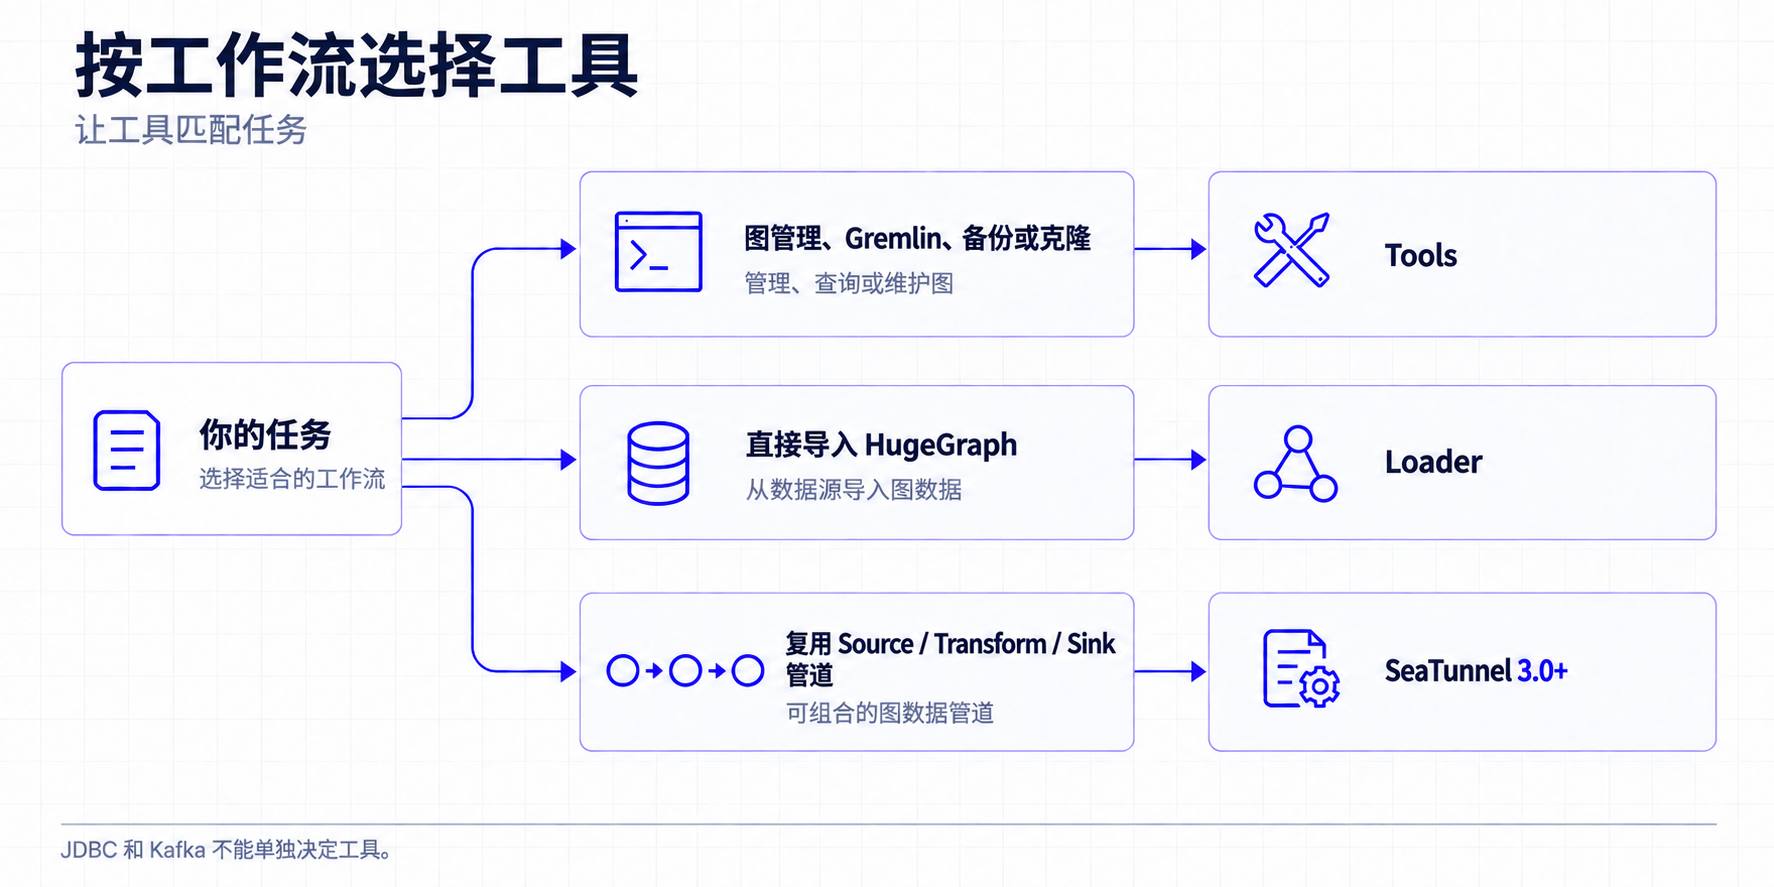
7 参考文档
HugeGraph 连接器
[1] HugeGraph Source
[2] HugeGraph Sink
配置与部署
[3] HOCON 作业文件配置说明
[4] SeaTunnel 3.0+ 正式版下载
[5] 连接器插件安装说明
[6] SeaTunnel 本地部署
执行引擎
[7] SeaTunnel 引擎概览
[8] SeaTunnel Spark 引擎
[9] SeaTunnel Flink 引擎
[10] Connector V2 多引擎说明
数据源连接器
[11] JDBC Source
[12] Kafka Source
[13] MySQL CDC Source
3.2.5 - Tools 快速上手
1 HugeGraph-Tools概述
HugeGraph-Tools 是 HugeGraph 的自动化部署、管理和备份/还原组件。
测试指南:如需在本地运行 Tools 测试,请参考 工具链本地测试指南
2 获取 HugeGraph-Tools
HugeGraph-Tools 包含在 Toolchain 发布包中,可以下载发布包,也可以从源码编译。
- 下载二进制tar包
- 下载源码编译安装
2.1 下载二进制tar包
下载最新版本的 HugeGraph-Toolchain 包, 然后进入 tools 子目录
2.2 下载源码编译安装
源码编译前请确保安装了wget命令
下载最新版本的 HugeGraph-Toolchain 源码包, 然后根目录编译或者单独编译 tool 子模块:
编译生成 tar 包:
生成的 tar 包位于 hugegraph-tools/target/apache-hugegraph-tools-${version}.tar.gz,同时会在 hugegraph-tools/apache-hugegraph-tools-${version} 生成解压后的目录(包含 bin/ 和 lib/)
3 使用
3.1 功能概览
解压后,进入 apache-hugegraph-tools-${version} 目录,可以使用bin/hugegraph或者bin/hugegraph help来查看 usage 信息,使用bin/hugegraph help <子命令>查看单个子命令的 usage。主要分为:
- 图管理类,graph-mode-set、graph-mode-get、graph-list、graph-get、graph-clear、graph-create、graph-clone 和 graph-drop
- 异步任务管理类,task-list、task-get、task-delete、task-cancel 和 task-clear
- Gremlin类,gremlin-execute 和 gremlin-schedule
- 备份/恢复类,backup、restore、migrate、schedule-backup 和 dump
- 认证数据备份/恢复类,auth-backup 和 auth-restore
- 安装部署类,deploy、clear、start-all 和 stop-all
3.2 [options]-全局变量
options是 HugeGraph-Tools 的全局变量,可以在 hugegraph-tools/bin/hugegraph 中配置,包括:
- –graph,HugeGraph-Tools 操作的图的名字,默认值是 hugegraph
- –url,HugeGraph-Server 的服务地址,默认是 http://127.0.0.1:8080
- –user,当 HugeGraph-Server 开启认证时,传递用户名
- –password,当 HugeGraph-Server 开启认证时,传递用户的密码
- –timeout,连接 HugeGraph-Server 时的超时时间,默认是 30s
- –trust-store-file,证书文件的路径,当 –url 使用 https 时,HugeGraph-Client 使用的 truststore 文件,默认为空,代表使用 hugegraph-tools 内置的 truststore 文件 conf/hugegraph.truststore
- –trust-store-password,证书文件的密码,当 –url 使用 https 时,HugeGraph-Client 使用的 truststore 的密码,默认为空,代表使用 hugegraph-tools 内置的 truststore 文件的密码
- –throw-mode,HugeGraph-Tools 出错时是否直接抛出异常,而不是打印错误信息后退出,默认为 false(主要用于测试)
连接协议由 –url 的 scheme 决定:使用
https://...即通过 https 连接。–trust-store-file 和 –trust-store-password 只能在 –url 使用 https 时设置,–user 和 –password 必须同时提供或同时省略。
上述全局变量,也可以通过环境变量来设置。一种方式是在命令行使用 export 设置临时环境变量,在该命令行关闭之前均有效
| 全局变量 | 环境变量 | 示例 |
|---|---|---|
| –url | HUGEGRAPH_URL | export HUGEGRAPH_URL=http://127.0.0.1:8080 |
| –graph | HUGEGRAPH_GRAPH | export HUGEGRAPH_GRAPH=hugegraph |
| –user | HUGEGRAPH_USERNAME | export HUGEGRAPH_USERNAME=admin |
| –password | HUGEGRAPH_PASSWORD | export HUGEGRAPH_PASSWORD=test |
| –timeout | HUGEGRAPH_TIMEOUT | export HUGEGRAPH_TIMEOUT=30 |
| –trust-store-file | HUGEGRAPH_TRUST_STORE_FILE | export HUGEGRAPH_TRUST_STORE_FILE=/tmp/trust-store |
| –trust-store-password | HUGEGRAPH_TRUST_STORE_PASSWORD | export HUGEGRAPH_TRUST_STORE_PASSWORD=xxxx |
下面两种写法查询同一个图的顶点总数,可按使用习惯任选一种。示例使用未启用鉴权的本地 Server;已启用鉴权时还需提供上述用户名和密码。
另一种方式是在 bin/hugegraph 脚本中设置环境变量:
bin/hugegraph 还会读取 JAVA_HOME(未设置时打印警告,https 需要它)和 JAVA_OPTIONS(JVM 参数,为空时脚本使用 -Xms512m,并根据机器空闲内存计算 -Xmx)。
3.3 图管理类,graph-mode-set、graph-mode-get、graph-list、graph-get、graph-clear、graph-create、graph-clone和graph-drop
- graph-mode-set,设置图的 restore mode
- –graph-mode 或者 -m,必填项,指定将要设置的模式,合法值包括 [NONE, RESTORING, MERGING, LOADING]
- graph-mode-get,获取图的 restore mode
- graph-list,列出某个 HugeGraph-Server 中全部的图
- graph-get,获取某个图及其存储后端类型
- graph-clear,清除某个图的全部 schema 和 data
- –confirm-message 或者 -c,必填项,删除确认信息,需要手动输入,二次确认防止误删,“I’m sure to delete all data”,包括双引号
- graph-create,使用配置文件创建新图
- –name 或者 -n,选填项,新图的名称,默认为 g
- –file 或者 -f,图配置文件的路径,文件内容会作为新图的配置发送给 HugeGraph-Server
- graph-clone,克隆已存在的图
- –name 或者 -n,选填项,新克隆图的名称,默认为 g
- –clone-graph-name,选填项,要克隆的源图名称,默认为 hugegraph
- graph-drop,删除图(不同于 graph-clear,这会完全删除图)
- –confirm-message 或者 -c,必填项,确认消息 “I’m sure to drop the graph”,包括双引号
graph-create、graph-clone、graph-clear 和 graph-drop 会将 –timeout 提升到至少 300 秒。
当需要把备份的图原样恢复到一个新的图中的时候,需要先将图模式设置为 RESTORING 模式;当需要将备份的图合并到已存在的图中时,需要先将图模式设置为 MERGING 模式。
3.4 异步任务管理类,task-list、task-get、task-delete、task-cancel 和 task-clear
- task-list,列出某个图中的异步任务,可以根据任务的状态过滤
- –status,选填项,指定要查看的任务的状态,即按状态过滤任务,合法值包括 [UNKNOWN, NEW, QUEUED, RESTORING, RUNNING, SUCCESS, CANCELLED, FAILED](不区分大小写)
- –limit,选填项,指定要获取的任务的数目,默认为 -1,意思为获取全部符合条件的任务,显式传入的值必须为正数
- task-get,获取某个异步任务的详细信息
- –task-id,必填项,指定异步任务的 ID
- task-delete,删除某个异步任务的信息
- –task-id,必填项,指定异步任务的 ID
- task-cancel,取消某个异步任务的执行
- –task-id,必填项,要取消的异步任务的 ID
- task-clear,清理完成的异步任务
- –force,选填项,设置时,表示清理全部异步任务,未执行完成的先取消,然后清除所有异步任务。默认只清理已完成的异步任务
3.5 Gremlin类,gremlin-execute和gremlin-schedule
- gremlin-execute,发送 Gremlin 语句到 HugeGraph-Server 来执行查询或修改操作,同步执行,结束后返回结果
- –file 或者 -f,指定要执行的脚本文件,UTF-8编码,与 –script 互斥
- –script 或者 -s,指定要执行的脚本字符串,与 –file 互斥
- –aliases 或者 -a,Gremlin 别名设置,格式为:key1=value1,key2=value2,…
- –bindings 或者 -b,Gremlin 绑定设置,格式为:key1=value1,key2=value2,…
- –language 或者 -l,Gremlin 脚本的语言,默认为 gremlin-groovy
–file 和 –script 二者互斥,必须设置其中之一
- gremlin-schedule,发送 Gremlin 语句到 HugeGraph-Server 来执行查询或修改操作,异步执行,任务提交后立刻返回异步任务id
- –file 或者 -f,指定要执行的脚本文件,UTF-8编码,与 –script 互斥
- –script 或者 -s,指定要执行的脚本字符串,与 –file 互斥
- –bindings 或者 -b,Gremlin 绑定设置,格式为:key1=value1,key2=value2,…
- –language 或者 -l,Gremlin 脚本的语言,默认为 gremlin-groovy
–file 和 –script 二者互斥,必须设置其中之一
3.6 备份/恢复类
- backup,将某张图中的 schema 或者 data 备份到 HugeGraph 系统之外,以 JSON 形式存在本地磁盘或者 HDFS
- –format,备份的格式,可选值包括 [json, text],默认为 json
- –all-properties,是否备份顶点/边全部的属性,仅在 –format 为 text 是有效,默认 false
- –label,要备份的顶点 label 或者边 label,仅在 –format 为 text 时生效;设置该项时,–huge-types 必须只包含一种类型,且该类型必须是 vertex 或者 edge,否则命令会失败
- –properties,要备份的顶点/边的属性,逗号分隔,仅在 –format 为 text 是有效,只有备份顶点或者边的时候有效
- –compress,备份时是否压缩数据,默认为 true
- –directory 或者 -d,存储 schema 或者 data 的目录,本地目录时,默认为’./{graphName}’,HDFS 时,默认为 ‘{fs.default.name}/{graphName}’
- –huge-types 或者 -t,要备份的数据类型,逗号分隔,可选值为 ‘all’ 或者 一个或多个 [vertex,edge,vertex_label,edge_label,property_key,index_label] 的组合,‘all’ 代表全部6种类型,即顶点、边和所有schema,‘schema’ 代表 4 种 schema 类型 [vertex_label, edge_label, property_key, index_label]
- –log 或者 -l,指定日志目录,默认为 ./logs
- –retry,指定失败重试次数,默认为 3
- –thread-num 或者 -T,使用的线程数,默认为 Math.min(10, Math.max(4, CPUs / 2))
- –split-size 或者 -s,指定在备份时对顶点或者边分块的大小,默认为 1048576,且不能小于 1048576(1M)
- -D,用 -Dkey=value 的模式指定动态参数,用来备份数据到 HDFS 时,指定 HDFS 的配置项,例如:-Dfs.default.name=hdfs://localhost:9000
当 –timeout 小于 120 秒时,backup(以及 migrate 中的备份步骤)会使用 120 秒
- restore,将 JSON 格式存储的 schema 或者 data 恢复到一个新图中(RESTORING 模式)或者合并到已存在的图中(MERGING 模式)
- –directory 或者 -d,存储 schema 或者 data 的目录,本地目录时,默认为’./{graphName}’,HDFS 时,默认为 ‘{fs.default.name}/{graphName}’
- –clean,是否在恢复图完成后删除 –directory 指定的目录,默认为 false
- –huge-types 或者 -t,要恢复的数据类型,逗号分隔,可选值为 ‘all’ 或者 一个或多个 [vertex,edge,vertex_label,edge_label,property_key,index_label] 的组合,‘all’ 代表全部6种类型,即顶点、边和所有schema,‘schema’ 代表 4 种 schema 类型 [vertex_label, edge_label, property_key, index_label]
- –log 或者 -l,指定日志目录,默认为 ./logs
- –retry,指定失败重试次数,默认为 3
- –thread-num 或者 -T,使用的线程数,默认为 Math.min(10, Math.max(4, CPUs / 2))
- -D,用 -Dkey=value 的模式指定动态参数,用来从 HDFS 恢复图时,指定 HDFS 的配置项,例如:-Dfs.default.name=hdfs://localhost:9000
只有当 –format 为 json 执行 backup 时,才可以使用 restore 命令恢复 restore 要求图处于 RESTORING 或 MERGING 模式(先用 graph-mode-set 设置),否则命令会失败
- migrate,将当前连接的图迁移至另一个 HugeGraphServer 中
- –target-graph,目标图的名字,默认为 hugegraph
- –target-url,目标图所在的 HugeGraphServer,默认为 http://127.0.0.1:8081
- –target-user,访问目标图的用户名
- –target-password,访问目标图的密码
- –target-timeout,访问目标图的超时时间
- –target-trust-store-file,访问目标图使用的 truststore 文件
- –target-trust-store-password,访问目标图使用的 truststore 的密码
- –directory 或者 -d,迁移过程中,存储源图的 schema 或者 data 的目录,本地目录时,默认为’./{graphName}’,HDFS 时,默认为 ‘{fs.default.name}/{graphName}’
- –huge-types 或者 -t,要迁移的数据类型,逗号分隔,可选值为 ‘all’ 或者 一个或多个 [vertex,edge,vertex_label,edge_label,property_key,index_label] 的组合,‘all’ 代表全部6种类型,即顶点、边和所有schema,‘schema’ 代表 4 种 schema 类型 [vertex_label, edge_label, property_key, index_label]
- –log 或者 -l,指定日志目录,默认为 ./logs
- –retry,指定失败重试次数,默认为 3
- –thread-num 或者 -T,使用的线程数,默认为 Math.min(10, Math.max(4, CPUs / 2))
- –split-size 或者 -s,指定迁移过程中对源图进行备份时顶点或者边分块的大小,默认为 1048576,且不能小于 1048576(1M)
- -D,用 -Dkey=value 的模式指定动态参数,用来在迁移图过程中需要备份数据到 HDFS 时,指定 HDFS 的配置项,例如:-Dfs.default.name=hdfs://localhost:9000
- –graph-mode 或者 -m,将源图恢复到目标图时将目标图设置的模式,合法值包括 [RESTORING, MERGING],默认为 RESTORING。迁移期间目标图会被切换到该模式,迁移结束后恢复为原来的模式
- –keep-local-data,是否保留在迁移图的过程中产生的源图的备份,默认为 false,即默认迁移图结束后不保留产生的源图备份
- schedule-backup,周期性对图执行备份操作,并保留一定数目的最新备份(目前仅支持本地文件系统)
- –directory 或者 -d,必填项,指定备份数据的目录
- –backup-num,选填项,指定保存的最新的备份的数目,默认为 3
- –interval,选填项,指定进行备份的周期,格式同 Linux crontab 格式,默认为 “0 0 * * *"(每天 00:00)
schedule-backup 会添加一条 crontab 任务,定期执行
backup -t all并写入{directory}/{graph}/hugegraph-backup-{yyMMddHHmm}/,只保留最新的 –backup-num 份备份。相对路径的 –directory 会相对于 hugegraph-tools 的根目录解析,且{directory}/{graph}必须尚不存在 - dump,把整张图的顶点和边全部导出,默认以
vertex vertex-edge1 vertex-edge2...的 JSON 格式存储。 用户也可以自定义存储格式。在hugegraph-tools/src/main/java/org/apache/hugegraph/formatter下实现一个继承自Formatter的类,例如CustomFormatter,使用时指定该类为 formatter:bin/hugegraph dump -f CustomFormatter- –formatter 或者 -f,指定使用的 formatter,默认为 JsonFormatter
- –directory 或者 -d,存储 schema 或者 data 的目录,本地目录时,默认为’./{graphName}’,HDFS 时,默认为 ‘{fs.default.name}/{graphName}’
- –log 或者 -l,指定日志目录,默认为 ./logs
- –retry,指定失败重试次数,默认为 3
- –thread-num 或者 -T,使用的线程数,默认为 Math.min(10, Math.max(4, CPUs / 2))
- –split-size 或者 -s,指定在备份时对顶点或者边分块的大小,默认为 1048576,且不能小于 1048576(1M)
- -D,用 -Dkey=value 的模式指定动态参数,用来备份数据到 HDFS 时,指定 HDFS 的配置项,例如:-Dfs.default.name=hdfs://localhost:9000
3.7 认证数据备份/恢复类
- auth-backup,备份认证数据到指定目录
- –types 或者 -t,要备份的认证数据类型,逗号分隔,可选值为 ‘all’ 或者一个或多个 [user, group, target, belong, access] 的组合,‘all’ 代表全部5种类型;包含 ‘belong’ 时必须同时包含 ‘user’ 和 ‘group’,包含 ‘access’ 时必须同时包含 ‘group’ 和 ’target’
- –directory,备份数据存储目录,本地目录时,默认为 ‘./auth-backup-restore’,HDFS 时,默认为 ‘{fs.default.name}/auth-backup-restore’(该选项没有 -d 短写)
- –retry,指定失败重试次数,默认为 3
- -D,用 -Dkey=value 的模式指定动态参数,用来备份数据到 HDFS 时,指定 HDFS 的配置项,例如:-Dfs.default.name=hdfs://localhost:9000
- auth-restore,从指定目录恢复认证数据
- –types 或者 -t,要恢复的认证数据类型,逗号分隔,可选值为 ‘all’ 或者一个或多个 [user, group, target, belong, access] 的组合,‘all’ 代表全部5种类型;包含 ‘belong’ 时必须同时包含 ‘user’ 和 ‘group’,包含 ‘access’ 时必须同时包含 ‘group’ 和 ’target’
- –directory,备份数据存储目录,本地目录时,默认为 ‘./auth-backup-restore’,HDFS 时,默认为 ‘{fs.default.name}/auth-backup-restore’(该选项没有 -d 短写)
- –retry,指定失败重试次数,默认为 3
- –strategy,冲突处理策略,可选值为 [stop, ignore],默认为 stop。stop 表示遇到冲突时停止恢复,ignore 表示忽略冲突继续恢复
- –init-password,恢复用户时设置的初始密码,当 –types 包含 user 时必填
- -D,用 -Dkey=value 的模式指定动态参数,用来从 HDFS 恢复数据时,指定 HDFS 的配置项,例如:-Dfs.default.name=hdfs://localhost:9000
3.8 安装部署类
- deploy,一键下载、安装和启动 HugeGraph-Server 和 HugeGraph-Studio
- -v,必填项,指定要安装的 HugeGraph-Server 和 HugeGraph-Studio 版本,必须是 bin/version-map.yaml 中列出的版本之一(0.6、0.7、0.8、0.9、0.10),脚本据此映射到对应的 server 和 studio 发布版本
- -p,必填项,指定安装的 HugeGraph-Server 和 HugeGraph-Studio 目录
- -u,选填项,指定下载 HugeGraph-Server 和 HugeGraph-Studio 压缩包的链接
- clear,清理 HugeGraph-Server 和 HugeGraph-Studio 目录和tar包(若对应的 server 或 studio 进程仍在运行则拒绝执行,删除每一项前都会提示确认)
- -p,必填项,指定要清理的 HugeGraph-Server 和 HugeGraph-Studio 的目录
- start-all,一键启动 HugeGraph-Server 和 HugeGraph-Studio
- -v,必填项,指定已安装的 HugeGraph-Server 和 HugeGraph-Studio 版本,取值同 deploy
- -p,必填项,指定安装了 HugeGraph-Server 和 HugeGraph-Studio 的目录
- stop-all,一键关闭 HugeGraph-Server 和 HugeGraph-Studio
deploy、start-all、clear 和 stop-all 由
bin/hugegraph直接转交给bin/deploy.sh、bin/start-all.sh、bin/clear.sh和bin/stop-all.sh执行,因此 3.2 中的全局变量和环境变量对它们不生效。
deploy命令中有可选参数 -u,提供时会使用指定的下载地址替代默认下载地址下载 tar 包,并且将地址写入
~/hugegraph-download-url-prefix文件中;之后如果不指定地址时,会优先从~/hugegraph-download-url-prefix指定的地址下载 tar 包;如果 -u 和~/hugegraph-download-url-prefix都没有时,会从默认下载地址https://github.com/hugegraph进行下载
3.9 具体命令参数
各子命令的具体参数如下:
3.10 具体命令示例
1. gremlin语句
2. 查看task情况
3. 图模式查看和设置
4. 清理图
5. 图备份
6. 周期性的备份
7. 图恢复
8. 图迁移
3.2.6 - 图导出/迁移
需要备份、导出或在两张图之间迁移数据时,从这里选择工具。Tools 适合单机运维和备份;SeaTunnel Source 适合把图数据接入可扩展的数据管道。
3.2.6.1 - 使用 SeaTunnel Source 导出与迁移图数据
如果你需要把数据从一张 HugeGraph 图复制到另一张图,使用 graph2graph:HugeGraph Source 从源图(A 图)读取顶点和边,数据经过可选的 Transform 后,由 HugeGraph Sink 写入目标图(B 图)。数据方向是 A 图 → HugeGraph Source →(可选 Transform)→ HugeGraph Sink → B 图。如果要把图数据导出到文件、JDBC、Kafka 等其他系统,则使用 graph2any,由下游 Sink 接收 Source 读取的数据。本文介绍这两类任务。
版本要求:本文面向 SeaTunnel 3.0+
SeaTunnel 3.0+ 提供 HugeGraph Source,支持图模型自动发现和多标签读取。 并行扫描的后端要求和配置限制见官方 Source 文档。
开始前请先完成导入页中的通用环境准备和配置,其中包含 JDK、HOCON、插件安装和图模型说明。
1 迁移 HugeGraph 图(graph2graph)
下面从源图迁移 person 顶点和 knows 边。请使用独立的目标图:本节采用 CUSTOMIZE_STRING 保留顶点 ID,不要复用前面已经创建为 PRIMARY_KEY 的 person 标签。
这两个任务只迁移指定标签和属性,不会完整复制源图的索引、TTL 等全部 Schema 配置。运行期间应暂停源图写入,避免两个任务读到不同时间的数据;完成后核对顶点、边数量及抽样属性。
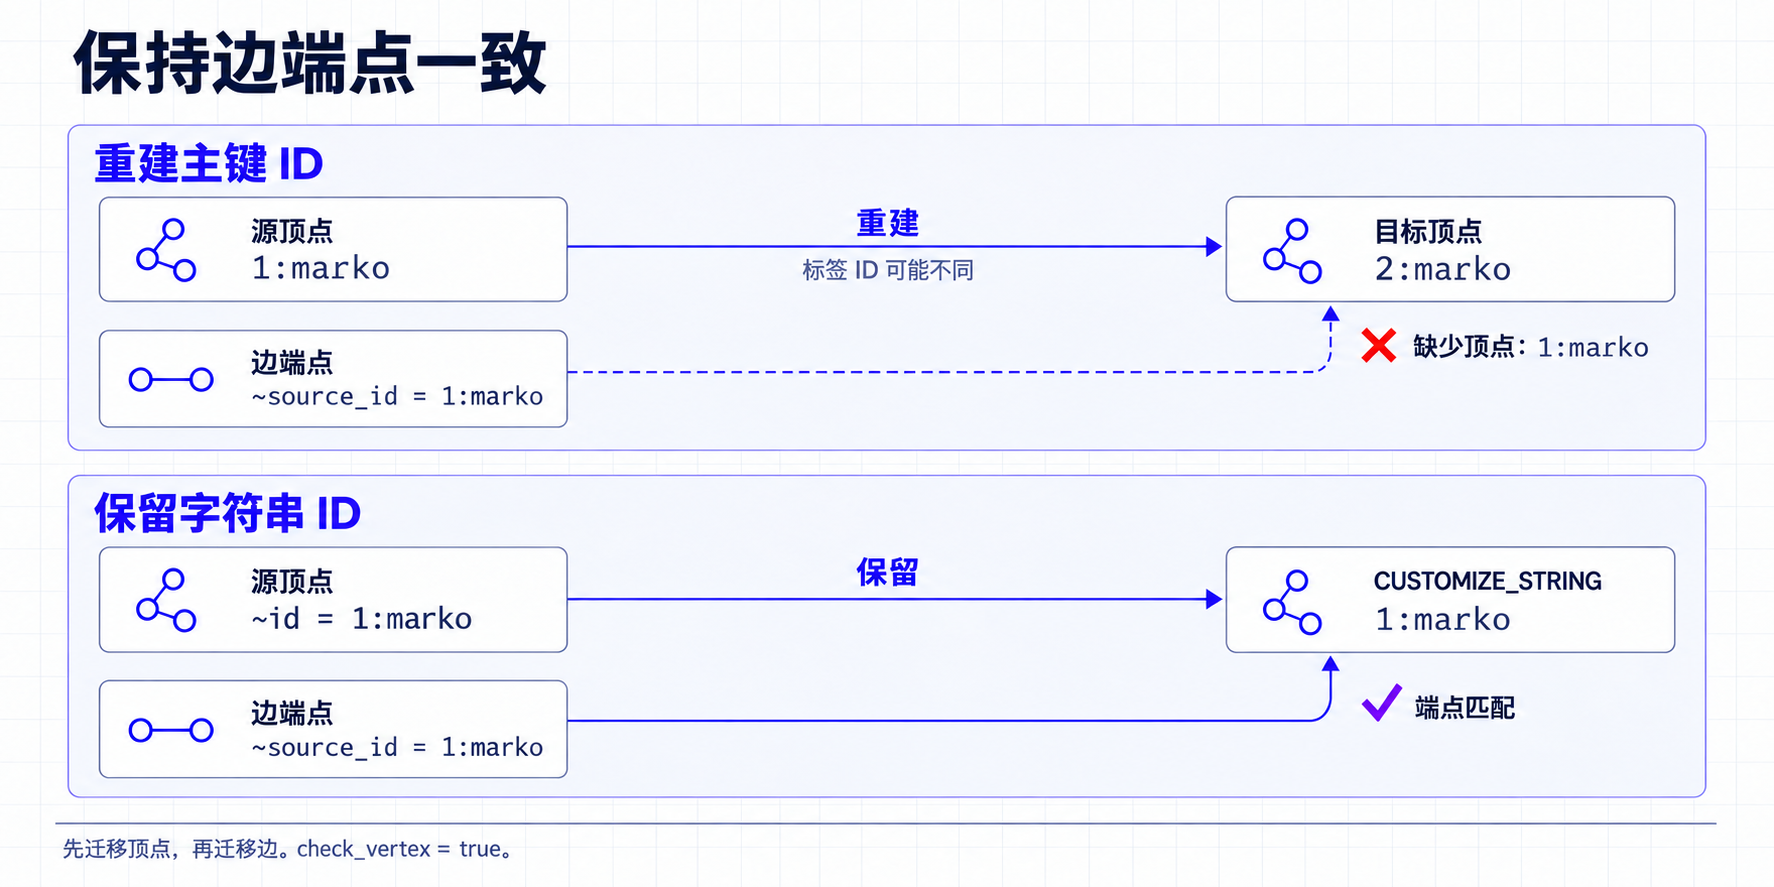
1.1 先迁移顶点
Source 自动补充 ~id 保留列,Sink 把原 ID 作为字符串保存。无需在 schema.fields 中声明 ~id,手动声明保留列会被拒绝。
1.2 再迁移边
确认顶点任务成功后,使用 Source 自动补充的 ~source_id 和 ~target_id 定位端点。因为上一任务保留了原 ID,这两列可以直接引用目标图中的顶点。
本例打开端点检查,并让写入错误直接导致任务失败。默认的 check_vertex = false 不保证最终一致:缺少端点可能产生悬空边,因此不能用任务成功代替迁移结果检查。
为什么保留 ID? HugeGraph 的
PRIMARY_KEYID 包含顶点标签的内部 ID,两张图可能不同。例如源图顶点是1:marko,目标图重新按主键生成的可能是2:marko。如果重新生成顶点 ID 后仍复用源图的边端点,边就会连错。本例将原 ID 保存为字符串,因此会改变目标图的 ID 策略
若要一次读取全部标签,省略 Source 的 label 后会读取 label_type(默认 VERTEX)下的全部 label,每个 label 输出一张表。这时需用 sourceTable 将各 Sink 映射绑定到对应表,例如 sourceTable = "default.person";具体值以 Writer 日志中的完整表名为准。不能直接套用本节的单标签配置。其他限制见 HugeGraph Source 文档。
2 导出到其他系统(graph2any)
graph2any 使用 HugeGraph Source[1] 读取顶点或边,再交给下游 Sink。下面示例将 person 顶点导出为本地 JSON 文件;导出到 JDBC、Kafka 等系统时,替换 LocalFile[2] 及其配置即可。
保存为 config/graph2file-person.conf,在 SeaTunnel 安装目录执行:
导出边时,将 Source 的 label 改为边标签、label_type 改为 EDGE,并在 schema.fields 中声明边属性。Source 会额外输出 ~source_id、~source_label、~target_id 和 ~target_label,这些保留列可直接写入文件或交给下游转换步骤。
本页只介绍数据行的读取和写出,不会自动复制源图的索引、TTL 或其他 Schema 设置。完整 Source 参数和通用环境说明请回到SeaTunnel 图导入文档[3]。
3 参考文档
连接器
[1] HugeGraph Source
[2] LocalFile Sink
关联文档
[3] SeaTunnel 图导入文档
3.2.7 - HugeGraph-Spark-Connector 快速上手
1 HugeGraph-Spark-Connector 概述
HugeGraph-Spark-Connector 使用 Spark DataFrame API 将批量数据写入 HugeGraph。当前实现提供顶点和边的写入器。
目前尚未实现从 HugeGraph 读取数据:表只实现了 SupportsWrite,因此不支持 spark.read.format(...)。连接器支持 CUSTOMIZE 和 PRIMARY_KEY 两种顶点 id 策略,AUTOMATIC 策略会被拒绝。
2 环境要求
- Java 8+
- Maven 3.6+
- Spark 3.2.x(模块基于 Spark 3.2.2 编译,依赖范围为
provided,因此需要由 Spark 运行环境提供 Spark 的 jar) - Scala 2.12(基于 Scala 2.12.11 编译)
3 编译
3.1 不执行测试的编译
以下命令均在仓库根目录执行。
3.2 执行默认测试的编译
两条命令都会在 hugegraph-spark-connector/target/hugegraph-spark-connector-${revision}-jar-with-dependencies.jar 生成一个包含依赖的 jar(不包含 Spark 本身)。如果不通过 Maven 管理依赖,可以把它传给 spark-submit --jars。
4 使用方法
先在 pom.xml 中添加依赖,并将 ${revision} 换成实际使用的发布版本:
format 必须写完整类名 org.apache.hugegraph.spark.connector.DataSource,连接器没有通过 Spark 的 DataSourceRegister 服务注册短名称。当 HugeGraphServer 开启鉴权时,需要在下面的示例中加上 .option("username", ...) 和 .option("token", ...)。
4.1 Schema 定义示例
假设我们有一个图,其 schema 定义如下:
4.2 写入顶点数据(Scala)
4.3 写入边数据(Scala)
4.4 写入 PRIMARY_KEY id 策略的顶点(Scala)
对于使用 primaryKeys(...) 的顶点标签,不要设置 id 选项:id 由主键列拼接生成。不属于 schema 的列可以通过 ignored-fields 丢弃。
4.5 写入两端 id 策略不同的边(Scala)
source-name 和 target-name 各自遵循对应顶点标签的 id 策略。下面的例子中,person 使用自定义字符串 id(一列),software 使用主键(其 name 列):
关于保存模式:SaveMode.Overwrite 和 SaveMode.Append 都只是插入数据,overwrite 路径不会先删除图中已有的数据。
5 配置参数
选项名匹配时不区分大小写并会去掉首尾空格。data-type 和 label 必填;当 data-type 为 edge 时 source-name 和 target-name 必填;其余选项都有默认值。
5.1 客户端配置
客户端配置用于配置 hugegraph-client。
| 参数 | 默认值 | 说明 |
|---|---|---|
host | localhost | HugeGraphServer 的地址,可以是主机名或 IP,也可以带 http:// / https:// 前缀 |
port | 8080 | HugeGraphServer 的端口 |
graph | hugegraph | 图名称 |
protocol | http | 向服务器发送请求的协议,可选 http 或 https |
username | null | 当 HugeGraphServer 开启权限认证时,当前图的用户名。未设置时使用图名称作为用户名 |
token | null | 当 HugeGraphServer 开启权限认证时,当前图的 token |
timeout | 60 | 插入结果返回的超时时间(秒) |
max-conn | CPUS * 4 | HugeClient 与 HugeGraphServer 之间的最大 HTTP 连接数 |
max-conn-per-route | CPUS * 2 | HugeClient 与 HugeGraphServer 之间每个路由的最大 HTTP 连接数 |
trust-store-file | null | 当请求协议为 https 时,客户端的证书文件路径。https 下未设置时,连接器会读取 JVM 系统属性 connector.home.path 指向目录下的 conf/hugegraph.truststore,此时该属性必须设置 |
trust-store-token | null | 当请求协议为 https 时,客户端的证书密码。https 下未设置时使用 hugegraph |
5.2 图数据配置
图数据配置用于说明 DataFrame 如何映射到顶点或边。
| 参数 | 默认值 | 说明 |
|---|---|---|
data-type | 必填。图数据类型,必须是 vertex 或 edge | |
label | 必填。要导入的顶点/边数据所属的标签 | |
id | 指定某一列作为顶点的 id 列。当顶点 id 策略为 CUSTOMIZE 时,必填;当 id 策略为 PRIMARY_KEY 时,必须为空。不支持 AUTOMATIC id 策略 | |
source-name | 当 data-type 为 edge 时必填。选择输入源的某些列作为源顶点的 id 列。当源顶点的 id 策略为 CUSTOMIZE 时,必须指定某一列作为顶点的 id 列;当源顶点的 id 策略为 PRIMARY_KEY 时,必须指定一列或多列用于拼接生成顶点的 id,即无论使用哪种 id 策略,此项都是必填的。多列之间用 , 分隔(delimiter 选项对此项不生效) | |
target-name | 当 data-type 为 edge 时必填。指定某些列作为目标顶点的 id 列,与 source-name 类似 | |
selected-fields | 选择某些列进行插入,其他未选择的列不插入,不能与 ignored-fields 同时存在 | |
ignored-fields | 忽略某些列使其不参与插入,不能与 selected-fields 同时存在 | |
batch-size | 500 | 导入数据时每批数据的条目数。按 Spark task 生效:每个分区的写入器在缓冲区累积到该数量的顶点/边时向服务端提交一次,commit 时再提交剩余部分 |
5.3 通用配置
通用配置包含一些常用的配置项。
| 参数 | 默认值 | 说明 |
|---|---|---|
delimiter | , | selected-fields 和 ignored-fields 的分隔符。source-name 和 target-name 始终按 , 拆分 |
6 注意事项与限制
- 每个 Spark 写入 task 会创建自己的 HugeClient,写入前把图切换到
LOADING模式,commit 或 abort 时恢复为NONE模式。 - 顶点 id 长度限制为 128 字节(UTF-8),对自定义字符串 id 和由主键拼接出的 id 都生效。
- 不支持
AUTOMATIC顶点 id 策略,创建写入器时会抛出IllegalArgumentException,写入失败。 - 暂不支持
SET或LIST基数的属性,只会转换SINGLE基数的值。 - 日期属性:字符串值必须使用
yyyy-MM-dd HH:mm:ss格式,按GMT+8时区解析;数值会被当作毫秒时间戳。 - 以字符串形式给出的布尔属性接受
true、1、yes、y和false、0、no、n(不区分大小写)。 - 自定义字符串 id 或任一主键值为空字符串的行会被跳过;为 null 时则会报错。
7 许可证
与 HugeGraph 一样,hugegraph-spark-connector 也采用 Apache 2.0 许可证。
3.3 - HugeGraph-AI
hugegraph-ai 提供 HugeGraph 的 Python 客户端、图机器学习工具,以及面向知识图谱构建和 GraphRAG 的 LLM 工具。
Apache License 2.0 · Ask DeepWiki
模块
- hugegraph-llm:知识图谱构建、GraphRAG 和自然语言图查询。
- hugegraph-ml:从 HugeGraph 读取图数据并运行图学习模型。
- hugegraph-python-client:管理 Schema、图数据和 Gremlin 查询的 Python SDK。
- vermeer-python-client:调用 Vermeer 图计算服务的 Python SDK。
仓库使用 uv workspace,其成员是 hugegraph-llm 和 hugegraph-python-client。hugegraph-ml 和 vermeer-python-client 是可编辑的路径依赖,不在 workspace members 中。当前仓库版本为 1.7.0。客户端源码目录叫 hugegraph-python-client,但发行包名是 hugegraph-python。
环境要求
- HugeGraph-AI 根目录 workspace:Python 3.10 或更高版本;HugeGraph-LLM 还要求低于 3.12
- HugeGraph-ML:Python 3.10 或更高版本
- PyPI 上的
hugegraph-python1.5.0:Python 3.9 或更高版本;当前仓库源码随 workspace 使用 Python 3.10 或更高版本 - Vermeer Python 客户端:当前源码要求 Python 3.10 或更高版本;发行元数据仍声明
>=3.9,详见客户端页 uv0.7 或更高版本- HugeGraph Server 1.5.0 或更高版本;当前 workspace 的 Python 客户端会拒绝可探测到的更低版本
可选依赖组
根项目为每个模块声明一个 extra,另有几个组合项:
| Extra | 安装内容 |
|---|---|
llm | hugegraph-llm |
ml | hugegraph-ml |
python-client | hugegraph-python(源码目录 hugegraph-python-client) |
vermeer | vermeer-python-client |
dev | pytest、pytest-cov、coverage、pylint、ruff、mypy、ty、pre-commit |
nk-llm | hugegraph-llm、hugegraph-python-client,以及编译镜像所需的 Nuitka |
all | 四个模块包 |
hugegraph-llm 自身还声明了 vectordb extra,用于安装 pymilvus 和 qdrant-client。
Docker Compose 部署
仓库提供同时启动 HugeGraph Server 和 RAG 服务的 Compose 文件:
默认地址:
- HugeGraph Server:
http://localhost:8080 - RAG 服务和 Web 界面:
http://localhost:8001
从源码启动 RAG 服务
uv sync 会在仓库根目录创建 .venv。从根目录安装可让 uv 一起解析 workspace 成员和路径依赖。当前仓库不跟踪 uv.lock;uv sync 会按 pyproject.toml 中的依赖声明和版本约束解析依赖。
安装 ML 依赖
示例脚本位于 hugegraph-ml/src/hugegraph_ml/examples/。
后续阅读
3.3.1 - HugeGraph-LLM
HugeGraph-LLM 用于知识图谱构建、GraphRAG 和自然语言图查询。演示服务把 Gradio 页面和 FastAPI 接口挂在同一个进程上,直接从源码启动时默认只监听本机 127.0.0.1:8001,可用 http://localhost:8001 访问。若显式启动源码入口且只需本机访问,可指定 --host 127.0.0.1;源码 Docker 镜像的 Dockerfile.llm 会覆盖默认值并监听 0.0.0.0:8001,不要在容器内改为 loopback,否则容器外无法通过映射端口访问。
生产环境必须为 HugeGraph-LLM 启用自身的登录认证(ENABLE_LOGIN=True,并替换 USER_TOKEN、ADMIN_TOKEN),同时在防火墙或网络入口设置来源 IP 白名单。HugeGraph Server 还必须单独开启认证与授权(见认证与授权说明)并保留 Server 审计日志(标准日志文件为 audit-*.log),为 GRAPH_USER 配置只具备该服务所需权限的账号。AI 服务 token 只认证 LLM 页面和 API,不能替代 HugeGraph Server 认证。
环境要求
AI 总结项目文档:Ask DeepWiki
- Python 3.10 或 3.11(
>=3.10,<3.12) uv0.7 或更高版本- HugeGraph Server 1.5.0 或更高版本;当前 workspace 中的 Python 客户端会拒绝可探测到的更低版本
Docker Compose 部署
在 HugeGraph-AI 仓库根目录准备环境文件:
启动后可访问:
- HugeGraph Server:
http://localhost:8080 - RAG 服务和 Web 页面:
http://localhost:8001
Compose 文件会把 ${PROJECT_PATH}/hugegraph-llm/.env 挂载到容器内的 /home/work/hugegraph-llm/.env,因此该文件必须在容器启动前存在。资源目录 hugegraph-llm/src/hugegraph_llm/resources 也可以用同样方式挂载,该挂载默认被注释掉。
应用读取 GRAPH_URL,Compose 注入的 HUGEGRAPH_HOST 和 HUGEGRAPH_PORT 不会覆盖它;因此容器内要将 GRAPH_URL 设为 server:8080,并在 .env 中配置匹配 HugeGraph Server 的用户名和密码。
容器镜像
| 镜像 | 构建文件 | 内容 |
|---|---|---|
docker/Dockerfile.llm | 源码运行镜像构建配方,入口是 python -m hugegraph_llm.demo.rag_demo.app --host 0.0.0.0 --port 8001 | |
docker/Dockerfile.nk | 基于 nk-llm extra 用 Nuitka 编译的二进制镜像构建配方,入口是 ./app.dist/app.bin |
Compose 文件引用未指定标签的 hugegraph/rag,Docker 会使用默认的 latest 标签。scripts/build_llm_image.sh 则以 docker/Dockerfile.llm 在本地构建 hugegraph/graphrag:1.7.0。Compose 引用的 hugegraph/rag:latest 与本地构建的 hugegraph/graphrag:1.7.0 是不同镜像;本地构建不会自动替换 Compose 所用镜像。要在 Compose 中运行本地构建结果,需将 Compose 的 image 改为 hugegraph/graphrag:1.7.0。该脚本只构建镜像,不会推送。两个 Dockerfile 都声明 8001 端口、以非 root 用户 work 运行,并用 curl -f http://localhost:8001/ 做镜像健康检查;两者都为资源目录声明数据卷。
scripts/build_llm_image.sh 会用 docker/Dockerfile.llm 构建并打上 hugegraph/graphrag:1.7.0 标签。
Kubernetes 部署
docker/charts/hg-llm 是 RAG 服务的 Helm chart,部署 hugegraph/graphrag 镜像。默认发布 NodePort 类型的 Service,把节点端口 8039 和服务端口 8080 映射到容器端口 8001,名称固定为 hg-llm-service。Ingress 和水平自动扩缩容已定义但默认关闭。
该 chart 只部署 RAG 服务,不会部署 HugeGraph Server。挂载的 .env 中要把 GRAPH_URL 设为 Pod 可访问的 HugeGraph 地址,并配置匹配的用户名和密码。
chart 中 image.tag 仍默认为 v0.0.1。当前构建脚本生成的标签是本地 hugegraph/graphrag:1.7.0;部署前须确保同名镜像已推送到集群可访问的仓库,或已加载到集群节点,并将 chart 的标签和拉取策略设为匹配的值。
chart 的 values.yaml 中,.env 和提示词 YAML 的挂载默认被注释掉。提示词 YAML 可用 ConfigMap;.env 可能含有密钥和密码,应使用 Secret,并把 volumes 中 env-config 的 configMap 改为 secret。Secret 和提示词 ConfigMap 可分别创建:
随后取消 volumeMounts 段落的注释,并按需要启用提示词 ConfigMap 的 volumes 和挂载。Helm 模板会直接渲染 values.yaml 中的卷定义。
从源码启动
依赖应从仓库根目录按 workspace 安装:
自定义监听地址和端口:
设置 HG_DEV_RELOAD=1 可让 uvicorn 以自动重载方式启动,便于开发调试。
服务以 hugegraph-llm/.env 保存模型、HugeGraph 和登录配置。提示词放在 hugegraph-llm/src/hugegraph_llm/resources/demo/config_prompt.yaml。缺少文件时,配置代码会按默认值创建。
.env 路径按以下顺序解析:先看是否设置了 HUGEGRAPH_LLM_ENV_PATH;未设置时,从源码运行则使用 hugegraph-llm/.env;否则使用当前工作目录下的 .env。
主要功能
构建 RAG 索引
Web 页面的第一个标签页可以处理文本或文件,并执行以下操作:
- 切分文本并写入 chunk 向量索引。
- 按给定 Schema 从文本抽取顶点和边。
- 将抽取结果写入 HugeGraph,并更新顶点向量索引。
文本可以在 text 子页直接输入,也可以在 file 子页上传。上传支持 .txt、.docx 和 .pdf,并可一次选择多个文件。加密 PDF 以及没有可提取文本层的扫描件 PDF 会被拒绝。
Schema 可以是内联 JSON,也可以是现有图名。通过 REST API 使用图名时,必须同时传入匹配的 client_config.graph;内联 JSON 不会连接 HugeGraph,也不能附带 client_config。
该标签页还提供两个生成器。Graph Schema Generator 根据查询示例和少样本示例生成 Schema。Graph Extraction Prompt Generator 根据描述的场景和选定的参考示例生成抽取提示词。Graph Extraction Split Type 下拉框可在抽取前选择 document、paragraph 或 sentence 粒度。
GraphRAG
查询流程可以组合直接回答、chunk 向量召回和图召回。图召回先抽取关键词并匹配顶点,再尝试 Text2Gremlin;生成或执行失败时可回退到预定义的图遍历方式。请求参数可控制返回数量、向量距离阈值、模板数量和重排序方式。
同一标签页还有批量回归测试面板,可从 .xlsx 或 .csv 文件读取问题、逐条作答,并返回可下载的结果文件。上传控件旁提供模板文件下载。
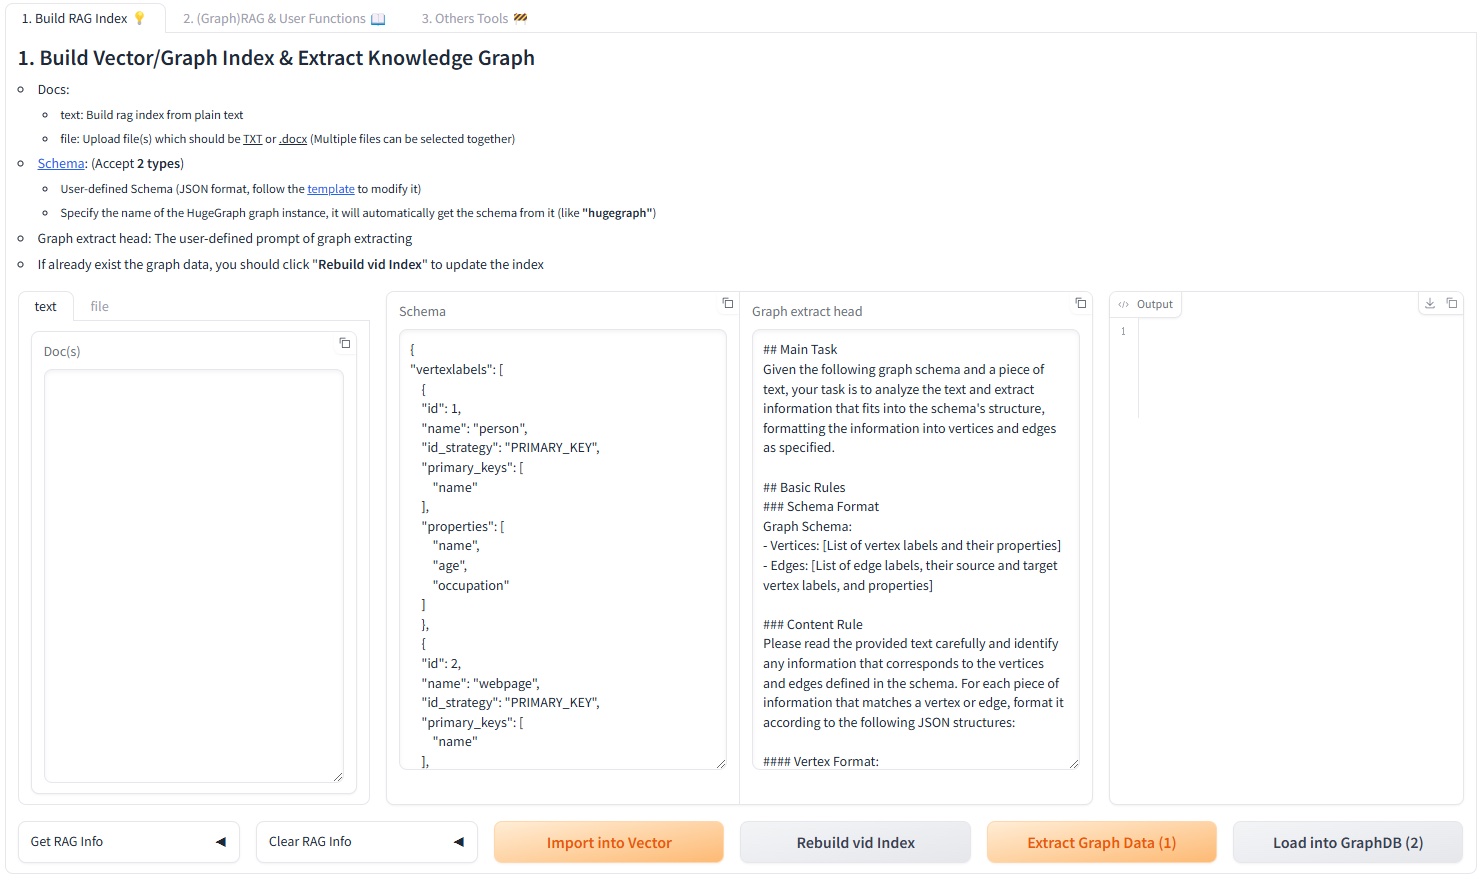
Text2Gremlin
POST /text2gremlin 根据自然语言、图 Schema 和可选示例生成 Gremlin。自定义提示词必须保留 {query}、{schema}、{example} 和 {vertices} 四个占位符。
对应的页面标签可以先用问题与 Gremlin 对照文件(.json 或 .csv)构建示例向量索引。未上传文件时使用内置的 resources/demo/text2gremlin.csv。
图工具与管理工具
Graph Tools 标签页可直接执行 Gremlin 查询、手动触发图备份,以及初始化 HugeGraph 演示数据。Admin Tools 标签页在校验 ADMIN_TOKEN 后展示 logs/llm-server.log 的末尾内容,并可刷新或清空该文件。
进程运行期间还有两个后台任务:每天 01:00 执行图备份的定时任务,以及持续更新顶点 id 向量的任务。
模型与向量后端
聊天、信息抽取和 Text2Gremlin 可以分别使用 OpenAI 兼容接口、Ollama 或 LiteLLM。嵌入模型可独立选择,同样支持这三种提供方。重排序支持 Cohere 和 SiliconFlow。
默认向量索引使用 FAISS。CUR_VECTOR_INDEX 可选 Faiss、Milvus 或 Qdrant,Web 页面的 5. Set up the vector engine. 面板提供同样的选择。Milvus 和 Qdrant 需要安装可选依赖:
页面操作流程见使用流程,完整环境变量见配置参考,HTTP 请求格式见REST API。
程序化调用
原有的 RAGPipeline 和 KgBuilder 类已被流水线调度器取代。通过 SchedulerSingleton 按名称调用流程:
已注册的流程名包括 rag_raw、rag_vector_only、rag_graph_only、rag_graph_vector、text2gremlin、build_examples_index、build_vector_index、graph_extract、import_graph_data、update_vid_embeddings、get_graph_index_info、build_schema 和 prompt_generate。schedule_stream_flow 是对应的异步流式版本。
开发检查
先在仓库根目录安装模块和开发工具,再运行与 CI 一致的检查:
Git hook 通过 pre-commit 启用:
3.3.2 - HugeGraph-ML
HugeGraph-ML 从 HugeGraph 读取图数据并转换为 DGL 图,供节点嵌入、节点分类、图分类、链接预测和欺诈检测等任务使用。模型实现位于 hugegraph-ml/src/hugegraph_ml/models/。
环境要求
- Python 3.10 或更高版本
- HugeGraph Server 1.5.0 或更高版本;当前 workspace 中的 Python 客户端会拒绝可探测到的更低版本
uv0.7 或更高版本
所有服务端访问都通过同一仓库中的 hugegraph-python-client(即 pyhugegraph 包)完成。HugeGraph2DGL 使用 Gremlin 接口的 g.V().hasLabel(...) 和 g.E().hasLabel(...) 拉取点边,数据集导入函数则通过 schema 接口和顶点、边的批量接口写入,每批 500 条。
ML 依赖在仓库根目录的 [tool.uv] constraint-dependencies 中声明版本约束:
| 依赖 | 版本约束 |
|---|---|
torch | ==2.2.0 |
dgl | ~=2.1.0 |
ogb | ~=1.3.6 |
torchdata | ~=0.7.0 |
catboost | ~=1.2.3 |
category-encoders | ~=2.6.3 |
numpy | ~=1.24.4 |
pandas | ~=2.2.3 |
这些约束限定依赖版本,不指定 CPU 或 CUDA 构建。支持 gpu 参数的任务默认值 -1 表示使用 CPU;使用 GPU 时,需要安装彼此兼容的 CUDA 版 torch 和 dgl。
安装
HugeGraph-ML 是根项目的路径依赖,但不属于 uv workspace members。应在仓库根目录选择 ml extra,让 uv 按 workspace 配置安装它及其本地客户端依赖。
已实现模型
下列模块均位于 hugegraph-ml/src/hugegraph_ml/models/。models/__init__.py 不做任何再导出,需要直接从模块文件导入。
| 模型 | 模块 | 入口类 | 用途 | 论文 |
|---|---|---|---|---|
| AGNN | agnn.py | AGNN | 节点分类 | 1803.03735 |
| APPNP | appnp.py | APPNP | 节点分类 | 1810.05997 |
| ARMA | arma.py | ARMA4NC | 节点分类 | 1901.01343 |
| BGNN | bgnn.py | BGNNPredictor | 梯度提升与 GNN 结合处理节点特征,自带示例执行回归任务 | 2101.08543 |
| BGRL | bgrl.py | BGRL | 自监督节点嵌入 | 2102.06514 |
| CARE-GNN | care_gnn.py | CAREGNN | 欺诈检测 | 2008.08692 |
| Cluster-GCN | cluster_gcn.py | SAGE | 基于子图采样的节点分类 | 1905.07953 |
| C&S | correct_and_smooth.py | MLP、CorrectAndSmooth、LabelPropagation | 对基础预测结果做校正与平滑 | 2010.13993 |
| DAGNN | dagnn.py | DAGNN | 节点分类 | 2007.09296 |
| DeeperGCN | deepergcn.py | DeeperGCN | 带边特征的节点分类 | 2006.07739 |
| DGI | dgi.py | DGI | 自监督节点嵌入 | 1809.10341 |
| DiffPool | diffpool.py | DiffPool | 图分类 | 1806.08804 |
| GATNE | gatne.py | DGLGATNE | 异构网络嵌入 | 1905.01669 |
| GIN | gin_global_pool.py | GIN | 图分类 | |
| GRACE | grace.py | GRACE | 自监督节点嵌入 | 2006.04131 |
| GRAND | grand.py | GRAND | 节点分类 | 2005.11079 |
| JKNet | jknet.py | JKNet | 节点分类 | 1806.03536 |
| MLP | mlp.py | MLPClassifier | 基于已学习嵌入的下游分类器 | |
| P-GNN | pgnn.py | PGNN | 链接预测 | you19b |
| SEAL | seal.py | DGCNN、SEALData | 链接预测 | 1802.09691 |
GIN 的 pooling 参数可取 sum(默认)、mean、max、global_attention 和 set2set。
读取图数据
hugegraph-ml/src/hugegraph_ml/data/hugegraph2dgl.py 中的 HugeGraph2DGL 会创建 PyHugeClient,并把查询结果转换为 DGL 对象:
| 方法 | 返回值 | 说明 |
|---|---|---|
convert_graph(vertex_label, edge_label, feat_key="feat", label_key="label", mask_keys=None) | dgl.DGLGraph | mask_keys 为空时取 ["train_mask", "val_mask", "test_mask"] |
convert_hetero_graph(vertex_labels, edge_labels, feat_key="feat", label_key="label", mask_keys=None) | DGL 异构图 | 参数为标签列表 |
convert_graph_dataset(graph_vertex_label, vertex_label, edge_label, feat_key="feat", label_key="label") | HugeGraphDataset | info 中写入 n_graphs、max_n_nodes、n_feat_dim、n_classes |
convert_graph_nx(vertex_label, edge_label) | networkx.Graph | P-GNN 使用 |
convert_graph_with_edge_feat(vertex_label, edge_label, node_feat_key="feat", edge_feat_key="edge_feat", label_key="label", mask_keys=None) | dgl.DGLGraph | 同时填充 edata["feat"] |
convert_graph_ogb(vertex_label, edge_label, split_label) | (dgl.DGLGraph, split_edge) | SEAL 使用 |
convert_hetero_graph_bgnn(vertex_labels, edge_labels, feat_key="feat", label_key="class", cat_key="cat_features", mask_keys=None) | DGL 异构图 | BGNN 使用 |
节点特征写入 ndata["feat"],标签写入 ndata["label"],各掩码写入 ndata[<mask key>]。NodeEmbed 只要求 feat;NodeClassify、NodeClassifyWithEdge 和 NodeClassifyWithSample 要求 feat、label、train_mask、val_mask 和 test_mask,缺少任意一项都会抛出 ValueError。
导入示例数据集
hugegraph_ml.utils.dgl2hugegraph_utils 负责把 DGL、OGB 和 NetworkX 数据集写入 HugeGraph,供转换层读取。这些函数都接受与 HugeGraph2DGL 相同的 url、graph、user、pwd 和 graphspace 参数,并且多数会先把数据集名转为大写再匹配。
| 函数 | 支持的数据集 | 创建的标签 |
|---|---|---|
import_graph_from_dgl | CORA、CITESEER、PUBMED | <NAME>_vertex、<NAME>_edge |
import_graphs_from_dgl | MUTAG、COLLAB、NCI1、PROTEINS、PTC、ENZYMES、DD | <NAME>_graph_vertex、<NAME>_vertex、<NAME>_edge |
import_hetero_graph_from_dgl | ACM | <NAME>_<ntype>_v、<NAME>_<etype>_e |
import_hetero_graph_from_dgl_no_feat | AMAZONGATNE | <NAME>_<ntype>_v、<NAME>_<etype>_e |
import_hetero_graph_from_dgl_bgnn | AVAZU | <NAME>_<ntype>_v、<NAME>_<etype>_e |
import_graph_from_nx | CAVEMAN | <NAME>_vertex、<NAME>_edge |
import_graph_from_dgl_with_edge_feat | CORA、CITESEER、PUBMED | <NAME>_edge_feat_vertex、<NAME>_edge_feat_edge |
import_graph_from_ogb | ogbl-collab,不做大写转换 | <NAME>_vertex、<NAME>_edge |
import_split_edge_from_ogb | ogbl-collab,不做大写转换 | <NAME>_split_edge |
传入其他名称会抛出 ValueError("dataset not supported")。import_split_edge_from_ogb 还需要顶点导入返回的 idx_to_vertex_id 映射和 max_nodes 上限。
clear_all_data() 会清空目标图中的全部点和边。测试 fixture 先调用它,再导入 CORA、MUTAG 和 ACM,结束时再次调用。
AMAZONGATNE 和 AVAZU 不会自动下载,压缩包地址写在 import_hetero_graph_from_dgl_no_feat 和 import_hetero_graph_from_dgl_bgnn 上方的注释里。
任务
任务类位于 hugegraph-ml/src/hugegraph_ml/tasks/,均接收转换后的图和模型实例。
| 类 | 模块 | 入口方法 |
|---|---|---|
NodeEmbed | node_embed.py | train_and_embed(add_self_loop=True, lr=1e-3, weight_decay=0, n_epochs=200, patience=inf, gpu=-1),返回 ndata["feat"] 被替换为嵌入结果的图 |
NodeClassify | node_classify.py | 先 train(lr, weight_decay, n_epochs, patience, early_stopping_monitor, gpu),再 evaluate() 返回 {"accuracy": ..., "loss": ...} |
NodeClassifyWithEdge | node_classify_with_edge.py | 结构相同,适用于同时读取 edata["feat"] 的模型 |
NodeClassifyWithSample | node_classify_with_sample.py | 基于 ClusterGCNSampler 分区的训练,仅使用 CPU,没有 gpu 参数 |
GraphClassify | graph_classify.py | train(batch_size=20, lr, weight_decay, n_epochs, patience, early_stopping_monitor, clip=2.0, gpu),在 HugeGraphDataset 上按 70/20/10 划分 |
DetectorCaregnn | fraud_detector_caregnn.py | CARE-GNN 训练,evaluate() 输出 recall 和 ROC AUC,并读取 ndata["feature"] 而非 ndata["feat"] |
HeteroSampleEmbedGATNE | hetero_sample_embed_gatne.py | train_and_embed(lr=1e-3, n_epochs=200, gpu=-1) |
LinkPredictionPGNN | link_prediction_pgnn.py | train(lr, weight_decay, n_epochs, gpu) |
LinkPredictionSeal | link_prediction_seal.py | 构造函数内部已调用 data_prepare(),随后执行 train(lr=1e-3, n_epochs=200, gpu=-1) |
patience 默认值为 float("inf")。utils/early_stopping.py 中的 EarlyStopping 可以监控 loss 或 accuracy,保存最优权重并在训练结束时恢复。
可运行示例
脚本位于 hugegraph-ml/src/hugegraph_ml/examples/。在 hugegraph-ml/src 目录下执行:
每个脚本同时提供同名函数,可以导入后用较小的 epoch 数调用。
| 脚本 | 模型 | 任务 | 读取的标签 |
|---|---|---|---|
agnn_example.py | AGNN | NodeClassify | CORA_vertex、CORA_edge |
appnp_example.py | APPNP | NodeClassify | CORA_vertex、CORA_edge |
arma_example.py | ARMA4NC | NodeClassify | CORA_vertex、CORA_edge |
bgnn_example.py | BGNNPredictor | 模型自带的 fit() | AVAZU__N_v、AVAZU__E_e |
bgrl_example.py | BGRL | NodeEmbed、NodeClassify | CORA_vertex、CORA_edge |
care_gnn_example.py | CAREGNN | DetectorCaregnn | AMAZON_user_v 以及 AMAZON_net_upu_e、AMAZON_net_usu_e、AMAZON_net_uvu_e |
cluster_gcn_example.py | SAGE | NodeClassifyWithSample | CORA_vertex、CORA_edge |
correct_and_smooth_example.py | correct_and_smooth 中的 MLP | NodeClassify | CORA_vertex、CORA_edge |
dagnn_example.py | DAGNN | NodeClassify | CORA_vertex、CORA_edge |
deepergcn_example.py | DeeperGCN | NodeClassifyWithEdge | 通过 convert_graph_with_edge_feat 读取 CORA_vertex、CORA_edge |
dgi_example.py | DGI | NodeEmbed、NodeClassify | CORA_vertex、CORA_edge |
diffpool_example.py | DiffPool | GraphClassify | MUTAG_graph_vertex、MUTAG_vertex、MUTAG_edge |
gatne_example.py | DGLGATNE | HeteroSampleEmbedGATNE | AMAZONGATNE__N_v、AMAZONGATNE_1_e、AMAZONGATNE_2_e |
gin_example.py | GIN | GraphClassify | MUTAG_graph_vertex、MUTAG_vertex、MUTAG_edge |
grace_example.py | GRACE | NodeEmbed、NodeClassify | CORA_vertex、CORA_edge |
grand_example.py | GRAND | NodeClassify | CORA_vertex、CORA_edge |
jknet_example.py | JKNet | NodeClassify | CORA_vertex、CORA_edge |
pgnn_example.py | PGNN | LinkPredictionPGNN | CAVEMAN_vertex、CAVEMAN_edge |
seal_example.py | DGCNN | LinkPredictionSeal | ogbl-collab_vertex、ogbl-collab_edge、ogbl-collab_split_edge |
DGI 节点嵌入示例
先把 DGL 的 Cora 数据集导入 HugeGraph。数据集名会先转为大写,因此 cora 和 CORA 都会生成 CORA_vertex 和 CORA_edge 标签:
读取图并训练 DGI:
evaluate() 返回类似 {'accuracy': 0.82, 'loss': 0.5714246034622192} 的字典。完整脚本是 hugegraph-ml/src/hugegraph_ml/examples/dgi_example.py。
GRAND 节点分类示例
GRAND 每次增强采样都会返回一组 logits,NodeClassify 会对列表中的每个元素分别应用掩码后再计算损失。完整脚本是 hugegraph-ml/src/hugegraph_ml/examples/grand_example.py。
排查问题
- 连接失败:检查 HugeGraph Server 地址、端口和认证信息。
- Schema 不匹配:示例默认使用
CORA_vertex和CORA_edge,自有数据需要传入实际标签。 ValueError: Graph is missing required node attribute ...:节点分类任务需要ndata中包含feat、label、train_mask、val_mask和test_mask。请导入带掩码的数据集,或给convert_graph传入自定义的mask_keys。ValueError: dataset not supported:导入函数只接受上表列出的名称,且import_graph_from_ogb匹配ogbl-collab时不做大写转换。- DGL 或 PyTorch 导入失败:回到仓库根目录重新执行
uv sync --extra ml,并确认当前 Python 来自根目录.venv。 bgrl_example.py目前在导入阶段就会失败:它从hugegraph_ml.models.bgrl导入MLP_Predictor,而该模块中的类名是MLPPredictor。care_gnn_example.py读取AMAZON_user_v和三个AMAZON_net_*_e边标签,仓库内没有对应的导入函数,需要自行准备该数据集后再运行。
3.3.3 - HugeGraph-LLM 使用流程
本文说明 HugeGraph-LLM Web 页面的处理流程。服务启动方式见 HugeGraph-LLM。
0. 配置面板
标签页上方是可折叠的配置面板,共五个部分:1. Set up the HugeGraph server.、2. Set up the LLM.、3. Set up the Embedding.、4. Set up the Reranker. 和 5. Set up the vector engine.。每部分都有独立的应用按钮,应用后会把受支持的字段写回 .env。页面顶部还会显示当前提示词语言。
1. 构建 RAG 索引
第一个标签页负责两类索引:
- 将文档切分后写入 chunk 向量索引。
- 按 Schema 从文档抽取顶点和边,写入 HugeGraph,并维护顶点向量索引。
flowchart TD
    A[输入文档] --> B[文本切分]
    B --> C[生成 chunk 向量]
    C --> D[写入向量索引]
    B --> E[LLM 按 Schema 抽取顶点和边]
    E --> F[写入 HugeGraph]
    F --> G[更新顶点向量索引]
输入来自 text 子页或 file 子页。上传支持 .txt、.docx 和 .pdf,可一次选择多个文件。
页面包含文档、Schema、抽取提示词和结果区域。常用操作有:
Import into Vector:切分文档并建立 chunk 向量索引。Extract Graph Data (1):按 Schema 抽取图数据。Load into GraphDB (2):把抽取结果写入 HugeGraph,并自动更新顶点向量。Update Vid Embedding:重新生成顶点向量,通常只在图中已有数据时才需要单独执行。
这些按钮旁的 Graph Extraction Split Type 下拉框可选 document、paragraph 或 sentence。document 把输入整体作为一个单元,另外两种会在抽取前先切分长文档。
页面还可以查看或清除 chunk 索引、顶点索引和图数据。清除操作会删除已有数据,执行前先确认当前图和索引是否仍被其他查询使用。
主控件下方还有两个折叠的辅助工具:
Graph Schema Generator:根据查询示例和少样本示例生成 Schema,填入 Graph Schema 字段。Graph Extraction Prompt Generator:根据期望场景(例如社交关系、金融知识图谱)和选定的参考示例生成 Graph Extract Prompt Header。
2. GraphRAG 查询
第二个标签页提供四种回答范围:
- 直接使用 LLM 回答。
- 只使用 chunk 向量召回。
- 只使用图召回。
- 合并图召回与向量召回。
flowchart TD
    Q[问题] --> V[查询 chunk 向量索引]
    Q --> K[抽取关键词]
    K --> M[匹配图顶点]
    M --> T[生成并执行 Gremlin]
    T -->|失败| B[BFS 图遍历回退]
    T --> R[整理图结果]
    B --> R
    V --> S[合并与重排序]
    R --> S
    S --> A[生成答案]
图召回先用关键词精确匹配 HugeGraph 顶点,找不到时再用顶点向量做近似匹配。匹配结果会进入 Text2Gremlin;生成或执行失败时,流程可以回退到预定义的图遍历。
Template Num 控制 Text2Gremlin 在图召回中的参与方式:
- 小于 0:完全跳过 Text2Gremlin,图召回直接使用预定义的图遍历。
- 等于 0:不带任何示例生成 Gremlin(zero-shot)。
- 大于 0:从示例索引中取相应数量的相近示例,并采用带模板的生成结果。示例数量会被限制在 0 到 10 之间。
该标签页的其他控件还有 Rerank method(bleu 或 reranker)、Graph Ratio、Near neighbor first 和 Query related information,以及可编辑的 Query Prompt 和 Keywords Extraction Prompt。
单条问答面板下方是批量回归测试面板。上传 .xlsx 或 .csv 问题文件,设置 Max Lines To Show,点击 Generate Answer (Batch)。答案会显示在预览表格中,并可下载为文件。上传控件旁提供模板文件下载。
3. Text2Gremlin
第三个标签页分为两部分。上半部分用问题与 Gremlin 对照文件(.json 或 .csv)构建示例向量索引;未上传文件时使用内置的 resources/demo/text2gremlin.csv。
下半部分把自然语言转换成 Gremlin:
- 读取当前图的 Schema。
- 从示例向量索引取回相近的自然语言与 Gremlin 对。
- 把问题、Schema、示例和已匹配顶点填入提示词。
- 调用 LLM 生成 Gremlin,并按所选输出类型决定是否执行。
Number of refer examples 设置取回的示例数量,范围 0 到 10,默认 2。结果显示在四个字段中:带模板的 Gremlin、不带模板的 Gremlin,以及两者各自的执行输出。
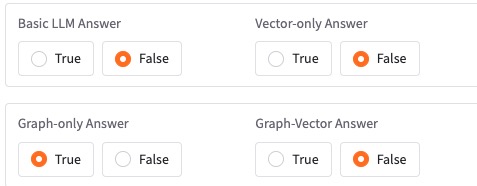
自定义提示词必须包含 {query}、{schema}、{example} 和 {vertices}。缺少任一占位符时,REST API 会拒绝请求。
4. 图工具与管理工具
Graph Tools 标签页可直接对当前图执行 Gremlin 查询、手动触发图备份,并通过 beta 操作初始化 HugeGraph 演示数据。后台还有两个任务:每天 01:00 自动备份图数据,以及在进程运行期间持续更新顶点 id 向量。
Admin Tools 需要密码。输入已配置的 ADMIN_TOKEN 后可查看 logs/llm-server.log 的末尾内容(每 60 秒自动刷新),并可手动刷新或清空该文件。ADMIN_TOKEN 为空或仍是占位值 xxxx 时,访问会被拒绝。
设置 ENABLE_LOGIN=True 后,Web 页面会要求基础认证,用户名固定为 rag,密码是 USER_TOKEN;REST API 则要求把 USER_TOKEN 作为 Bearer token。日志接口还要求单独配置安全的 ADMIN_TOKEN。
生产环境必须启用 HugeGraph-LLM 自身的登录认证,并替换 USER_TOKEN 和 ADMIN_TOKEN,同时在防火墙或网络入口设置来源 IP 白名单。HugeGraph Server 还必须单独开启认证与授权(见认证与授权说明)并保留 Server 审计日志(标准日志文件为 audit-*.log),为 GRAPH_USER 配置最小必要权限。AI 服务 token 不会替代 HugeGraph Server 认证。
5. 提示词语言
在 hugegraph-llm/.env 中设置:
修改后重启服务。该配置选择内置提示词语言,不会自动翻译输入文档,也不是 /rag 请求体字段。
6. REST 调用
Web 页面和 REST API 使用同一套流程。需要程序集成时使用 /rag、/rag/graph、/graph/extract 和 /text2gremlin;请求结构见 REST API。
3.3.4 - 配置参考
HugeGraph-LLM 从 .env 读取运行配置,提示词单独保存在 config_prompt.yaml。两者使用不同的路径解析规则;不要把提示词文件当作 .env 的一部分。
.env 路径按以下顺序解析:
- 若设置了环境变量
HUGEGRAPH_LLM_ENV_PATH,则使用该路径,开头的~会被展开。 - 从源码运行时,使用
hugegraph-llm/.env。 - 以已安装的包运行时,使用当前工作目录下的
.env。
该路径在导入配置模块时确定。设置 HUGEGRAPH_LLM_ENV_PATH 时,需在启动 Python 进程前设置;不能只把它写进将要读取的 .env 文件。覆盖路径使用相对路径时,以进程当前工作目录为基准。
提示词 YAML 路径按以下顺序解析:
- 若进程环境中设置了
HUGEGRAPH_LLM_PROMPT_CONFIG_PATH,使用该路径,并展开开头的~。 - 从源码运行时,使用
hugegraph-llm/src/hugegraph_llm/resources/demo/config_prompt.yaml。 - 以已安装的包运行时,使用
${XDG_CONFIG_HOME:-~/.config}/hugegraph-llm/config_prompt.yaml。
覆盖路径的环境变量也要在进程启动前设置。相对路径以进程当前工作目录为基准。源码 Docker 镜像通过 PYTHONPATH 指向源码目录,因此默认提示词路径仍位于 hugegraph-llm/src/hugegraph_llm/resources/demo/。
运行以下命令可按配置类的默认值创建或更新文件:
--update 默认开启,因此不带参数运行效果相同。配置模块首次导入时会为缺失的 .env 和提示词 YAML 按默认值创建文件;文件已存在时,生成器会交互询问是否覆盖。该命令会处理 HugeGraph、管理员、LLM、索引配置及提示词 YAML,不会在无确认的情况下覆盖已有文件。
.env 包含密钥和密码,不要提交到版本库。
基础选项
| 配置项 | 默认值 | 说明 |
|---|---|---|
LANGUAGE | EN | 提示词语言,可选 EN、CN |
CHAT_LLM_TYPE | openai | 回答模型,可选 openai、litellm、ollama/local |
EXTRACT_LLM_TYPE | openai | 信息抽取模型,取值同上 |
TEXT2GQL_LLM_TYPE | openai | Text2Gremlin 模型,取值同上 |
EMBEDDING_TYPE | openai | 嵌入模型,取值同上,也可以留空 |
RERANKER_TYPE | 空 | 可选 cohere、siliconflow |
KEYWORD_EXTRACT_TYPE | llm | 可选 llm、textrank、hybrid |
WINDOW_SIZE | 3 | TextRank 滑窗,范围 1 到 10 |
HYBRID_LLM_WEIGHTS | 0.5 | hybrid 模式中 LLM 结果的权重,范围 0 到 1 |
OpenAI 兼容接口
聊天、抽取和 Text2Gremlin 可以使用不同端点、密钥和模型。
| 用途 | API 地址 | 密钥 | 模型 | 最大 token 默认值 |
|---|---|---|---|---|
| 回答 | OPENAI_CHAT_API_BASE | OPENAI_CHAT_API_KEY | OPENAI_CHAT_LANGUAGE_MODEL | OPENAI_CHAT_TOKENS=8192 |
| 抽取 | OPENAI_EXTRACT_API_BASE | OPENAI_EXTRACT_API_KEY | OPENAI_EXTRACT_LANGUAGE_MODEL | OPENAI_EXTRACT_TOKENS=256 |
| Text2Gremlin | OPENAI_TEXT2GQL_API_BASE | OPENAI_TEXT2GQL_API_KEY | OPENAI_TEXT2GQL_LANGUAGE_MODEL | OPENAI_TEXT2GQL_TOKENS=4096 |
| 嵌入 | OPENAI_EMBEDDING_API_BASE | OPENAI_EMBEDDING_API_KEY | OPENAI_EMBEDDING_MODEL | 不适用 |
API 地址默认是 https://api.openai.com/v1;三个语言模型默认是 gpt-4.1-mini,嵌入模型默认是 text-embedding-3-small。
OPENAI_BASE_URL 和 OPENAI_API_KEY 可作为通用回退值。嵌入模型另有 OPENAI_EMBEDDING_BASE_URL 和 OPENAI_EMBEDDING_API_KEY 回退值。
LiteLLM
| 用途 | API 地址 | 密钥 | 模型 | 最大 token 默认值 |
|---|---|---|---|---|
| 回答 | LITELLM_CHAT_API_BASE | LITELLM_CHAT_API_KEY | LITELLM_CHAT_LANGUAGE_MODEL | LITELLM_CHAT_TOKENS=8192 |
| 抽取 | LITELLM_EXTRACT_API_BASE | LITELLM_EXTRACT_API_KEY | LITELLM_EXTRACT_LANGUAGE_MODEL | LITELLM_EXTRACT_TOKENS=256 |
| Text2Gremlin | LITELLM_TEXT2GQL_API_BASE | LITELLM_TEXT2GQL_API_KEY | LITELLM_TEXT2GQL_LANGUAGE_MODEL | LITELLM_TEXT2GQL_TOKENS=4096 |
| 嵌入 | LITELLM_EMBEDDING_API_BASE | LITELLM_EMBEDDING_API_KEY | LITELLM_EMBEDDING_MODEL | 不适用 |
三个语言模型默认是 openai/gpt-4.1-mini,嵌入模型默认是 openai/text-embedding-3-small。模型名通常使用 供应商/模型 格式,具体取值由 LiteLLM 服务决定。
Ollama
| 用途 | 主机 | 端口 | 模型 |
|---|---|---|---|
| 回答 | OLLAMA_CHAT_HOST | OLLAMA_CHAT_PORT | OLLAMA_CHAT_LANGUAGE_MODEL |
| 抽取 | OLLAMA_EXTRACT_HOST | OLLAMA_EXTRACT_PORT | OLLAMA_EXTRACT_LANGUAGE_MODEL |
| Text2Gremlin | OLLAMA_TEXT2GQL_HOST | OLLAMA_TEXT2GQL_PORT | OLLAMA_TEXT2GQL_LANGUAGE_MODEL |
| 嵌入 | OLLAMA_EMBEDDING_HOST | OLLAMA_EMBEDDING_PORT | OLLAMA_EMBEDDING_MODEL |
主机默认是 127.0.0.1,端口默认是 11434,模型名没有默认值。使用前先在 Ollama 中拉取对应模型。
重排序
| 配置项 | 默认值 | 说明 |
|---|---|---|
COHERE_BASE_URL | https://api.cohere.com/v1/rerank | Cohere rerank 接口;CO_API_URL 可作为回退值 |
RERANKER_API_KEY | 空 | Cohere 或 SiliconFlow 密钥 |
RERANKER_MODEL | 空 | 服务端支持的模型名 |
HugeGraph 连接与召回限制
| 配置项 | 默认值 | 说明 |
|---|---|---|
GRAPH_URL | 127.0.0.1:8080 | HugeGraph 地址,不拆分为 IP 和端口 |
GRAPH_NAME | hugegraph | 图名 |
GRAPH_USER | admin | 用户名 |
GRAPH_PWD | xxx | 密码 |
GRAPH_SPACE | 空 | GraphSpace 名称 |
LIMIT_PROPERTY | False | 是否限制返回属性;配置类按字符串读取 |
MAX_GRAPH_PATH | 10 | 最大图路径长度 |
MAX_GRAPH_ITEMS | 30 | 图召回的最大项目数 |
EDGE_LIMIT_PRE_LABEL | 8 | 每个边标签的返回上限 |
VECTOR_DIS_THRESHOLD | 0.9 | 向量距离阈值;超过阈值的结果会被忽略 |
TOPK_PER_KEYWORD | 1 | 每个关键词的候选数 |
TOPK_RETURN_RESULTS | 20 | 重排序后返回的结果数 |
向量索引后端
| 配置项 | 默认值 | 说明 |
|---|---|---|
CUR_VECTOR_INDEX | Faiss | 当前使用的向量库:Faiss、Milvus 或 Qdrant |
QDRANT_HOST | 空 | |
QDRANT_PORT | 6333 | |
QDRANT_API_KEY | 空 | |
MILVUS_HOST | 空 | |
MILVUS_PORT | 19530 | |
MILVUS_USER | 空 | |
MILVUS_PASSWORD | 空 |
FAISS 在本地运行,无需额外依赖。未安装可选依赖就选择 Milvus 或 Qdrant 时,会报错并指出缺少的包,因此需要先安装:
Web 页面的 5. Set up the vector engine. 面板提供同样的选择,并会保存所选引擎的连接配置。
登录与日志接口
| 配置项 | 默认值 | 说明 |
|---|---|---|
ENABLE_LOGIN | False | 是否要求 Bearer token;配置类按字符串读取 |
USER_TOKEN | 4321 | Web 页面和普通 API 的 token |
ADMIN_TOKEN | xxxx | /logs 使用的管理员 token |
ADMIN_TOKEN 为空或仍为 xxxx 时,/logs 会直接返回 403。
生产环境必须设置 ENABLE_LOGIN=True,替换 USER_TOKEN 和 ADMIN_TOKEN,并通过防火墙或网络入口设置来源 IP 白名单。这只保护 HugeGraph-LLM;HugeGraph Server 还必须单独开启认证与授权(见认证与授权说明)并保留 Server 审计日志(标准日志文件为 audit-*.log),为 GRAPH_USER 设置最小必要权限。两端使用不同的认证凭据。
最小 OpenAI 配置
配置加载
配置类先提供代码默认值。当前实现会在初始化时把所选 .env 中的值写入进程环境,再初始化配置对象;若 shell 中已经有同名变量,文件中的值会覆盖它。缺少的键使用配置类默认值,空值会被忽略,未知键会被忽略。Web 页面和配置 API 可以在运行时更新当前设置,并把受支持的字段同步回 .env。手工改动 .env 后应重启服务;提示词 YAML 会在服务启动或页面加载时读取。
键名匹配不区分大小写。
配置定义位于:
hugegraph-llm/src/hugegraph_llm/config/llm_config.pyhugegraph-llm/src/hugegraph_llm/config/hugegraph_config.pyhugegraph-llm/src/hugegraph_llm/config/index_config.pyhugegraph-llm/src/hugegraph_llm/config/admin_config.pyhugegraph-llm/src/hugegraph_llm/config/prompt_config.pyhugegraph-llm/src/hugegraph_llm/config/models/base_config.py:加载与文件同步逻辑
3.3.5 - HugeGraph-LLM REST API
HugeGraph-LLM 演示进程同时提供 Web 页面和 REST API。默认地址是 http://localhost:8001:
所有接口都使用 POST:
| 路径 | 成功状态码 | 用途 |
|---|---|---|
/rag | 200 | 按所选召回方式回答问题 |
/rag/graph | 200 | 只做图召回,不生成最终答案 |
/graph/extract | 200 | 从文本抽取顶点和边 |
/text2gremlin | 200 | 由自然语言生成 Gremlin |
/config/graph | 201 | 更新 HugeGraph 连接 |
/config/llm | 201 | 更新语言模型 |
/config/embedding | 201 | 更新嵌入模型 |
/config/rerank | 201 | 更新重排序模型 |
/logs | 200 | 流式返回服务日志 |
认证
在 .env 中启用登录:
启用后,请求需要 Bearer token:
同一开关也会给 Gradio 页面加上基础认证,用户名固定为 rag,密码是 USER_TOKEN。token 不正确时返回 401,并带上 WWW-Authenticate: Bearer 响应头。ENABLE_LOGIN 保持 False 时所有接口都不做鉴权。
生产环境必须启用 HugeGraph-LLM 自身的登录认证,并在防火墙或网络入口设置来源 IP 白名单。该认证只保护 HugeGraph-LLM 的页面和 REST API;HugeGraph Server 还必须单独开启认证与授权(见认证与授权说明)并保留 Server 审计日志(标准日志文件为 audit-*.log),为 GRAPH_USER 配置最小必要权限。USER_TOKEN 不会替代 Server 认证。
RAG
POST /rag
根据开关返回一种或多种回答。未显式指定时只启用 graph_only。
响应只包含已启用的回答字段:
其他可选参数包括 graph_ratio(默认 0.5)、rerank_method(bleu 或 reranker,默认 bleu)、near_neighbor_first(默认 false)、custom_priority_info,以及三个自定义提示词字段 answer_prompt、keywords_extract_prompt 和 gremlin_prompt。省略提示词字段时使用 config_prompt.yaml 中的值。
gremlin_tmpl_num 决定图召回阶段 Text2Gremlin 的执行方式:小于 0 表示跳过 Text2Gremlin,直接使用预定义的图遍历;等于 0 表示不带示例生成 Gremlin;大于 0 表示从示例索引中取相应数量的示例。
query 为空或只有空白字符时返回 400。
POST /rag/graph
只执行图召回,不生成最终自然语言答案:
响应的 graph_recall 可能包含 query、keywords、match_vids、graph_result_flag、gremlin、graph_result 和 vertex_degree_list。设置 get_vertex_only=true 可在顶点匹配后提前返回,此时接口会把 match_vids 替换为完整的顶点详情。
query 为空返回 400,请求类型错误返回 400,其他失败返回 500。
图抽取
POST /graph/extract
使用内联 Schema 时不会连接 HugeGraph:
请求字段:
| 字段 | 默认值 | 说明 |
|---|---|---|
texts | 必填 | 字符串或字符串数组;空白项会被丢弃,全部为空时报错 |
schema | 必填 | 内联 JSON 对象或字符串,或现有图名 |
example_prompt | 提示词 YAML 中的值 | 抽取提示词头部 |
extract_type | property_graph | 目前仅接受该值 |
language | zh | zh 或 en,用于文本切分 |
split_type | document | document、paragraph 或 sentence |
include_meta | false | 在 meta 中加入 vertex_count、edge_count 和 text_count |
client_config | 无 | 仅在 schema 为图名时允许传入 |
内联 Schema 必须是包含 vertexlabels 和 edgelabels 两个列表的对象。每个顶点标签需要非空的 name 和非空的 properties 列表;每条边标签需要非空的 name、source_label 和 target_label。propertykeys 可选,若存在必须是列表。
若 schema 传现有图名,必须同时传入 client_config,且 client_config.graph 必须和图名相同。这里的 client_config 只接受 graph、user、pwd 和 gs,未知字段会被拒绝,且没有 url 字段:
成功响应固定包含 status(始终为 succeeded)、result.vertices、result.edges、warnings 和 meta。include_meta 不为 true 时 meta 为空。
Text2Gremlin
POST /text2gremlin
output_types 可包含:
match_resulttemplate_gremlinraw_gremlintemplate_execution_resultraw_execution_result
省略该字段时默认只返回 template_gremlin;传空数组表示由实现返回全部输出。自定义 gremlin_prompt 必须包含 {query}、{schema}、{example} 和 {vertices},缺少占位符时请求校验失败,并会列出缺失的占位符。
example_num 默认是 0,表示不使用模板,取值会被限制在 0 到 10 之间。client_config 只在单次请求内覆盖 HugeGraph 连接,生成时使用的 Schema 是当前生效的图名。query 为空返回 400,生成失败返回 500。
运行时配置
POST /config/graph
user 和 pwd 默认是空字符串,gs 可选。
POST /config/llm 与 POST /config/embedding
两个端点使用同一个请求模型。/config/llm 会把 chat_llm_type、extract_llm_type 和 text2gql_llm_type 一起设为相同的值;要分别设置各任务的类型,只能通过 .env 或 Web 页面。OpenAI 或 LiteLLM 示例:
Ollama 请求仍要提供公共字段;api_key 和 api_base 可传空字符串:
POST /config/rerank
reranker_type 可选 cohere、siliconflow。Cohere 还可以传 cohere_base_url。
四个配置端点成功时都返回 201。它们会改动进程当前配置,并可能同步到 .env。/config/llm、/config/embedding 和 /config/rerank 在应用过程中抛出异常时会回滚到原有取值,/config/graph 不会。
/rag、/rag/graph 和 /text2gremlin 的 client_config 只在单次请求期间覆盖 HugeGraph 连接,且仅应用请求中实际出现的字段。当前实现仍会临时改动进程全局设置,不适合用不同连接并发发起长请求。
日志
POST /logs
该接口要求 .env 中的 ADMIN_TOKEN 已改成安全值。请求体示例:
log_file 默认是 llm-server.log,只能是 logs/ 目录下的文件名,不能是绝对路径、不能包含路径分隔符,也不能解析为 . 或 ..。非法文件名返回 400。
ADMIN_TOKEN 未设置或仍是占位值时,在比对 token 之前就返回 403;token 不匹配时返回内容为 Invalid admin_token 的 403 响应。
成功时返回 text/plain 流:先回放文件末尾 125 行,然后像 tail -f 一样持续输出新内容。
3.3.6 - Vermeer Python 客户端
vermeer-python-client 是 Vermeer 的 Python SDK。Vermeer 是使用 Go 编写、以内存计算为主的图计算引擎。该 SDK 封装了 Vermeer master 的 REST API,可以在 Python 中列出图、提交加载和计算任务、读取任务状态。导入时使用的包名是 pyvermeer。
模块没有固定 Vermeer 服务端版本,它通过 HTTP 访问 Vermeer master,调用的接口见 API 概览。
环境要求
- 当前源码实际要求 Python 3.10 或更高版本;虽然该模块打包元数据声明
>=3.9,代码中的类型标注使用了 Python 3.10 语法 - 一个可通过 HTTP 访问的 Vermeer master。默认 HTTP 端口为
6688;Docker 部署需发布6688:6688,见 Vermeer 快速上手。 uv(推荐)或pip
运行时依赖:requests、urllib3、python-dateutil、decorator、rich 和 setuptools。
安装
打包元数据中的发行包名是 vermeer-python-client,其版本号独立于仓库版本号管理。该包尚未发布到 PyPI,请从源码安装。
在 HugeGraph-AI 仓库根目录,使用 vermeer extra 把它安装到共用的虚拟环境中:
vermeer-python-client 是以可编辑路径依赖的方式接入的,并不是 uv workspace member,因此在仓库根目录直接执行 uv sync 不会安装它,必须显式指定该 extra(或使用 --all-extras)。
单独安装该模块:
连接 Vermeer master
构造函数参数:
| 参数 | 类型 | 默认值 | 说明 |
|---|---|---|---|
ip | str | 必填 | Vermeer master 的主机名或 IP 地址 |
port | int | 必填 | Vermeer master 的 REST 端口 |
token | str | 必填 | 原样作为 Authorization 请求头发送 |
timeout | (float, float) 或 None | None | 连接超时和读取超时,单位为秒 |
log_level | str | "INFO" | 应用到共享 VermeerClient 日志器的级别 |
如果 Python 客户端运行在宿主机,ip 填宿主机可访问的 master 地址;如果运行在容器中,则填容器网络内的 master 地址。客户端只连接 master 的 HTTP API,HugeGraph PD/Store 地址则必须能由执行加载任务的 Vermeer 节点访问。
连接前需要了解的行为:
- 当 master 不校验鉴权时,
token可以是空字符串,但不能是None,否则会话会抛出ValueError("Vermeer Token must be provided.")。 timeout是(连接超时, 读取超时)二元组。VermeerConfig自身的默认值是(0.5, 15.0),但客户端总是把自己的参数传下去,因此不传timeout时实际存入的是None,请求会一直等待。需要超时就显式传入该二元组。- 基础 URL 固定拼接为
http://{ip}:{port}/,即客户端只使用明文 HTTP。 - 每个请求都会设置
Content-Type: application/json,并把params序列化进请求体,GET请求也是如此。 - 底层会话配置了对 HTTP 500、502、504 的最多 3 次重试和
0.1的退避系数;状态码重试遵循 urllib3 默认允许的方法,POST不在其中,因此不能依赖它自动重试任务提交。 log_level设置的是名为VermeerClient的共享日志器的级别。它的控制台 handler 固定为INFO,因此目前DEBUG级别的记录不会打印到控制台。
端到端示例
模块自带一个可运行的示例:vermeer-python-client/src/pyvermeer/demo/task_demo.py。下面的版本在其基础上增加了有截止时间的任务轮询,先等待加载成功、再读取图并提交 PageRank 计算;PD 地址和 HugeGraph 密码从环境变量读取。服务端 worker group 也必须与任务空间的分配匹配;单 worker 快速上手可将 worker_group 设为 $,保留命名组时先按 Vermeer 快速上手 将该组绑定到任务空间。
加载任务以 loaded 表示成功,计算任务以 complete 表示成功;error 或 canceled 会中止示例。运行前设置 VERMEER_PD_PEERS,其值是 JSON 数组字符串,例如 export VERMEER_PD_PEERS='["hugegraph-pd:8686"]';其中地址必须能由 Vermeer master 访问,PD 返回的 Store 地址也必须能由 worker 访问。只有 master 配置为 token 鉴权时才设置 VERMEER_TOKEN;不启用鉴权时空字符串可用。
示例的 output.type=local 会把结果写到执行任务的 worker 本地文件系统,文件名以 result/pagerank 为前缀。容器部署时需把 worker 的结果目录挂载出来才能从宿主机读取。poll_timeout 是客户端轮询截止时间;检查期限之间的请求仍受 HTTP 超时和 SDK 重试影响,因此实际结束时间可能越过该值。超时只停止客户端等待,不会取消服务端任务。
不要把真实的 HugeGraph 密码写死在脚本或配置文件中,请像上面这样从环境变量或凭据管理系统读取。
保存并运行文档中的端到端示例
将上方完整的增强示例代码保存为 vermeer_client_example.py,放在 hugegraph-ai/ 仓库根目录。在该目录使用已安装 vermeer extra 的 workspace 环境运行:
输入密码后按回车。将 hugegraph-pd:8686 替换为 Vermeer master 可访问的 PD 地址;若 master 启用了 token 鉴权,还要从本机凭据管理方式设置 VERMEER_TOKEN。上述命令运行的是文档增强示例,不是包内原始 demo。
包内原始 demo
vermeer-python-client/src/pyvermeer/demo/task_demo.py 是另一份精简示例:它把客户端端口写为 8688,把 PD 地址写为 127.0.0.1:8686,并使用 xxx 占位用户名和密码。它不会读取本页增强示例使用的环境变量,也没有任务状态轮询或 PageRank 计算。若运行该文件,需单独调整其中的服务地址和 HugeGraph 凭据;不能用它替代上面的文档示例命令。
API 概览
PyVermeerClient 以属性的方式暴露各个 API 组,目前注册了 graph 和 tasks 两个组。
client.graph
| 方法 | Vermeer 接口 | 返回值 |
|---|---|---|
get_graphs() | GET /graphs | GraphsResponse |
get_graph(graph_name) | GET /graphs/{graph_name} | GraphResponse |
client.tasks
| 方法 | Vermeer 接口 | 返回值 |
|---|---|---|
get_tasks() | GET /tasks | TasksResponse |
get_task(task_id) | GET /task/{task_id} | TaskResponse |
create_task(create_task) | POST /tasks/create | TaskCreateResponse |
pyvermeer/api/master.py 和 pyvermeer/api/worker.py 目前只有许可证头,也没有注册到客户端上。因此尽管 pyvermeer/structure/ 下已经有 MasterResponse 和 WorkersResponse,master 和 worker 信息暂时还无法通过客户端获取。
client.send_request(method, endpoint, params) 是这两个组共用的请求入口。对于还没有封装的 Vermeer 接口,可以直接调用它,返回值是解析后的 JSON 字典。
请求与响应对象
TaskCreateRequest(task_type, graph_name, params) 序列化为 {"task_type": ..., "graph": ..., "params": ...}。注意 graph_name 在报文中的字段名是 graph,与 Vermeer REST API 的请求体一致。
所有响应类型都继承 BaseResponse,提供 errcode、message 属性和 to_dict() 方法。errcode 为 0 表示成功,1 表示错误,-1 表示响应体中没有该字段。
GraphsResponse.graphs和GraphResponse.graph返回VermeerGraph对象,包含name、space_name、status、create_time、update_time、vertex_count、edge_count、workers、worker_group、use_out_edges、use_property、use_out_degree、use_undirected、on_disk和backend_option。TasksResponse.tasks、TaskResponse.task和TaskCreateResponse.task返回TaskInfo对象,SDK 读取id、state、create_user、create_type、create_time、start_time、update_time、graph_name、space_name、params、workers和error_message。- 时间字段由
python-dateutil解析为datetime对象,空字符串会解析为None。
当前服务端以 task_type 返回任务类型,而 SDK 的 TaskInfo.type 按 type 读取,因此该属性目前为空;服务端还返回的 statistics_result 不会被 SDK 的 TaskInfo 保留。轮询状态请使用 TaskInfo.state。这是当前源码的字段契约差异。
任务参数
客户端不会校验 params,键和值都会原样传给 Vermeer,因此可用的参数名由引擎决定,而不是由 SDK 决定。加载参数以及各算法的参数请参考 Vermeer 快速上手。
使用流程与直接调用 REST API 相同:先创建 load 任务把图读入 Vermeer,等待任务完成,再针对已加载的图创建计算任务。
异常
pyvermeer.utils.exception 定义了四种异常,都由底层的 requests 或 JSON 解析失败包装而来:
| 异常 | 触发场景 |
|---|---|
ConnectError | requests.ConnectionError,无法连接 master |
TimeOutError | requests.Timeout,连接或读取超时 |
JsonDecodeError | 响应体不是合法的 JSON |
UnknownError | 请求过程中的其他失败 |
客户端不检查响应的 HTTP 状态码,请通过返回对象的 errcode 和 message 判断是成功还是 Vermeer 端返回了错误。
代码检查
在 HugeGraph-AI 仓库根目录执行格式化和静态检查:
源码位于 vermeer-python-client/src/pyvermeer/。目前有少量 src/tests/structure/test_task_data.py 结构测试,没有覆盖 HTTP API 的集成测试。
参考
3.4 - HugeGraph 图计算(OLAP)
HugeGraph-Computer 仓库包含两套部署和运行方式不同的图计算系统。通用图算法任务默认建议从 Go Vermeer 开始;需要 Java BSP/Pregel 分布式计算模型时,请使用 Computer。两者都可接入 HugeGraph,但配置和作业入口不能互换。
默认入口:Go Vermeer
flowchart TB
    Master["Master"] --> Workers["Workers"]
    Master -->|PD| PD["PD"]
    Workers -->|扫描| Store["Store"]
    Workers -.->|REST| Server["Server"]
当 load.type=hugegraph 时,Vermeer Master 通过 PD 查询分区元数据,Workers 直接扫描 HStore Store 分区。仅当 output.type=hugegraph 时,Workers 才通过 Server REST API 写回结果;其他数据源或输出配置不需要对应连接。
Java Computer
flowchart TB
    Config["作业配置"] --> Master["Master"] --> Workers["Workers"]
    Master -. BSP .-> Etcd["etcd"]
    Workers <-->|REST| Server["Server"]
    Workers <-->|HDFS| HDFS["HDFS(可选)"]
作业配置可由 Kubernetes Operator 或 YARN 提交。Workers 通过 REST API 从 HugeGraph Server 读取图数据,并可按输出配置写回计算结果;选择 HDFS 输入或输出时,Workers 直接访问 HDFS。Master 使用 etcd 协调 BSP 作业。
3.4.1 - HugeGraph-Vermeer 快速上手
一、Vermeer 概述
1.1 运行架构
Vermeer 是使用 Go 编写的高性能内存优先图计算框架,支持一次启动、多次执行,以及 15+ OLAP 图算法的极速计算,大部分算法可在秒到分钟级完成。实际耗时取决于图规模、算法参数和可用资源。当前由一个 master 调度,可连接多个 worker。
master 是负责通信、转发、汇总的节点,计算量和占用资源量较少。worker 是计算节点,用于存储图数据和运行计算任务,占用大量内存和 cpu。grpc 和 rest 模块分别负责内部通信和外部调用。
启动时,程序先设置内置默认值,再读取工作目录下 config/<env>.ini 的 [default] 节,最后由显式命令行参数覆盖对应配置;例如 --env=master 读取 config/master.ini。Docker 镜像把仓库中的配置复制到 /go/bin/config/,并以 /go/bin/ 为工作目录。挂载宿主机目录到 /go/bin/config 会遮住镜像自带文件,因此该目录必须包含实际使用的 ini 文件。配置读取器不从环境变量取值。
默认端口如下:
| 角色 | 配置键 | 默认地址 | 用途 |
|---|---|---|---|
| master | http_peer | 0.0.0.0:6688 | REST API;宿主机客户端访问此端口 |
| master | grpc_peer | 0.0.0.0:6689 | worker 连接 master 的 gRPC 端口 |
| worker | http_peer | 0.0.0.0:6788 | worker HTTP 服务 |
| worker | grpc_peer | 0.0.0.0:6789 | worker gRPC 监听地址,同时会通告给 master 供节点间通信 |
Docker 示例只把 master 的 HTTP 端口发布到宿主机回环地址 127.0.0.1:6688:6688;master 和 worker 的 gRPC 端口留在容器网络内部。
flowchart LR
  Client["curl / Python 客户端"] -->|"HTTP :6688"| Master["master"]
  Worker["worker"] <-->|"双向 gRPC:master :6689,worker :6789"| Master
  Master -->|"gRPC 查询分区"| PD["HugeGraph PD"]
  Worker -->|"gRPC 扫描分区"| Store["HugeGraph Store"]
1.2 运行方法
生产环境必须启用 HugeGraph Server 认证与授权、IP 白名单和最小权限授权,并保留 audit-*.log 审计记录。Server Auth 不会保护 Vermeer、PD 和 Store 的独立接口;这些 HTTP、gRPC 端口必须限制在可信网络及调用方范围内,Vermeer 对外入口需配置访问控制。
Vermeer 的 master.ini 默认 auth=none,普通及管理 API 均未启用鉴权。本机快速上手只发布回环端口;远程访问前必须启用 auth=token,或通过受保护网络、网关将访问限制到可信调用方。
下面两种 Docker 启动方式都需要先准备一个宿主机配置目录。请在 Vermeer 仓库根目录执行,将项目提供的 master.ini 和 worker.ini 模板复制到该目录;挂载会覆盖镜像里的 /go/bin/config,所以不要把空目录或整个用户主目录挂进去:
master.ini 保留 HTTP/gRPC 监听地址 0.0.0.0:6688 和 0.0.0.0:6689。Compose 示例为网络分配固定地址 172.20.0.10(master)和 172.20.0.11(worker),因此将复制后的 worker.ini 中这些配置设为:
此单 worker 示例将 worker_group 设为 $,表示未绑定命名组时使用的通用组;请在 ini 文件中原样写入美元符号。仓库模板默认是 worker_group=default,若保留命名组,需先将它绑定到任务所在的空间或图,再提交任务。例如默认空间为 $DEFAULT 时,可执行:
该接口响应 errcode=0 表示绑定成功;启用 token 鉴权时还需带上授权请求头。master_peer 必须指向 worker 所在网络能访问的 master gRPC 地址。grpc_peer 同时用于 worker 监听和向 master 通告自己的地址,不能设为不可从其他容器访问的 0.0.0.0。如果更改网络子网或地址,需同步修改此处的 IP;多个 worker 还需要各自唯一且可互相访问的 grpc_peer 地址。
- 方案一:Docker Compose(推荐)
在 Vermeer 仓库根目录运行。可以修改仓库已有的 docker-compose.yaml,也可以使用下面的配置。仓库文件当前将整个 ~/ 挂载到配置目录且没有发布 master HTTP 端口,运行前必须按示例更换挂载路径并增加端口映射:
把 /home/user/vermeer-config 换成上面实际的配置目录绝对路径。若修改 vermeer_network 的子网或固定 IP,也要同步更新 worker.ini 中的 grpc_peer 和 master_peer。不要复用默认 worker.ini 的 grpc_peer=0.0.0.0:6789 作为容器间通告地址。
在项目目录构建镜像并启动:
查看日志 / 停止 / 删除:
- 方案二:通过 docker run 单独启动(手动创建网络并分配静态 IP)
将 CONFIG_DIR 设为上面准备的配置目录,并确保复制后的 worker.ini 已按固定容器地址设置 grpc_peer 和 master_peer。该示例中的 CONFIG_DIR 需替换为实际的绝对路径。
构建镜像:
创建自定义 bridge 网络(一次性操作):
运行 master(调整 CONFIG_DIR 为您的绝对配置路径,可以根据实际情况调整IP):
运行 worker:
查看日志 / 停止 / 删除:
- 方案三:从源码构建
构建。具体请参照 Vermeer Readme。
从 Vermeer 仓库根目录启动,例如 ./vermeer --env=master 和 ./vermeer --env=worker01。worker01.ini 中的 grpc_peer 应填写可由 master 和其他 worker 访问、且本机可以绑定的地址;master_peer 指向 master 的 gRPC 监听地址。
启动 master 后,在宿主机验证 HTTP 端口:
请求应返回 HTTP 200,JSON 响应中的 errcode 为 0。
二、任务创建类 rest api
2.1 简介
创建任务的流程是先提交 load 任务,等待图加载完成,再提交 compute 任务。同一张已加载的图可重复用于计算,不会因任务完成而自动删除。异步接口返回创建结果和任务信息(包括任务 ID),不代表任务已经完成;同步接口会一直等待任务进入成功或失败状态,调用方及代理的 HTTP 超时需足够长。任务状态可通过查询接口读取:加载成功为 loaded,计算成功为 complete,失败为 error,取消为 canceled,其余状态仍在等待或执行中。图在加载中或错误状态时不能用于计算;删除图要求图处于可删除状态且当前未被使用。
可以使用的 url 如下:
- 异步接口:
POST http://master_ip:port/tasks/create,从响应的task.id取得任务 ID。 - 同步接口:
POST http://master_ip:port/tasks/create/sync,等待该任务结束后返回。 - 查询单个任务:
GET http://master_ip:port/task/{task_id};响应中的errcode为0表示查询成功,再按task.state判断业务状态。异步任务应在客户端设置轮询截止时间;到时只停止客户端等待,不会自动取消服务端任务。
2.2 加载图数据
以下示例列出常用的加载参数;引擎会按具体加载器读取参数,未被加载器使用的键不会改变行为。
vermeer提供三种加载方式:
- 从本地加载
load.vertex_files 和 load.edge_files 是“worker 地址主机部分到文件路径”的映射;路径由对应 worker 进程读取。容器部署时,数据文件必须先挂载进 worker 容器,并填写容器内路径。在上面的 Compose 示例中,应将主机数据目录挂到 worker 的 /data(例如增加 - /host/data:/data:ro),并把映射键设为 grpc_peer 中的 172.20.0.11;其他部署则使用各自 worker 上报地址的主机部分。
可以预先获取数据集,例如 twitter-2010 数据集。获取方式:https://snap.stanford.edu/data/twitter-2010.html,第一个 twitter-2010.txt.gz 即可。
request 示例:
- 从hugegraph加载
request 示例:
将请求中的地址、图名和凭据替换为实际连接信息。
Vermeer master 使用 load.hg_pd_peers 连接 PD 并查询分区,worker 再连接 PD 返回的 Store 地址读取数据。因此这些服务地址必须能从对应的 Vermeer 容器或主机访问;在 Docker 容器里,127.0.0.1 指向容器自身,不能用来代替宿主机或另一容器的地址。
- 从hdfs加载
request 示例:
2.3 输出计算结果
当前有实际写入器的结果方式为 local、hdfs 和 hugegraph,通过 output.type 指定;none 表示不写出结果。源码保留 afs 类型常量,但当前主线没有注册 AFS 加载器或写入器。指定 output.need_statistics 为 1 时,统计结果会写入任务信息;统计算子的适用范围取决于对应算法实现。
以下示例列出常用的计算和结果输出参数;算法支持的参数以 Vermeer 当前实现为准。
request 示例:
output.type=local 的结果写在执行任务的 worker 本地文件系统中;容器部署时,如需从宿主机读取结果,请将 worker 的输出目录挂载出来。
三、支持的算法
3.1 PageRank
PageRank 算法又称网页排名算法,是一种由搜索引擎根据网页(节点)之间相互的超链接进行计算的技
术,用来体现网页(节点)的相关性和重要性。
- 如果一个网页被很多其他网页链接到,说明这个网页比较重要,也就是其 PageRank 值会相对较高。
- 如果一个 PageRank 值很高的网页链接到其他网页,那么被链接到的网页的 PageRank 值会相应地提高。
PageRank 算法适用于网页排序、社交网络重点人物发掘等场景。
request 示例:
3.2 WCC(弱连通分量)
弱连通分量,计算无向图中所有联通的子图,输出各顶点所属的弱联通子图 id,表明各个点之间的连通性,区分不同的连通社区。
request 示例:
3.3 LPA(标签传播)
标签传递算法,是一种图聚类算法,常用在社交网络中,用于发现潜在的社区。
request 示例:
3.4 Degree Centrality(度中心性)
度中心性算法,算法用于计算图中每个节点的度中心性值,支持无向图和有向图。度中心性是衡量节点重要性的重要指标,节点与其它节点的边越多,则节点的度中心性值越大,节点在图中的重要性也就越高。在无向图中,度中心性的计算是基于边信息统计节点出现次数,得出节点的度中心性的值,在有向图中则基于边的方向进行筛选,基于输入边或输出边信息统计节点出现次数,得到节点的入度值或出度值。它表明各个点的重要性,一般越重要的点度数越高。
request 示例:
3.5 Closeness Centrality(紧密中心性)
紧密中心性(Closeness Centrality)用于计算一个节点到所有其他可达节点的最短距离的倒数,进行累积后归一化的值。紧密中心度可以用来衡量信息从该节点传输到其他节点的时间长短。节点的“Closeness Centrality”越大,其在所在图中的位置越靠近中心,适用于社交网络中关键节点发掘等场景。
request 示例:
3.6 Betweenness Centrality(中介中心性算法)
中介中心性算法(Betweeness Centrality)判断一个节点具有"桥梁"节点的值,值越大说明它作为图中两点间必经路径的可能性越大,典型的例子包括社交网络中的共同关注的人。适用于衡量社群围绕某个节点的聚集程度。
request 示例:
3.7 Triangle Count(三角形计数)
三角形计数算法,用于计算通过每个顶点的三角形个数,适用于计算用户之间的关系,关联性是不是成三角形。三角形越多,代表图中节点关联程度越高,组织关系越严密。社交网络中的三角形表示存在有凝聚力的社区,识别三角形有助于理解网络中个人或群体的聚类和相互联系。在金融网络或交易网络中,三角形的存在可能表示存在可疑或欺诈活动,三角形计数可以帮助识别可能需要进一步调查的交易模式。
输出的结果为 每个顶点对应一个 Triangle Count,即为每个顶点所在三角形的个数。
注:该算法为无向图算法,忽略边的方向。
request 示例:
3.8 K-Core
K-Core 算法,标记所有度数为 K 的顶点,适用于图的剪枝,查找图的核心部分。
request 示例:
3.9 SSSP(单元最短路径)
单源最短路径算法,求一个点到其他所有点的最短距离。
request 示例:
3.10 KOUT
以一个点为起点,获取这个点的 k 层的节点。
request 示例:
3.11 Louvain
Louvain 算法是一种基于模块度的社区发现算法。其基本思想是网络中节点尝试遍历所有邻居的社区标签,并选择最大化模块度增量的社区标签。在最大化模块度之后,每个社区看成一个新的节点,重复直到模块度不再增大。
Vermeer 上实现的分布式 Louvain 算法受节点顺序、并行计算等因素影响,并且由于 Louvain 算法由于其遍历顺序的随机导致社区压缩也具有一定的随机性,导致重复多次执行可能存在不同的结果。但整体趋势不会有大的变化。
request 示例:
3.12 Jaccard 相似度系数
Jaccard index , 又称为 Jaccard 相似系数(Jaccard similarity coefficient)用于比较有限样本集之间的相似性与差异性。Jaccard 系数值越大,样本相似度越高。用于计算一个给定的源点,与图中其他所有点的 Jaccard 相似系数。
request 示例:
3.13 Personalized PageRank
个性化的 pagerank 的目标是要计算所有节点相对于用户 u 的相关度。从用户 u 对应的节点开始游走,每到一个节点都以 1-d 的概率停止游走并从 u 重新开始,或者以 d 的概率继续游走,从当前节点指向的节点中按照均匀分布随机选择一个节点往下游走。用于给定一个起点,计算此起点开始游走的个性化 pagerank 得分。适用于社交推荐等场景。
由于计算需要使用出度,需要在读取图时需要设置 load.use_out_degree 为 1。
request 示例:
3.14 全图 Kout
计算图的所有节点的k度邻居(不包含自己以及1~k-1度的邻居),由于全图kout算法内存膨胀比较厉害,目前k限制在1和2,另外,全局kout算法支持过滤功能( 参数如:“compute.filter”:“risk_level==1”),在计算第k度的是时候进行过滤条件的判断,符合过滤条件的进入最终结果集,算法最终输出是符合条件的邻居个数。
request 示例:
3.15 集聚系数 clustering coefficient
集聚系数表示一个图中节点聚集程度的系数。在现实的网络中,尤其是在特定的网络中,由于相对高密度连接点的关系,节点总是趋向于建立一组严密的组织关系。集聚系数算法(Cluster Coefficient)用于计算图中节点的聚集程度。本算法为局部集聚系数。局部集聚系数可以测量图中每一个结点附近的集聚程度。
request 示例:
3.16 SCC(强连通分量)
在有向图的数学理论中,如果一个图的每一个顶点都可从该图其他任意一点到达,则称该图是强连通的。在任意有向图中能够实现强连通的部分我们称其为强连通分量。它表明各个点之间的连通性,区分不同的连通社区。
🚧, 后续随时更新完善,欢迎随时提出建议和意见。
3.4.2 - HugeGraph-Computer 快速上手
1. 组件说明
HugeGraph-Computer 是基于 BSP(Bulk Synchronous Parallel,批量同步并行)模型的 Java 分布式图计算框架,算法按超步迭代运行。它可由 Kubernetes Operator 或 YARN 调度,也可在单机上启动 master 和 worker 进程进行小规模试跑。
它与同一仓库中的 Vermeer 是两套实现:Computer 使用 Java/BSP 运行时,面向分布式计算;Vermeer 是 Go 实现的内存图计算平台,采用 master-worker 结构。两者共享 HugeGraph 数据源,但部署和任务配置不能互换。
Computer 支持从 HugeGraph 或 HDFS 读取图数据,并可将结果写回 HugeGraph 或 HDFS。运行时可把部分数据溢写到磁盘;能否完成任务仍取决于输入规模、资源和配置,不应把溢写能力理解为不受资源限制。
2. 前置条件与连接
构建和运行需要 JDK 11 或更高版本。源码构建还需要 Maven 3.5 或更高版本。PageRank 示例要求一个已启动且包含待计算图数据的 HugeGraph-Server,以及可供 master、worker 访问的 etcd。
| 服务 | 示例地址或端口 | 用途 |
|---|---|---|
| HugeGraph-Server | http://127.0.0.1:8080 | 读取图数据并写回算法结果;以 hugegraph.url 为准。 |
| etcd | http://127.0.0.1:2379 | BSP 作业协调;以 bsp.etcd_endpoints 为准。 |
| Computer master RPC | TCP 8190 | worker 连接 master;发行配置中的端口。 |
| Computer worker 数据传输 | 本地默认由系统分配;K8s Operator 默认 8099 | worker 之间传输顶点和消息。跨主机时需保证公告地址和端口可达。 |
| MinIO(K8s 清单) | HTTP 9000 | 用于输入分区快照。Computer 1.7.0 清单把 Service 的 9000 错映射到 MinIO Console 的 9090;启用快照前需将 targetPort 改为 9000。默认 snapshot.write=false、snapshot.load=false,不启用快照时无需访问 MinIO。 |
| cert-manager(K8s) | 集群内服务 | Operator 清单使用 cert-manager.io/v1 的 Certificate、Issuer 和 CA 注入功能;部署 Operator 前必须先安装兼容版本。 |
| HDFS | 按集群配置 | 仅当输入或输出配置为 HDFS 时需要。 |
Kubernetes 作业中的 hugegraph.url 必须是各计算 Pod 都能访问的地址,不能填仅在个人电脑上可用的 localhost。如果启用了 HugeGraph 认证,应在配置中填写用户名和密码,并为 REST 查询使用对应凭据。
生产环境必须为 HugeGraph Server 开启认证与授权(见认证与授权说明)并保留 Server 审计日志(标准日志文件为 audit-*.log),为 Computer 使用只具备作业所需读写权限的专用账号,并为 Server 网络入口设置来源 IP 白名单。hugegraph.username 和 hugegraph.password 只是 Computer 连接 Server 的凭据,不能替代 Server 端认证。
更多配置项见Computer 配置参考。
3. 获取源码并构建发行包
Apache HugeGraph 下载目录按版本提供 Computer 源码包,不提供单独的预编译 Computer 二进制包。下面以 VERSION=1.7.0 为例;该发布版的源码包和构建产物文件名含 -incubating-,其他版本请按下载目录中的实际文件名调整。
从当前 master 构建时可直接克隆并打包:
发行包由 computer/computer-dist 组装,包含 bin/start-computer.sh、运行依赖 lib/、内置算法 algorithm/builtin-algorithm.jar 及默认配置 conf/computer.properties、conf/log4j2.xml。源码默认配置位于 computer/computer-dist/src/assembly/static/conf/computer.properties。1.7.0 发布源码的构建产物带 -incubating-,当前 master 的发行名不带该标记,且版本号由源码 POM 决定;不要混用两种源码对应的 tar 包名。
4. 单机运行 PageRank
先编辑发行目录中的 conf/computer.properties,按实际环境修改 HugeGraph 地址、图名和认证信息,并确认 bsp.etcd_endpoints 指向可访问的 etcd。默认配置已选择内置 PageRankParams;master 和 worker 必须使用同一份配置及相同的 job.id。每个并行作业应使用不同的 job.id。
在两个终端中都从发行目录启动进程。启动脚本默认读取 conf/computer.properties,也可用 -c 指定配置文件。
master 会等待配置要求的 worker 注册后运行作业。查看两个终端输出;默认日志配置也会在当前发行目录的 logs/ 下写入 master 和 worker 日志。只有进程启动成功并不代表计算完成,应确认 master 日志中输入、超步计算和输出阶段均正常结束。
PageRank 参数类将结果写回 HugeGraph,属性名为 page_rank。运行前先检查图中每个目标顶点类型都允许此属性;Computer 会按 DOUBLE、OLAP_COMMON 创建属性键,但不会把它加入顶点类型。若属性键不存在,可先创建:
如果该属性键已存在,确认其类型为 DOUBLE 且 write_type 为 OLAP_COMMON。先列出图中的顶点类型,再对每个要计算的类型添加可空的 page_rank 属性;把示例中的 person 替换为实际类型名:
若图当前读模式不显示 OLAP 写入,可由管理员把读模式设为 ALL:
查询顶点以确认结果属性:
需要认证时,在 curl 命令中添加 --user "$HG_USER:$HG_PASSWORD"。读模式接口和权限说明见图读模式 REST API。
5. 在 Kubernetes 中运行 PageRank
先确保 HugeGraph-Server 对计算 Pod 可达,并按 cert-manager 官方安装文档安装与集群兼容的 cert-manager。Computer Operator 清单会部署 Operator、etcd 和 MinIO;CRD 与 Operator 清单应使用同一 Computer 发行版本。下面以 1.7.0 发布版为例:
1.7.0 清单中的 MinIO Service 把 S3 API 的 9000 端口映射到了 Console 的 9090;启用快照时先修正映射,并将 snapshot.minio_endpoint 设为 http://hugegraph-computer-operator-minio.hugegraph-computer-operator-system.svc:9000。默认不启用快照时可跳过。
替换 HugeGraph 地址为计算 Pod 可访问的服务地址后,提交 HugeGraphComputerJob。示例使用官方 Docker Hub 的 hugegraph/hugegraph-computer:latest,并引用镜像内置的 PageRank JAR;自定义算法 JAR 可预置在镜像内通过 jarFile 指定,也可用 remoteJarUri 从 HTTP(S) 地址下载。分区数需不小于 worker 数量。
将以下 YAML 保存为 pagerank-job.yaml,然后应用该文件:
SUCCEEDED 表示作业完成。Operator 默认会在作业完成后删除 CR 和计算资源;需要保留结果或排查失败作业时,可按需展开下方说明。
Operator 默认 AUTO_DESTROY_POD=true,短作业的 CR 和 Pod 可能在查看前被清理。若要保留它们,请在提交作业前关闭该选项,并等待 Controller 新 Pod 就绪后再提交;该设置必须改在 Java Operator 的 controller 容器中:
查看运行信息或失败日志:
查询完结果后删除 CR 以清理关联资源,并恢复默认策略:
PageRank 写回 HugeGraph 后按上一节设置读模式并查询。若改用 HDFS 输出,结果位于 output.hdfs_path_prefix/<job.id>/ 下,文件名和分区布局由作业配置决定。
完整 CRD 字段见Computer 配置参考中的 CRD 说明。
6. 内置算法与开发入口
当前源码中的内置算法包括:
- 中心性:PageRank、Betweenness Centrality、Closeness Centrality、Degree Centrality。
- 社区与结构:Clustering Coefficient、K-core、LPA、Triangle Count、WCC。
- 路径与采样:环检测、带过滤的环检测、单源最短路径、Random Walk。
算法实现位于 computer/computer-algorithm。自定义算法需要遵循 Computer API 并打包为可加载的 JAR;模块划分和开发入口见Computer README。
3.4.3 - HugeGraph-Computer 配置参考
Computer 配置选项
表格中的默认值来自 computer-api 模块的 ComputerOptions.java;发行包的 conf/computer.properties 显式设置的值以“代码默认值(发行包:实际值)”标注。rpc.* 等通用配置由 HugeGraph Commons 提供,以下会单独标出发行包实际值。
配置文件从哪里来
- 源码模板:
computer/computer-dist/src/assembly/static/conf/computer.properties;日志配置模板为同目录的log4j2.xml。Mavenpackage阶段将模板复制进发行目录的conf/,并将运行依赖和内置算法 JAR 装入lib/、algorithm/。模板由源码维护,没有单独的配置生成命令。 - 单机、YARN:启动脚本默认读取发行目录的
conf/computer.properties,可使用bin/start-computer.sh -c <配置文件路径>覆盖;master 和 worker 应读到同一组作业参数。 - Kubernetes Operator:用户在 CRD 的
spec.computerConf中提供键值;Operator 将它写成 ConfigMap,挂载为容器内的computer.properties。Operator 会补入作业 ID、worker 数量、Pod 地址和未指定时的 etcd 地址,并在未指定或设为0时将数据传输端口设为8099、master RPC 端口设为8190。transport.server_host与rpc.server_host会被设置为 Pod IP。作业容器启动脚本只对${POD_IP}、${HOSTNAME}、${POD_NAME}、${POD_NAMESPACE}做环境变量替换。 - Kubernetes 作业镜像必须包含 Computer 运行时。算法 JAR 可以预置在镜像内并由 CRD 的
jarFile指向,也可以通过remoteJarUri设置 HTTP(S) 地址,让启动脚本下载并加载。示例与字段见Computer 快速上手及下方 CRD 表。
Apache HugeGraph 下载目录提供各发布版本的 Computer 源码包,不提供单独的预编译二进制包。1.7.0 的发布源码包名含 -incubating-;在该 tag 的 computer/ Maven 聚合工程运行 mvn clean package -DskipTests 后,发行包也带 -incubating-。当前 master 的发行名不含该标记,版本号由 POM 决定。源码包不能作为已构建发行包直接启动。
表格中的空 HugeGraph 凭据和 MinIO 示例密钥仅适用于本地或演示环境。生产环境必须为 HugeGraph Server 开启认证与授权(见认证与授权说明)并保留 Server 审计日志(标准日志文件为 audit-*.log),为 Computer 配置最小必要权限的 Server 账号,并为 Server 网络入口设置来源 IP 白名单;不要将示例 MinIO 密钥用于生产。
1. 基础配置
HugeGraph-Computer 核心作业设置。
| 配置项 | 默认值 | 说明 |
|---|---|---|
| hugegraph.url | http://127.0.0.1:8080 | HugeGraph 服务器 URL,用于加载数据和写回结果。 |
| hugegraph.name | hugegraph | 图名称,用于加载数据和写回结果。 |
| hugegraph.username | "" (空) | HugeGraph 认证用户名(如果未启用认证则留空)。 |
| hugegraph.password | "" (空) | HugeGraph 认证密码(如果未启用认证则留空)。 |
| job.id | local_0001 (打包: local_001) | YARN 集群或 K8s 集群上的作业标识符。 |
| job.namespace | "" (空) | 可选的 etcd 作业键名前缀,可用于隔离不同命名空间;它不是 Kubernetes metadata.namespace,Operator 不会自动填入。 |
| job.workers_count | 1 | 执行一个图算法作业的 Worker 数量。在 K8s 中由 Operator 设置。 |
| job.partitions_count | 1 | 执行一个图算法作业的分区数量。 |
| job.partitions_thread_nums | 4 | 分区并行计算的线程数量。 |
2. 算法配置
计算逻辑的算法特定配置。
| 配置项 | 默认值 | 说明 |
|---|---|---|
| algorithm.params_class | ComputerOptions.Null 占位类 | 必填。用于在算法运行前传递算法参数的类。 |
| algorithm.result_class | ComputerOptions.Null 占位类 | 顶点值的类,用于存储顶点的计算结果。 |
| algorithm.message_class | ComputerOptions.Null 占位类 | 计算顶点时传递的消息类。 |
3. 输入配置
从 HugeGraph 或其他数据源加载输入数据的配置。
3.1 输入源
| 配置项 | 默认值 | 说明 |
|---|---|---|
| input.source_type | hugegraph-server | 加载输入数据的源类型,允许值:[‘hugegraph-server’, ‘hugegraph-loader’]。‘hugegraph-loader’ 表示使用 hugegraph-loader 从 HDFS 或文件加载数据。如果使用 ‘hugegraph-loader’,请配置 ‘input.loader_struct_path’ 和 ‘input.loader_schema_path’。 |
| input.loader_struct_path | "" (空) | Loader 输入的结构路径,仅在 input.source_type=hugegraph-loader 时生效。 |
| input.loader_schema_path | "" (空) | Loader 输入的 Schema 路径,仅在 input.source_type=hugegraph-loader 时生效。 |
3.2 输入分片
| 配置项 | 默认值 | 说明 |
|---|---|---|
| input.split_size | 1048576 (1 MB) | 输入分片大小(字节)。 |
| input.split_max_splits | 10000000 | 最大输入分片数量。 |
| input.split_page_size | 500 | 流式加载输入分片数据的页面大小。 |
| input.split_fetch_timeout | 300 | 获取输入分片的超时时间(秒)。 |
3.3 输入处理
| 配置项 | 默认值 | 说明 |
|---|---|---|
| input.filter_class | org.apache.hugegraph.computer.core.input.filter.DefaultInputFilter | 创建输入过滤器对象的类。输入过滤器用于根据用户需求过滤顶点边。 |
| input.edge_direction | OUT | 要加载的边的方向,允许值:[OUT, IN, BOTH]。当值为 BOTH 时,将加载 OUT 和 IN 两个方向的边。 |
| input.edge_freq | MULTIPLE | 一对顶点之间可以存在的边的频率,允许值:[SINGLE, SINGLE_PER_LABEL, MULTIPLE]。SINGLE 表示一对顶点之间只能存在一条边(通过 sourceId + targetId 标识);SINGLE_PER_LABEL 表示每个边标签在一对顶点之间可以有一条边(通过 sourceId + edgeLabel + targetId 标识);MULTIPLE 表示一对顶点之间可以存在多条边(通过 sourceId + edgeLabel + sortValues + targetId 标识)。 |
| input.max_edges_in_one_vertex | 200 | 允许附加到一个顶点的最大邻接边数量。邻接边将作为一个批处理单元一起存储和传输。 |
3.4 输入性能
| 配置项 | 默认值 | 说明 |
|---|---|---|
| input.send_thread_nums | 4 | 并行发送顶点或边的线程数量。 |
4. 快照与存储配置
HugeGraph-Computer 支持快照功能,可将顶点/边分区保存到本地存储或 MinIO 对象存储,用于断点恢复或加速重复计算。
4.1 基础快照配置
| 配置项 | 默认值 | 说明 |
|---|---|---|
| snapshot.write | false | 是否写入输入顶点/边分区的快照。 |
| snapshot.load | false | 是否从顶点/边分区的快照加载。 |
| snapshot.name | "" (空) | 用户自定义的快照名称,用于区分不同的快照。 |
4.2 MinIO 集成(可选)
MinIO 可用作 K8s 部署中快照的分布式对象存储后端。
| 配置项 | 默认值 | 说明 |
|---|---|---|
| snapshot.minio_endpoint | "" (空) | MinIO 服务端点(例如 http://minio:9000)。使用 MinIO 时必填。 |
| snapshot.minio_access_key | minioadmin | MinIO 认证访问密钥。 |
| snapshot.minio_secret_key | minioadmin | MinIO 认证密钥。 |
| snapshot.minio_bucket_name | "" (空) | 用于存储快照数据的 MinIO 存储桶名称。 |
使用场景:
- 断点恢复:作业失败后从快照恢复,避免重新加载数据
- 重复计算:多次运行同一算法时从快照加载数据以加速启动
- A/B 测试:保存同一数据集的多个快照版本,测试不同的算法参数
示例:本地快照(在 computer.properties 中):
示例:MinIO 快照(在 K8s CRD computerConf 中):
5. Worker 与 Master 配置
Worker 和 Master 计算逻辑的配置。
5.1 Master 配置
| 配置项 | 默认值 | 说明 |
|---|---|---|
| master.computation_class | org.apache.hugegraph.computer.core.master.DefaultMasterComputation | Master 计算是可以决定是否继续下一个超步的计算。它在每个超步结束时在 master 上运行。 |
5.2 Worker 计算
| 配置项 | 默认值 | 说明 |
|---|---|---|
| worker.computation_class | org.apache.hugegraph.computer.core.config.Null | 创建 worker 计算对象的类。Worker 计算用于在每个超步中计算每个顶点。 |
| worker.combiner_class | org.apache.hugegraph.computer.core.config.Null | Combiner 可以将消息组合为一个顶点的一个值。例如,PageRank 算法可以将一个顶点的消息组合为一个求和值。 |
| worker.partitioner | org.apache.hugegraph.computer.core.graph.partition.HashPartitioner | 分区器,决定顶点应该在哪个分区中,以及分区应该在哪个 worker 中。 |
5.3 Worker 组合器
| 配置项 | 默认值 | 说明 |
|---|---|---|
| worker.vertex_properties_combiner_class | org.apache.hugegraph.computer.core.combiner.OverwritePropertiesCombiner | 组合器可以在输入步骤将同一顶点的多个属性组合为一个属性。 |
| worker.edge_properties_combiner_class | org.apache.hugegraph.computer.core.combiner.OverwritePropertiesCombiner | 组合器可以在输入步骤将同一边的多个属性组合为一个属性。 |
5.4 Worker 缓冲区
| 配置项 | 默认值 | 说明 |
|---|---|---|
| worker.received_buffers_bytes_limit | 104857600 (100 MB) | 接收数据缓冲区的限制字节数。所有缓冲区的总大小不能超过此限制。如果接收缓冲区达到此限制,它们将被合并到文件中(溢出到磁盘)。 |
| worker.write_buffer_capacity | 52428800 (50 MB) | 用于存储顶点或消息的写缓冲区的初始大小。 |
| worker.write_buffer_threshold | 52428800 (50 MB) | 写缓冲区的阈值。超过它将触发排序。写缓冲区用于存储顶点或消息。 |
5.5 Worker 数据与超时
| 配置项 | 默认值 | 说明 |
|---|---|---|
| worker.data_dirs | [jobs] | 用逗号分隔的目录,接收的顶点和消息可以持久化到其中。 |
| worker.wait_sort_timeout | 600000 (10 分钟) | 消息处理程序等待排序线程对一批缓冲区进行排序的最大超时时间(毫秒)。 |
| worker.wait_finish_messages_timeout | 86400000 (24 小时) | 消息处理程序等待所有 worker 完成消息的最大超时时间(毫秒)。 |
6. I/O 与输出配置
输出计算结果的配置。
6.1 输出类与结果
| 配置项 | 默认值 | 说明 |
|---|---|---|
| output.output_class | org.apache.hugegraph.computer.core.output.LogOutput | 输出每个顶点计算结果的类。在迭代计算后调用。 |
| output.result_name | value | 该值由 WORKER_COMPUTATION_CLASS 创建的实例的 #name() 动态分配。 |
| output.result_write_type | OLAP_COMMON | 输出到 HugeGraph 的结果写入类型,允许值:[OLAP_COMMON, OLAP_SECONDARY, OLAP_RANGE]。 |
6.2 输出行为
| 配置项 | 默认值 | 说明 |
|---|---|---|
| output.with_adjacent_edges | false | 是否输出顶点的邻接边。 |
| output.with_vertex_properties | false | 是否输出顶点的属性。 |
| output.with_edge_properties | false | 是否输出边的属性。 |
6.3 批量输出
| 配置项 | 默认值 | 说明 |
|---|---|---|
| output.batch_size | 500 | 输出的批处理大小。 |
| output.batch_threads | 1 | 用于批量输出的线程数量。 |
| output.single_threads | 1 | 用于单个输出的线程数量。 |
6.4 HDFS 输出
| 配置项 | 默认值 | 说明 |
|---|---|---|
| output.hdfs_url | hdfs://127.0.0.1:9000 | 输出的 HDFS URL。 |
| output.hdfs_user | hadoop | 输出的 HDFS 用户。 |
| output.hdfs_path_prefix | /hugegraph-computer/results | HDFS 输出结果的目录。 |
| output.hdfs_delimiter | , (逗号) | HDFS 输出的分隔符。 |
| output.hdfs_merge_partitions | true | 是否合并多个分区的输出文件。 |
| output.hdfs_replication | 3 | HDFS 的副本数。 |
| output.hdfs_core_site_path | "" (空) | HDFS core site 路径。 |
| output.hdfs_site_path | "" (空) | HDFS site 路径。 |
| output.hdfs_kerberos_enable | false | 是否为 HDFS 启用 Kerberos 认证。 |
| output.hdfs_kerberos_principal | "" (空) | HDFS 的 Kerberos 认证 principal。 |
| output.hdfs_kerberos_keytab | "" (空) | HDFS 的 Kerberos 认证 keytab 文件。 |
| output.hdfs_krb5_conf | /etc/krb5.conf | Kerberos 配置文件路径。 |
6.5 重试与超时
| 配置项 | 默认值 | 说明 |
|---|---|---|
| output.retry_times | 3 | 输出失败时的重试次数。 |
| output.retry_interval | 10 | 输出失败时的重试间隔(秒)。 |
| output.thread_pool_shutdown_timeout | 60 | 输出线程池关闭的超时时间(秒)。 |
7. 网络与传输配置
Worker 和 Master 之间网络通信的配置。
7.1 服务器配置
| 配置项 | 默认值 | 说明 |
|---|---|---|
| transport.server_host | 127.0.0.1 | worker 数据服务监听并向其他 worker 公告的地址。多主机场景必须使用其他节点可达的地址;Operator 会改为 Pod IP。 |
| transport.server_port | 0(发行包:0;K8s Operator:8099) | worker 数据传输监听端口。单机值 0 表示系统分配端口;Operator 会将 K8s 默认值改为固定端口 8099,以便 Pod 间通信。 |
| transport.server_threads | 4 | 服务器传输线程的数量。 |
7.2 客户端配置
| 配置项 | 默认值 | 说明 |
|---|---|---|
| transport.client_threads | 4 | 客户端传输线程的数量。 |
| transport.client_connect_timeout | 3000 | 客户端连接到服务器的超时时间(毫秒)。 |
7.3 协议配置
| 配置项 | 默认值 | 说明 |
|---|---|---|
| transport.provider_class | org.apache.hugegraph.computer.core.network.netty.NettyTransportProvider | 传输提供程序,目前仅支持 Netty。 |
| transport.io_mode | AUTO | 网络 IO 模式,允许值:[NIO, EPOLL, AUTO]。AUTO 表示自动选择适当的模式。 |
| transport.tcp_keep_alive | true | 是否启用 TCP keep-alive。 |
| transport.transport_epoll_lt | false | 是否启用 EPOLL 水平触发(仅在 io_mode=EPOLL 时有效)。 |
7.4 缓冲区配置
| 配置项 | 默认值 | 说明 |
|---|---|---|
| transport.send_buffer_size | 0 | Socket 发送缓冲区大小(字节)。0 表示使用系统默认值。 |
| transport.receive_buffer_size | 0 | Socket 接收缓冲区大小(字节)。0 表示使用系统默认值。 |
| transport.write_buffer_high_mark | 67108864 (64 MB) | 写缓冲区的高水位标记(字节)。如果排队字节数 > write_buffer_high_mark,将触发发送不可用。 |
| transport.write_buffer_low_mark | 33554432 (32 MB) | 写缓冲区的低水位标记(字节)。如果排队字节数 < write_buffer_low_mark,将触发发送可用。 |
7.5 流量控制
| 配置项 | 默认值 | 说明 |
|---|---|---|
| transport.max_pending_requests | 8 | 客户端未接收 ACK 的最大数量。如果未接收 ACK 的数量 >= max_pending_requests,将触发发送不可用。 |
| transport.min_pending_requests | 6 | 客户端未接收 ACK 的最小数量。如果未接收 ACK 的数量 < min_pending_requests,将触发发送可用。 |
| transport.min_ack_interval | 200 | 服务器回复 ACK 的最小间隔(毫秒)。 |
7.6 超时配置
| 配置项 | 默认值 | 说明 |
|---|---|---|
| transport.close_timeout | 10000 | 关闭服务器或关闭客户端的超时时间(毫秒)。 |
| transport.sync_request_timeout | 10000 | 发送同步请求后等待响应的超时时间(毫秒)。 |
| transport.finish_session_timeout | 0 | 完成会话的超时时间(毫秒)。0 表示使用 (transport.sync_request_timeout × transport.max_pending_requests)。 |
| transport.write_socket_timeout | 3000 | 将数据写入 socket 缓冲区的超时时间(毫秒)。 |
| transport.server_idle_timeout | 360000 (6 分钟) | 服务器空闲的最大超时时间(毫秒)。 |
7.7 心跳配置
| 配置项 | 默认值 | 说明 |
|---|---|---|
| transport.heartbeat_interval | 20000 (20 秒) | 客户端心跳之间的最小间隔(毫秒)。 |
| transport.max_timeout_heartbeat_count | 120 | 客户端超时心跳的最大次数。如果连续等待心跳响应超时的次数 > max_timeout_heartbeat_count,通道将从客户端关闭。 |
7.8 高级网络设置
| 配置项 | 默认值 | 说明 |
|---|---|---|
| transport.max_syn_backlog | 511 | 服务器端 SYN 队列的容量。0 表示使用系统默认值。 |
| transport.recv_file_mode | true | 是否启用接收缓冲文件模式。如果启用,将使用零拷贝从 socket 接收缓冲区并写入文件。注意:需要操作系统支持零拷贝(例如 Linux sendfile/splice)。 |
| transport.network_retries | 3 | 网络通信不稳定时的重试次数。 |
7.9 Master RPC 配置
以下两个键由 HugeGraph Commons 的 RPC 配置定义;computer.properties 发行模板显式设置了主机和端口。Kubernetes Operator 会公告 Pod IP,并在未指定有效端口时使用 8190。
| 配置项 | 发行包值 | 说明 |
|---|---|---|
| rpc.server_host | 127.0.0.1(K8s:Pod IP) | Master RPC 服务地址,worker 必须能访问此地址。 |
| rpc.server_port | 8190(K8s 默认:8190) | Master RPC 监听端口;集群安全组和网络策略须允许 worker 连接。 |
8. 存储与持久化配置
HGKV(HugeGraph Key-Value)存储引擎和值文件的配置。
8.1 HGKV 配置
| 配置项 | 默认值 | 说明 |
|---|---|---|
| hgkv.max_file_size | 2147483648 (2 GB) | 每个 HGKV 文件的最大字节数。 |
| hgkv.max_data_block_size | 65536 (64 KB) | HGKV 文件数据块的最大字节大小。 |
| hgkv.max_merge_files | 10 | 一次合并的最大文件数。 |
| hgkv.temp_file_dir | /tmp/hgkv | 此文件夹用于在文件合并过程中存储临时文件。 |
8.2 值文件配置
| 配置项 | 默认值 | 说明 |
|---|---|---|
| valuefile.max_segment_size | 1073741824 (1 GB) | 值文件每个段的最大字节数。 |
9. BSP 与协调配置
批量同步并行(BSP)协议和 etcd 协调的配置。
| 配置项 | 默认值 | 说明 |
|---|---|---|
| bsp.etcd_endpoints | http://localhost:2379(发行包:http://127.0.0.1:2379) | etcd 客户端端点;多个地址用逗号分隔。K8s Operator 在未由 computerConf 指定时使用 Operator 的 INTERNAL_ETCD_URL。 |
| bsp.max_super_step | 10 (打包: 2) | 算法的最大超步数。 |
| bsp.register_timeout | 300000 (打包: 100000) | 等待 master 和 worker 注册的最大超时时间(毫秒)。 |
| bsp.wait_workers_timeout | 86400000 (24 小时) | 等待 worker BSP 事件的最大超时时间(毫秒)。 |
| bsp.wait_master_timeout | 86400000 (24 小时) | 等待 master BSP 事件的最大超时时间(毫秒)。 |
| bsp.log_interval | 30000 (30 秒) | 等待 BSP 事件时打印日志的日志间隔(毫秒)。 |
10. 性能调优配置
性能优化的配置。
| 配置项 | 默认值 | 说明 |
|---|---|---|
| allocator.max_vertices_per_thread | 10000 | 每个内存分配器中每个线程处理的最大顶点数。 |
| sort.thread_nums | 4 | 执行内部排序的线程数量。 |
11. 系统管理配置
以下配置在 Kubernetes 作业中由 Operator 自动补齐或覆盖。除非自定义了 Operator 或网络,不应手动覆盖这些值;job.namespace 是可选的用户配置,见基础配置表。
| 配置项 | 管理者 | 说明 |
|---|---|---|
| bsp.etcd_endpoints | K8s Operator | 仅在 computerConf 未设置时,取 Operator 的 INTERNAL_ETCD_URL。 |
| transport.server_host | K8s Operator | 覆盖为 Pod IP;worker 需要互相访问。 |
| transport.server_port | K8s Operator | 未设置或为 0 时设置为 8099,不是随机端口。 |
| job.id | K8s Operator | 自动从 CRD 设置为作业 ID |
| job.workers_count | K8s Operator | 自动从 CRD workerInstances 设置 |
| rpc.server_host | K8s Operator | 覆盖为 master Pod IP。 |
| rpc.server_port | K8s Operator | 未设置或为 0 时设置为 8190。 |
| rpc.remote_url | Computer 启动流程 | 读取配置时会移除该项,不应作为作业配置设置。 |
为什么禁止修改:
- BSP/RPC 配置:必须与实际部署的 etcd/RPC 服务匹配。手动覆盖会破坏协调。
- 作业配置:必须与 K8s CRD 规范匹配。不匹配会导致 worker 数量错误。
- 传输配置:必须使用 worker 互相可达的 Pod IP 和端口;K8s 的默认端口为
8099。
K8s Operator 配置选项
注意:选项需要通过环境变量设置进行转换,例如 k8s.internal_etcd_url => INTERNAL_ETCD_URL
| 配置项 | 默认值 | 说明 |
|---|---|---|
| k8s.auto_destroy_pod | true | 作业完成或失败后是否删除作业 CR;CR 删除后 Operator 会清理关联计算资源。 |
| k8s.close_reconciler_timeout | 120 | 关闭 reconciler 的最大超时时间(毫秒)。 |
| k8s.internal_etcd_url | 代码默认 http://127.0.0.1:2379;发行清单覆盖为 http://hugegraph-computer-operator-etcd.hugegraph-computer-operator-system:2379 | Operator 作业使用的 etcd URL。使用随附清单时实际值是 etcd Service 地址。 |
| k8s.internal_minio_url | 代码默认 http://127.0.0.1:9000;发行清单覆盖为 http://hugegraph-computer-operator-minio.hugegraph-computer-operator-system:9000 | Operator 为作业补入的 MinIO 地址;仅启用 MinIO 快照时需要。 |
| k8s.max_reconcile_retry | 3 | reconcile 的最大重试次数。 |
| k8s.probe_backlog | 50 | 服务健康探针的最大积压。 |
| k8s.probe_port | 9892 | controller 绑定的用于服务健康探针的端口。 |
| k8s.ready_check_internal | 1000 | 检查就绪的时间间隔(毫秒)。 |
| k8s.ready_timeout | 30000 | 检查就绪的最大超时时间(毫秒)。 |
| k8s.reconciler_count | 代码默认 Runtime.getRuntime().availableProcessors();发行清单覆盖为 6 | reconciler 线程的最大数量。 |
| k8s.resync_period | 600000 | 被监视资源进行 reconcile 的最小频率。 |
| k8s.timezone | Asia/Shanghai | computer 作业和 operator 的时区。 |
| k8s.watch_namespace | hugegraph-computer-operator-system | 监视自定义资源的命名空间。随附发行清单也设置为此值;使用 * 可监视所有命名空间。 |
HugeGraph-Computer CRD
| 字段 | 默认值 | 说明 | 必填 |
|---|---|---|---|
| algorithmName | 算法名称。 | true | |
| jobId | 作业 ID。 | true | |
| image | Computer 作业使用的容器镜像,必须包含 Computer 运行时。目标算法 JAR 可预置在镜像内,或通过 remoteJarUri 下载。 | true | |
| computerConf | computer 配置选项的映射。 | true | |
| workerInstances | worker 实例数量,将覆盖 ‘job.workers_count’ 选项。 | true | |
| pullPolicy | 未设置时由 Kubernetes 按镜像标签决定:latest 为 Always,其他标签为 IfNotPresent | 可显式设置 Always、Never 或 IfNotPresent;CRD 未提供默认值。详见 镜像拉取策略。 | false |
| pullSecrets | 镜像拉取密钥,详情请参考:https://kubernetes.io/docs/concepts/containers/images/#specifying-imagepullsecrets-on-a-pod | false | |
| masterCpu | master 的 CPU 限制,单位可以是 ’m’ 或无单位,详情请参考:https://kubernetes.io/docs/concepts/configuration/manage-resources-containers/#meaning-of-cpu | false | |
| workerCpu | worker 的 CPU 限制,单位可以是 ’m’ 或无单位,详情请参考:https://kubernetes.io/docs/concepts/configuration/manage-resources-containers/#meaning-of-cpu | false | |
| masterMemory | master 的内存限制,单位可以是 Ei、Pi、Ti、Gi、Mi、Ki 之一,详情请参考:https://kubernetes.io/docs/concepts/configuration/manage-resources-containers/#meaning-of-memory | false | |
| workerMemory | worker 的内存限制,单位可以是 Ei、Pi、Ti、Gi、Mi、Ki 之一,详情请参考:https://kubernetes.io/docs/concepts/configuration/manage-resources-containers/#meaning-of-memory | false | |
| log4jXml | computer 作业的 log4j.xml 内容。 | false | |
| jarFile | 容器镜像内算法 JAR 的路径。 | false | |
| remoteJarUri | 算法 JAR 的 HTTP(S) 地址;启动脚本会下载该 JAR 并加载。 | false | |
| jvmOptions | computer 作业的 Java 启动参数。 | false | |
| envVars | 请参考:https://kubernetes.io/docs/tasks/inject-data-application/define-interdependent-environment-variables/ | false | |
| envFrom | 请参考:https://kubernetes.io/docs/tasks/inject-data-application/define-environment-variable-container/ | false | |
| masterCommand | bin/start-computer.sh | master 的运行命令,等同于 Docker 的 ‘Entrypoint’ 字段。 | false |
| masterArgs | ["-r master", “-d k8s”] | master 的运行参数,等同于 Docker 的 ‘Cmd’ 字段。 | false |
| workerCommand | bin/start-computer.sh | worker 的运行命令,等同于 Docker 的 ‘Entrypoint’ 字段。 | false |
| workerArgs | ["-r worker", “-d k8s”] | worker 的运行参数,等同于 Docker 的 ‘Cmd’ 字段。 | false |
| volumes | 请参考:https://kubernetes.io/docs/concepts/storage/volumes/ | false | |
| volumeMounts | 请参考:https://kubernetes.io/docs/concepts/storage/volumes/ | false | |
| secretPaths | k8s-secret 名称和挂载路径的映射。 | false | |
| configMapPaths | k8s-configmap 名称和挂载路径的映射。 | false | |
| podTemplateSpec | 请参考:https://kubernetes.io/docs/reference/kubernetes-api/workload-resources/pod-template-v1/#PodTemplateSpec | false | |
| securityContext | 请参考:https://kubernetes.io/docs/tasks/configure-pod-container/security-context/ | false |
KubeDriver 配置选项
| 配置项 | 默认值 | 说明 |
|---|---|---|
| k8s.build_image_bash_path | 用于构建镜像的命令路径。 | |
| k8s.enable_internal_algorithm | true | 是否启用内部算法。 |
| k8s.framework_image_url | hugegraph/hugegraph-computer:latest | computer 框架的镜像 URL。 |
| k8s.image_repository_password | 登录镜像仓库的密码。 | |
| k8s.image_repository_registry | 登录镜像仓库的地址。 | |
| k8s.image_repository_url | hugegraph/hugegraph-computer | 镜像仓库的 URL。 |
| k8s.image_repository_username | 登录镜像仓库的用户名。 | |
| k8s.internal_algorithm | [pageRank] | 所有内部算法的名称列表。注意:算法名称在这里使用驼峰命名法(例如 pageRank),但算法实现返回下划线命名法(例如 page_rank)。 |
| k8s.internal_algorithm_image_url | hugegraph/hugegraph-computer:latest | 内部算法的镜像 URL。 |
| k8s.jar_file_dir | /cache/jars/ | 算法 jar 将上传到的目录。 |
| k8s.kube_config | ~/.kube/config | k8s 配置文件的路径。 |
| k8s.log4j_xml_path | computer 作业的 log4j.xml 路径。 | |
| k8s.namespace | hugegraph-computer-operator-system | hugegraph-computer 系统的命名空间。 |
| k8s.pull_secret_names | [] | 拉取镜像的 pull-secret 名称。 |
3.5 - HugeGraph Client
Java 和 Go Client 位于 HugeGraph Toolchain 仓库,Python Client 位于 HugeGraph-AI 仓库。三者的安装方式和 API 不完全相同,请进入对应页面查看。
3.5.1 - HugeGraph-Java-Client
1 HugeGraph-Client 概述
HugeGraph Java Client 将 Java API 转换为 HugeGraph Server 的 REST 请求,支持管理 Schema 和图数据、执行 Gremlin 及调用 Traverser API。详细接口见 Client API,本文给出 Java 项目的接入示例。
其他语言可使用 Go Client 或 HugeGraph-AI 仓库中的 Python Client。
2 环境要求
- JDK 11(当前 CI 使用版本;源码目标版本为 Java 8)
- Maven 3.6+
3 使用流程
使用 HugeGraph-Client 的基本步骤如下:
- 新建Eclipse/ IDEA Maven 项目;
- 在 pom 文件中添加 HugeGraph-Client 依赖;
- 创建类,调用 HugeGraph-Client 接口;
详细使用过程见下节完整示例。
4 完整示例
4.1 新建 Maven 工程
可以选择 Eclipse 或者 Intellij Idea 创建工程:
4.2 添加 hugegraph-client 依赖
添加 hugegraph-client 依赖
以下完整示例使用的 Schema、Graph、Gremlin 和资源关闭接口在已发布的 Client 1.7.0 中可用,也与 Toolchain master 兼容。
上面的依赖可直接用于示例工程。
如果需要API 参考中的 master 新接口(例如能力探测),请使用 Toolchain master 的 Client 1.8.0,
将 POM 中的版本改为 1.8.0。该版本未发布到 Maven 仓库时,先在 Toolchain 源码根目录运行以下命令,
将 Client 及其父 POM 安装到本地 Maven 仓库。源码构建仍需从配置的 Maven 仓库获取依赖。
Client 与 Server 的版本不必相同;升级前核对服务端 API 兼容范围及所需功能。
4.3 Example
4.3.1 SingleExample
4.3.2 BatchExample
4.4 运行 Example
运行 Example 之前需要启动 Server, 启动过程见HugeGraph-Server 快速上手
4.5 详细 API 说明
3.5.2 - HugeGraph Python 客户端快速上手
hugegraph-python-client 是 HugeGraph 的 Python SDK,可管理 Schema、读写图数据并执行 Gremlin 查询。HugeGraph-LLM 和 HugeGraph-ML 也使用这个客户端。
该模块位于 hugegraph-ai 仓库的 hugegraph-python-client/ 目录下,导入名为 pyhugegraph。
环境要求
- 客户端与 HugeGraph-AI workspace 均要求 Python 3.10 或更高版本,CI 在 3.10 和 3.11 上运行客户端测试。
- HugeGraph Server 1.5.0 或更高版本。客户端会拒绝连接更低版本的 Server,此类场景请改用 v1.3.x 客户端。
uv(推荐)或pip
运行时依赖为 decorator、requests、setuptools、urllib3 和 rich。
安装
发布到 PyPI 的发行包名是 hugegraph-python:
上述命令不固定版本号,默认安装最新发布版;发行信息见 PyPI 发布页。源码目录名是 hugegraph-python-client,发行包名为 hugegraph-python;需要主线代码时,请从 HugeGraph-AI workspace 安装。
如需使用仓库中的最新代码,请从 HugeGraph-AI 仓库根目录同步 workspace。hugegraph-python-client 是 workspace 成员,通过 python-client extra 暴露,因此仅执行 uv sync 不会安装它:
连接并写入数据
客户端参数
PyHugeClient(url, graph, user, pwd, graphspace=None, timeout=None)
| 参数 | 类型 | 默认值 | 说明 |
|---|---|---|---|
url | str | 必填 | HugeGraph Server 的基础 URL。若未带协议头,客户端会自动补上 http://,因此 127.0.0.1:8080 也可以使用。 |
graph | str | 必填 | 图名称,是第二个位置参数。 |
user | str | 必填 | 用户名,以 HTTP Basic Auth 发送。 |
pwd | str | 必填 | 密码,以 HTTP Basic Auth 发送。 |
graphspace | str 或 None | None | GraphSpace 名称,None 的解析规则见下文。 |
timeout | tuple[float, float] 或 None | None | (连接, 读取) 超时时间,单位为秒。None 会取 (0.5, 15.0)。 |
每个 HTTP 会话在收到 500、502、504 响应时会重试 3 次,退避因子为 0.1。
Server 版本与 GraphSpace
客户端在构造时解析 GraphSpace:
- 传入非空的
graphspace字符串时直接开启 GraphSpace 模式。 - 否则客户端会请求
GET {url}/versions并读取versions.core。 - Server 版本低于 1.5.0 时抛出
RuntimeError,提示升级 Server 或改用 v1.3.x 客户端。 - Server 版本高于 1.5.0 时会把
graphspace设为DEFAULT并开启 GraphSpace 模式,同时在日志中打印警告。版本恰好为 1.5.0 时保持关闭。 - 若因网络原因探测失败,GraphSpace 模式保持关闭。
该模式决定请求前缀:开启时为 /graphspaces/<graphspace>/graphs/<graph>/...,关闭时为 /graphs/<graph>/...。
客户端提供的 Manager
每个访问器都会惰性创建对应的 Manager,并为其分配独立的 HTTP 会话。
| 访问器 | Manager | 覆盖范围 |
|---|---|---|
client.schema() | SchemaManager | 属性、顶点标签、边标签、索引标签 |
client.graph() | GraphManager | 顶点与边的增删改查、批量写入、分页 |
client.gremlin() | GremlinManager | 执行 Gremlin |
client.graphs() | GraphsManager | 图列表、图信息、配置、清空数据 |
client.traverser() | TraverserManager | 遍历与路径算法 |
client.variable() | VariableManager | 图变量 |
client.task() | TaskManager | 异步任务的查询、取消、删除 |
client.auth() | AuthManager | 用户、用户组、资源、归属、权限 |
client.metrics() | MetricsManager | Server 指标 |
client.version() | VersionManager | Server 版本 |
pyhugegraph.api 中还提供了 RankManager、RebuildManager 和 ServicesManager,但 PyHugeClient 暂未提供对应的访问器,需要时可自行传入 session 构造。
常用操作
构建 Schema
Schema 构建器采用链式调用,最后调用 create(),也可以用 append()、eliminate() 和 remove() 修改已有定义。
查询 Schema
读取、更新和删除图数据
图接口直接接收属性字典,不支持链式的属性构建器:
addVertex 返回 VertexData,包含 id、label、type 和 properties。addEdge 返回 EdgeData,包含 id、label、type、outV、outVLabel、inV、inVLabel 和 properties。
传给客户端的顶点 ID 可以是字符串、整数或 uuid.UUID。布尔值会被拒绝,整数必须落在 Java signed long 范围内。
批量写入
addVertices 接收 (label, properties) 二元组,addEdges 接收 (label, out_id, in_id, out_label, in_label, properties) 六元组。两者返回的对象只携带生成的 ID。
分页与条件查询
执行 Gremlin
exec 会根据图名称和解析出的 GraphSpace 自动绑定 graph 与 g 别名,并返回服务端响应中的 result 字段。响应缺少 requestId、status 或 result 时抛出 ResponseParseError。
图遍历
TraverserManager 封装了 Server 的 traverser 接口,方法名使用蛇形命名。
基于 POST 的接口需要传入请求体:advanced_paths、customized_paths、template_paths、customized_crosspoints 和 fusiform_similarity。
图变量
异步任务
Server 指标与图信息
认证与授权
AuthManager 与 Server 的路由保持一致:用户、资源、归属和权限挂载在 /graphspaces/{graphspace}/auth/... 下,用户组仍在 Server 级别的 /auth/groups。在 HugeGraph 1.7.0 及以上版本必须能解析出 graphspace,否则这些调用会在发出请求前抛出 ValueError。
方法命名
Manager 中以驼峰命名的方法(例如 addVertex、getVertexById)会在构造时自动生成蛇形命名别名,graph.add_vertex(...) 与 graph.addVertex(...) 指向同一个方法。驼峰写法已在 debug 日志中标记为废弃,新代码建议使用蛇形命名。
错误处理
异常定义在 pyhugegraph.utils.exceptions 中:
| 异常 | 触发条件 |
|---|---|
NotAuthorizedError | Server 返回 401 |
NotFoundError | Server 返回 404,或缺少必填参数 |
ServerError | 其他非 2xx 响应,异常信息中附带服务端消息 |
ResponseParseError | 成功响应无法解析为预期结构 |
ServiceUnavailableError | Server 返回 ServiceUnavailableException |
InvalidParameterError、CreateError、RemoveError、UpdateError、DataFormatError | 由各构建器和数据结构抛出 |
请求体与响应体写入日志时,会对密码、token 和 secret 等字段做脱敏处理。
接口参数会随 HugeGraph REST API 版本变化。遇到不兼容时,先核对当前 Server 的 REST API 文档与客户端测试用例。
开发检查
在 HugeGraph-AI 仓库根目录运行格式与静态检查:
按照 CI 的方式运行测试:
CI 的集成测试作业使用 hugegraph/hugegraph:1.7.0 镜像。需要非默认空间时,还可以设置 HUGEGRAPH_GRAPHSPACE。
源码与测试位于 hugegraph-python-client/src/pyhugegraph/ 和 hugegraph-python-client/src/tests/,可直接运行的示例在 hugegraph-python-client/src/pyhugegraph/example/hugegraph_example.py。
3.5.3 - HugeGraph Go 客户端快速入门
HugeGraph Go Client 是 Toolchain 仓库中的 Go SDK,目前提供版本查询、Schema(PropertyKey、VertexLabel、EdgeLabel)、顶点和 Gremlin API。边数据 API 尚未实现。
该模块仍在开发中。接口范围以
hugegraph-client-go/api/v1下的源码为准。
环境要求
- Go 1.19 或更高版本
- 可访问的 HugeGraph Server,默认示例地址为
http://127.0.0.1:8080
安装
在 Go module 项目中执行:
初始化客户端
NewCommonClient 要求 Host 是 IP 地址,Port 在 1 到 65535 之间;客户端始终使用明文 HTTP 连接。未启用认证时,用户名和密码留空;只有两者都设置时才会发送 Basic Auth。
GraphSpace 只在 Vertex API(此时请求路径为 /graphspaces/{space}/graphs/{graph}/...)和 Gremlin 默认 aliases 中生效(空值按 DEFAULT 处理)。Schema 相关入口和 Version() 始终请求 /graphs/{graph}/... 和 /versions,与 GraphSpace 无关。默认图空间填写 DEFAULT;将 GraphSpace 留空时,Vertex API 会回退到旧版 Server 使用的 /graphs/{graph} 路径。
Version() 返回的 Versions 包含 HugeGraph Server、Core、Gremlin 和 REST API 版本。若使用源码提供的 NewDefaultCommonClient(),默认连接 127.0.0.1:8080 下的 hugegraph 图,使用 admin/pa 认证,并挂载一个打印全部请求和响应体的 ColorLogger;生产代码通常应显式传入配置。
配置项
hugegraph.Config 包含以下字段:
| 字段 | 类型 | 说明 |
|---|---|---|
Host | string | HugeGraph Server 的 IP 地址,不支持主机名 |
Port | int | HugeGraph Server 的 REST 端口,取值 1 到 65535 |
GraphSpace | string | 图空间,仅 Vertex API 和 Gremlin 默认 aliases 使用;不需要时填空字符串 |
Graph | string | Server 上配置的图名 |
Username | string | Server 用户名,未启用认证时填空字符串 |
Password | string | Server 密码,未启用认证时填空字符串 |
Transport | http.RoundTripper | 自定义 HTTP transport,为 nil 时使用 http.DefaultTransport |
Logger | hgtransport.Logger | 请求/响应日志,为 nil 时不记录日志 |
hgtransport 包提供四种 logger:TextLogger(纯文本)、ColorLogger(终端彩色)、CurlLogger(可执行的 curl 命令)和 JSONLogger(JSON 行)。它们的字段相同:Output(io.Writer)、EnableRequestBody 和 EnableResponseBody。
已实现的入口
CommonClient 当前公开以下入口:
| 入口 | 用途 |
|---|---|
Version() | 查询服务端版本 |
Schema() | 查询完整 Schema |
Propertykey | Create、GetAll、GetByName、UpdateUserdata、DeleteByName |
VertexLabel | Create、GetAll、GetByName、UpdateUserdata、DeleteByName |
EdgeLabel | Create、GetAll、DeleteByName |
Vertex | Create、BatchCreate、UpdateProperties(通过 WithAction 指定 append 或 eliminate) |
Gremlin | Get 和 Post。Post 默认 language 为 gremlin-groovy,根据 GraphSpace 和 Graph 自动填充 graph/g aliases,并在 Data 中返回解析后的结果;Get 只返回状态码,并把原始响应打印到 stdout。 |
每个操作都通过挂在操作本身上的 With... 函数式选项传参,例如 client.Gremlin.Post.WithGremlin(...) 或 client.Propertykey.GetByName.WithName(...)。
EdgeLabel.Create 的请求数据允许 Properties: nil 或空切片 []string{},用于创建无属性的边标签。
类型化 API 返回的 err 表示参数校验、传输、响应读取或 JSON 解码错误。
HTTP 4xx/5xx 仍可能返回 err == nil,例如创建顶点时指定不存在的 label 会返回 HTTP 400。
读取结果数据前,请检查 response.StatusCode 是否属于 2xx。调用 Gremlin.Post 时,还需检查 response.Data.Status.Code 是否为成功的 Gremlin 协议状态码(2xx)。
Vertex相关操作的入参是internal/model包中的model.Vertex[any]。Go 不允许从其他 module 导入internal包,因此目前VertexAPI 只能在客户端 module 内部调用;其测试文件也已全部注释。
完整调用方式可参考各 API 目录中的测试,例如 version_test.go、gemlin_test.go 和 vertexlabel_test.go。
4 - HugeGraph-Server 配置
本节介绍 HugeGraph-Server 的配置文件、可用选项、认证和 HTTPS 设置。
后端配置
4.1 - Server 启动指南
1 概述
默认配置位于发行包解压目录的 conf/ 下。HBase、Kerberos 和 HTTPS 等外部文件可以由用户提供到其他路径,详见对应的后端、认证和 HTTPS 页面。
主要的配置文件包括:gremlin-server.yaml、rest-server.properties 和 hugegraph.properties
HugeGraphServer 内部集成了 GremlinServer 和 RestServer,而 gremlin-server.yaml 和 rest-server.properties 就是用来配置这两个 Server 的。
- GremlinServer:GremlinServer 接收 Gremlin 请求并调用图引擎。
- RestServer:提供 RESTful API,根据不同的 HTTP 请求,调用对应的 Core API,如果用户请求体是 gremlin 语句,则会转发给 GremlinServer,实现对图数据的操作。
下面对这三个配置文件逐一介绍。
生产环境必须配置 Server 鉴权与网络边界
本页的认证配置属于 HugeGraph Server。生产环境必须按 Server 认证与授权配置启用 Auth、配置 IP 白名单和最小权限,并保留、保护 Server audit-*.log。示例中注释掉的认证配置表示默认未启用。
发行包把默认配置放在安装目录的 conf/ 下;这些文件来自 Server 仓库的静态发行素材,构建时随包复制。未在配置文件中出现的选项采用代码定义的默认值;配置文件显式写入的值会覆盖该默认值。
本页的默认文件行为按固定 Server 主线 2f827d6 核对;实际使用的发布包应以其自身版本对应的配置文件和入口脚本为准。
| 文件 | 来源和用途 | 装载行为 |
|---|---|---|
conf/gremlin-server.yaml | 随发行包提供;配置 Gremlin Server。 | start-hugegraph.sh 将它作为 Server 启动参数传入。 |
conf/rest-server.properties | 按固定 Server 主线构建时随发行包提供;配置 REST Server、PD、认证等。 | 启动脚本和 Server 进程读取;对应主线构建的容器入口脚本也会在启动前更新其中受支持的选项。 |
conf/graphs/hugegraph.properties | 随发行包提供的默认图配置,使用 RocksDB。 | init-store.sh 和 Server 应用初始化都会扫描该目录;初始化阶段会尝试加载其中的图配置。graph.load_from_local_config 默认 false,只控制管理器构造阶段预加载及 reload() 重扫。 |
conf/graphs/hstore.properties.template | 随发行包提供的 HStore 模板;其他图配置由用户按需创建。 | HStore 镜像在构建时把模板改名为 hugegraph.properties;裸发行包用户可复制模板并修改。 |
完整的默认文件见Server 主线源码:gremlin-server.yaml、rest-server.properties、hugegraph.properties 和 hstore.properties.template。
以下 Docker 环境变量行为仅适用于从 master 主线构建的镜像,不会把任意环境变量名转换为配置项。该版本的入口脚本在初始化和启动前处理 HG_SERVER_BACKEND、HG_SERVER_PD_PEERS、HG_SERVER_USE_PD、HG_SERVER_CLUSTER、HG_SERVER_REST_URL、HG_SERVER_MIN_FREE_MEMORY、HG_SERVER_AUTH_TOKEN_SECRET、HG_SERVER_INIT_STORE_ENABLED 和 PASSWORD;历史发布镜像需按各自 tag 对应的 entrypoint 核实支持项。见 Docker entrypoint。
2 gremlin-server.yaml
只展示启动时常调整的选项;完整文件及序列化器、插件配置见上方源码链接。
发行包中的 host 和 port 默认行是注释;未指定时使用 127.0.0.1:8182。若要修改监听地址,取消注释并设置这两项:
通常只需关注 channelizer、host 和 port。图不在 Gremlin Server 的 graphs 段加载;REST 侧管理器会在 Server 应用初始化时扫描 graphs 目录并尝试载入本地图配置。graph.load_from_local_config 只控制管理器构造阶段的预加载与 reload() 重扫;默认 false 不会关闭应用初始化阶段的本地加载。
- channelizer:默认的
WsAndHttpChannelizer同时支持 WebSocket 和 HTTP。Gremlin-Console 使用 WebSocket,HugeGraph-Client、Loader 和 Hubble 使用 HTTP;
默认 GremlinServer 是服务在 127.0.0.1:8182,如果需要修改,配置 host、port 即可
- host:部署 GremlinServer 机器的机器名或 IP,GremlinServer 不直接暴露给用户,由 RestServer 转发 Gremlin 请求;
- port:部署 GremlinServer 机器的端口;
同时需要在 rest-server.properties 中增加对应的配置项 gremlinserver.url=http://host:port
3 rest-server.properties
下面是可用的 rest-server.properties 示例。主线模板未写出 graph.load_from_local_config,源码默认值为 false。示例中设为 true 是可选的:它开启管理器构造阶段预加载和 reload() 重扫;Server 应用初始化阶段仍会扫描并尝试加载本地图配置。
- restserver.url:RestServer 提供服务的 url,根据实际环境修改。如果其他 IP 地址无法访问,可以尝试修改为特定的地址;或修改为
http://0.0.0.0来监听来自任何 IP 地址的请求,这种方案较为便捷,但需要留意服务可被访问的网络范围; - graphs:图配置文件所在目录,默认值是
./conf/graphs。init-store.sh会扫描该目录;Server 应用初始化也会扫描并尝试加载其中的 properties 文件; - graph.load_from_local_config:是否在管理器构造阶段预加载本地图配置,以及在
reload()时重新扫描;源码默认值为false。它不会禁止 Server 应用初始化阶段的本地加载,也不是安全隔离开关;
当前上游模板中的 Arthas 键仍写作
arthas.telnet_port、arthas.http_port和arthas.disabled_commands,但ServerOptions读取的是下方示例中的 camelCase 名称。自定义配置应使用arthas.telnetPort、arthas.httpPort和arthas.disabledCommands。
配置项 gremlinserver.url 是 GremlinServer 为 RestServer 提供服务的 url,该配置项默认为 http://127.0.0.1:8182,如需修改,需要和 gremlin-server.yaml 中的 host 和 port 相匹配;该值可以像模板那样省略协议前缀,缺失时会自动补上
http://。
4 hugegraph.properties
hugegraph.properties 是随发行包提供的默认图配置;每个额外的图都应在 conf/graphs 下提供自己的 properties 文件。这里展示选择默认 RocksDB 后端所需的关键配置,完整文件见上方源码链接。
重点关注未注释的几项:
- gremlin.graph:GremlinServer 的启动入口,用户不要修改此项;开启鉴权时才改为
org.apache.hugegraph.auth.HugeFactoryAuthProxy; - vertex.cache_type / edge.cache_type:缓存实现,可选值为
l1和l2,默认l2; - backend:使用的后端存储。1.7.0 支持 memory、rocksdb、hstore 和 hbase;
- serializer:schema、vertex 和 edge 写入后端时使用的序列化器。RocksDB 使用 binary;
- store:图在后端使用的存储名称;
- task.schedule_period、task.retry、task.wait_timeout:异步任务的调度周期(秒)、重试次数和等待超时(秒)。调度器由后端决定,
hstore使用分布式调度器,其余后端使用本地调度器;旧的task.scheduler_type键已被忽略; - search.text_analyzer / search.text_analyzer_mode:全文索引使用的分词器及其模式。可选分词器为
ansj、hanlp、smartcn、jieba、jcseg、mmseg4j和ikanalyzer,每种分词器有各自的模式取值; - rocksdb.data_path:backend 为 rocksdb 时此项才有意义,rocksdb 的数据目录,默认为
rocksdb-data/data - rocksdb.wal_path:backend 为 rocksdb 时此项才有意义,rocksdb 的日志目录,默认为
rocksdb-data/wal
5 多图配置
一个 Server 可以加载多个图,每个图使用单独的 properties 文件。下面创建 RocksDB 图 hugegraph_rocksdb 和内存图 hugegraph_memory。
[可选]:修改 rest-server.properties
通过修改 rest-server.properties 中的 graphs 配置项来设置图的配置文件目录。默认配置为 graphs=./conf/graphs;需要其他目录时调整 graphs。下面将 graph.load_from_local_config 设为 true,作为管理器构造阶段预加载和 reload() 重扫的可选设置;应用初始化仍会读取该目录中的本地图配置:
在 conf/graphs 路径下基于 hugegraph.properties 创建 hugegraph_memory.properties 和 hugegraph_rocksdb.properties。
hugegraph_memory.properties 修改如下:
hugegraph_rocksdb.properties 修改如下:
停止 Server,初始化执行 init-store.sh(为新的图创建数据库),重新启动 Server
查看创建的图:
查看某个图的信息:
4.2 - Server 完整配置手册
表格中的默认值指选项未在配置文件中显式设置时采用的源码默认值;发行包配置文件可能写入不同的值并覆盖它,实际运行值应以对应安装包的配置文件为准。
Gremlin Server 配置项
对应配置文件gremlin-server.yaml
| config option | default value | description |
|---|---|---|
| host | 127.0.0.1 | The host or ip of Gremlin Server. |
| port | 8182 | The listening port of Gremlin Server. |
| graphs | {} | 图由 Server 动态加载,不要在此处配置。 |
| evaluationTimeout | 30000 | Gremlin 脚本执行超时,单位为毫秒。 |
| channelizer | org.apache.tinkerpop.gremlin.server.channel.WsAndHttpChannelizer | 同时处理 WebSocket 和 HTTP 请求。 |
| maxContentLength | 65536 | Server 接受的单个请求的最大字节数。 |
| maxChunkSize | 8192 | HTTP 请求分块的最大字节数。 |
| maxHeaderSize | 8192 | HTTP 请求头的最大字节数。 |
| resultIterationBatchSize | 64 | 流式返回结果集时,每批返回的结果条数。 |
| ssl.enabled | false | Gremlin Server 是否启用 TLS。 |
| authentication | 未配置 | 启用认证时配置认证器、处理器和 rest-server.properties 路径。 |
Rest Server & API 配置项
对应配置文件rest-server.properties
| config option | default value | description |
|---|---|---|
| graphs | ./conf/graphs | 图配置 properties 文件所在目录。 |
| graph.load_from_local_config | false | 控制管理器构造阶段是否预加载本地图配置,以及 reload() 时是否重扫。应用初始化仍会扫描并尝试加载 graphs 目录,因此 false 不是阻止本地配置加载的安全开关。 |
| graphs.enable_dynamic_create_drop | true | Whether to enable create or drop graph dynamically. |
| init_store.enabled | true | Whether init-store initializes the local backend stores and the built-in admin account. Set false in distributed deployments (PD/HStore) where the storage side already owns the metadata. |
| server.id | 空字符串 | The optional legacy id of hugegraph-server. |
| server.role | master | The role of nodes in the cluster, available types are [master, worker, computer] |
| server.node_id | node-id1 | The node id of the server. |
| server.node_role | worker | The node role of the server. |
| server.graphspace | DEFAULT | The graph space of the server. |
| server.service_id | DEFAULT | The service id of the server. |
| server.path_graphspace | DEFAULT | The default path graph space of the server. |
| server.start_ignore_single_graph_error | true | Whether to start ignore single graph error. |
| server.event_hub_threads | 1 | The event hub threads of server. |
| restserver.url | http://127.0.0.1:8080 | The url for listening of graph server. |
| ssl.keystore_file | conf/hugegraph-server.keystore | The path of server keystore file used when https protocol is enabled. |
| ssl.keystore_password | hugegraph | The password of the server keystore file when the https protocol is enabled. |
| white_ip.status | disable | The status of whether enable white ip. |
| restserver.max_worker_threads | 2 * CPUs | The maximum worker threads of rest server. |
| restserver.task_threads | max(4, CPUs / 2) | The task threads of rest server. |
| restserver.min_free_memory | 64 | The minimum free memory(MB) of rest server, requests will be rejected when the available memory of system is lower than this value. |
| restserver.request_timeout | 30 | The time in seconds within which a request must complete, -1 means no timeout. |
| restserver.connection_idle_timeout | 30 | The time in seconds to keep an inactive connection alive, -1 means no timeout. |
| restserver.connection_max_requests | 256 | The max number of HTTP requests allowed to be processed on one keep-alive connection, -1 means unlimited. |
| gremlinserver.url | http://127.0.0.1:8182 | The url of gremlin server. |
| gremlinserver.max_route | 2 * CPUs | The max route number for gremlin server. |
| gremlinserver.timeout | 30 | The timeout in seconds of waiting for gremlin server. |
| batch.max_edges_per_batch | 2500 | The maximum number of edges submitted per batch. |
| batch.max_vertices_per_batch | 2500 | The maximum number of vertices submitted per batch. |
| batch.max_write_ratio | 70 | The maximum thread ratio for batch writing, only take effect if the batch.max_write_threads is 0. |
| batch.max_write_threads | 0 | The maximum threads for batch writing, if the value is 0, the actual value will be set to batch.max_write_ratio * restserver.max_worker_threads. |
| raft.group_peers | 127.0.0.1:8090 | The rpc address of raft group initial peers. |
| auth.authenticator | The class path of authenticator implementation. e.g., org.apache.hugegraph.auth.StandardAuthenticator, or a custom implementation. | |
| auth.graph_store | hugegraph | The name of graph used to store authentication information, like users, only for org.apache.hugegraph.auth.StandardAuthenticator. |
| auth.admin_pa | pa | Server 启动路径初始化内置 admin 账户时使用,默认值为公开的 pa,生产部署前必须显式设置强密码。本地持久化后端首次初始化由 init-store.sh 交互式读取密码。 |
| auth.remote_url | If the address is empty, it provide auth service, otherwise it is auth client and also provide auth service through rpc forwarding. The remote url can be set to multiple addresses, which are concat by ‘,’. | |
| exception.allow_trace | true | Whether to allow exception trace stack. |
| memory_monitor.threshold | 0.85 | Threshold for JVM memory usage monitoring, 1 means disabling the memory monitoring task. |
| memory_monitor.period | 2000 | The period in ms of JVM memory usage monitoring, in each period we will detect the jvm memory usage and take corresponding actions. |
| log.slow_query_threshold | 1000 | The threshold time(ms) of logging slow query, 0 means logging slow query is disabled. |
| log.slow_query_body_limit | 512 | 慢查询日志记录的请求体最大字节数,0 表示不记录。记录的前缀原样写入,可能包含敏感的 Gremlin 或 Cypher 字面量。 |
角色选举配置项 server.role_election 和 server.role.* 仅适用于 1.7.0 及更早版本。之后的版本不再读取这些配置项:若仍然设置,服务可以正常启动,并为每个配置项输出一条警告日志。
PD/Meta 配置项 (分布式模式)
对应配置文件rest-server.properties
| config option | default value | description |
|---|---|---|
| usePD | false | Whether use pd. |
| pd.peers | 127.0.0.1:8686 | The pd server peers, separated with commas. |
| cluster | hg-test | The cluster name. |
| pd.stores_wait_timeout | 300 | 等待 PD 中达到 pd.initial-store-count 的 Store 处于活跃状态的秒数,之后才打开 hstore 图;范围为 0..2147483647,0 表示不等待。 |
| metrics.data_to_pd | true | Whether to report metrics data to pd. |
| meta.endpoints | http://127.0.0.1:2379 | meta 端点的 URL。当前代码中没有任何地方读取该配置项,设置后不会生效;meta 连接由 pd.peers 建立。 |
| meta.use_ca | false | Whether to use ca to meta server. |
| meta.ca | The ca file of meta server. | |
| meta.client_ca | The client ca file of meta server. | |
| meta.client_key | The client key file of meta server. |
HStore 后端还会从图配置文件 {graph-name}.properties 中读取以下两项,默认值 0 表示由 PD 决定:
| config option | default value | description |
|---|---|---|
| hstore.partition_count | 0 | Number of partitions, which PD controls partitions based on. |
| hstore.shard_count | 0 | Number of copies, which PD controls partition copies based on. |
认证数据图配置项
以下选项写在 auth.graph_store 指定图的 properties 文件中,默认文件为 conf/graphs/hugegraph.properties。auth.authenticator、auth.graph_store、auth.admin_pa 和 auth.remote_url 则配置在上方的 rest-server.properties 表中。
| config option | default value | description |
|---|---|---|
| auth.audit_log_rate | 1000.0 | 每用户认证审计日志的最大输出速率,单位为条/秒,取非负数。运行时截断为整数:1.9 按 1 条/秒,0 或小于 1 的值会抑制审计日志;建议使用正整数。 |
| auth.cache_capacity | 10240 | 每个认证缓存的容量上限,取非负整数。 |
| auth.cache_expire | 600 | 认证客户端和服务端缓存的过期时间,单位为秒,取非负整数。 |
| auth.token_expire | 86400 | JWT token 的有效期,单位为秒,取非负整数。 |
| auth.token_secret | 32 个随机字节经 Base64 编码 | 认证数据图的配置项;默认密钥不写回文件。若需跨重启或跨节点验证 token,应在每个节点的认证图配置中设置同一个强随机值。HS256 密钥按 UTF-8 字节计至少 32 字节。 |
基本配置项
基本配置项及后端配置项对应配置文件:{graph-name}.properties,如hugegraph.properties
| config option | default value | description |
|---|---|---|
| gremlin.graph | org.apache.hugegraph.HugeFactory | Gremlin entrance to create graph. |
| backend | memory | The data store type. For version 1.7.0+ the allowed values are [memory, rocksdb, hstore, hbase]; the shipped conf/graphs/hugegraph.properties sets rocksdb and conf/graphs/hstore.properties.template sets hstore. Note: cassandra, scylladb, mysql, postgresql were removed in 1.7.0 (use <= 1.5.x for legacy backends). |
| serializer | text | The serializer for backend store, built-in values are [text, binary, binaryscatter]; a backend may register its own, like hbase. The shipped graph templates set binary. |
| serializer.buffer_max_capacity | 134217728 | The process-wide max capacity of one serialization buffer in bytes. |
| store | hugegraph | The backend database namespace. |
| store.connection_detect_interval | 600 | The interval in seconds for detecting connections, if the idle time of a connection exceeds this value, detect it and reconnect if needed before using, value 0 means detecting every time. |
| store.graph | g | The graph table name, which store vertex, edge and property. |
| graphspace | DEFAULT | The graph space name. |
| alias.graph.id | The graph alias id. | |
| graph.read_mode | OLTP_ONLY | The graph read mode, which could be ALL | OLTP_ONLY | OLAP_ONLY. |
| pd.peers | 127.0.0.1:8686 | The addresses of pd nodes, separated with commas. Only used by the hstore backend. |
| pd.cluster | hg | 图连接 PD 元数据时使用的集群名前缀,适用于 usePD=false;若 Server 以 usePD=true 启动,则优先使用 REST 配置中的 cluster。此值在进程内绑定一次。 |
| schema.illegal_name_regex | .\s+$|~. | The regex specified the illegal format for schema name. |
| schema.cache_capacity | 10000 | The max cache size(items) of schema cache. |
| schema.init_template | The template schema used to init graph. | |
| schema.index_rebuild_using_pushdown | true | Whether to use pushdown when to create/rebuild index. |
| vertex.cache_type | l2 | The type of vertex cache, allowed values are [l1, l2]. |
| vertex.cache_capacity | 10000000 | The max cache size(items) of vertex cache. |
| vertex.cache_expire | 600 | The expiration time in seconds of vertex cache. |
| vertex.check_customized_id_exist | false | Whether to check the vertices exist for those using customized id strategy. |
| vertex.default_label | vertex | The default vertex label. |
| vertex.tx_capacity | 10000 | The max size(items) of vertices(uncommitted) in transaction. |
| vertex.check_adjacent_vertex_exist | false | Whether to check the adjacent vertices of edges exist. |
| vertex.lazy_load_adjacent_vertex | true | Whether to lazy load adjacent vertices of edges. |
| vertex.part_edge_commit_size | 5000 | Whether to enable the mode to commit part of edges of vertex, enabled if commit size > 0, 0 means disabled. |
| vertex.encode_primary_key_number | true | Whether to encode number value of primary key in vertex id. |
| vertex.remove_left_index_at_overwrite | false | Whether remove left index at overwrite. |
| edge.cache_type | l2 | The type of edge cache, allowed values are [l1, l2]. |
| edge.cache_capacity | 1000000 | The max cache size(items) of edge cache. |
| edge.cache_expire | 600 | The expiration time in seconds of edge cache. |
| edge.tx_capacity | 10000 | The max size(items) of edges(uncommitted) in transaction. |
| query.page_size | 500 | The size of each page when querying by paging. |
| query.batch_size | 1000 | The size of each batch when querying by batch. |
| query.ignore_invalid_data | true | Whether to ignore invalid data of vertex or edge. |
| query.index_intersect_threshold | 1000 | The maximum number of intermediate results to intersect indexes when querying by multiple single index properties. |
| query.max_indexes_available | 1 | The upper limit of the number of indexes that can be used to query. |
| query.dedup_option | limit | The way to dedup data, allowed values are [limit, global]. |
| query.trust_index | false | Whether to trust index. |
| query.ramtable_edges_capacity | 20000000 | The maximum number of edges in ramtable, include OUT and IN edges. |
| query.ramtable_enable | false | Whether to enable ramtable for query of adjacent edges. |
| query.ramtable_vertices_capacity | 10000000 | The maximum number of vertices in ramtable, generally the largest vertex id is used as capacity. |
| query.optimize_aggregate_by_index | false | Whether to optimize aggregate query(like count) by index. |
| oltp.concurrent_depth | 10 | The min depth to enable concurrent oltp algorithm. |
| oltp.concurrent_threads | max(10, CPUs / 2) | Thread number to concurrently execute oltp algorithm. |
| oltp.collection_type | EC | The implementation type of collections used in oltp algorithm, allowed values are [JCF, EC, FU]. |
| oltp.query_batch_size | 10000 | The size of each batch when executing oltp algorithm. |
| oltp.query_batch_avg_degree_ratio | 0.95 | The ratio of exponential approximation for average degree of iterator when executing oltp algorithm. |
| oltp.query_batch_expect_degree | 100000000 | The expect sum of degree in each batch when executing oltp algorithm. |
| rate_limit.read | 0 | The max rate(times/s) to execute query of vertices/edges. |
| rate_limit.write | 0 | The max rate(items/s) to add/update/delete vertices/edges. |
| task.schedule_period | 10 | Period time in seconds when scheduler to schedule task. |
| task.wait_timeout | 10 | Timeout in seconds for waiting for the task to complete, such as when truncating or clearing the backend. |
| task.retry | 0 | Task retry times, allowed range is [0, 3]. |
| task.input_size_limit | 16777216 | The job input size limit in bytes. |
| task.result_size_limit | 16777216 | The job result size limit in bytes. |
| task.sync_deletion | false | Whether to delete schema or expired data synchronously. |
| task.ttl_delete_batch | 1 | The batch size used to delete expired data. |
| computer.config | ./conf/computer.yaml | The config file path of computer job. |
| k8s.operator_template | ./conf/operator-template.yaml | The path of operator container template. |
| k8s.quota_template | ./conf/resource-quota-template.yaml | The path of resource quota template. |
| search.text_analyzer | ikanalyzer | Choose a text analyzer for searching the vertex/edge properties, available type are [ansj, hanlp, smartcn, jieba, jcseg, mmseg4j, ikanalyzer]. The shipped graph templates set jieba. If use ‘ikanalyzer’, need download jar from ‘https://github.com/apache/hugegraph-doc/raw/ik_binary/dist/server/ikanalyzer-2012_u6.jar' to lib directory |
| search.text_analyzer_mode | smart | Specify the mode for the text analyzer, the available mode of analyzer are {ansj: [BaseAnalysis, IndexAnalysis, ToAnalysis, NlpAnalysis], hanlp: [standard, nlp, index, nShort, shortest, speed], smartcn: [], jieba: [SEARCH, INDEX], jcseg: [Simple, Complex], mmseg4j: [Simple, Complex, MaxWord], ikanalyzer: [smart, max_word]}. |
| snowflake.datacenter_id | 0 | The datacenter id of snowflake id generator. |
| snowflake.force_string | false | Whether to force the snowflake long id to be a string. |
| snowflake.worker_id | 0 | The worker id of snowflake id generator. |
| memory.mode | off-heap | The memory mode used for query in HugeGraph. |
| memory.max_capacity | 1073741824 | The maximum memory capacity in bytes that can be managed for all queries in HugeGraph. |
| memory.one_query_max_capacity | 104857600 | The maximum memory capacity in bytes that can be managed for a query in HugeGraph. |
| memory.alignment | 8 | The alignment used for round memory size. |
发行包中的图配置模板已将这些配置项标注为废弃。它们仅在 raft.mode=true 时生效,且 raft.group_peers 从 rest-server.properties 读取,而不是图配置文件。
| config option | default value | description |
|---|---|---|
| raft.mode | false | Whether the backend storage works in raft mode. |
| raft.safe_read | false | Whether to use linearly consistent read. |
| raft.path | ./raftlog | The log path of current raft node. |
| raft.use_replicator_pipeline | true | Whether to use replicator line, when turned on it multiple logs can be sent in parallel, and the next log doesn’t have to wait for the ack message of the current log to be sent. |
| raft.election_timeout | 10000 | Timeout in milliseconds to launch a round of election. |
| raft.snapshot_interval | 3600 | The interval in seconds to trigger snapshot save. |
| raft.snapshot_threads | 4 | The thread number used to do snapshot. |
| raft.snapshot_parallel_compress | false | Whether to enable parallel compress. |
| raft.snapshot_compress_threads | 4 | The thread number used to do snapshot compress. |
| raft.snapshot_decompress_threads | 4 | The thread number used to do snapshot decompress. |
| raft.backend_threads | CPUs | The thread number used to apply task to backend. |
| raft.read_index_threads | 8 | The thread number used to execute reading index. |
| raft.read_strategy | ReadOnlyLeaseBased | The linearizability of read strategy, allowed values are [ReadOnlyLeaseBased, ReadOnlySafe]. |
| raft.apply_batch | 1 | The apply batch size to trigger disruptor event handler. |
| raft.queue_size | 16384 | The disruptor buffers size for jraft RaftNode, StateMachine and LogManager. |
| raft.queue_publish_timeout | 60 | The timeout in second when publish event into disruptor. |
| raft.rpc_threads | max(CPUs * 2, 80) | The rpc threads for jraft RPC layer. |
| raft.rpc_connect_timeout | 5000 | The rpc connect timeout in milliseconds for jraft rpc. |
| raft.rpc_timeout | 60 | The general rpc timeout in seconds for jraft rpc. |
| raft.install_snapshot_rpc_timeout | 36000 | The install snapshot rpc timeout in seconds for jraft rpc. |
| raft.rpc_buf_low_water_mark | 10485760 | The ChannelOutboundBuffer’s low water mark of netty, when buffer size less than this size, the method ChannelOutboundBuffer.isWritable() will return true, it means that low downstream pressure or good network. |
| raft.rpc_buf_high_water_mark | 20971520 | The ChannelOutboundBuffer’s high water mark of netty, only when buffer size exceed this size, the method ChannelOutboundBuffer.isWritable() will return false, it means that the downstream pressure is too great to process the request or network is very congestion, upstream needs to limit rate at this time. |
RocksDB 后端配置项
| config option | default value | description |
|---|---|---|
| backend | Must be set to rocksdb. | |
| serializer | Must be set to binary. | |
| rocksdb.data_path | rocksdb-data/data | The path for storing data of RocksDB. |
| rocksdb.wal_path | rocksdb-data/wal | The path for storing WAL of RocksDB. |
| rocksdb.sst_path | The path for ingesting SST file into RocksDB. | |
| rocksdb.data_disks | [] | The optimized disks for storing data of RocksDB. The format of each element: STORE/TABLE: /path/disk.Allowed keys are [g/vertex, g/edge_out, g/edge_in, g/vertex_label_index, g/edge_label_index, g/range_int_index, g/range_float_index, g/range_long_index, g/range_double_index, g/secondary_index, g/search_index, g/shard_index, g/unique_index, g/olap] |
| rocksdb.log_level | INFO | The info log level of RocksDB. |
| rocksdb.num_levels | 7 | Set the number of levels for this database. |
| rocksdb.compaction_style | LEVEL | Set compaction style for RocksDB: LEVEL/UNIVERSAL/FIFO. |
| rocksdb.optimize_mode | true | Optimize for heavy workloads and big datasets. |
| rocksdb.bulkload_mode | false | Switch to the mode to bulk load data into RocksDB. |
| rocksdb.compression_per_level | [none, none, snappy, snappy, snappy, snappy, snappy] | The compression algorithms for different levels of RocksDB, allowed values are none/snappy/z/bzip2/lz4/lz4hc/xpress/zstd. |
| rocksdb.bottommost_compression | none | The compression algorithm for the bottommost level of RocksDB, allowed values are none/snappy/z/bzip2/lz4/lz4hc/xpress/zstd. |
| rocksdb.compression | snappy | The compression algorithm for compressing blocks of RocksDB, allowed values are none/snappy/z/bzip2/lz4/lz4hc/xpress/zstd. |
| rocksdb.max_background_jobs | 8 | Maximum number of concurrent background jobs, including flushes and compactions. |
| rocksdb.max_subcompactions | 4 | The value represents the maximum number of threads per compaction job. |
| rocksdb.delayed_write_rate | 16777216 | The rate limit in bytes/s of user write requests when need to slow down if the compaction gets behind. |
| rocksdb.max_open_files | -1 | The maximum number of open files that can be cached by RocksDB, -1 means no limit. |
| rocksdb.max_manifest_file_size | 104857600 | The max size of manifest file in bytes. |
| rocksdb.skip_stats_update_on_db_open | false | Whether to skip statistics update when opening the database, setting this flag true allows us to not update statistics. |
| rocksdb.skip_check_sst_size_on_db_open | false | Whether to skip checking sizes of all sst files when opening the database. |
| rocksdb.max_file_opening_threads | 16 | The max number of threads used to open files. |
| rocksdb.max_total_wal_size | 0 | Total size of WAL files in bytes. Once WALs exceed this size, we will start forcing the flush of column families related, 0 means no limit. |
| rocksdb.bytes_per_sync | 0 | Allows OS to incrementally sync SST files to disk while they are being written, asynchronously in the background. Issue one request for every bytes_per_sync written. 0 turns it off. |
| rocksdb.wal_bytes_per_sync | 0 | Allows OS to incrementally sync WAL files to disk while they are being written, asynchronously in the background. Issue one request for every bytes_per_sync written. 0 turns it off. |
| rocksdb.strict_bytes_per_sync | false | When true, guarantees SST/WAL files have at most bytes_per_sync/wal_bytes_per_sync bytes submitted for writeback at any given time. This can be used to handle cases where processing speed exceeds I/O speed. |
| rocksdb.db_write_buffer_size | 0 | Total size of write buffers in bytes across all column families, 0 means no limit. |
| rocksdb.log_readahead_size | 0 | The number of bytes to prefetch when reading the log. 0 means the prefetching is disabled. |
| rocksdb.compaction_readahead_size | 0 | The number of bytes to perform bigger reads when doing compaction. If running RocksDB on spinning disks, you should set this to at least 2MB. 0 means the prefetching is disabled. |
| rocksdb.row_cache_capacity | 0 | The capacity in bytes of global cache for table-level rows. 0 means the row_cache is disabled. |
| rocksdb.delete_obsolete_files_period | 21600 | The periodicity in seconds when obsolete files get deleted, 0 means always do full purge. |
| rocksdb.write_buffer_size | 134217728 | Amount of data in bytes to build up in memory. |
| rocksdb.max_write_buffer_number | 6 | The maximum number of write buffers that are built up in memory. |
| rocksdb.min_write_buffer_number_to_merge | 2 | The minimum number of write buffers that will be merged together. |
| rocksdb.max_write_buffer_number_to_maintain | 0 | The total maximum number of write buffers to maintain in memory for conflict checking when transactions are used. |
| rocksdb.memtable_bloom_size_ratio | 0.0 | If prefix-extractor is set and memtable_bloom_size_ratio is not 0, or if memtable_whole_key_filtering is set true, create bloom filter for memtable with the size of write_buffer_size * memtable_bloom_size_ratio. If it is larger than 0.25, it is santinized to 0.25. |
| rocksdb.memtable_whole_key_filtering | false | Enable whole key bloom filter in memtable, it can potentially reduce CPU usage for point-look-ups. Note this will only take effect if memtable_bloom_size_ratio > 0. |
| rocksdb.memtable_huge_page_size | 0 | The page size for huge page TLB for bloom in memtable. If <= 0, not allocate from huge page TLB but from malloc. |
| rocksdb.inplace_update_support | false | Allows thread-safe inplace updates if a put key exists in current memtable and sizeof new value is smaller. |
| rocksdb.level_compaction_dynamic_level_bytes | false | Whether to enable level_compaction_dynamic_level_bytes, if it’s enabled we give max_bytes_for_level_multiplier a priority against max_bytes_for_level_base, the bytes of base level is dynamic for a more predictable LSM tree, it is useful to limit worse case space amplification. Turning this feature on/off for an existing DB can cause unexpected LSM tree structure so it’s not recommended. |
| rocksdb.max_bytes_for_level_base | 536870912 | The upper-bound of the total size of level-1 files in bytes. |
| rocksdb.max_bytes_for_level_multiplier | 10.0 | The ratio between the total size of level (L+1) files and the total size of level L files for all L. |
| rocksdb.target_file_size_base | 67108864 | The target file size for compaction in bytes. |
| rocksdb.target_file_size_multiplier | 1 | The size ratio between a level L file and a level (L+1) file. |
| rocksdb.level0_file_num_compaction_trigger | 2 | Number of files to trigger level-0 compaction. |
| rocksdb.level0_slowdown_writes_trigger | 20 | Soft limit on number of level-0 files for slowing down writes. |
| rocksdb.level0_stop_writes_trigger | 36 | Hard limit on number of level-0 files for stopping writes. |
| rocksdb.soft_pending_compaction_bytes_limit | 68719476736 | The soft limit to impose on pending compaction in bytes. |
| rocksdb.hard_pending_compaction_bytes_limit | 274877906944 | The hard limit to impose on pending compaction in bytes. |
| rocksdb.allow_mmap_writes | false | Allow the OS to mmap file for writing. |
| rocksdb.allow_mmap_reads | false | Allow the OS to mmap file for reading sst tables. |
| rocksdb.use_direct_reads | false | Enable the OS to use direct I/O for reading sst tables. |
| rocksdb.use_direct_io_for_flush_and_compaction | false | Enable the OS to use direct read/writes in flush and compaction. |
| rocksdb.use_fsync | false | If true, then every store to stable storage will issue a fsync. |
| rocksdb.atomic_flush | false | If true, flushing multiple column families and committing their results atomically to MANIFEST. Note that it’s not necessary to set atomic_flush=true if WAL is always enabled. |
| rocksdb.format_version | 5 | The format version of BlockBasedTable, allowed values are 0~5. |
| rocksdb.index_type | kBinarySearch | The index type used to lookup between data blocks with the sst table, allowed values are [kBinarySearch,kHashSearch,kTwoLevelIndexSearch,kBinarySearchWithFirstKey]. |
| rocksdb.data_block_index_type | kDataBlockBinarySearch | The search type used to point lookup in data block with the sst table, allowed values are [kDataBlockBinarySearch,kDataBlockBinaryAndHash]. |
| rocksdb.data_block_hash_table_util_ratio | 0.75 | The hash table utilization ratio value of entries/buckets. It is valid only when data_block_index_type=kDataBlockBinaryAndHash. |
| rocksdb.block_size | 4096 | Approximate size of user data packed per block, Note that it corresponds to uncompressed data. |
| rocksdb.block_size_deviation | 10 | The percentage of free space used to close a block. |
| rocksdb.block_restart_interval | 16 | The block restart interval for delta encoding in blocks. |
| rocksdb.block_cache_capacity | 8388608 | The amount of block cache in bytes that will be used by RocksDB, 0 means no block cache. |
| rocksdb.cache_index_and_filter_blocks | true | Set this option true if we’d put index/filter blocks to the block cache. |
| rocksdb.pin_l0_filter_and_index_blocks_in_cache | true | Set this option true if we’d pin L0 index/filter blocks to the block cache. |
| rocksdb.bloom_filter_bits_per_key | -1 | The bits per key in bloom filter, a good value is 10, which yields a filter with ~ 1% false positive rate. Set bloom_filter_bits_per_key > 0 to enable bloom filter, -1 means no bloom filter (0~0.5 round down to no filter). |
| rocksdb.bloom_filter_block_based_mode | false | If bloom filter is enabled, set this option true to use block based filter rather than full filter. |
| rocksdb.bloom_filter_whole_key_filtering | true | If bloom filter is enabled, set this option true to place whole keys in the bloom filter, else place the prefix of keys when prefix-extractor is set. |
| rocksdb.optimize_filters_for_hits | true | If bloom filter is enabled, this flag allows us to not store filters for the last level. set this option true to optimize the filters mainly for cases where keys are found rather than also optimize for keys missed. |
| rocksdb.partition_filters_and_indexes | false | If bloom filter is enabled, set this option true to use partitioned full filters and indexes for each sst file. This option is incompatible with block-based filters. |
| rocksdb.pin_top_level_index_and_filter | true | If partition_filters_and_indexes is set true, set this option true if we’d pin top-level index of partitioned filter and index blocks to the block cache. |
| rocksdb.prefix_extractor_n_bytes | 0 | The prefix-extractor uses the first N bytes of a key as its prefix, it will use the full key when a key is shorter than the N. 0 means unset prefix-extractor. |
对应配置文件rest-server.properties
| config option | default value | description |
|---|---|---|
| server.use_k8s | false | Whether to use k8s to support multiple tenancy. |
| server.deploy_in_k8s | false | Whether to deploy server in k8s. |
| server.urls_to_pd | http://0.0.0.0:8080 | Used as the server address reserved for PD and provided to clients, only used when starting the server in k8s. |
| server.k8s_url | https://127.0.0.1:8888 | The url of k8s. |
| server.k8s_use_ca | false | Whether to use ca to k8s api server. |
| server.k8s_ca | The ca file of k8s api server. | |
| server.k8s_client_ca | The client ca file of k8s api server. | |
| server.k8s_client_key | The client key file of k8s api server. | |
| k8s.api | false | The k8s api start status when the computer service is enabled. |
| k8s.namespace | hugegraph-computer-system | The namespace used for k8s work when the computer service is enabled. |
| k8s.kubeconfig | The k8s kube config file when the computer service is enabled. | |
| k8s.hugegraph_url | The hugegraph url for k8s work when the computer service is enabled. | |
| k8s.enable_internal_algorithm | true | Whether to open k8s internal algorithm. |
| service.access_pd_name | hg | Service name for server to access pd service. |
| service.access_pd_token | Service token for server to access pd service. | |
| server.k8s_oltp_image | 127.0.0.1/kgs_bd/hugegraphserver:3.0.0 | The oltp server image of k8s. |
| server.k8s_olap_image | hugegraph/hugegraph-server:v1 | The olap server image of k8s. |
| server.k8s_storage_image | hugegraph/hugegraph-server:v1 | The storage server image of k8s. |
| server.default_oltp_k8s_namespace | hugegraph-server | The default oltp namespace for HugeGraph default graph space. |
| server.default_olap_k8s_namespace | hugegraph-computer-system | The default olap namespace for HugeGraph default graph space. |
| k8s.internal_algorithm | [page-rank, degree-centrality, wcc, triangle-count, rings, rings-with-filter, betweenness-centrality, closeness-centrality, lpa, links, kcore, louvain, clustering-coefficient, ppr, subgraph-match] | The names of the built-in k8s algorithms. |
| k8s.algorithms | See ServerOptions.K8S_ALGORITHMS | The name:paramsClass mapping of the built-in k8s algorithms. |
| k8s.internal_algorithm_image_url | 空 | K8s 内置算法使用的镜像地址。 |
对应配置文件rest-server.properties
| config option | default value | description |
|---|---|---|
| arthas.telnetPort | 8562 | Arthas telnet port. |
| arthas.httpPort | 8561 | Arthas HTTP port. |
| arthas.ip | 0.0.0.0 | Arthas bind IP. |
| arthas.disabledCommands | jad | Disabled Arthas commands, separated by commas. |
对应配置文件rest-server.properties
| config option | default value | description |
|---|---|---|
| rpc.server_host | The hosts/ips bound by rpc server to provide services, empty value means not enabled. | |
| rpc.server_port | 8090 | The port bound by rpc server to provide services. |
| rpc.server_adaptive_port | false | Whether the bound port is adaptive, if it’s enabled, when the port is in use, automatically +1 to detect the next available port. Note that this process is not atomic, so there may still be port conflicts. |
| rpc.server_timeout | 30 | The timeout(in seconds) of rpc server execution. |
| rpc.remote_url | The remote urls of rpc peers, it can be set to multiple addresses, which are concat by ‘,’, empty value means not enabled. | |
| rpc.client_connect_timeout | 20 | The timeout(in seconds) of rpc client connect to rpc server. |
| rpc.client_reconnect_period | 10 | The period(in seconds) of rpc client reconnect to rpc server. |
| rpc.client_read_timeout | 40 | The timeout(in seconds) of rpc client read from rpc server. |
| rpc.client_retries | 3 | Failed retry number of rpc client calls to rpc server. |
| rpc.client_load_balancer | consistentHash | The rpc client uses a load-balancing algorithm to access multiple rpc servers in one cluster. Default value is ‘consistentHash’, means forwarding by request parameters. |
| rpc.protocol | bolt | Rpc communication protocol, client and server need to be specified the same value. |
| rpc.serialization | hessian2 | Rpc serialization type, client and server must set the same value. Note: If you choose ‘protobuf’, you need to add the relative IDL file. (Could refer PD/Store *.proto) |
| rpc.config_order | 999 | Sofa-RPC configuration file loading order, the larger the more later loading. |
| rpc.logger_impl | com.alipay.sofa.rpc.log.SLF4JLoggerImpl | Sofa-RPC log implementation class. |
| config option | default value | description |
|---|---|---|
| backend | Must be set to hbase. | |
| serializer | Must be set to hbase. | |
| hbase.hosts | localhost | The hostnames or ip addresses of HBase zookeeper, separated with commas. |
| hbase.port | 2181 | The port address of HBase zookeeper. |
| hbase.threads_max | 64 | The max threads num of hbase connections. |
| hbase.znode_parent | /hbase | The znode parent path of HBase zookeeper. |
| hbase.zk_retry | 3 | The recovery retry times of HBase zookeeper. |
| hbase.truncate_timeout | 30 | The timeout in seconds of waiting for store truncate. |
| hbase.aggregation_timeout | 43200 | The timeout in seconds of waiting for aggregation. |
| hbase.kerberos_enable | false | Is Kerberos authentication enabled for HBase. |
| hbase.kerberos_keytab | The HBase’s key tab file for kerberos authentication. | |
| hbase.kerberos_principal | The HBase’s principal for kerberos authentication. | |
| hbase.krb5_conf | /etc/krb5.conf | Kerberos configuration file, including KDC IP, default realm, etc. |
| hbase.hbase_site | /etc/hbase/conf/hbase-site.xml | The HBase’s configuration file |
| hbase.enable_partition | true | Is pre-split partitions enabled for HBase. |
| hbase.vertex_partitions | 10 | The number of partitions of the HBase vertex table. |
| hbase.edge_partitions | 30 | The number of partitions of the HBase edge table. |
≤ 1.5 版本配置 (Legacy)
以下后端存储在 1.7.0+ 版本中不再支持,仅在 1.5.x 及更早版本中可用:
| config option | default value | description |
|---|---|---|
| backend | Must be set to cassandra. | |
| serializer | Must be set to cassandra. | |
| cassandra.host | localhost | The seeds hostname or ip address of cassandra cluster. |
| cassandra.port | 9042 | The seeds port address of cassandra cluster. |
| cassandra.connect_timeout | 5 | The cassandra driver connect server timeout(seconds). |
| cassandra.read_timeout | 20 | The cassandra driver read from server timeout(seconds). |
| cassandra.keyspace.strategy | SimpleStrategy | The replication strategy of keyspace, valid value is SimpleStrategy or NetworkTopologyStrategy. |
| cassandra.keyspace.replication | [3] | The keyspace replication factor of SimpleStrategy, like ‘[3]’.Or replicas in each datacenter of NetworkTopologyStrategy, like ‘[dc1:2,dc2:1]’. |
| cassandra.username | The username to use to login to cassandra cluster. | |
| cassandra.password | The password corresponding to cassandra.username. | |
| cassandra.compression_type | none | The compression algorithm of cassandra transport: none/snappy/lz4. |
| cassandra.jmx_port=7199 | 7199 | The port of JMX API service for cassandra. |
| cassandra.aggregation_timeout | 43200 | The timeout in seconds of waiting for aggregation. |
| config option | default value | description |
|---|---|---|
| backend | Must be set to scylladb. | |
| serializer | Must be set to scylladb. |
其它与 Cassandra 后端一致。
| config option | default value | description |
|---|---|---|
| backend | Must be set to mysql. | |
| serializer | Must be set to mysql. | |
| jdbc.driver | com.mysql.jdbc.Driver | The JDBC driver class to connect database. |
| jdbc.url | jdbc:mysql://127.0.0.1:3306 | The url of database in JDBC format. |
| jdbc.username | root | The username to login database. |
| jdbc.password | ****** | The password corresponding to jdbc.username. |
| jdbc.ssl_mode | false | The SSL mode of connections with database. |
| jdbc.reconnect_interval | 3 | The interval(seconds) between reconnections when the database connection fails. |
| jdbc.reconnect_max_times | 3 | The reconnect times when the database connection fails. |
| jdbc.storage_engine | InnoDB | The storage engine of backend store database, like InnoDB/MyISAM/RocksDB for MySQL. |
| jdbc.postgresql.connect_database | template1 | The database used to connect when init store, drop store or check store exist. |
| config option | default value | description |
|---|---|---|
| backend | Must be set to postgresql. | |
| serializer | Must be set to postgresql. |
其它与 MySQL 后端一致。
PostgreSQL 后端的 driver 和 url 应该设置为:
jdbc.driver=org.postgresql.Driverjdbc.url=jdbc:postgresql://localhost:5432/
4.3 - HugeGraph 内置用户权限与扩展权限配置及使用
概述
HugeGraph 内置 StandardAuthenticator,支持多用户认证和基于“用户、用户组、操作、资源”的权限控制。
StandardAuthenticator 模式的几个核心设计:
- 初始化时创建超级管理员 (
admin) 用户,后续通过超级管理员创建其它用户,新创建的用户被分配足够权限后,可以创建或管理更多的用户 - 支持动态创建用户、用户组、资源,支持动态分配或取消权限
- 用户可以属于一个或多个用户组,每个用户组可以拥有对任意个资源的操作权限,操作类型包括:读、写、删除、执行等种类
- “资源” 描述了图数据库中的数据,比如符合某一类条件的顶点,每一个资源包括
type、label、properties三个要素,共有 18 种类型、任意 label、任意 properties 可组合形成的资源,一个资源的内部条件是且关系,多个资源之间的条件是或关系
举例说明:
配置用户认证
HugeGraph 目前默认未启用用户认证功能,需通过修改配置文件来启用该功能。
生产环境必须启用鉴权
HugeGraph 默认不启用用户认证。生产环境必须启用认证与授权、设置非默认强管理员密码、启用并维护 Server IP 白名单,并按最小权限为用户授权;不得将 Gremlin、Cypher 等查询接口直接暴露到公网。Server 标准配置会将鉴权代理记录写入 audit-*.log,部署时必须保留并限制这些日志的读取权限。auth.audit_log_rate 只限制每用户的日志输出速率,不是审计日志的启停开关。
StandardAuthenticator 支持多用户认证和细粒度权限控制。也可以实现 HugeAuthenticator 接口来接入已有的用户系统。
用户认证使用 HTTP Basic Authentication。Basic 后面的值是 用户名:密码 的 Base64 编码。使用 curl 时可直接通过 -u 传入凭据:
保护 Basic Authentication 凭据
Basic Authentication 只对 用户名:密码 做 Base64 编码,不会加密凭据。通过网络发送时必须使用 HTTPS;相关设置见 HTTPS 配置。
旧版本 JWT 风险
HugeGraph-Server 1.5.0 之前的版本在鉴权模式下存在 JWT 相关安全隐患。使用受影响版本时必须升级,或按该版本要求修改 JWT token 的 secretKey。
auth.token_secret 由认证数据图的配置读取。默认认证图名为 hugegraph,因此配置文件通常是 conf/graphs/hugegraph.properties;如果修改了 auth.graph_store,应改为对应图的 properties 文件。
源码默认会生成 32 个随机字节并以 Base64 编码,但该值不会写回配置文件;重启后或多个 Server 节点之间无法依赖各自生成的默认值保持一致。若需要令已有 token 在重启后继续有效,或让多个节点验证同一 token,请为认证图显式配置同一个强随机密钥:
Server 将配置字符串按 UTF-8 编码后交给 JJWT 的 HS256 签名器,密钥至少需要 32 字节;这是字节长度要求,不代表任意 32 字符串都具有足够随机性。下面的命令在本机生成 32 个随机字节并以 Base64 编码。
可在本机终端生成密钥,再通过安全方式填入认证图配置;不要把实际密钥提交到代码库或公开日志:
由于默认值在每次启动时随机生成,当 token 需要在重启后继续有效、或者需要被多个服务节点接受时,必须显式配置该项。token 的有效期由 auth.token_expire 决定,默认为 86400 秒。
auth.token_expire 和 auth.token_secret 都属于 auth.graph_store 指定的认证数据图配置;rest-server.properties 中的同名项不会覆盖认证图配置。
StandardAuthenticator 模式
StandardAuthenticator模式是通过在数据库后端存储用户信息来支持用户认证和权限控制,该实现基于数据库存储的用户的名称与密码进行认证(密码已被加密),基于用户的角色来细粒度控制用户权限。下面是具体的配置流程(重启服务生效):
在配置文件gremlin-server.yaml中配置authenticator及其rest-server文件路径:
在 rest-server.properties 中配置认证器和权限数据存储图:
其中,graph_store配置项是指使用哪一个图来存储用户信息,如果存在多个图的话,选取任意一个均可。
在配置文件hugegraph{n}.properties中配置gremlin.graph信息:
权限 API 的调用方式见 Authentication API 文档。
自定义用户认证系统
如果需要支持更加灵活的用户系统,可自定义 authenticator 进行扩展,自定义 authenticator 实现接口org.apache.hugegraph.auth.HugeAuthenticator即可,然后修改配置文件中authenticator配置项指向该实现。
基于鉴权模式启动
首次执行 init-store.sh 时,如果尚未创建 admin 用户,命令会要求输入管理员密码。对于已经初始化的持久化后端,init-store.sh 会补充认证所需的系统信息,无需删除原有图数据。
使用 Docker 时开启鉴权模式
对于镜像 hugegraph/hugegraph 大于等于 1.2.0 的版本,我们可以在启动 docker 镜像的同时开启鉴权模式
具体做法如下:
1. 采用 docker run
在 docker run 中添加环境变量 PASSWORD=xxx(密码可以自由设置)即可开启鉴权模式::
2. 采用 docker-compose
使用 docker-compose 在环境变量中设置 PASSWORD=xxx即可
3. 进入容器后重新开启鉴权模式
首先进入容器:
之后参照 基于鉴权模式启动 即可
4.4 - 配置 HugeGraphServer 使用 https 协议
概述
HugeGraphServer 默认使用的是 http 协议,可以配置成 https。
HTTPS 不替代服务端鉴权与访问控制
HTTPS 保护传输链路,但不限制调用者权限。生产环境必须使用 HTTPS,并按 Server 认证与授权配置启用 Server Auth、IP 白名单和最小权限授权,同时保留、保护 Server audit-*.log。若由反向代理终结 TLS,还必须限制到 Server 后端端口的网络访问。
生产环境使用专用服务端证书
若启动时找不到 conf/hugegraph-server.keystore,脚本会下载共享的演示 keystore,其密码为公开值 hugegraph。生产环境必须使用专用证书和 keystore 密码,并限制私钥文件的读取权限。
服务端配置
修改 conf/rest-server.properties 配置文件,将 restserver.url 的 schema 部分改为 https。
由于 keystore 文件没有声明许可证,发行包中并不包含它。当 restserver.url 以 https 开头而 conf/hugegraph-server.keystore
不存在时,bin/start-hugegraph.sh 会在启动前从 hugegraph-doc 仓库的 binary-1.5 分支下载该文件,其密码为 hugegraph。
这两项都是 ssl.keystore_file 和 ssl.keystore_password 的默认值,用户可以生成自己的 keystore 文件及密码,然后修改这两个配置项。
客户端配置
在 HugeGraph-Client 中使用 https
在构造 HugeClient 时传入 https 相关的配置,代码示例:
注意:HugeGraph-Client 在 1.9.0 版本以前是直接以 new 的方式创建,并且不支持 https 协议,在 1.9.0 版本以后改成以 builder 的方式创建,并支持配置 https 协议。
在 HugeGraph-Loader 中使用 https
启动导入任务时,在命令行中添加如下选项:
hugegraph-loader 的 conf 目录下已经放了一个默认的客户端证书文件 hugegraph.truststore,其密码是 hugegraph。
在 HugeGraph-Tools 中使用 https
执行命令时,在命令行中添加如下选项:
hugegraph-tools 的 conf 目录下已经放了一个默认的客户端证书文件 hugegraph.truststore,其密码是 hugegraph。
如何生成证书文件
本部分给出生成证书的示例,如果默认的证书已经够用,或者已经知晓如何生成,可跳过。
服务端
- ⽣成服务端私钥,并且导⼊到服务端 keystore ⽂件中,server.keystore 是给服务端⽤的,其中保存着⾃⼰的私钥
过程中根据需求填写描述信息,默认证书的描述信息如下:
- 根据服务端私钥,导出服务端证书
server.crt 就是服务端的证书
客户端
client.truststore 是给客户端⽤的,其中保存着受信任的证书
4.5 - 配置 RocksDB 后端
概述
RocksDB 是一个嵌入式的 LSM-tree 键值存储。使用 rocksdb 后端时,HugeGraph-Server 把全部图数据保存在
服务进程内部的 RocksDB 实例中,不需要额外部署存储服务。发布包中的 conf/graphs/hugegraph.properties
默认使用的就是这个后端。
从 1.7.0 版本开始,服务端只接受 memory、rocksdb、hbase 和 hstore 作为后端。rocksdb 后端把
数据写在单台服务器的本地磁盘上,不支持共享存储,因此多个服务无法基于同一个数据目录提供同一个图。
分布式部署请使用 hstore 后端,配合 PD 与 Store。
RocksDB 的 JNI 依赖在 hugegraph-rocksdb/pom.xml 中固定为 8.10.2 版本,因此磁盘格式与各配置项的
语义都以 RocksDB 8.10 为准。
该后端上报的驱动版本是 1.11,在初始化图时会写入 system store 的 meta 表中。
选择后端
在图配置文件(conf/graphs/<graph>.properties)中设置后端与序列化器:
backend=rocksdb选择 RocksDB 存储实现。serializer=binary是发布包模板为该后端使用的序列化器。内置的序列化器为binary、binaryscatter和text。store是该图在后端中的库名,同时也是存储实现拿到的图名的一部分。
首次启动前执行一次 bin/init-store.sh 创建各个 store,然后再启动服务。bin/init-store.sh 与
bin/hugegraph-server.sh 都会加载 RocksDB 库,数据目录在执行这些脚本的机器上创建。
发布包会为打包时 backend.properties 中列出的每个后端注册配置项空间和存储实现,该文件的取值来自
hugegraph.backends 构建属性。默认构建会注册 rocksdb, hbase, hstore;使用 -Drocksdb-only 构建会
激活 rocksdb-only profile,产出的发布包只注册 rocksdb。未注册的后端在启动时会报
Not exists BackendStoreProvider。
注册过程还会额外注册一个名字 rocksdbsst,它对应的实现写出 SST 文件而不是打开一个可用的数据库。
该名字不在允许的后端列表中,因此 backend=rocksdbsst 会被拒绝并报 backend is illegal: rocksdbsst。
如果要把 SST 文件导入普通的 rocksdb 图,请使用下面介绍的 rocksdb.sst_path。
数据目录结构
有两个目录需要关注:rocksdb.data_path(默认 rocksdb-data/data)和 rocksdb.wal_path
(默认 rocksdb-data/wal)。相对路径基于服务的工作目录解析,也就是安装目录。
每个图会打开三个 store:m 存放 schema,g 存放图数据,s 是 system store。store 名会拼接到上面
两个路径之后,因此一个默认的单图安装目录如下:
RocksDB 数据目录
- rocksdb-data/
- data/
- m/schema store:属性键、顶点/边/索引标签、计数器
- g/graph store:顶点、边、索引表、olap 表
- s/system store:任务、服务信息、后端 meta(驱动版本)
- wal/
- m/
- g/
- s/
- data/
后端的每张表在所属 store 中对应一个 RocksDB 列族,名字形如 <database>+<table>,其中 database 由图名
推导得到。已有数据目录中的列族总是会被重新打开,因此旧版本创建的表仍然可读。
还需要注意:
- 两个图不能共用同一个数据路径。通过 API 基于已有配置克隆创建图时,存储实现会在
rocksdb.data_path和rocksdb.wal_path后面追加_<newGraph>。删除这样的图会同时删除这两个目录。 - 快照创建在数据目录旁边:数据路径的最后两段会加上前缀重写,因此在默认路径下 graph store 的快照位于
rocksdb-data/<prefix>_data/g。恢复快照时会先关闭实例,删除数据目录,再把快照移动到原位置。 - 设置了
rocksdb.data_disks时,其中列出的表会在指定路径下作为独立的 RocksDB 实例打开,而不再放在rocksdb.data_path下。服务最多并发打开 8 个实例,打开最多等待 600 秒,会话关闭最多等待 30 秒。
路径与日志配置项
| config option | default value | description |
|---|---|---|
| rocksdb.data_path | rocksdb-data/data | RocksDB 数据存储路径,不允许为空。 |
| rocksdb.data_disks | [] | 为部分表指定独立磁盘,每个元素格式为 STORE/TABLE: /path/disk。允许的键为 [g/vertex, g/edge_out, g/edge_in, g/vertex_label_index, g/edge_label_index, g/range_int_index, g/range_float_index, g/range_long_index, g/range_double_index, g/secondary_index, g/search_index, g/shard_index, g/unique_index, g/olap]。磁盘路径不能与 rocksdb.data_path 相同。 |
| rocksdb.wal_path | rocksdb-data/wal | RocksDB WAL 存储路径,不允许为空。 |
| rocksdb.sst_path | (空) | 待导入 RocksDB 的 SST 文件所在路径,为空表示不导入。 |
| rocksdb.log_level | INFO | RocksDB 的日志级别,可选值:DEBUG、INFO、WARN、ERROR、FATAL、HEADER。 |
压缩与合并配置项
| config option | default value | description |
|---|---|---|
| rocksdb.num_levels | 7 | 数据库的层数,取值范围 1 到 2^31-1。 |
| rocksdb.compaction_style | LEVEL | RocksDB 的 compaction 策略:LEVEL/UNIVERSAL/FIFO。 |
| rocksdb.optimize_mode | true | 针对高负载和大数据量做优化,具体行为见下文的配置项生效方式一节。 |
| rocksdb.bulkload_mode | false | 切换到批量导入数据的模式。 |
| rocksdb.compression_per_level | [none, none, snappy, snappy, snappy, snappy, snappy] | 各层使用的压缩算法,可选值为 none/snappy/z/bzip2/lz4/lz4hc/xpress/zstd。列表必须为空,或者元素个数正好等于 rocksdb.num_levels。 |
| rocksdb.bottommost_compression | none | 最底层使用的压缩算法,可选值为 none/snappy/z/bzip2/lz4/lz4hc/xpress/zstd。 |
| rocksdb.compression | snappy | 压缩数据块使用的压缩算法,可选值为 none/snappy/z/bzip2/lz4/lz4hc/xpress/zstd。 |
数据库级配置项
| config option | default value | description |
|---|---|---|
| rocksdb.max_background_jobs | 8 | 后台任务(包括 flush 和 compaction)的最大并发数,取值范围 1 到 2^31-1。 |
| rocksdb.max_subcompactions | 4 | 单个 compaction 任务使用的最大线程数,取值范围 1 到 2^31-1。 |
| rocksdb.delayed_write_rate | 16777216(16 MB/s) | 当 compaction 落后需要降速时,用户写请求的限速值,单位字节每秒。 |
| rocksdb.max_open_files | -1 | RocksDB 可缓存的最大打开文件数,-1 表示不限制。 |
| rocksdb.max_manifest_file_size | 104857600(100 MB) | manifest 文件的最大字节数。 |
| rocksdb.skip_stats_update_on_db_open | false | 打开数据库时是否跳过统计信息更新,设为 true 表示不更新统计信息。 |
| rocksdb.skip_check_sst_size_on_db_open | false | 打开数据库时是否跳过检查所有 sst 文件的大小。 |
| rocksdb.max_file_opening_threads | 16 | 打开文件使用的最大线程数,取值范围 1 到 2^31-1。 |
| rocksdb.max_total_wal_size | 0 | WAL 文件的总大小上限,单位字节。超过后会强制 flush 相关的列族,0 表示不限制。 |
| rocksdb.bytes_per_sync | 0 | 允许操作系统在后台异步地增量同步正在写入的 SST 文件,每写入这么多字节发起一次请求,0 表示关闭。 |
| rocksdb.wal_bytes_per_sync | 0 | 同上,作用于 WAL 文件,0 表示关闭。 |
| rocksdb.strict_bytes_per_sync | false | 为 true 时保证任意时刻提交回写的 SST/WAL 数据不超过 bytes_per_sync/wal_bytes_per_sync 字节,可用于处理写入速度超过 I/O 速度的场景。 |
| rocksdb.db_write_buffer_size | 0 | 所有列族 write buffer 的总大小上限,单位字节,0 表示不限制。 |
| rocksdb.log_readahead_size | 0 | 读取日志时预取的字节数,0 表示关闭预取。 |
| rocksdb.compaction_readahead_size | 0 | compaction 时批量读取的字节数。如果 RocksDB 跑在机械盘上,建议至少设为 2MB,0 表示关闭预取。 |
| rocksdb.row_cache_capacity | 0 | 表级行缓存的全局容量,单位字节,0 表示关闭 row_cache。 |
| rocksdb.delete_obsolete_files_period | 21600(6 小时) | 删除废弃文件的周期,单位秒,0 表示每次都做完整清理。该值传给 RocksDB 前会换算成微秒。 |
Memtable 配置项
| config option | default value | description |
|---|---|---|
| rocksdb.write_buffer_size | 134217728(128 MB) | 在内存中累积的数据量,单位字节,最小 1 MB。该值针对单个列族生效。 |
| rocksdb.max_write_buffer_number | 6 | 内存中累积的 write buffer 的最大个数,取值范围 1 到 2^31-1。 |
| rocksdb.min_write_buffer_number_to_merge | 2 | 会被合并到一起的 write buffer 的最小个数,取值范围 1 到 2^31-1。 |
| rocksdb.max_write_buffer_number_to_maintain | 0 | 使用事务时,为冲突检查在内存中保留的 write buffer 总数上限。 |
| rocksdb.memtable_bloom_size_ratio | 0.0 | 设置了 prefix-extractor 且该值不为 0,或者 memtable_whole_key_filtering 为 true 时,为 memtable 创建大小为 write_buffer_size * memtable_bloom_size_ratio 的布隆过滤器。大于 0.25 的取值会被收敛为 0.25,取值范围 0.0 到 1.0。 |
| rocksdb.memtable_whole_key_filtering | false | 在 memtable 中启用全键布隆过滤器,可以降低点查的 CPU 开销。只有 memtable_bloom_size_ratio > 0 时才生效。 |
| rocksdb.memtable_huge_page_size | 0 | memtable 中布隆过滤器使用的 huge page TLB 的页大小,小于等于 0 时不从 huge page TLB 分配,改用 malloc。 |
| rocksdb.inplace_update_support | false | 当写入的键已存在于当前 memtable 且新值更小时,允许线程安全的原地更新。 |
层级大小与写入限流配置项
| config option | default value | description |
|---|---|---|
| rocksdb.level_compaction_dynamic_level_bytes | false | 是否启用 level_compaction_dynamic_level_bytes。启用后 max_bytes_for_level_multiplier 的优先级高于 max_bytes_for_level_base,基准层的大小是动态的,LSM tree 更可预测,有助于限制最差情况下的空间放大。对已有数据库开关该特性可能造成异常的 LSM tree 结构,因此不推荐改动。 |
| rocksdb.max_bytes_for_level_base | 536870912(512 MB) | level-1 文件总大小的上限,单位字节,最小 1 MB。 |
| rocksdb.max_bytes_for_level_multiplier | 10.0 | 对所有层 L,第 L+1 层文件总大小与第 L 层文件总大小的比值,最小 1.0。 |
| rocksdb.target_file_size_base | 67108864(64 MB) | compaction 的目标文件大小,单位字节,最小 1 MB。 |
| rocksdb.target_file_size_multiplier | 1 | 第 L 层文件与第 L+1 层文件的大小比值。 |
| rocksdb.level0_file_num_compaction_trigger | 2 | 触发 level-0 compaction 的文件数。 |
| rocksdb.level0_slowdown_writes_trigger | 20 | 触发写入降速的 level-0 文件数软上限。 |
| rocksdb.level0_stop_writes_trigger | 36 | 触发停写的 level-0 文件数硬上限。 |
| rocksdb.soft_pending_compaction_bytes_limit | 68719476736(64 GB) | 待 compaction 数据量的软上限,单位字节,最小 1 GB。 |
| rocksdb.hard_pending_compaction_bytes_limit | 274877906944(256 GB) | 待 compaction 数据量的硬上限,单位字节,最小 1 GB。 |
文件 I/O 配置项
| config option | default value | description |
|---|---|---|
| rocksdb.allow_mmap_writes | false | 允许操作系统以 mmap 方式写文件。 |
| rocksdb.allow_mmap_reads | false | 允许操作系统以 mmap 方式读取 sst 文件。 |
| rocksdb.use_direct_reads | false | 读取 sst 文件时使用直接 I/O。 |
| rocksdb.use_direct_io_for_flush_and_compaction | false | flush 和 compaction 时使用直接读写。 |
| rocksdb.use_fsync | false | 为 true 时每次持久化都会执行 fsync。 |
| rocksdb.atomic_flush | false | 为 true 时多个列族的 flush 结果会原子地提交到 MANIFEST。WAL 一直开启的情况下不必设置该项。 |
SST 表格式与块缓存配置项
| config option | default value | description |
|---|---|---|
| rocksdb.format_version | 5 | BlockBasedTable 的格式版本,可选值为 0~5。 |
| rocksdb.index_type | kBinarySearch | sst 文件中数据块之间查找使用的索引类型,可选值为 [kBinarySearch, kHashSearch, kTwoLevelIndexSearch, kBinarySearchWithFirstKey]。 |
| rocksdb.data_block_index_type | kDataBlockBinarySearch | sst 文件数据块内点查使用的查找类型,可选值为 [kDataBlockBinarySearch, kDataBlockBinaryAndHash]。 |
| rocksdb.data_block_hash_table_util_ratio | 0.75 | 哈希表 entries/buckets 的使用率,仅在 data_block_index_type=kDataBlockBinaryAndHash 时有效,取值范围 0.0 到 1.0。 |
| rocksdb.block_size | 4096(4 KB) | 每个块中打包的用户数据的近似大小,注意对应的是未压缩的数据。 |
| rocksdb.block_size_deviation | 10 | 用于结束一个块的空闲空间百分比,取值范围 0 到 100。 |
| rocksdb.block_restart_interval | 16 | 块内增量编码的 restart 间隔。 |
| rocksdb.block_cache_capacity | 8388608(8 MB) | RocksDB 使用的块缓存大小,单位字节,0 表示不使用块缓存。每个列族都会创建一个该大小的独立缓存。 |
布隆过滤器配置项
只有 rocksdb.bloom_filter_bits_per_key 大于等于 0 时,本组的配置项才会被读取。默认值 -1 表示不启用
布隆过滤器,此时本表中其他配置项都不生效,包括索引和过滤块的缓存相关项。
| config option | default value | description |
|---|---|---|
| rocksdb.bloom_filter_bits_per_key | -1 | 布隆过滤器中每个键占用的位数,10 是一个不错的取值,对应约 1% 的误判率。大于 0 表示启用布隆过滤器,-1 表示不启用(0~0.5 向下取整为不启用)。 |
| rocksdb.bloom_filter_block_based_mode | false | 启用布隆过滤器时,设为 true 表示使用 block based filter 而不是 full filter。 |
| rocksdb.bloom_filter_whole_key_filtering | true | 启用布隆过滤器时,设为 true 表示把完整的键放入布隆过滤器,否则在设置了 prefix-extractor 时放入键的前缀。 |
| rocksdb.cache_index_and_filter_blocks | true | 设为 true 表示把索引块和过滤块放入块缓存。 |
| rocksdb.pin_l0_filter_and_index_blocks_in_cache | true | 设为 true 表示把 L0 的索引块和过滤块固定在块缓存中。 |
| rocksdb.optimize_filters_for_hits | true | 启用布隆过滤器时,该开关允许不为最后一层存储过滤器,设为 true 表示主要针对命中的场景优化过滤器,而不是同时优化未命中的场景。该项在过滤器关闭时也会生效。 |
| rocksdb.partition_filters_and_indexes | false | 启用布隆过滤器时,设为 true 表示每个 sst 文件使用分区的 full filter 和索引。该项与 block based filter 不兼容。开启后索引类型会被强制为 kTwoLevelIndexSearch,元数据块大小取 rocksdb.block_size。 |
| rocksdb.pin_top_level_index_and_filter | true | 当 partition_filters_and_indexes 为 true 时,设为 true 表示把分区过滤块和索引块的顶层索引固定在块缓存中。 |
| rocksdb.prefix_extractor_n_bytes | 0 | prefix-extractor 取键的前 N 个字节作为前缀,键长度小于 N 时使用完整键,0 表示不设置 prefix-extractor。 |
配置项的生效方式
服务为每个 store 和每个列族构建一次 RocksDB 的选项对象,因此上面任何配置项的修改都在下次启动服务时 生效。
rocksdb.optimize_mode=true会在应用上表中的取值之前先套用一组预设:数据库层面把并行度提高到可用 处理器数的一半(至少 1),允许 memtable 并发写入,并开启写线程自适应让出;列族层面调用 RocksDB 的 level-style 和 universal-style compaction 预设。显式配置项在之后应用,因此配置文件中写明的取值会覆盖 预设。rocksdb.bulkload_mode=true会关闭自动 compaction,把三个 level-0 触发阈值提高到 int 最大值,把两个 待 compaction 上限提高到 long 最大值。导入结束后要关闭它并重启,否则 compaction 不会运行。rocksdb.block_cache_capacity=0表示彻底关闭块缓存,而不是不限制大小。rocksdb.prefix_extractor_n_bytes大于 0 时会安装一个该长度的 capped prefix extractor。- 所有列族都使用
uint64addmerge 操作符,计数器表依赖它。 - 数据库不存在时会自动创建,
avoid_unnecessary_blocking_io和write_dbid_to_manifest始终开启。
内存说明
RocksDB 的缓存和 write buffer 都是本地内存分配,不属于 bin/hugegraph-server.sh 中设置的 JVM 堆。
GET /metrics/backend 接口会返回存储的使用量:内存数值是所有已打开列族的块缓存用量、固定在块缓存中的
用量、预估的 table reader 内存(索引块和过滤块)以及全部 memtable 大小之和,取自 RocksDB 的属性。
有两个配置项的实际占用会随列族数量成倍增长:
rocksdb.block_cache_capacity为每个列族创建一个缓存实例,因此一台服务的块缓存总量大致等于该值乘以 所有图的m、g、s三个 store 中已打开表的数量,再加上rocksdb.data_disks额外打开的实例。rocksdb.write_buffer_size乘以rocksdb.max_write_buffer_number限定的是单个列族的 memtable 内存。rocksdb.db_write_buffer_size限制一个 store 内所有列族的总量,默认值 0 表示没有这个限制。
rocksdb.row_cache_capacity 不同:它是每个 store 一个缓存,0 表示关闭。
导入 SST 文件
设置 rocksdb.sst_path 即开启导入。打开 store 时以及每次创建表时,服务会遍历
<sst_path>/<column family>/ 目录,收集其中所有非空的 *.sst 文件,导入到对应的列族。导入采用移动
文件的方式而不是复制,因此源目录会被导入过程消耗掉。
raft 模式
RocksDB 后端仍然可以运行在 raft 状态机之后:raft.mode=true 时,本地后端的存储实现会被 raft 实现包装。
包装层会拒绝共享存储的后端,因此 rocksdb 可用而 hbase 不可用。raft 模式下 RocksDB 会话写入时关闭
WAL 且不做 sync,因为状态机可以通过快照加 raft 日志恢复,而该后端支持快照。
使用时需要注意:
bin/init-store.sh在初始化后端时会强制把raft.mode置为 false,因此初始化过程不会走 raft。- 发布包中的
conf/graphs/hugegraph.properties已把 raft 相关配置标记为废弃。1.7.0 及之后版本的分布式 部署改用hstore后端,配合 PD 与 Store。 - raft 成员管理接口位于
graphspaces/{graphspace}/graphs/{graph}/raft/之下,包括list_peers、get_leader、set_leader、transfer_leader、add_peer和remove_peer。bin/raft-tools.sh封装了 同样的操作,但它拼接的 URL 中仍然没有 graphspace 段,在 1.7.0 的服务上需要调整路径才能使用。 - 其余
raft.*配置项见 Server 配置选项。
后端能力
该后端的特性开关决定了哪些操作可以下推给存储:
- 支持按键前缀扫描、按键范围扫描、分页查询、范围条件和 order-by。
- RocksDB 内部没有索引,因此按名字查询 schema、按标签查询以及按标签删除边由服务端完成,而不是由存储 完成。
- 通过 RocksDB 的 write batch 支持事务。
- 支持快照,raft 模式和备份依赖该能力。
- 不支持共享存储,一个数据目录属于一台服务。
- 支持 olap 属性,对应的表会作为额外的列族创建。
- 存储本身不会让数据过期,因此服务端在读取时过滤掉 TTL 已到期的元素。
- 存储层不支持
in、contains、contains_key条件,不支持聚合属性,也不支持原地更新顶点或边的属性。
riscv64 平台说明
在 Linux riscv64 上,RocksDB 的 JNI 库需要 libatomic.so.1。bin/util.sh 会查找该库并在
bin/hugegraph-server.sh、bin/init-store.sh 和 bin/dump-store.sh 启动 JVM 之前把它加入
LD_PRELOAD。如果找不到,这些脚本会以
RISC-V RocksDB requires libatomic.so.1; install libatomic1 退出,安装 libatomic1 包即可解决。
4.6 - 配置 HStore 分布式后端
1 概述
hstore 是 HugeGraph 的分布式存储后端。图使用该后端时,HugeGraph-Server 本地磁盘上不保存任何图数据,数据由另外两个进程负责:
- HugeGraph-PD(Placement Driver)保存集群元数据:已注册的 Store 列表、每个图的分区布局、分区到 Store 的映射关系、图的 Schema 以及 Schema 的 id 计数器。
- HugeGraph-Store 保存实际的键值数据,并通过 Raft 在多个 Store 节点之间复制。
Server 进程内嵌了 PD 客户端和 Store 客户端。每次读写时,它先向 PD 查询该 key 属于哪个分区、当前哪个 Store 节点是这个分区的 leader,然后把请求直接发给这个 Store 节点。
服务端的适配层是 hugegraph-hstore 模块,它以后端名 hstore 注册,驱动版本为 1.13。
选择 hstore 影响的不只是数据写到哪里,Server 还会根据后端类型切换下列行为:
| 方面 | 使用 hstore | 使用本地后端 |
|---|---|---|
| Schema 存储 | 通过 PD 元数据驱动读写 Schema | Schema 保存在 m store 中 |
| Schema id | 通过 PD 客户端由 PD 分配 | 由 schema store 分配 |
| System store | 没有独立的 system store,系统数据写入 graph store | 独立的 s store |
| 任务调度器 | distributed | local |
| 权限管理器 | StandardAuthManagerV2 | StandardAuthManager |
| 后端版本校验 | 读取 graph store | 读取 system store |
init-store.sh | 跳过该图,元数据由 PD 和 Store 负责 | 创建本地 store |
2 前置条件
hstore 不能独立工作。在 Server 打开 hstore 图之前,PD 集群和至少一个 Store 节点必须已经运行,并且启动顺序如下:
- PD,先启动以便组成 Raft 组。
- Store,通过 gRPC 向 PD 注册。gRPC 地址出现在 PD 自身
pd.initial-store-list中的 Store 会直接进入Up状态;不在该列表中、并且 PD 从未见过它处于Up或Offline的 Store 会注册为Pending, 需要先激活才能提供数据服务。 - Server,随后从 PD 读回 Store 列表。
服务端需要关注的默认端口:
| 进程 | gRPC 端口 | REST 端口 |
|---|---|---|
| PD | 8686 | 8620 |
| Store | 8500 | 8520 |
服务端的 pd.peers 指向 PD 的 gRPC 端口,而不是 REST 端口。
另外两个进程的安装与配置方式,参见 安装/构建 HugeGraph-PD 和 安装/构建 HugeGraph-Store。
3 选择 hstore 后端
3.1 图配置文件
在图的属性文件(例如 conf/graphs/hugegraph.properties)中设置后端:
关于这四个配置项:
backend=hstore选择该适配层。自 1.7.0 起允许的取值为memory、rocksdb、hbase和hstore。 发行包中做校验的位置对该值不区分大小写。serializer=binary是必需的。注册hstore后端时只注册了配置空间和存储 provider,并没有注册自己的 序列化器,适配层就是按二进制序列化器编写的。serializer的内置默认值是text,因此必须显式写出该项。store=hugegraph是 PD 看到的图名中的命名空间部分。Server 以<graphspace>/<store>打开 provider, 每个底层 store 再追加自己的后缀,因此 PD 中每个 store 对应一个图条目:图数据是DEFAULT/hugegraph/g,schema store 位是DEFAULT/hugegraph/m。graphspace默认为DEFAULT,g和m是固定的。pd.peers是以逗号分隔的 PD gRPC 地址列表。适配层从图配置中读取该项,而不是从rest-server.properties中读取,图级别的元数据连接也使用同一个值。
如果图配置文件中没有 pd.peers,那么在加载图时,只要 usePD 为 true 或者后端是 hstore, Server 会把 rest-server.properties 中的值复制到图配置里。不过在图配置文件中显式写出该项更清晰。
3.2 rest-server.properties
usePD=true 让 Server 在启动时从 PD 加载元数据。在这条路径上,它会把元数据管理器连接到 PD,创建内置的 admin 账号和默认图空间,加载图空间与服务,创建内部的系统图(后端固定为 hstore),并加载 PD 中保存的图配置。
它和图级别的 backend=hstore 是两个独立的开关:一个图可以使用 hstore 而 usePD 保持默认的 false,此时 Server 不会走基于 PD 的元数据路径。发行包自带的测试启动脚本在后端为 hstore 时会设置该项。
3.3 发行包中的模板文件
发行包在 conf/graphs/hstore.properties.template 中提供了一份该后端的现成图配置文件。它与 hugegraph.properties 的差别是:把 backend 设为 hstore、不注释 pd.peers=127.0.0.1:8686、
并且不包含内存管理配置段。
hstore 的 Docker 镜像会自动套用这份模板:它删除 conf/graphs/hugegraph.properties,再把模板重命名过去,因此容器启动时就已经选好了 hstore 后端。
本地构建的发行包默认编译了 hstore provider。rocksdb-only 这个 Maven profile 会把编译进去的后端列表
收窄为只有 rocksdb,backend=hstore 在 provider 工厂检查后会报 Not exists BackendStoreProvider: hstore。
4 hstore 配置项
hstore 配置空间中只有下面两个配置项,它们写在图的属性文件里。
| 配置项 | 默认值 | 说明 |
|---|---|---|
| hstore.partition_count | 0 | 分区数量,PD 依据该值控制分区(Number of partitions)。 |
| hstore.shard_count | 0 | 副本数量,PD 依据该值控制分区副本(Number of copies)。 |
4.1 hstore.partition_count
每个 graph store 第一次被打开时,Server 会把这个数字连同图名一起发给 PD。取负值会在此处被拒绝,报错信息为 The value of hstore.partition_count cannot be less than 0.
PD 对该值的处理方式:
0,也就是默认值,表示交给 PD 决定。对图数据 store,PD 使用自身集群级别的分区总数,该总数由pd.initial-store-list中的条目数量、partition.store-max-shard-count和partition.default-shard-count推算得出;对/m和/sstore 固定使用1。- 取值在
1到该总数之间时,按原值使用。 - 取值大于该总数时,会被下调到该总数。
该数字在 store 首次向 PD 注册时生效,之后再修改属性文件不会让已有的图重新分区。
4.2 hstore.shard_count
hstore.shard_count 声明在 hstore 配置空间中,属性文件里也接受该项,但当前版本服务端没有任何代码读取它:适配层读取的只有 hstore.partition_count 一项。实际生效的副本数由 PD 的配置决定,即 PD application.yml
中的 partition.default-shard-count。
5 只在 hstore 模式下生效的其他配置项
下列配置项位于公共的 rest-server.properties 和图属性文件中,但只有在使用 PD 和 hstore 后端时才生效,或者才会改变行为。source 列给出该配置项在本轮核对的 Server 主线提交 2f827d6 中的声明位置(文件与行号)。
| 配置项 | 文件 | 默认值 | 在 hstore 模式下的作用 | source |
|---|---|---|---|---|
| pd.peers | rest-server.properties | 127.0.0.1:8686 | 用于元数据、服务发现和系统图的 PD 地址 | ServerOptions.java:195-201 |
| pd.peers | {graph}.properties | 127.0.0.1:8686 | 后端适配层自身使用的 PD 地址 | CoreOptions.java:649-654 |
| usePD | rest-server.properties | false | Server 启动时是否从 PD 加载元数据 | ServerOptions.java:401-407 |
| cluster | rest-server.properties | hg-test | 集群名,作为所有 PD 元数据 key 的前缀 | ServerOptions.java:187-193 |
| init_store.enabled | rest-server.properties | true | PD/Store 部署下应设为 false,元数据已由存储侧负责 | ServerOptions.java:382-390 |
| graph.load_from_local_config | rest-server.properties | false | 控制管理器构造阶段预加载及 reload() 重扫本地图配置;应用初始化仍扫描并尝试加载,因此 false 不是阻止本地配置加载的安全开关 | ServerOptions.java:366-372 |
| auth.graph_store | rest-server.properties | hugegraph | 保存权限数据的图,关闭 init-store 时会校验它使用 hstore 后端 | ServerOptions.java:602-609 |
| graphspace | {graph}.properties | DEFAULT | PD 看到的图名的第一段 | CoreOptions.java:679-685 |
init-store.sh 从不初始化 hstore 图。在开启的路径上,它扫描 conf/graphs 并跳过后端为 hstore 的每一个图。如果用 init_store.enabled=false 整体关闭这一步,它会改为校验 admin 账号仍然能在 PD 启动路径上被创建:
usePD 必须为 true、权限图必须存在于本地配置中且后端为 hstore、auth.admin_pa 必须显式设置为非空值。否则启动会直接失败,而不是使用公开的默认密码创建账号。
6 Server 如何通过 PD 发现 Store
适配层在进程中第一次打开 hstore 图时,一次性构建这些客户端:
- 用
pd.peers构建 PD 客户端配置,带上 PD 的鉴权凭据,并开启客户端侧的分区缓存。 - 创建进程级的 PD 客户端。
- 用该 PD 客户端创建进程级的 Store 客户端。
创建 Store 客户端时,会把一个基于 PD 的分区器同时注册为 Store 客户端节点管理器的 node provider、 partitioner 和 notifier。路由逻辑全部在这个分区器中:
- 单点和前缀请求:向 PD 查询拥有该 key 的分区,取该分区的 leader 副本,把请求发到对应的 store id。
- 按 code 的范围扫描:按 code 逐个遍历分区直到覆盖整个范围,每个分区产生一个目标 Store。
- 全图扫描:向 PD 查询该图的活跃 Store,并向全部 Store 扇出请求。
- Store 地址解析:通过 PD 把 store id 解析成主机和端口。
- 缓存失效:当某个 Store 返回分区 leader 已迁移时,notifier 会更新 PD 客户端缓存中的分区 leader 并使过期的分区条目失效,之后的请求就会跟随新的 leader。
由于 Store 列表来自 PD 而不是配置文件,增删 Store 节点只需要针对同一个 PD 集群启动或停止它,服务端不需要改任何配置。
7 后端能力
hstore 并不支持本地后端的所有查询形式。对用户可见的差异如下:
| 特性 | 是否支持 |
|---|---|
| 按 key 前缀扫描 | 支持 |
| 按 key 范围扫描 | 支持 |
| 带范围条件的查询 | 支持 |
| 带 order by 的查询 | 支持 |
| 分页查询 | 支持 |
| OLAP 属性 | 支持 |
| Task 和 Server 顶点 | 支持 |
| Scan token | 不支持 |
| 按名称查询 Schema | 不支持 |
| 按 label 查询 | 不支持 |
带 in 条件的查询 | 不支持 |
带 contains 的查询 | 不支持 |
带 contains key 的查询 | 不支持 |
| 按输入 id 顺序排序 | 不支持 |
| 按 label 删除边 | 不支持 |
| 更新顶点属性 | 不支持 |
| 更新边属性 | 不支持 |
| 事务 | 不支持 |
| Number 类型 | 不支持 |
| 聚合属性 | 不支持 |
| TTL | 不支持 |
不支持按输入 id 顺序排序,是因为多节点批量扫描会按 Store 对输入 key 分组,从而丢失全局顺序;不支持更新顶点和边属性,是因为属性被存放在单个 cell 中。
8 验证
Server 启动后,后端指标接口会返回 PD 当前认为处于活跃状态的 Store 数量:
响应中的 nodes 就是 PD 返回的活跃 Store 数量。nodes 为 0 说明 Server 连上了 PD,但 PD 中没有状态为 Up 的 Store,通常是 Store 节点还没注册,或者因为不在 PD 的 pd.initial-store-list 中而注册成了 Pending。
4.7 - 配置 HBase 后端
概述
HBase 后端将图数据存储在 Apache HBase 表中。HugeGraph 仅作为 HBase 客户端:它通过 HBase 的 ZooKeeper 集群连接,为每个图创建一个 HBase namespace,并在其中创建该图的 schema 表、数据表和索引表。计数查询由 HBase 的 AggregateImplementation 协处理器完成,HugeGraph 在创建每张表时都会挂载该协处理器。
注意:HBase 后端已废弃,计划在 HugeGraph 2.0 中移除。新部署请使用
hstore(分布式)或rocksdb(内嵌,默认值),已有的 HBase 部署请规划迁移。
自 1.7.0 起,发行包内置的后端只有 hstore、rocksdb、hbase 和 memory。HBase provider 上报的后端驱动版本为 1.12。
支持的 HBase 版本
客户端 jar 固定为 HBase 2.6.5(hbase-endpoint 加 hbase-shaded-client)。服务端要求 HBase 2.x:当检测到的 HBase 版本低于 2.0 时,scan 逻辑会把 inclusive stop row 改写为 exclusive 并追加一个 0 字节,因为该版本之前 inclusive stop row 不生效。CI 任务和本地 Docker 镜像都使用 HBase 2.6.5,后端也是针对这个版本做测试的。
选择该后端
修改需要使用 HBase 的图的 conf/graphs/hugegraph.properties:
注意:
serializer必须设置为hbase,而不是binary。HBase 序列化器是BinarySerializer的子类,它不在 rowkey 中写入 id 前缀,并写入预分区的顶点表和边表所需要的分区前缀。使用serializer=binary时这两点都不生效。
然后初始化后端并启动服务:
默认发行包构建时包含 rocksdb, hbase, hstore 三个后端,无需额外引入 jar。使用 rocksdb-only Maven profile 构建的发行包不包含 HBase 后端,此时 backend=hbase 会以 Not exists BackendStoreProvider: hbase 打开失败。
下面所有配置项都位于图配置文件(conf/graphs/hugegraph.properties)中,而不是 rest-server.properties。只有当发行包包含 hbase 后端时,这些配置项才会被注册。
连接配置项
| 配置项 | 默认值 | 说明 |
|---|---|---|
| hbase.hosts | localhost | HBase ZooKeeper 的主机名或 IP 地址,多个以逗号分隔,不允许为空。对应 hbase.zookeeper.quorum。 |
| hbase.port | 2181 | HBase ZooKeeper 的端口,取值范围 1 到 65535。对应 hbase.zookeeper.property.clientPort。 |
| hbase.znode_parent | /hbase | HBase ZooKeeper 的 znode 父路径,不允许为空。对应 zookeeper.znode.parent。 |
| hbase.zk_retry | 3 | HBase ZooKeeper 的恢复重试次数,取值范围 0 到 1000。对应 zookeeper.recovery.retry。 |
| hbase.threads_max | 64 | HBase 连接的最大线程数,取值范围 1 到 1000。对应 hbase.hconnection.threads.max,HBase 自身默认值为 256,这里取更小的值以避免内存溢出。 |
超时配置项
| 配置项 | 默认值 | 说明 |
|---|---|---|
| hbase.truncate_timeout | 30 | 等待后端 truncate 的超时时间,单位秒,必须为正数。该超时按 store 计算,而一个图有三个 store,因此一次 truncate 最多耗时该值的三倍。 |
| hbase.aggregation_timeout | 43200(12 小时) | 等待聚合的超时时间,单位秒,必须为正数。它会设置计数查询所用聚合客户端的 hbase.rpc.timeout。 |
Kerberos 与 HBase 配置文件配置项
| 配置项 | 默认值 | 说明 |
|---|---|---|
| hbase.kerberos_enable | false | 是否为 HBase 启用 Kerberos 认证。 |
| hbase.krb5_conf | /etc/krb5.conf | Kerberos 配置文件,包含 KDC IP、默认 realm 等。会被设置为 java.security.krb5.conf 系统属性。 |
| hbase.hbase_site | /etc/hbase/conf/hbase-site.xml | HBase 的配置文件。无论是否启用 Kerberos,每次建立连接时都会把它作为配置资源加载。 |
| hbase.kerberos_principal | (空) | Kerberos 认证使用的 HBase principal。 |
| hbase.kerberos_keytab | (空) | Kerberos 认证使用的 HBase keytab 文件。 |
当 hbase.kerberos_enable=true 时,HugeGraph 会在连接上把 hadoop.security.authentication 和 hbase.security.authentication 设置为 kerberos,然后在打开连接之前用配置的 principal 从 keytab 登录。因此 Kerberos 环境下 hbase.krb5_conf、hbase.hbase_site、hbase.kerberos_principal 和 hbase.kerberos_keytab 四项都必须有效:
即使关闭 Kerberos,hbase.hbase_site 也会被读取,路径不存在时相当于加载了一个空资源。当需要上述配置项之外的 HBase 设置时,把它指向集群自身的 hbase-site.xml。
预分区配置项
| 配置项 | 默认值 | 说明 |
|---|---|---|
| hbase.enable_partition | true | 是否为 HBase 启用预分区。它同时决定后端是否声明支持前缀扫描和范围扫描。 |
| hbase.vertex_partitions | 10 | HBase 顶点表的分区数,不允许为负数。 |
| hbase.edge_partitions | 30 | HBase 边表的分区数,不允许为负数。 |
启用预分区后,顶点表按 hbase.vertex_partitions 个 region 创建,两张边表各按 hbase.edge_partitions 个 region 创建,序列化器会在 rowkey 前面加上 id 哈希得到的分区前缀。
注意:请在初始化后端之前,按实际数据量和 region server 数量调整分区数。它对导入速度影响很大,并且只在建表时生效。
关闭 hbase.enable_partition 会恢复不带前缀的原始 rowkey。作为交换,后端此时会声明支持前缀扫描和范围扫描,这两类扫描在预分区 rowkey 下无法工作。
Namespace 与表结构
每个图对应一个 HBase namespace,名称为 <graphspace>/<store> 转小写,并把 / 替换为 _,因为 HBase namespace 名称只允许字母数字和 _ 字符。在默认配置 graphspace=DEFAULT、store=hugegraph 下,namespace 为 default_hugegraph。
在该 namespace 内,一个图包含三个 store:schema store m、graph store g 和 system store s:
| Store | 表 |
|---|---|
schema (m) | VL、EL、PK、IL、C、m_si |
graph (g) | g_v、g_oe、g_ie、g_si、g_vi、g_ei、g_ii、g_fi、g_li、g_di、g_ai、g_hi、g_ui |
system (s) | s_v、s_oe、s_ie、s_si、s_vi、s_ei、s_ii、s_fi、s_li、s_di、s_ai、s_hi、s_ui、M |
g_v 是顶点表,g_oe 和 g_ie 分别是出边表和入边表,其余 g_* 表依次是二级索引、顶点标签索引、边标签索引、范围索引(int、float、long、double)、全文索引、shard 索引和唯一索引表。所有表都只有一个名为 f 的列族,并且都在建表时挂载了 org.apache.hadoop.hbase.coprocessor.AggregateImplementation 协处理器。只有 g_v、g_oe 和 g_ie 会预分区,system store 中同名的那几张表按单个 region 创建。
system store 中的 M 表保存 init-store.sh 写入的后端版本。truncate 图时会排除该表,因为丢失它会导致下次启动的版本校验失败。清空图会删除这些表;连同存储空间一起清空则会删除整个 namespace。
GET /metrics/backend 会返回 HBase 集群状态:cluster_id、master_name、average_load、hbase_version、region_count、leaving_servers、nodes、region_servers,以及一个 servers map,其中包含每个 region server 的堆内存、磁盘、请求数和 region 明细。PUT /graphspaces/{graphspace}/graphs/{name}/compact 会请求 HBase 对该图的所有表做 compaction。
使用 Docker 做本地测试
Server 仓库中的 docker/hbase 会构建一个 HBase 2.6.5 单机镜像(hugegraph/hbase:2.6.5,容器名 hg-hbase-test),用于本地开发和测试。以下命令都在仓库根目录执行。
为运行在宿主机上的 HugeGraph 启动 HBase:
为运行在同一个 Docker 网络中的容器化 HugeGraph 启动 HBase:
对外公布的主机名很重要:容器启动时会把 HBASE_MASTER_HOSTNAME 和 HBASE_REGIONSERVER_HOSTNAME 写入自己的 hbase-site.xml,未设置时回退到 HBASE_HOSTNAME(默认 hbase)。如果客户端无法解析这个主机名,即使 ZooKeeper 可用,也会报 UnknownHostException: hbase:16000。
映射到宿主机的端口:
| 端口 | 服务 |
|---|---|
| 2181 | ZooKeeper,与 hbase.port 默认值一致 |
| 16000 | HBase Master RPC |
| 16010 | HBase Master Web UI,http://localhost:16010 |
| 16020 | HBase RegionServer RPC |
| 16030 | HBase RegionServer Web UI,http://localhost:16030 |
针对它运行后端测试:
停止并删除数据卷:
该镜像会分别启动 ZooKeeper、master 和 region server 三个守护进程,并等到 master 上报有存活的 server 之后才开始 tail 日志,因此首次启动会比较慢。请给 Docker 分配至少 4 GB 内存。compose 的健康检查也因此设置了 90 秒的 start period。
限制
HBase 后端不支持以下特性:
- 事务。rollback 只会丢弃尚未提交的批次,而 commit 是逐表写入的,因此跨表不是原子的。
- 原地更新单个顶点或边属性,以及合并顶点属性。属性存放在一个 cell 中,因此会重写整个属性列。
- 按名称查询 schema,以及仅按标签查询顶点或边。这两者都需要 HBase 二级索引。
- 按标签删除边。
- 带
in条件、contains条件或contains_key条件的查询。 - 聚合属性和 OLAP 属性。
- 原生数值类型(后端特性
supportsNumberType为关闭状态)。 - scan token。
hbase.enable_partition为true时的前缀扫描和范围扫描。- 除
count以外的聚合函数,其它聚合函数会被拒绝。 - 快照。创建或恢复后端快照会抛出
UnsupportedOperationException。
已支持的特性包括顶点和边的 TTL、分页查询、order by 查询、范围条件,以及按输入 id 排序。
5 - 客户端与 API
本节包含 REST API、Gremlin Console 和客户端说明。当前 Server REST API 使用图空间和图名称组成资源路径;具体路径以各 API 页面和 Server 的 OpenAPI 页面为准。
5.1 - HugeGraph RESTful API
本目录介绍当前 master 的 REST API。历史版本用法请切换到对应的多版本文档: HugeGraph 1.7 RESTful API 或 HugeGraph 1.5 RESTful API。
默认图空间名是
DEFAULT。
Server 启动后,可访问 http://localhost:8080/swagger-ui/index.html 查看当前版本的 OpenAPI 页面。使用示例
5.1.1 - Graphspace API
2.0 Graphspace
在 HugeGraph 中,多租户是通过图空间(graph space)来实现的,资源的分配和隔离可以通过图空间进行。
重要前置条件:
- 目前图空间功能只支持在 hstore 模式下使用。
- 如果非 hstore 模式,则只能使用默认的图空间
DEFAULT,且不支持创建、删除和更新图空间的操作。 - 注意在 rest-server.properties 中,设置
usePD=true,并且 hugegraph.properties 中,设置backend=hstore - 生产环境必须启用 Server 认证与授权,并将新建图空间的
auth设为true。生产管理员密码必须替换公开默认值pa(由auth.admin_pa配置)。 - 本页所有接口都只在 PD 模式下可用,单机模式下会返回
400和GraphSpace management is not supported in standalone mode错误信息。
限制图空间列表和详情接口的访问
GET /graphspaces 和 GET /graphspaces/{graphspace} 均未声明 @RolesAllowed;Server 未启用鉴权时这两个接口可匿名调用,启用鉴权后也没有方法级管理员角色限制。详情响应包含 dp_username 和 dp_password。生产环境必须将 white_ip.status 设为 enable 并通过 IP 白名单 API 启用、维护名单。网关必须按调用者身份或角色,仅允许管理员和可信运维调用方访问这两条路径;只限制来源 IP 范围仍会让同一网段的普通已认证业务账号读取 DP 凭据。Server 网络策略必须仅允许可信网关的出口地址访问 API 端口,阻断客户端绕过网关的直连路径。网关须记录这两条路径的调用身份、来源和结果;Server audit-*.log 用于鉴权授权记录,不能替代这两条路径的网关访问审计。业务账号须按最小权限授权。
2.0.1 创建一个图空间
Method & Url
Request Body
注意:目前 cpu,内存,以及 k8s 相关功能暂未开放
| 名称 | 是否必填 | 类型 | 默认值 | 取值范围 | 说明 |
|---|---|---|---|---|---|
| name | 是 | String | 小写字母、数字和下划线组成,首字符必须是小写字母,长度不超过 48 | 图空间的名字 | |
| nickname | 否 | String | name 的值 | 在所有图空间中必须唯一 | 图空间的显示名 |
| description | 否 | String | 图空间的描述信息 | ||
| cpu_limit | 是 | Int | > 0 | CPU 核数 | |
| memory_limit | 是 | Int | > 0 | 内存大小,单位 GB | |
| storage_limit | 是 | Int | > 0 | 图空间的数据占据的磁盘空间上限,单位 GB | |
| compute_cpu_limit | 否 | Int | 0 | >= 0 | 针对图计算的额外资源配置,单位 cores。当该字段不配置或者配置为 0 时,会由 cpu_limit 字段的值进行覆盖 |
| compute_memory_limit | 否 | Int | 0 | >= 0 | 针对图计算的额外内存配置,单位 GB。当该字段不配置或者配置为 0 时,会由 memory_limit 字段的值进行覆盖 |
| oltp_namespace | 否 | String | "" | OLTP 的 k8s 命名空间 | |
| olap_namespace | 否 | String | "" | OLAP 的 k8s 命名空间。当 olap_namespace 和 oltp_namespace 的值相同时,其配置的资源限额会进行合并 | |
| storage_namespace | 否 | String | "" | 存储的 k8s 命名空间 | |
| operator_image_path | 否 | String | "" | 图计算 operator 的镜像地址:在创建图空间时,允许指定对应的图计算镜像并交由 K8S 进行统一管理 | |
| internal_algorithm_image_url | 否 | String | "" | 图计算的算法镜像地址:在创建图空间时,允许指定图计算的算法镜像并交由 K8S 进行统一管理 | |
| max_graph_number | 是 | Int | > 0 | 图空间的图数目的上限 | |
| max_role_number | 否 | Int | 0 | 图空间的角色数目的上限 | |
| auth | 否 | Boolean | false | true, false | 图空间是否支持权限认证 |
| configs | 否 | Map | 其他配置信息 |
Response Status
Response Body
2.0.2 列出系统所有图空间
Method & Url
Response Status
Response Body
2.0.3 查看某个图空间
Params
路径参数说明:
- graphspace: 图空间名称
Method & Url
Response Status
Response Body
上述
dp_username和dp_password是文档示例值。实际详情响应会返回对应图空间的 DP 凭据,应按敏感凭据保护。
2.0.4 更新某个图空间
注意:auth 鉴权配置,在创建图空间的过程一旦确定下来,不允许更新
Params
路径参数说明:
- graphspace: 图空间名称
请求体说明:
- action: 标记本次操作为 Update 动作,取值固定为 “update”
- update: 即将更新的值,下述参数都应置于 update 中
| 名称 | 是否必填 | 类型 | 默认值 | 取值范围 | 说明 |
|---|---|---|---|---|---|
| name | 是 | String | 必须与路径中的图空间名一致 | 图空间名称 | |
| nickname | 否 | String | 在所有图空间中必须唯一 | 图空间的显示名 | |
| description | 否 | String | 图空间的描述信息 | ||
| cpu_limit | 是 | Int | > 0 | OLTP HugeGraphServer 的 CPU 核数 | |
| memory_limit | 是 | Int | > 0 | OLTP HugeGraphServer 的内存大小,单位 GB | |
| storage_limit | 是 | Int | > 0 | 图空间的数据占据的磁盘空间上限,单位 GB | |
| compute_cpu_limit | 否 | Int | 0 | >= 0 | 针对图计算的额外资源配置,单位 cores。当该字段不配置或者配置为 0 时,会由 cpu_limit 字段的值进行覆盖 |
| compute_memory_limit | 否 | Int | 0 | >= 0 | 针对图计算的额外内存配置,单位 GB。当该字段不配置或者配置为 0 时,会由 memory_limit 字段的值进行覆盖 |
| oltp_namespace | 否 | String | OLTP 的 k8s 命名空间 | ||
| olap_namespace | 否 | String | OLAP 的 k8s 命名空间。当 olap_namespace 和 oltp_namespace 的值相同时,其配置的资源限额会进行合并 | ||
| storage_namespace | 否 | String | 存储的 k8s 命名空间 | ||
| operator_image_path | 否 | String | 图计算 operator 的镜像地址:在更新图空间时,允许指定对应的图计算镜像并交由 K8S 进行统一管理 | ||
| internal_algorithm_image_url | 否 | String | 图计算的算法镜像地址:在更新图空间时,允许指定图计算的算法镜像并交由 K8S 进行统一管理 | ||
| max_graph_number | 是 | Int | > 0 | 图空间的图数目的上限 | |
| max_role_number | 否 | Int | 图空间的角色数目的上限 |
Method & Url
Request Body
Response Status
Response Body
2.0.5 删除某个图空间
Params
路径参数说明:
- graphspace: 图空间名称
Method & Url
Response Status
注意:删除图空间,会导致图空间的全部资源被释放。
2.0.6 列出系统所有图空间及其详情
Params
请求参数说明:
- prefix: 只返回名称或显示名以该前缀开头的图空间
Method & Url
Response Status
Response Body
每条记录包含与 GET /graphspaces/{graphspace} 相同的字段,并额外带上 authed、default、create_time 和 update_time。authed 表示当前用户是否可以进入该图空间:当图空间开启了鉴权,而当前用户既不是管理员、也不是该空间的管理员或成员时为 false。default 目前恒为 false,默认图空间功能尚未实现。
默认角色
每个图空间内置四种默认角色,可以一次性把一整组权限赋给某个用户或角色:
space:图空间管理员,只有管理员可以授予space_member:图空间成员analyst:图空间分析师observer:只读角色,传入graph时可以收窄到单个图
user 既可以是用户名,也可以是角色名。当前用户是否具备某个默认角色也可以通过 GET /graphspaces/{graphspace}/auth/managers/default 查询,参见 Authentication API。
2.0.7 授予默认角色
Params
路径参数说明:
- graphspace: 图空间名称
请求体说明:
- user: 用户名或角色名,必填
- role: 取值为
space、space_member、analyst、observer之一,必填 - graph: 图名称,选填,只在
role=observer时生效
Method & Url
Request Body
Response Status
Response Body
只有在单个图上授予角色时才会回显 graph。
2.0.8 查询默认角色
Params
路径参数说明:
- graphspace: 图空间名称
请求参数说明:
- user: 用户名或角色名,必填
- role: 默认角色名称,必填
- graph: 图名称,选填,只在
role=observer时生效
Method & Url
Response Status
Response Body
2.0.9 回收默认角色
Params
路径参数说明:
- graphspace: 图空间名称
请求参数说明:
- user: 用户名或角色名,必填
- role: 默认角色名称,必填
- graph: 图名称,选填,只在
role=observer时生效
Method & Url
Response Status
Schema 模板
Schema 模板把一段 Gremlin schema 脚本以名称保存下来,创建图时通过 schema 字段引用它来初始化图,参见 Graphs API。模板可以由它的创建者、图空间管理员或系统管理员修改和删除。
2.0.10 创建 schema 模板
Params
路径参数说明:
- graphspace: 图空间名称
请求体说明:
- name: 模板名称,必填
- schema: Gremlin schema 脚本,必填
Method & Url
Request Body
Response Status
Response Body
2.0.11 列出图空间的全部 schema 模板
Method & Url
Response Status
Response Body
2.0.12 查看某个 schema 模板
Method & Url
Response Status
2.0.13 修改某个 schema 模板
只能修改 schema,模板名称不可修改。
Method & Url
Request Body
Response Status
2.0.14 删除某个 schema 模板
Method & Url
Response Status
5.1.2 - Schema API
1.1 Schema
HugeGraph 提供单一接口获取某个图的全部 Schema 信息,包括:PropertyKey、VertexLabel、EdgeLabel 和 IndexLabel。
Method & Url
Response Status
Response Body
5.1.3 - PropertyKey API
1.2 PropertyKey
Params 说明:
- name:属性类型名称,必填
- data_type:属性类型数据类型,包括:bool、byte、int、long、float、double、text、date、uuid、blob,默认
text类型 (代表 string 字符串类型) - cardinality:属性类型基数,包括:single、list、set,默认
single(代表单属性值)
请求体字段说明:
- id:属性类型 id 值
- properties:属性的属性,对于属性而言,此项为空
- user_data:设置属性类型的通用信息,比如可设置 age 属性的取值范围,最小为 0,最大为 100;目前此项不做任何校验,只为后期拓展提供预留入口
1.2.1 创建一个 PropertyKey
Method & Url
Request Body
Response Status
Response Body
1.2.2 为已存在的 PropertyKey 添加或移除 userdata
Params
- action: 表示当前行为是添加还是移除,取值为
append(添加)和eliminate(移除)
Method & Url
Request Body
Response Status
Response Body
1.2.3 获取所有的 PropertyKey
Method & Url
Response Status
Response Body
1.2.4 根据 name 获取 PropertyKey
Method & Url
其中,age为要获取的 PropertyKey 的名称
Response Status
Response Body
1.2.5 根据 name 删除 PropertyKey
Method & Url
其中,age为要删除的 PropertyKey 的名称
Response Status
Response Body
5.1.4 - VertexLabel API
1.3 VertexLabel
假设已经创建好了 1.1.3 中列出来的 PropertyKeys
Params 说明
- id:顶点类型 id 值
- name:顶点类型名称,必填
- id_strategy: 顶点类型的 ID 策略,主键 ID、自动生成、自定义字符串、自定义数字、自定义 UUID,默认主键 ID
- properties: 顶点类型关联的属性类型
- primary_keys: 主键属性,当 ID 策略为 PRIMARY_KEY 时必须有值,其他 ID 策略时必须为空;
- enable_label_index:是否开启类型索引,默认关闭
- index_names:顶点类型创建的索引,详情见 3.4
- nullable_keys:可为空的属性
- user_data:设置顶点类型的通用信息,作用同属性类型
1.3.1 创建一个 VertexLabel
Method & Url
Request Body
Response Status
Response Body
从 hugegraph-server v0.11.2 版本开始支持顶点的 TTL 功能。顶点的 TTL 是通过 VertexLabel 来设置的。比如希望 person 类型的顶点存活时间为一天,需要在创建 person VertexLabel 的时候将 TTL 字段设置为 86400000,即单位为毫秒。
另外,当顶点中带有"创建时间"的属性且希望以"创建时间"属性作为计算顶点存活时间的起点时,可以设置 VertexLabel 中的 ttl_start_time 字段。比如 person VertexLabel 有 createdTime 属性,且 createdTime 是 Date 类型的参数,希望 person 类型的顶点从创建开始存活一天的时间,那么创建 person VertexLabel 的 Request Body 如下:
1.3.2 为已存在的 VertexLabel 添加 properties 或 userdata,或者移除 userdata(目前不支持移除 properties)
Params
- action: 表示当前行为是添加还是移除,取值为
append(添加)和eliminate(移除)
Method & Url
Request Body
Response Status
Response Body
1.3.3 获取所有的 VertexLabel
Method & Url
Response Status
Response Body
1.3.4 根据 name 获取 VertexLabel
Method & Url
Response Status
Response Body
1.3.5 根据 name 删除 VertexLabel
删除 VertexLabel 会导致删除对应的顶点以及相关的索引数据,会产生一个异步任务
Method & Url
Response Status
Response Body
注:
可以通过
GET http://localhost:8080/graphspaces/DEFAULT/graphs/hugegraph/tasks/1(其中"1"是 task_id)来查询异步任务的执行状态,更多异步任务 RESTful API
5.1.5 - EdgeLabel API
1.4 EdgeLabel
假设已经创建好了 1.2.3 中的 PropertyKeys 和 1.3.3 中的 VertexLabels
Params 说明
- name:顶点类型名称,必填
- source_label: 源顶点类型的名称,必填
- target_label: 目标顶点类型的名称,必填
- frequency:两个点之间是否可以有多条边,可以取值 SINGLE 和 MULTIPLE,非必填,默认值 SINGLE
- properties: 边类型关联的属性类型,选填
- sort_keys: 当允许关联多次时,指定区分键属性列表
- nullable_keys:可为空的属性,选填,默认可为空
- enable_label_index:是否开启类型索引,默认关闭
1.4.1 创建一个 EdgeLabel
Method & Url
Request Body
Response Status
Response Body
从 hugegraph-server v0.11.2 版本开始支持边的 TTL 功能。边的 TTL 是通过 EdgeLabel 来设置的。比如希望 knows 类型的边存活时间为一天,需要在创建 knows EdgeLabel 的时候将 TTL 字段设置为 86400000,即单位为毫秒。
另外,当边中带有"创建时间"的属性且希望以"创建时间"属性作为计算边存活时间的起点时,可以设置 EdgeLabel 中的 ttl_start_time 字段。比如 knows EdgeLabel 有 createdTime 属性,且 createdTime 是 Date 类型的参数,希望 knows 类型的边从创建开始存活一天的时间,那么创建 knows EdgeLabel 的 Request Body 如下:
1.4.2 为已存在的 EdgeLabel 添加 properties 或 userdata,或者移除 userdata(目前不支持移除 properties)
Params
- action: 表示当前行为是添加还是移除,取值为
append(添加)和eliminate(移除)
Method & Url
Request Body
Response Status
Response Body
1.4.3 获取所有的 EdgeLabel
Method & Url
Response Status
Response Body
1.4.4 根据 name 获取 EdgeLabel
Method & Url
Response Status
Response Body
1.4.5 根据 name 删除 EdgeLabel
删除 EdgeLabel 会导致删除对应的边以及相关的索引数据,会产生一个异步任务
Method & Url
Response Status
Response Body
注:
可以通过
GET http://localhost:8080/graphspaces/DEFAULT/graphs/hugegraph/tasks/1(其中"1"是 task_id)来查询异步任务的执行状态,更多异步任务 RESTful API
5.1.6 - IndexLabel API
1.5 IndexLabel
假设已经创建好了 1.1.3 中的 PropertyKeys、1.2.3 中的 VertexLabels 以及 1.3.3 中的 EdgeLabels
1.5.1 创建一个 IndexLabel
Method & Url
Request Body
Response Status
Response Body
1.5.2 获取所有的 IndexLabel
Method & Url
Response Status
Response Body
1.5.3 根据 name 获取 IndexLabel
Method & Url
Response Status
Response Body
1.5.4 根据 name 删除 IndexLabel
删除 IndexLabel 会导致删除相关的索引数据,会产生一个异步任务
Method & Url
Response Status
Response Body
注:
可以通过
GET http://localhost:8080/graphspaces/DEFAULT/graphs/hugegraph/tasks/1(其中"1"是 task_id)来查询异步任务的执行状态,更多异步任务 RESTful API
1.5.5 为已存在的 IndexLabel 添加或移除 userdata
该方式只能修改 user_data,请求体中不能带 base_type、base_value 和 index_type。
Params
- action: 表示当前行为是添加还是移除,取值为
append(添加)和eliminate(移除)
Method & Url
Request Body
Response Status
Response Body
5.1.7 - Rebuild API
1.6 Rebuild
1.6.1 重建 IndexLabel
Method & Url
Response Status
Response Body
注:
可以通过
GET http://localhost:8080/graphspaces/DEFAULT/graphs/hugegraph/tasks/1(其中"1"是 task_id)来查询异步任务的执行状态,更多异步任务 RESTful API
1.6.2 VertexLabel 对应的全部索引重建
Method & Url
Response Status
Response Body
注:
可以通过
GET http://localhost:8080/graphspaces/DEFAULT/graphs/hugegraph/tasks/2(其中"2"是 task_id)来查询异步任务的执行状态,更多异步任务 RESTful API
1.6.3 EdgeLabel 对应的全部索引重建
Method & Url
Response Status
Response Body
注:
可以通过
GET http://localhost:8080/graphspaces/DEFAULT/graphs/hugegraph/tasks/3(其中"3"是 task_id)来查询异步任务的执行状态,更多异步任务 RESTful API
5.1.8 - Vertex API
2.1 Vertex
顶点类型中的 Id 策略决定了顶点的 Id 类型,其对应的 id 类型如下:
| Id_Strategy | id type |
|---|---|
| AUTOMATIC | number |
| PRIMARY_KEY | string |
| CUSTOMIZE_STRING | string |
| CUSTOMIZE_NUMBER | number |
| CUSTOMIZE_UUID | uuid |
顶点的 GET/PUT/DELETE API 中 url 的 id 部分应该传入带有类型信息的 id 值,这个类型信息通过 json 串是否带引号来表示,也就是说:
- 当 id 类型为
number时,url 中的 id 不带引号,例如xxx/vertices/123456 - 当 id 类型为
string时,url 中的 id 带引号,例如xxx/vertices/"123456"
接下来的示例需要先根据以下 groovy 脚本创建图 schema
2.1.1 创建一个顶点
Params
路径参数说明:
- graphspace: 图空间名称
- graph: 图名称
Method & Url
Request Body
Response Status
Response Body
2.1.2 创建多个顶点
Params
路径参数说明:
- graphspace: 图空间名称
- graph: 图名称
Method & Url
Request Body
Response Status
Response Body
2.1.3 更新顶点属性
Params
路径参数说明:
- graphspace: 图空间名称
- graph: 图名称
- id: 顶点 id,需要包含引号,例如"1:marko"
Method & Url
Request Body
注意:属性的取值有三种类别,分别为 single、set 和 list。single 表示增加或更新属性值,set 或 list 表示追加属性值。
Response Status
Response Body
2.1.4 批量更新顶点属性
功能说明
批量更新顶点的属性时,可以选择多种更新策略,如下:
- SUM: 数值累加
- BIGGER: 原值和新值 (数字、日期) 取更大的
- SMALLER: 原值和新值 (数字、日期) 取更小的
- UNION: Set 属性取并集
- INTERSECTION: Set 属性取交集
- APPEND: List 属性追加元素
- ELIMINATE: List/Set属性删除元素
- OVERRIDE: 覆盖已有属性,如果新属性为 null,则仍然使用旧属性
假设原顶点的属性如下:
通过以下命令新增顶点:
Params
路径参数说明:
- graphspace: 图空间名称
- graph: 图名称
Method & Url
Request Body
Response Status
Response Body
结果分析如下:
- lang 属性未指定更新策略,直接用新值覆盖旧值,无论新值是否为 null;
- price 属性指定 BIGGER 的更新策略,旧属性值为 328,新属性值为 299,所以仍然保留了旧属性值 328;
- age 属性指定 OVERRIDE 更新策略,而新属性值中未传入 age,相当于 age 为 null,所以仍然保留了原属性值 32;
- city 属性也指定了 OVERRIDE 更新策略,且新属性值不为 null,所以覆盖了旧值;
- weight 属性指定了 SUM 更新策略,旧属性值为 0.1,新属性值为 0.2,最后的值为 0.3;
- hobby 属性(基数为 Set)指定了 UNION 更新策略,所以新值与旧值取了并集;
其他更新策略的使用方式与此类似,此处不再详述。
2.1.5 删除顶点属性
Params
路径参数说明:
- graphspace: 图空间名称
- graph: 图名称
- id: 顶点 id,需要包含引号,例如"1:marko"
Method & Url
Request Body
注意:这里会直接删除属性(删除 key 和所有 value),无论其属性的取值是 single、set 或 list。
Response Status
Response Body
2.1.6 获取符合条件的顶点
Params
路径参数说明:
- graphspace: 图空间名称
- graph: 图名称
请求参数说明:
- label: 顶点的类型
- properties: 属性键值对(查询属性的前提是该属性已经建立了索引)
- keep_start_p: 默认为 false,设置为 true 时不会自动转义范围匹配表达式,例如
properties={"age":"P.gt(18)"}会被当作精确匹配,即 age 属性等于字符串 “P.gt(18)” - offset: 偏移量,默认为 0
- limit: 查询结果的最大数目,默认为 100
- page: 分页的页号
以上参数都是可选的,page 不能与非 0 的 offset 同时使用,其余参数之间可以任意组合。
属性键值对由属性名称和属性值组成 JSON 格式的对象,可以使用多个属性键值对作为查询条件,属性值支持精确匹配和范围匹配,精确匹配的形式如properties={"age":29},范围匹配的形式如properties={"age":"P.gt(29)"},范围匹配支持以下表达式:
| 表达式 | 说明 |
|---|---|
| P.eq(number) | 属性值等于 number 的顶点 |
| P.neq(number) | 属性值不等于 number 的顶点 |
| P.lt(number) | 属性值小于 number 的顶点 |
| P.lte(number) | 属性值小于等于 number 的顶点 |
| P.gt(number) | 属性值大于 number 的顶点 |
| P.gte(number) | 属性值大于等于 number 的顶点 |
| P.between(number1,number2) | 属性值大于等于 number1 且小于 number2 的顶点 |
| P.inside(number1,number2) | 属性值大于 number1 且小于 number2 的顶点 |
| P.outside(number1,number2) | 属性值小于 number1 且大于 number2 的顶点 |
| P.within(value1,value2,value3,…) | 属性值等于任何一个给定 value 的顶点 |
查询所有 age 为 29 且 label 为 person 的顶点
Method & Url
Response Status
Response Body
分页查询所有顶点,获取第一页(page 不带参数值),限定 3 条
通过以下命令新增顶点:
Method & Url
Response Status
Response Body
返回的 body 里面是带有下一页的页号信息的,"page": "CIYxOnBldGVyAAAAAAAAAAM=",在查询下一页的时候将该值赋给 page 参数。
分页查询所有顶点,获取下一页(page 带上上一页返回的 page 值),限定 3 条
Method & Url
Response Status
Response Body
当"page": null时,表示已经没有下一页了(注:如果后端使用的是 Cassandra,为了提高性能,当返回的页数刚好是最后一页时,返回的 page 值可能不为空,但是如果用这个 page 值再请求下一页数据时,就会返回 空数据 和 page = null,其他情况也类似)
2.1.7 根据 Id 获取顶点
Params
路径参数说明:
- graphspace: 图空间名称
- graph: 图名称
- id: 顶点 id,需要包含引号,例如"1:marko"
Method & Url
Response Status
Response Body
2.1.8 根据 Id 删除顶点
Params
路径参数说明:
- graphspace: 图空间名称
- graph: 图名称
- id: 顶点 id,需要包含引号,例如"1:marko"
请求参数说明:
- label: 顶点类型,可选参数
仅根据 Id 删除顶点
Method & Url
Response Status
根据 Label+Id 删除顶点
通过指定 Label 参数和 Id 来删除顶点时,一般来说其性能比仅根据 Id 删除会更好。
Method & Url
Response Status
5.1.9 - Edge API
2.2 Edge
顶点 id 格式的修改也影响到了边的 id 以及源顶点和目标顶点 id 的格式
EdgeId 是由 src-vertex-id + direction + label + sort-values + tgt-vertex-id 拼接而成,但是这里的顶点 id 类型不是通过引号区分的,而是根据前缀区分:
- 当 id 类型为 number 时,EdgeId 的顶点 id 前有一个前缀
L,形如 “L123456>1»L987654” - 当 id 类型为 string 时,EdgeId 的顶点 id 前有一个前缀
S,形如 “S1:peter>1»S2:lop”
接下来的示例需要先根据以下 groovy 脚本创建图 schema
2.2.1 创建一条边
Params
路径参数说明:
- graphspace: 图空间名称
- graph:待操作的图
请求体说明:
- label:边类型名称,必填
- outV:源顶点 id,必填
- inV:目标顶点 id,必填
- outVLabel:源顶点类型,必填
- inVLabel:目标顶点类型,必填
- properties: 边关联的属性,对象内部结构为:
- name:属性名称
- value:属性值
Method & Url
Request Body
Response Status
Response Body
2.2.2 创建多条边
Params
路径参数说明:
- graphspace: 图空间名称
- graph:待操作的图
请求参数说明:
- check_vertex:是否检查顶点存在 (true | false),当设置为 true 而待插入边的源顶点或目标顶点不存在时会报错,默认为 true
请求体说明:
- 边信息的列表
Method & Url
Request Body
Response Status
Response Body
2.2.3 更新边属性
Params
路径参数说明:
- graphspace: 图空间名称
- graph:待操作的图
- id:待操作的边 id
请求参数说明:
- action:append 操作
请求体说明:
- 边信息
Method & Url
Request Body
注意:属性的取值是有三种类别的,分别是 single、set 和 list。如果是 single,表示增加或更新属性值;如果是 set 或 list,则表示追加属性值
Response Status
Response Body
2.2.4 批量更新边属性
Params
路径参数说明:
- graphspace: 图空间名称
- graph:待操作的图
请求体说明:
- edges:边信息的列表
- update_strategies:对于每个属性,可以单独设置其更新策略,包括:
- SUM:仅支持 number 类型
- BIGGER/SMALLER:仅支持 date/number 类型
- UNION/INTERSECTION:仅支持 set 类型
- APPEND/ELIMINATE:仅支持 collection 类型
- OVERRIDE
- check_vertex:是否检查顶点存在 (true | false),当设置为 true 而待插入边的源顶点或目标顶点不存在时会报错,默认为 true
- create_if_not_exist:目前只支持设定为 true
Method & Url
Request Body
Response Status
Response Body
2.2.5 删除边属性
Params
路径参数说明:
- graphspace: 图空间名称
- graph:待操作的图
- id:待操作的边 id
请求参数说明:
- action:eliminate 操作
请求体说明:
- 边信息
Method & Url
Request Body
注意:这里会直接删除属性(删除 key 和所有 value),无论其属性的取值是 single、set 或 list
Response Status
Response Body
无法删除未设置为 nullable 的属性
2.2.6 获取符合条件的边
Params
路径参数说明:
- graphspace: 图空间名称
- graph:待操作的图
请求参数说明:
- vertex_id: 顶点 id
- direction: 边的方向 (OUT | IN | BOTH),默认为 BOTH
- label: 边的标签
- properties: 属性键值对 (根据属性查询的前提是预先建立了索引)
- keep_start_p: 默认为 false,当设置为 true 后,不会自动转义范围匹配输入的表达式,例如此时
properties={"age":"P.gt(0.8)"}会被理解为精确匹配,即 age 属性等于 “P.gt(0.8)” - offset:偏移,默认为 0
- limit: 查询数目,默认为 100
- page: 页号
属性键值对由 JSON 格式的属性名称和属性值组成,允许多个属性键值对作为查询条件,属性值支持精确匹配和范围匹配,精确匹配时形如 properties={"weight":0.8},范围匹配时形如 properties={"age":"P.gt(0.8)"},范围匹配支持的表达式如下:
| 表达式 | 说明 |
|---|---|
| P.eq(number) | 属性值等于 number 的边 |
| P.neq(number) | 属性值不等于 number 的边 |
| P.lt(number) | 属性值小于 number 的边 |
| P.lte(number) | 属性值小于等于 number 的边 |
| P.gt(number) | 属性值大于 number 的边 |
| P.gte(number) | 属性值大于等于 number 的边 |
| P.between(number1,number2) | 属性值大于等于 number1 且小于 number2 的边 |
| P.inside(number1,number2) | 属性值大于 number1 且小于 number2 的边 |
| P.outside(number1,number2) | 属性值小于 number1 且大于 number2 的边 |
| P.within(value1,value2,value3,…) | 属性值等于任何一个给定 value 的边 |
| P.textcontains(value) | 属性值包含给定 value 的边 (string 类型) |
| P.contains(value) | 属性值包含给定 value 的边 (collection 类型) |
查询与顶点 person:marko(vertex_id=“1:marko”) 相连且 label 为 knows 的且 date 属性等于 “20160111” 的边
Method & Url
Response Status
Response Body
分页查询所有边,获取第一页(page 不带参数值),限定 2 条
Method & Url
Response Status
Response Body
返回的 body 里面是带有下一页的页号信息的,"page": "EoYxOm1hcmtvgggCAIQyOmxvcAAAAAAAAAAC",在查询下一页的时候将该值赋给 page 参数
分页查询所有边,获取下一页(page 带上上一页返回的 page 值),限定 2 条
Method & Url
Response Status
Response Body
此时 "page": null 表示已经没有下一页了
注:后端为 Cassandra 时,为了性能考虑,返回页恰好为最后一页时,返回
page值可能非空,通过该page再请求下一页数据时则返回空数据及page = null,其他情况类似
2.2.7 根据 id 获取边
Params
路径参数说明:
- graphspace: 图空间名称
- graph:待操作的图
- id:待操作的边 id
Method & Url
Response Status
Response Body
2.2.8 根据 id 删除边
Params
路径参数说明:
- graphspace: 图空间名称
- graph:待操作的图
- id:待操作的边 id
请求参数说明:
- label: 边的标签
仅根据 id 删除边
Method & Url
Response Status
根据 label + id 删除边
通过指定 label 参数和 id 来删除边时,一般来说其性能比仅根据 id 删除会更好
Method & Url
Response Status
5.1.10 - Traverser API
3.1 traverser API 概述
HugeGraphServer 为 HugeGraph 图数据库提供了 RESTful API 接口。除了顶点和边的 CRUD 基本操作以外,还提供了一些遍历(traverser)方法,我们称为traverser API。这些遍历方法实现了一些复杂的图算法,方便用户对图进行分析和挖掘。
HugeGraph 支持的 Traverser API 包括:
- K-out API,根据起始顶点,查找恰好 N 步可达的邻居,分为基础版和高级版:
- 基础版使用 GET 方法,根据起始顶点,查找恰好 N 步可达的邻居
- 高级版使用 POST 方法,根据起始顶点,查找恰好 N 步可达的邻居,与基础版的不同在于:
- 支持只统计邻居数量
- 支持顶点和边属性过滤
- 支持返回到达邻居的最短路径
- K-neighbor API,根据起始顶点,查找 N 步以内可达的所有邻居,分为基础版和高级版:
- 基础版使用 GET 方法,根据起始顶点,查找 N 步以内可达的所有邻居
- 高级版使用 POST 方法,根据起始顶点,查找 N 步以内可达的所有邻居,与基础版的不同在于:
- 支持只统计邻居数量
- 支持顶点和边属性过滤
- 支持返回到达邻居的最短路径
- Same Neighbors, 查询两个顶点的共同邻居
- Jaccard Similarity API,计算 jaccard 相似度,包括两种:
- 一种是使用 GET 方法,计算两个顶点的邻居的相似度(交并比)
- 一种是使用 POST 方法,在全图中查找与起点的 jaccard similarity 最高的 N 个点
- Shortest Path API,查找两个顶点之间的最短路径
- All Shortest Paths,查找两个顶点间的全部最短路径
- Weighted Shortest Path,查找起点到目标点的带权最短路径
- Single Source Shortest Path,查找一个点到其他各个点的加权最短路径
- Multi Node Shortest Path,查找指定顶点集之间两两最短路径
- Paths API,查找两个顶点间的全部路径,分为基础版和高级版:
- 基础版使用 GET 方法,根据起点和终点,查找两个顶点间的全部路径
- 高级版使用 POST 方法,根据一组起点和一组终点,查找两个集合间符合条件的全部路径
- Customized Paths API,从一批顶点出发,按(一种)模式遍历经过的全部路径
- Template Path API,指定起点和终点以及起点和终点间路径信息,查找符合的路径
- Crosspoints API,查找两个顶点的交点(共同祖先或者共同子孙)
- Customized Crosspoints API,从一批顶点出发,按多种模式遍历,最后一步到达的顶点的交点
- Rings API,从起始顶点出发,可到达的环路路径
- Rays API,从起始顶点出发,可到达边界的路径(即无环路径)
- Fusiform Similarity API,查找一个顶点的梭形相似点
- Adamic-Adar API,计算两个顶点的 Adamic-Adar 指标
- Resource Allocation API,计算两个顶点的资源分配指标
- Edge Existence API,查询两个顶点之间存在的边
- Count API,统计经过若干步遍历后可达的顶点数量,不返回顶点本身
- Vertices API
- 按 ID 批量查询顶点;
- 获取顶点的分区;
- 按分区查询顶点;
- Edges API
- 按 ID 批量查询边;
- 获取边的分区;
- 按分区查询边;
3.2. traverser API 详解
使用方法中的例子,都是基于 TinkerPop 官网给出的图:
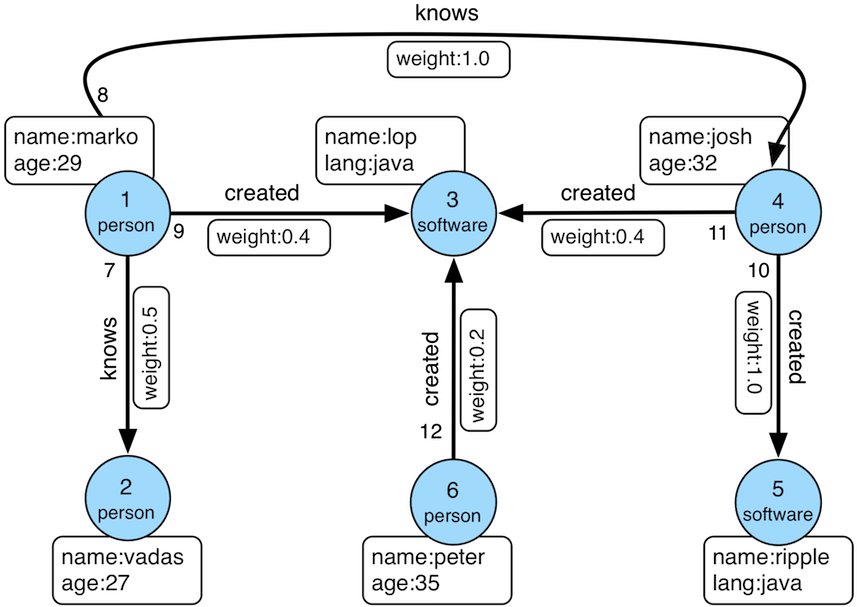
数据导入程序如下:
顶点 ID 为:
边 ID 为:
3.2.1 K-out API(GET,基础版)
3.2.1.1 功能介绍
根据起始顶点、方向、边的类型(可选)和深度 depth,查找从起始顶点出发恰好 depth 步可达的顶点
Params
- source:起始顶点 id,必填项
- direction:起始顶点向外发散的方向(OUT,IN,BOTH),选填项,默认是 BOTH
- max_depth:步数,必填项
- label:边的类型,选填项,默认代表所有 edge label
- nearest:nearest 为 true 时,代表起始顶点到达结果顶点的最短路径长度为 depth,不存在更短的路径;nearest 为 false 时,代表起始顶点到结果顶点有一条长度为 depth 的路径(未必最短且可以有环),选填项,默认为 true
- max_degree:查询过程中,单个顶点遍历的最大邻接边数目,选填项,默认为 10000
- capacity:遍历过程中最大的访问的顶点数目,选填项,默认为 10000000
- limit:返回的顶点的最大数目,选填项,默认为 10000000
3.2.1.2 使用方法
Method & Url
Response Status
Response Body
3.2.1.3 适用场景
查找恰好 N 步关系可达的顶点。两个例子:
- 家族关系中,查找一个人的所有孙子,person A 通过连续的两条“儿子”边到达的顶点集合。
- 社交关系中发现潜在好友,例如:与目标用户相隔两层朋友关系的用户,可以通过连续两条“朋友”边到达的顶点。
3.2.2 K-out API(POST,高级版)
3.2.2.1 功能介绍
根据起始顶点、步骤(包括方向、边类型和过滤属性)和深度 depth,查找从起始顶点出发恰好 depth 步可达的顶点。
与 K-out 基础版的不同在于:
- 支持只统计邻居数量
- 支持边属性过滤
- 支持返回到达邻居的最短路径
Params
- source:起始顶点 id,必填项
- steps: 从起始点出发的 Steps,必填项,结构如下:
- direction:表示边的方向(OUT,IN,BOTH),默认是 BOTH
- edge_steps:边 Step 集合,支持对单边的类型和属性过滤,如果为空,则不过滤
- label:边类型
- properties:边属性
- vertex_steps:顶点 Step 集合,支持对单点的类型和属性过滤,如果为空,则不过滤
- label:顶点类型
- properties:顶点属性
- max_degree:查询过程中,单个顶点遍历的最大邻接边数目,默认为 10000;当前也兼容参数名
degree。 - skip_degree:用于设置查询过程中舍弃超级顶点的最小边数,即当某个顶点的邻接边数目大于 skip_degree 时,完全舍弃该顶点。选填项,如果开启时,需满足
skip_degree >= max_degree约束,默认为 0 (不启用),表示不跳过任何点 (注意:开启此配置后,遍历时会尝试访问一个顶点的 skip_degree 条边,而不仅仅是 max_degree 条边,这样有额外的遍历开销,对查询性能影响可能有较大影响,请确认理解后再开启)
- max_depth:步数,必填项
- nearest:nearest 为 true 时,代表起始顶点到达结果顶点的最短路径长度为 depth,不存在更短的路径;nearest 为 false 时,代表起始顶点到结果顶点有一条长度为 depth 的路径(未必最短且可以有环),选填项,默认为 true
- count_only:Boolean 值,true 表示只统计结果的数目,不返回具体结果;false 表示返回具体的结果,默认为 false
- with_path:true 表示返回起始点到每个邻居的最短路径,false 表示不返回起始点到每个邻居的最短路径,选填项,默认为 false
- with_edge,选填项,默认为 false:
- 如果设置为 true,则结果将包含所有边的完整信息,即路径中的所有边
- 当 with_path 为 true 时,将返回所有路径中的边的完整信息
- 当 with_path 为 false 时,不返回任何信息
- 如果设置为 false,则仅返回边的 id
- 如果设置为 true,则结果将包含所有边的完整信息,即路径中的所有边
- with_vertex,选填项,默认为 false:
- 如果设置为 true,则结果将包含所有顶点的完整信息,即路径中的所有顶点
- 当 with_path 为 true 时,将返回所有路径中的顶点的完整信息
- 当 with_path 为 false 时,返回所有邻居顶点的完整信息
- 如果设置为 false,则仅返回顶点的 id
- 如果设置为 true,则结果将包含所有顶点的完整信息,即路径中的所有顶点
- capacity:遍历过程中最大的访问的顶点数目,选填项,默认为 10000000
- limit:返回的顶点的最大数目,选填项,默认为 10000000
- traverse_mode: 遍历方式,可选择“breadth_first_search”或“depth_first_search”作为参数,默认为“breadth_first_search”
3.2.2.2 使用方法
Method & Url
Request Body
Response Status
Response Body
3.2.2.3 适用场景
参见 3.2.1.3
3.2.3 K-neighbor(GET,基础版)
3.2.3.1 功能介绍
根据起始顶点、方向、边的类型(可选)和深度 depth,查找包括起始顶点在内、depth 步之内可达的所有顶点
相当于:起始顶点、K-out(1)、K-out(2)、… 、K-out(max_depth) 的并集
Params
- source: 起始顶点 id,必填项
- direction:起始顶点向外发散的方向(OUT,IN,BOTH),选填项,默认是 BOTH
- max_depth:步数,必填项
- label:边的类型,选填项,默认代表所有 edge label
- max_degree:查询过程中,单个顶点遍历的最大邻接边数目,选填项,默认为 10000
- limit:返回的顶点的最大数目,也即遍历过程中最大的访问的顶点数目,选填项,默认为 10000000
3.2.3.2 使用方法
Method & Url
Response Status
Response Body
3.2.3.3 适用场景
查找 N 步以内可达的所有顶点,例如:
- 家族关系中,查找一个人五服以内所有子孙,person A 通过连续的 5 条“亲子”边到达的顶点集合。
- 社交关系中发现好友圈子,例如目标用户通过 1 条、2 条、3 条“朋友”边可到达的用户可以组成目标用户的朋友圈子
3.2.4 K-neighbor API(POST,高级版)
3.2.4.1 功能介绍
根据起始顶点、步骤(包括方向、边类型和过滤属性)和深度 depth,查找从起始顶点出发 depth 步内可达的所有顶点。
与 K-neighbor 基础版的不同在于:
- 支持只统计邻居数量
- 支持边属性过滤
- 支持返回到达邻居的最短路径
Params
- source:起始顶点 id,必填项
- steps: 从起始点出发的 Steps,必填项,结构如下:
- direction:表示边的方向(OUT,IN,BOTH),默认是 BOTH
- 从起始点出发的 Steps,必填项,结构如下:
- direction:表示边的方向(OUT,IN,BOTH),默认是 BOTH
- edge_steps:边 Step 集合,支持对单边的类型和属性过滤,如果为空,则不过滤
- label:边类型
- properties:边属性
- vertex_steps:顶点 Step 集合,支持对单点的类型和属性过滤,如果为空,则不过滤
- label:顶点类型
- properties:顶点属性
- max_degree:查询过程中,单个顶点遍历的最大邻接边数目,默认为 10000;当前也兼容参数名
degree。 - skip_degree:用于设置查询过程中舍弃超级顶点的最小边数,即当某个顶点的邻接边数目大于 skip_degree 时,完全舍弃该顶点。选填项,如果开启时,需满足
skip_degree >= max_degree约束,默认为 0 (不启用),表示不跳过任何点 (注意:开启此配置后,遍历时会尝试访问一个顶点的 skip_degree 条边,而不仅仅是 max_degree 条边,这样有额外的遍历开销,对查询性能影响可能有较大影响,请确认理解后再开启)
- max_depth:步数,必填项
- count_only:Boolean 值,true 表示只统计结果的数目,不返回具体结果;false 表示返回具体的结果,默认为 false
- with_path:true 表示返回起始点到每个邻居的最短路径,false 表示不返回起始点到每个邻居的最短路径,选填项,默认为 false
- with_edge,选填项,默认为 false:
- 如果设置为 true,则结果将包含所有边的完整信息,即路径中的所有边
- 当 with_path 为 true 时,将返回所有路径中的边的完整信息
- 当 with_path 为 false 时,不返回任何信息
- 如果设置为 false,则仅返回边的 id
- 如果设置为 true,则结果将包含所有边的完整信息,即路径中的所有边
- with_vertex,选填项,默认为 false:
- 如果设置为 true,则结果将包含所有顶点的完整信息,即路径中的所有顶点
- 当 with_path 为 true 时,将返回所有路径中的顶点的完整信息
- 当 with_path 为 false 时,返回所有邻居顶点的完整信息
- 如果设置为 false,则仅返回顶点的 id
- 如果设置为 true,则结果将包含所有顶点的完整信息,即路径中的所有顶点
- limit:返回的顶点的最大数目,选填项,默认为 10000000
3.2.4.2 使用方法
Method & Url
Request Body
Response Status
Response Body
3.2.4.3 适用场景
参见 3.2.3.3
3.2.5 Same Neighbors
3.2.5.1 功能介绍
查询两个点的共同邻居
Params
- vertex:一个顶点 id,必填项
- other:另一个顶点 id,必填项
- direction:顶点向外发散的方向(OUT,IN,BOTH),选填项,默认是 BOTH
- label:边的类型,选填项,默认代表所有 edge label
- max_degree:查询过程中,单个顶点遍历的最大邻接边数目,选填项,默认为 10000
- limit:返回的共同邻居的最大数目,选填项,默认为 10000000
3.2.5.2 使用方法
Method & Url
Response Status
Response Body
3.2.5.3 适用场景
查找两个顶点的共同邻居:
- 社交关系中发现两个用户的共同粉丝或者共同关注用户
3.2.6 Jaccard Similarity (GET)
3.2.6.1 功能介绍
计算两个顶点的 jaccard similarity(两个顶点邻居的交集比上两个顶点邻居的并集)
对于并集非空的邻居集合 N(u) 和 N(v),上述定义可写为:
Params
- vertex:一个顶点 id,必填项
- other:另一个顶点 id,必填项
- direction:顶点向外发散的方向(OUT,IN,BOTH),选填项,默认是 BOTH
- label:边的类型,选填项,默认代表所有 edge label
- max_degree:查询过程中,单个顶点遍历的最大邻接边数目,选填项,默认为 10000
3.2.6.2 使用方法
Method & Url
Response Status
Response Body
3.2.6.3 适用场景
用于评估两个点的相似性或者紧密度
3.2.7 Jaccard Similarity (POST)
3.2.7.1 功能介绍
计算与指定顶点的 jaccard similarity 最大的 N 个点
jaccard similarity 的计算方式为:两个顶点邻居的交集比上两个顶点邻居的并集
Params
- vertex:一个顶点 id,必填项
- 从起始点出发的 Step,必填项,结构如下:
- direction:表示边的方向(OUT,IN,BOTH),默认是 BOTH
- labels:边的类型列表
- properties:通过属性的值过滤边
- max_degree:查询过程中,单个顶点遍历的最大邻接边数目,默认为 10000;当前也兼容参数名
degree。 - skip_degree:用于设置查询过程中舍弃超级顶点的最小边数,即当某个顶点的邻接边数目大于 skip_degree 时,完全舍弃该顶点。选填项,如果开启时,需满足
skip_degree >= max_degree约束,默认为 0 (不启用),表示不跳过任何点 (注意:开启此配置后,遍历时会尝试访问一个顶点的 skip_degree 条边,而不仅仅是 max_degree 条边,这样有额外的遍历开销,对查询性能影响可能有较大影响,请确认理解后再开启)
- top:返回一个起点的 jaccard similarity 中最大的 top 个,选填项,默认为 100
- capacity:遍历过程中最大的访问的顶点数目,选填项,默认为 10000000
3.2.7.2 使用方法
Method & Url
Request Body
Response Status
Response Body
3.2.7.3 适用场景
用于在图中找出与指定顶点相似性最高的顶点
3.2.8 Shortest Path
3.2.8.1 功能介绍
根据起始顶点、目的顶点、方向、边的类型(可选)和最大深度,查找一条最短路径
Params
- source:起始顶点 id,必填项
- target:目的顶点 id,必填项
- direction:起始顶点向外发散的方向(OUT,IN,BOTH),选填项,默认是 BOTH
- max_depth:最大步数,必填项
- label:边的类型,选填项,默认代表所有 edge label
- max_degree:查询过程中,单个顶点遍历的最大邻接边数目,选填项,默认为 10000
- skip_degree:用于设置查询过程中舍弃超级顶点的最小边数,即当某个顶点的邻接边数目大于 skip_degree 时,完全舍弃该顶点。选填项,如果开启时,需满足
skip_degree >= max_degree约束,默认为 0 (不启用),表示不跳过任何点 (注意:开启此配置后,遍历时会尝试访问一个顶点的 skip_degree 条边,而不仅仅是 max_degree 条边,这样有额外的遍历开销,对查询性能影响可能有较大影响,请确认理解后再开启) - capacity:遍历过程中最大的访问的顶点数目,选填项,默认为 10000000
3.2.8.2 使用方法
Method & Url
Response Status
Response Body
3.2.8.3 适用场景
查找两个顶点间的最短路径,例如:
- 社交关系网中,查找两个用户有关系的最短路径,即最近的朋友关系链
- 设备关联网络中,查找两个设备最短的关联关系
3.2.9 All Shortest Paths
3.2.9.1 功能介绍
根据起始顶点、目的顶点、方向、边的类型(可选)和最大深度,查找两点间所有的最短路径
Params
- source:起始顶点 id,必填项
- target:目的顶点 id,必填项
- direction:起始顶点向外发散的方向(OUT,IN,BOTH),选填项,默认是 BOTH
- max_depth:最大步数,必填项
- label:边的类型,选填项,默认代表所有 edge label
- max_degree:查询过程中,单个顶点遍历的最大邻接边数目,选填项,默认为 10000
- skip_degree:用于设置查询过程中舍弃超级顶点的最小边数,即当某个顶点的邻接边数目大于 skip_degree 时,完全舍弃该顶点。选填项,如果开启时,需满足
skip_degree >= max_degree约束,默认为 0 (不启用),表示不跳过任何点 (注意:开启此配置后,遍历时会尝试访问一个顶点的 skip_degree 条边,而不仅仅是 max_degree 条边,这样有额外的遍历开销,对查询性能影响可能有较大影响,请确认理解后再开启) - capacity:遍历过程中最大的访问的顶点数目,选填项,默认为 10000000
3.2.9.2 使用方法
Method & Url
Response Status
Response Body
3.2.9.3 适用场景
查找两个顶点间的所有最短路径,例如:
- 社交关系网中,查找两个用户有关系的全部最短路径,即最近的朋友关系链
- 设备关联网络中,查找两个设备全部的最短关联关系
3.2.10 Weighted Shortest Path
3.2.10.1 功能介绍
根据起始顶点、目的顶点、方向、边的类型(可选)和最大深度,查找一条带权最短路径
Params
- source:起始顶点 id,必填项
- target:目的顶点 id,必填项
- direction:起始顶点向外发散的方向(OUT,IN,BOTH),选填项,默认是 BOTH
- label:边的类型,选填项,默认代表所有 edge label
- weight:边的权重属性,必填项,必须是数字类型的属性
- max_degree:查询过程中,单个顶点遍历的最大邻接边数目,选填项,默认为 10000
- skip_degree:用于设置查询过程中舍弃超级顶点的最小边数,即当某个顶点的邻接边数目大于 skip_degree 时,完全舍弃该顶点。选填项,如果开启时,需满足
skip_degree >= max_degree约束,默认为 0 (不启用),表示不跳过任何点 (注意:开启此配置后,遍历时会尝试访问一个顶点的 skip_degree 条边,而不仅仅是 max_degree 条边,这样有额外的遍历开销,对查询性能影响可能有较大影响,请确认理解后再开启) - capacity:遍历过程中最大的访问的顶点数目,选填项,默认为 10000000
- with_vertex:true 表示返回结果包含完整的顶点信息(路径中的全部顶点),false 时表示只返回顶点 id,选填项,默认为 false
3.2.10.2 使用方法
Method & Url
Response Status
Response Body
3.2.10.3 适用场景
查找两个顶点间的带权最短路径,例如:
- 交通线路中查找从 A 城市到 B 城市花钱最少的交通方式
3.2.11 Single Source Shortest Path
3.2.11.1 功能介绍
从一个顶点出发,查找该点到图中其他顶点的最短路径(可选是否带权重)
Params
- source:起始顶点 id,必填项
- direction:起始顶点向外发散的方向(OUT,IN,BOTH),选填项,默认是 BOTH
- label:边的类型,选填项,默认代表所有 edge label
- weight:边的权重属性,选填项,必须是数字类型的属性,如果不填或者虽然填了但是边没有该属性,则权重为 1.0
- max_degree:查询过程中,单个顶点遍历的最大邻接边数目,选填项,默认为 10000
- skip_degree:用于设置查询过程中舍弃超级顶点的最小边数,即当某个顶点的邻接边数目大于 skip_degree 时,完全舍弃该顶点。选填项,如果开启时,需满足
skip_degree >= max_degree约束,默认为 0 (不启用),表示不跳过任何点 (注意:开启此配置后,遍历时会尝试访问一个顶点的 skip_degree 条边,而不仅仅是 max_degree 条边,这样有额外的遍历开销,对查询性能影响可能有较大影响,请确认理解后再开启) - capacity:遍历过程中最大的访问的顶点数目,选填项,默认为 10000000
- limit:查询到的目标顶点个数,也是返回的最短路径的条数,选填项,默认为 10
- with_vertex:true 表示返回结果包含完整的顶点信息(路径中的全部顶点),false 时表示只返回顶点 id,选填项,默认为 false
3.2.11.2 使用方法
Method & Url
Response Status
Response Body
3.2.11.3 适用场景
查找从一个点出发到其他顶点的带权最短路径,比如:
- 查找从北京出发到全国其他所有城市的耗时最短的乘车方案
3.2.12 Multi Node Shortest Path
3.2.12.1 功能介绍
查找指定顶点集两两之间的最短路径
Params
- vertices:定义起始顶点,必填项,指定方式包括:
- ids:通过顶点 id 列表提供起始顶点
- label 和 properties:如果没有指定 ids,则使用 label 和 properties 的联合条件查询起始顶点
- label:顶点的类型
- properties:通过属性的值查询起始顶点
注意:properties 中的属性值可以是列表,表示只要 key 对应的 value 在列表中就可以
- step:表示从起始顶点到终止顶点走过的路径,必填项,Step 的结构如下:
- direction:表示边的方向(OUT,IN,BOTH),默认是 BOTH
- labels:边的类型列表
- properties:通过属性的值过滤边
- max_degree:查询过程中,单个顶点遍历的最大邻接边数目,默认为 10000;当前也兼容参数名
degree。 - skip_degree:用于设置查询过程中舍弃超级顶点的最小边数,即当某个顶点的邻接边数目大于 skip_degree 时,完全舍弃该顶点。选填项,如果开启时,需满足
skip_degree >= max_degree约束,默认为 0 (不启用),表示不跳过任何点 (注意:开启此配置后,遍历时会尝试访问一个顶点的 skip_degree 条边,而不仅仅是 max_degree 条边,这样有额外的遍历开销,对查询性能影响可能有较大影响,请确认理解后再开启)
- max_depth:步数,必填项
- capacity:遍历过程中最大的访问的顶点数目,选填项,默认为 10000000
- with_vertex:true 表示返回结果包含完整的顶点信息(路径中的全部顶点),false 时表示只返回顶点 id,选填项,默认为 false
3.2.12.2 使用方法
Method & Url
Request Body
Response Status
Response Body
3.2.12.3 适用场景
查找多个点之间的最短路径,比如:
- 查找多个公司和法人之间的最短路径
3.2.13 Paths(GET,基础版)
3.2.13.1 功能介绍
根据起始顶点、目的顶点、方向、边的类型(可选)和最大深度等条件查找所有路径
Params
- source:起始顶点 id,必填项
- target:目的顶点 id,必填项
- direction:起始顶点向外发散的方向(OUT,IN,BOTH),选填项,默认是 BOTH
- label:边的类型,选填项,默认代表所有 edge label
- max_depth:步数,必填项
- max_degree:查询过程中,单个顶点遍历的最大邻接边数目,选填项,默认为 10000
- capacity:遍历过程中最大的访问的顶点数目,选填项,默认为 10000000
- limit:返回的路径的最大数目,选填项,默认为 10
3.2.13.2 使用方法
Method & Url
Response Status
Response Body
3.2.13.3 适用场景
查找两个顶点间的所有路径,例如:
- 社交网络中,查找两个用户所有可能的关系路径
- 设备关联网络中,查找两个设备之间所有的关联路径
3.2.14 Paths(POST,高级版)
3.2.14.1 功能介绍
根据起始顶点、目的顶点、步骤(step)和最大深度等条件查找所有路径
Params
- sources:定义起始顶点,必填项,指定方式包括:
- ids:通过顶点 id 列表提供起始顶点
- label 和 properties:如果没有指定 ids,则使用 label 和 properties 的联合条件查询起始顶点
- label:顶点的类型
- properties:通过属性的值查询起始顶点
注意:properties 中的属性值可以是列表,表示只要 key 对应的 value 在列表中就可以
- targets:定义终止顶点,必填项,指定方式包括:
- ids:通过顶点 id 列表提供终止顶点
- label 和 properties:如果没有指定 ids,则使用 label 和 properties 的联合条件查询终止顶点
- label:顶点的类型
- properties:通过属性的值查询终止顶点
注意:properties 中的属性值可以是列表,表示只要 key 对应的 value 在列表中就可以
- step:表示从起始顶点到终止顶点走过的路径,必填项,Step 的结构如下:
- direction:表示边的方向(OUT,IN,BOTH),默认是 BOTH
- labels:边的类型列表
- properties:通过属性的值过滤边
- max_degree:查询过程中,单个顶点遍历的最大邻接边数目,默认为 10000;当前也兼容参数名
degree。 - skip_degree:用于设置查询过程中舍弃超级顶点的最小边数,即当某个顶点的邻接边数目大于 skip_degree 时,完全舍弃该顶点。选填项,如果开启时,需满足
skip_degree >= max_degree约束,默认为 0 (不启用),表示不跳过任何点 (注意:开启此配置后,遍历时会尝试访问一个顶点的 skip_degree 条边,而不仅仅是 max_degree 条边,这样有额外的遍历开销,对查询性能影响可能有较大影响,请确认理解后再开启)
- max_depth:步数,必填项
- nearest:nearest 为 true 时,代表起始顶点到达结果顶点的最短路径长度为 depth,不存在更短的路径;nearest 为 false 时,代表起始顶点到结果顶点有一条长度为 depth 的路径(未必最短且可以有环),选填项,默认为 true
- capacity:遍历过程中最大的访问的顶点数目,选填项,默认为 10000000
- limit:返回的路径的最大数目,选填项,默认为 10
- with_vertex:true 表示返回结果包含完整的顶点信息(路径中的全部顶点),false 时表示只返回顶点 id,选填项,默认为 false
3.2.14.2 使用方法
Method & Url
Request Body
Response Status
Response Body
3.2.14.3 适用场景
查找两个顶点间的所有路径,例如:
- 社交网络中,查找两个用户所有可能的关系路径
- 设备关联网络中,查找两个设备之间所有的关联路径
3.2.15 Customized Paths
3.2.15.1 功能介绍
根据一批起始顶点、边规则(包括方向、边的类型和属性过滤)和最大深度等条件查找符合条件的所有的路径
Params
- sources:定义起始顶点,必填项,指定方式包括:
- ids:通过顶点 id 列表提供起始顶点
- label 和 properties:如果没有指定 ids,则使用 label 和 properties 的联合条件查询起始顶点
- label:顶点的类型
- properties:通过属性的值查询起始顶点
注意:properties 中的属性值可以是列表,表示只要 key 对应的 value 在列表中就可以
- steps:表示从起始顶点走过的路径规则,是一组 Step 的列表。必填项。每个 Step 的结构如下:
- direction:表示边的方向(OUT,IN,BOTH),默认是 BOTH
- labels:边的类型列表
- properties:通过属性的值过滤边
- weight_by:根据指定的属性计算边的权重,sort_by 不为 NONE 时有效,与 default_weight 互斥
- default_weight:当边没有属性作为权重计算值时,采取的默认权重,sort_by 不为 NONE 时有效,与 weight_by 互斥
- max_degree:查询过程中,单个顶点遍历的最大邻接边数目,默认为 10000;当前也兼容参数名
degree。 - sample:当需要对某个 step 的符合条件的边进行采样时设置,-1 表示不采样,默认为采样 100
- sort_by:根据路径的权重排序,选填项,默认为 NONE:
- NONE 表示不排序,默认值
- INCR 表示按照路径权重的升序排序
- DECR 表示按照路径权重的降序排序
- capacity:遍历过程中最大的访问的顶点数目,选填项,默认为 10000000
- limit:返回的路径的最大数目,选填项,默认为 10
- with_vertex:true 表示返回结果包含完整的顶点信息(路径中的全部顶点),false 时表示只返回顶点 id,选填项,默认为 false
3.2.15.2 使用方法
Method & Url
Request Body
Response Status
Response Body
3.2.15.3 适用场景
适合查找各种复杂的路径集合,例如:
- 社交网络中,查找看过张艺谋所导演的电影的用户关注的大 V 的路径(张艺谋—>电影—->用户—>大 V)
- 风控网络中,查找多个高风险用户的直系亲属的朋友的路径(高风险用户—>直系亲属—>朋友)
3.2.16 Template Paths
3.2.16.1 功能介绍
根据一批起始顶点、边规则(包括方向、边的类型和属性过滤)和最大深度等条件查找符合条件的所有的路径
Params
- sources:定义起始顶点,必填项,指定方式包括:
- ids:通过顶点 id 列表提供起始顶点
- label 和 properties:如果没有指定 ids,则使用 label 和 properties 的联合条件查询起始顶点
- label:顶点的类型
- properties:通过属性的值查询起始顶点
注意:properties 中的属性值可以是列表,表示只要 key 对应的 value 在列表中就可以
- targets:定义终止顶点,必填项,指定方式包括:
- ids:通过顶点 id 列表提供终止顶点
- label 和 properties:如果没有指定 ids,则使用 label 和 properties 的联合条件查询终止顶点
- label:顶点的类型
- properties:通过属性的值查询终止顶点
注意:properties 中的属性值可以是列表,表示只要 key 对应的 value 在列表中就可以
- steps:表示从起始顶点走过的路径规则,是一组 Step 的列表。必填项。每个 Step 的结构如下:
- direction:表示边的方向(OUT,IN,BOTH),默认是 BOTH
- labels:边的类型列表
- properties:通过属性的值过滤边
- max_times:当前 step 可以重复的次数,当为 N 时,表示从起始顶点可以经过当前 step 1-N 次
- max_degree:查询过程中,单个顶点遍历的最大邻接边数目,默认为 10000;当前也兼容参数名
degree。 - skip_degree:用于设置查询过程中舍弃超级顶点的最小边数,即当某个顶点的邻接边数目大于 skip_degree 时,完全舍弃该顶点。选填项,如果开启时,需满足
skip_degree >= max_degree约束,默认为 0 (不启用),表示不跳过任何点 (注意:开启此配置后,遍历时会尝试访问一个顶点的 skip_degree 条边,而不仅仅是 max_degree 条边,这样有额外的遍历开销,对查询性能影响可能有较大影响,请确认理解后再开启)
- with_ring:Boolean 值,true 表示包含环路;false 表示不包含环路,默认为 false
- capacity:遍历过程中最大的访问的顶点数目,选填项,默认为 10000000
- limit:返回的路径的最大数目,选填项,默认为 10
- with_vertex:true 表示返回结果包含完整的顶点信息(路径中的全部顶点),false 时表示只返回顶点 id,选填项,默认为 false
3.2.16.2 使用方法
Method & Url
Request Body
Response Status
Response Body
3.2.16.3 适用场景
适合查找各种复杂的模板路径,比如 personA -(朋友)-> personB -(同学)-> personC,其中"朋友"和"同学"边可以分别是最多 3 层和 4 层的情况
3.2.17 Crosspoints
3.2.17.1 功能介绍
根据起始顶点、目的顶点、方向、边的类型(可选)和最大深度等条件查找相交点
Params
- source:起始顶点 id,必填项
- target:目的顶点 id,必填项
- direction:起始顶点到目的顶点的方向,目的点到起始点是反方向,BOTH 时不考虑方向(OUT,IN,BOTH),选填项,默认是 BOTH
- label:边的类型,选填项,默认代表所有 edge label
- max_depth:步数,必填项
- max_degree:查询过程中,单个顶点遍历的最大邻接边数目,选填项,默认为 10000
- capacity:遍历过程中最大的访问的顶点数目,选填项,默认为 10000000
- limit:返回的交点的最大数目,选填项,默认为 10
3.2.17.2 使用方法
Method & Url
Response Status
Response Body
3.2.17.3 适用场景
查找两个顶点的交点及其路径,例如:
- 社交网络中,查找两个用户共同关注的话题或者大 V
- 家族关系中,查找共同的祖先
3.2.18 Customized Crosspoints
3.2.18.1 功能介绍
根据一批起始顶点、多种边规则(包括方向、边的类型和属性过滤)和最大深度等条件查找符合条件的所有的路径终点的交集
Params
sources:定义起始顶点,必填项,指定方式包括:
- ids:通过顶点 id 列表提供起始顶点
- label 和 properties:如果没有指定 ids,则使用 label 和 properties 的联合条件查询起始顶点
- label:顶点的类型
- properties:通过属性的值查询起始顶点
注意:properties 中的属性值可以是列表,表示只要 key 对应的 value 在列表中就可以
path_patterns:表示从起始顶点走过的路径规则,是一组规则的列表。必填项。每个规则是一个 PathPattern
- 每个 PathPattern 是一组 Step 列表,每个 Step 结构如下:
- direction:表示边的方向(OUT,IN,BOTH),默认是 BOTH
- labels:边的类型列表
- properties:通过属性的值过滤边
- max_degree:查询过程中,单个顶点遍历的最大邻接边数目,默认为 10000;当前也兼容参数名
degree。 - skip_degree:用于设置查询过程中舍弃超级顶点的最小边数,即当某个顶点的邻接边数目大于 skip_degree 时,完全舍弃该顶点。选填项,如果开启时,需满足
skip_degree >= max_degree约束,默认为 0 (不启用),表示不跳过任何点 (注意:开启此配置后,遍历时会尝试访问一个顶点的 skip_degree 条边,而不仅仅是 max_degree 条边,这样有额外的遍历开销,对查询性能影响可能有较大影响,请确认理解后再开启)
- 每个 PathPattern 是一组 Step 列表,每个 Step 结构如下:
capacity:遍历过程中最大的访问的顶点数目,选填项,默认为 10000000
limit:返回的路径的最大数目,选填项,默认为 10
with_path:true 表示返回交点所在的路径,false 表示不返回交点所在的路径,选填项,默认为 false
with_vertex,选填项,默认为 false:
- true 表示返回结果包含完整的顶点信息(路径中的全部顶点)
- with_path 为 true 时,返回所有路径中的顶点的完整信息
- with_path 为 false 时,返回所有交点的完整信息
- false 时表示只返回顶点 id
- true 表示返回结果包含完整的顶点信息(路径中的全部顶点)
3.2.18.2 使用方法
Method & Url
Request Body
Response Status
Response Body
3.2.18.3 适用场景
查询一组顶点通过多种路径在终点有交集的情况。例如:
- 在商品图谱中,多款手机、学习机、游戏机通过不同的低级别的类目路径,最终都属于一级类目的电子设备
3.2.19 Rings
3.2.19.1 功能介绍
根据起始顶点、方向、边的类型(可选)和最大深度等条件查找可达的环路
例如:1 -> 25 -> 775 -> 14690 -> 25, 其中环路为 25 -> 775 -> 14690 -> 25
Params
- source:起始顶点 id,必填项
- direction:起始顶点发出的边的方向(OUT,IN,BOTH),选填项,默认是 BOTH
- label:边的类型,选填项,默认代表所有 edge label
- max_depth:步数,必填项
- source_in_ring:环路是否包含起点,选填项,默认为 true
- max_degree:查询过程中,单个顶点遍历的最大邻接边数目,选填项,默认为 10000
- capacity:遍历过程中最大的访问的顶点数目,选填项,默认为 10000000
- limit:返回的可达环路的最大数目,选填项,默认为 10
3.2.19.2 使用方法
Method & Url
Response Status
Response Body
3.2.19.3 适用场景
查询起始顶点可达的环路,例如:
- 风控项目中,查询一个用户可达的循环担保的人或者设备
- 设备关联网络中,发现一个设备周围的循环引用的设备
3.2.20 Rays
3.2.20.1 功能介绍
根据起始顶点、方向、边的类型(可选)和最大深度等条件查找发散到边界顶点的路径
例如:1 -> 25 -> 775 -> 14690 -> 2289 -> 18379, 其中 18379 为边界顶点,即没有从 18379 发出的边
Params
- source:起始顶点 id,必填项
- direction:起始顶点发出的边的方向(OUT,IN,BOTH),选填项,默认是 BOTH
- label:边的类型,选填项,默认代表所有 edge label
- max_depth:步数,必填项
- max_degree:查询过程中,单个顶点遍历的最大邻接边数目,选填项,默认为 10000
- capacity:遍历过程中最大的访问的顶点数目,选填项,默认为 10000000
- limit:返回的非环路的最大数目,选填项,默认为 10
3.2.20.2 使用方法
Method & Url
Response Status
Response Body
3.2.20.3 适用场景
查找起始顶点到某种关系的边界顶点的路径,例如:
- 家族关系中,查找一个人到所有还没有孩子的子孙的路径
- 设备关联网络中,找到某个设备到终端设备的路径
3.2.21 Fusiform Similarity
3.2.21.1 功能介绍
按照条件查询一批顶点对应的"梭形相似点"。当两个顶点跟很多共同的顶点之间有某种关系的时候,我们认为这两个点为"梭形相似点"。举个例子说明"梭形相似点":“读者 A"读了 100 本书,可以定义读过这 100 本书中的 80 本以上的读者,是"读者 A"的"梭形相似点”
Params
sources:定义起始顶点,必填项,指定方式包括:
- ids:通过顶点 id 列表提供起始顶点
- label 和 properties:如果没有指定 ids,则使用 label 和 properties 的联合条件查询起始顶点
- label:顶点的类型
- properties:通过属性的值查询起始顶点
注意:properties 中的属性值可以是列表,表示只要 key 对应的 value 在列表中就可以
label:边的类型,选填项,默认代表所有 edge label
direction:起始顶点向外发散的方向(OUT,IN,BOTH),选填项,默认是 BOTH
min_neighbors:最少邻居数目,邻居数目少于这个阈值时,认为起点不具备"梭形相似点"。比如想要找一个"读者 A"读过的书的"梭形相似点",那么
min_neighbors为 100 时,表示"读者 A"至少要读过 100 本书才可以有"梭形相似点",必填项alpha:相似度,代表:起点与"梭形相似点"的共同邻居数目占起点的全部邻居数目的比例,必填项
min_similars:“梭形相似点"的最少个数,只有当起点的"梭形相似点"数目大于或等于该值时,才会返回起点及其"梭形相似点”,选填项,默认值为 1
top:返回一个起点的"梭形相似点"中相似度最高的 top 个,必填项,0 表示全部
group_property:与
min_groups一起使用,当起点跟其所有的"梭形相似点"某个属性的值有至少min_groups个不同值时,才会返回该起点及其"梭形相似点"。比如为"读者 A"推荐"异地"书友时,需要设置group_property为读者的"城市"属性,min_group至少为 2,选填项,不填代表不需要根据属性过滤min_groups:与
group_property一起使用,只有group_property设置时才有意义max_degree:查询过程中,单个顶点遍历的最大邻接边数目,选填项,默认为 10000
capacity:遍历过程中最大的访问的顶点数目,选填项,默认为 10000000
limit:返回的结果数目上限(一个起点及其"梭形相似点"算一个结果),选填项,默认为 10
with_intermediary:是否返回起点及其"梭形相似点"共同关联的中间点,默认为 false
with_vertex,选填项,默认为 false:
- true 表示返回结果包含完整的顶点信息
- false 时表示只返回顶点 id
3.2.21.2 使用方法
Method & Url
Request Body
Response Status
Response Body
3.2.21.3 适用场景
查询一组顶点相似度很高的顶点。例如:
- 跟一个读者有类似书单的读者
- 跟一个玩家玩类似游戏的玩家
3.2.22 Vertices
3.2.22.1 根据顶点的 id 列表,批量查询顶点
Params
- ids:要查询的顶点 id 列表
Method & Url
Response Status
Response Body
3.2.22.2 获取顶点 Shard 信息
通过指定的分片大小 split_size,获取顶点分片信息(可以与 3.2.21.3 中的 Scan 配合使用来获取顶点)。
Params
- split_size:分片大小,必填项
Method & Url
Response Status
Response Body
3.2.22.3 根据 Shard 信息批量获取顶点
通过指定的分片信息批量查询顶点(Shard 信息的获取参见 3.2.21.2 Shard)。
Params
- start:分片起始位置,必填项
- end:分片结束位置,必填项
- page:分页位置,选填项,默认为 null,不分页;当 page 为“”时表示分页的第一页,从 start 指示的位置开始
- page_limit:分页获取顶点时,一页中顶点数目的上限,选填项,默认为 100000
Method & Url
Response Status
Response Body
3.2.22.4 适用场景
- 按 id 列表查询顶点,可用于批量查询顶点,比如在 path 查询到多条路径之后,可以进一步查询某条路径的所有顶点属性。
- 获取分片和按分片查询顶点,可以用来遍历全部顶点
3.2.23 Edges
3.2.23.1 根据边的 id 列表,批量查询边
Params
- ids:要查询的边 id 列表
Method & Url
Response Status
Response Body
3.2.23.2 获取边 Shard 信息
通过指定的分片大小 split_size,获取边分片信息(可以与 3.2.22.3 中的 Scan 配合使用来获取边)。
Params
- split_size:分片大小,必填项
Method & Url
Response Status
Response Body
3.2.23.3 根据 Shard 信息批量获取边
通过指定的分片信息批量查询边(Shard 信息的获取参见 3.2.22.2)。
Params
- start:分片起始位置,必填项
- end:分片结束位置,必填项
- page:分页位置,选填项,默认为 null,不分页;当 page 为“”时表示分页的第一页,从 start 指示的位置开始
- page_limit:分页获取边时,一页中边数目的上限,选填项,默认为 100000
Method & Url
Response Status
Response Body
3.2.23.4 适用场景
- 按 id 列表查询边,可用于批量查询边
- 获取分片和按分片查询边,可以用来遍历全部边
3.2.24 Adamic-Adar
3.2.24.1 功能介绍
计算两个顶点的 Adamic-Adar 指标,即每个共同邻居的度取对数后倒数之和。
Params
- vertex:一个顶点 id,必填项
- other:另一个顶点 id,必填项,不能与
vertex相同 - direction:顶点向外发散的方向(OUT,IN,BOTH),选填项,默认是 BOTH
- label:边的类型,选填项,默认代表所有 edge label
- max_degree:查询过程中,单个顶点遍历的最大邻接边数目,选填项,默认为 10000
- limit:参与计算的共同邻居的最大数目,选填项,默认为 10000000
3.2.24.2 使用方法
Method & Url
Response Status
Response Body
度为 0 的共同邻居会被跳过,因此两个顶点没有共同邻居时结果为 0.0。
3.2.24.3 适用场景
预测两个顶点之间是否可能出现连边,其中冷门的共同邻居比热门的共同邻居权重更高。
3.2.25 Resource Allocation
3.2.25.1 功能介绍
计算两个顶点的资源分配指标,即每个共同邻居的度的倒数之和。
Params
- vertex:一个顶点 id,必填项
- other:另一个顶点 id,必填项,不能与
vertex相同 - direction:顶点向外发散的方向(OUT,IN,BOTH),选填项,默认是 BOTH
- label:边的类型,选填项,默认代表所有 edge label
- max_degree:查询过程中,单个顶点遍历的最大邻接边数目,选填项,默认为 10000
- limit:参与计算的共同邻居的最大数目,选填项,默认为 10000000
3.2.25.2 使用方法
Method & Url
Response Status
Response Body
3.2.25.3 适用场景
连边预测,相比 Adamic-Adar 对高度数的共同邻居惩罚更强。
3.2.26 Edge Existence
3.2.26.1 功能介绍
查询起点和终点之间存在的边。
Params
- source:起始顶点 id,必填项
- target:目标顶点 id,必填项
- label:边的类型,选填项,默认代表所有 edge label
- sort_values:排序键的取值,当 edge label 的 frequency 为 MULTIPLE 时用于从多条平行边中选定一条,选填项,默认为空字符串
- limit:返回的边的最大数目,选填项,默认为 100
3.2.26.2 使用方法
Method & Url
Response Status
Response Body
3.2.26.3 适用场景
判断两个顶点之间是否直接相连,并在一次请求中拿到连接边的属性。
3.2.27 Count
3.2.27.1 功能介绍
统计从起始顶点出发,经过若干步遍历后可达的顶点数量,不返回顶点本身。
Params
- source:起始顶点 id,必填项
- steps:遍历的步骤,必填项,每个 step 支持以下字段:
- direction:顶点向外发散的方向(OUT,IN,BOTH),选填项,默认是 BOTH
- labels:当前 step 的边类型列表,选填项,默认代表所有 edge label
- properties:当前 step 的边属性过滤条件,选填项
- max_degree:当前 step 中单个顶点遍历的最大邻接边数目,选填项,默认为 10000
- skip_degree:当前 step 中跳过超级点的阈值,选填项,默认为 100000
- contains_traversed:是否把中间各步到达的顶点也计入结果,选填项,默认为 false
- dedup_size:用于去重的顶点数上限,
-1表示不限制,选填项,默认为 1000000
3.2.27.2 使用方法
Method & Url
Request Body
Response Status
Response Body
3.2.27.3 适用场景
只关心多步邻居的规模时使用,避免序列化和传输大量顶点。
5.1.11 - Rank API
4.1 rank API 概述
HugeGraphServer 除了上一节提到的遍历(traverser)方法,还提供了一类专门做推荐的方法,我们称为rank API,可在图中为一个点推荐与其关系密切的其它点。
4.2 rank API 详解
4.2.1 Personal Rank API
Personal Rank 算法典型场景是用于推荐应用中,根据某个点现有的出边,推荐具有相近 / 相同关系的其他点,比如根据某个人的阅读记录 / 习惯,向它推荐其他可能感兴趣的书,或潜在的书友,举例如下:
- 假设给定 1 个 Person 点 是 tom, 它喜欢
a,b,c,d,e5 本书,我们的想给 tom 推荐一些书友,以及一些书,最容易的想法就是看看还有哪些人喜欢过这些书 (共同兴趣) - 那么此时,需要有其它的 Person 点比如 neo, 他喜欢
b,d,f3 本书,以及 jay, 它喜欢c,d,e,g4 本书,lee 它喜欢a,d,e,f4 本书 - 由于 tom 已经看过的书不需要重复推荐,所以返回结果里应该期望推荐有共同喜好的其他书友看过,但 tom 没看过的书,比如推荐 “f” 和 “g” 书,且优先级 f > g
- 此时再计算 tom 的个性化 rank 值,就会返回排序后 TopN 推荐的 书友 + 书 的结果了 (如果只需要推荐的书,选择 OTHER_LABEL 即可)
4.2.1.0 数据准备
上面是一个简单的例子,这里再提供一个公开的 1MB 测试数据集 MovieLens 为例,用户需下载该数据集,然后使用 HugeGraph-Loader 导入到 HugeGraph 中,简单起见,数据中顶点 user 和 movie 的属性都忽略,仅使用 id 字段即可,边 rating 的具体评分值也忽略。loader 使用的元数据文件和输入源映射文件内容如下:
注意将映射文件中
input.path的值修改为自己本地的路径。
4.2.1.1 功能介绍
适用于二分图,给出所有源顶点相关的其他顶点及其相关性组成的列表。
二分图:也称二部图,是图论里的一种特殊模型,也是一种特殊的网络流。其最大的特点在于,可以将图里的顶点分为两个集合,两个集合之间的点有边相连,但集合内的点之间没有直接关联。
假设有一个用户和物品的二分图,基于随机游走的 PersonalRank 算法步骤如下:
- 选定一个起点用户 u,其初始权重为 1.0,从 Vu 开始游走(有 alpha 的概率走到邻居点,1 - alpha 的概率停留);
- 如果决定向外游走,那么会选取某一个类型的出边,例如
rating来查找共同的打分人:- 那就从当前节点的邻居节点中按照均匀分布随机选择一个,并且按照均匀分布划分权重值;
- 给源顶点补偿权重 1 - alpha;
- 重复步骤 2;
- 达到一定步数或达到精度后收敛,得到推荐列表。
Params
必填项:
- source: 源顶点 id
- label: 源点出发的某类边 label,须连接两类不同顶点
选填项:
- alpha:每轮迭代时从某个点往外走的概率,与 PageRank 算法中的 alpha 类似,取值区间为 (0, 1], 默认值
0.85 - max_degree: 查询过程中,单个顶点遍历的最大邻接边数目,默认为
10000 - max_depth: 迭代次数,取值区间为 [2, 5000], 默认值
5 - with_label:筛选结果中保留哪些结果,可选以下三类,默认为
BOTH_LABEL- SAME_LABEL:仅保留与源顶点相同类别的顶点
- OTHER_LABEL:仅保留与源顶点不同类别(二分图的另一端)的顶点
- BOTH_LABEL:同时保留与源顶点相同和相反类别的顶点
- limit: 返回的顶点的最大数目,默认为
100 - max_diff: 提前收敛的精度差,默认为
0.0001(后续实现) - sorted:返回的结果是否根据 rank 排序,为 true 时降序排列,反之不排序,默认为
true
4.2.1.2 使用方法
Method & Url
Request Body
Response Status
Response Body
4.2.1.3 适用场景
两类不同顶点连接形成的二分图中,给某个点推荐相关性最高的其他顶点,例如:
- 阅读推荐: 找出优先给某人推荐的其他书籍, 也可以同时推荐共同喜好最高的书友 (例: 微信 “你的好友也在看 xx 文章” 功能)
- 社交推荐: 找出拥有相同关注话题的其他博主, 也可以推荐可能感兴趣的新闻/消息 (例: Weibo 中的 “热点推荐” 功能)
- 商品推荐: 通过某人现在的购物习惯, 找出应优先推给它的商品列表, 也可以给它推荐带货播主 (例: TaoBao 的 “猜你喜欢” 功能)
4.2.2 Neighbor Rank API
4.2.2.0 数据准备
4.2.2.1 功能介绍
在一般图结构中,找出每一层与给定起点相关性最高的前 N 个顶点及其相关度,用图的语义理解就是:从起点往外走,走到各层各个顶点的概率。
Params
- source: 源顶点 id,必填项
- alpha:每轮迭代时从某个点往外走的概率,与 PageRank 算法中的 alpha 类似,必填项,取值区间为 (0, 1]
- steps: 表示从起始顶点走过的路径规则,是一组 Step 的列表,每个 Step 对应结果中的一层,必填项。每个 Step 的结构如下:
- direction:表示边的方向(OUT, IN, BOTH),默认是 BOTH
- labels:边的类型列表,多个边类型取并集
- max_degree:查询过程中,单个顶点遍历的最大邻接边数目,默认为 10000;当前也兼容参数名
degree。 - skip_degree:当前层跳过超级点的阈值,默认为 0,表示不跳过
- top:在结果中每一层只保留权重最高的前 N 个结果,默认为 10,最大值为 1000
- capacity: 遍历过程中最大的访问的顶点数目,选填项,默认为 10000000
4.2.2.2 使用方法
Method & Url
Request Body
Response Status
Response Body
4.2.2.3 适用场景
为给定的起点在不同的层中找到最应该推荐的顶点。
- 比如:在观众、朋友、电影、导演的四层图结构中,根据某个观众的朋友们喜欢的电影,为这个观众推荐电影;或者根据这些电影是谁拍的,为其推荐导演。
5.1.12 - Variable API
5.1 Variables
Variables 可以用来存储有关整个图的数据,数据按照键值对的方式存取
5.1.1 创建或者更新某个键值对
Method & Url
Request Body
Response Status
Response Body
5.1.2 列出全部键值对
Method & Url
Response Status
Response Body
5.1.3 列出某个键值对
Method & Url
Response Status
Response Body
5.1.4 删除某个键值对
Method & Url
Response Status
5.1.13 - Graphs API
6.1 Graphs
生产环境必须启用 Server 认证与授权,通过 IP 白名单及最小权限控制图管理接口的访问,并保留 audit-*.log 审计记录。下文非鉴权配置仅用于隔离的本地测试。
本页介绍当前 master 的 Graphs API。历史版本的路径和请求体请切换到对应多版本页面: 1.7 版 Graphs API 或 1.5 版 Graphs API。
启用鉴权时,创建、克隆、删除、清空、修改图显示名、读取图配置、设置读模式和手动压缩等操作要求图空间管理权限(space);管理员可按权限继承规则满足。创建或恢复快照、设置数据模式允许图空间管理者或该图所有者操作;列表、详情、数据模式读取和读模式读取按图读取权限校验。Raft API 另要求图空间成员权限。
6.1.1 列出图空间中全部的图
Params
路径参数说明:
- graphspace: 图空间名称
Method & Url
Response Status
Response Body
6.1.2 查看某个图的信息
Params
路径参数说明:
- graphspace: 图空间名称
- graph: 图名称
Method & Url
Response Status
Response Body
6.1.3 清空某个图的全部数据,包括 schema、vertex、edge 和 index 等
Params
路径参数说明:
- graphspace: 图空间名称
- graph: 图名称
请求参数说明:
由于清空图是一个比较危险的操作,为避免用户误调用,我们给 API 添加了用于确认的参数:
- confirm_message: 默认为
I'm sure to delete all data
Method & Url
Response Status
6.1.4 克隆一个图
Params
路径参数说明:
- graphspace: 图空间名称
- graph: 要创建的新图名称
请求参数说明:
- clone_graph_name: 已有图的名称;从已有的图来克隆,用户可选择传递配置文件,传递时将替换已有图中的配置;
Method & Url
Request Body (可选)
克隆一个非鉴权模式的图(设置 Content-Type: application/json)
Note:
- Rocksdb 存储路径不能与现有图相同(需使用不同的目录)
- 如需开启新图的权限系统,需替换设置
gremlin.graph=org.apache.hugegraph.auth.HugeFactoryAuthProxy
Response Status
Response Body
6.1.5 创建一个图
Params
路径参数说明:
- graphspace: 图空间名称
- graph: 图名称
Method & Url
Request Body
创建一个图(设置 Content-Type: application/json)
gremlin.graph 配置说明:
- 鉴权模式:
"gremlin.graph": "org.apache.hugegraph.auth.HugeFactoryAuthProxy"(生产环境必须使用) - 非鉴权模式:
"gremlin.graph": "org.apache.hugegraph.HugeFactory"
注意:如果 backend 是 hstore,请确保 HugeGraph-Server 已正确配置 PD,参见 HStore 配置。调度器由后端类型决定:hstore 使用分布式调度器,其他后端使用本地调度器。
选填字段及其默认值:
gremlin.graph默认为org.apache.hugegraph.HugeFactorybackend在 PD 模式下默认为hstore,否则默认为rocksdbserializer默认为binarystore默认为图名称nickname设置图的显示名,在图空间内必须唯一schema指定初始化该图所用的 schema 模板,会被保存为schema.init_templatedescription会原样返回在响应中
RocksDB 示例:
HStore 示例:
Note: Rocksdb 存储路径不能与现有图相同(需使用不同的目录)
Response Status
Response Body
6.1.6 删除某个图及其全部数据
启用鉴权时需要图空间管理权限(space)。
Params
路径参数说明:
- graphspace: 图空间名称
- graph: 图名称
请求参数说明:
由于删除图是一个比较危险的操作,为避免用户误调用,我们给 API 添加了用于确认的参数:
- confirm_message: 默认为
I'm sure to drop the graph
Method & Url
Response Status
6.1.7 列出图空间中全部的图及其配置
对当前用户有读权限的每个图返回一条记录,其中包含该图的配置(形如密码、密钥、token、凭证、私钥的配置项会被过滤掉)以及下面这些字段。当前用户的默认图会排在前面。
Params
路径参数说明:
- graphspace: 图空间名称
请求参数说明:
- prefix: 只返回名称或显示名以该前缀开头的图
Method & Url
Response Status
Response Body
default_update_time 只在该图是当前用户的默认图时返回,create_time 只在该图记录了创建时间时返回。
6.1.8 修改某个图的显示名
Params
路径参数说明:
- graphspace: 图空间名称
- graph: 图名称
请求参数说明:
- action: 固定为
update - update: 需要修改的字段。
name必填且必须与路径中的图名一致,nickname是新的显示名,在图空间内必须唯一。
Method & Url
Request Body
Response Status
Response Body
6.1.9 管理当前用户的默认图
默认图是按用户记录的,因此下面的接口都以调用者的身份生效。它们依赖权限系统,未开启权限的单机模式下会返回 400 和 GraphSpace management is not supported in standalone mode。
设置默认图
Method & Url
Response Status
Response Body
取消默认图
Method & Url
Response Status
Response Body
查看默认图
Method & Url
Response Status
Response Body
6.1.10 重新加载图空间中的图
重新加载服务中的图,适用于图配置在服务外部被改动之后。
Params
路径参数说明:
- graphspace: 图空间名称
请求参数说明:
- action: 固定为
reload
Method & Url
Request Body
Response Status
Response Body
6.2 Conf
6.2.1 查看某个图的配置
Method & Url
Response Status
Response Body
6.3 Mode
合法的图模式包括:NONE,RESTORING,MERGING,LOADING
- None 模式(默认),元数据和图数据的写入属于正常状态。特别的:
- 元数据(schema)创建时不允许指定 ID
- 图数据(vertex)在 id strategy 为 Automatic 时,不允许指定 ID
- LOADING:批量导入数据时自动启用,特别的:
- 添加顶点/边时,不会检查必填属性是否传入
Restore 时存在两种不同的模式:Restoring 和 Merging
- Restoring 模式,恢复到一个新图中,特别的:
- 元数据(schema)创建时允许指定 ID
- 图数据(vertex)在 id strategy 为 Automatic 时,允许指定 ID
- Merging 模式,合并到一个已存在元数据和图数据的图中,特别的:
- 元数据(schema)创建时不允许指定 ID
- 图数据(vertex)在 id strategy 为 Automatic 时,允许指定 ID
正常情况下,图模式为 None,当需要 Restore 图时,需要根据需要临时修改图模式为 Restoring 模式或者 Merging 模式,并在完成 Restore 时,恢复图模式为 None。
6.3.1 查看某个图的模式
启用鉴权时需要图读取权限(space_member 或该图的所有者)。
Method & Url
Response Status
Response Body
合法的图模式包括:NONE,RESTORING,MERGING,LOADING
6.3.2 设置某个图的模式
启用鉴权时需要图空间管理权限(space)或该图所有者权限;管理员可按权限继承规则满足。
Method & Url
Request Body
合法的图模式包括:NONE,RESTORING,MERGING,LOADING
Response Status
Response Body
6.3.3 查看某个图的读模式
启用鉴权时需要图读取权限(space_member 或该图的所有者)。
Params
- name: 图的名称
Method & Url
Response Status
Response Body
6.3.4 设置某个图的读模式
启用鉴权时需要图空间管理权限(space);管理员可按权限继承规则满足。
Params
- name: 图的名称
Method & Url
Request Body
合法的读模式包括:ALL,OLTP_ONLY。传入 OLAP_ONLY 时接口会报错
Graph-read-mode could be ALL or OLTP_ONLY。
Response Status
Response Body
6.4 Snapshot
6.4.1 创建快照
启用鉴权时需要图空间管理权限(space)或该图所有者权限;管理员可按权限继承规则满足。
Params
- name: 图的名称
Method & Url
Response Status
Response Body
6.4.2 快照恢复
启用鉴权时需要图空间管理权限(space)或该图所有者权限;管理员可按权限继承规则满足。
Params
- name: 图的名称
Method & Url
Response Status
Response Body
6.5 Compact
6.5.1 手动压缩图
启用鉴权时需要图空间管理权限(space);管理员可按权限继承规则满足。
Params
- name: 图的名称
Method & Url
Response Status
Response Body
6.6 Raft
以下接口只在图运行于 raft 模式时可用,参见 配置项 中的 raft.mode。未开启 raft 模式的图会返回 400 和 Allowed <operation> operation only when working on raft mode。
启用鉴权时需要图空间成员权限(space_member);管理员可按权限继承规则满足。
Params
路径参数说明:
- graphspace: 图空间名称
- graph: 图名称
请求参数说明:
- group: raft 组名称,默认为
default - endpoint: 节点地址,形如
host:port。transfer_leader、set_leader、add_peer和remove_peer必填。
6.6.1 查看 raft 组的成员列表
Method & Url
Response Status
Response Body
返回对象的 key 是 raft 组名称。
6.6.2 查看 raft 组的 leader
Method & Url
Response Status
Response Body
6.6.3 转移 raft 组的 leader
Method & Url
Response Status
Response Body
6.6.4 指定 raft 组的 leader
Method & Url
Response Status
Response Body
6.6.5 向 raft 组添加成员
该操作会创建一个异步任务,参见 Task API。
Method & Url
Response Status
Response Body
6.6.6 从 raft 组移除成员
该操作会创建一个异步任务,参见 Task API。
Method & Url
Response Status
Response Body
5.1.14 - Task API
7.1 Task
7.1.1 列出某个图中全部的异步任务
Params
- status: 异步任务的状态,取值为 NEW、SCHEDULING、SCHEDULED、QUEUED、RESTORING、RUNNING、SUCCESS、CANCELLING、CANCELLED、FAILED、HANGING、DELETING 之一,不区分大小写
- ids: 需要查询的任务 id,可以重复传多个。不能与
status或page同时使用,并且会忽略limit - limit:返回异步任务数目上限,默认为 100
- page: 分页的页标记,传该参数时响应中会带上下一页的
page字段
Method & Url
Response Status
Response Body
7.1.2 查看某个异步任务的信息
Params
- with_result: 是否加载任务的结果,默认为 true
Method & Url
Response Status
Response Body
7.1.3 删除某个异步任务信息,不删除异步任务本身
Params
- force: 任务仍在运行时是否强制删除,默认为 false
Method & Url
Response Status
7.1.4 取消某个异步任务,该异步任务必须具有处理中断的能力
假设已经通过Gremlin API创建了一个异步任务如下:
Method & Url
请保证在 10 秒内发送该请求,如果超过 10 秒发送,任务可能已经执行完成,无法取消。
Response Status
对已经完成或者正在取消中的任务发起取消会返回 400。
Response Body
返回整个任务对象,其中 task_status 为 cancelling 或 cancelled:
此时查询 label 为 man 的顶点数目,一定是小于 10 的。
7.2 Algorithm Job
在服务内部以异步任务的方式调度一个 OLAP 算法,返回的 task id 可以用上面的 Task API 跟踪。
Params
路径参数说明:
- graphspace: 图空间名称
- graph: 图名称
- name: 算法名称,已注册的算法有
count_vertex、count_edge、degree_centrality、stress_centrality、betweenness_centrality、closeness_centrality、eigenvector_centrality、triangle_count、cluster_coefficient、lpa、louvain、weak_connected_component、fusiform_similarity、rings、k_core、page_rank和subgraph_stat。名称不存在时返回404。
Method & Url
Request Body
请求体是算法的参数集合,每个算法各自校验自己的参数。传 {} 表示全部使用默认值。
Response Status
Response Body
7.3 Computer Job
以异步任务的方式调度一个 HugeGraph-Computer 作业。该作业在服务外部执行,参见 HugeGraph-Computer。
Params
路径参数说明:
- graphspace: 图空间名称
- graph: 图名称
- name: 算法名称,已注册的有
page_rank、weak_connected_component、lpa、triangle_count和louvain。名称不存在时返回404。
Method & Url
Request Body
请求体是作业的参数集合,传 {} 表示全部使用默认值。
Response Status
Response Body
5.1.15 - Gremlin API
8.1 Gremlin
生产环境下安全使用原生查询接口
图查询语言 (如 Gremlin/Cypher) 本身的灵活性会带来一些潜在的安全隐患。为了保障核心安全,请避免直接在公网环境暴露任何相关的原生查询接口。
生产环境必须开启 鉴权体系 (Auth)、启用并维护 IP 白名单,并按最小权限控制用户可执行的操作。Server 标准配置会把鉴权代理的授权记录写入 audit-*.log;必须保留并限制其读取权限。auth.audit_log_rate 只限制每用户日志输出速率,不是审计日志的启停开关。
8.1.1 向 HugeGraphServer 发送 gremlin 语句(GET),同步执行
Params
- gremlin: 要发送给
HugeGraphServer执行的gremlin语句 - bindings: 用来绑定参数,key 是字符串,value 是绑定的值(只能是字符串或者数字),功能类似于 MySQL 的 Prepared Statement,用于加速语句执行
- language: 发送语句的语言类型,默认为
gremlin-groovy - aliases: 为存在于图空间的已有变量添加别名
此 REST 代理的 GET 查询不能可靠地传递含 JSON 花括号的 aliases 参数;当前图绑定名带连字符,也不能直接作为 Groovy 变量。以下用简单表达式示范 GET。需要选择图执行遍历时,请使用下方带 aliases 的 POST 示例。
Method & Url
Response Status
Response Body
8.1.2 向 HugeGraphServer 发送 gremlin 语句(POST),同步执行
查询顶点数
可执行请求命令
/gremlin 是顶层接口。图空间 DEFAULT 中图 hugegraph 对应的 traversal source 名为 __g_DEFAULT-hugegraph,请求通过 aliases 映射为脚本中的 g。若使用不同图空间或图名,应按 Server 绑定名调整 alias。批量结果可能以 gzip 返回,curl 使用 --compressed 可自动解压。
Response Status
Response Body
顶点数取决于当前图中的数据;上面的 6 仅为示例结果。
响应体的结构与其他 Vertex 或 Edge 的 RESTful API 的结构有区别,用户可能需要自行解析。
查询边
Request Body
Response Status
Response Body
边 ID、端点和属性值取决于当前图中的数据。
8.1.3 向 HugeGraphServer 发送 gremlin 语句(POST),异步执行
Method & Url
查询顶点
Request Body
注意:
异步请求不能自行传入
aliases字段;Server 会自动绑定graph(当前图对象)和g(当前遍历源),并把 URL 中的图名作为graph的别名。因此脚本可以使用graph或g,也可以使用当前请求路径中的图名。
Response Status
Response Body
注:
可以通过
GET http://localhost:8080/graphspaces/DEFAULT/graphs/hugegraph/tasks/1(其中"1"是 task_id)来查询异步任务的执行状态,更多异步任务 RESTful API
查询边
Request Body
Response Status
Response Body
注:
可以通过
GET http://localhost:8080/graphspaces/DEFAULT/graphs/hugegraph/tasks/2(其中"2"是 task_id)来查询异步任务的执行状态,更多异步任务 RESTful API
5.1.16 - Cypher API
9.1 Cypher
Cypher 接口必须携带
Authorization请求头,Basic或Bearer均可。即使服务未开启鉴权,不带该请求头的请求也会返回401。凭证会通过conf/remote-objects.yaml转发给 Gremlin Server。
9.1.1 向 HugeGraphServer 发送 Cypher 语句(GET),同步执行
Method & Url
Params
路径参数说明:
- graphspace: 图空间名称
- graph: 图名称
请求参数说明:
- cypher: cypher 语句
使用示例
Response Status
Response Body
9.1.2 向 HugeGraphServer 发送 Cypher 语句(POST),同步执行
Method & Url
Params
路径参数说明:
- graphspace: 图空间名称
- graph: 图名称
Body
{cypher}
- cypher: cypher 语句
注意:
不是 JSON 格式,是纯文本的 Cypher 语句
使用示例
Request Body
Response Status
Response Body
5.1.17 - Authentication API
版本说明:本页介绍当前
master的接口。历史用法请切换到对应多版本页面: 1.7 版认证 API 或 1.5 版认证 API。用户、图空间用户组、资源、关联和赋权接口使用
/graphspaces/{graphspace}/auth/...。登录、登出和 token 校验仍使用/auth/login、/auth/logout、/auth/verify;图空间默认角色接口位于/graphspaces/{graphspace}/role。源码保留顶层/auth/groups,本页组接口示例使用图空间范围接口。
下文 {group_id}、{target_id}、{another_target_id}、{belong_id} 和 {access_id} 均为占位符,使用前须替换为对应响应中的 id。将 ID 放入 URL 路径时,还须按 URL 路径组件规则编码。
10.1 用户认证与权限控制
开启权限及相关配置请先参考 权限配置 文档
用户认证与权限控制概述:
HugeGraph 支持多用户认证、以及细粒度的权限访问控制,采用基于“用户 - 用户组 - 操作 - 资源”的 4 层设计,灵活控制用户角色与权限。 资源描述了图数据库中的数据,比如符合某一类条件的顶点,每一个资源包括 type、label、properties 三个要素,共有 18 种 type、 任意 label、任意 properties 的组合形成的资源,一个资源的内部条件是且关系,多个资源之间的条件是或关系。用户可以属于一个或多个用户组,每个用户组可以拥有对任意个资源的操作权限,操作类型包括:读、写、删除、执行等种类。HugeGraph 支持动态创建用户、用户组、资源, 支持动态分配或取消权限。初始化数据库时超级管理员用户被创建,后续可通过超级管理员创建各类角色用户,新创建的用户如果被分配足够权限后,可以由其创建或管理更多的用户。
举例说明:
user(name=boss) -belong-> group(name=all) -access(read)-> target(graph=graph1, resource={label: person,
city: Beijing})
描述:用户’boss’拥有对’graph1’图中北京人的读权限。
接口说明:
用户认证与权限控制的核心接口包括 5 类:UserAPI、GroupAPI、TargetAPI、BelongAPI、AccessAPI。除此之外,ManagerAPI 用于授予图空间级别的管理角色,LoginAPI 用于签发和校验 token,ProjectAPI 用于把多个图归为一组从而一次性授权。
10.2 用户(User)API
用户接口包括:创建用户,删除用户,修改用户,和查询用户相关信息接口。
10.2.1 创建用户
Params
- user_name: 用户名称
- user_password: 用户密码
- user_nickname: 用户昵称
- user_phone: 用户手机号
- user_email: 用户邮箱
- user_avatar: 用户头像地址
- user_description: 用户描述
其中 user_name 和 user_password 为必填,其余为选填。
Request Body
Method & Url
Response Status
Response Body
返回报文中,密码为加密后的密文
10.2.2 删除用户
Params
- id: 需要删除的用户 Id
Method & Url
Response Status
10.2.3 修改用户
Params
- id: 需要修改的用户 Id
Method & Url
Request Body
修改 user_password 和 user_phone。user_name 不可修改,传了也必须与已有名称一致。
Response Status
Response Body
返回结果是包含修改过的内容在内的整个用户对象
10.2.4 查询用户列表
Params
- name: 只返回该名称的用户,传该参数时返回的是单个用户对象而不是列表,用户不存在时返回
404 - limit: 返回结果条数的上限,默认为 100
Method & Url
Response Status
Response Body
10.2.5 查询某个用户
Params
- id: 需要查询的用户 Id
Method & Url
Response Status
Response Body
10.2.6 查询某个用户的角色
Method & Url
Response Status
Response Body
10.3 用户组(Group)API
用户组会赋予相应的资源权限,用户会被分配不同的用户组,即可拥有不同的资源权限。
用户组接口包括:创建用户组,删除用户组,修改用户组,和查询用户组相关信息接口。
GraphSpace 用户组名由服务端生成,格式为
~hubble_role:v1:+ GraphSpace 名称的 base64url 编码 +:+ 32 个十六进制字符。 例如,DEFAULT的名称和 ID 都是~hubble_role:v1:REVGQVVMVA:<32 hex>。请求中的group_name只是客户端标签;后续请求请用创建响应返回的 ID。
10.3.1 创建用户组
Params
- group_name: 必填的客户端标签;持久化名称由服务端生成
- group_description: 用户组描述
Request Body
group_name 为必填字段;图空间范围的用户组持久化名称由服务端生成,不能用此字段自定义。请从创建响应中复制 id,用于后续关联、授权、查询、更新或删除。
Method & Url
Response Status
Response Body
10.3.2 删除用户组
Params
- id: 需要删除的用户组 Id
Method & Url
Response Status
10.3.3 修改用户组
Params
- id: 需要修改的用户组 Id
Method & Url
Request Body
修改 group_description。GraphSpace 形式下这里的 group_name 应当省略,或等于服务端生成的名称,传入其他值会被拒绝并提示 “The name of group can’t be updated”。
Response Status
Response Body
返回结果是包含修改过的内容在内的整个用户组对象
10.3.4 查询用户组列表
Params
- limit: 返回结果条数的上限
Method & Url
Response Status
Response Body
10.3.5 查询某个用户组
Params
- id: 需要查询的用户组 Id
Method & Url
Response Status
Response Body
10.4 资源(Target)API
资源描述了图数据库中的数据,比如符合某一类条件的顶点,每一个资源包括 type、label、properties 三个要素,共有 18 种 type、
任意 label、任意 properties 的组合形成的资源,一个资源的内部条件是且关系,多个资源之间的条件是或关系。
资源接口包括:资源的创建、删除、修改和查询。
10.4.1 创建资源
Params
- target_name: 资源名称
- target_graph: 资源图
- target_url: 资源地址
- target_resources: 资源定义 (列表)
target_resources 可以包括多个 target_resource,以列表的形式存储。
每个 target_resource 包含:
- type:可选值 VERTEX, EDGE 等,可填 ALL,则表示可以是顶点或边;
- label:可选值,⼀个顶点或边类型的名称,可填*,则表示任意类型;
- properties:map 类型,可包含多个属性的键值对,必须匹配所有属性值,属性值⽀持填条件范围(age: P.gte(18)),properties 如果为 null 表示任意属性均可,如果属性名和属性值均为‘*ʼ也表示任意属性均可。
如精细资源:“target_resources”: [{“type”:“VERTEX”,“label”:“person”,“properties”:{“city”:“Beijing”,“age”:“P.gte(20)”}}]**
资源定义含义:类型是’person’的顶点,且城市属性是’Beijing’,年龄属性大于等于 20。
Request Body
Method & Url
Response Status
Response Body
10.4.2 删除资源
Params
- id: 需要删除的资源 Id
Method & Url
Response Status
10.4.3 修改资源
Params
- id: 需要修改的资源 Id
Method & Url
Request Body
修改资源定义中的 type
Response Status
Response Body
返回结果是包含修改过的内容在内的整个用户组对象
10.4.4 查询资源列表
Params
- limit: 返回结果条数的上限
Method & Url
Response Status
Response Body
10.4.5 查询某个资源
Params
- id: 需要查询的资源 Id
Method & Url
Response Status
Response Body
10.5 关联角色(Belong)API
关联用户和用户组的关系,一个用户可以关联一个或者多个用户组。用户组拥有相关资源的权限,不同用户组的资源权限可以理解为不同的角色。即给用户关联角色。
关联角色接口包括:用户关联角色的创建、删除、修改和查询。
下例沿用 10.3 的用户组 ID。实际调用时请换成自己创建响应中的 ID。后续操作使用 Belong 创建响应里的
id,并将 URL 路径中的>编码为%3E。
10.5.1 创建用户的关联角色
Params
- user: 用户 Id
- group: 用户组 Id
- belong_description: 描述
Request Body
Method & Url
Response Status
Response Body
10.5.2 删除关联角色
Params
- id: 需要删除的关联角色 Id
Method & Url
Response Status
10.5.3 修改关联角色
关联角色只能修改描述,不能修改 user 和 group 属性,如果需要修改关联角色,需要删除原来关联关系,新增关联角色。
Params
- id: 需要修改的关联角色 Id
Method & Url
Request Body
修改 belong_description
Response Status
Response Body
返回结果是包含修改过的内容在内的整个用户组对象
10.5.4 查询关联角色列表
Params
- user: 只返回该用户的关联关系
- group: 只返回该角色的关联关系
- limit: 返回结果条数的上限,默认为 100
user 和 group 不能同时使用。
Method & Url
Response Status
Response Body
10.5.5 查看某个关联角色
Params
- id: 需要查询的关联角色 Id
Method & Url
Response Status
Response Body
10.6 赋权(Access)API
给用户组赋予资源的权限,主要包含:读操作 (READ)、写操作 (WRITE)、删除操作 (DELETE)、执行操作 (EXECUTE) 等。
赋权接口包括:赋权的创建、删除、修改和查询。
下例使用 10.3 和 10.4 返回的用户组 ID、资源 ID。实际调用时请换成自己的响应值。后续操作使用 Access 创建响应里的
id,并将 URL 路径中的>编码为%3E。
10.6.1 创建赋权 (用户组赋予资源的权限)
Params
- group: 用户组 Id
- target: 资源 Id
- access_permission: 权限许可
- access_description: 赋权描述
access_permission:
- READ:读操作,所有的查询,包括查询 Schema、查顶点/边,查询顶点和边的数量 VERTEX_AGGR/EDGE_AGGR,也包括读图的状态 STATUS、变量 VAR、任务 TASK 等;
- WRITE:写操作,所有的创建、更新操作,包括给 Schema 增加 property key,给顶点增加或更新属性等;
- DELETE:删除操作,包括删除元数据、删除顶点/边;
- EXECUTE:执⾏操作,包括执⾏ Gremlin 语句、执⾏ Task、执⾏ metadata 函数;
Request Body
Method & Url
Response Status
Response Body
10.6.2 删除赋权
Params
- id: 需要删除的赋权 Id
Method & Url
Response Status
10.6.3 修改赋权
赋权只能修改描述,不能修改用户组、资源和权限许可,如果需要修改赋权的关系,可以删除原来的赋权关系,新增赋权。
Params
- id: 需要修改的赋权 Id
Method & Url
Request Body
修改 access_description
Response Status
Response Body
返回结果是包含修改过的内容在内的整个用户组对象
10.6.4 查询赋权列表
Params
- group: 只返回该角色的赋权记录
- target: 只返回该资源上的赋权记录
- limit: 返回结果条数的上限,默认为 100
group 和 target 不能同时使用。
Method & Url
Response Status
Response Body
10.6.5 查询某个赋权
Params
- id: 需要查询的赋权 Id
Method & Url
Response Status
Response Body
10.7 图空间管理员(Manager)API
重要提示:在使用以下 API 之前,需要先创建图空间(graphspace)。请参考 Graphspace API 创建名为 gs1 的图空间。文档中的示例均假设已存在名为 gs1 的图空间
重要提示:管理员相关接口只在 PD 模式下可用,单机模式下会返回 400 和 GraphSpace management is not supported in standalone mode 错误信息。
- 图空间管理员 API 用于在 graphspace 维度给用户授予/回收管理员角色,并查询当前用户或其他用户在该 graphspace 下的角色信息。角色类型可取
SPACE、SPACE_MEMBER、ADMIN。
10.7.1 检查当前登录用户是否拥有某个角色
Params
- type: 需要校验的角色类型,必填,取值为
SPACE、SPACE_MEMBER、ADMIN之一
Method & Url
Response Status
Response Body
10.7.2 查询图空间管理员列表
Params
- type: 角色类型,必填,取值为
SPACE、SPACE_MEMBER、ADMIN之一。SPACE返回图空间管理员,SPACE_MEMBER返回图空间成员,ADMIN返回整个集群的管理员
Method & Url
Response Status
Response Body
10.7.3 授权/创建图空间管理员
- 下面在 gs1 下,将用户 boss 授权为 SPACE_MEMBER 角色
Params
- user: 用户或角色名称,必填
- type: 角色类型,必填,取值为
SPACE、SPACE_MEMBER、ADMIN之一
把已经是图空间成员的用户授权为
SPACE时会先回收其成员角色,反之同理。只有管理员可以授予ADMIN。
Request Body
Method & Url
Response Status
Response Body
10.7.4 取消图空间管理员权限
- 下面在 gs1 下,将用户 boss 的 SPACE_MEMBER 角色删除
Params
- user: 需要删除的用户名称,内置的
admin用户不能从ADMIN中移除 - type: 需要删除的角色类型,取值为
SPACE、SPACE_MEMBER、ADMIN之一
Method & Url
Response Status
10.7.5 查询指定用户在图空间中的角色
Params
- user: 用户名称
Method & Url
Response Status
Response Body
返回的角色取自 ADMIN、SPACE、SPACE_MEMBER;用户在该图空间下不具备其中任何角色时返回 NONE。
10.7.6 检查当前登录用户是否拥有某个默认角色
默认角色是图空间的内置角色,参见 Graphspace API。role 的合法取值为 space、space_member、analyst 和 observer;graph 只在 role=observer 时生效。
Params
- role: 默认角色名称,必填
- graph: 图名称,选填,只在
role=observer时使用
Method & Url
Response Status
Response Body
10.8 登录(Login)API
除了 HTTP Basic 认证之外,服务还可以签发 JWT token,之后通过 Authorization: Bearer <token> 请求头携带。登录相关接口不带图空间前缀。
token 使用 auth.token_secret 配置项签名,有效期为 auth.token_expire 秒(默认 86400)。该密钥的默认值在启动时随机生成,因此当 token 需要在重启后继续有效、或者需要被多个服务节点接受时,必须显式配置该项。
10.8.1 登录并获取 token
Params
- user_name: 用户名称,必填
- user_password: 用户密码,必填
- token_expire: token 有效期(秒),选填
Request Body
Method & Url
Response Status
用户名或密码错误时返回 401。
Response Body
10.8.2 登出并使 token 失效
需要失效的 token 从请求头中获取,无需请求体。
Params
请求头说明:
- Authorization:
Bearer <token>,必填。只接受 Bearer 方式,其他方式返回400。
Method & Url
Response Status
token 非法或已过期时返回 401。
10.8.3 校验 token
Params
请求头说明:
- Authorization:
Bearer <token>,必填
Method & Url
Response Status
token 非法或已过期时返回 401。
Response Body
10.9 项目(Project)API
项目把一组图和一个管理员角色、一个操作员角色绑定在一起,从而可以一次性对这组图授权。创建项目时会同时生成它的 project_target、project_admin_group 和 project_op_group,这些字段会在响应中返回,但不能由客户端设置。
10.9.1 创建项目
Params
- project_name: 项目名称,必填
- project_description: 项目描述,选填
创建时不能传 project_graphs,请使用下面的 add_graph 操作。
Request Body
Method & Url
Response Status
Response Body
10.9.2 向项目中添加或移除图
Params
- id: 项目 Id
- action:
add_graph表示添加,remove_graph表示移除
Request Body
Method & Url
Response Status
Response Body
返回整个项目对象,其中包含更新后的图列表。
10.9.3 修改项目描述
Params
- id: 项目 Id
不传 action 时表示修改描述,此时请求体中不能带 project_graphs。
Request Body
Method & Url
Response Status
10.9.4 查询项目列表
Params
- limit: 返回结果条数的上限,默认为 100
Method & Url
Response Status
Response Body
10.9.5 查询某个项目
Params
- id: 项目 Id
Method & Url
Response Status
10.9.6 删除项目
Params
- id: 项目 Id
删除前需要先把项目中的图全部移除。
Method & Url
Response Status
5.1.18 - Metrics API
HugeGraph 提供了获取监控信息的 Metrics 接口,比如各个 Gremlin 执行时间的统计、缓存的占用大小等。Metrics 接口包括如下几类:基础指标、统计指标、系统指标、后端存储指标。
1. 基础指标
1.1 获取所有基础指标
Params
- type:如果传值为
json,则以 json 格式返回,否则以 Promethaus 格式返回。
1.1.1 Method & Url
Response Status
Response Body
1.1.2 Method & Url
Response Status
Response Body
1.2 获取 Gauges 指标
Method & Url
Response Status
Response Body
1.3 获取 Counters 指标
Method & Url
Response Status
Response Body
1.4 获取 histograms 指标
Method & Url
Response Status
Response Body
1.5 获取 meters 指标
Method & Url
Response Status
Response Body
1.6 获取 timers 指标
Method & Url
Response Status
Response Body
2.统计指标
Params
- type:如果传值为 json,则以 json 格式返回,否则以 Promethaus 格式返回。
2.1 Method & Url
Response Status
Response Body
2.2 Method & Url
Response Status
Response Body
3.系统指标
系统指标主要返回机器运行指标,如内存、线程等信息。
Method & Url
Response Status
Response Body
4.后端指标
hugeGraph 支持多种后端存储,后端指标包括内存、磁盘等信息。
Method & Url
Response Status
Response Body
5.1.19 - Other API
11.1 Other
11.1.1 查看HugeGraph的版本信息
Method & Url
Response Status
Response Body
11.1.2 查看服务的概要信息
返回服务名、内核版本、文档地址以及当前节点注册的 API 分组。
Method & Url
Response Status
Response Body
swagger_ui 由 restserver.url 拼接得到,apis 是当前节点注册的 API 分组,按名称排序。
11.1.3 列出服务的全部 API
按 API 分组和资源类列出所有已注册的接口方法,每条记录包含 url、HTTP 方法,以及查询参数的类型和默认值。
Method & Url
Response Status
Response Body
返回内容较长,下面的片段展示了它的结构:
11.1.4 查看和切换异常堆栈开关
服务返回的错误信息中是否带上 exception 和 cause 等异常堆栈字段,由 exception.allow_trace 配置项(默认 true)决定。下面的接口是一个节点级别的运行期覆盖开关:打开时无论配置项取值如何都会带上堆栈。GET 返回的是该覆盖开关的状态,初始为 false。
Method & Url
Response Status
Response Body
Method & Url
Request Body
Response Status
Response Body
11.1.5 管理 IP 白名单,该操作需要管理员权限
白名单只在开关打开时生效,参见 white_ip.status 配置项(默认 disable)。
查看白名单
Method & Url
Response Status
Response Body
向白名单添加或删除 IP
Params
- ips: IPv4 地址列表
- action:
load表示添加,remove表示删除
Method & Url
Request Body
Response Status
Response Body
existed_ips 是已经在白名单中的地址,added_ips 是新增的地址,illegal_ips 只在存在非法 IPv4 地址时返回。action=remove 时返回的是 removed_ips 和 non_existed_ips。
启用或关闭白名单
Params
- status:
true表示启用,false表示关闭
Method & Url
Response Status
Response Body
11.1.6 启动 Arthas 诊断代理
将 Arthas 代理挂载到正在运行的服务进程上用于诊断。端口、绑定 IP 和禁用命令取自 arthas.telnetPort、arthas.httpPort、arthas.ip 和 arthas.disabledCommands 配置项,参见 配置项。
Method & Url
Response Status
Response Body
返回生效的 Arthas 配置:
5.2 - HugeGraph Java Client
本文的代码都是java语言写的,但其风格与gremlin(groovy)是非常类似的。用户只需要把代码中的变量声明替换成def或直接去掉,
就能将java代码转变为groovy;另外就是每一行语句最后可以不加分号,groovy认为一行就是一条语句。
用户在HugeGraph-Hubble中编写的gremlin(groovy)可以参考本文的java代码,下面会举出几个例子。
本文以 Toolchain master(Client 1.8.0)为准。请先按快速入门准备对应依赖;
能力探测等新增接口不能直接用于旧版 Client。
1 HugeGraph-Client
HugeGraph-Client 是操作 graph 的总入口,用户必须先创建出 HugeGraph-Client 对象,与 HugeGraph-Server 建立连接(伪连接)后,才能获取到 schema、graph 以及 gremlin 的操作入口对象。
HugeGraph-Client 连接服务端已有的图。构造器支持传入 GraphSpace;使用双参数构造器或传入空值时,GraphSpace 默认为 DEFAULT。
上述创建 HugeClient 的过程如果失败会抛出异常,用户需要 try-catch。如果成功则继续获取 schema、graph 以及 gremlin 的 manager。
在HugeGraph - Hubble中通过gremlin来操作时,不需要使用HugeClient,可以忽略。
1.1 构造器选项
构造器支持下列选项。所有超时参数的单位都是秒,内部会转换为毫秒。
| interface | description | default |
|---|---|---|
configUrl(String url) | 服务端地址,通常已经通过 builder(...) 传入 | 必填 |
configGraph(String graph) | 图名称,通常已经通过 builder(...) 传入 | 必填 |
configGraphSpace(String graphSpace) | GraphSpace 名称,传入 null 或空值时回退为 DEFAULT | DEFAULT |
configUser(String username, String password) | 服务端用户名和密码,传入 null 时按空字符串处理 | 空,不开启认证 |
configToken(String token) | 使用 Token 代替用户名和密码 | 空 |
configTimeout(int seconds) | 请求超时,建议使用正数秒值 | 20 |
configConnectTimeout(Integer seconds) | 连接超时,不设置时沿用 configTimeout | 未设置 |
configReadTimeout(Integer seconds) | 读取超时,不设置时沿用 configTimeout | 未设置 |
configPool(int maxConns, int maxConnsPerRoute) | 连接池大小,任意一项传入 0 时恢复其默认值 | 4 x CPU 数,2 x CPU 数 |
configIdleTime(int seconds) | 空闲连接保持时间,必须大于 0 | 30 |
configSSL(String trustStoreFile, String trustStorePassword) | HTTPS 连接使用的信任库 | 空 |
configHttpBuilder(Consumer<OkHttpClient.Builder> consumer) | 回调,用于进一步定制底层的 OkHttp 客户端 | 无 |
graphRequired(boolean graphRequired) | build() 是否拒绝空的 url 或图名称 | true |
当前 master 的 configTimeout(0) 存在单位换算缺陷,会得到 20,000 秒而非默认的 20 秒。
保持默认值时省略该调用,或显式使用 configTimeout(20);不要用 0 恢复默认值。
调用 build() 时,客户端会读取服务端的 API 版本,超出 [0.38, 0.81) 范围时报错。
1.2 操作入口
除 schema、graph 和 gremlin 外,HugeClient 还提供下列入口。图级别的入口只有在指定了图名称时才可用;如果创建客户端时图名称为空,这些入口会返回 null,直到调用 assignGraph(graphSpace, graph) 为止。
| interface | returns | scope | description |
|---|---|---|---|
schema() | SchemaManager | graph | 管理 PropertyKey、VertexLabel、EdgeLabel 和 IndexLabel |
graph() | GraphManager | graph | 单条或批量地增删改查顶点和边 |
gremlin() | GremlinManager | graph | 同步执行 Gremlin 语句,或作为异步任务提交 |
cypher() | CypherManager | graph | 同步执行 Cypher 语句,或作为异步任务提交 |
traverser() | TraverserManager | graph | RESTful 遍历,如最短路径、k-out、k-neighbor、交叉点等 |
variables() | VariablesManager | graph | 获取、设置、列出和删除图变量 |
job() | JobManager | graph | 重建 VertexLabel、EdgeLabel 或 IndexLabel 的索引 |
task() | TaskManager | graph | 列出、获取、取消、删除异步任务,或等待其完成 |
computer() | ComputerManager | graph | 创建、取消、列出和获取 computer 任务 |
graphs() | GraphsManager | graphspace | 创建、克隆、列出、重载、清空和删除图,读取和设置图的模式 |
graphSpace() | GraphSpaceManager | server | 管理 GraphSpace,详见第 4 节 |
auth() | AuthManager | server | 管理 user、group、target、belong 和 access |
metrics() | MetricsManager | server | 读取后端、系统和统计指标 |
versionManager() | VersionManager | server | 读取服务端的 core、gremlin 和 API 版本 |
客户端还会报告所连服务端支持的能力,调用方可以据此判断,而不必解析版本号:supportsGraphSpace()、supportsCypher()、supportsGraphCreate()、supportsDefaultRole() 和 isServerAuthEnabled()。
2 元数据
2.1 SchemaManager
SchemaManager 用于管理 HugeGraph 中的四种元数据,分别是 PropertyKey(属性类型)、VertexLabel(顶点类型)、EdgeLabel(边类型)和 IndexLabel(索引标签)。在定义元数据信息之前必须先创建 SchemaManager 对象。
用户可使用如下方法获得 SchemaManager 对象:
在HugeGraph-Hubble中通过gremlin创建schema对象:
下面分别介绍四种元数据的定义过程。
2.2 PropertyKey
2.2.1 接口及参数介绍
PropertyKey 用来规范顶点和边的属性的约束,暂不支持定义属性的属性。
PropertyKey 允许定义的约束信息包括:name、datatype、cardinality、aggregateType、writeType、userdata,下面逐一介绍。
- name: 属性的名字,用来区分不同的 PropertyKey,不允许有同名的属性;
| interface | param | must set |
|---|---|---|
| propertyKey(String name) | name | y |
- datatype:属性值类型,必须从下表中选择符合具体业务场景的一项显式设置;
| interface | Java Class |
|---|---|
| asText() | String |
| asInt() | Integer |
| asDate() | Date |
| asUUID() | UUID |
| asBoolean() | Boolean |
| asByte() | Byte |
| asBlob() | Byte[] |
| asDouble() | Double |
| asFloat() | Float |
| asLong() | Long |
- cardinality:属性值是单值还是多值,多值的情况下又分为允许有重复值和不允许有重复值,该项默认为 single,如有必要可从下表中选择一项设置;
| interface | cardinality | description |
|---|---|---|
| valueSingle() | single | single value |
| valueList() | list | multi-values that allow duplicate value |
| valueSet() | set | multi-values that not allow duplicate value |
- aggregateType:同一属性被重复写入时的合并方式,默认为 none,即保留最后写入的值。数值类的选项要求属性为数字类型;
| interface | aggregateType | description |
|---|---|---|
| calcSum() | sum | 对写入的值累加 |
| calcMax() | max | 保留最大值 |
| calcMin() | min | 保留最小值 |
| calcOld() | old | 保留首次写入的值,忽略后续更新 |
aggregateType(AggregateType type) 可以直接设置该项,传入 AggregateType.NONE 即恢复默认。
- writeType:属性属于 OLTP 图数据还是 OLAP 计算结果,对于 OLAP 还区分是否带索引,默认为 oltp;
| writeType | description |
|---|---|
| OLTP | 普通图属性 |
| OLAP_COMMON | 不带索引的 OLAP 属性 |
| OLAP_SECONDARY | 带二级索引的 OLAP 属性 |
| OLAP_RANGE | 带范围索引的 OLAP 属性 |
| interface | description |
|---|---|
| writeType(WriteType writeType) | 使用枚举值设置写入类型 |
| writeType(String name) | 使用枚举名设置写入类型 |
- userdata:用户可以自己添加一些约束或额外信息,然后自行检查传入的属性是否满足约束,或者必要的时候提取出额外信息
| interface | description |
|---|---|
| userdata(String key, Object value) | The same key, the latter will cover the former |
2.2.2 创建 PropertyKey
在HugeGraph-Hubble中通过gremlin创建上述PropertyKey对象的语法完全一致,如果用户没有定义出schema变量,应该这样写:
以下的示例中,gremlin与java的语法完全一致,不再赘述。
- ifNotExist():为 create 添加判断机制,若当前 PropertyKey 已经存在则不再创建,否则创建该属性。若不添加判断,在 properkey 已存在的情况下会抛出异常信息,下同,不再赘述。
2.2.3 删除 PropertyKey
2.2.4 查询 PropertyKey
2.3 VertexLabel
2.3.1 接口及参数介绍
VertexLabel 用来定义顶点类型,描述顶点的约束信息:
VertexLabel 允许定义的约束信息包括:name、idStrategy、properties、primaryKeys、nullableKeys 和 ttl,下面逐一介绍。
- name: 属性的名字,用来区分不同的 VertexLabel,不允许有同名的属性;
| interface | param | must set |
|---|---|---|
| vertexLabel(String name) | name | y |
- idStrategy: 每一个 VertexLabel 都可以选择自己的 Id 策略,目前有三种策略供选择,即 Automatic(自动生成)、Customize(用户传入)和 PrimaryKey(主属性键)。其中 Automatic 使用 Snowflake 算法生成 Id,Customize 需要用户自行传入字符串或数字类型的 Id,PrimaryKey 则允许用户从 VertexLabel 的属性中选择若干主属性作为区分的依据,HugeGraph 内部会根据主属性的值拼接生成 Id。idStrategy 默认使用 Automatic 的,但如果用户没有显式设置 idStrategy 又调用了 primaryKeys(…) 方法设置了主属性,则 idStrategy 将自动使用 PrimaryKey;
| interface | idStrategy | description |
|---|---|---|
| useAutomaticId | AUTOMATIC | generate id automatically by Snowflake algorithm |
| useCustomizeStringId | CUSTOMIZE_STRING | passed id by user, must be string type |
| useCustomizeNumberId | CUSTOMIZE_NUMBER | passed id by user, must be number type |
| useCustomizeUuidId | CUSTOMIZE_UUID | passed id by user, must be UUID type |
| usePrimaryKeyId | PRIMARY_KEY | choose some important prop as primary key to splice id |
- properties: 定义顶点的属性,传入的参数是 PropertyKey 的 name
| interface | description |
|---|---|
| properties(String… properties) | allow to pass multi props |
- primaryKeys: 当用户选择了 PrimaryKey 的 Id 策略时,需要从 VertexLabel 的属性中选择若干主属性作为区分的依据;
| interface | description |
|---|---|
| primaryKeys(String… keys) | allow to choose multi prop as primaryKeys |
需要注意的是,Id 策略的选择与 primaryKeys 的设置有一些相互约束,不能随意调用,约束关系见下表:
| useAutomaticId | useCustomizeStringId | useCustomizeNumberId | usePrimaryKeyId | |
|---|---|---|---|---|
| unset primaryKeys | AUTOMATIC | CUSTOMIZE_STRING | CUSTOMIZE_NUMBER | ERROR |
| set primaryKeys | ERROR | ERROR | ERROR | PRIMARY_KEY |
客户端自身只校验 Id 策略是否被重复设置,因此在同一个构造器上调用两个上述方法会在本地报错。上表中的组合由服务端校验。
- nullableKeys: 对于通过 properties(…) 方法设置过的属性,默认全都是不可为空的,也就是在创建顶点时该属性必须赋值,这样可能对用户数据提出了太过严格的完整性要求。为避免这样的强约束,用户可以通过 本方法设置若干属性为可空的,这样添加顶点时该属性可以不赋值。
| interface | description |
|---|---|
| nullableKeys(String… properties) | allow to pass multi props |
注意:primaryKeys 和 nullableKeys 不能有交集,因为一个属性不能既作为主属性,又是可空的。
- ttl:该类型顶点的存活时间,默认为 0,即永不过期。客户端会拒绝负值。默认从顶点写入的时刻开始计时;设置 ttlStartTime 后,改为从该 label 的某个日期属性开始计时。
| interface | description |
|---|---|
| ttl(long ttl) | 设置存活时间,0 表示不过期 |
| ttlStartTime(String property) | 指定计时起点所用的日期属性 |
- enableLabelIndex:用户可以指定是否需要为 label 创建索引。不创建则无法全局搜索指定 label 的顶点和边,创建则可以全局搜索,做类似于
g.V().hasLabel('person'), g.E().has('label', 'person')这样的查询, 但是插入数据时性能上会更加慢,并且需要占用更多的存储空间。此项默认为 true。
| interface | description |
|---|---|
| enableLabelIndex(boolean enable) | Whether to create a label index |
- userdata:用户可以自己添加一些约束或额外信息,然后自行检查传入的属性是否满足约束,或者必要的时候提取出额外信息
| interface | description |
|---|---|
| userdata(String key, Object value) | The same key, the latter will cover the former |
2.3.2 创建 VertexLabel
2.3.3 追加 VertexLabel
VertexLabel 是可以追加约束的,不过仅限 properties 和 nullableKeys,而且追加的属性也必须添加到 nullableKeys 集合中。
2.3.4 删除 VertexLabel
2.3.5 查询 VertexLabel
2.4 EdgeLabel
2.4.1 接口及参数介绍
EdgeLabel 用来定义边类型,描述边的约束信息。
EdgeLabel 允许定义的约束信息包括:name、sourceLabel、targetLabel、frequency、properties、sortKeys、nullableKeys 和 ttl,下面逐一介绍。
- name: 属性的名字,用来区分不同的 EdgeLabel,不允许有同名的属性;
| interface | param | must set |
|---|---|---|
| edgeLabel(String name) | name | y |
sourceLabel 和 targetLabel: 边连接的源顶点类型名和目标顶点类型名,两者都设置等同于声明一组连接。
link: EdgeLabel 内部保存的是一组源顶点和目标顶点的组合,因此
link(...)可以多次调用,让同一种边连接多组顶点类型。一旦通过这种方式添加过组合,sourceLabel(...)和targetLabel(...)就会被拒绝;同时sourceLabel()和targetLabel()这两个取值方法只在恰好有一组组合时可用,需要读取全部组合时请使用links()。
| interface | param | must set |
|---|---|---|
| link(String sourceLabel, String targetLabel) | sourceLabel, targetLabel | y,或设置下面两项 |
| sourceLabel(String label) | label | y,除非已使用 link() |
| targetLabel(String label) | label | y,除非已使用 link() |
- frequency: 字面意思是频率,表示在两个具体的顶点间某个关系出现的次数,可以是单次(single)或多次(frequency),默认为 single;
| interface | frequency | description |
|---|---|---|
| singleTime() | single | a relationship can only occur once |
| multiTimes() | multiple | a relationship can occur many times |
- properties: 定义边的属性
| interface | description |
|---|---|
| properties(String… properties) | allow to pass multi props |
- sortKeys: 当 EdgeLabel 的 frequency 为 multiple 时,需要某些属性来区分这多次的关系,故引入了 sortKeys(排序键);
| interface | description |
|---|---|
| sortKeys(String… keys) | allow to choose multi prop as sortKeys |
- nullableKeys: 与顶点中的 nullableKeys 概念一致,不再赘述
注意:sortKeys 和 nullableKeys 也不能有交集。
ttl:与顶点中的 ttl 概念一致,同样提供
ttl(long ttl)和ttlStartTime(String property)方法,默认值同样为 0。edge label type:EdgeLabel 默认为普通类型,也可以声明为一族边类型的父类型、某个父类型的子类型,或者通用类型:
| interface | edgeLabelType | description |
|---|---|---|
| asBase() | PARENT | 将该 label 声明为父类型 |
| withBase(String parentLabel) | SUB | 将该 label 声明为 parentLabel 的子类型 |
| asGeneral() | GENERAL | 将该 label 声明为通用类型 |
enableLabelIndex:与顶点中的 enableLabelIndex 概念一致,不再赘述
userdata:用户可以自己添加一些约束或额外信息,然后自行检查传入的属性是否满足约束,或者必要的时候提取出额外信息
| interface | description |
|---|---|
| userdata(String key, Object value) | The same key, the latter will cover the former |
2.4.2 创建 EdgeLabel
2.4.3 追加 EdgeLabel
2.4.4 删除 EdgeLabel
2.4.5 查询 EdgeLabel
2.5 IndexLabel
2.5.1 接口及参数介绍
IndexLabel 用来定义索引类型,描述索引的约束信息,主要是为了方便查询。
IndexLabel 允许定义的约束信息包括:name、baseType、baseValue、indexFields、indexType,下面逐一介绍。
- name: 属性的名字,用来区分不同的 IndexLabel,不允许有同名的属性;
| interface | param | must set |
|---|---|---|
| indexLabel(String name) | name | y |
baseType: 表示要为 VertexLabel 还是 EdgeLabel 建立索引, 与下面的 baseValue 配合使用;
baseValue: 指定要建立索引的 VertexLabel 或 EdgeLabel 的名称;
| interface | param | description |
|---|---|---|
| onV(String baseValue) | baseValue | build index for VertexLabel: ‘baseValue’ |
| onE(String baseValue) | baseValue | build index for EdgeLabel: ‘baseValue’ |
- indexFields: 要在哪些属性上建立索引,可以是为多列建立联合索引;
| interface | param | description |
|---|---|---|
| by(String… fields) | files | allow to build index for multi fields for secondary index |
- indexType: 建立的索引类型,目前支持五种,即 Secondary、Range、Search、Shard 和 Unique。
- Secondary 支持精确匹配的二级索引,允许建立联合索引,联合索引支持索引前缀搜索
- 单个属性,支持相等查询,比如:person 顶点的 city 属性的二级索引,可以用
g.V().has("city", "北京")查询"city 属性值是北京"的全部顶点 - 联合索引,支持前缀查询和相等查询,比如:person 顶点的 city 和 street 属性的联合索引,可以用
g.V().has ("city", "北京").has('street', '中关村街道')查询"city属性值是北京且street属性值是中关村"的全部顶点,或者g.V() .has("city", "北京")查询"city 属性值是北京"的全部顶点
secondary index 的查询都是基于"是"或者"相等"的查询条件,不支持"部分匹配"
- 单个属性,支持相等查询,比如:person 顶点的 city 属性的二级索引,可以用
- Range 支持数值类型的范围查询
- 必须是单个数字或者日期属性,比如:person 顶点的 age 属性的范围索引,可以用
g.V().has("age", P.gt(18))查询"age属性值大于18"的顶点。除了P.gt()以外,还支持P.gte(),P.lte(),P.lt(),P.eq(),P.between(),P.inside()和P.outside()等
- 必须是单个数字或者日期属性,比如:person 顶点的 age 属性的范围索引,可以用
- Search 支持全文检索的索引
- 必须是单个文本属性,比如:person 顶点的 address 属性的全文索引,可以用
g.V().has("address", Text .contains('大厦')查询"address 属性中包含大厦"的全部顶点
search index 的查询是基于"是"或者"包含"的查询条件
- 必须是单个文本属性,比如:person 顶点的 address 属性的全文索引,可以用
- Shard 支持前缀匹配 + 数字范围查询的索引
- N 个属性的分片索引,支持前缀相等情况下的范围查询,比如:person 顶点的 city 和 age 属性的分片索引,可以用
g.V().has ("city", "北京").has("age", P.between(18, 30))查询"city 属性是北京且年龄大于等于 18 小于 30"的全部顶点 - shard index N 个属性全是文本属性时,等价于 secondary index
- shard index 只有单个数字或者日期属性时,等价于 range index
shard index 可以有任意数字或者日期属性,但是查询时最多只能提供一个范围查找条件,且该范围查找条件的属性的前缀属性都是相等查询条件
- N 个属性的分片索引,支持前缀相等情况下的范围查询,比如:person 顶点的 city 和 age 属性的分片索引,可以用
- Unique 支持属性值唯一性约束,即可以限定属性的值不重复,允许联合索引,但不支持查询
- 单个或者多个属性的唯一性索引,不可用来查询,只可对属性的值进行限定,当出现重复值时将报错
- Secondary 支持精确匹配的二级索引,允许建立联合索引,联合索引支持索引前缀搜索
| interface | indexType | description |
|---|---|---|
| secondary() | Secondary | support prefix search |
| range() | Range | support range(numeric or date type) search |
| search() | Search | support full text search |
| shard() | Shard | support prefix + range(numeric or date type) search |
| unique() | Unique | support unique props value, not support search |
2.5.2 创建 IndexLabel
以下示例假定已创建带 name、age 的 person 顶点类型,以及带 date 的 created 边类型。
先补充索引所需属性;id 是业务属性,与顶点的内部 ID 不同。
2.5.3 删除 IndexLabel
2.5.4 查询 IndexLabel
3 图数据
3.1 Vertex
顶点是构成图的最基本元素,一个图中可以有非常多的顶点。下面给出一个添加顶点的例子:
- 添加顶点的关键是顶点属性,添加顶点函数的参数个数必须为偶数,且满足
key1 -> val1, key2 -> val2 ···的顺序排列,键值对之间的顺序是自由的。 - 参数中必须包含一对特殊的键值对,就是
T.LABEL -> "val",用来定义该顶点的类别,以便于程序从缓存或后端获取到该 VertexLabel 的 schema 定义,然后做后续的约束检查。例子中的 label 定义为 person。T.LABEL就是常量"label",直接传入该字符串效果相同。 - 如果顶点类型的 Id 策略为
AUTOMATIC,则不允许用户传入 id 键值对。 - 如果顶点类型的 Id 策略为
CUSTOMIZE_STRING,则用户需要自己传入 String 类型 id 的值,键值对形如:T.ID, "123456"。 - 如果顶点类型的 Id 策略为
CUSTOMIZE_NUMBER,则用户需要自己传入 Number 类型 id 的值,键值对形如:T.ID, 123456。 - 如果顶点类型的 Id 策略为
PRIMARY_KEY,参数还必须全部包含该primaryKeys对应属性的名和值,如果不设置会抛出异常。比如之前person的primaryKeys是name,例子中就设置了name的值为marko。 - 对于非 nullableKeys 的属性,必须要赋值。
- 剩下的参数就是顶点其他属性的设置,但并非必须。
- 调用
addVertex方法后,顶点会立刻被插入到后端存储系统中。
3.2 Edge
有了点,还需要边才能构成完整的图。下面给出一个添加边的例子:
- 由(源)顶点来调用添加边的函数,函数第一个参数为边的 label,第二个参数是目标顶点,这两个参数的位置和顺序是固定的。后续的参数就是
key1 -> val1, key2 -> val2 ···的顺序排列,设置边的属性,键值对顺序自由。 - 源顶点和目标顶点必须符合 EdgeLabel 中 source-label 和 target-label 的定义,不能随意添加。
- 对于非 nullableKeys 的属性,必须要赋值。
注意:当 frequency 为 multiple 时必须要设置 sortKeys 对应属性类型的值。
4 图管理
Client 支持管理一个物理部署中的多个 GraphSpace,每个 GraphSpace 可以包含多个图。不指定 GraphSpace 时使用 DEFAULT。
GraphSpace 需要服务端 core 版本不低于 1.7.0。连接更早的服务端时,客户端会退回到 legacy 模式,此时 hugeClient.supportsGraphSpace() 返回 false。
4.1 创建GraphSpace
4.2 GraphSpace 接口汇总
| 类别 | 接口 | 描述 |
|---|---|---|
| Manager - 查询 | listGraphSpace() | 获取所有 GraphSpace 名称 |
| listProfile() / listProfile(String prefix) | 获取 GraphSpace 概要 | |
| getGraphSpace(String name) | 获取指定 GraphSpace | |
| getDefault() | 获取默认 GraphSpace | |
| Manager - 创建/更新 | createGraphSpace(GraphSpace) | 创建 GraphSpace |
| updateGraphSpace(GraphSpace) | 更新配置 | |
| setDefault(String name) | 设置默认 GraphSpace | |
| Manager - 删除 | deleteGraphSpace(String name) | 删除指定 GraphSpace |
| Manager - 默认角色 | setDefaultRole(String name, String user, String role) | 授予默认角色,可用第四个参数限定到某个图 |
| checkDefaultRole(String name, String user, String role) | 检查默认角色,可用第四个参数限定到某个图 | |
| deleteDefaultRole(String name, String user, String role) | 撤销默认角色,可用第四个参数限定到某个图 | |
| GraphSpace - 属性 | getName() / getNickname() / getDescription() | 获取名称/昵称/描述 |
| getGraphNumberUsed() / getRoleNumberUsed() | 获取已使用的图数量/角色数量 | |
| getCpuUsed() / getMemoryUsed() / getStorageUsed() | 获取已使用的资源 | |
| getCreateTime() / getUpdateTime() | 获取创建时间/更新时间 | |
| GraphSpace - 配置 | setDescription(String) / setNickname(String) | 设置描述/昵称 |
| setMaxGraphNumber(int) / setMaxRoleNumber(int) | 设置最大图数量/角色数量 | |
| setCpuLimit(int) / setMemoryLimit(int) / setStorageLimit(int) | 设置资源配额 | |
| setConfigs(Map<String, Object>) | 设置额外的配置项 |
5 简单示例
简单示例见HugeGraph-Client
5.3 - Gremlin-Console
Gremlin-Console 是由 Tinkerpop 自己开发的一个交互式客户端,用户可以使用该客户端对 Graph 做各种操作,主要有两种使用模式:
- 单机离线调用模式
- Client/Server 请求模式
注:Gremlin-Console 只是便于用户快速上手体验,不建议在生产环境中使用。
1 单机离线调用模式
由于 lib 目录下已经包含了 HugeCore 的 jar 包,且 HugeGraph-Server 已经作为插件注册到 Gremlin-Console 中,用户可以直接写 Groovy 脚本调用 HugeGraph-Core 的代码,然后交由 Gremlin-Console 内的解析引擎执行,就能在不启动 Server 的情况下操作图。
这里提供一个示例,首先修改 hugegraph.properties 配置使用 Memory 后端 (使用其他后端可能会出现一些初始化问题):
然后输入下述命令:
这里的
--会被 getopts 解析为最后一个 option,这样后面的 options 就可以传入 Gremlin-Console 进行处理了。-i代表Execute the specified script and leave the console open on completion,更多的选项可以参考 Gremlin-Console 的源代码。
其中 example.groovy 是 scripts 目录下的一个示例脚本,该脚本插入了一些数据,并在最后查询图中顶点和边的数量。
此时还可以继续输入 Gremlin 语句对图进行操作:
更多的 Gremlin 语句请参考 Tinkerpop 官网。
2 Client/Server 请求模式
Gremlin-Console 通过 WebSocket 连接 HugeGraph-Server。默认配置使用 WsAndHttpChannelizer,可同时处理 WebSocket 和 HTTP 请求,无需切换 Channelizer。
确认 host、port 与 remote.yaml 一致,然后按照步骤启动 HugeGraph-Server。
下面进入 Gremlin-Console:
连接 Server,需在配置文件中指定连接参数,在 conf 目录下有一个默认的 remote.yaml:
如果 Server 开启了鉴权模式,需要在同一个文件中补上凭据:
conf 目录下还提供了 remote-objects.yaml 和 gremlin-driver-settings.yaml,它们使用相同的 host、port 和序列化器配置。
Server 端的图以图空间限定名绑定,因此图空间 DEFAULT 下的图 hugegraph 绑定名为 DEFAULT-hugegraph,其 traversal source 绑定名为 __g_DEFAULT-hugegraph。裸写 hugegraph 在 Server 端无法解析,而 DEFAULT-hugegraph 又不是合法的 Groovy 标识符,所以远程脚本需要通过别名访问 traversal source。如果启动 HugeGraph-Server 时预加载了示例图,查询方式如下:
注意:在 Client/Server 模式下,所有和 Server 有关的操作都要加上
:>,如果不加,表示在 console 本地操作。:>发送的脚本不带别名,因此只能使用 Server 自身已绑定的名称。
更多关于 Gremlin-Console 的使用,请参考 Tinkerpop 官网。
6 - 使用指南
本节说明 HugeGraph 的架构、设计、备份恢复、插件开发、安全设置和常见问题。
6.1 - HugeGraph 架构概览
全栈组件
HugeGraph 生态由职责不同的图数据库、图计算、图 AI 和工具链组件组成。HugeGraph Server 提供 OLTP 图数据库服务;HugeGraph-Computer 与 Vermeer 是独立的 OLAP 图计算引擎;HugeGraph-AI 提供图 AI 能力。Toolchain 中的客户端、数据导入、可视化和运维工具为应用及运维人员提供配套入口。
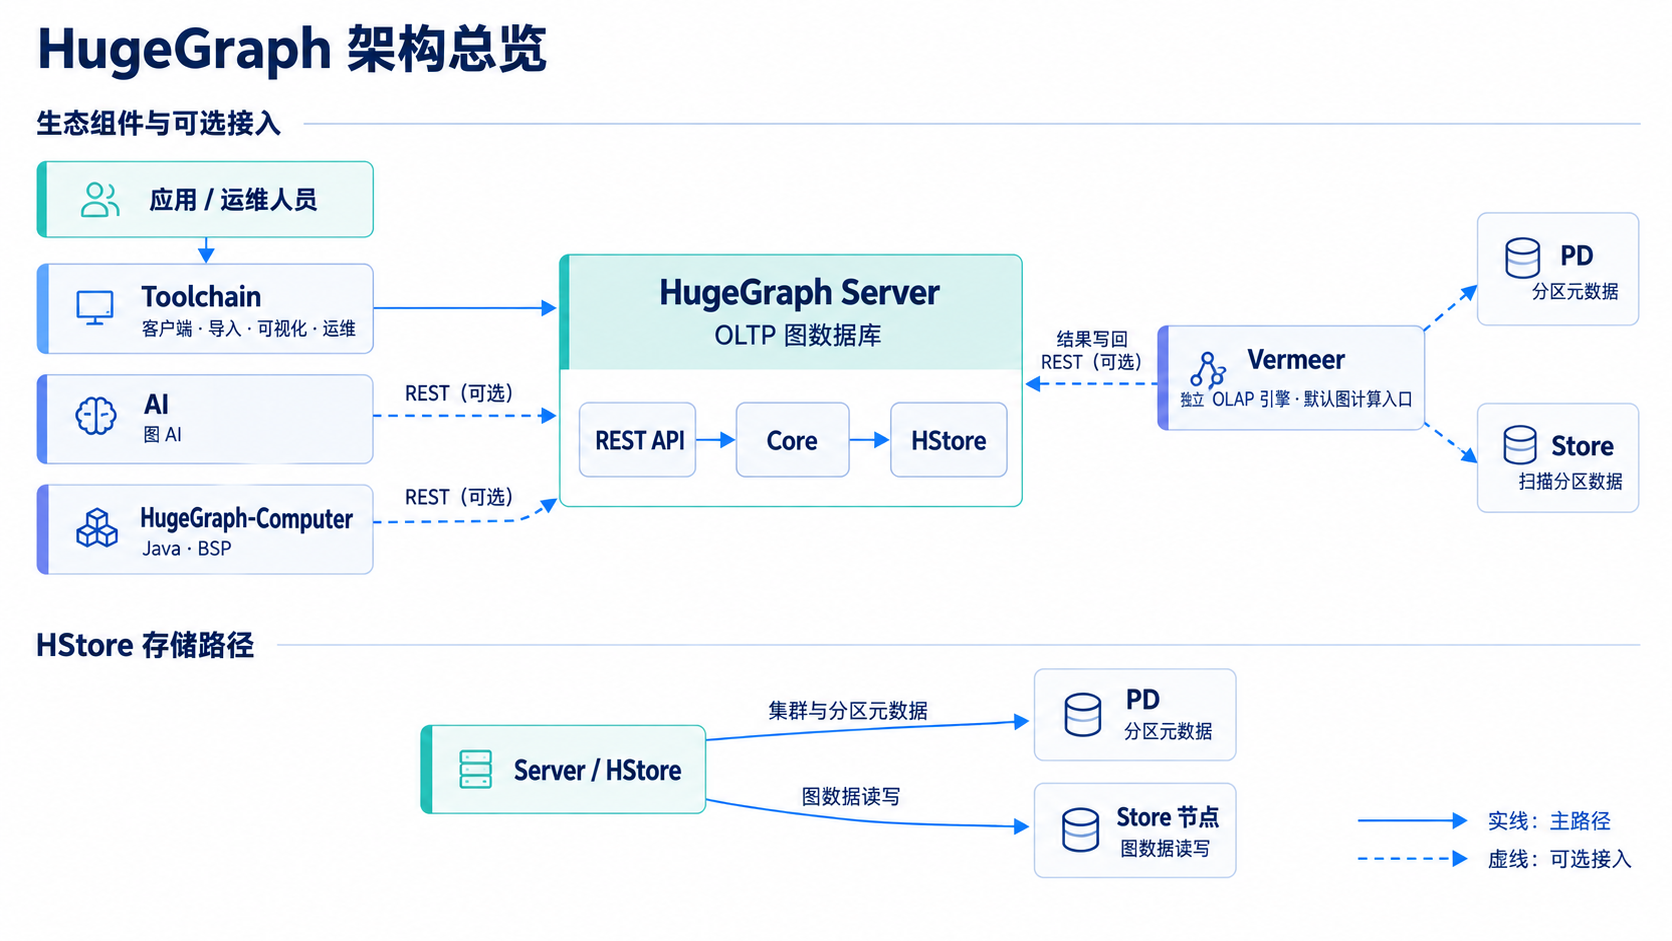
图:Server 以 HStore 后端为例;RocksDB、HBase 等独立后端见下方 Mermaid。Vermeer 和 HugeGraph-Computer 是独立的 OLAP 引擎,虚线表示可选接入。
生态接入
flowchart TB
Apps["应用 / 运维"] --> Toolchain["Toolchain"] --> Server["Server REST API"]
AI["AI"] -. REST .-> Server
Computer["Computer"] -. REST .-> Server
Vermeer["Vermeer"] -. PD .-> PD["PD"]
Vermeer -. 扫描 .-> Store["Store"]
Vermeer -. 写回 .-> Server虚线表示可选的 HugeGraph 接入,不代表所有 AI、Computer 或 Vermeer 任务都必须连接 Server、PD 或 Store。Computer 和 AI 通过 Server REST API 读写图数据。Vermeer 的 HugeGraph 输入模式向 PD 查询分区元数据,并直接向 Store 扫描 HStore 分区;选择 HugeGraph 结果输出时,再通过 Server REST API 写回结果。
Server 内部结构
flowchart TB
API["REST API / Gremlin"] --> Core["Core"] --> Adapter["后端适配"]
Adapter --> RocksDB["RocksDB"]
Adapter --> HBase["HBase"]
Adapter --> HStore["HStore"]
HStore --> PD["PD"]
HStore --> Store["Store"]Server 的 REST API 和 Gremlin 接口把请求交给 Core,再由存储后端适配器执行读写。RocksDB 和 HBase 是独立后端;HStore 适配器从 PD 获取集群元数据和分区信息,并向 Store 节点发送图数据操作。PD 管理集群元数据与分区,不承载图数据读写路径。
当前 Server 提供 RocksDB、HBase、HStore 和内存后端实现。内存后端主要用于测试或临时使用,不属于正式持久化部署选项;生产部署方式见 Server 快速上手。
Toolchain 的主要组件如下:
- Hubble:通过 Web 界面连接图数据库,管理 Schema、导入数据并执行查询。
- Loader:转换多种数据源并批量导入图数据。
- Tools:提供部署、管理和备份恢复命令。
- Client:封装 Server 连接、Schema 管理、图数据读写和查询;支持 Java、Python 和 Go 客户端,Rust 客户端仍在开发中。
独立图计算引擎
- Vermeer:提供独立的图计算服务及算法接口。
- HugeGraph-Computer:基于 BSP/Pregel 模型的 Java 分布式图计算引擎。
历史架构图
下图保留作历史参考,其中 Server 同时承担 OLTP 与 OLAP、以及多种旧后端的标注不代表 当前主线实现。
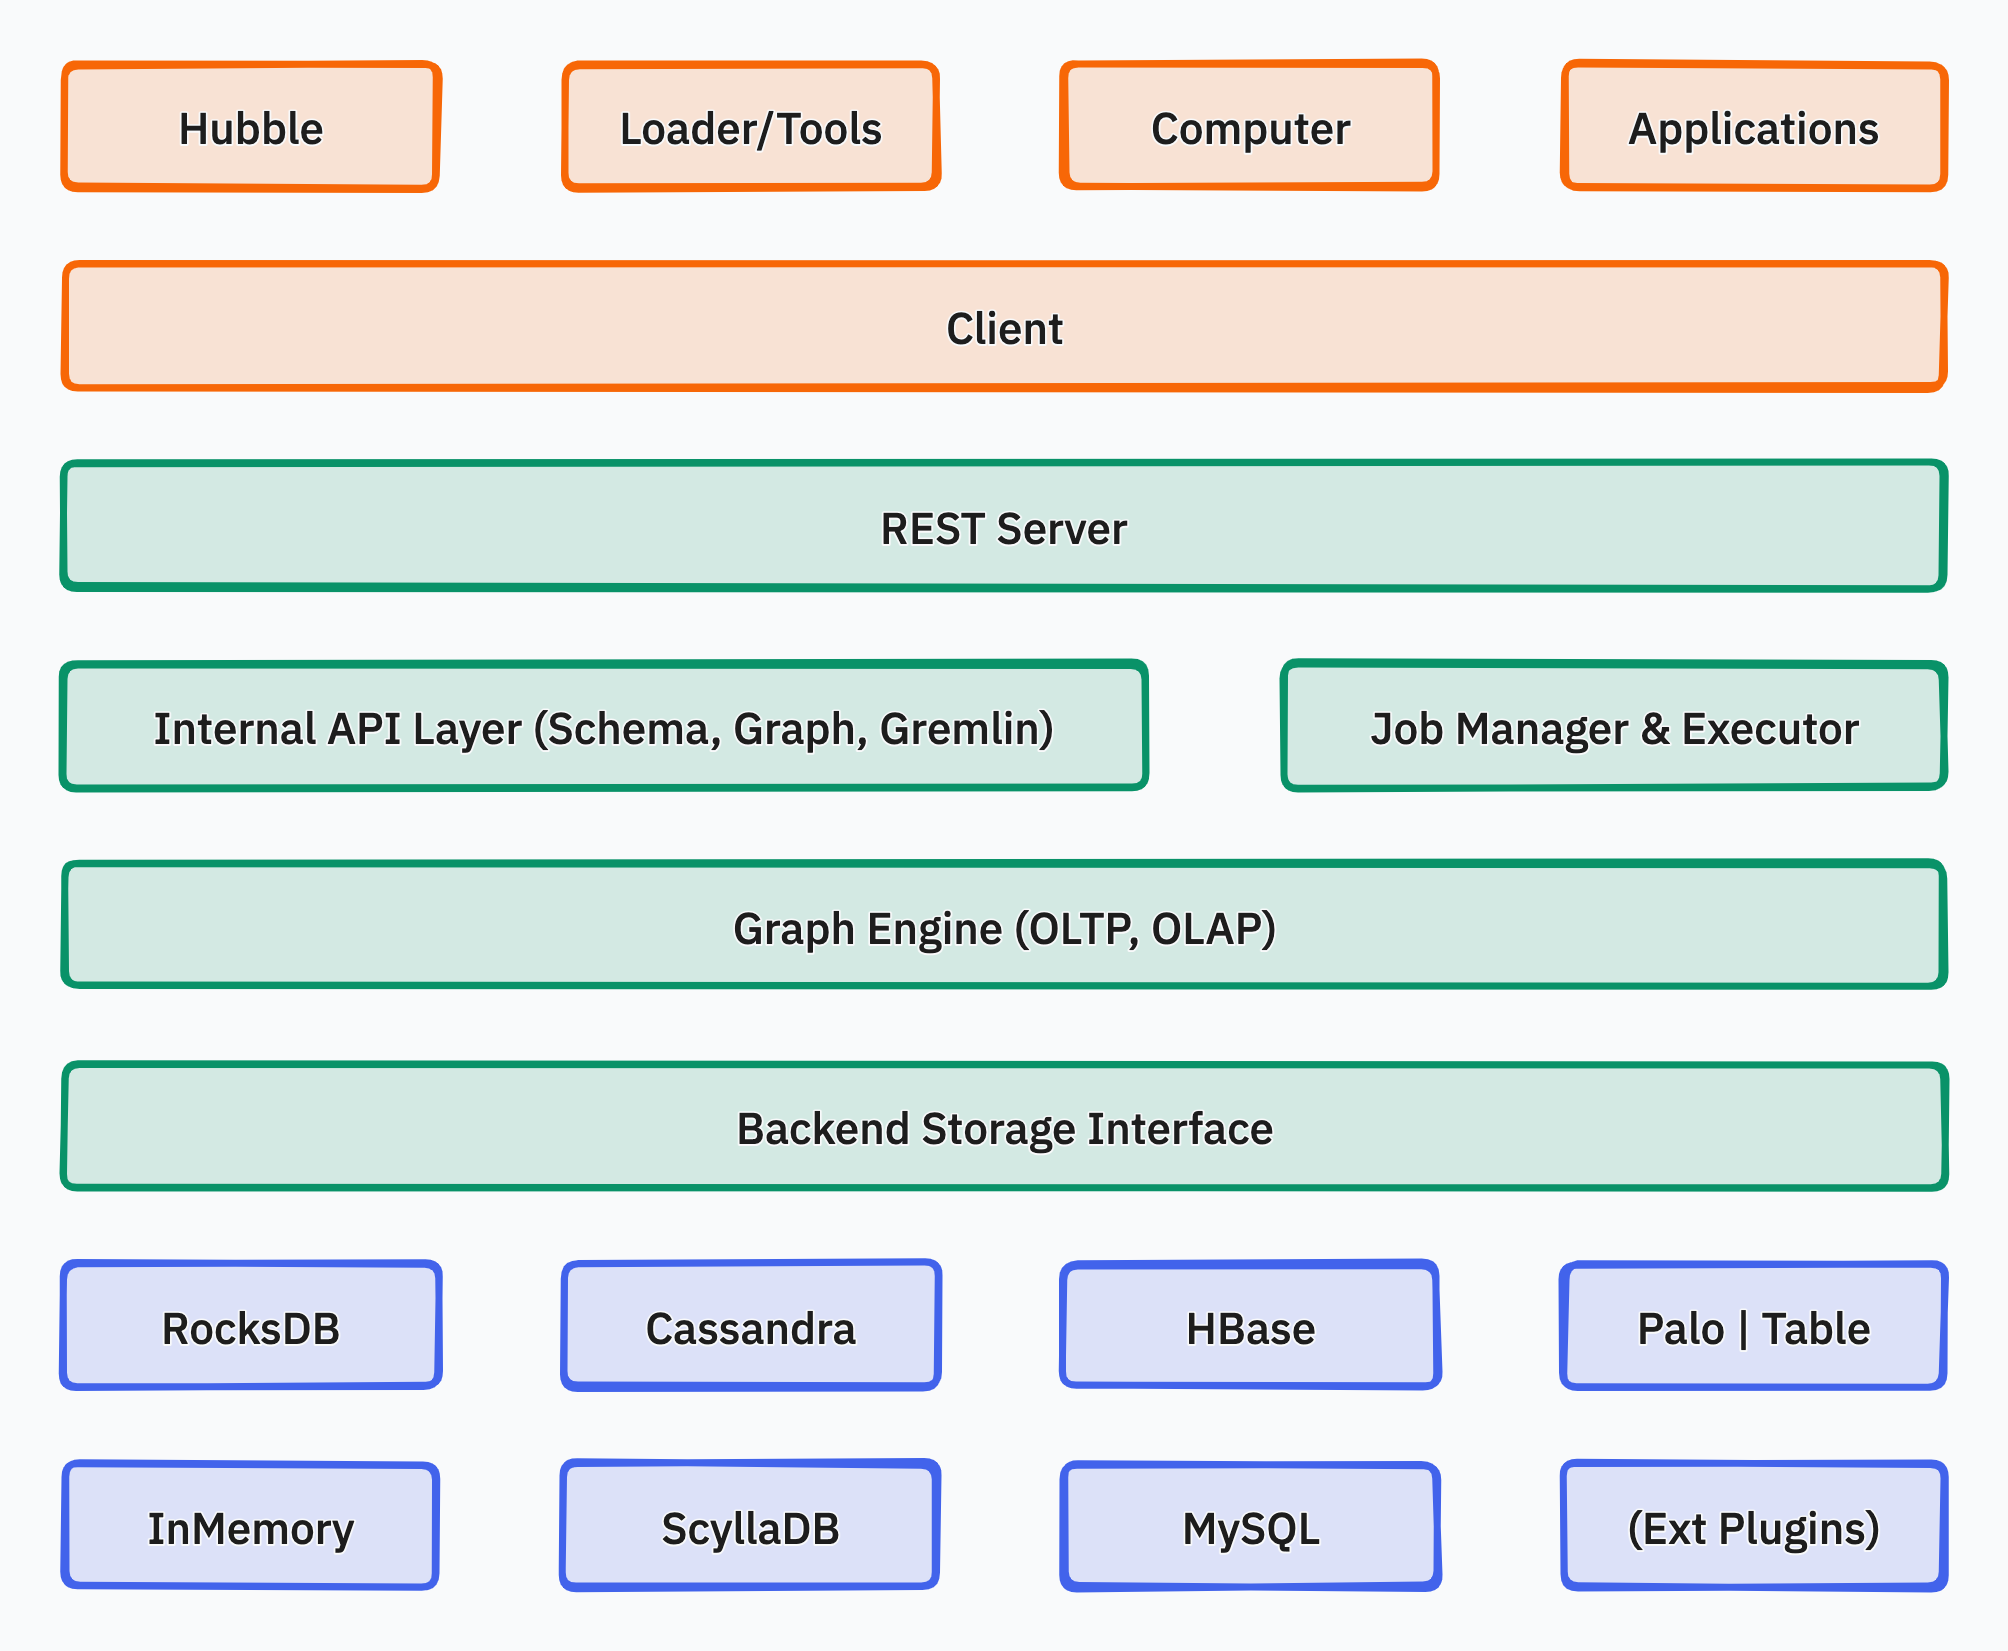
6.2 - HugeGraph 设计理念
1. 属性图模型
版本说明:本页保留早期设计内容。属性图模型和顶点 ID 策略仍与 当前主线源码相符;图示、分区结论及事务实现描述按各节注明的范围阅读,不能直接当作当前部署或存储实现说明。
常见的图数据表示模型有两种,分别是RDF(Resource Description Framework)模型和属性图模型。 RDF和Property Graph都是最基础、最有名的图表示模式,都能够表示各种图的实体关系建模。 RDF是W3C标准,而Property Graph是工业标准,受到广大图数据库厂商的广泛支持。HugeGraph目前采用Property Graph。
HugeGraph采用属性图模型。下图以人物和图书为例,展示顶点与有向边各自的标签和属性;这是逻辑模型示意,不描述 当前主线的内部数据布局。
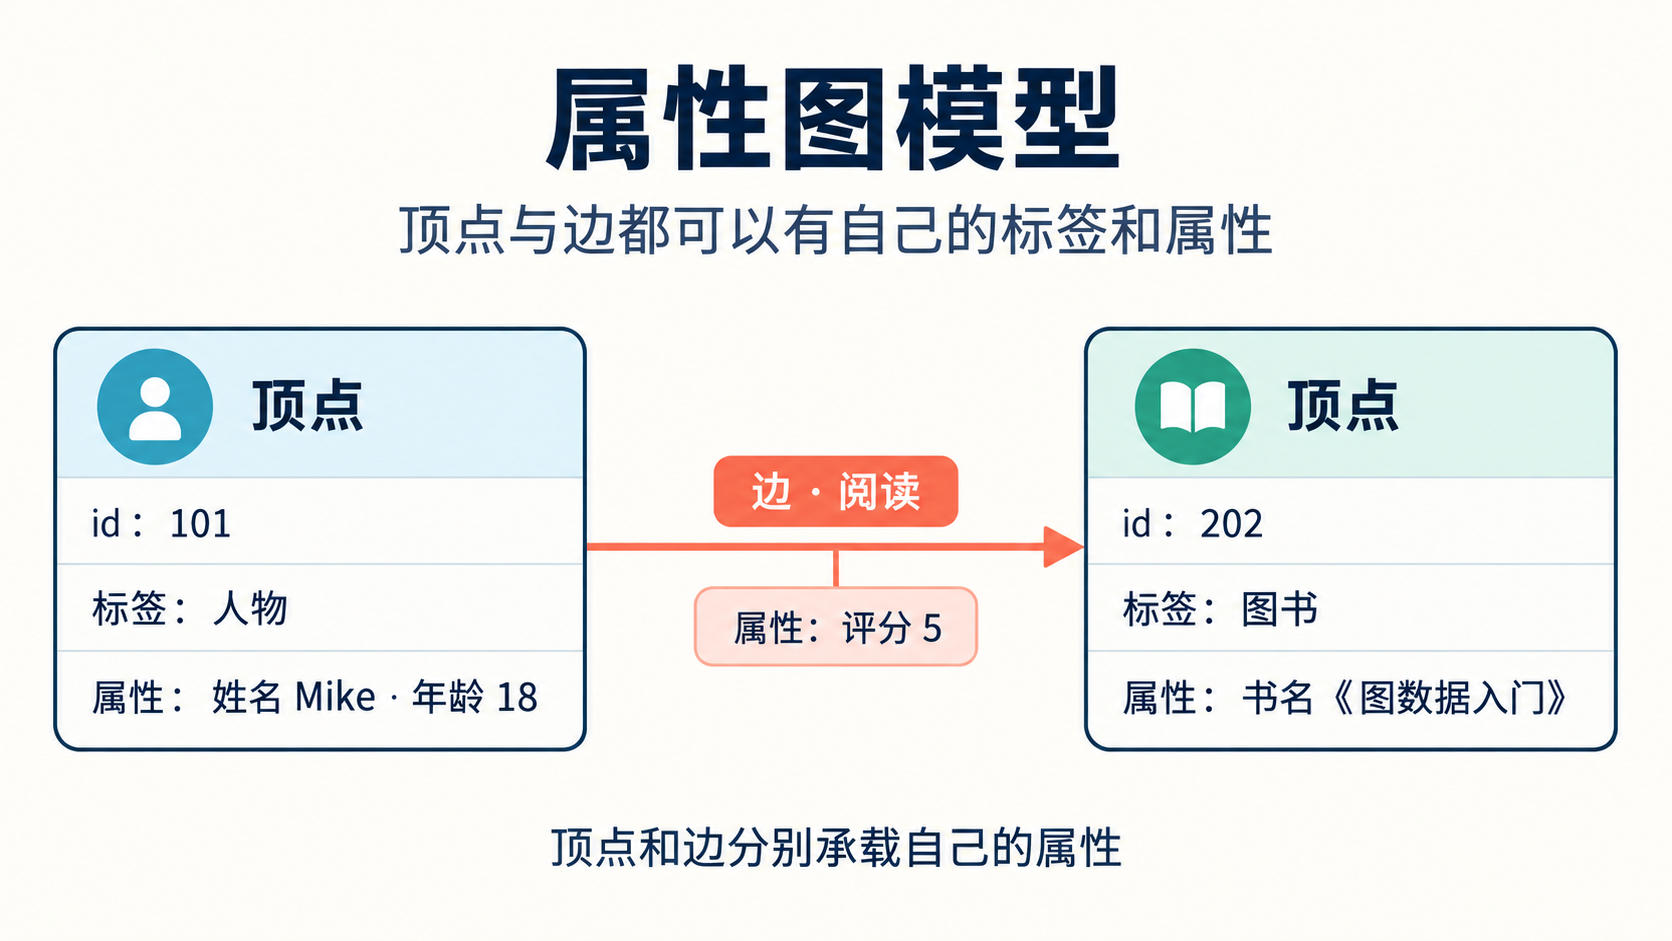
图:顶点和边分别携带自己的标签与属性。
在HugeGraph内部,每个顶点 / 边由唯一的 VertexId / EdgeId 标识,属性存储在对应点 / 边内部。而顶点与顶点之间的关系 / 映射则是通过边来存储的。
顶点属性值通过边指针方式存储时,如果要更新一个顶点特定的属性值直接通过覆盖写入即可,其弊端是冗余存储了VertexId;如果要更新关系的属性需要通过read-and-modify方式,先读取所有属性,修改部分属性,然后再写入存储系统,更新效率较低。 从经验来看顶点属性的修改需求较多,而边的属性修改需求较少,例如PageRank和Graph Cluster等计算都需要频繁修改顶点的属性值。
2. 图分区方案
版本说明:Edge Cut 与 Vertex Cut 的比较属于历史设计背景。当前主线的 PD 与 Store 源码没有把“HugeGraph 采用 Edge Cut”定义为实现契约,因此下文该结论不适用于描述 当前主线的实际分区与副本机制;当前分布式部署请参考 HStore 快速上手。
对于分布式图数据库而言,图的分区存储方式有两种:分别是边分割存储(Edge Cut)和点分割存储(Vertex Cut),如下图所示。使用Edge Cut方式存储图时,任何一个顶点只会出现在一台机器上,而边可能分布在不同机器上,这种存储方式有可能导致边多次存储。 使用Vertex Cut方式存储图时,任何一条边只会出现在一台机器上,而每相同的一个点可能分布到不同机器上,这种存储方式可能会导致顶点多次存储。
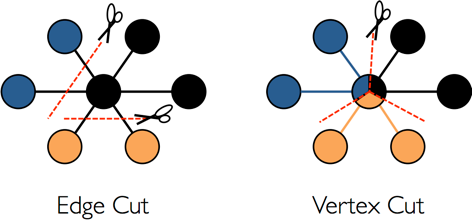
采用EdgeCut分区方案可以支持高性能的插入和更新操作,而VertexCut分区方案更适合静态图查询分析,因此EdgeCut适合OLTP图查询,VertexCut更适合OLAP的图查询。早期设计资料曾记载 HugeGraph 采用 Edge Cut。此处保留该历史结论,不将其视为当前分区实现说明。
3. VertexId 策略
HugeGraph的Vertex支持四种ID策略,在同一个图数据库中不同的VertexLabel可以使用不同的Id策略,目前HugeGraph支持的Id策略分别是:
- 自动生成(AUTOMATIC):使用Snowflake算法自动生成全局唯一Id,Long类型;
- 主键(PRIMARY_KEY):通过VertexLabel+PrimaryKeyValues生成Id,String类型;
- 自定义(CUSTOMIZE_STRING|CUSTOMIZE_NUMBER):用户自定义Id,分为String和Long类型两种,需自己保证Id的唯一性;
- 自定义UUID(CUSTOMIZE_UUID):用户自定义UUID形式的Id,需自己保证Id的唯一性;
默认的Id策略是AUTOMATIC,如果用户调用primaryKeys()方法并设置了正确的PrimaryKeys,则自动启用PRIMARY_KEY策略。启用PRIMARY_KEY策略后HugeGraph能根据PrimaryKeys实现数据去重。
- AUTOMATIC ID策略
- PRIMARY_KEY ID策略
- CUSTOMIZE_STRING ID策略
- CUSTOMIZE_NUMBER ID策略
- CUSTOMIZE_UUID ID策略
如果用户需要Vertex去重,有三种方案分别是:
- 采用PRIMARY_KEY策略,自动覆盖,适合大数据量批量插入,用户无法知道是否发生了覆盖行为
- 采用AUTOMATIC策略,read-and-modify,适合小数据量插入,用户可以明确知道是否发生覆盖
- 采用CUSTOMIZE_STRING或CUSTOMIZE_NUMBER策略,用户自己保证唯一
4. EdgeId 策略
当前实现提示:本节的四项组合是历史简化描述。当前
EdgeId还区分边方向及父、子边标签;其实际字段见 Server 源码中的EdgeId实现。需要依赖 ID 格式或持久化键时,应以对应版本源码为准。
HugeGraph的EdgeId是由srcVertexId+edgeLabel+sortKey+tgtVertexId四部分组合而成。其中sortKey是HugeGraph的一个重要概念。在Edge中加入sortKey作为Edge的唯一标识的原因有两个:
- 如果两个顶点之间存在多条相同Label的边可通过
sortKey来区分 - 对于SuperNode的节点,可以通过
sortKey来排序截断。
由于EdgeId是由srcVertexId+edgeLabel+sortKey+tgtVertexId四部分组合,多次插入相同的Edge时HugeGraph会自动覆盖以实现去重。需要注意的是如果批量插入模式下Edge的属性也将会覆盖。
另外由于HugeGraph的EdgeId采用自动去重策略,对于self-loop(一个顶点存在一条指向自身的边)的情况下HugeGraph认为仅有一条边,对于采用AUTOMATIC策略的图数据库(例如TitianDB )则会认为该图存在两条边。
HugeGraph的边仅支持有向边,无向边可以创建Out和In两条边来实现。
5. HugeGraph 事务概览
版本范围:下文关于 HugeGraph 隔离级别、线程绑定和后端原子性的描述保留为历史实现说明。各后端的事务隔离与失败回滚边界应以对应实现为准,不应将下述历史描述当作跨后端保证。
TinkerPop事务概述
TinkerPop 事务是对数据库执行操作的工作单元,一个事务内的一组操作要么执行成功,要么全部失败。详细介绍请参考TinkerPop官方文档:http://tinkerpop.apache.org/docs/current/reference/#transactions
TinkerPop事务操作接口
- open 打开事务
- commit 提交事务
- rollback 回滚事务
- close 关闭事务
TinkerPop事务规范
- 事务必须显式提交后才可生效(未提交时修改操作只有本事务内查询可看到)
- 事务必须打开之后才可提交或回滚
- 如果事务设置自动打开则无需显式打开(默认方式),如果设置手动打开则必须显式打开
- 可设置事务关闭时:自动提交、自动回滚(默认方式)、手动(禁止显式关闭)等3种模式
- 事务在提交或回滚后必须是关闭状态
- 事务在查询后必须是打开状态
- 事务(非threaded tx)必须线程隔离,多线程操作同一事务互不影响
更多事务规范用例见:Transaction Test
HugeGraph事务实现
- 一个事务中所有的操作要么成功要么失败
- 一个事务只能读取到另外一个事务已提交的内容(Read committed)
- 所有未提交的操作均能在本事务中查询出来,包括:
- 增加顶点能够查询出该顶点
- 删除顶点能够过滤掉该顶点
- 删除顶点能够过滤掉该顶点相关边
- 增加边能够查询出该边
- 删除边能够过滤掉该边
- 增加/修改(顶点、边)属性能够在查询时生效
- 删除(顶点、边)属性能够在查询时生效
- 所有未提交的操作在事务回滚后均失效,包括:
- 顶点、边的增加、删除
- 属性的增加/修改、删除
示例:一个事务无法读取另一个事务未提交的内容
事务实现原理
- 服务端内部通过将事务与线程绑定实现隔离(ThreadLocal)
- 本事务未提交的内容按照时间顺序覆盖老数据以供本事务查询最新版本数据
- 底层依赖后端数据库保证事务原子性操作(如RocksDB的batch接口保证原子性)
注意
REST API 未提供独立的事务生命周期接口;写操作接口会在服务端调用相应的事务提交逻辑。
TinkerPop API允许打开事务,请求完成时会自动关闭(Gremlin Server强制关闭)
6.3 - HugeGraph Plugin 机制及插件扩展流程
背景
- HugeGraph 不仅开源开放,而且要做到简单易用,一般用户无需更改源码也能轻松增加插件扩展功能。
- HugeGraph 支持多种内置存储后端,也允许用户无需更改现有源码的情况下扩展自定义后端。
- HugeGraph 支持全文检索,全文检索功能涉及到各语言分词,目前已内置 7 种分词器(ansj、hanlp、smartcn、jieba、jcseg、mmseg4j、ikanalyzer),也允许用户无需更改现有源码的情况下扩展自定义分词器。
可扩展维度
目前插件方式提供如下几个维度的扩展项:
- 后端存储
- 序列化器
- 自定义配置项
- 分词器
插件实现机制
- HugeGraph 提供插件接口 HugeGraphPlugin,通过 Java SPI 机制支持插件化
- HugeGraph 在 HugeGraphPlugin 接口上以静态方法提供了 4 个扩展项注册函数:
registerOptions()、registerBackend()、registerSerializer()、registerAnalyzer() - 插件实现者实现相应的 Options、Backend、Serializer 或 Analyzer 的接口
- 插件实现者实现 HugeGraphPlugin 接口的
register()方法,在该方法中注册上述第 3 点所列的具体实现类,并打成 jar 包 - 插件使用者将 jar 包放在 HugeGraph Server 安装目录的
plugins目录下,修改相关配置项为插件自定义值,重启即可生效
插件实现流程实例
1 新建一个 maven 项目
1.1 项目名称取名:hugegraph-plugin-demo
1.2 添加hugegraph-core Jar 包依赖
maven pom.xml 详细内容如下。hugegraph.version 应与要兼容的 Server 版本一致;此处以当前主线版本 1.7.0 为例:
2 实现扩展功能
2.1 扩展自定义后端
2.1.1 实现接口 BackendStoreProvider
- 可实现接口:
org.apache.hugegraph.backend.store.BackendStoreProvider - 或者继承抽象类:
org.apache.hugegraph.backend.store.AbstractBackendStoreProvider
以 RocksDB 后端 RocksDBStoreProvider 为例:
2.1.2 实现接口 BackendStore
BackendStore 的核心抽象方法如下(接口默认辅助方法略):
2.1.3 扩展自定义序列化器
序列化器必须继承抽象类:org.apache.hugegraph.backend.serializer.AbstractSerializer(implements GraphSerializer, SchemaSerializer) 主要接口的定义如下:
2.1.4 扩展自定义配置项
增加自定义后端时,可能需要增加新的配置项,实现流程主要包括:
- 增加配置项容器类,并实现接口
org.apache.hugegraph.config.OptionHolder - 提供单例方法
public static OptionHolder instance(),并在对象初始化时调用方法OptionHolder.registerOptions() - 增加配置项声明,单值配置项类型为
ConfigOption、多值配置项类型为ConfigListOption
以 RocksDB 配置项定义为例:
2.2 扩展自定义分词器
分词器需要实现接口org.apache.hugegraph.analyzer.Analyzer,以实现一个 SpaceAnalyzer 空格分词器为例。
3. 实现插件接口,并进行注册
插件注册入口为HugeGraphPlugin.register(),自定义插件必须实现该接口方法,在其内部注册上述定义好的扩展项。接口org.apache.hugegraph.plugin.HugeGraphPlugin定义如下:
并且 HugeGraphPlugin 提供了 4 个静态方法用于注册扩展项:
- registerOptions(String name, String classPath):注册配置项
- registerBackend(String name, String classPath):注册后端(BackendStoreProvider)
- registerSerializer(String name, String classPath):注册序列化器
- registerAnalyzer(String name, String classPath):注册分词器
下面以注册 SpaceAnalyzer 分词器为例:
4. 配置 SPI 入口
- 确保 services 目录存在:hugegraph-plugin-demo/resources/META-INF/services
- 在 services 目录下建立文本文件:org.apache.hugegraph.plugin.HugeGraphPlugin
- 文件内容如下:org.apache.hugegraph.plugin.DemoPlugin
5. 打 Jar 包
通过 maven 打包,在项目目录下执行命令mvn package,在 target 目录下会生成 Jar 包文件。使用时将该 Jar 包拷到plugins目录,重启服务即可生效。
6.4 - HugeGraph工具链本地测试指南
本指南帮助开发者在本地运行 HugeGraph 工具链测试。
1. 核心概念
1.1 核心依赖:HugeGraph Server
工具链的集成测试和功能测试都依赖 HugeGraph Server,包括 Client、Loader、Hubble、Spark Connector、Tools 等组件。
1.2 测试类型
- 单元测试 (Unit Tests):测试单个函数/方法,不依赖外部服务
- API 测试 (ApiTestSuite):测试 API 接口,需要运行中的 HugeGraph Server
- 功能测试 (FuncTestSuite):端到端测试,需要完整的系统环境
2. 环境准备
2.1 系统要求
- 操作系统:Linux / macOS(Windows 使用 WSL2)
- JDK:>= 11,配置好
JAVA_HOME - Maven:>= 3.6
- Python:>= 3.11(仅 Hubble 测试需要)
2.2 克隆代码
3. 部署测试环境
方式选择
- 脚本部署:指定 Server Commit,可复现 CI 使用的服务端版本
- Docker 部署:适合快速检查;测试失败时应先核对镜像与 Toolchain 的兼容性
详细安装说明参考 社区文档
3.1 脚本部署
参数说明
$COMMIT_ID:指定 Server 源码的 Git Commit ID$DB_DATABASE/$DB_PASS:Loader JDBC 测试用的 MySQL 数据库名和密码
部署步骤
1. 安装 HugeGraph Server
- 脚本会启动 HTTP 8080 和 HTTPS 8443 两个实例,并配置
admin/pa认证。 - 执行前确认两个端口未被占用。
2. 安装可选依赖
3. 健康检查
3.2 Docker 部署
注意:Docker 镜像可能版本滞后,如遇兼容性问题请使用脚本部署
快速启动
docker-compose 配置(可选)
完整配置示例,包含 Server、MySQL、Hadoop 服务(需要 Docker Compose V2):
Hadoop 配置挂载
在与 docker-compose.yml 相同的目录下创建 ./config 文件夹用于挂载 Hadoop 配置文件。如果不需要 HDFS 测试,可以跳过此步骤。
📁 ./config/core-site.xml 内容:
📁 ./config/hdfs-site.xml 内容:
Docker 操作
4. 运行测试
各工具的测试流程:
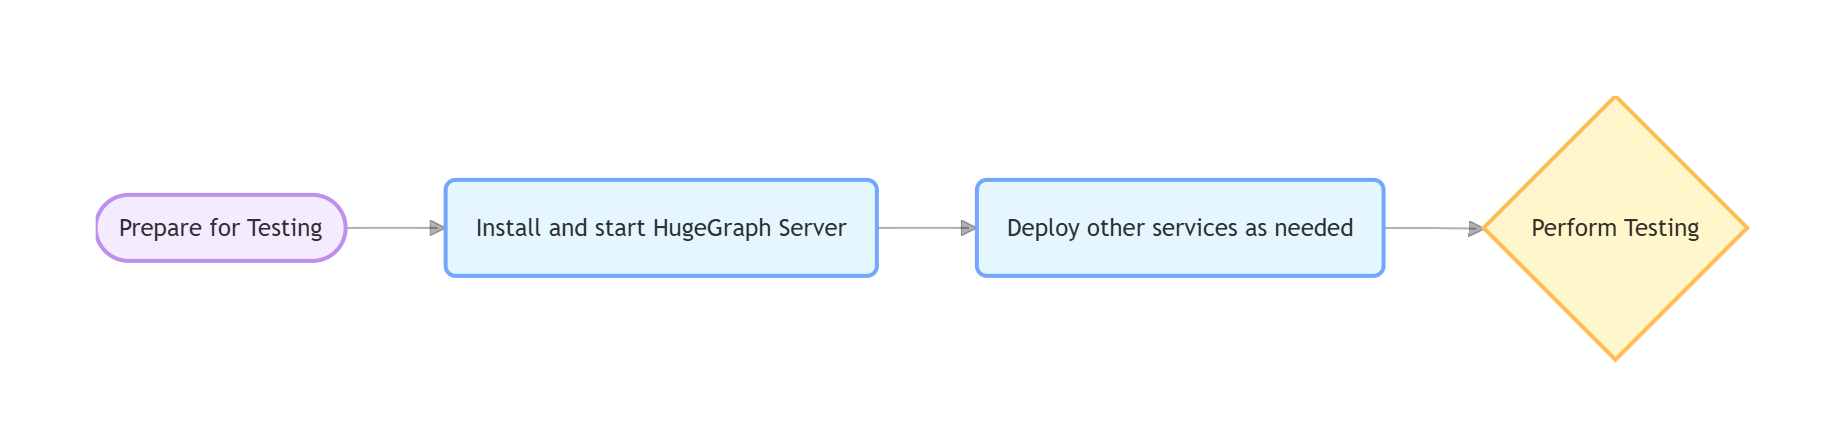
4.1 hugegraph-client
编译
依赖服务
启动 HugeGraph Server(参考 第3节)
Server 鉴权配置
ApiTest 需要认证。使用 3.1 节的脚本安装时无需重复配置;自行部署 Server 时,认证配置和测试凭证必须与测试代码一致。
运行测试
测试失败时检查 Server 日志:
logs/hugegraph-server.log
4.2 hugegraph-loader
编译
依赖服务
- 必需:HugeGraph Server
- 可选:Hadoop (HDFS 测试)、MySQL (JDBC 测试);Kafka 测试通过 Testcontainers 启动 Kafka 容器,因此还需要可用的 Docker daemon
运行测试
4.3 hugegraph-hubble
编译
依赖服务
1. 启动 Server(参考 第3节)
2. Python 环境
3. 构建并验证
运行测试
4.4 hugegraph-spark-connector
编译
运行测试
4.5 hugegraph-tools
编译
运行测试
5. 常见问题
服务连接问题
无法连接 Server、MySQL 或 Hadoop 时:
- 确认服务已启动(Server 必须在 8080 端口)
- 检查端口占用:
lsof -i:8080 - Docker 检查:
docker compose ps和docker compose logs
配置问题
找不到文件或参数错误时:
- 检查环境变量:
echo $COMMIT_ID - 脚本权限:
chmod +x hugegraph-*/assembly/travis/*.sh
HDFS 测试失败
- 确认 NameNode/DataNode 运行正常
- 检查 Hadoop 日志
- 验证 HDFS 连接:
hdfs dfsadmin -report
JDBC 测试失败
- 确认 MySQL 运行正常
- 验证数据库连接:
mysql -u root -p$DB_PASS - 检查 MySQL 日志
6. 参考资料
- HugeGraph GitHub 仓库:https://github.com/apache/hugegraph
- HugeGraph 工具链 GitHub 仓库:https://github.com/apache/hugegraph-toolchain
- HugeGraph Server 文档:https://hugegraph.apache.org/cn/docs/quickstart/hugegraph/hugegraph-server/
- CI 配置:
.github/workflows/*-ci.yml - 依赖服务安装脚本:
hugegraph-*/assembly/travis/
6.5 - Backup Restore
描述
Backup 和 Restore 是备份图和恢复图的功能。备份和恢复的数据包括元数据(schema)和图数据(vertex 和 edge)。
Backup
将 HugeGraph 系统中的一张图的元数据和图数据以 JSON 格式导出。
Restore
将 Backup 导出的JSON格式的数据,重新导入到 HugeGraph 系统中的一个图中。
Restore 有两种模式:
- Restoring 模式,将 Backup 导出的元数据和图数据原封不动的恢复到 HugeGraph 系统中。可用于图的备份和恢复,一般目标图是新图(没有元数据和图数据)。比如:
- 系统升级,先备份图,然后升级系统,最后将图恢复到新的系统中
- 图迁移,从一个 HugeGraph 系统中,使用 Backup 功能将图导出,然后使用 Restore 功能将图导入另一个 HugeGraph 系统中
- Merging 模式,将 Backup 导出的元数据和图数据导入到另一个已经存在元数据或者图数据的图中,过程中元数据的 ID 可能发生改变,顶点和边的 ID 也会发生相应变化。
- 可用于合并图
使用方法
可以使用hugegraph-tools进行图的备份和恢复。
Backup
该命令将 http://127.0.0.1:8080(默认 –url)的 hugegraph 图的全部元数据和图数据备份到data目录下。
Backup 在任意图模式下都可以正常工作,它不会检查图模式
Restore
Restore 有两种模式: RESTORING 和 MERGING,恢复之前首先要根据需要设置图模式,图处于其他模式时 restore 命令会失败。
步骤1:查看并设置图模式
该命令用于查看当前图模式,包括:NONE、RESTORING、MERGING、LOADING。
该命令用于设置图模式,Restore 之前可以设置成 RESTORING 或者 MERGING 模式,例子中设置成 RESTORING。
步骤2:Restore 数据
该命令将data目录下的全部元数据和图数据重新导入到 http://127.0.0.1:8080 的 hugegraph 图中。
步骤3:恢复图模式
该命令用于恢复图模式为 NONE。
至此,一次完整的图备份和图恢复流程结束。
帮助
备份和恢复命令的详细使用方式可以参考hugegraph-tools文档。
Backup/Restore使用和实现的API说明
Backup
Backup 使用元数据和图数据的相应的 list(GET) API 导出,并未增加新的 API。
Restore
Restore 使用元数据和图数据的相应的 create(POST) API 导入,并未增加新的 API。
Restore 时存在两种不同的模式: Restoring 和 Merging,另外,还有常规模式 NONE(默认),区别如下:
- None 模式,元数据和图数据的写入属于正常状态,可参见功能说明。特别的:
- 元数据(schema)创建时不允许指定 ID
- 图数据(vertex)在 id strategy 为 Automatic 时,不允许指定 ID
- Restoring 模式,恢复到一个新图中,特别的:
- 元数据(schema)创建时允许指定 ID
- 图数据(vertex)在 id strategy 为 Automatic 时,允许指定 ID
- Merging 模式,合并到一个已存在元数据和图数据的图中,特别的:
- 元数据(schema)创建时不允许指定 ID
- 图数据(vertex)在 id strategy 为 Automatic 时,允许指定 ID
正常情况下,图模式为 None,当需要 Restore 图时,需要根据需要临时修改图模式为 Restoring 模式或者 Merging 模式,并在完成 Restore 时,恢复图模式为 None。
实现的设置图模式的 RESTful API 如下:
查看某个图的模式
启用鉴权时需要图读取权限(space_member 或该图的所有者)。
Method & Url
Response Status
Response Body
合法的图模式包括:NONE,RESTORING,MERGING,LOADING
设置某个图的模式
启用鉴权时需要图空间管理权限(space);管理员可按权限继承规则满足。
Method & Url
Request Body
合法的图模式包括:NONE,RESTORING,MERGING,LOADING
Response Status
Response Body
6.6 - HugeGraph Docker 集群部署指南
概述
HugeGraph 通过 Docker-Compose 可快速运行完整的分布式集群版(PD + Store + Server)。该方式适用于 Linux 和 Mac。
前置条件
- Docker Engine 20.10+ 或 Docker Desktop 4.x+
- Docker Compose v2
- Mac 运行 3 节点集群时,建议分配至少 12 GB 内存(设置 → 资源 → 内存)。[其他平台根据实际情况调整]
已测试环境:Linux(原生 Docker)和 macOS(Docker Desktop with ARM M4)
Compose 文件
在 HugeGraph 主仓库 docker/ 目录下提供了四个 compose 文件:
| 文件 | 服务 | 适用场景 |
|---|---|---|
docker-compose.yml | 1 个 RocksDB Server + 1 个 Hubble | 默认的单机快速启动,推荐从这里开始 |
docker-compose-hstore.yml | 1 PD + 1 Store + 1 Server + 1 Hubble | 分布式本地开发 |
docker-compose-3pd-3store-3server.yml | 3 PD + 3 Store + 3 Server + 1 Hubble | HA 参考与评估 |
docker-compose.dev.yml | (仅覆盖文件) | 最小 HStore 拓扑的源码构建覆盖,始终与 docker-compose-hstore.yml 一起使用 |
单机拓扑使用 hugegraph/hugegraph:${HUGEGRAPH_VERSION:-latest};HStore 拓扑使用对应的 hugegraph/pd、hugegraph/store 和 hugegraph/server tag。Hubble 由 ${HUBBLE_IMAGE:-hugegraph/hubble:latest} 单独选择。
注: 后续步骤皆为假设你本地已拉取
hugegraph主仓库代码 (至少是 docker 目录)
本页的 HStore 与 HA Compose 操作按当前主线文件编写,必须使用从同一主线源码构建的 PD、Store 和 Server 镜像;不要把这些 Compose 文件与 1.7.0 标签的 HStore 组件镜像混用。单机示例单独固定 hugegraph/hugegraph:1.7.0 镜像标签。
鉴权环境
以下 .env 模板对应当前主线 Compose。尖括号内容和 replace-with-your-password 都是占位,必须替换为真实值后才能载入或启动;可参考主线 docker/README.md 的鉴权环境步骤生成 .env,并先替换其中的管理员密码占位:
在主线 HStore 和 HA 拓扑中,HG_PD_AUTH_SECRET_KEY 是 PD REST Basic 鉴权密码,所有 PD 节点、Server 和 Hubble 都必须使用同一个值。当前主线 PD Docker 镜像要求设置该密钥。Hubble 不会直接读取 .env,启动前还要用该值生成拓扑对应的本地配置文件,见下文。不要提交 .env 或生成的 .local.properties。
HUGEGRAPH_ADMIN_PASSWORD 非空时会以 PASSWORD 启用 Server 鉴权,Hubble 通过 Server API 自动识别该模式;该密码只在首次初始化内置 admin 账号。不设置或设为空值则关闭鉴权,这只适用于可信的本地环境。
当前主线 Compose 会把 HUGEGRAPH_AUTH_TOKEN_SECRET 传给 HG_SERVER_AUTH_TOKEN_SECRET。同一密钥可让主线多 Server 副本验证相同 token,并在容器重建后继续验证已签发 token;HA Compose 还要求显式提供该密钥。hugegraph/hugegraph:1.7.0 单机镜像的 Docker 入口脚本只根据 PASSWORD 开启鉴权,不读取 HG_SERVER_AUTH_TOKEN_SECRET,因此不要把 .env 中该变量视为该镜像的固定 JWT 配置。若在 1.7.0 中需要固定 JWT secret,请在其认证图配置 conf/graphs/hugegraph.properties 中显式设置 auth.token_secret,并确保该配置随容器替换保留;认证图路径及密钥生成说明见鉴权配置指南。
之后修改 HUGEGRAPH_ADMIN_PASSWORD 不会轮换已有密码,请使用用户 API 修改。
生产环境的组件访问控制
生产环境必须按 Server 认证与授权配置 为图 API 启用 Server Auth,启用并维护 Server IP 白名单、按最小权限授权,并保留、限制读取 Server audit-*.log。PD 的 REST 凭据与 PD/Store 的 gRPC、Raft、REST 网络边界独立配置;Server Auth 不会保护这些端口。仅向集群节点和受信运维入口开放 PD/Store 端口。
单节点快速启动
本节固定使用 hugegraph/hugegraph:1.7.0 单机镜像标签;HStore/HA 示例使用当前主线构建镜像,不能照搬本节的版本号。
验证:
Hubble 默认只发布在宿主机回环地址(127.0.0.1:8088)。只有在 HTTPS 反向代理和可信网络管控之后才应设置 HUBBLE_PUBLISH_HOST。
最小 HStore 快速启动(当前主线镜像)
从 HugeGraph Server 主线仓库根目录构建 PD、Store 和 HStore Server 镜像:
从仓库根目录执行以下命令进入 docker/,载入 .env 并生成最小拓扑所需的 Hubble 配置。缺少 hstore.local.properties 时,Compose 不会为只读 bind mount 自动创建有效配置;先生成文件再启动:
验证:
若要从本地源码构建该拓扑而不是拉取镜像,可加上开发覆盖文件,并在后续所有生命周期命令中同时带上这两个文件:
覆盖文件为本地构建生成 dev 标签的镜像;如果已经按上文构建 local 标签镜像,则使用基础 Compose 文件和 HUGEGRAPH_VERSION=local 启动,不要同时混用两个版本标签。
3 节点集群快速启动(当前主线镜像)
HA Compose 文件不包含源码构建覆盖层。先按最小 HStore 一节从同一主线源码构建 hugegraph/pd:local、hugegraph/store:local 和 hugegraph/server:local,然后在 docker/ 目录载入 .env,生成 HA Hubble 配置并启动:
HA Hubble bind-mount conf/hubble/hstore-ha.local.properties;必须在启动前生成。该文件与最小 HStore 使用的 hstore.local.properties 分开生成,但两者从同一 .env 读取同一个 HG_PD_AUTH_SECRET_KEY。
默认内置的启动顺序:
- PD (节点)最先启动,且必须通过
/v1/health健康检查 - Store (节点)在所有 PD 健康后再启动
- Server (节点)在所有 Store + PD 健康后最后启动
验证集群正常:PD 的 /v1/health 和 /v1/ready 是无需认证的探针;查询 Store 注册和分区数据属于受保护的 PD REST 管理接口,需用用户名 hg 和 .env 中的 HG_PD_AUTH_SECRET_KEY 进行 Basic 认证。
开启鉴权后,图列表接口应拒绝匿名请求并接受管理员:
另外两个 Server 分别在 8081 和 8082 上提供服务,其余 PD 和 Store 节点分别在 8621/8622 和 8521/8522。
环境变量参考
以下 PD、Store、Server 和 Compose 变量表描述当前主线镜像入口及 Compose 文件,不是 hugegraph/hugegraph:1.7.0 单机镜像的环境变量契约。PD 和 Store 的入口脚本会把各自的变量拼成 SPRING_APPLICATION_JSON,并在启动时打印部分非敏感配置摘要;PD 密钥不会打印在该摘要中。docker logs 可用于核对日志列出的配置项,但不要以日志中未显示密钥来判断是否生效。Server 的入口脚本则直接改写 conf/graphs/hugegraph.properties 和 conf/rest-server.properties 中的键。
PD 变量
| 变量 | 必填 | 默认值 | 映射配置 |
|---|---|---|---|
HG_PD_GRPC_HOST | 是 | (无) | grpc.host |
HG_PD_RAFT_ADDRESS | 是 | (无) | raft.address |
HG_PD_RAFT_PEERS_LIST | 是 | (无) | raft.peers-list |
HG_PD_INITIAL_STORE_LIST | 是 | (无) | pd.initial-store-list |
HG_PD_GRPC_PORT | 否 | 8686 | grpc.port |
HG_PD_REST_PORT | 否 | 8620 | server.port |
HG_PD_DATA_PATH | 否 | /hugegraph-pd/pd_data | pd.data-path |
HG_PD_INITIAL_STORE_COUNT | 否 | 1 | pd.initial-store-count |
HG_PD_AUTH_SECRET_KEY | 是(当前主线 Docker) | 无 | auth.secret-key;PD REST Basic 密码,也供 Server 与 Hubble 使用 |
已弃用的别名:
GRPC_HOST→HG_PD_GRPC_HOST、RAFT_ADDRESS→HG_PD_RAFT_ADDRESS、RAFT_PEERS→HG_PD_RAFT_PEERS_LIST、PD_INITIAL_STORE_LIST→HG_PD_INITIAL_STORE_LIST。只有当新名称未设置时才会把旧名称映射过去,并打印一条警告日志。任一必填变量缺失时,入口脚本以退出码 2 退出。
Store 变量
| 变量 | 必填 | 默认值 | 映射配置 |
|---|---|---|---|
HG_STORE_PD_ADDRESS | 是 | (无) | pdserver.address |
HG_STORE_GRPC_HOST | 是 | (无) | grpc.host |
HG_STORE_RAFT_ADDRESS | 是 | (无) | raft.address |
HG_STORE_GRPC_PORT | 否 | 8500 | grpc.port |
HG_STORE_REST_PORT | 否 | 8520 | server.port |
HG_STORE_DATA_PATH | 否 | /hugegraph-store/storage | app.data-path |
已弃用的别名:
PD_ADDRESS→HG_STORE_PD_ADDRESS、GRPC_HOST→HG_STORE_GRPC_HOST、RAFT_ADDRESS→HG_STORE_RAFT_ADDRESS
Server 变量
与 PD、Store 不同,Server 入口脚本没有必填变量:只有实际设置了的变量才会被写入配置文件。但分布式部署至少需要 HG_SERVER_BACKEND 和 HG_SERVER_PD_PEERS。
| 变量 | 默认值 | 映射配置 |
|---|---|---|
HG_SERVER_BACKEND | 模板取值(rocksdb,在 hugegraph/server 镜像中为 hstore) | conf/graphs/hugegraph.properties 中的 backend |
HG_SERVER_PD_PEERS | (无) | hugegraph.properties 和 rest-server.properties 中的 pd.peers |
HG_SERVER_USE_PD | false | rest-server.properties 中的 usePD |
HG_SERVER_CLUSTER | hg-test | rest-server.properties 中的 cluster |
HG_SERVER_REST_URL | http://0.0.0.0:8080(镜像中已设置) | restserver.url |
HG_SERVER_MIN_FREE_MEMORY | 64(MB) | restserver.min_free_memory |
HG_SERVER_INIT_STORE_ENABLED | true | init_store.enabled;元数据由存储侧管理的 PD/HStore 部署应设为 false |
HG_SERVER_AUTH_TOKEN_SECRET | 设置了 PASSWORD 时自动生成 | 两个配置文件中的 auth.token_secret,至少 32 字节 |
HG_SERVER_REQUIRE_AUTH_TOKEN_SECRET | false | 为 true 时,只设置 PASSWORD 而未设置 HG_SERVER_AUTH_TOKEN_SECRET 则拒绝启动 |
PASSWORD | (无) | auth.admin_pa,并执行 bin/enable-auth.sh 开启鉴权模式 |
PRELOAD | (无) | 为 true 时从 scripts/example.groovy 预加载示例图 |
JAVA_OPTS | 镜像中已设置 | 传给 bin/start-hugegraph.sh -j |
HG_SERVER_STARTUP_TIMEOUT_S | 120(秒) | 传给 bin/start-hugegraph.sh -t,允许范围为 1–86400;详见下文的 Server 启动等待超时 |
STORE_REST | store:8520 | wait-partition.sh 轮询的 Store REST 地址,仅 hstore 后端使用 |
HG_SERVER_PD_REST_ENDPOINT | 由 pd.peers 把 :8686 改写为 :8620 得到 | wait-storage.sh 轮询的 PD REST 地址 |
PD_AUTH_USER | store | wait-storage.sh 访问 PD REST API 的 Basic 用户名 |
PD_AUTH_PASSWORD | 空 | PD REST Basic 密码;启用 PD REST 鉴权时须与 HG_PD_AUTH_SECRET_KEY 相同 |
WAIT_PARTITION_TIMEOUT_S | 120 | wait-partition.sh 等待分区分配的时长 |
已弃用的别名:
BACKEND→HG_SERVER_BACKEND、PD_PEERS→HG_SERVER_PD_PEERS
wait-storage.sh 最多等待 300 秒直到出现状态为 Up 的 Store。该时长写死在脚本中,无法通过环境变量调整。
HG_SERVER_INIT_STORE_ENABLED 只接受 HugeConfig 能识别的写法(忽略大小写):y、t、yes、on、true、n、f、no、off、false。其他取值(包括 0 和 1)都会让入口脚本终止。
入口脚本在初始化成功后写入 docker/init_complete,后续启动会跳过重新初始化,但仍会再执行一次 bin/init-store.sh,以便关闭状态下每次启动都重新校验配置。
Compose 变量
以下变量由 Compose 文件读取,而非入口脚本:
| 变量 | 默认值 | 用途 |
|---|---|---|
HUGEGRAPH_VERSION | latest | Server、PD 和 Store 的镜像 tag |
HUGEGRAPH_PULL_POLICY | missing | 上述镜像的 pull_policy,使用 never 可保留本地构建的镜像 |
HUBBLE_IMAGE | hugegraph/hubble:latest | Hubble 镜像,与 HUGEGRAPH_VERSION 独立选择 |
HUBBLE_PULL_POLICY | missing | Hubble 镜像的 pull_policy |
HUBBLE_PUBLISH_HOST | 127.0.0.1 | Hubble 8088 端口发布到的宿主机网卡 |
HUGEGRAPH_ADMIN_PASSWORD | (无) | 以 PASSWORD 传给 Server |
HUGEGRAPH_AUTH_TOKEN_SECRET | (无) | 当前主线 Compose 以 HG_SERVER_AUTH_TOKEN_SECRET 传给 Server;1.7.0 镜像不读取该变量 |
HG_PD_AUTH_SECRET_KEY | (无) | HStore 拓扑 PD REST Basic 密码;由 Compose 传给 PD 和 Server,并用于生成 Hubble 本地配置 |
端口参考
3 节点集群发布的端口:
| 服务 | 宿主机端口 | 容器端口 | 用途 |
|---|---|---|---|
| pd0 | 8620 | 8620 | REST API |
| pd0 | 8686 | 8686 | gRPC |
| pd1 | 8621 | 8620 | REST API |
| pd1 | 8687 | 8686 | gRPC |
| pd2 | 8622 | 8620 | REST API |
| pd2 | 8688 | 8686 | gRPC |
| store0 | 8500 | 8500 | gRPC |
| store0 | 8510 | 8510 | Raft |
| store0 | 8520 | 8520 | REST API |
| store1 | 8501 | 8500 | gRPC |
| store1 | 8511 | 8510 | Raft |
| store1 | 8521 | 8520 | REST API |
| store2 | 8502 | 8500 | gRPC |
| store2 | 8512 | 8510 | Raft |
| store2 | 8522 | 8520 | REST API |
| server0 | 8080 | 8080 | Graph API |
| server1 | 8081 | 8080 | Graph API |
| server2 | 8082 | 8080 | Graph API |
| hubble | 8088 | 8088 | Hubble 界面,默认绑定 127.0.0.1 |
单机拓扑只发布 8080 和 8088;最小 HStore 拓扑发布 8620(PD REST)、8520(Store REST)、8080 和 8088。PD Raft 使用网络内的 8610,所有拓扑都不对外发布。
故障排查
容器 OOM 退出(exit code 137):将 Docker Desktop 内存增加到 12 GB 以上 (或调整被 kill 的启动 jvm 内存设置)
Raft 选举超时:检查所有 PD 节点的
HG_PD_RAFT_PEERS_LIST是否一致。验证连通性:docker exec hg-pd0 ping pd1分区分配未完成:在
docker/目录先载入.env,再用 PD REST Basic 认证检查 Store:3 个 Store 都显示
"state":"Up"后,PD 才能为集群完成分区分配。连接被拒:确保
HG_*环境变量使用容器主机名(pd0、store0),而非127.0.0.1数据在意料之外地保留了下来:
docker compose down会保留命名卷。要同时删除该拓扑的数据,请使用docker compose down -v
查看运行时日志:使用 docker logs <container-name>(如 docker logs hg-pd0)可直接查看日志,无需进入容器。单机镜像 hugegraph/hugegraph 设置了 STDOUT_MODE=true,其服务日志会输出到容器 stdout。hugegraph/server(HStore)镜像没有设置该变量,因此对 HStore 拓扑的 Server 执行 docker logs 只能看到入口脚本的输出,其余内容需在容器内查看 logs/hugegraph-server.log。
容器监控与健康检查
版本说明:本节描述当前主线 Docker 镜像的行为,不包含在
1.7.0镜像中。可使用上文从主线构建并标记为local的镜像,或包含这些改动的latest镜像。
进程监控模型
此前,三个 Docker 入口脚本均以 tail -f /dev/null 结尾,即使 Java 进程崩溃,容器仍会保持运行状态。由于容器从未退出,Docker 的 restart: unless-stopped 策略也不会触发。
现在,入口脚本直接监控 Java 进程:
- PD 和 Store 容器:入口脚本向启动脚本传入
-d false参数,启动脚本通过exec直接替换为 Java 进程。容器进程即为 Java 进程,当 Java 退出(崩溃或正常关闭)时,容器立即退出,Docker 的重启策略随即触发。 - Server 容器:入口脚本使用
tail --pid=$PID -f /dev/null阻塞,直到 Java 退出。SIGTERM/SIGINT信号陷阱会将docker stop信号转发给 Java 并等待其正常关闭(退出码 0)。若 Java 崩溃,入口脚本以退出码 1 退出,从而触发重启策略。 - 所有镜像中的 PID 1 均为
dumb-init,负责将 Docker 信号转发给入口脚本进程。
Server 启动等待超时
HG_SERVER_STARTUP_TIMEOUT_S 控制 Server 启动脚本等待 REST 服务响应的时长,未设置时默认 120 秒。取值必须是不带前导零的十进制整数,范围为 1–86400 秒。空字符串、0、负数、小数和超出范围的值都会使入口脚本记录错误并以退出码 1 退出。
入口脚本通过 bin/start-hugegraph.sh -t 传入该值。如果 Server 在等待期限内未就绪,或进程提前退出,启动失败,容器以退出码 1 退出;配置的重启策略可能会重新启动容器。此时长不包括此前的存储初始化或等待后端就绪的时间。
例如,在 HugeGraph 仓库的 docker/ 目录下,将单机 Server 的启动等待时间增加到 300 秒(Compose 文件会将该变量传入容器):
该设置与 Docker 健康检查的 start_period、interval、timeout 和 retries 相互独立。健康检查参数决定何时将容器标记为 unhealthy;仅增加健康检查的等待时间,不会延长 Server 启动脚本的等待期限。调整此变量也不会自动修改健康检查参数,启动较慢时应分别检查这两组设置。
健康检查端点
所有四个 Docker 镜像现已内置 HEALTHCHECK 指令。docker ps 将显示真实的健康状态。在 90 秒的启动期内,检查失败不计入统计;此后,连续三次失败将把容器标记为 unhealthy。
| 镜像 | 健康检查端点 | 端口 | 参数 |
|---|---|---|---|
hugegraph/hugegraph(单机 RocksDB Server) | GET /versions | 8080 | --interval=15s --timeout=10s --start-period=90s --retries=3 |
hugegraph/server(HStore Server) | GET /versions | 8080 | 同上 |
hugegraph/pd | GET /v1/health | 8620 | 同上 |
hugegraph/store | GET /v1/health | 8520 | 同上 |
Compose 文件在此之上还定义了自己的健康检查,因此 --wait 和 depends_on: condition: service_healthy 不依赖镜像内置的检查。Compose 中的检查使用更短的启动期(视服务和拓扑为 30 到 120 秒)和更多的重试次数。
注意:
start-hugegraph.sh中的-m true标志(基于 cron 的监控)仅适用于虚拟机/裸机部署,Docker 镜像中未安装也不使用该功能。Docker 用户应依赖内置的HEALTHCHECK和 Docker 重启策略。
6.7 - FAQ
如何选择后端存储? 选 RocksDB 还是分布式存储?
HugeGraph 支持多种部署模式,根据数据规模和场景选择:
- 单机模式:Server + RocksDB,适合开发测试、Graph AI 和中小规模生产环境(≤ 2 TB)
- 分布式模式:HugeGraph-PD + HugeGraph-Store(HStore),用于需要水平扩展和多副本的部署,支持 ≤ 1 PB 的数据规模
1.7.0 支持 RocksDB、HStore、HBase 和 Memory。Cassandra、ScyllaDB、MySQL、PostgreSQL 等旧后端需使用 1.5.x 或更早版本。
启动服务时提示:
xxx (core dumped) xxx请先确认 JDK 版本不低于 Java 11。HugeGraph 1.7.0 不再支持 Java 8。
启动服务成功了,但是操作图时有类似于"无法连接到后端或连接未打开"的提示
RocksDB、HBase 等本地持久化后端首次启动前需要使用
init-store初始化。HStore 由 PD、Store 管理,不执行该脚本。所有的后端在使用前都需要执行
init-store吗,序列化的选择可以随意填写么?Memory 和 HStore 不执行
init-store;RocksDB、HBase 等本地持久化后端首次使用前需要初始化。序列化器必须与后端匹配,例如 RocksDB 使用binary。执行
init-store报错:Exception in thread "main" java.lang.UnsatisfiedLinkError: /tmp/librocksdbjni3226083071221514754.so: /usr/lib64/libstdc++.so.6: version `GLIBCXX_3.4.10' not found (required by /tmp/librocksdbjni3226083071221514754.so)RocksDB需要 gcc 4.3.0 (GLIBCXX_3.4.10) 及以上版本
bin目录下包含start-hugegraph.sh、start-restserver.sh和start-gremlinserver.sh三个似乎与启动有关的脚本,到底该使用哪个当前发布包只保留
start-hugegraph.sh作为 Server 启动脚本。GremlinServer 和 REST Server 由同一进程启动。配置了两个图,名字是
hugegraph和hugegraph1,而启动服务的命令是start-hugegraph.sh,是只打开了hugegraph这个图吗脚本名称与图名无关。Server 默认从
conf/graphs扫描并加载本地图配置,目录可在conf/rest-server.properties的graphs配置项中修改。graph.load_from_local_config的默认值是false,只控制图管理器构造阶段的预加载及reload()重扫,不能用于禁止启动时加载;需要加载多个本地图时,为每个图准备独立配置文件。详见服务端配置说明。服务启动成功后,使用
curl查询所有顶点时返回乱码服务端返回的批量顶点/边是压缩(gzip)过的,可以使用管道重定向至
gunzip进行解压(curl http://example | gunzip),也可以用Firefox的postman或者Chrome浏览器的restlet插件发请求,会自动解压缩响应数据。使用顶点Id通过
RESTful API查询顶点时返回空,但是顶点确实是存在的检查顶点Id的类型,如果是字符串类型,
API的url中的id部分需要加上双引号,数字类型则不用加。已经根据需要给顶点Id加上了双引号,但是通过
RESTful API查询顶点时仍然返回空检查顶点id中是否包含
+、空格、/、?、%、&和=这些URL的保留字符,如果存在则需要进行编码。下表给出了编码值:查询某一类别的顶点或边(
query by label)时提示超时由于属于某一label的数据量可能比较多,请加上limit限制。
通过
RESTful API操作图是可以的,但是发送Gremlin语句就报错:Request Failed(500)可能是
GremlinServer的配置有误,检查gremlin-server.yaml的host、port是否与rest-server.properties的gremlinserver.url匹配,如不匹配则修改,然后重启服务。使用
Loader导数据出现Socket Timeout异常,然后导致Loader中断持续地导入数据会使
Server的压力过大,然后导致有些请求超时。可以通过调整Loader的参数来适当缓解Server压力(如:重试次数,重试间隔,错误容忍数等),降低该问题出现频率。如何删除图中的全部数据
管理员可调用
DELETE /graphspaces/{graphspace}/graphs/{graph}/clear?confirm_message=I'm sure to delete all data。confirm_message查询参数必须与该值完全一致,否则请求会被拒绝,详见 Graph API。该操作会清除 schema、顶点、边和索引。清空了数据库,并且执行了
init-store,但是添加schema时提示"xxx has existed"HugeGraphServer内是有缓存的,清空数据库的同时是需要重启Server的,否则残留的缓存会产生不一致。插入顶点或边的过程中报错:
The max length of vertex id is 16384, but got xxx {yyy}或The max length of edge id is 65536, but got xxx {yyy}为了保证查询性能,目前的后端存储对id列的长度做了限制,顶点id不能超过16384字节,边id长度不能超过65536字节;索引id超过32字节时会转为哈希存储,而不是报错。
是否支持嵌套属性,如果不支持,是否有什么替代方案
嵌套属性目前暂不支持。替代方案:可以把嵌套属性作为单独的顶点拿出来,然后用边连接起来。
一个
EdgeLabel是否可以连接多对VertexLabel,比如"投资"关系,可以是"个人"投资"企业",也可以是"企业"投资"企业"可以。创建
EdgeLabel时对每一对顶点标签各调用一次link(sourceLabel, targetLabel),所有配对都会被保留,因此同一个"投资"标签可以同时覆盖"个人"投资"企业"和"企业"投资"企业"。旧的sourceLabel()和targetLabel()构建方法已废弃,且只支持单一配对。通过
RestAPI发送请求时提示HTTP 415 Unsupported Media Type请求头中需要指定
Content-Type:application/json
其他问题可以在对应项目的 issue 区搜索,例如 Server-Issues / Loader Issues
6.8 - 报告安全问题
报告 Apache HugeGraph 的安全问题
生产环境安全要求
HugeGraph 默认不启用用户认证。生产环境必须启用认证与授权、将 white_ip.status 设为 enable 并启用和维护 IP 白名单,同时按最小权限为账号授权;不得将 Gremlin、Cypher 等查询接口直接暴露到公网。白名单管理方式见 IP 白名单 API。生产部署还必须隔离 Server 进程,可使用 Docker 或 Kubernetes 等容器环境。
Server 标准配置将鉴权代理的审计记录写入 audit-*.log。部署时必须保留并限制这些日志的读取权限。auth.audit_log_rate 只控制每用户的最大日志输出速率,不是审计日志的启停开关。
漏洞报告范围
近期社区已收到较多关于图查询语言灵活性的安全反馈。在 HugeGraph 安全体系整体重构完成前,对于在不启用或跳过 Auth 系统/避开授权身份的前提下执行 DSL 查询的情况,此类已知风险将不再单独视为新漏洞进行处理。
如果在已开启 Auth 系统的环境中仍能以匿名或未授权身份访问并利用漏洞,或者成功绕过 IP 白名单 / 逃逸容器造成严重越权或底层系统破坏,仍属于高危安全漏洞,欢迎向社区报告。
遵循 ASF 的规范,HugeGraph 社区对解决修复项目中的安全问题保持非常积极和开放的态度。
我们强烈建议用户首先向我们的独立安全邮件列表报告此类问题,相关详细的流程规范请参考 ASF SEC 守则。
请注意,安全邮件组适用于报告未公开的安全漏洞并跟进漏洞处理的过程。常规的软件 Bug/Error 报告应该使用 Github Issue/Discussion 或是 HugeGraph-Dev 邮箱组。发送到安全邮件组但与安全问题无关的邮件将被忽略。
独立的安全邮件 (组) 地址为: security@hugegraph.apache.org
安全漏洞处理大体流程如下:
- 报告人私下向 Apache HugeGraph SEC 邮件组报告漏洞 (尽可能包括复现的版本/相关说明/复现方式/影响范围等)
- HugeGraph 项目安全团队与报告人私下合作/商讨漏洞解决方案 (初步确认后可申请
CVE编号予以登记) - 项目创建一个新版本的受漏洞影响的软件包,以提供修复程序
- 合适的时间可公开漏洞的大体问题 & 描述如何应用修复程序 (遵循 ASF 规范,公告中不应携带复现细节等敏感信息)
- 正式的 CVE 发布及相关流程同 ASF-SEC 页面
已发现的安全漏洞 (CVEs)
HugeGraph 主仓库 (Server/PD/Store)
- CVE-2024-27348: HugeGraph-Server - Command execution in gremlin
- CVE-2024-27349: HugeGraph-Server - Bypass whitelist in Auth mode
- CVE-2024-43441: HugeGraph-Server - Fixed JWT Token (Secret)
- CVE-2025-26866: HugeGraph-Server - RAFT and deserialization vulnerability
HugeGraph-Toolchain 仓库 (Hubble/Loader/Client/Tools/..)
- CVE-2024-27347: HugeGraph-Hubble - SSRF in Hubble connection page
7 - 查询语言
HugeGraph 支持 Gremlin 和 Cypher。这里主要介绍 Gremlin 用法;Cypher HTTP 接口见 Cypher API。
7.1 - HugeGraph Gremlin
概述
HugeGraph支持Apache TinkerPop3的图形遍历查询语言Gremlin。 SQL是关系型数据库查询语言,而Gremlin是一种通用的图数据库查询语言,Gremlin可用于创建图的实体(Vertex和Edge)、修改实体内部属性、删除实体,也可执行图的查询操作。
Gremlin可用于创建图的实体(Vertex和Edge)、修改实体内部属性、删除实体,更主要的是可用于执行图的查询及分析操作。
TinkerPop Features
HugeGraph实现了TinkerPop框架,但是并没有实现TinkerPop所有的特性。
下表列出HugeGraph对TinkerPop各种特性的支持情况:
Graph Features
| Name | Description | Support |
|---|---|---|
| Computer | Determines if the {@code Graph} implementation supports {@link GraphComputer} based processing | false |
| Transactions | Determines if the {@code Graph} implementations supports transactions. | true |
| Persistence | Determines if the {@code Graph} implementation supports persisting it’s contents natively to disk.This feature does not refer to every graph’s ability to write to disk via the Gremlin IO packages(.e.g. GraphML), unless the graph natively persists to disk via those options somehow. For example,TinkerGraph does not support this feature as it is a pure in-sideEffects graph. | 取决于后端 |
| ThreadedTransactions | Determines if the {@code Graph} implementation supports threaded transactions which allow a transaction be executed across multiple threads via {@link Transaction#createThreadedTx()}. | false |
| ConcurrentAccess | Determines if the {@code Graph} implementation supports more than one connection to the same instance at the same time. For example, Neo4j embedded does not support this feature because concurrent access to the same database files by multiple instances is not possible. However, Neo4j HA could support this feature as each new {@code Graph} instance coordinates with the Neo4j cluster allowing multiple instances to operate on the same database. | false |
Vertex Features
| Name | Description | Support |
|---|---|---|
| UserSuppliedIds | Determines if an {@link Element} can have a user defined identifier. Implementation that do not support this feature will be expected to auto-generate unique identifiers. In other words, if the {@link Graph} allows {@code graph.addVertex(id,x)} to work and thus set the identifier of the newly added {@link Vertex} to the value of {@code x} then this feature should return true. In this case, {@code x} is assumed to be an identifier data type that the {@link Graph} will accept. | true |
| NumericIds | Determines if an {@link Element} has numeric identifiers as their internal representation. In other words,if the value returned from {@link Element#id()} is a numeric value then this method should be return {@code true}. Note that this feature is most generally used for determining the appropriate tests to execute in the Gremlin Test Suite. | false |
| StringIds | Determines if an {@link Element} has string identifiers as their internal representation. In other words, if the value returned from {@link Element#id()} is a string value then this method should be return {@code true}. Note that this feature is most generally used for determining the appropriate tests to execute in the Gremlin Test Suite. | true |
| UuidIds | Determines if an {@link Element} has UUID identifiers as their internal representation. In other words,if the value returned from {@link Element#id()} is a {@link UUID} value then this method should be return {@code true}.Note that this feature is most generally used for determining the appropriate tests to execute in the Gremlin Test Suite. | false |
| CustomIds | Determines if an {@link Element} has a specific custom object as their internal representation.In other words, if the value returned from {@link Element#id()} is a type defined by the graph implementations, such as OrientDB’s {@code Rid}, then this method should be return {@code true}.Note that this feature is most generally used for determining the appropriate tests to execute in the Gremlin Test Suite. | true |
| AnyIds | Determines if an {@link Element} any Java object is a suitable identifier. TinkerGraph is a good example of a {@link Graph} that can support this feature, as it can use any {@link Object} as a value for the identifier. Note that this feature is most generally used for determining the appropriate tests to execute in the Gremlin Test Suite. This setting should only return {@code true} if {@link #supportsUserSuppliedIds()} is {@code true}. | false |
| AddProperty | Determines if an {@link Element} allows properties to be added. This feature is set independently from supporting “data types” and refers to support of calls to {@link Element#property(String, Object)}. | true |
| RemoveProperty | Determines if an {@link Element} allows properties to be removed. | true |
| AddVertices | Determines if a {@link Vertex} can be added to the {@code Graph}. | true |
| MultiProperties | Determines if a {@link Vertex} can support multiple properties with the same key. | true |
| DuplicateMultiProperties | Determines if a {@link Vertex} can support non-unique values on the same key. For this value to be {@code true}, then {@link #supportsMetaProperties()} must also return true. By default this method, just returns what {@link #supportsMultiProperties()} returns. | true |
| MetaProperties | Determines if a {@link Vertex} can support properties on vertex properties. It is assumed that a graph will support all the same data types for meta-properties that are supported for regular properties. | false |
| RemoveVertices | Determines if a {@link Vertex} can be removed from the {@code Graph}. | true |
Edge Features
| Name | Description | Support |
|---|---|---|
| UserSuppliedIds | Determines if an {@link Element} can have a user defined identifier. Implementation that do not support this feature will be expected to auto-generate unique identifiers. In other words, if the {@link Graph} allows {@code graph.addVertex(id,x)} to work and thus set the identifier of the newly added {@link Vertex} to the value of {@code x} then this feature should return true. In this case, {@code x} is assumed to be an identifier data type that the {@link Graph} will accept. | false |
| NumericIds | Determines if an {@link Element} has numeric identifiers as their internal representation. In other words,if the value returned from {@link Element#id()} is a numeric value then this method should be return {@code true}. Note that this feature is most generally used for determining the appropriate tests to execute in the Gremlin Test Suite. | false |
| StringIds | Determines if an {@link Element} has string identifiers as their internal representation. In other words, if the value returned from {@link Element#id()} is a string value then this method should be return {@code true}. Note that this feature is most generally used for determining the appropriate tests to execute in the Gremlin Test Suite. | true |
| UuidIds | Determines if an {@link Element} has UUID identifiers as their internal representation. In other words,if the value returned from {@link Element#id()} is a {@link UUID} value then this method should be return {@code true}.Note that this feature is most generally used for determining the appropriate tests to execute in the Gremlin Test Suite. | false |
| CustomIds | Determines if an {@link Element} has a specific custom object as their internal representation.In other words, if the value returned from {@link Element#id()} is a type defined by the graph implementations, such as OrientDB’s {@code Rid}, then this method should be return {@code true}.Note that this feature is most generally used for determining the appropriate tests to execute in the Gremlin Test Suite. | true |
| AnyIds | Determines if an {@link Element} any Java object is a suitable identifier. TinkerGraph is a good example of a {@link Graph} that can support this feature, as it can use any {@link Object} as a value for the identifier. Note that this feature is most generally used for determining the appropriate tests to execute in the Gremlin Test Suite. This setting should only return {@code true} if {@link #supportsUserSuppliedIds()} is {@code true}. | false |
| AddProperty | Determines if an {@link Element} allows properties to be added. This feature is set independently from supporting “data types” and refers to support of calls to {@link Element#property(String, Object)}. | true |
| RemoveProperty | Determines if an {@link Element} allows properties to be removed. | true |
| AddEdges | Determines if an {@link Edge} can be added to a {@code Vertex}. | true |
| RemoveEdges | Determines if an {@link Edge} can be removed from a {@code Vertex}. | true |
Data Type Features
| Name | Description | Support |
|---|---|---|
| BooleanValues | true | |
| ByteValues | true | |
| DoubleValues | true | |
| FloatValues | true | |
| IntegerValues | true | |
| LongValues | true | |
| MapValues | Supports setting of a {@code Map} value. The assumption is that the {@code Map} can contain arbitrary serializable values that may or may not be defined as a feature itself | false |
| MixedListValues | Supports setting of a {@code List} value. The assumption is that the {@code List} can contain arbitrary serializable values that may or may not be defined as a feature itself. As this{@code List} is “mixed” it does not need to contain objects of the same type. | false |
| BooleanArrayValues | false | |
| ByteArrayValues | true | |
| DoubleArrayValues | false | |
| FloatArrayValues | false | |
| IntegerArrayValues | false | |
| LongArrayValues | false | |
| SerializableValues | false | |
| StringArrayValues | false | |
| StringValues | true | |
| UniformListValues | Supports setting of a {@code List} value. The assumption is that the {@code List} can contain arbitrary serializable values that may or may not be defined as a feature itself. As this{@code List} is “uniform” it must contain objects of the same type. | true |
Gremlin的步骤
HugeGraph支持Gremlin的所有步骤。有关Gremlin的完整参考信息,请参与Gremlin官网。
| 步骤 | 说明 | 文档 |
|---|---|---|
| addE | 在两个顶点之间添加边 | addE step |
| addV | 将顶点添加到图形 | addV step |
| and | 确保所有遍历都返回值 | and step |
| as | 用于向步骤的输出分配变量的步骤调制器 | as step |
| by | 与group和order配合使用的步骤调制器 | by step |
| coalesce | 返回第一个返回结果的遍历 | coalesce step |
| constant | 返回常量值。 与coalesce配合使用 | constant step |
| count | 从遍历返回计数 | count step |
| dedup | 返回已删除重复内容的值 | dedup step |
| drop | 丢弃值(顶点/边缘) | drop step |
| fold | 充当用于计算结果聚合值的屏障 | fold step |
| group | 根据指定的标签将值分组 | group step |
| has | 用于筛选属性、顶点和边缘。 支持hasLabel、hasId、hasNot 和 has 变体 | has step |
| inject | 将值注入流中 | inject step |
| is | 用于通过布尔表达式执行筛选器 | is step |
| limit | 用于限制遍历中的项数 | limit step |
| local | 本地包装遍历的某个部分,类似于子查询 | local step |
| not | 用于生成筛选器的求反结果 | not step |
| optional | 如果生成了某个结果,则返回指定遍历的结果,否则返回调用元素 | optional step |
| or | 确保至少有一个遍历会返回值 | or step |
| order | 按指定的排序顺序返回结果 | order step |
| path | 返回遍历的完整路径 | path step |
| project | 将属性投影为映射 | project step |
| properties | 返回指定标签的属性 | properties step |
| range | 根据指定的值范围进行筛选 | range step |
| repeat | 将步骤重复指定的次数。 用于循环 | repeat step |
| sample | 用于对遍历返回的结果采样 | sample step |
| select | 用于投影遍历返回的结果 | select step |
| store | 用于遍历返回的非阻塞聚合 | store step |
| tree | 将顶点中的路径聚合到树中 | tree step |
| unfold | 将迭代器作为步骤展开 | unfold step |
| union | 合并多个遍历返回的结果 | union step |
| V | 包括顶点与边之间的遍历所需的步骤:V、E、out、in、both、outE、inE、bothE、outV、inV、bothV 和 otherV | vertex steps |
| where | 用于筛选遍历返回的结果。 支持 eq、neq、lt、lte、gt、gte 和 between 运算符 | where step |
7.2 - HugeGraph Examples
1 概述
本示例将TitanDB Getting Started 为模板来演示 HugeGraph 的使用方法。通过对比 HugeGraph 和 TitanDB,了解 HugeGraph 和 TitanDB 的差异。
1.1 HugeGraph 与 TitanDB 的异同
HugeGraph 和 TitanDB 都是基于Apache TinkerPop3框架的图数据库,均支持Gremlin图查询语言,在使用方法和接口方面具有很多相似的地方。然而 HugeGraph 是全新设计开发的,其代码结构清晰,功能较为丰富,接口更为友好等特点。
HugeGraph 相对于 TitanDB 而言,其主要特点如下:
- HugeGraph 目前有 HugeGraph-API、HugeGraph-Client、HugeGraph-Loader、HugeGraph-Studio、HugeGraph-Spark 等完善的工具组件,可以完成系统集成、数据载入、图可视化查询、Spark 连接等功能;
- HugeGraph 具有 Server 和 Client 的概念,第三方系统可以通过 jar 引用、client、api 等多种方式接入,而 TitanDB 仅支持 jar 引用方式接入。
- HugeGraph 的 Schema 需要显式定义,所有的插入和查询均需要通过严格的 schema 校验,目前暂不支持 schema 的隐式创建。
- HugeGraph 充分利用后端存储系统的特点来实现数据高效存取,而 TitanDB 以统一的 Kv 结构无视后端的差异性。
- HugeGraph 的更新操作可以实现按需操作(例如:更新某个属性)性能更好。TitanDB 的更新是 read and update 方式。
- HugeGraph 的 VertexId 和 EdgeId 均支持拼接,可实现自动去重,同时查询性能更好。TitanDB 的所有 Id 均是自动生成,查询需要经索引。
1.2 人物关系图谱
本示例通过 Property Graph Model 图数据模型来描述希腊神话中各人物角色的关系(也被成为人物关系图谱),具体关系详见下图。
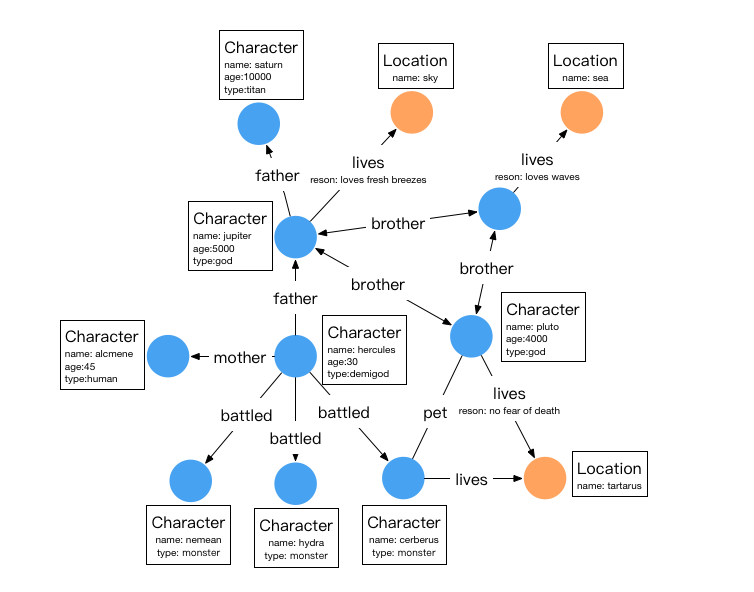
其中,圆形节点代表实体 (Vertex),箭头代表关系(Edge),方框的内容为属性。
该关系图谱中有两类顶点,分别是人物(character)和位置(location)如下表:
| 名称 | 类型 | 属性 |
|---|---|---|
| character | vertex | name,age,type |
| location | vertex | name |
有六种关系,分别是父子(father)、母子(mother)、兄弟(brother)、战斗(battled)、居住 (lives)、拥有宠物(pet)关于关系图谱的具体信息如下:
| 名称 | 类型 | source vertex label | target vertex label | 属性 |
|---|---|---|---|---|
| father | edge | character | character | - |
| mother | edge | character | character | - |
| brother | edge | character | character | - |
| battled | edge | character | character | time |
| pet | edge | character | character | - |
| lives | edge | character | location | reason |
一个 edge label 可以连接多对 source vertex label 和 target vertex label:创建时对每一对顶点标签各调用一次 link(sourceLabel, targetLabel) 即可。已废弃的 sourceLabel() 和 targetLabel() 构建方法只支持单一配对。
本例子将原TitanDB中的monster, god, human, demigod均使用相同的vertex label: character来表示, 同时增加属性type来标识人物的类型。edge label与原TitanDB保持一致。
2 Graph Schema and Data Ingest Examples
HugeGraph 需要显示创建 Schema,因此需要依次创建 PropertyKey、VertexLabel、EdgeLabel,如果有需要索引还需要创建 IndexLabel。
以下代码片段假定 Groovy 脚本已打开 HugeGraph 实例并将其绑定为 graph,同时设置遍历源 g = graph.traversal()。可从 Gremlin Console 本地模式示例开始;该页面的 scripts/example.groovy 会创建这两个变量。远程 Console 中的 g 是 Server 端遍历源别名,客户端本地没有 graph 对象;远程建模请使用本页之外的 Schema REST API。
2.1 Graph Schema
2.2 Graph Data
2.3 Indices
HugeGraph 默认是自动生成 Id,如果用户通过primaryKeys指定VertexLabel的primaryKeys字段列表后,VertexLabel的 Id 策略将会自动切换到primaryKeys策略。启用primaryKeys策略后,HugeGraph 通过vertexLabel+primaryKeys拼接生成VertexId ,可实现自动去重,同时无需额外创建索引即可以使用primaryKeys中的属性进行快速查询。例如 “character” 和 “location” 都有primaryKeys("name")属性,因此在不额外创建索引的情况下可以通过g.V().hasLabel('character') .has('name','hercules')查询 vertex。
3 Graph Traversal Examples
3.1 Traversal Query
1. Find the grandfather of hercules
也可以通过repeat方式:
2. Find the name of Hercules’s father
3. Find the characters with age > 100
4. Find who are pluto’s cohabitants
5. Find pluto can’t be his own cohabitant
6. Pluto’s Brothers
推荐使用HugeGraph-Hubble 通过可视化的方式来执行上述代码。另外也可以通过 HugeGraph-Client、HugeApi、GremlinConsole 和 GremlinDriver 等多种方式执行上述代码。
3.2 总结
HugeGraph 目前支持 Gremlin 的语法,用户可以通过 Gremlin / REST-API 实现各种查询需求。
8 - PERFORMANCE
⚠️ 性能测试章节正在重构
当前章节中的 benchmark、API 性能和 Loader 性能报告均基于历史版本、测试方法或测试环境,旧结果不代表当前版本的实际性能,也不适合直接用于版本比较或容量规划。后续将统一更新测试方法、软硬件环境和报告,并对旧报告进行归档。
当前可查阅的 benchmark 页面:
- HugeGraph 0.5.6 性能测试:历史报告,等待按统一方法重新测试;其中收录 HugeGraph 0.4.4 历史性能测试。
8.1 - HugeGraph BenchMark Performance
Note:
当前的性能指标测试基于很早期的版本。最新版本在性能和功能上都有显著的改进。我们鼓励您参考最新的发布版本, 该版本具有自主分布式存储和增强的计算推下能力。或者,您可以等待社区更新相关测试数据 (也欢迎反馈共建)。
同目录下的 HugeGraph 0.4.4 历史性能测试 数据来自 2018 年,仅用于历史参考。
1 测试环境
1.1 硬件信息
| CPU | Memory | 网卡 | 磁盘 |
|---|---|---|---|
| 48 Intel(R) Xeon(R) CPU E5-2650 v4 @ 2.20GHz | 128G | 10000Mbps | 750GB SSD |
1.2 软件信息
1.2.1 测试用例
测试使用graphdb-benchmark,一个图数据库测试集。该测试集主要包含 4 类测试:
Massive Insertion,批量插入顶点和边,一定数量的顶点或边一次性提交
Single Insertion,单条插入,每个顶点或者每条边立即提交
Query,主要是图数据库的基本查询操作:
- Find Neighbors,查询所有顶点的邻居
- Find Adjacent Nodes,查询所有边的邻接顶点
- Find Shortest Path,查询第一个顶点到 100 个随机顶点的最短路径
Clustering,基于 Louvain Method 的社区发现算法
1.2.2 测试数据集
测试使用人造数据和真实数据
MIW、SIW 和 QW 使用 SNAP 数据集
CW 使用LFR-Benchmark generator生成的人造数据
本测试用到的数据集规模
| 名称 | vertex 数目 | edge 数目 | 文件大小 |
|---|---|---|---|
| email-enron.txt | 36,691 | 367,661 | 4MB |
| com-youtube.ungraph.txt | 1,157,806 | 2,987,624 | 38.7MB |
| amazon0601.txt | 403,393 | 3,387,388 | 47.9MB |
| com-lj.ungraph.txt | 3997961 | 34681189 | 479MB |
1.3 服务配置
HugeGraph 版本:0.5.6,RestServer 和 Gremlin Server 和 backends 都在同一台服务器上
- RocksDB 版本:rocksdbjni-5.8.6
Titan 版本:0.5.4, 使用 thrift+Cassandra 模式
- Cassandra 版本:cassandra-3.10,commit-log 和 data 共用 SSD
Neo4j 版本:2.0.1
graphdb-benchmark 适配的 Titan 版本为 0.5.4
2 测试结果
2.1 Batch 插入性能
以下图表和原表均为 HugeGraph 0.5.6 历史测试数据,不代表当前版本性能。硬件、软件版本和后端条件见上方测试环境。
图表使用对数坐标比较批量插入耗时(秒);点击图例可切换系列,原表保留供准确取值。
{
"tooltip": {
"trigger": "axis",
"confine": true
},
"legend": {
"data": [
"HugeGraph",
"Titan",
"Neo4j"
]
},
"grid": {
"left": 75,
"right": 30,
"top": 55,
"bottom": 75
},
"xAxis": {
"type": "category",
"data": [
"email-enron (30w)",
"amazon0601 (300w)",
"YouTube (300w)",
"LiveJournal (3000w)"
],
"axisLabel": {
"rotate": 10
}
},
"yAxis": {
"type": "log",
"name": "耗时 / 秒(对数)"
},
"series": [
{
"name": "HugeGraph",
"type": "bar",
"data": [
0.629,
5.711,
5.243,
67.033
]
},
{
"name": "Titan",
"type": "bar",
"data": [
10.15,
108.569,
150.266,
1217.944
]
},
{
"name": "Neo4j",
"type": "bar",
"data": [
3.884,
18.938,
24.89,
281.537
]
}
]
}| Backend | email-enron(30w) | amazon0601(300w) | com-youtube.ungraph(300w) | com-lj.ungraph(3000w) |
|---|---|---|---|---|
| HugeGraph | 0.629 | 5.711 | 5.243 | 67.033 |
| Titan | 10.15 | 108.569 | 150.266 | 1217.944 |
| Neo4j | 3.884 | 18.938 | 24.890 | 281.537 |
说明
- 表头"()“中数据是数据规模,以边为单位
- 表中数据是批量插入的时间,单位是 s
- 例如,HugeGraph 使用 RocksDB 插入 amazon0601 数据集的 300w 条边,花费 5.711s
结论
- 批量插入性能 HugeGraph(RocksDB) > Neo4j > Titan(thrift+Cassandra)
2.2 遍历性能
2.2.1 术语说明
- FN(Find Neighbor), 遍历所有 vertex, 根据 vertex 查邻接 edge, 通过 edge 和 vertex 查 other vertex
- FA(Find Adjacent), 遍历所有 edge,根据 edge 获得 source vertex 和 target vertex
2.2.2 FN 性能
| Backend | email-enron(3.6w) | amazon0601(40w) | com-youtube.ungraph(120w) | com-lj.ungraph(400w) |
|---|---|---|---|---|
| HugeGraph | 4.072 | 45.118 | 66.006 | 609.083 |
| Titan | 8.084 | 92.507 | 184.543 | 1099.371 |
| Neo4j | 2.424 | 10.537 | 11.609 | 106.919 |
说明
- 表头”()“中数据是数据规模,以顶点为单位
- 表中数据是遍历顶点花费的时间,单位是 s
- 例如,HugeGraph 使用 RocksDB 后端遍历 amazon0601 的所有顶点,并查找邻接边和另一顶点,总共耗时 45.118s
2.2.3 FA 性能
| Backend | email-enron(30w) | amazon0601(300w) | com-youtube.ungraph(300w) | com-lj.ungraph(3000w) |
|---|---|---|---|---|
| HugeGraph | 1.540 | 10.764 | 11.243 | 151.271 |
| Titan | 7.361 | 93.344 | 169.218 | 1085.235 |
| Neo4j | 1.673 | 4.775 | 4.284 | 40.507 |
说明
- 表头”()“中数据是数据规模,以边为单位
- 表中数据是遍历边花费的时间,单位是 s
- 例如,HugeGraph 使用 RocksDB 后端遍历 amazon0601 的所有边,并查询每条边的两个顶点,总共耗时 10.764s
结论
- 遍历性能 Neo4j > HugeGraph(RocksDB) > Titan(thrift+Cassandra)
2.3 HugeGraph-图常用分析方法性能
术语说明
- FS(Find Shortest Path), 寻找最短路径
- K-neighbor,从起始 vertex 出发,通过 K 跳边能够到达的所有顶点,包括 1, 2, 3…(K-1), K 跳边可达 vertex
- K-out, 从起始 vertex 出发,恰好经过 K 跳 out 边能够到达的顶点
FS 性能
| Backend | email-enron(30w) | amazon0601(300w) | com-youtube.ungraph(300w) | com-lj.ungraph(3000w) |
|---|---|---|---|---|
| HugeGraph | 0.494 | 0.103 | 3.364 | 8.155 |
| Titan | 11.818 | 0.239 | 377.709 | 575.678 |
| Neo4j | 1.719 | 1.800 | 1.956 | 8.530 |
说明
- 表头”()“中数据是数据规模,以边为单位
- 表中数据是找到从第一个顶点出发到达随机选择的 100 个顶点的最短路径的时间,单位是 s
- 例如,HugeGraph 使用 RocksDB 后端在图 amazon0601 中查找第一个顶点到 100 个随机顶点的最短路径,总共耗时 0.103s
结论
- 在数据规模小或者顶点关联关系少的场景下,HugeGraph 性能优于 Neo4j 和 Titan
- 随着数据规模增大且顶点的关联度增高,HugeGraph 与 Neo4j 性能趋近,都远高于 Titan
K-neighbor 性能
| 顶点 | 深度 | 一度 | 二度 | 三度 | 四度 | 五度 | 六度 |
|---|---|---|---|---|---|---|---|
| v1 | 时间 | 0.031s | 0.033s | 0.048s | 0.500s | 11.27s | OOM |
| v111 | 时间 | 0.027s | 0.034s | 0.115 | 1.36s | OOM | – |
| v1111 | 时间 | 0.039s | 0.027s | 0.052s | 0.511s | 10.96s | OOM |
说明
- HugeGraph-Server 的 JVM 内存设置为 32GB,数据量过大时会出现 OOM
K-out 性能
| 顶点 | 深度 | 一度 | 二度 | 三度 | 四度 | 五度 | 六度 |
|---|---|---|---|---|---|---|---|
| v1 | 时间 | 0.054s | 0.057s | 0.109s | 0.526s | 3.77s | OOM |
| 度 | 10 | 133 | 2453 | 50,830 | 1,128,688 | ||
| v111 | 时间 | 0.032s | 0.042s | 0.136s | 1.25s | 20.62s | OOM |
| 度 | 10 | 211 | 4944 | 113150 | 2,629,970 | ||
| v1111 | 时间 | 0.039s | 0.045s | 0.053s | 1.10s | 2.92s | OOM |
| 度 | 10 | 140 | 2555 | 50825 | 1,070,230 |
说明
- HugeGraph-Server 的 JVM 内存设置为 32GB,数据量过大时会出现 OOM
结论
- FS 场景,HugeGraph 性能优于 Neo4j 和 Titan
- K-neighbor 和 K-out 场景,HugeGraph 能够实现在 5 度范围内秒级返回结果
2.4 图综合性能测试-CW
| 数据库 | 规模 1000 | 规模 5000 | 规模 10000 | 规模 20000 |
|---|---|---|---|---|
| HugeGraph(core) | 20.804 | 242.099 | 744.780 | 1700.547 |
| Titan | 45.790 | 820.633 | 2652.235 | 9568.623 |
| Neo4j | 5.913 | 50.267 | 142.354 | 460.880 |
说明
- “规模"以顶点为单位
- 表中数据是社区发现完成需要的时间,单位是 s,例如 HugeGraph 使用 RocksDB 后端在规模 10000 的数据集,社区聚合不再变化,需要耗时 744.780s
- CW 测试是 CRUD 的综合评估
- 该测试中 HugeGraph 跟 Titan 一样,没有通过 client,直接对 core 操作
结论
- 社区聚类算法性能 Neo4j > HugeGraph > Titan
8.2 - HugeGraph-API Performance
HugeGraph API性能测试主要测试HugeGraph-Server对RESTful API请求的并发处理能力,包括:
- 顶点/边的单条插入
- 顶点/边的批量插入
- 顶点/边的查询
HugeGraph的每个发布版本的RESTful API的性能测试情况可以参考:
即将更新,敬请期待!
8.2.1 - v0.5.6 Stand-alone(RocksDB)
Note:
当前的性能指标测试基于很早期的版本。最新版本在性能和功能上都有显著的改进。我们鼓励您参考最新的发布版本, 该版本具有自主分布式存储和增强的计算推下能力。或者,您可以等待社区更新相关测试数据 (也欢迎反馈共建)。
1 测试环境
被压机器信息
| CPU | Memory | 网卡 | 磁盘 |
|---|---|---|---|
| 48 Intel(R) Xeon(R) CPU E5-2650 v4 @ 2.20GHz | 128G | 10000Mbps | 750GB SSD,2.7T HDD |
- 起压力机器信息:与被压机器同配置
- 测试工具:apache-Jmeter-2.5.1
注:起压机器和被压机器在同一机房
2 测试说明
2.1 名词定义(时间的单位均为 ms)
- Samples – 本次场景中一共完成了多少个线程
- Average – 平均响应时间
- Median – 统计意义上面的响应时间的中值
- 90% Line – 所有线程中 90% 的线程的响应时间都小于 xx
- Min – 最小响应时间
- Max – 最大响应时间
- Error – 出错率
- Throughput – 吞吐量
- KB/sec – 以流量做衡量的吞吐量
2.2 底层存储
后端存储使用 RocksDB,HugeGraph 与 RocksDB 都在同一机器上启动,server 相关的配置文件除主机和端口有修改外,其余均保持默认。
3 性能结果总结
- HugeGraph 单条插入顶点和边的速度在每秒 1w 左右
- 顶点和边的批量插入速度远大于单条插入速度
- 按 id 查询顶点和边的并发度可达到 13000 以上,且请求的平均延时小于 50ms
4 测试结果及分析
4.1 batch 插入
4.1.1 压力上限测试
测试方法
不断提升并发量,测试 server 仍能正常提供服务的压力上限
压力参数
持续时间:5min
顶点的最大插入速度:

结论:
- 并发 2200,顶点的吞吐量是 2026.8,每秒可处理的数据:2026.8*200=405360/s
边的最大插入速度

结论:
- 并发 900,边的吞吐量是 776.9,每秒可处理的数据:776.9*500=388450/s
4.2 single 插入
4.2.1 压力上限测试
测试方法
不断提升并发量,测试 server 仍能正常提供服务的压力上限
压力参数
- 持续时间:5min
- 服务异常标志:错误率大于 0.00%
顶点的单条插入

结论:
- 并发 11500,吞吐量为 10730,顶点的单条插入并发能力为 11500
边的单条插入

结论:
- 并发 9000,吞吐量是 8418,边的单条插入并发能力为 9000
4.3 按 id 查询
4.3.1 压力上限测试
测试方法
不断提升并发量,测试 server 仍能正常提供服务的压力上限
压力参数
- 持续时间:5min
- 服务异常标志:错误率大于 0.00%
顶点的按 id 查询

结论:
- 并发 14000,吞吐量是 12663,顶点的按 id 查询的并发能力为 14000,平均延时为 44ms
边的按 id 查询

结论:
- 并发 13000,吞吐量是 12225,边的按 id 查询的并发能力为 13000,平均延时为 12ms
8.2.2 - v0.5.6 Cluster(Cassandra)
Note:
当前的性能指标测试基于很早期的版本。最新版本在性能和功能上都有显著的改进。我们鼓励您参考最新的发布版本, 该版本具有自主分布式存储和增强的计算推下能力。或者,您可以等待社区更新相关测试数据 (也欢迎反馈共建)。
1 测试环境
被压机器信息
| CPU | Memory | 网卡 | 磁盘 |
|---|---|---|---|
| 48 Intel(R) Xeon(R) CPU E5-2650 v4 @ 2.20GHz | 128G | 10000Mbps | 750GB SSD,2.7T HDD |
- 起压力机器信息:与被压机器同配置
- 测试工具:apache-Jmeter-2.5.1
注:起压机器和被压机器在同一机房
2 测试说明
2.1 名词定义(时间的单位均为 ms)
- Samples – 本次场景中一共完成了多少个线程
- Average – 平均响应时间
- Median – 统计意义上面的响应时间的中值
- 90% Line – 所有线程中 90% 的线程的响应时间都小于 xx
- Min – 最小响应时间
- Max – 最大响应时间
- Error – 出错率
- Throughput – 吞吐量
- KB/sec – 以流量做衡量的吞吐量
2.2 底层存储
后端存储使用 15 节点 Cassandra 集群,HugeGraph 与 Cassandra 集群位于不同的服务器,server 相关的配置文件除主机和端口有修改外,其余均保持默认。
3 性能结果总结
- HugeGraph 单条插入顶点和边的速度分别为 9000 和 4500
- 顶点和边的批量插入速度分别为5w/s和15w/s,远大于单条插入速度
- 按 id 查询顶点和边的并发度可达到 12000 以上,且请求的平均延时小于 70ms
4 测试结果及分析
4.1 batch 插入
4.1.1 压力上限测试
测试方法
不断提升并发量,测试 server 仍能正常提供服务的压力上限
压力参数
持续时间:5min
顶点的最大插入速度:

结论:
- 并发 3500,顶点的吞吐量是 261,每秒可处理的数据:261*200=52200/s
边的最大插入速度

结论:
- 并发 1000,边的吞吐量是 323,每秒可处理的数据:323*500=161500/s
4.2 single 插入
4.2.1 压力上限测试
测试方法
不断提升并发量,测试 server 仍能正常提供服务的压力上限
压力参数
- 持续时间:5min
- 服务异常标志:错误率大于 0.00%
顶点的单条插入

结论:
- 并发 9000,吞吐量为 8400,顶点的单条插入并发能力为 9000
边的单条插入

结论:
- 并发 4500,吞吐量是 4160,边的单条插入并发能力为 4500
4.3 按 id 查询
4.3.1 压力上限测试
测试方法
不断提升并发量,测试 server 仍能正常提供服务的压力上限
压力参数
- 持续时间:5min
- 服务异常标志:错误率大于 0.00%
顶点的按 id 查询

结论:
- 并发 14500,吞吐量是 13576,顶点的按 id 查询的并发能力为 14500,平均延时为 11ms
边的按 id 查询

结论:
- 并发 12000,吞吐量是 10688,边的按 id 查询的并发能力为 12000,平均延时为 63ms
8.3 - HugeGraph-Loader Performance
Note:
当前的性能指标测试基于很早期的版本。最新版本在性能和功能上都有显著的改进。我们鼓励您参考最新的发布版本, 该版本具有自主分布式存储和增强的计算推下能力。或者,您可以等待社区更新相关测试数据 (也欢迎反馈共建)。
使用场景
当要批量插入的图数据(包括顶点和边)条数为 billion 级别及以下,或者总数据量小于 TB 时, 可以采用 HugeGraph-Loader 工具持续、高速导入图数据
性能
测试均采用网址数据的边数据
RocksDB 单机性能
- 关闭 label index,22.8w edges/s
- 开启 label index,15.3w edges/s
Cassandra 集群性能
- 默认开启 label index,6.3w edges/s
8.4 - HugeGraph 0.4.4 性能测试
⚠️ 历史数据,暂不作为当前版本性能依据
本页面记录的是 HugeGraph 0.4.4 的性能测试,数据来自 2018 年。测试环境、软件版本和实现与当前版本差异很大,测试结果仅供历史参考,不能直接用于评估当前版本的性能。
后续将补充基于最新版本的性能测试报告,并归档本页面。当前版本的性能结论请以更新后的报告为准。
1 测试环境
1.1 硬件信息
| CPU | Memory | 网卡 | 磁盘 |
|---|---|---|---|
| 48 Intel(R) Xeon(R) CPU E5-2650 v4 @ 2.20GHz | 128G | 10000Mbps | 750GB SSD |
1.2 软件信息
1.2.1 测试用例
测试使用graphdb-benchmark,一个图数据库测试集。该测试集主要包含4类测试:
Massive Insertion,批量插入顶点和边,一定数量的顶点或边一次性提交
Single Insertion,单条插入,每个顶点或者每条边立即提交
Query,主要是图数据库的基本查询操作:
- Find Neighbors,查询所有顶点的邻居
- Find Adjacent Nodes,查询所有边的邻接顶点
- Find Shortest Path,查询第一个顶点到100个随机顶点的最短路径
Clustering,基于Louvain Method的社区发现算法
1.2.2 测试数据集
测试使用人造数据和真实数据
MIW、SIW和QW使用SNAP数据集
CW使用LFR-Benchmark generator生成的人造数据
本测试用到的数据集规模
| 名称 | vertex数目 | edge数目 | 文件大小 |
|---|---|---|---|
| email-enron.txt | 36,691 | 367,661 | 4MB |
| com-youtube.ungraph.txt | 1,157,806 | 2,987,624 | 38.7MB |
| amazon0601.txt | 403,393 | 3,387,388 | 47.9MB |
1.3 服务配置
- HugeGraph版本:0.4.4,RestServer和Gremlin Server和backends都在同一台服务器上
- Cassandra版本:cassandra-3.10,commit-log 和data共用SSD
- RocksDB版本:rocksdbjni-5.8.6
- Titan版本:0.5.4, 使用thrift+Cassandra模式
graphdb-benchmark适配的Titan版本为0.5.4
2 测试结果
2.1 Batch插入性能
| Backend | email-enron(30w) | amazon0601(300w) | com-youtube.ungraph(300w) |
|---|---|---|---|
| Titan | 9.516 | 88.123 | 111.586 |
| RocksDB | 2.345 | 14.076 | 16.636 |
| Cassandra | 11.930 | 108.709 | 101.959 |
| Memory | 3.077 | 15.204 | 13.841 |
说明
- 表头"()“中数据是数据规模,以边为单位
- 表中数据是批量插入的时间,单位是s
- 例如,HugeGraph使用RocksDB插入amazon0601数据集的300w条边,花费14.076s,速度约为21w edges/s
结论
- RocksDB和Memory后端插入性能优于Cassandra
- HugeGraph和Titan同样使用Cassandra作为后端的情况下,插入性能接近
2.2 遍历性能
2.2.1 术语说明
- FN(Find Neighbor), 遍历所有vertex, 根据vertex查邻接edge, 通过edge和vertex查other vertex
- FA(Find Adjacent), 遍历所有edge,根据edge获得source vertex和target vertex
2.2.2 FN性能
| Backend | email-enron(3.6w) | amazon0601(40w) | com-youtube.ungraph(120w) |
|---|---|---|---|
| Titan | 7.724 | 70.935 | 128.884 |
| RocksDB | 8.876 | 65.852 | 63.388 |
| Cassandra | 13.125 | 126.959 | 102.580 |
| Memory | 22.309 | 207.411 | 165.609 |
说明
- 表头”()“中数据是数据规模,以顶点为单位
- 表中数据是遍历顶点花费的时间,单位是s
- 例如,HugeGraph使用RocksDB后端遍历amazon0601的所有顶点,并查找邻接边和另一顶点,总共耗时65.852s
2.2.3 FA性能
| Backend | email-enron(30w) | amazon0601(300w) | com-youtube.ungraph(300w) |
|---|---|---|---|
| Titan | 7.119 | 63.353 | 115.633 |
| RocksDB | 6.032 | 64.526 | 52.721 |
| Cassandra | 9.410 | 102.766 | 94.197 |
| Memory | 12.340 | 195.444 | 140.89 |
说明
- 表头”()“中数据是数据规模,以边为单位
- 表中数据是遍历边花费的时间,单位是s
- 例如,HugeGraph使用RocksDB后端遍历amazon0601的所有边,并查询每条边的两个顶点,总共耗时64.526s
结论
- HugeGraph RocksDB > Titan thrift+Cassandra > HugeGraph Cassandra > HugeGraph Memory
2.3 HugeGraph-图常用分析方法性能
术语说明
- FS(Find Shortest Path), 寻找最短路径
- K-neighbor,从起始vertex出发,通过K跳边能够到达的所有顶点, 包括1, 2, 3…(K-1), K跳边可达vertex
- K-out, 从起始vertex出发,恰好经过K跳out边能够到达的顶点
FS性能
| Backend | email-enron(30w) | amazon0601(300w) | com-youtube.ungraph(300w) |
|---|---|---|---|
| Titan | 11.333 | 0.313 | 376.06 |
| RocksDB | 44.391 | 2.221 | 268.792 |
| Cassandra | 39.845 | 3.337 | 331.113 |
| Memory | 35.638 | 2.059 | 388.987 |
说明
- 表头”()“中数据是数据规模,以边为单位
- 表中数据是找到从第一个顶点出发到达随机选择的100个顶点的最短路径的时间,单位是s
- 例如,HugeGraph使用RocksDB查找第一个顶点到100个随机顶点的最短路径,总共耗时2.059s
结论
- 在数据规模小或者顶点关联关系少的场景下,Titan最短路径性能优于HugeGraph
- 随着数据规模增大且顶点的关联度增高,HugeGraph最短路径性能优于Titan
K-neighbor性能
| 顶点 | 深度 | 一度 | 二度 | 三度 | 四度 | 五度 | 六度 |
|---|---|---|---|---|---|---|---|
| v1 | 时间 | 0.031s | 0.033s | 0.048s | 0.500s | 11.27s | OOM |
| v111 | 时间 | 0.027s | 0.034s | 0.115 | 1.36s | OOM | – |
| v1111 | 时间 | 0.039s | 0.027s | 0.052s | 0.511s | 10.96s | OOM |
说明
- HugeGraph-Server的JVM内存设置为32GB,数据量过大时会出现OOM
K-out性能
| 顶点 | 深度 | 一度 | 二度 | 三度 | 四度 | 五度 | 六度 |
|---|---|---|---|---|---|---|---|
| v1 | 时间 | 0.054s | 0.057s | 0.109s | 0.526s | 3.77s | OOM |
| 度 | 10 | 133 | 2453 | 50,830 | 1,128,688 | ||
| v111 | 时间 | 0.032s | 0.042s | 0.136s | 1.25s | 20.62s | OOM |
| 度 | 10 | 211 | 4944 | 113150 | 2,629,970 | ||
| v1111 | 时间 | 0.039s | 0.045s | 0.053s | 1.10s | 2.92s | OOM |
| 度 | 10 | 140 | 2555 | 50825 | 1,070,230 |
说明
- HugeGraph-Server的JVM内存设置为32GB,数据量过大时会出现OOM
结论
- FS场景,HugeGraph性能优于Titan
- K-neighbor和K-out场景,HugeGraph能够实现在5度范围内秒级返回结果
2.4 图综合性能测试-CW
| 数据库 | 规模1000 | 规模5000 | 规模10000 | 规模20000 |
|---|---|---|---|---|
| Titan | 45.943 | 849.168 | 2737.117 | 9791.46 |
| Memory(core) | 41.077 | 1825.905 | * | * |
| Cassandra(core) | 39.783 | 862.744 | 2423.136 | 6564.191 |
| RocksDB(core) | 33.383 | 199.894 | 763.869 | 1677.813 |
说明
- “规模"以顶点为单位
- 表中数据是社区发现完成需要的时间,单位是s,例如HugeGraph使用RocksDB后端在规模10000的数据集,社区聚合不再变化,需要耗时763.869s
- “*“表示超过10000s未完成
- CW测试是CRUD的综合评估
- 后三者分别是HugeGraph的不同后端,该测试中HugeGraph跟Titan一样,没有通过client,直接对core操作
结论
- HugeGraph在使用Cassandra后端时,性能略优于Titan,随着数据规模的增大,优势越来越明显,数据规模20000时,比Titan快30%
- HugeGraph在使用RocksDB后端时,性能远高于Titan和HugeGraph的Cassandra后端,分别比两者快了6倍和4倍
9 - 贡献指南
提交代码或文档前,请先阅读贡献流程。Committer 提名、邮件列表订阅和版本验证分别由对应页面说明;贡献者协议使用 ASF 官方 ICLA/CCLA。
9.1 - 参与 HugeGraph 社区
选择贡献方式
可以通过 GitHub Issues 报告问题,也可以提交代码、测试或文档。准备较大的改动前,建议先创建 Issue 并说明范围,避免重复工作。
下面以 apache/hugegraph 为例。其他 HugeGraph 仓库的流程相同,但构建和测试命令应以各仓库的 README.md、AGENTS.md 和 CI 配置为准。
准备仓库
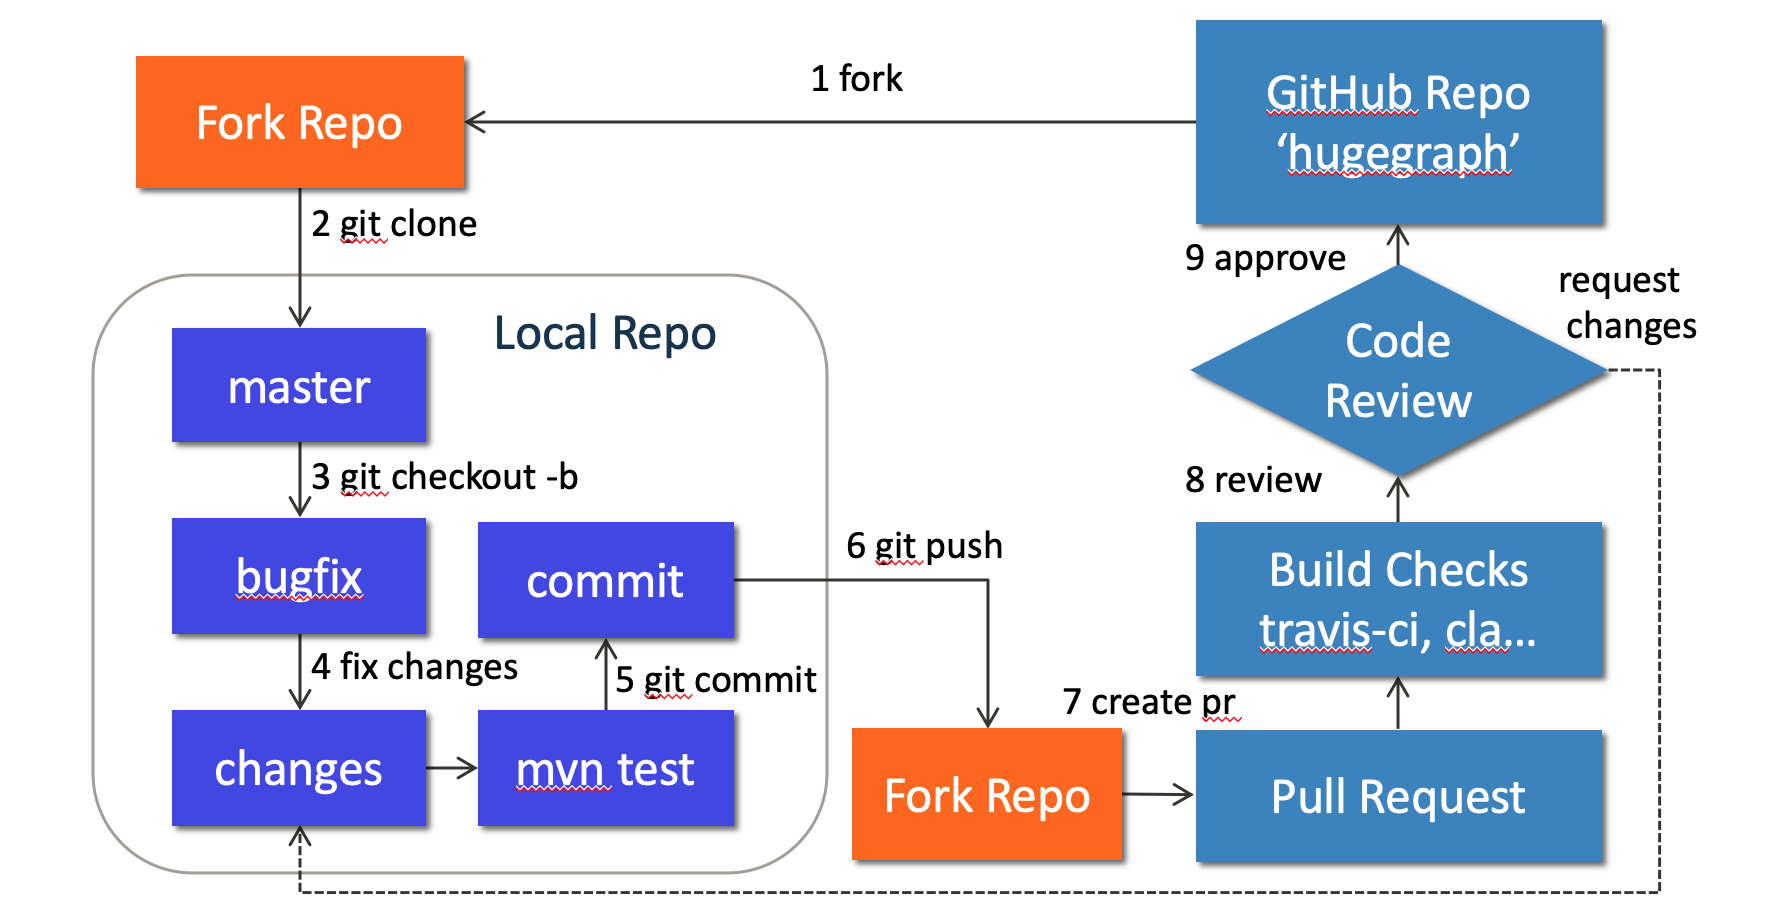
先在 GitHub 上 fork apache/hugegraph,再克隆自己的 fork:
不要直接在 master 上开发。每项改动使用单独分支:
修改和验证
HugeGraph Server 的代码位于 hugegraph-server/。例如,核心模块路径是:
当前主仓库根目录的 Maven 模块如下;Server 的存储适配器 hugegraph-server/hugegraph-hstore/ 与独立的存储节点项目 hugegraph-store/ 是不同模块。
| 路径 | 子模块 |
|---|---|
hugegraph-server/ | hugegraph-core/、hugegraph-api/、hugegraph-example/、hugegraph-dist/、hugegraph-test/、hugegraph-rocksdb/、hugegraph-hbase/、hugegraph-hstore/ |
hugegraph-pd/ | hg-pd-common/、hg-pd-client/、hg-pd-core/、hg-pd-service/、hg-pd-dist/、hg-pd-cli/、hg-pd-grpc/、hg-pd-test/ |
hugegraph-store/ | hg-store-common/、hg-store-client/、hg-store-core/、hg-store-node/、hg-store-dist/、hg-store-cli/、hg-store-grpc/、hg-store-rocksdb/、hg-store-test/ |
hugegraph-commons/ | hugegraph-common/、hugegraph-rpc/ |
hugegraph-cluster-test/ | hugegraph-clustertest-minicluster/、hugegraph-clustertest-dist/、hugegraph-clustertest-test/ |
| 独立根模块 | hugegraph-struct/、install-dist/ |
上述名称来自根 pom.xml 及各子项目 pom.xml;代码结构以正在使用的分支为准。
先运行与改动直接相关的测试。Server 常用测试入口如下:
GitHub 已不支持通过用户名和密码直接推送代码。需要使用个人访问令牌时,请在令牌设置页创建并按需授权:
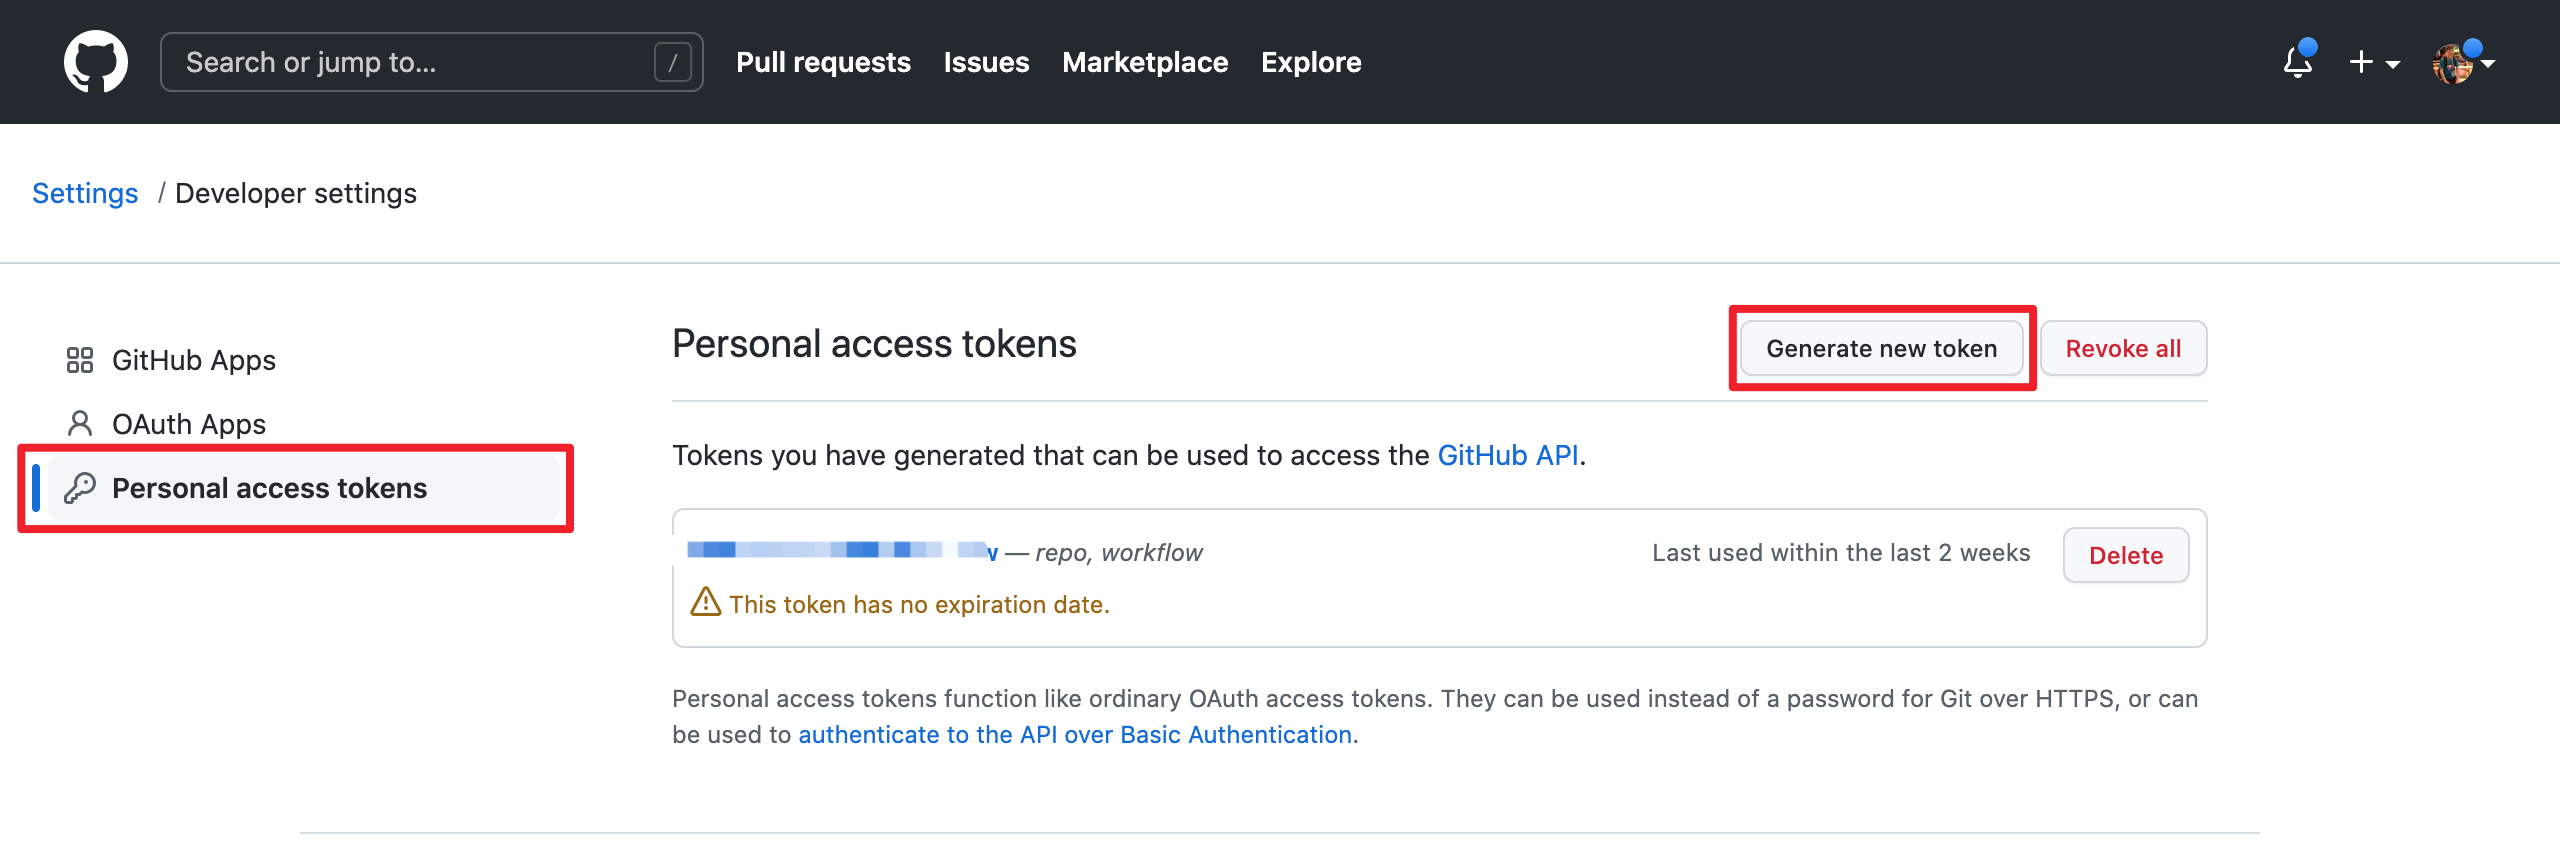
提交第三方依赖时,还要同步发行包中的许可证信息:
- 把依赖的许可证文件放入
hugegraph-server/hugegraph-dist/release-docs/licenses/。 - 更新
hugegraph-server/hugegraph-dist/release-docs/LICENSE;依赖包含 NOTICE 时,同时更新NOTICE。 - 运行
hugegraph-server/hugegraph-dist/scripts/dependency/regenerate_known_dependencies.sh,更新已知依赖清单。
提交 Pull Request
提交代码所用的邮箱需要绑定到 GitHub 账号。请在邮箱设置页完成绑定:
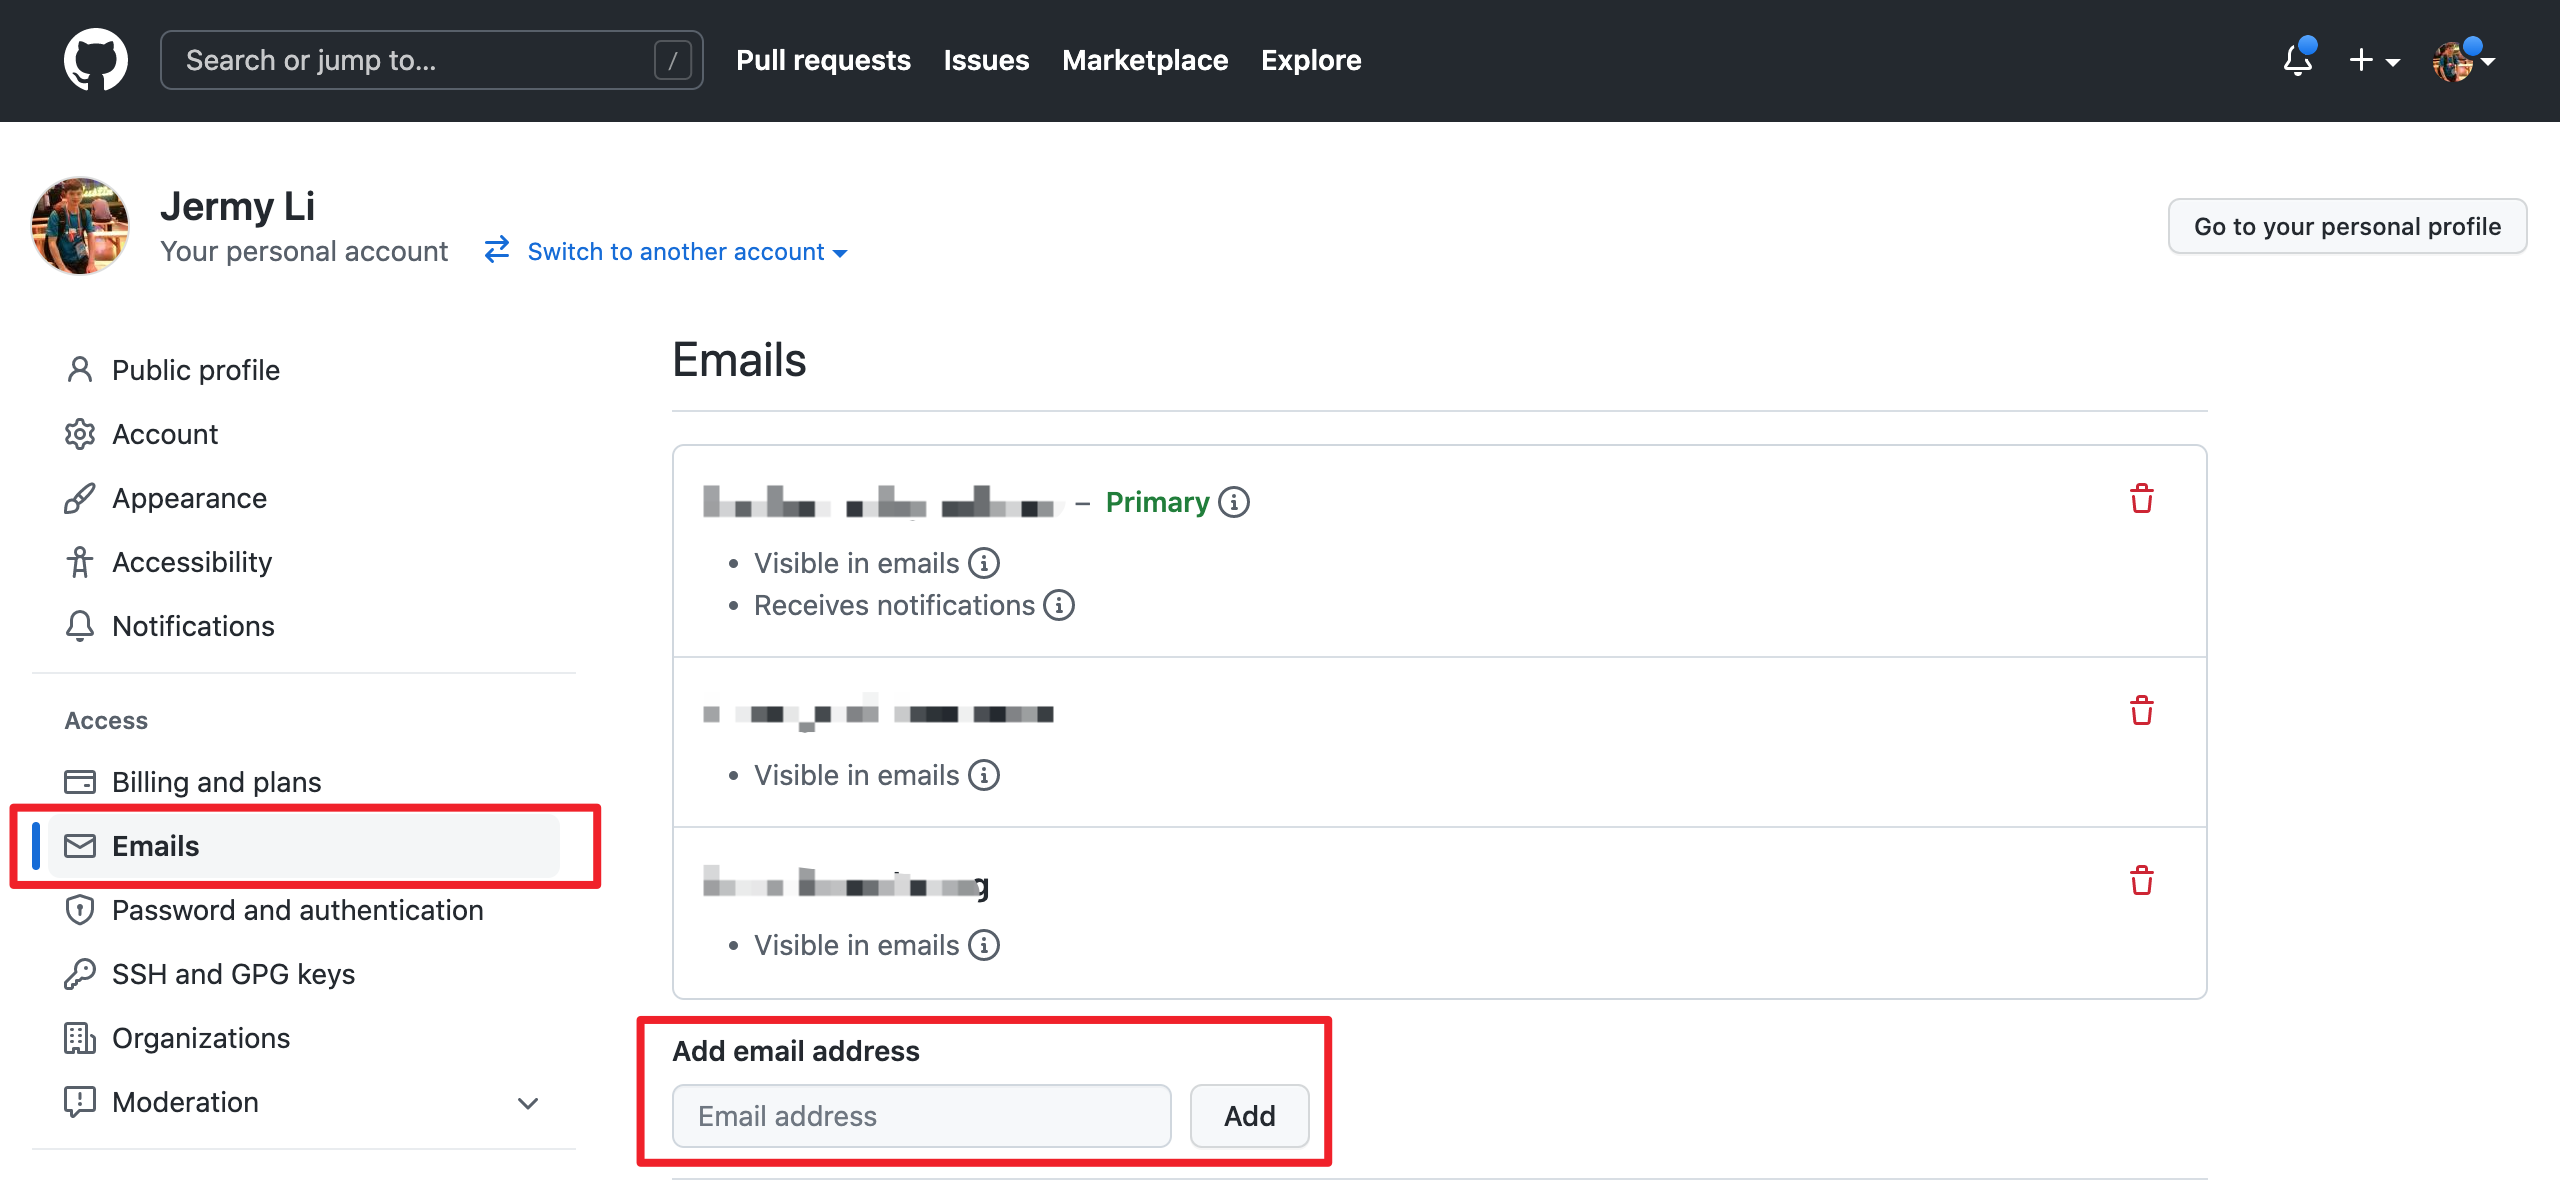
提交信息使用 type(module): message 格式,例如:
然后从 fork 分支向 apache/hugegraph:master 创建 Pull Request。说明问题、修改方法和实际运行的验证命令;界面变化应附截图。
处理 Review
CI 失败或 reviewer 要求修改时,在原分支继续提交并推送。需要同步上游时,可以 rebase:
不要使用普通 --force 覆盖远端分支。完成所有 CI 和 review 要求后,由项目 maintainer 合并 Pull Request。
Contributor Agreement 使用 ASF 官方流程,见贡献者协议。
9.2 - 订阅社区邮件列表
HugeGraph 使用 dev@hugegraph.apache.org 讨论开发和使用问题。向列表发信前需要先订阅,否则邮件可能被拦截。
订阅
- 使用准备订阅的邮箱向 dev-subscribe@hugegraph.apache.org 发送一封任意主题、任意内容的邮件。
- 收到确认邮件后直接回复。
- 收到订阅成功邮件后,即可向 dev@hugegraph.apache.org 发信。
如果没有收到确认邮件,先检查垃圾邮件和自动分类目录。仍未收到时,等待一段时间后重新发送订阅邮件。
未订阅也可以在 ASF Mailing List Archives 浏览公开邮件。
退订
- 使用订阅邮箱向 dev-unsubscribe@hugegraph.apache.org 发信。
- 收到
dev-help@hugegraph.apache.org的确认邮件后直接回复。 - 收到主题包含
GOODBYE的邮件后,退订完成。
ASF 邮件列表的通用说明见 Apache Mailing Lists。
9.3 - 验证 Apache 发版
Note: 这篇文档会持续更新。 HugeGraph 1.8.0 的源码构建与发行包运行验证统一使用 Java 17。
毕业说明:Apache HugeGraph 已于 2026 年 1 月毕业。正式发版投票现由 HugeGraph 社区内部完成(
dev@hugegraph.apache.org上的 PMC binding 投票),不再需要 Incubatorgeneral@incubator.apache.org审批。
自动化发版验证
Workflow 与 dist/validate-release.sh 共用 Java 17 校验逻辑。发行版本与 SVN RC 路径分别指定,
Maven staging repository 使用投票邮件中的地址。Server/Toolchain 四个源码和二进制包是必需项,
同一候选目录也可包含 AI、Computer 源码包。每个包均须附带 SHA512 与 GPG 签名;未知包名和版本不符会阻断验证。
所有包均检查完整性、内容和许可证,Computer 源码另执行 Maven 构建;AI、Computer 产品运行验证需另行完成。
严格 RC 模式使用全新、相互隔离的 Maven 仓库,不预装本地 Server SDK。
源码构建产物和下载的二进制包分别执行 Server、Client、普通 Loader、Tools 与 Hubble 业务断言,失败后保留日志。
Workflow 的 source-prevalidation 模式使用明确的 Server/Toolchain commit SHA 和无签名源码归档,
它不证明真实 RC 签名、下载及远端 staging 依赖解析已通过。
license-review-*.txt 中的许可选择和例外仍需人工复核,明确的 Category-X-only 依赖会阻断验证;自动成功不等于发布批准。
本地预验证和证据目录说明见验证脚本指南。
控制台和 GitHub Job Summary 汇总结果、失败阶段、复核提示及日志位置;源码预验证不会显示为 RC 验收通过。
验证阶段
当内部的临时发布和打包工作完成后,其他的社区开发者 (尤其是 PMC) 需要按 ASF 发版规范参与验证,可参考:
- ASF 发布策略
- Incubator 检查清单(历史参考) 确保某个人发布版本的"正确性 + 完整性", 这里需要每个人都尽量参与,然后后序邮件回复的时候说明自己 已检查了哪些项。(下面是核心项)
1. 准备工作
如果本地没有 svn 或 gpg 或 wget 环境,建议先安装一下 (windows 推荐使用 WSL2 环境,
或者至少是 git-bash), 同时确保安装 Java 17 和 maven 软件。
2. 检查 hash 值
首先需要检查 source + binary 包的文件完整性,通过 shasum 进行校验,确保和发布到 apache/github 上的
hash 值一致 (一般是 sha512)
3. 检查 gpg 签名
这个就是为了确保发布的包是由可信赖的人上传的,假设 tom 签名后上传,其他人应该下载 A 的公钥 然后进行签名确认, 相关命令:
必须同时确认验证退出码为零,且 VALIDSIG 中的指纹对应投票邮件的签名者;使用签名子密钥时,核对其报告的主密钥指纹。
密钥信任警告本身不表示签名无效,也不能只凭本地化的 Good signature 文本判断成功。
即使同时出现 VALIDSIG 或退出码为零,遇到 REVKEYSIG、EXPKEYSIG、EXPSIG 仍须停止,交由发版负责人复核或更新候选包。
格式见 GnuPG 状态说明。
先确认了整体的"完整性 + 一致性", 然后接下来确认具体的内容 (关键)
4. 检查压缩包内容
这里检查准备工作下载的压缩包内容。分源码包 + 二进制包两个方面,源码包更为严格,挑核心的部分说 (完整的列表可参考官方 Wiki, 比较长)
A. 源码包
解压 *hugegraph*src.tar.gz后,进行如下检查:
- 包名/目录名应符合当前发版命名(历史版本可能仍包含
incubating),且不存在空的文件/文件夹 - 存在
LICENSE+NOTICE且内容正常;历史版本若在项目孵化期发布,还需检查DISCLAIMER - 不存在 缺乏 License 的二进制文件
- 源码文件都包含标准
ASF License头 (这个用插件跑一下为主) - 检查每个父 / 子模块的
pom.xml版本号是否一致 (且符合期望) - 最后,确保源码可以正常 / 正确编译 (然后看看测试和规范)
PMC 同学请特别注意认真检查 LICENSE + NOTICE 文件,确保文件严格遵循了 ASF 的发版要求,
大部分的发版问题都与之相关
手动 Maven 命令的 settings 必须指向投票邮件中的 staging repository,并使用全新的本地仓库。 不要预装本地 Server SDK 来掩盖 staging 缺少依赖;自动化验证脚本会生成这些设置。
B. 二进制包
解压 xxx-hugegraph.tar.gz后,进行如下检查:
- 包名/目录名应符合当前发版命名(历史版本可能仍包含
incubating) - 存在
LICENSE+NOTICE且内容正常(历史版本若在项目孵化期发布,还需检查DISCLAIMER) - 服务启动
注: 如果二进制包里面引入了第三方依赖, 则需要更新 LICENSE, 加入第三方依赖的 LICENSE; 若第三方依赖 LICENSE 是 Apache 2.0, 且对应的项目中包含了 NOTICE, 则还需要更新我们的 NOTICE 文件
5. 检查官网以及 github 等页面
- 确保官网至少满足 apache website check, 以及没有死链等
- 更新下载链接存在,以及版本更新说明页面更新
- …
邮件模板
检查完成后,你应该按不同角色回复邮件:(普通开发者 & PMC 成员)
特别注意 PMC 成员必须使用 binding 标记回复邮件,这对于统计有效投票很重要;
9.4 - 在 IDEA 中配置 Server 开发环境
适用范围:下述 IDEA 配置基于 HugeGraph 1.2.0 发布标签,仅作为历史调试步骤保留。当前主线的源码目录和验证入口见贡献流程与 Server 快速上手;不要从本页推断当前模块清单。
背景
在 快速上手 部分已经介绍了使用脚本启停 HugeGraph-Server 的流程。下面以 Linux 平台为例,介绍使用 IntelliJ IDEA 运行与调试 HugeGraph-Server 的流程。
本地启动的核心与脚本启动是一样的:
- 初始化数据库后端,执行
InitStore类初始化图 - 启动 HugeGraph-Server,执行
HugeGraphServer类加载初始化的图信息启动
在执行下述流程之前,请确保已经克隆了 HugeGraph 的源代码,并且已经配置了 Java 11 环境 & 可以参考这个 配置文档
步骤
1. 配置文件拷贝
为了避免配置文件的更改影响 Git 的追踪,建议将所需的配置文件拷贝到一个单独的文件夹中:
将 path-to-your-directory 替换为你创建的文件夹的路径。命令需在仓库根目录执行,hugegraph-dist 模块位于顶层的 hugegraph-server 目录之下。
下列 ToplingDB 步骤仅适用于历史定制构建。当前主线源码不包含
preload-topling.sh或 ToplingDB 模块,按当前主线调试时跳过此说明。
2. InitStore 类初始化图
首先,需要在配置文件中配置数据库后端。以 RocksDB 为例,在 path-to-your-directory/conf/graphs/hugegraph.properties 文件中进行以下配置:
然后,打开 IntelliJ IDEA 的 Run/Debug Configurations 面板,创建一个新的 Application 配置,按照以下步骤进行配置:
- 在
Use classpath of module中选择hugegraph-dist - 将
Main class设置为org.apache.hugegraph.cmd.InitStore - 设置运行参数为
conf/rest-server.properties,这里的路径是相对于工作路径的,需要将工作路径设置为path-to-your-directory - (可选,仅 ToplingDB 构建) ToplingDB 需要通过
LD_PRELOAD机制预加载动态库,开发者需设置两个环境变量:LD_LIBRARY_PATH指向preload-topling.sh解压出的library目录,LD_PRELOAD设置为libjemalloc.so:librocksdbjni-linux64.so,以确保相关库在运行时被正确加载- LD_LIBRARY_PATH=/path/to/your/library:$LD_LIBRARY_PATH
- LD_PRELOAD=libjemalloc.so:librocksdbjni-linux64.so
若在 Java 11 环境下为 HugeGraph-Server 配置了用户认证 (authenticator),需要参考二进制包的脚本配置,添加下述 VM options:
否则会报错:
配置完成后运行,如果运行成功,将会输出以下类似运行日志:
3. 运行 HugeGraphServer
类似地,打开 IntelliJ IDEA 的 Run/Debug Configurations 面板,创建一个新的 Application 配置,按照以下步骤进行配置:
- 在
Use classpath of module中选择hugegraph-dist - 将
Main class设置为org.apache.hugegraph.dist.HugeGraphServer - 设置运行参数为
conf/gremlin-server.yaml conf/rest-server.properties,同样地,这里的路径是相对于工作路径的,需要将工作路径设置为path-to-your-directory
二进制包中的
bin/hugegraph-server.sh并不直接启动该类,而是启动org.apache.hugegraph.bootstrap.HugeGraphServerBootstrap:它在两个配置文件路径之前多接收一个true/false的安全检查开关,为true时安装HugeSecurityManager,随后再交给HugeGraphServer。从 IDEA 直接运行HugeGraphServer会跳过这层包装,因此不会安装 security manager,这通常正是调试时想要的效果。
类似的,若在 Java 11 环境下为 HugeGraph-Server 配置了用户认证 (authenticator),同样需要参考二进制包的脚本配置,添加下述 VM options:
否则会报错:
配置完成后运行,如果看到以下类似日志,表示 HugeGraphServer 已经成功启动:
4. 调试 HugeGraphServer (可选)
在完成上述配置后,可以尝试对 HugeGraphServer 进行调试。在调试模式下运行 HugeGraphServer,并在以下位置设置断点:
然后,使用 RESTful API 请求 HugeGraphServer:
此时,可以在调试器中查看详细的变量信息。
5. Log4j2 日志配置
默认情况下,运行 InitStore 和 HugeGraphServer 时,读取的 Log4j2 配置文件路径为 hugegraph-server/hugegraph-dist/src/main/resources/log4j2.xml,而不是 path-to-your-directory/conf/log4j2.xml,这个配置文件是使用脚本启动 HugeGraph-Server 时读取的。
为了避免同时维护两份配置文件,可以考虑在 IntelliJ IDEA 运行与调试 HugeGraph-Server 时,修改读取的 Log4j2 配置文件路径:
- 打开之前创建的
Application配置 - 点击
Modify options-Add VM options - 设置 VM options 为
-Dlog4j.configurationFile=conf/log4j2.xml
可能遇到的问题
1. java: package sun.misc does not exist
原因可能是在使用 Java 11 编译时触发了交叉编译,导致项目中使用的 sun.misc.Unsafe 找不到符号。有两种解决方案可供选择:
- 在 IntelliJ IDEA 的
Preferences/Settings中找到Java Compiler面板,然后关闭--release选项 (推荐) - 或者将项目的 SDK 版本设置为 8 (Deprecated soon)
2. java: *.store.raft.rpc.RaftRequests does not exist (RPC Generated Files)
原因是源代码没有包含 RPC-generated 文件。可以尝试两种方法来解决:
- [命令] 在根目录下运行
mvn clean compile -DskipTests(推荐) - [UI] 在 IDEA 中,右键点击
hugegraph模块,选择Manve -> Generate Sources and Update Folders
3. Log4j2 日志无法打印 %l 等位置信息
这是因为 Log4j2 中使用了 asynchronous loggers,可以参考官方文档进行配置
参考
9.5 - Apache HugeGraph Committer 指南
本文档概述了 Apache Committer 推选要求以及流程,对应的 ASF 官方文档可见:https://community.apache.org/newcommitter.html
候选人要求
- 候选人应遵守 Apache Code of Conduct
- PMC 成员将通过搜索邮件列表、issues、PRs、官网文档等方式,了解候选人如何与他人互动,以及他们所做的贡献
- 以下是在评估候选人是否适合成为 Committer 时需要考虑的一些要点:
- 与社区成员合作的能力
- 担任导师的能力
- 社区参与度
- 贡献程度
- 个人技能/能力
推选详细流程
讨论 (DISCUSS) → 投票 (VOTE) → 邀请 (INVITE) → 公告 (ANNOUNCE)
发起社区邮件讨论 (DISCUSS)
任何 HugeGraph 的 PMC 成员都可以发起投票讨论,在发现社区贡献者任何有价值的贡献并取得候选人本人同意后,可以在 private@hugegraph.apache.org 发起讨论。 讨论邮件里提议者要把候选人的贡献说清楚,并最好给出确认贡献的 URL 等信息,便于大家讨论分析。
下面是 HugeGraph 对应的邮件模板:(仅供参考)
Note: 后续将使用 xxx 指代候选人名,一般
xxx为一个容易读的名字 (例如Simon Jay)
ASF-INFRA建议避免使用不易读的ID直接作为邮件人名代指 (例如避免simon321或wh0isSim0n😄)另发送邮件最好选择 “纯文本” 模式,否则排版在 ASF Mail UI 中可能会乱
对于讨论邮件中贡献链接,可以使用 GitHub Search 的统计功能,按需输入如下对应关键词查询即可,可以在此基础上添加新的 repo 如 repo:apache/hugegraph-computer,特别注意调整时间范围 (下面是一个模板参考,请自行调整参数):
- PR 提交次数
is:pr author:xxx repo:apache/hugegraph repo:apache/hugegraph-doc created:>2023-06-01 updated:<2023-12-25
- 代码提交/修改行数
- PR 提交关联 Issue 次数
linked:issue involves:xxx repo:apache/hugegraph repo:apache/hugegraph-doc created:>2023-06-01 updated:<2023-12-25
- PR Review 个数
type:pr reviewed-by:xxx repo:apache/hugegraph repo:apache/hugegraph-doc created:>2023-06-01 updated:<2023-12-25
- PR Review 行数
- 合并次数
type:pr author:xxx repo:apache/hugegraph repo:apache/hugegraph-doc created:>2023-06-01 updated:<2023-12-25
- 有效合并行数
- Issue 提交数
type:issue author:xxx repo:apache/hugegraph repo:apache/hugegraph-doc created:>2023-06-01 updated:<2023-12-25
- Issue 修复数
- 在 Issue 提交数的基础上选取状态为 closed 的 Issues
- Issue 参与数
type:issue involves:xxx repo:apache/hugegraph repo:apache/hugegraph-doc created:>2023-06-01 updated:<2023-12-25
- 评论 Issue 数
type:issue commenter:xxx repo:apache/hugegraph repo:apache/hugegraph-doc created:>2023-06-01 updated:<2023-12-25
- 评论 PR 数
type:pr commenter:xxx repo:apache/hugegraph repo:apache/hugegraph-doc created:>2023-06-01 updated:<2023-12-25
Mailing Lists 的参与则可使用 https://lists.apache.org/list?dev@hugegraph.apache.org:lte=10M:xxx 查询。
发起社区邮件投票 (VOTE)
如果讨论邮件在规定时间内没有收到分歧信息,投票发起者需要在 private@hugegraph.apache.org 发起对 Committer 的选举投票。
下面是对应的邮件模板:
然后 PMC 成员回复 +1 或 -1 的邮件回复表达意见,一般来说至少需要 ≥3 票 +1 才能结束投票。
宣布投票结果 (RESULT)
投票邮件结束后,投票发起者需要邮件里提醒投票结束。同时,投票发起者需要发起邮件宣布投票结果,发送至 private@hugegraph.apache.org,邮件模板可参考:
向候选人发起邮件邀请 (INVITE)
宣布投票结果邮件发出后,投票发起人要给候选人发送邀请邮件。邀请邮件主送候选人,抄送 private@hugegraph.apache.org,被邀请的候选人必须通过指定的邮箱地址回复接受或者拒绝该邀请。
下面是对应可参考的邮件模板:
候选人接受邀请 (ACCEPT)
候选人应回复上述邮件 (选择 reply all),表明接受邀请,邮件模板可参考:
当然,候选人也可以选择拒绝邀请,这里就没有模板了:)
一旦邀请被接受,候选人需要完成以下事项:
- 订阅 dev@hugegraph.apache.org,具体步骤/过滤等配置请参考文档
- 签署 ICLA,具体步骤见下↓
ICLA 签署流程
- 下载 ICLA
- 打开 PDF 并填写相关内容,均需要全英文填写,建议使用 PDF 工具编辑并署名
- Full name: 名字在前,姓氏在后
- Public name: 可以不填,默认和
Full name相同 - 勾选 check this box only if you enter names with your family name first
- Postal Address: 英文地址,从小地方到大地方的顺序来写,需详细到门牌号
- Country: 所在国家英文
- E-mail: 邮箱地址,建议与上述邮件中使用的邮箱相同
- (optional) preferred Apache id(s): 选择一个 Apache committer 页面不存在的 SVN ID
- (optional) notify project:Apache HugeGraph
- 签名:务必使用 PDF 工具手写
- Date: 格式 xxxx-xx-xx
- 签署完之后将
icla.pdf重命名为姓名拼音-icla.pdf - 发送下述邮件,并附件引用
姓名拼音-icla.pdf
PMC 成员将等待 Apache secretary 团队确认 ICLA 备案,候选人和 PMC 成员将收到以下电子邮件:
设置 Apache 账号和开发环境 (CONFIG)
备案完成后,候选人将收到来自 root@apache.org 主题为 Welcome to the Apache Software Foundation 的邮件,此时需按照邮件中的步骤设置 Apache 账号和开发环境:
- 重置密码 https://id.apache.org/reset/enter
- 配置个人信息 https://whimsy.apache.org/roster/committer/xxx
- 关联 GitHub 账号 https://gitbox.apache.org/boxer
- 这一步需要配置 GitHub 双重身份验证 (2FA)
- 负责提名的 PMC 成员需通过 Roster 页面,将新的 Committer 添加到官方提交者列表中 (重要, 否则仓库权限不生效)
- 在这一步后,候选人即新的 Committer 才拥有对 GitHub HugeGraph 仓库的写权限
- (可选) 新的 Committer 可以使用 Apache 账号申请免费使用 Jetbrains 的全系列产品
发布公告邮件 (ANNOUNCE)
当候选人完成上述步骤后,候选人将正式成为 HugeGraph 的 Committer,此时需要向 dev@hugegraph.apache.org 发送公告邮件,邮件模板可参考:
更新治理信息入口
Apache HugeGraph 已于 2026 年 1 月毕业,治理信息不再通过 Incubator clutch 页面维护,而是通过 ASF committee/project 数据维护。
请优先检查:
若信息未自动同步,请按照 ASF 官方流程联系 Apache Community Development 或 ASF Infra 协助处理。
参考
- https://community.apache.org/newcommitter.html (ASF 官方文档)
- https://infra.apache.org/new-committers-guide.html
- https://www.apache.org/dev/pmc.html#newcommitter
- https://linkis.apache.org/zh-CN/community/how-to-vote-a-committer-pmc
- https://www.apache.org/licenses/contributor-agreements.html#submitting
- https://www.apache.org/licenses/cla-faq.html#printer
- https://linkis.apache.org/zh-CN/community/how-to-sign-apache-icla
- https://github.com/apache/hugegraph/issues/1732 (HugeGraph ICLA related issue)
10 - CHANGELOGS
10.1 - HugeGraph 1.7.0 Release Notes
WIP: This doc is under construction, please wait for the final version (BETA)
运行环境/版本说明
1.7.0版 hugegraph 相关组件仅支持 Java 11 编译/运行环境
hugegraph
API Changes
- BREAKING CHANGE: Disable legacy backends include MySQL/PG/c*(.etc) #2746
- BREAKING CHANGE: Release version 1.7.0 [server + pd + store] #2889
Feature Changes
- Support MemoryManagement for graph query framework #2649
- LoginAPI support token_expire field #2754
- Add option for task role election #2843
- Optimize perf by avoid boxing long #2861
- StringId hold bytes to avoid decode/encode #2862
- Add PerfExample5 and PerfExample6 #2860
- RocksDBStore remove redundant checkOpened() call #2863
- Add path filter #2898
- Init serena memory system & add memories #2902
Bug Fixes
- Filter dynamice path(PUT/GET/DELETE) with params cause OOM #2569
- JRaft Histogram Metrics Value NaN #2631
- Update server image desc #2702
- Kneigbor-api has unmatched edge type with server #2699
- Add license for swagger-ui & reset use stage to false in ci yml #2706
- Fix build pd-store arm image #2744
- Fix graph server cache notifier mechanism #2729
- Tx leak when stopping the graph server #2791
- Ensure backend is initialized in gremlin script #2824
- Fix some potential lock & type cast issues #2895
- Fix npe in getVersion #2897
- Fix the support for graphsapi in rocksdb and add testing for graphsapi #2900
- Remove graph path in auth api path #2899
- Migrate to LTS jdk11 in all Dockerfile #2901
- Remove the judgment for java8 compatibility in the init-store #2905
- Add missing license and remove binary license.txt & fix tinkerpop ci & remove duplicate module #2910
Option Changes
- Remove some outdated configuration #2678
Other Changes
- Update outdated docs for release 1.5.0 #2690
- Fix licenses and remove empty files #2692
- Update repo artifacts references #2695
- Adjust release fury version #2698
- Fix the JSON license issue #2697
- Add debug info for tp test #2688
- Enhance words in README #2734
- Add collaborators in asf config #2741
- Adjust the related filters of sofa-bolt #2735
- Reopen discussion in .asf.yml config #2751
- Fix typo in README #2806
- Centralize version management in project #2797
- Update notice year #2826
- Improve maven Reproducible Builds → upgrade plugins #2874
- Enhance docker instruction with auth opened graph #2881
- Remove the package existing in java8 #2792
- Revise Docker usage instructions in README #2882
- Add DeepWiki badge to README #2883
- Update guidance for store module #2894
- Update test commands and improve documentation clarity #2893
- Bump rocksdb version from 7.2.2 to 8.10.2 #2896
hugegraph-toolchain
API Changes
- Support graphspace #633
Feature Changes
- Support jdbc date type & sync .editorconfig #648
- Add a useSSL option for mysql #650
- Patch for father sub edge #654
- Improve user experience for user script #666
- Support concurrent readers, short-id & Graphsrc #683
- Init serena onboarding & project memory files #692
Bug Fixes
- Typo word in display #655
- Patch up missing classes and methods for hubble #657
- Adjust Client to 1.7.0 server #689
- Remove json license for release 1.7.0 #698
Other Changes
- Update hugegraph source commit id #640
- Add collaborators in asf config #656
- Update pom for version-1.7.0 #681
- Add DeepWiki badge to README #684
- Adjust APIs to compatible with 1.7.0 server #685
- Adjust LoadContext to 1.7.0 version #687
- Migrate to LTS jdk11 in all Dockerfile #691
- Update copyright year in NOTICE file #697
hugegraph-computer
Feature Changes
- Migration Vermeer to hugegraph-computer #316
- Make startChan’s size configurable #328
- Assign WorkerGroup via worker configuration #332
- Support task priority based scheduling #336
- Avoid 800k #340
Bug Fixes
- Fix docker file build #341
Other Changes
- Update release version to 1.5.0 #318
- Update go depends module & fix headers #321
- Update go version to 1.23 #322
- Add collaborator in .asf.yaml #323
- Update the Go version in docker image #333
- Add DeepWiki badge to README #337
- Bump project version to 1.7.0 (RELEASE) #338
- Update copyright year in NOTICE file #342
hugegraph-ai
API Changes
- Support choose template in api #135
- Add post method for paths-api #162
- Support switch graph in api & add some query configs #184
- Text2gremlin api #258
- Support switching prompt EN/CN #269
- BREAKING CHANGE: Update keyword extraction method #282
Feature Changes
- Added the process of text2gql in graphrag V1.0 #105
- Use pydantic-settings for config management #122
- Timely execute vid embedding & enhance some HTTP logic #141
- Use retry from tenacity #143
- Modify the summary info and enhance the request logic #147
- Automatic backup graph data timely #151
- Add a button to backup data & count together #153
- Extract topk_per_keyword & topk_return_results to .env #154
- Modify clear buttons #156
- Support intent recognition V1 #159
- Change vid embedding x:yy to yy & use multi-thread #158
- Support mathjax in rag query block V1 #157
- Use poetry to manage the dependencies #149
- Return schema.groovy first when backup graph data #161
- Merge all logs into one file #171
- Use uv for the CI action #175
- Use EN prompt for keywords extraction #174
- Support litellm LLM provider #178
- Improve graph extraction default prompt #187
- Replace vid by full vertexes info #189
- Support asynchronous streaming generation in rag block by using async_generator and asyncio.wait #190
- Generalize the regex extraction func #194
- Create quick_start.md #196
- Support Docker & K8s deployment way #195
- Multi-stage building in Dockerfile #199
- Support graph checking before updating vid embedding #205
- Disable text2gql by default #216
- Use 4.1-mini and 0.01 temperature by default #214
- Enhance the multi configs for LLM #212
- Textbox to Code #217
- Replace the IP + Port with URL #209
- Update gradio’s version #235
- Use asyncio to get embeddings #215
- Change QPS -> RPM for timer decorator #241
- Support batch embedding #238
- Using nuitka to provide a binary/perf way for the service #242
- Use uv instead poetry #226
- Basic compatible in text2gremlin generation #261
- Enhance config path handling and add project root validation #262
- Add vermeer python client for graph computing #263
- Use uv in client & ml modules & adapter the CI #257
- Use uv to manage pkgs & update README #272
- Limit the deps version to handle critical init problems #279
- Support semi-automated prompt generation #281
- Support semi-automated generated graph schema #274
- Unify all modules with uv #287
- Add GitHub Actions for auto upstream sync and update SEALData subsample logic #289
- Add a basic LLM/AI coding instruction file #290
- Add rules for AI coding guideline - V1.0 #293
- Replace QianFan by OpenAI-compatible format #285
- Optimize vector index with asyncio embedding #264
- Refactor embedding parallelization to preserve order #295
- Support storing vector data for a graph instance by model type/name #265
- Add AGENTS.md as new document standard #299
- Add Fixed Workflow Execution Engine: Flow, Node, and Scheduler Architecture #302
- Support vector db layer V1.0 #304
Bug Fixes
- Limit the length of log & improve the format #121
- Pylint in ml #125
- Critical bug with pylint usage #131
- Multi vid k-neighbor query only return the data of first vid #132
- Replace getenv usage to settings #133
- Correct header writing errors #140
- Update prompt to fit prefix cache #137
- Extract_graph_data use wrong method #145
- Use empty str for llm config #155
- Update gremlin generate prompt to apply fuzzy match #163
- Enable fastapi auto reload function #164
- Fix tiny bugs & optimize reranker layout #202
- Enable tasks concurrency configs in Gradio #188
- Align regex extraction of json to json format of prompt #211
- Fix documentation sample code error #219
- Failed to remove vectors when updating vid embedding #243
- Skip empty chunk in LLM steaming mode #245
- Ollama batch embedding bug #250
- Fix Dockerfile to add pyproject.toml anchor file #266
- Add missing ‘properties’ in gremlin prompt formatting #298
- Fixed cgraph version #305
- Ollama embedding API usage and config param #306
Option Changes
- Remove enable_gql logic in api & rag block #148
Other Changes
- Update README for python-client/SDK #150
- Enable pip cache #142
- Enable discussion & change merge way #201
- Synchronization with official documentation #273
- Fix grammar errors #275
- Improve README clarity and deployment instructions #276
- Add docker-compose deployment and improve container networking instructions #280
- Update docker compose command #283
- Reduce third-party library log output #244
- Update README with improved setup instructions #294
- Add collaborators in asf config #182
发布细节
Please check the release details/contributor in each repository:
10.2 - HugeGraph 1.5.0 Release Notes
WIP: This doc is under construction, please wait for the final version (BETA)
运行环境/版本说明
- 1.5.0版开始,
hugegraph相关组件仅支持 Java 11 编译/运行环境
PS: 未来 HugeGraph 组件的版本会朝着 Java 11 -> Java 17 -> Java 21 演进
hugegraph
本版本新增了大量功能并进行了多项优化,尤其是针对自控分布式版本新后端 HStore (Raft + RocksDB) 的实现支持,欢迎试用反馈
API Changes
- BREAKING CHANGE: Support “parent & child”
EdgeLabeltype #2662
Feature Changes
- Integrate
pd-grpc,pd-common, andpd-client#2498 - Integrate
store-grpc,store-common, andstore-client#2476 - Integrate
store-rocksdbsubmodule #2513 - Integrate
pd-coreinto HugeGraph #2478 - Integrate
pd-serviceinto HugeGraph #2528 - Integrate
pd-distinto HugeGraph and add core tests, client tests, and REST tests for PD #2532 - Integrate
server-hstoreinto HugeGraph #2534 - Integrate
store-coresubmodule #2548 - Integrate
store-nodesubmodule #2537 - Support new backend Hstore #2560
- Support Docker deployment for PD and Store #2573
- Add a tool method
encode#2647 - Add basic
MiniClustermodule for distributed system testing #2615 - Support disabling RocksDB auto-compaction via configuration #2586
Bug Fixes
- Switch RocksDB backend to memory when executing Gremlin examples #2518
- Avoid overriding backend config in Gremlin example scripts #2519
- Update resource references #2522
- Randomly generate default values #2568
- Update build artifact path for Docker deployment #2590
- Ensure thread safety for range attributes in PD #2641
- Correct server Docker copy source path #2637
- Fix JRaft Timer Metrics bug in Hstore #2602
- Enable JRaft MaxBodySize configuration #2633
Option Changes
- Mark old raft configs as deprecated #2661
- Enlarge bytes write limit and remove
bigparameter when encoding/decoding string ID length #2622
Other Changes
- Add Swagger-UI LICENSE files #2495
- Translate CJK comments and punctuations to English across multiple modules #2536, #2623, #2645
- Introduce
install-distmodule in root #2552 - Enable up-to-date checks for UI (CI) #2609
- Minor improvements for POM properties #2574
- Migrate HugeGraph Commons #2628
- Tar source and binary packages for HugeGraph with PD-Store #2594
- Refactor: Enhance cache invalidation of the partition → leader shard in
ClientCache#2588 - Refactor: Remove redundant properties in
LogMetaandPartitionMeta#2598
hugegraph-toolchain
API Changes
- Support “parent & child”
EdgeLabeltype #624
Feature Changes
- Support English interface & add a script/doc for it in Hubble #631
Bug Fixes
- Serialize source and target label for non-father EdgeLabel #628
- Encode/decode Chinese error after building Hubble package #627
- Configure IPv4 to fix timeout of
yarn installin Hubble #636 - Remove debugging output to speed up the frontend construction in Hubble #638
Other Changes
- Bump
expressfrom 4.18.2 to 4.19.2 in Hubble Frontend #598 - Make IDEA support IssueNavigationLink #600
- Update
yarn.lockfor Hubble #605 - Introduce
editorconfig-maven-pluginfor verifying code style defined in.editorconfig#614 - Upgrade distribution version to 1.5.0 #639
Documentation Changes
- Clarify the contributing guidelines #604
- Enhance the README file for Hubble #613
- Update README style referring to the server’s style #615
hugegraph-ai
API Changes
- Added local LLM API and version API. #41, #44
- Implemented new API and optimized code structure. #63
- Support for graphspace and refactored all APIs. #67
Feature Changes
- Added openai’s apibase configuration and asynchronous methods in RAG web demo. #41, #58
- Support for multi reranker and enhanced UI. #73
- Node embedding, node classify, and graph classify with models based on DGL. #83
- Graph learning algorithm implementation (10+). #102
- Support for any openai-style API (standard). #95
Bug Fixes
- Fixed fusiform_similarity test in traverser for server 1.3.0. #37
- Avoid generating config twice and corrected e_cache type. #56, #117
- Fixed null value detection on vid attributes. #115
- Handled profile regenerate error. #98
Option Changes
- Added auth for fastapi and gradio. #70
- Support for multiple property types and importing graph from the entire doc. #84
Other Changes
- Reformatted documentation and updated README. #36, #81
- Introduced a black for code format in GitHub actions. #47
- Updated dependencies and environment preparations. #45, #65
- Enhanced user-friendly README. #82
hugegraph-computer
Feature Changes
Bug Fixes
- Fix: base-ref/head-ref Missed in Dependency-Review on Schedule Push #304
Option Changes
- Refactor(core): StringEncoding #300
Other Changes
- Improve(algorithm): Random Walk Vertex Inactive #301
- Upgrade Version to 1.3.0 #305
- Doc(readme): Clarify the Contributing Guidelines #306
- Doc(readme): Add Hyperlink to Apache 2.0 #308
- Migrate Project to Computer Directory #310
- Update for Release 1.5 #317
- Fix Path When Exporting Source Package #319
发布细节
Please check the release details/contributor in each repository:
10.3 - HugeGraph 1.3.0 Release Notes
运行环境/版本说明
- 优先在
hugegraph/toolchain/commons软件中使用 Java 11, 此次是这些模块最后一次主版本兼容 Java 8 了。(computer 则仅支持 Java11) - 另外相比 Java11, 使用 Java8 会失去一些安全性的保障,我们推荐生产或对外网暴露访问的环境使用 Java11 并开启 Auth 权限认证
1.3.0 是最后兼容 Java 8 的版本,在 1.5.0 开始就会全面使用 Java 11 (除client外).
PS: 未来 HugeGraph 组件的版本会朝着 Java 11 -> Java 17 -> Java 21 演进
hugegraph
在此次版本中我们修复了一些 SEC 相关的问题,如果是线上或者对外服务请升级到最新版本 + 开启权限认证
API Changes
- feat(api): optimize adjacent-edges query (#2408)
Feature Changes
- feat: support docker use the auth when starting (#2403)
- feat: added the OpenTelemetry trace support (#2477)
Bug Fix
- fix(core): task restore interrupt problem on restart server (#2401)
- fix(server): reinitialize the progress to set up graph auth friendly (#2411)
- fix(chore): remove zgc in dockerfile for ARM env (#2421)
- fix(server): make CacheManager constructor private to satisfy the singleton pattern (#2432)
- fix(server): unify the license headers (#2438)
- fix: format and clean code in dist and example modules (#2441)
- fix: format and clean code in core module (#2440)
- fix: format and clean code in modules (#2439)
- fix(server): clean up the code (#2456)
- fix(server): remove extra blank lines (#2459)
- fix(server): add tip for gremlin api NPE with an empty query (#2467)
- fix(server): fix the metric name when promthus collects hugegraph metric, see issue (#2462)
- fix(server):
serverStartederror when execute gremlin example (#2473) - fix(auth): enhance the URL check (#2422)
Option Changes
- refact(server): enhance the storage path in RocksDB & clean code (#2491)
Other Changes
- chore: add a license link (#2398)
- doc: enhance NOTICE info to keep it clear (#2409)
- chore(server): update swagger info for default server profile (#2423)
- fix(server): unify license header for protobuf file (#2448)
- chore: improve license header checker confs and pre-check header when validating (#2445)
- chore: unify to call SchemaLabel.getLabelId() (#2458)
- chore: refine the hg-style.xml specification (#2457)
- chore: Add a newline formatting configuration and a comment for warning (#2464)
- chore(server): clear context after req done (#2470)
hugegraph-toolchain
API Changes
Feature Changes
- fix(loader): update shade plugin for spark loader (#566)
- fix(hubble): yarn install timeout in arm64 (#583)
- fix(loader): support file name with prefix for hdfs source (#571)
- feat(hubble): warp the exception info in HugeClientUtil (#589)
Bug Fix
- fix: concurrency issue causing file overwrite due to identical filenames (#572)
Option Changes
- feat(client): support user defined OKHTTPClient configs (#590)
Other Changes
- doc: update copyright date(year) in NOTICE (#567)
- chore(deps): bump ip from 1.1.5 to 1.1.9 in /hugegraph-hubble/hubble-fe (#580)
- refactor(hubble): enhance maven front plugin (#568)
- chore(deps): bump es5-ext from 0.10.53 to 0.10.63 in /hugegraph-hubble/hubble-fe (#582)
- chore(hubble): Enhance code style in hubble (#592)
- chore: upgrade version to 1.3.0 (#596)
- chore(ci): update profile commit id for 1.3 (#597)
hugegraph-commons
Feature Changes
- feat: support user defined RestClientConfig/HTTPClient params (#140)
Bug Fix
Other Changes
- chore: disable clean flatten for deploy (#141)
hugegraph-ai
这是 hugegraph-ai 的第一个发布版本,包含了多种特性,其中包括初始化的 Python 客户端、通过 LLM 构建知识图谱的能力, 以及基于 HugeGraph 的 RAG(Retrieval-Augmented Generation)集成。此外,该版本还在 python 客户端方面增加了重要的功能, 如变量 API、认证(auth)、度量(metric)、遍历器(traverser)和任务 API,以及使用 Gradio 创建交互式和可视化的演示。
除了这些新功能外,该版本还解决了多个错误和问题,确保了更加稳定和无误的用户体验。维护任务,如依赖更新、项目结构改进以及基本持续集成(CI)的添加, 进一步增强了项目的健壮性和开发工作流程。
这个版本的发布凝聚了 HugeGraph 社区的协作努力,感谢各位贡献者的付出。
Feature Changes
- feat: initialize hugegraph python client (#5)
- feat(llm): knowledge graph construction by llm (#7)
- feat: initialize rag based on HugeGraph (#20)
- feat(client): add variables api and test (#24)
- feat: add llm wenxinyiyan & config util & spo_triple_extract (#27)
- feat: add auth&metric&traverser&task api and ut (#28)
- feat: refactor construct knowledge graph task (#29)
- feat: Introduce gradio for creating interactive and visual demo (#30)
Bug Fix
- fix: invalid GitHub label (#3)
- fix: import error (#13)
- fix: function getEdgeByPage(): the generated query url does not include the parameter page (#15)
- fix: issue template (#23)
- fix: base-ref/head-ref missed in dependency-check-ci on branch push (#25)
Other Changes
- chore: add asf.yaml and ISSUE_TEMPLATE (#1)
- Bump urllib3 from 2.0.3 to 2.0.7 in /hugegraph-python (#8)
- chore: create .gitignore file for py (#9)
- refact: improve project structure & add some basic CI (#17)
- chore: Update LICENSE and NOTICE (#31)
- chore: add release scripts (#33)
- chore: change file chmod 755 (#34)
发布细节
Please check the release details/contributor in each repository:
10.4 - HugeGraph 1.2.0 Release Notes
Java version statement
In the future, we will gradually upgrade the java version, Java 11 -> Java 17 -> Java 21.
- Consider using Java 11 in hugegraph/hugegraph-toolchain/hugegraph-commons, also compatible with Java 8 now.
- hugegraph-computer required to use Java 11, not compatible with Java 8 now!
v1.2.0 是倒数第二个兼容 Java8 的大版本, 到 1.5.0 PD/Store 正式合入 master 后标志着 Java8 兼容的正式终结 (除 Client 外所有组件都将以 Java 11 作为基准,然后逐步迈向 Java17/21).
hugegraph
API Changes
- feat(api&core): in oltp apis, add statistics info and support full info about vertices and edges (#2262)
- feat(api): support embedded arthas agent in hugegraph-server (#2278,#2337)
- feat(api): support metric API Prometheus format & add statistic metric api (#2286)
- feat(api-core): support label & property filtering for both edge and vertex & support kout dfs mode (#2295)
- feat(api): support recording slow query log (#2327)
Feature Changes
- feat: support task auto manage by server role state machine (#2130)
- feat: support parallel compress snapshot (#2136)
- feat: use an enhanced CypherAPI to refactor it (#2143)
- feat(perf): support JMH benchmark in HG-test module (#2238)
- feat: optimising adjacency edge queries (#2242)
- Feat: IP white list (#2299)
- feat(cassandra): adapt cassandra from 3.11.12 to 4.0.10 (#2300)
- feat: support Cassandra with docker-compose in server (#2307)
- feat(core): support batch+parallel edges traverse (#2312)
- feat: adapt Dockerfile for new project structur (#2344)
- feat(server):swagger support auth for standardAuth mode by (#2360)
- feat(core): add IntMapByDynamicHash V1 implement (#2377)
Bug Fix
- fix: transfer add_peer/remove_peer command to leader (#2112)
- fix query dirty edges of a vertex with cache (#2166)
- fix exception of vertex-drop with index (#2181)
- fix: remove dup ‘From’ in filterExpiredResultFromFromBackend (#2207)
- fix: jdbc ssl mode parameter redundant (#2224)
- fix: error when start gremlin-console with sample script (#2231)
- fix(core): support order by id (#2233)
- fix: update ssl_mode value (#2235)
- fix: optimizing ClassNotFoundException error message for MYSQL (#2246)
- fix: asf invalid notification scheme ‘discussions_status’ (#2247)
- fix: asf invalid notification scheme ‘discussions_comment’ (#2250)
- fix: incorrect use of ‘NO_LIMIT’ variable (#2253)
- fix(core): close flat mapper iterator after usage (#2281)
- fix(dist): avoid var PRELOAD cover environmnet vars (#2302)
- fix: base-ref/head-ref missed in dependency-review on master (#2308)
- fix(core): handle schema Cache expandCapacity concurrent problem (#2332)
- fix: in wait-storage.sh, always wait for storage with default rocksdb (#2333)
- fix(api): refactor/downgrade record logic for slow log (#2347)
- fix(api): clean some code for release (#2348)
- fix: remove redirect-to-master from synchronous Gremlin API (#2356)
- fix HBase PrefixFilter bug (#2364)
- chore: fix curl failed to request https urls (#2378)
- fix(api): correct the vertex id in the edge-existence api (#2380)
- fix: github action build docker image failed during the release 1.2 process (#2386)
- fix: TinkerPop unit test lack some lables (#2387)
Option Changes
- feat(dist): support pre-load test graph data in docker container (#2241)
Other Changes
- refact: use standard UTF-8 charset & enhance CI configs (#2095)
- move validate release to hugegraph-doc (#2109)
- refact: use a slim way to build docker image on latest code & support zgc (#2118)
- chore: remove stage-repo in pom due to release done & update mail rule (#2128)
- doc: update issue template & README file (#2131)
- chore: cmn algorithm optimization (#2134)
- add github token for license check comment (#2139)
- chore: disable PR up-to-date in branch (#2150)
- refact(core): remove lock of globalMasterInfo to optimize perf (#2151)
- chore: async remove left index shouldn’t effect query (#2199)
- refact(rocksdb): clean & reformat some code (#2200)
- refact(core): optimized batch removal of remaining indices consumed by a single consumer (#2203)
- add com.janeluo.ikkanalyzer dependency to core model (#2206)
- refact(core): early stop unnecessary loops in edge cache (#2211)
- doc: update README & add QR code (#2218)
- chore: update .asf.yaml for mail rule (#2221)
- chore: improve the UI & content in README (#2227)
- chore: add pr template (#2234)
- doc: modify ASF and remove meaningless CLA (#2237)
- chore(dist): replace wget to curl to download swagger-ui (#2277)
- Update StandardStateMachineCallback.java (#2290)
- doc: update README about start server with example graph (#2315)
- README.md tiny improve (#2320)
- doc: README.md tiny improve (#2331)
- refact: adjust project structure for merge PD & Store[Breaking Change] (#2338)
- chore: disable raft test in normal PR due to timeout problem (#2349)
- chore(ci): add stage profile settings (#2361)
- refact(api): update common 1.2 & fix jersey client code problem (#2365)
- chore: move server info into GlobalMasterInfo (#2370)
- chore: reset hugegraph version to 1.2.0 (#2382)
hugegraph-computer
Feature Changes
- feat: implement fast-failover for MessageRecvManager and DataClientManager (#243)
- feat: implement parallel send data in load graph step (#248)
- feat(k8s): init operator project & add webhook (#259, #263)
- feat(core): support load vertex/edge snapshot (#269)
- feat(k8s): Add MinIO as internal(default) storage (#272)
- feat(algorithm): support random walk in computer (#274, #280)
- feat: use ‘foreground’ delete policy to cancel k8s job (#290)
Bug Fix
- fix: superstep not take effect (#237)
- fix(k8s): modify inconsistent apiGroups (#270)
- fix(algorithm): record loop is not copied (#276)
- refact(core): adaptor for common 1.2 & fix a string of possible CI problem (#286)
- fix: remove okhttp1 due to conflicts risk (#294)
- fix(core): io.grpc.grpc-core dependency conflic (#296)
Option Changes
- feat(core): isolate namespace for different input data source (#252)
- refact(core): support auth config for computer task (#265)
Other Changes
- remove apache stage repo & update notification rule (#232)
- chore: fix empty license file (#233)
- chore: enhance mailbox settings & enable require ci (#235)
- fix: typo errors in start-computer.sh (#238)
- [Feature-241] Add PULL_REQUEST_TEMPLATE (#242, #257)
- chore: change etcd url only for ci (#245)
- doc: update readme & add QR code (#249)
- doc(k8s): add building note for missing classes (#254)
- chore: reduce mail to dev list (#255)
- add: dependency-review (#266)
- chore: correct incorrect comment (#268)
- refactor(api): ListValue.getFirst() replaces ListValue.get(0) (#282)
- Improve: Passing workerId to WorkerStat & Skip wait worker close if master executes failed (#292)
- chore: add check dependencies (#293)
- chore(license): update license for 1.2.0 (#299)
hugegraph-toolchain
API Changes
- feat(client): support edgeExistence api (#544)
- refact(client): update tests for new OLTP traverser APIs (#550)
Feature Changes
- feat(spark): support spark-sink connector for loader (#497)
- feat(loader): support kafka as datasource (#506)
- feat(client): support go client for hugegraph (#514)
- feat(loader): support docker for loader (#530)
- feat: update common version and remove jersey code (#538)
Bug Fix
- fix: convert numbers to strings (#465)
- fix: hugegraph-spark-loader shell string length limit (#469)
- fix: spark loader meet Exception: Class is not registered (#470)
- fix: spark loader Task not serializable (#471)
- fix: spark with loader has dependency conflicts (#480)
- fix: spark-loader example schema and struct mismatch (#504)
- fix(loader): error log (#499)
- fix: checkstyle && add suppressions.xml (#500)
- fix(loader): resolve error in loader script (#510)
- fix: base-ref/head-ref missed in dependency-check-ci on branch push (#516, #551)
- fix yarn network connection on linux/arm64 arch (#519)
- fix(hubble): drop-down box could not display all options (#535)
- fix(hubble): build with node and yarn (#543)
- fix(loader): loader options (#548)
- fix(hubble): parent override children dep version (#549)
- fix: exclude okhttp1 which has different groupID with okhttp3 (#555)
- fix: github action build docker image failed (#556, #557)
- fix: build error with npm not exist & tiny improve (#558)
Option Changes
- set default data when create graph (#447)
Other Changes
- chore: remove apache stage repo & update mail rule (#433, #474, #479)
- refact: clean extra store file in all modules (#434)
- chore: use fixed node.js version 16 to avoid ci problem (#437, #441)
- chore(hubble): use latest code in Dockerfile (#440)
- chore: remove maven plugin for docker build (#443)
- chore: improve spark parallel (#450)
- doc: fix build status badge link (#455)
- chore: keep hadoop-hdfs-client and hadoop-common version consistent (#457)
- doc: add basic contact info & QR code in README (#462, #475)
- chore: disable PR up-to-date in branch (#473)
- chore: auto add pr auto label by path (#466, #528)
- chore: unify the dependencies versions of the entire project (#478)
- chore(deps): bump async, semver, word-wrap, browserify-sign in hubble-fe (#484, #491, #494, #529)
- chore: add pr template (#498)
- doc(hubble): add docker-compose to start with server (#522)
- chore(ci): add stage profile settings (#536)
- chore(client): increase the api num as the latest server commit + 10 (#546)
- chore(spark): install hugegraph from source (#552)
- doc: adjust docker related desc in readme (#559)
- chore(license): update license for 1.2 (#560, #561)
hugegraph-commons
Feature Changes
- feat(common): replace jersey dependencies with OkHttp (Breaking Change) (#133)
Bug Fix
- fix(common): handle spring-boot2/jersey dependency conflicts (#131)
- fix: Assert.assertThrows() should check result of exceptionConsumer (#135)
- fix(common): json param convert (#137)
Other Changes
- refact(common): add more construction methods for convenient (#132)
- add: dependency-review (#134)
- refact(common): rename jsonutil to avoid conflicts with server (#136)
- doc: update README for release (#138)
- update licence (#139)
Release Details
Please check the release details in each repository:
10.5 - HugeGraph 1.0.0 Release Notes
OLTP API & Client 更新
API/Client 接口更新
- 支持热更新
trace开关的/exception/traceAPI。 - 支持 Cypher 图查询语言 API。
- 支持通过 Swagger UI 接口来查看提供的 API 列表。
- 将各算法中 ’limit’ 参数的类型由 long 调整为 int。
- 支持在 Client 端跳过 Server 对 HBase 写入数据 (Beta)。
Core & Server
功能更新
- 支持 Java 11 版本。
- 支持 2 个新的 OLTP 算法:adamic-adar 和 resource-allocation。
- 支持 HBase 后端使用哈希 RowKey,并且允许预初始化 HBase 表。
- 支持 Cypher 图查询语言。
- 支持集群 Master 角色的自动管理与故障转移。
- 支持 16 个 OLAP 算法,包括:LPA, Louvain, PageRank, BetweennessCentrality, RingsDetect 等。
- 根据 Apache 基金会对项目的发版要求进行适配,包括 License 合规性、发版流程、代码风格等,支持 Apache 版本发布。
Bug 修复
- 修复无法根据多个 Label 和属性来查询边数据。
- 增加对环路检测算法的最大深度限制。
- 修复 tree() 语句返回结果异常问题。
- 修复批量更新边传入 Id 时的检查异常问题。
- 解决非预期的 Task 状态问题。
- 解决在更新顶点时未清除边缓存的问题。
- 修复 MySQL 后端执行 g.V() 时的错误。
- 修复因为 server-info 无法超时导致的问题。
- 导出了 ConditionP 类型用于 Gremlin 中用户使用。
- 修复 within + Text.contains 查询问题。
- 修复 addIndexLabel/removeIndexLabel 接口的竞争条件问题。
- 限制仅 Admin 允许输出图实例。
- 修复 Profile API 的检查问题。
- 修复在 count().is(0) 查询中 Empty Graph 的问题。
- 修复在异常时无法关闭服务的问题。
- 修复在 Apple M1 系统上的 JNA 报错 UnsatisfiedLinkError 的问题。
- 修复启动 RpcServer 时报 NPE 的问题。
- 修复 ACTION_CLEARED 参数数量的问题。
- 修复 RpcServer 服务启动问题。
- 修复用户传入参数可能得数字转换隐患问题。
- 移除了 Word 分词器依赖。
- 修复 Cassandra 与 MySQL 后端在异常时未优雅关闭迭代器的问题。
配置项更新
- 将配置项
raft.endpoint从 Graph 作用域移动到 Server 作用域中。
其它修改
- refact(core): enhance schema job module.
- refact(raft): improve raft module & test & install snapshot and add peer.
- refact(core): remove early cycle detection & limit max depth.
- cache: fix assert node.next==empty.
- fix apache license conflicts: jnr-posix and jboss-logging.
- chore: add logo in README & remove outdated log4j version.
- refact(core): improve CachedGraphTransaction perf.
- chore: update CI config & support ci robot & add codeQL SEC-check & graph option.
- refact: ignore security check api & fix some bugs & clean code.
- doc: enhance CONTRIBUTING.md & README.md.
- refact: add checkstyle plugin & clean/format the code.
- refact(core): improve decode string empty bytes & avoid array-construct columns in BackendEntry.
- refact(cassandra): translate ipv4 to ipv6 metrics & update cassandra dependency version.
- chore: use .asf.yaml for apache workflow & replace APPLICATION_JSON with TEXT_PLAIN.
- feat: add system schema store.
- refact(rocksdb): update rocksdb version to 6.22 & improve rocksdb code.
- refact: update mysql scope to test & clean protobuf style/configs.
- chore: upgrade Dockerfile server to 0.12.0 & add editorconfig & improve ci.
- chore: upgrade grpc version.
- feat: support updateIfPresent/updateIfAbsent operation.
- chore: modify abnormal logs & upgrade netty-all to 4.1.44.
- refact: upgrade dependencies & adopt new analyzer & clean code.
- chore: improve .gitignore & update ci configs & add RAT/flatten plugin.
- chore(license): add dependencies-check ci & 3rd-party dependency licenses.
- refact: Shutdown log when shutdown process & fix tx leak & enhance the file path.
- refact: rename package to apache & dependency in all modules (Breaking Change).
- chore: add license checker & update antrun plugin & fix building problem in windows.
- feat: support one-step script for apache release v1.0.0 release.
Computer (OLAP)
Algorithm Changes
- 支持 PageRank 算法。
- 支持 WCC 算法。
- 支持 degree centrality 算法。
- 支持 triangle count 算法。
- 支持 rings detection 算法。
- 支持 LPA 算法。
- 支持 k-core 算法。
- 支持 closeness centrality 算法。
- 支持 betweenness centrality 算法。
- 支持 cluster coefficient 算法。
Platform Changes
- feat: init module computer-core & computer-algorithm & etcd dependency.
- feat: add Id as base type of vertex id.
- feat: init Vertex/Edge/Properties & JsonStructGraphOutput.
- feat: load data from hugegraph server.
- feat: init basic combiner, Bsp4Worker, Bsp4Master.
- feat: init sort & transport interface & basic FileInput/Output Stream.
- feat: init computation & ComputerOutput/Driver interface.
- feat: init Partitioner and HashPartitioner
- feat: init Master/WorkerService module.
- feat: init Heap/LoserTree sorting.
- feat: init rpc module.
- feat: init transport server, client, en/decode, flowControl, heartbeat.
- feat: init DataDirManager & PointerCombiner.
- feat: init aggregator module & add copy() and assign() methods to Value class.
- feat: add startAsync and finishAsync on client side, add onStarted and onFinished on server side.
- feat: init store/sort module.
- feat: link managers in worker sending end.
- feat: implement data receiver of worker.
- feat: implement StreamGraphInput and EntryInput.
- feat: add Sender and Receiver to process compute message.
- feat: add seqfile fromat.
- feat: add ComputeManager.
- feat: add computer-k8s and computer-k8s-operator.
- feat: add startup and make docker image code.
- feat: sort different type of message use different combiner.
- feat: add HDFS output format.
- feat: mount config-map and secret to container.
- feat: support java11.
- feat: support partition concurrent compute.
- refact: abstract computer-api from computer-core.
- refact: optimize data receiving.
- fix: release file descriptor after input and compute.
- doc: add operator deploy readme.
- feat: prepare for Apache release.
Toolchain (loader, tools, hubble)
- 支持 Loader 使用 SQL 格式来选取从关系数据库导入哪些数据。
- 支持 Loader 从 Spark 导入数据(包括 JDBC 方式)。
- 支持 Loader 增加 Flink-CDC 模式。
- 解决 Loader 导入 ORC 格式数据时,报错 NPE。
- 解决 Loader 在 Spark/Flink 模式时未缓存 Schema 的问题。
- 解决 Loader 的 Json 反序列化问题。
- 解决 Loader 的 Jackson 版本冲突与依赖问题。
- 支持 Hubble 高级算法接口的 UI 界面。
- 支持 Hubble 中 Gremlin 语句的高亮格式显示。
- 支持 Hubble 使用 Docker 镜像部署。
- 支持 输出构建日志。
- 解决 Hubble 的端口输入框问题。
- 支持 Apache 项目发版的适配。
Commons (common,rpc)
- 支持 assert-throws 方法返回 Future。
- 增加 Cnm 与 Anm 方法到 CollectionUtil 中。
- 支持 用户自定义的 content-type。
- 支持 Apache 项目发版的适配。
Release Details
更加详细的版本变更信息,可以查看各个子仓库的链接:
10.6 - HugeGraph 0.12 Release Notes
API & Client
接口更新
- 支持 https + auth 模式连接图服务(hugegraph-client #109 #110)
- 统一 kout/kneighbor 等 OLTP 接口的参数命名及默认值(hugegraph-client #122 #123)
- 支持 RESTful 接口利用 P.textcontains() 进行属性全文检索(hugegraph #1312)
- 增加 graph_read_mode API 接口,以切换 OLTP、OLAP 读模式(hugegraph #1332)
- 支持 list/set 类型的聚合属性 aggregate property(hugegraph #1332)
- 权限接口增加 METRICS 资源类型(hugegraph #1355、hugegraph-client #114)
- 权限接口增加 SCHEMA 资源类型(hugegraph #1362、hugegraph-client #117)
- 增加手动 compact API 接口,支持 rocksdb/cassandra/hbase 后端(hugegraph #1378)
- 权限接口增加 login/logout API,支持颁发或回收 Token(hugegraph #1500、hugegraph-client #125)
- 权限接口增加 project API(hugegraph #1504、hugegraph-client #127)
- 增加 OLAP 回写接口,支持 cassandra/rocksdb 后端(hugegraph #1506、hugegraph-client #129)
- 增加返回一个图的所有 Schema 的 API 接口(hugegraph #1567、hugegraph-client #134)
- 变更 property key 创建与更新 API 的 HTTP 返回码为 202(hugegraph #1584)
- 增强 Text.contains() 支持 3 种格式:“word”、"(word)"、"(word1|word2|word3)"(hugegraph #1652)
- 统一了属性中特殊字符的行为(hugegraph #1670 #1684)
- 支持动态创建图实例、克隆图实例、删除图实例(hugegraph-client #135)
其它修改
- 修复在恢复 index label 时 IndexLabelV56 id 丢失的问题(hugegraph-client #118)
- 为 Edge 类增加 name() 方法(hugegraph-client #121)
Core & Server
功能更新
- 支持动态创建图实例(hugegraph #1065)
- 支持通过 Gremlin 调用 OLTP 算法(hugegraph #1289)
- 支持多集群使用同一个图权限服务,以共享权限信息(hugegraph #1350)
- 支持跨多节点的 Cache 缓存同步(hugegraph #1357)
- 支持 OLTP 算法使用原生集合以降低 GC 压力提升性能(hugegraph #1409)
- 支持对新增的 Raft 节点打快照或恢复快照(hugegraph #1439)
- 支持对集合属性建立二级索引 Secondary Index(hugegraph #1474)
- 支持审计日志,及其压缩、限速等功能(hugegraph #1492 #1493)
- 支持 OLTP 算法使用高性能并行无锁原生集合以提升性能(hugegraph #1552)
BUG 修复
- 修复带权最短路径算法(weighted shortest path)NPE 问题(hugegraph #1250)
- 增加 Raft 相关的安全操作白名单(hugegraph #1257)
- 修复 RocksDB 实例未正确关闭的问题(hugegraph #1264)
- 在清空数据 truncate 操作之后,显示的发起写快照 Raft Snapshot(hugegraph #1275)
- 修复 Raft Leader 在收到 Follower 转发请求时未更新缓存的问题(hugegraph #1279)
- 修复带权最短路径算法(weighted shortest path)结果不稳定的问题(hugegraph #1280)
- 修复 rays 算法 limit 参数不生效问题(hugegraph #1284)
- 修复 neighborrank 算法 capacity 参数未检查的问题(hugegraph #1290)
- 修复 PostgreSQL 因为不存在与用户同名的数据库而初始化失败的问题(hugegraph #1293)
- 修复 HBase 后端当启用 Kerberos 时初始化失败的问题(hugegraph #1294)
- 修复 HBase/RocksDB 后端 shard 结束判断错误问题(hugegraph #1306)
- 修复带权最短路径算法(weighted shortest path)未检查目标顶点存在的问题(hugegraph #1307)
- 修复 personalrank/neighborrank 算法中非 String 类型 id 的问题(hugegraph #1310)
- 检查必须是 master 节点才允许调度 gremlin job(hugegraph #1314)
- 修复 g.V().hasLabel().limit(n) 因为索引覆盖导致的部分结果不准确问题(hugegraph #1316)
- 修复 jaccardsimilarity 算法当并集为空时报 NaN 错误的问题(hugegraph #1324)
- 修复 Raft Follower 节点操作 Schema 多节点之间数据不同步问题(hugegraph #1325)
- 修复因为 tx 未关闭导致的 TTL 不生效问题(hugegraph #1330)
- 修复 gremlin job 的执行结果大于 Cassandra 限制但小于任务限制时的异常处理(hugegraph #1334)
- 检查权限接口 auth-delete 和 role-get API 操作时图必须存在(hugegraph #1338)
- 修复异步任务结果中包含 path/tree 时系列化不正常的问题(hugegraph #1351)
- 修复初始化 admin 用户时的 NPE 问题(hugegraph #1360)
- 修复异步任务原子性操作问题,确保 update/get fields 及 re-schedule 的原子性(hugegraph #1361)
- 修复权限 NONE 资源类型的问题(hugegraph #1362)
- 修复启用权限后,truncate 操作报错 SecurityException 及管理员信息丢失问题(hugegraph #1365)
- 修复启用权限后,解析数据忽略了权限异常的问题(hugegraph #1380)
- 修复 AuthManager 在初始化时会尝试连接其它节点的问题(hugegraph #1381)
- 修复特定的 shard 信息导致 base64 解码错误的问题(hugegraph #1383)
- 修复启用权限后,使用 consistent-hash LB 在校验权限时,creator 为空的问题(hugegraph #1385)
- 改进权限中 VAR 资源不再依赖于 VERTEX 资源(hugegraph #1386)
- 规范启用权限后,Schema 操作仅依赖具体的资源(hugegraph #1387)
- 规范启用权限后,部分操作由依赖 STATUS 资源改为依赖 ANY 资源(hugegraph #1391)
- 规范启用权限后,禁止初始化管理员密码为空(hugegraph #1400)
- 检查创建用户时 username/password 不允许为空(hugegraph #1402)
- 修复更新 Label 时,PrimaryKey 或 SortKey 被设置为可空属性的问题(hugegraph #1406)
- 修复 ScyllaDB 丢失分页结果问题(hugegraph #1407)
- 修复带权最短路径算法(weighted shortest path)权重属性强制转换为 double 的问题(hugegraph #1432)
- 统一 OLTP 算法中的 degree 参数命名(hugegraph #1433)
- 修复 fusiformsimilarity 算法当 similars 为空的时候返回所有的顶点问题(hugegraph #1434)
- 改进 paths 算法,当起始点与目标点相同时应该返回空路径(hugegraph #1435)
- 修改 kout/kneighbor 的 limit 参数默认值 10 为 10000000(hugegraph #1436)
- 修复分页信息中的 ‘+’ 被 URL 编码为空格的问题(hugegraph #1437)
- 改进边更新接口的错误提示信息(hugegraph #1443)
- 修复 kout 算法 degree 未在所有 label 范围生效的问题(hugegraph #1459)
- 改进 kneighbor/kout 算法,起始点不允许出现在结果集中(hugegraph #1459 #1463)
- 统一 kout/kneighbor 的 Get 和 Post 版本行为(hugegraph #1470)
- 改进创建边时顶点类型不匹配的错误提示信息(hugegraph #1477)
- 修复 Range Index 的残留索引问题(hugegraph #1498)
- 修复权限操作未失效缓存的问题(hugegraph #1528)
- 修复 sameneighbor 的 limit 参数默认值 10 为 10000000(hugegraph #1530)
- 修复 clear API 不应该所有后端都调用 create snapshot 的问题(hugegraph #1532)
- 修复当 loading 模式时创建 Index Label 阻塞问题(hugegraph #1548)
- 修复增加图到 project 或从 project 移除图的问题(hugegraph #1562)
- 改进权限操作的一些错误提示信息(hugegraph #1563)
- 支持浮点属性设置为 Infinity/NaN 的值(hugegraph #1578)
- 修复 Raft 启用 safe_read 时的 quorum read 问题(hugegraph #1618)
- 修复 token 过期时间配置的单位问题(hugegraph #1625)
- 修复 MySQL Statement 资源泄露问题(hugegraph #1627)
- 修复竞争条件下 Schema.getIndexLabel 获取不到数据的问题(hugegraph #1629)
- 修复 HugeVertex4Insert 无法系列化问题(hugegraph #1630)
- 修复 MySQL count Statement 未关闭问题(hugegraph #1640)
- 修复当删除 Index Label 异常时,导致状态不同步问题(hugegraph #1642)
- 修复 MySQL 执行 gremlin timeout 导致的 statement 未关闭问题(hugegraph #1643)
- 改进 Search Index 以兼容特殊 Unicode 字符:\u0000 to \u0003(hugegraph #1659)
- 修复 #1659 引入的 Char 未转化为 String 的问题(hugegraph #1664)
- 修复 has() + within() 查询时结果异常问题(hugegraph #1680)
- 升级 Log4j 版本到 2.17 以修复安全漏洞(hugegraph #1686 #1698 #1702)
- 修复 HBase 后端 shard scan 中 startkey 包含空串时 NPE 问题(hugegraph #1691)
- 修复 paths 算法在深层环路遍历时性能下降问题(hugegraph #1694)
- 改进 personalrank 算法的参数默认值及错误检查(hugegraph #1695)
- 修复 RESTful 接口 P.within 条件不生效问题(hugegraph #1704)
- 修复启用权限时无法动态创建图的问题(hugegraph #1708)
配置项修改:
- 共享 SSL 相关配置项命名(hugegraph #1260)
- 支持 RocksDB 配置项 rocksdb.level_compaction_dynamic_level_bytes(hugegraph #1262)
- 去除 RESFful Server 服务协议配置项 restserver.protocol,自动提取 URL 中的 Schema(hugegraph #1272)
- 增加 PostgreSQL 配置项 jdbc.postgresql.connect_database(hugegraph #1293)
- 增加针对顶点主键是否编码的配置项 vertex.encode_primary_key_number(hugegraph #1323)
- 增加针对聚合查询是否启用索引优化的配置项 query.optimize_aggregate_by_index(hugegraph #1549)
- 修改 cache_type 的默认值 l1 为 l2(hugegraph #1681)
- 增加 JDBC 强制重连配置项 jdbc.forced_auto_reconnect(hugegraph #1710)
其它修改
- 增加默认的 SSL Certificate 文件(hugegraph #1254)
- OLTP 并行请求共享线程池,而非每个请求使用单独的线程池(hugegraph #1258)
- 修复 Example 的问题(hugegraph #1308)
- 使用 jraft 版本 1.3.5(hugegraph #1313)
- 如果启用了 Raft 模式时,关闭 RocksDB 的 WAL(hugegraph #1318)
- 使用 TarLz4Util 来提升快照 Snapshot 压缩的性能(hugegraph #1336)
- 升级存储的版本号(store version),因为 property key 增加了 read frequency(hugegraph #1341)
- 顶点/边 vertex/edge 的 Get API 使用 queryVertex/queryEdge 方法来替代 iterator 方法(hugegraph #1345)
- 支持 BFS 优化的多度查询(hugegraph #1359)
- 改进 RocksDB deleteRange() 带来的查询性能问题(hugegraph #1375)
- 修复 travis-ci cannot find symbol Namifiable 问题(hugegraph #1376)
- 确保 RocksDB 快照的磁盘与 data path 指定的一致(hugegraph #1392)
- 修复 MacOS 空闲内存 free_memory 计算不准确问题(hugegraph #1396)
- 增加 Raft onBusy 回调来配合限速(hugegraph #1401)
- 升级 netty-all 版本 4.1.13.Final 到 4.1.42.Final(hugegraph #1403)
- 支持 TaskScheduler 暂停当设置为 loading 模式时(hugegraph #1414)
- 修复 raft-tools 脚本的问题(hugegraph #1416)
- 修复 license params 问题(hugegraph #1420)
- 提升写权限日志的性能,通过 batch flush & async write 方式改进(hugegraph #1448)
- 增加 MySQL 连接 URL 的日志记录(hugegraph #1451)
- 提升用户信息校验性能(hugegraph# 1460)
- 修复 TTL 因为起始时间问题导致的错误(hugegraph #1478)
- 支持日志配置的热加载及对审计日志的压缩(hugegraph #1492)
- 支持针对用户级别的审计日志的限速(hugegraph #1493)
- 缓存 RamCache 支持用户自定义的过期时间(hugegraph #1494)
- 在 auth client 端缓存 login role 以避免重复的 RPC 调用(hugegraph #1507)
- 修复 IdSet.contains() 未复写 AbstractCollection.contains() 问题(hugegraph #1511)
- 修复当 commitPartOfEdgeDeletions() 失败时,未回滚 rollback 的问题(hugegraph #1513)
- 提升 Cache metrics 性能(hugegraph #1515)
- 当发生 license 操作错误时,增加打印异常日志(hugegraph #1522)
- 改进 SimilarsMap 实现(hugegraph #1523)
- 使用 tokenless 方式来更新 coverage(hugegraph #1529)
- 改进 project update 接口的代码(hugegraph #1537)
- 允许从 option() 访问 GRAPH_STORE(hugegraph #1546)
- 优化 kout/kneighbor 的 count 查询以避免拷贝集合(hugegraph #1550)
- 优化 shortestpath 遍历方式,以数据量少的一端优先遍历(hugegraph #1569)
- 完善 rocksdb.data_disks 配置项的 allowed keys 提示信息(hugegraph #1585)
- 为 number id 优化 OLTP 遍历中的 id2code 方法性能(hugegraph #1623)
- 优化 HugeElement.getProperties() 返回 Collection<Property>(hugegraph #1624)
- 增加 APACHE PROPOSAL 文件(hugegraph #1644)
- 改进 close tx 的流程(hugegraph #1655)
- 当 reset() 时为 MySQL close 捕获所有类型异常(hugegraph #1661)
- 改进 OLAP property 模块代码(hugegraph #1675)
- 改进查询模块的执行性能(hugegraph #1711)
Loader
- 支持导入 Parquet 格式文件(hugegraph-loader #174)
- 支持 HDFS Kerberos 权限验证(hugegraph-loader #176)
- 支持 HTTPS 协议连接到服务端导入数据(hugegraph-loader #183)
- 修复 trust store file 路径问题(hugegraph-loader #186)
- 处理 loading mode 重置的异常(hugegraph-loader #187)
- 增加在插入数据时对非空属性的检查(hugegraph-loader #190)
- 修复客户端与服务端时区不同导致的时间判断问题(hugegraph-loader #192)
- 优化数据解析性能(hugegraph-loader #194)
- 当用户指定了文件头时,检查其必须不为空(hugegraph-loader #195)
- 修复示例程序中 MySQL struct.json 格式问题(hugegraph-loader #198)
- 修复顶点边导入速度不精确的问题(hugegraph-loader #200 #205)
- 当导入启用 check-vertex 时,确保先导入顶点再导入边(hugegraph-loader #206)
- 修复边 Json 数据导入格式不统一时数组溢出的问题(hugegraph-loader #211)
- 修复因边 mapping 文件不存在导致的 NPE 问题(hugegraph-loader #213)
- 修复读取时间可能出现负数的问题(hugegraph-loader #215)
- 改进目录文件的日志打印(hugegraph-loader #223)
- 改进 loader 的的 Schema 处理流程(hugegraph-loader #230)
Tools
- 支持 HTTPS 协议(hugegraph-tools #71)
- 移除 –protocol 参数,直接从 URL 中自动提取(hugegraph-tools #72)
- 支持将数据 dump 到 HDFS 文件系统(hugegraph-tools #73)
- 修复 trust store file 路径问题(hugegraph-tools #75)
- 支持权限信息的备份恢复(hugegraph-tools #76)
- 支持无参数的 Printer 打印(hugegraph-tools #79)
- 修复 MacOS free_memory 计算问题(hugegraph-tools #82)
- 支持备份恢复时指定线程数 hugegraph-tools #83)
- 支持动态创建图、克隆图、删除图等命令(hugegraph-tools #95)
11 - Apache 贡献者协议
Apache 贡献者协议
HugeGraph 使用 Apache Software Foundation(ASF)的标准贡献者协议,不再使用项目自定义的 CLA 或 GitHub CLA Assistant 流程。
普通的小型贡献按 Apache License 2.0 第 5 条提交。成为 committer 前,或提交较大贡献时,需要签署 ASF Individual Contributor License Agreement(ICLA)。如果贡献的知识产权属于公司,还可能需要 Corporate Contributor License Agreement(CCLA);CCLA 不能替代个人 ICLA。
协议正文、填写要求和提交方式以 ASF 官方页面为准:
请阅读协议后按官方要求签名,并将完整文件作为附件单独发送至 secretary@apache.org。不要把协议发送到 HugeGraph 开发者邮件列表,也不要提交到 GitHub 仓库。