这是本节的多页打印视图。 .
Quick Start
- 1: HugeGraph (OLTP)
- 2: HugeGraph ToolChain
- 2.1: HugeGraph-Hubble Quick Start
- 2.2: 图可视化
- 2.3: HugeGraph-Loader Quick Start
- 2.4: 图导入
- 2.4.1: 使用 SeaTunnel Sink 导入图数据
- 2.5: Tools Quick Start
- 2.6: 图导出/迁移
- 2.6.1: 使用 SeaTunnel Source 导出与迁移图数据
- 2.7: HugeGraph-Spark-Connector Quick Start
- 3: HugeGraph-AI
- 3.1: HugeGraph-LLM
- 3.2: HugeGraph-ML
- 3.3: HugeGraph-LLM 使用流程
- 3.4: 配置参考
- 3.5: HugeGraph-LLM REST API
- 3.6: Vermeer Python 客户端
- 4: HugeGraph 图计算(OLAP)
- 5: HugeGraph Client
根据需要选择 Server、Toolchain、图计算或 HugeGraph-AI 的快速开始文档。各组件独立发布,安装前请核对对应仓库的运行环境和版本。
1 - HugeGraph (OLTP)
DeepWiki 提供实时更新的项目文档,内容更全面准确,适合快速了解项目最新情况。
GitHub 访问: https://github.com/apache/hugegraph
1.1 - HugeGraph Server 快速开始
1 HugeGraph Server 概述
apache/hugegraph 是 HugeGraph 图数据库的主仓库,包含 hugegraph-server、hugegraph-pd、hugegraph-store 等一级模块。本页介绍其中的 hugegraph-server 模块及其运行服务。
hugegraph-server 模块包含 hugegraph-core、hugegraph-api、hugegraph-dist 和存储适配等子模块。Core 实现属性图模型、事务与 TinkerPop 接口,API 提供 HTTP 服务并将客户端请求交给 Core 处理。图数据由 RocksDB(单机默认)、HStore(分布式)或 HBase 后端保存。
⚠️ 版本说明:本文以 HugeGraph 1.7.0 至
master分支的代码为参考,仅介绍 RocksDB、HStore 和 HBase。其他旧后端的使用与配置请参考 HugeGraph 1.5.x 文档。
名称说明:
HugeGraph表示整个项目或主仓库,hugegraph-server表示仓库中的 Server 模块,HugeGraphServer是服务进程的 Java 类名。下文的 Server 服务指运行中的图数据库服务。
2 依赖
2.1 安装 Java 11 (JDK 11)
HugeGraph 1.7.0 中的 hugegraph-server 模块使用 Java 11 编译,运行和源码构建均需使用 Java 11 或更高版本。
在继续阅读前,请先执行 java -version 命令确认 JDK 版本。
1.7.0 起不再支持 Java 8。
bin/hugegraph-server.sh在低于 Java 11 的环境下会直接拒绝启动。
安全检查默认开启,会安装
HugeSecurityManager,它要求 Java 11 到 23。JDK 24 移除了 Security Manager(JEP 486),因此在 Java 24 及更高版本上必须关闭该检查后再启动服务:bin/start-hugegraph.sh -s false。
源码构建还需要 Maven 3.5.0 或更高版本。
3 部署
有四种方式可以部署 Server 服务:
- 使用 Docker 容器进行测试或开发。
- 下载二进制 tar 包。
- 从源码编译。
- 使用已过时的一键部署工具。
不要把 Gremlin、Cypher 等查询接口直接暴露到公网。生产环境应启用认证与授权,限制网络访问并保留审计日志;部署建议见安全指南。
3.1 使用 Docker 容器 (便于测试)
可参考 Docker 部署方式。
可以使用 docker run -itd --name=server -p 8080:8080 -e PASSWORD=xxx hugegraph/hugegraph:1.7.0 快速启动一个使用 RocksDB 后端的 Server 实例。
可选项:
- 可以使用
docker exec -it server bash进入容器执行运维或调试操作。 - 可以使用
docker run -itd --name=server -p 8080:8080 -e PRELOAD="true" hugegraph/hugegraph:1.7.0在启动时预加载一个内置样例图。可通过RESTful API进行验证,具体步骤可参考 5.1.4。 - 可以使用
-e PASSWORD=xxx开启鉴权模式并设置 admin 密码,具体步骤可参考 Config Authentication。
如果使用 Docker Desktop,则可以按如下方式设置相关选项:
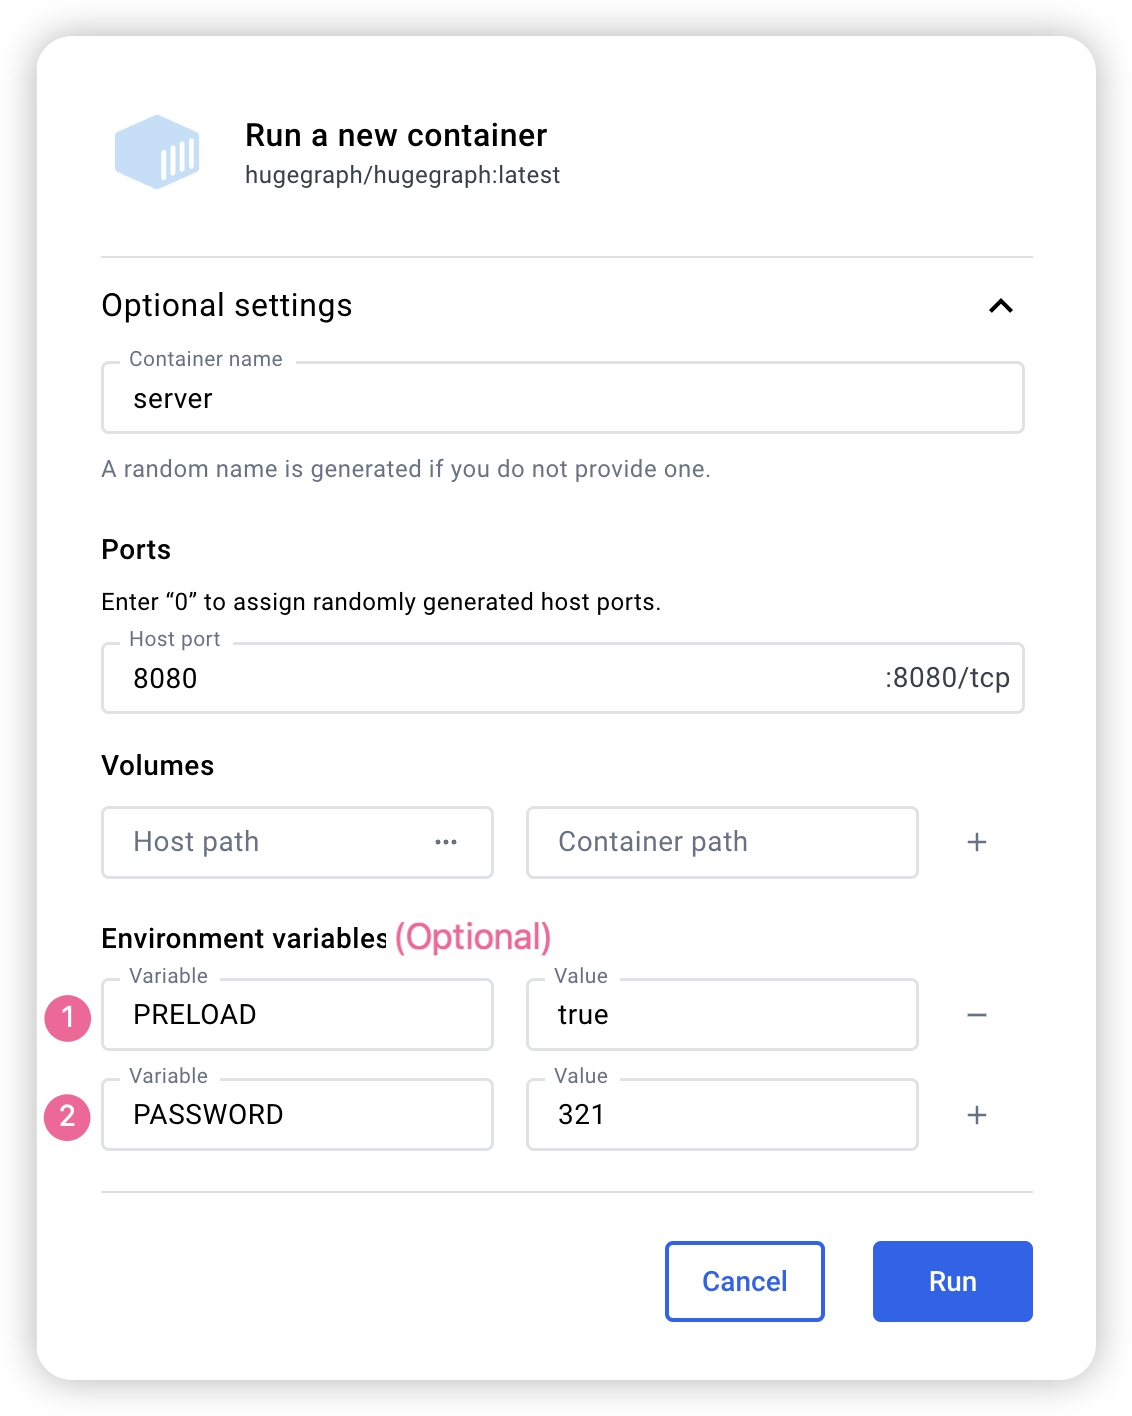
注意:Docker Compose 文件使用桥接网络(
hg-net),适用于 Linux 和 Mac(Docker Desktop)。如需运行 3 节点分布式集群,请为 Docker Desktop 分配至少 12 GB 内存(设置 → 资源 → 内存)。Linux 上 Docker 直接使用宿主机内存。
如果希望通过一个配置文件统一管理 HugeGraph 的多个服务实例,则可以使用 docker compose。
docker/ 目录下提供了四个 compose 文件:
| 拓扑 | compose 文件 | 服务 |
|---|---|---|
| 单机(推荐从这里开始) | docker-compose.yml | 1 个 RocksDB Server + 1 个 Hubble |
| 最小 HStore | docker-compose-hstore.yml | 1 PD + 1 Store + 1 Server + 1 Hubble |
| HA 参考 | docker-compose-3pd-3store-3server.yml | 3 PD + 3 Store + 3 Server + 1 Hubble |
| 最小 HStore 拓扑的源码构建覆盖文件 | docker-compose.dev.yml | (需与 docker-compose-hstore.yml 一起使用) |
单机拓扑将 Server 暴露在 8080 端口,Hubble 暴露在 127.0.0.1:8088。HUGEGRAPH_VERSION 决定 Server、PD 和 Store 的镜像 tag,Hubble 由 HUBBLE_IMAGE 单独选择。
compose 文件从 HUGEGRAPH_ADMIN_PASSWORD 读取管理员密码,从 HUGEGRAPH_AUTH_TOKEN_SECRET 读取 JWT 密钥,通常放在 docker/.env 文件中。HUGEGRAPH_ADMIN_PASSWORD 非空即开启鉴权,Hubble 会自动识别该模式。若直接使用 docker run,则改为传入 -e PASSWORD=xxx。
完整的部署指南请参阅 docker/README.md。
注意:
HugeGraph 的 Docker 镜像主要用于便捷地快速启动 HugeGraph,并不是 ASF 官方发布物料包。你可以从 ASF Release Distribution Policy 中了解更多细节。
推荐使用
release tag(如1.7.0/1.x.0) 以获取稳定版。使用latesttag 可以使用开发中的最新功能。
3.2 下载 tar 包
3.3 源码编译
源码编译前请确保本机有安装 wget/curl 命令
下载 HugeGraph 源代码
编译打包生成 tar 包
构建成功时日志中会出现:
执行成功后,在 hugegraph 目录下生成 *hugegraph-*.tar.gz 文件,就是编译生成的 tar 包。
默认构建会打包 rocksdb、hbase 和 hstore 三个后端模块,并把它们记录在 hugegraph-dist jar 内的 backend.properties 资源的 backends 配置项中。若只需要包含 RocksDB 的精简发布包,可加上 -Drocksdb-only:
3.4 使用 tools 工具部署 (Outdated)
HugeGraph-Tools 提供一键部署命令,可以下载、解压、配置并启动 Server 服务和 HugeGraph-Hubble。HugeGraph-Toolchain 发布包中已包含这些工具。
注:
${version}为版本号,最新版本号可参考 Download 页面,或直接从 Download 页面点击链接下载
HugeGraph-Tools 的总入口脚本是 bin/hugegraph,用户可以使用 help 子命令查看其用法,这里只介绍一键部署的命令。
{hugegraph-version} 表示要部署的 Server 服务及 HugeGraphStudio 版本,可在 conf/version-mapping.yaml 中查看版本信息。{install-path} 指定安装目录,{download-path-prefix} 可选,用于指定 tar 包下载地址。例如部署 0.6 版本时,可以执行 bin/hugegraph deploy -v 0.6 -p services。
4 配置
如果需要快速启动 HugeGraph 仅用于测试,那么只需要进行少数几个配置项的修改即可(见下一节)。
5 启动
5.1 使用启动脚本启动
启动流程分为首次启动和非首次启动两种情况。首次启动前需要先初始化后端数据库,然后再启动服务。
如果服务曾被手动停止,或因其他原因需要再次启动,由于后端数据库已持久化存在,通常可以直接启动服务。
HugeGraphServer 启动时会连接后端存储并检查其版本信息。如果后端尚未初始化,或者已初始化但版本不匹配(例如存在旧版本数据),HugeGraphServer 会启动失败并给出错误信息。
如果需要外部访问 HugeGraphServer,请修改 rest-server.properties 的 restserver.url 配置项(默认为 http://127.0.0.1:8080),修改成机器名或 IP 地址。
由于各种后端所需的配置(hugegraph.properties)及启动步骤略有不同,下面逐一对各后端的配置及启动做介绍。
注: 如果想要开启 HugeGraph 权限系统,在启动 Server 之前应按照 Server 鉴权配置 进行配置。(尤其是生产环境/外网环境须开启)
5.1.1 分布式存储 (HStore)
分布式存储是 HugeGraph 1.5.0 之后推出的新特性,它基于 HugeGraph-PD 和 HugeGraph-Store 组件实现了分布式的数据存储和计算。
要使用分布式存储引擎,需要先部署 HugeGraph-PD 和 HugeGraph-Store,详见 HugeGraph-PD 快速入门 和 HugeGraph-Store 快速入门。
确保 PD 和 Store 服务均已启动后
- 修改 Server 服务的
hugegraph.properties配置:
发布包中自带该后端的模板文件 conf/graphs/hstore.properties.template,可将其复制覆盖 conf/graphs/hugegraph.properties 后修改 pd.peers。
任务调度器由后端决定,无需配置 task.scheduler_type:hstore 使用分布式调度器,其余后端使用本地调度器。为兼容旧配置,该键仍可存在,但会被忽略并打印一条警告日志。
- 修改 Server 服务的
rest-server.properties配置:
如果配置多个 Server 节点,需要为每个节点修改 rest-server.properties 配置文件,例如:
节点 1(主节点):
节点 2(工作节点):
同时,还需要修改每个节点的 gremlin-server.yaml 中的端口配置:
节点 1:
节点 2:
启动 Server:
使用分布式存储引擎的启动顺序为:
- 启动 HugeGraph-PD
- 启动 HugeGraph-Store
- 启动 Server 服务
HStore 的元数据和存储由 PD、Store 管理,init-store 会跳过该后端。开启鉴权时,执行 init-store 仍会创建内置的 admin 账号。如果该账号已由存储侧持有,可在 rest-server.properties 中设置 init_store.enabled=false 以整体跳过这一步,Docker 的 HStore 拓扑即采用这种方式。
验证服务是否正常启动:
停止服务的顺序应该与启动顺序相反:
- 停止 Server 服务
- 停止 HugeGraph-Store
- 停止 HugeGraph-PD
Docker 分布式集群
通过 Docker-Compose 运行完整的分布式集群(3 PD + 3 Store + 3 Server):
服务通过 hg-net 桥接网络上的容器主机名进行通信。配置通过环境变量注入:
该拓扑设置了 HG_SERVER_REQUIRE_AUTH_TOKEN_SECRET: "true",因此在只提供密码而没有共享 JWT 密钥时 Server 会拒绝启动。启动前请在 docker/.env 中同时写入 HUGEGRAPH_ADMIN_PASSWORD 和 HUGEGRAPH_AUTH_TOKEN_SECRET。完整的变量说明见 Docker 集群指南。
验证集群:
运行时日志可通过 docker logs <container-name>(如 docker logs hg-pd0)直接查看,无需进入容器。
完整的环境变量参考、端口表和故障排查指南请参阅 docker/README.md。
5.1.2 RocksDB / ToplingDB
以下从本地 properties 文件启动图的示例要求在 conf/rest-server.properties 中设置:
当前源码默认值是 false,上游发布模板尚未写出该选项。
RocksDB 是一个嵌入式的数据库,不需要手动安装部署,要求 GCC 版本 >= 4.3.0(GLIBCXX_3.4.10),如不满足,需要提前升级 GCC
修改 hugegraph.properties
初始化数据库(第一次启动时或在 conf/graphs/ 下手动添加了新配置时需要进行初始化)
启动 server
提示的 url 与 rest-server.properties 中配置的 restserver.url 一致
ToplingDB (Beta): 作为 RocksDB 的高性能替代方案,配置方式请参考: ToplingDB Quick Start
5.1.3 HBase
5.1.4 启动 server 的时候创建示例图
在启动脚本时携带 -p true 参数,表示开启 preload,即创建示例图。
并且使用 RESTful API 请求 HugeGraphServer 得到如下结果:
代表创建示例图成功。
5.1.5 启动脚本的参数
bin/start-hugegraph.sh 支持以下参数。每个参数都需要带值,即写作 -d false,不能只写 -d。
| 参数 | 取值 | 默认值 | 作用 |
|---|---|---|---|
-d | true、false | true | 守护进程模式。-d false 时脚本留在前台,并把 SIGTERM/SIGINT 转发给服务进程 |
-g | zgc 或 ZGC | 不填则用 G1GC | 选择垃圾回收器。只接受 ZGC,其他取值会直接终止启动;ZGC 需要 Java 11 及以上 |
-m | true、false | false | 安装基于 crontab 的监控任务(bin/start-monitor.sh),仅用于虚拟机和物理机部署 |
-p | true、false | false | 预加载示例图,见 5.1.4 |
-s | true、false | true | 开启安全检查(HugeSecurityManager)。要求 Java 11 到 23,且 conf/java-security.properties 可读 |
-j | JVM 参数 | 空 | 追加到服务命令行的额外 JVM 参数 |
-t | 秒 | 30 | 判定启动失败前等待服务响应的时长 |
-y | true、false | false | 开启 OpenTelemetry agent 上报链路追踪 |
bin/stop-hugegraph.sh 支持 -m true|false(默认 true),用于控制停止服务时是否同时移除 crontab 监控任务。
5.2 使用 Docker
在 3.1 使用 Docker 容器 中,我们已经介绍了如何使用 docker 部署 Server 服务。还可以通过切换后端存储或设置参数,在 Server 启动时加载样例图。
5.2.1 启动 server 的时候创建示例图
在 Docker 启动时设置环境变量 PRELOAD=true,即可在启动脚本执行过程中加载样例数据。
使用
docker run使用
docker run -itd --name=server -p 8080:8080 -e PRELOAD=true hugegraph/hugegraph:1.7.0使用
docker-compose创建
docker-compose.yml,具体文件如下,在环境变量中设置 PRELOAD=true。其中,example.groovy是一个预定义的脚本,用于预加载样例数据。如果有需要,可以通过挂载新的example.groovy脚本改变预加载的数据。使用命令
docker compose up -d启动容器
使用 RESTful API 请求 HugeGraphServer 得到如下结果:
代表创建示例图成功。
6 访问 Server
6.1 服务启动状态校验
jps 查看服务进程
curl 请求 RESTful API
返回结果 200,代表 server 启动正常
6.2 请求 Server
HugeGraphServer 的 RESTful API 包括多种类型的资源,典型的包括 graph、schema、gremlin、traverser 和 task
graph包含vertices、edgesschema包含vertexlabels、propertykeys、edgelabels、indexlabelsgremlin包含各种Gremlin语句,如g.v(),可以同步或者异步执行traverser包含各种高级查询,包括最短路径、交叉点、N 步可达邻居等task包含异步任务的查询和删除
6.2.1 获取 hugegraph 的顶点及相关属性
说明
由于图的点和边很多,对于 list 型的请求,比如获取所有顶点,获取所有边等,Server 会将数据压缩再返回,所以使用 curl 时得到一堆乱码,可以重定向至
gunzip进行解压。推荐使用 Chrome 浏览器 + Restlet 插件发送 HTTP 请求进行测试。当前 HugeGraphServer 的默认配置只能是本机访问,可以修改配置,使其能在其他机器访问。
响应体如下:
详细的 API 请参考 RESTful-API 文档。
另外也可以通过访问 localhost:8080/swagger-ui/index.html 查看 API。
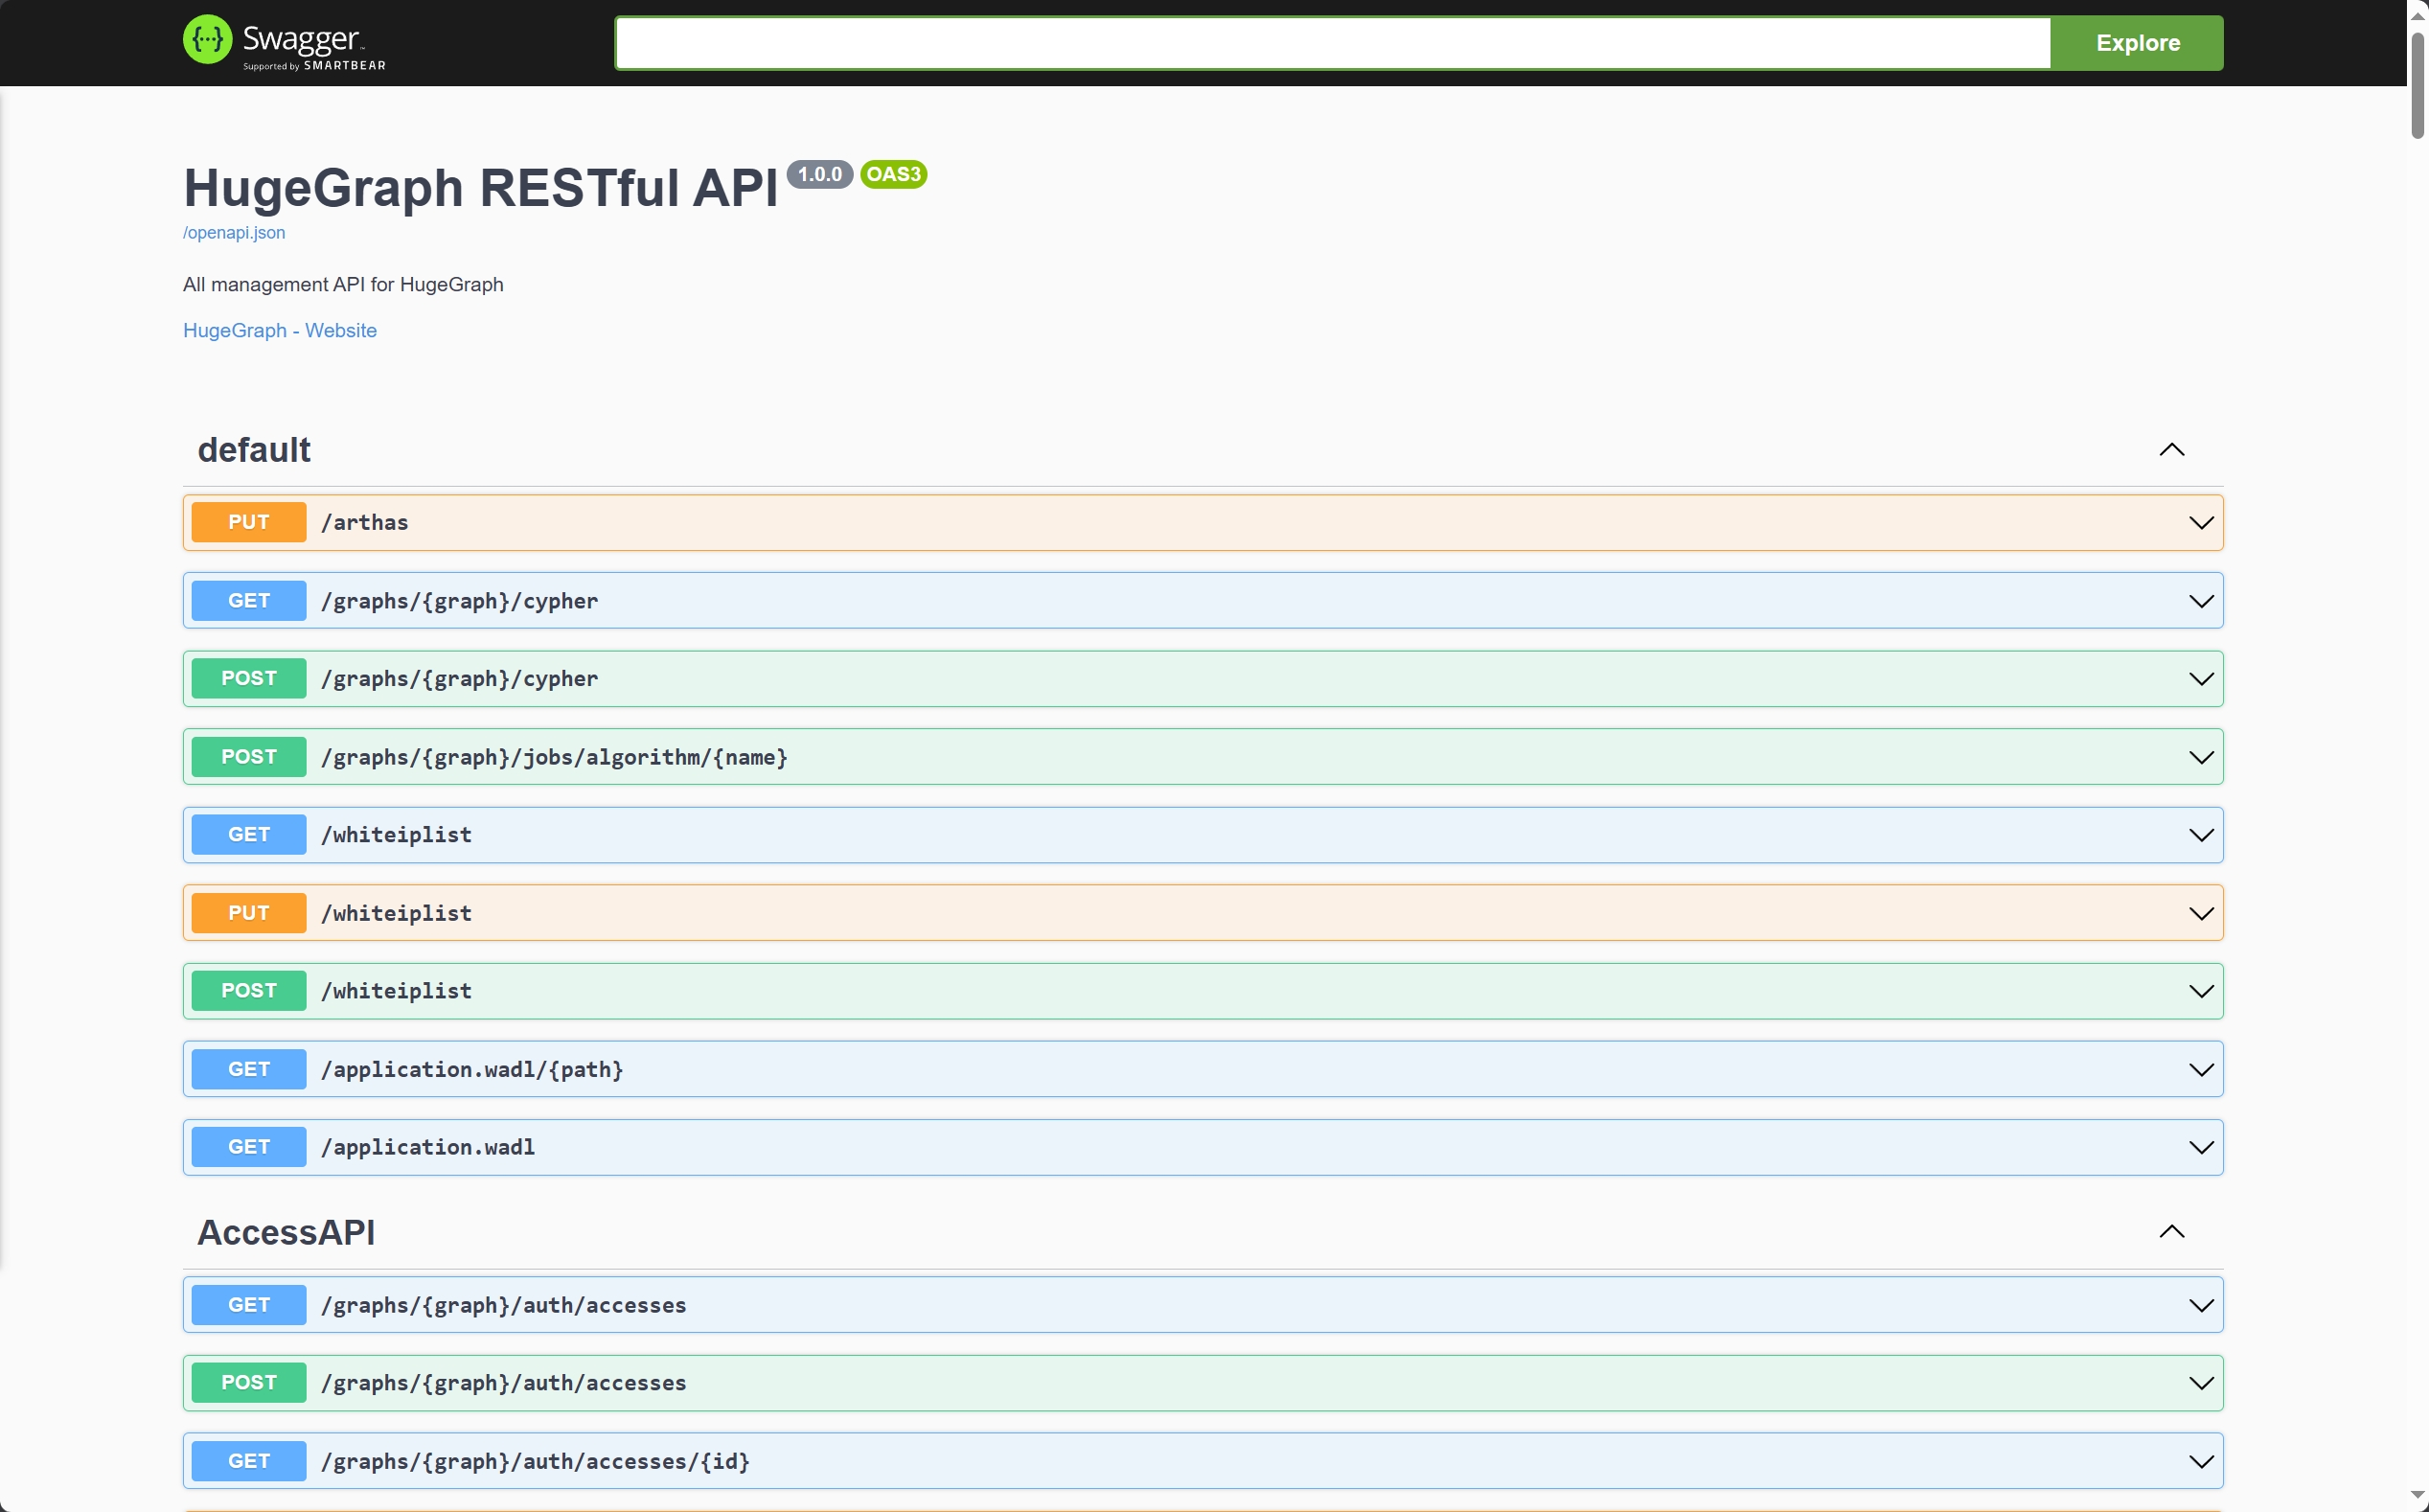
在使用 Swagger UI 调试 HugeGraph 提供的 API 时,如果 HugeGraph Server 开启了鉴权模式,可以在 Swagger 页面输入鉴权信息。
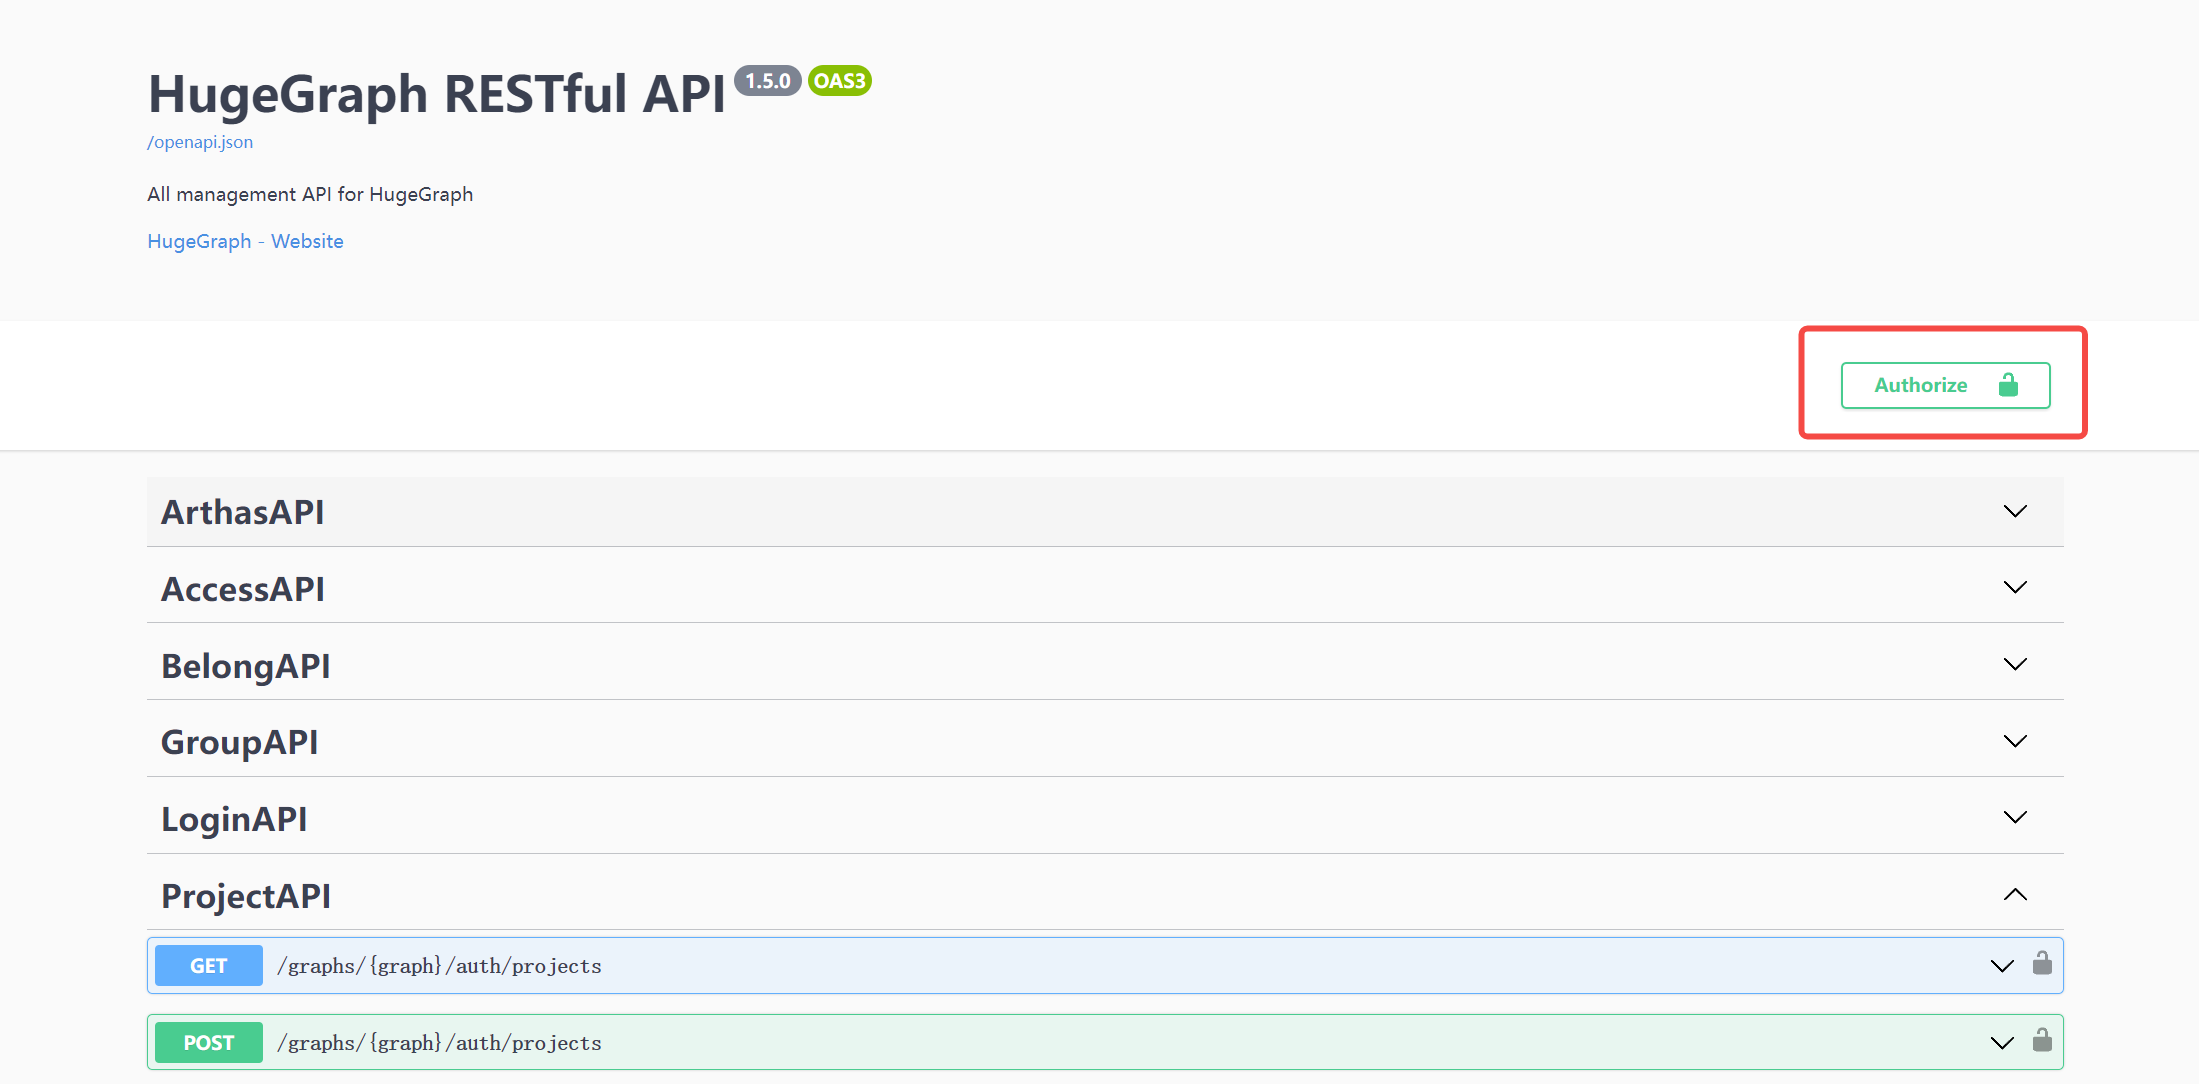
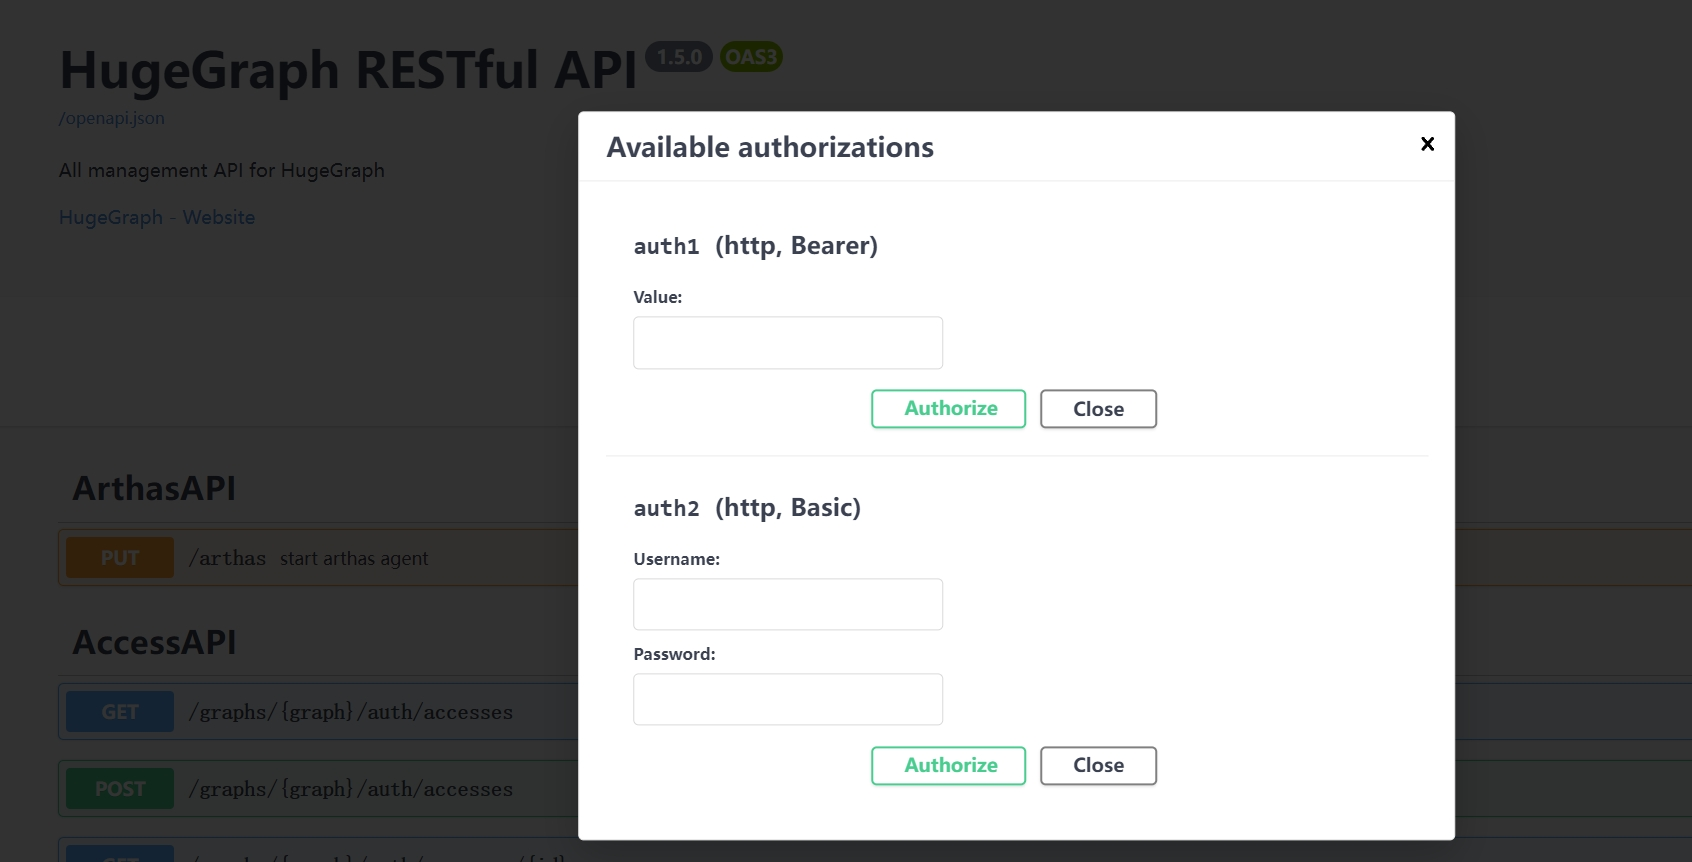
当前 HugeGraph 支持基于 Basic 和 Bearer 两种形式设置鉴权信息。
7 停止 Server
8 使用 IntelliJ IDEA 调试 Server
1.2 - HugeGraph-PD Quick Start
1 HugeGraph-PD 概述
HugeGraph-PD(Placement Driver)是 HugeGraph 分布式版本的元数据管理组件,负责管理图数据的分布和存储节点的协调。它在分布式 HugeGraph 中扮演着核心角色,维护集群状态并协调 HugeGraph-Store 存储节点。
PD 将集群元数据保存在 pd.data-path 下的内嵌 RocksDB 中,并通过 Raft 在各 PD 节点之间复制,因此 3 节点或 5 节点的 PD 集群在少数节点宕机时仍可继续提供服务。在此基础上,PD 还负责注册和激活 Store 节点、分配与再平衡分区、跟踪 Store 心跳,并响应来自 Store 和 Server 的服务发现请求。
PD 监听三个端口:
| 端口 | 默认值 | 配置项 | 使用方 |
|---|---|---|---|
| gRPC | 8686 | grpc.port | Store 和 Server 客户端 |
| REST | 8620 | server.port | 管理接口、健康检查、监控指标 |
| Raft | 8610 | raft.address | 仅其他 PD 节点 |
2 依赖
2.1 前置条件
- 操作系统:Linux 或 macOS(Windows 尚未经过完整测试)
- Java 版本:≥ 11
- Maven 版本:≥ 3.5.0
3 部署
有两种方式可以部署 HugeGraph-PD 组件:
- 方式 1:下载 tar 包
- 方式 2:源码编译
3.1 下载 tar 包
从 Apache HugeGraph 官方下载页面下载最新版本的 HugeGraph-PD:
3.2 源码编译
只编译 PD 发布包及其依赖模块:
解压后的发布目录只包含三个子目录:bin(启停脚本)、conf(application.yml、application.yml.template、log4j2.xml、verify-license.json)和 lib(hg-pd-service jar 包)。
3.3 Docker 部署
HugeGraph-PD Docker 镜像已发布在 Docker Hub,镜像名为 hugegraph/pd。
注: 后续步骤皆假设你本地已拉取
hugegraph主仓库代码 (至少是 docker 目录)
使用 docker-compose 模式部署完整的 3 节点集群(PD + Store + Server):
单 PD、单 Store、单 Server 的最小拓扑对应 docker-compose-hstore.yml。
通过 docker run 运行单个 PD 节点时,通过环境变量提供配置:
环境变量参考:
| 变量 | 必填 | 默认值 | 对应配置项 | 描述 |
|---|---|---|---|---|
HG_PD_GRPC_HOST | 是 | 无 | grpc.host | 本节点的 gRPC 主机名/IP(Docker 中使用 pd0,裸机使用 192.168.1.10) |
HG_PD_RAFT_ADDRESS | 是 | 无 | raft.address | 本节点的 Raft 地址(如 pd0:8610) |
HG_PD_RAFT_PEERS_LIST | 是 | 无 | raft.peers-list | 所有 PD 节点的 Raft 地址(如 pd0:8610,pd1:8610,pd2:8610) |
HG_PD_INITIAL_STORE_LIST | 是 | 无 | pd.initial-store-list | 预期的 Store gRPC 地址(如 store0:8500,store1:8500,store2:8500) |
HG_PD_GRPC_PORT | 否 | 8686 | grpc.port | gRPC 服务端口 |
HG_PD_REST_PORT | 否 | 8620 | server.port | REST API 端口 |
HG_PD_DATA_PATH | 否 | /hugegraph-pd/pd_data | pd.data-path | 元数据存储路径 |
HG_PD_INITIAL_STORE_COUNT | 否 | 1 | pd.initial-store-count | 集群可用所需的最小 Store 数量 |
缺少上述四个必填变量中的任意一个时,entrypoint 会拒绝启动。它把这些值转换成 SPRING_APPLICATION_JSON 覆盖项,因此无需修改镜像内的 conf/application.yml;未被 HG_PD_* 变量覆盖的配置项仍沿用该文件中的值。JAVA_OPTS 会透传给 JVM。
注意:在 Docker 桥接网络中,
HG_PD_GRPC_HOST和HG_PD_RAFT_ADDRESS应使用容器主机名(如pd0)而非 IP 地址。
已弃用的别名:
GRPC_HOST、RAFT_ADDRESS、RAFT_PEERS、PD_INITIAL_STORE_LIST仍可使用,但会输出弃用警告。新部署请使用HG_PD_*名称。
镜像内置 HEALTHCHECK,每 15 秒探测 8620 端口上的 GET /v1/health,启动宽限期 90 秒、重试 3 次,因此 docker ps 能反映真实的 PD 健康状态。entrypoint 以 -d false 调用启动脚本,容器进程就是 Java 进程本身,Java 退出时容器随之退出并触发 Docker 的重启策略。镜像还设置了 STDOUT_MODE=true,因此运行时日志可通过 docker logs <container-name>(如 docker logs hg-pd0)直接查看,无需进入容器。
完整的集群部署指南请参阅 docker/README.md。
4 配置
PD 的主要配置文件为 conf/application.yml,以下是发布包中自带的内容:
conf/application.yml.template 是另一份带占位符($GRPC_PORT$、$RAFT_ADDRESS$ 等)的副本,供自动生成配置的部署工具使用,PD 本身不读取它。启动脚本通过 -Dspring.config.location 指定的始终是 conf/application.yml。
4.1 配置项参考
conf/application.yml 中未出现的配置项会回退到下表的内置默认值;没有内置默认值的配置项必须存在,否则 PD 无法启动。
gRPC 与 REST
| 配置项 | 发布包中的值 | 内置默认值 | 描述 |
|---|---|---|---|
grpc.host | 127.0.0.1 | 无,必填 | 本 PD 对外公布的 gRPC 地址。Store 和 Server 会连到这个地址,因此分布式部署时必须填可访问的 IPv4 地址或主机名,不能用 127.0.0.1 或 0.0.0.0。 |
grpc.port | 8686 | 无,必填 | gRPC 端口。 |
server.port | 8620 | 无,必填 | REST API 端口,同时也是 Raft 成员信息中公布的 REST 端口。 |
application.yml.template 中还有 grpc.netty-server.max-inbound-message-size: 100MB,但 PD 在代码中把 gRPC 服务端的入站消息上限固定为 1 GB,该配置项实际不生效。
Raft
| 配置项 | 发布包中的值 | 内置默认值 | 描述 |
|---|---|---|---|
raft.address | 127.0.0.1:8610 | 无,必填 | 本节点的 Raft 地址,格式为 host:port。每个节点必须不同,且必须出现在 raft.peers-list 中。 |
raft.peers-list | 127.0.0.1:8610 | 无,必填 | 逗号分隔的全部 PD 节点 Raft 地址(含本节点)。所有节点上必须完全一致。 |
raft.enable | 未设置 | true | 为 true 时元数据写入经过 Raft 状态机;为 false 时 PD 直接写本地存储,不做复制。 |
raft.ip-whitelist.enabled | 未设置 | true | 为 true 时 Raft RPC 端口只接受由 raft.peers-list 解析出的地址的连接,其他连接会被断开并记录 Blocked connection from <ip>。peer 列表变更时白名单会重新解析,但主机名不变而 IP 变化的情况(例如容器重启)仍需重启 PD。 |
raft.snapshotInterval | 未设置 | 300 | Raft 快照生成间隔(秒)。 |
raft.rpc-timeout | 未设置 | 10000 | Raft RPC 的连接、请求和安装快照超时时间(毫秒)。 |
PD 核心
| 配置项 | 发布包中的值 | 内置默认值 | 描述 |
|---|---|---|---|
pd.data-path | ./pd_data | 无,必填 | 元数据目录。rocksdb/ 子目录存放 RocksDB 数据,pd_raft/ 子目录存放 Raft 日志、元信息和快照。 |
pd.patrol-interval | 1800 | 300 | 巡检周期(秒)。巡检会检查各 Store 上的分区健康状况并平衡分区数量。 |
pd.initial-store-count | 1 | 3 | 活跃 Store 节点的最小数量。低于该值时集群状态变为 Cluster_Not_Ready,整个集群视为不可用。建议设为实际部署的 Store 数量。 |
pd.initial-store-list | 127.0.0.1:8500 | 空 | 逗号分隔的 Store gRPC 地址(ip:port),列表中的 Store 注册后自动激活。条目也可以带分组 id,写作 store_address/group_id。 |
pd.cluster_id | 未设置 | 1 | 集群 id,用于区分不同的 PD 集群。 |
Store 管理
| 配置项 | 发布包中的值 | 内置默认值 | 描述 |
|---|---|---|---|
store.keepAlive-timeout | 未设置 | 300 | 心跳超时时间(秒)。超过该时间未收到心跳,Store 视为临时不可用,其分区 leader 转移到其他副本。 |
store.max-down-time | 172800 | 1800 | 超过该时间(秒)后 Store 视为永久不可用,其副本重新分配到其他机器。 |
store.monitor_data_enabled | true | false | 是否持久化 Store 监控采样数据。 |
store.monitor_data_interval | 1 minute | 1 minute | 采样间隔,格式为 <数字> <单位>,单位为 second、minute、hour、day、month、year 之一;省略数字时按 1 计。 |
store.monitor_data_retention | 1 day | 1 day | 监控数据保留时长,格式同上。 |
分区
| 配置项 | 发布包中的值 | 内置默认值 | 描述 |
|---|---|---|---|
partition.default-shard-count | 1 | 3 | 每个分区的副本数。生产集群建议设为 3。 |
partition.store-max-shard-count | 12 | 24 | 单个 Store 最多承载的分区副本数。 |
初始分区数由这两个配置项和 pd.initial-store-list 的长度推导得出:
服务发现、License 与监控
| 配置项 | 发布包中的值 | 内置默认值 | 描述 |
|---|---|---|---|
discovery.heartbeat-try-count | 未设置 | 3 | 客户端注册后连续丢失多少次心跳就删除其注册信息。 |
license.verify-path | ./conf/verify-license.json | 无,必填 | License 校验描述文件路径,由 /v1/license 接口读取。 |
license.license-path | ./conf/hugegraph.license | 无,必填 | License 文件路径。发布包只带 verify-license.json,不带 license 文件,因此在提供该文件之前 license 接口会返回错误。 |
auth.secret-key | 未设置 | 内置常量 | 用于给内部客户端签发 PD token 的 HS256 密钥。 |
management.metrics.export.prometheus.enabled | true | Spring Boot 默认值 | 是否暴露 /actuator/prometheus。 |
management.endpoints.web.exposure.include | "*" | Spring Boot 默认值 | 需要暴露的 actuator 端点。 |
logging.config | file:./conf/log4j2.xml | 无 | Log4j2 配置文件,会写出 logs/hugegraph-pd.log、logs/hugegraph-pd_raft.log 和 logs/audit-hugegraph-pd.log。 |
线程池
| 配置项 | 内置默认值 | 描述 |
|---|---|---|
thread.pool.grpc.core | 600 | 处理 gRPC 请求的线程池核心线程数。 |
thread.pool.grpc.max | 1000 | 该线程池的最大线程数。 |
thread.pool.grpc.queue | 无上限 | 该线程池的队列容量。 |
job.uninterruptibleThreadPool.core | 0 | 元数据后台任务线程池的核心线程数。小于等于 0 时取可用处理器数的一半。 |
job.uninterruptibleThreadPool.max | 256 | 该线程池的最大线程数。 |
job.uninterruptibleThreadPool.queue | 无上限 | 该线程池的队列容量。 |
4.2 单节点配置
发布包自带的 conf/application.yml 本身就是一份可用的单节点配置,适用于开发和测试:单节点 PD 不存在 Raft 多数派可失,partition.default-shard-count: 1 表示每个分区只有一个副本。
4.3 三节点集群配置
生产环境请部署 3 个或 5 个 PD 节点,节点数取奇数以保证 Raft 总能形成多数派。3 节点集群可容忍 1 个节点故障。raft.peers-list 必须列出全部节点,并且在所有节点上逐字节一致;grpc.host 和 raft.address 每个节点各不相同。
节点 1(192.168.1.10):
节点 2(192.168.1.11)和节点 3(192.168.1.12)使用同一份配置,只把 grpc.host 和 raft.address 换成自己的地址:
若要在同一台机器上启动 3 个 PD 节点做测试,需为每个节点分别指定 pd.data-path 和各自的端口,例如 raft 端口 8610/8611/8612、gRPC 端口 8686/8687/8688、REST 端口 8620/8621/8622。
在 Docker 桥接网络中,同样的配置来自环境变量,并使用容器主机名而非 IP 地址:
5 启动与停止
5.1 启动 PD
在 PD 安装目录下执行:
脚本要求 PATH 或 JAVA_HOME 中有 11 及以上版本的 JDK;如果发现已有 Java 进程在使用本安装目录的 conf 目录,脚本会直接退出,不做任何事。
支持的参数:
| 参数 | 取值 | 默认值 | 描述 |
|---|---|---|---|
-d | true、false | true | 守护进程模式,详见下文。 |
-g | zgc、ZGC | 不设置 | 垃圾回收器。不带该参数即使用默认的 G1GC;填其他值(包括 g1)会导致启动中止。 |
-j | JVM 参数 | 空 | 额外的 JVM 参数,例如 -j "-Xmx8g -Xms8g"。 |
-y | true、false | false | 挂载 OpenTelemetry Java agent。首次使用时会把 agent 下载到 plugins/ 并校验 MD5,trace 通过 gRPC 上报到 http://127.0.0.1:4317。 |
-d 参数控制守护进程模式:
-d true(默认):以后台守护进程方式运行,脚本立即返回。-d false:以前台模式运行,脚本通过exec替换为 Java 进程,容器/进程管理器的进程即为 Java 本身。在 Docker 或进程管理器(systemd、supervisord)下运行时请使用此参数,以便在崩溃时自动检测并重启服务。
每个参数都有对应的环境变量:DAEMON、GC_OPTION、USER_OPTION 和 OPEN_TELEMETRY。设置 JAVA_OPTIONS 会完全替换脚本计算出的堆参数,否则脚本会根据可用内存在 512 MB 到 32 GB 之间选择堆大小。设置 STDOUT_MODE=true 时 JVM 输出保留在 stdout,不再重定向到 logs/hugegraph-pd-stdout.log,Docker 镜像正是这样做的。
启动成功后,可以在 logs/hugegraph-pd-stdout.log 中看到类似以下的日志:
进程号会写入 bin/pid。
5.2 停止 PD
在 PD 安装目录下执行:
脚本读取 bin/pid,向该进程发送终止信号,最多等待 30 秒直到进程退出,然后删除 pid 文件。如果 bin/pid 不存在,脚本会提示并正常退出。
6 分布式集群的启动顺序
请按以下顺序启动各组件:
- 全部 PD 节点。它们组成 Raft 组并选出 leader。等到每个节点都能响应
GET /v1/health再继续。 - 全部 Store 节点。每个 Store 通过 gRPC 向 PD 注册,PD 会自动激活
pd.initial-store-list中列出的 Store。等到GET /v1/stores中每个 Store 的state都是Up再继续。 - 全部 Server 节点。Server 读取
pd.peers,并依赖 PD 报告至少有一个存活的 Store 才能完成分区分配。
Docker Compose 的各个拓扑正是这样编排的:Store 容器通过 depends_on 加 condition: service_healthy 等待 PD 的 /v1/health 健康检查,Server 容器以同样方式等待 Store 的健康检查,Server 的 entrypoint 还会轮询 PD 的 /v1/stores,直到有 Store 报告 Up 才启动 HugeGraph。
停止时顺序相反:先停 Server,再停 Store,最后停 PD。
7 验证
7.1 REST API 认证
除 /actuator/*、/v1/health 和 /v1/prom/targets/* 之外,PD 的所有 REST 路径都要求带 HTTP Basic Authorization 头,且用户名必须是内部服务名 hg、store、hubble、vermeer 之一。不带该头的请求会得到:
目前不校验密码,任意值均可。Server 自带的 bin/wait-storage.sh 使用 store:admin,并支持用 PD_AUTH_USER 和 PD_AUTH_PASSWORD 覆盖,因此下面的示例使用同样的凭据:
警告:该校验只用于区分 HugeGraph 自身组件与其他流量。请勿把 PD 的 REST 或 gRPC 端口暴露到不可信网络,应通过防火墙规则或安全组加以限制,并保持
raft.ip-whitelist.enabled开启,使 Raft 端口只接受配置中的 peer。
7.2 健康检查
GET /v1/health 不需要凭据,Docker 健康检查用的就是它。它返回 200 且响应体为空:
Spring Boot actuator 端点同样可用,输出更直观:
如果返回 {"status":"UP"},则表示 PD 服务已成功启动。
7.3 集群与成员状态
查看 PD 成员以及当前的 Raft leader:
响应中包含 pdList、选出的 pdLeader、numOfService、numOfNormalService 和 stateCountMap。健康的 3 节点 PD 集群中,numOfService 和 numOfNormalService 都应为 3,且恰好有一个成员的 role 为 Leader。
GET /v1/cluster 在成员列表之外还返回 Store 列表、图列表和集群整体状态;GET / 返回一份简要汇总(leader 地址、集群状态、成员数、Store 数、图数量、分区数)。
7.4 Store 状态
也可以通过 PD API 查看 Store 节点状态:
如果响应中 state 为 Up,说明对应的 Store 节点运行正常。下面的示例只有一个 Store 节点。在一个健康的 3 节点部署中,storeId 列表应包含 3 个 ID,且 stateCountMap.Up、numOfService 和 numOfNormalService 都应为 3。
7.5 其他 REST 接口
下表中的路径均相对于 http://<pd-host>:8620,除注明外都需要 7.1 中的 Basic 认证头。
| 方法与路径 | 描述 |
|---|---|
GET / | 集群简要统计:leader、状态、成员数、Store 数、图数量、分区数 |
GET /v1/health | 健康检查,无需认证 |
GET /v1/cluster | 集群完整统计:PD 成员、Store、图、分区 |
GET /v1/members | PD 成员列表,含角色和选出的 leader |
POST /v1/members/change | 修改 Raft peer 列表,请求体 {"peerList": "..."} |
GET /v1/stores | 已注册的 Store 节点及其状态和统计信息 |
GET /v1/store/{storeId} | 单个 Store 节点 |
POST /v1/store/{storeId} | 修改 Store 状态,请求体 {"storeState": "..."} |
DELETE /v1/store/{storeId} | 从集群中移除 Store |
POST /v1/store/log | Store 状态变更日志,请求体 {"startTime": "...", "endTime": "..."} |
GET /v1/storesAndStats | Store 原始元数据,用于调试 |
GET /v1/store_monitor/{storeId} | Store 监控采样数据(文本) |
GET /v1/store_monitor/json/{storeId} | Store 监控采样数据(JSON) |
GET /v1/shards | 所有分区的所有副本,含 store id、角色、状态和进度 |
GET /v1/shardGroups | Shard 分组 |
GET /v1/shardGroupsCache | PD 内存缓存中的 shard 分组 |
GET /v1/shardLeaders | 按 Store raft 地址分组的分区 leader |
GET /v1/balanceLeaders | 在各 Store 之间重新平衡分区 leader |
GET /v1/partitions | 分区列表及其状态和统计信息 |
GET /v1/highLevelPartitions | 分区列表,含各图的 key 数量和数据大小 |
GET /v1/partitionsAndStats | 分区原始元数据,用于调试 |
POST /v1/partitions/log | 分区变更日志,请求体 {"startTime": "...", "endTime": "..."} |
GET /v1/resetPartitionState | 重置所有分区的状态 |
GET /v1/graphs | 图列表 |
GET /v1/graph/** | 按名称查询单个图 |
POST /v1/graph/** | 修改图的分区数,请求体 {"partitionCount": N} |
GET /v1/graph/partitionSizeRange | 集群允许的分区数上下限 |
GET /v1/graph-spaces | 图空间列表 |
GET /v1/graph-spaces/** | 单个图空间 |
POST /v1/graph-spaces/** | 修改图空间 |
POST /v1/registry | 注册一个服务实例用于服务发现 |
POST /v1/registryInfo | 查询已注册的实例 |
GET /v1/allInfo | 所有已注册的实例 |
GET /v1/license | License 信息 |
GET /v1/license/machineInfo | License 校验看到的 IP 和 MAC 地址 |
GET /v1/task/patrolStores | 立即执行 Store 巡检任务 |
GET /v1/task/patrolPartitions | 立即执行分区巡检任务 |
GET /v1/task/balancePartitions | 在各 Store 之间重新平衡分区 |
GET /v1/task/splitPartitions | 立即执行自动分区拆分 |
GET /v1/task/balanceLeaders | 重新平衡分区 leader |
GET /v1/task/compact | 让 Store 节点对其分区的 RocksDB 文件做 compaction |
GET /v1/prom/targets/{appName} | Prometheus 服务发现目标,无需认证 |
GET /v1/prom/targets-all | 所有应用类型的 Prometheus 目标 |
GET /v1/prom/sd_config | Prometheus HTTP 服务发现配置 |
GET /actuator/health | Spring Boot 健康检查,无需认证 |
GET /actuator/metrics | Spring Boot 监控指标,无需认证 |
GET /actuator/prometheus | Prometheus 抓取端点,无需认证 |
两个 log 接口接受形如 {"startTime": "...", "endTime": "..."} 的时间范围,yyyy-MM-dd HH:mm:ss 和 yyyy-MM-dd 都是可接受的格式。
PD 以 hg 前缀注册自己的指标,因此 /actuator/prometheus 除标准 JVM 指标外还会暴露 hg_up、hg_graphs、hg_stores 和 hg_terms,在存在图之后还会有按图统计的分区和大小指标。
1.3 - HugeGraph-Store Quick Start
1 HugeGraph-Store 概述
HugeGraph-Store 是 HugeGraph 分布式版本的存储节点组件,负责实际存储和管理图数据。它与 HugeGraph-PD 协同工作,共同构成 HugeGraph 的分布式存储引擎,提供高可用性和水平扩展能力。
每个 Store 节点使用 RocksDB 保存图数据,并通过 Raft(JRaft)进行复制:每个分区是一个独立的 Raft 组,因此分区在丢失少数副本时仍可继续工作。Store 节点之间并不直接感知彼此,它们向 PD 注册,由 PD 下发分区分配,并通过心跳上报状态。HugeGraph-Server 先从 PD 查询分区位置,再通过 gRPC 访问 Store。
2 依赖
2.1 前置条件
- 操作系统:Linux 或 macOS(Windows 尚未经过完整测试)
- Java 版本:≥ 11(编译期强制校验,
bin/start-hugegraph-store.sh启动时会再次检查) - Maven 版本:≥ 3.5.0
- 如需进行多节点部署,请先部署 HugeGraph-PD
3 部署
有两种方式可以部署 HugeGraph-Store 组件:
- 方式 1:下载 tar 包
- 方式 2:源码编译
3.1 下载 tar 包
从 Apache HugeGraph 官方下载页面下载最新版本的 HugeGraph-Store:
3.2 源码编译
如果只想单独编译 Store 而不是整个仓库,需要先编译 hugegraph-struct,因为 Store 依赖它:
生成的目录只包含 bin/、conf/ 和 lib/hg-store-node-{version}.jar。
3.3 Docker 部署
HugeGraph-Store Docker 镜像已发布在 Docker Hub,镜像名是 hugegraph/store。
注: 后续步骤皆假设你本地已拉取
hugegraph主仓库代码 (至少是 docker 目录)
有两个 compose 文件包含 Store:
| Compose 文件 | 拓扑 | 用途 |
|---|---|---|
docker-compose-hstore.yml | 1 PD + 1 Store + 1 Server + 1 Hubble | 最小分布式部署 |
docker-compose-3pd-3store-3server.yml | 3 PD + 3 Store + 3 Server + 1 Hubble | 多节点参考部署 |
通过 docker run 运行单个 Store 节点:
环境变量参考:
| 变量 | 必填 | 默认值 | 对应配置项 | 描述 |
|---|---|---|---|---|
HG_STORE_PD_ADDRESS | 是 | n/a | pdserver.address | PD gRPC 地址(如 pd0:8686,pd1:8686,pd2:8686) |
HG_STORE_GRPC_HOST | 是 | n/a | grpc.host | 本节点的 gRPC 主机名/IP(如 store0) |
HG_STORE_RAFT_ADDRESS | 是 | n/a | raft.address | 本节点的 Raft 地址(如 store0:8510) |
HG_STORE_GRPC_PORT | 否 | 8500 | grpc.port | gRPC 服务端口 |
HG_STORE_REST_PORT | 否 | 8520 | server.port | REST API 端口 |
HG_STORE_DATA_PATH | 否 | /hugegraph-store/storage | app.data-path | 数据存储路径 |
入口脚本会把这些变量转换为 SPRING_APPLICATION_JSON,覆盖在 conf/application.yml 之上,然后执行 bin/start-hugegraph-store.sh -d false -j "$JAVA_OPTS"。上表未覆盖的配置项仍需要修改 conf/application.yml,或者自行提供 SPRING_APPLICATION_JSON。
镜像细节:
JAVA_OPTS默认值为-XX:+UnlockExperimentalVMOptions -XX:+UseContainerSupport -XX:MaxRAMPercentage=50 -XshowSettings:vmSTDOUT_MODE=true,因此 Java 日志输出到容器 stdout,而不是logs/hugegraph-store-server.logHEALTHCHECK在 90 秒启动期后每 15 秒访问一次GET http://localhost:8520/v1/health- 镜像只声明了
EXPOSE 8520;如果需要从 Docker 网络之外访问 8500 和 8510,请自行发布这两个端口
注意:在 Docker 桥接网络中,
HG_STORE_GRPC_HOST应使用容器主机名(如store0)而非 IP 地址。
已弃用的别名:
PD_ADDRESS、GRPC_HOST、RAFT_ADDRESS仍可使用,但会输出弃用警告。新部署请使用HG_STORE_*名称。
4 配置
Store 从 conf/ 读取两个配置文件:
application.yml,主配置文件(PD 地址、各端口、Raft、数据路径)application-pd.yml,由application.yml中的spring.profiles.include: pd引入,包含 RocksDB 内存设置和 Actuator 暴露配置
4.1 application.yml
发布包中自带的文件内容如下:
4.2 application-pd.yml
4.3 配置项参考
下表中「模板值」是上面两个文件中的取值,「代码默认值」是配置项缺失时节点使用的回退值;模板未列出的配置项应以代码默认值为准。
核心
| 配置项 | 模板值 | 代码默认值 | 说明 |
|---|---|---|---|
pdserver.address | localhost:8686 | 必填 | PD gRPC 地址,多个地址用逗号分隔。Store 在此注册并获取分区分配。必须填写 PD 的 grpc.port,不是 PD 的 REST 端口。 |
grpc.host | 127.0.0.1 | 必填 | 本节点对外公布的 gRPC 地址。应设置为可路由的 IP 或主机名,127.0.0.1 只适用于单机部署。 |
grpc.port | 8500 | 必填 | gRPC 端口,Server 和 Store 客户端连接此端口。 |
grpc.netty-server.max-inbound-message-size | 1000MB | gRPC 默认值 | 单个入站 gRPC 消息的最大大小,由 grpc-spring-boot-starter 的 Netty 服务端读取。 |
grpc.server.wait-time | 未设置 | 3600 | 扫描流等待客户端消费一页数据的秒数,超时后服务端中止该流。 |
server.port | 8520 | 必填 | REST 和 Actuator 端口,同时以 rest.port 标签上报给 PD。 |
Raft
| 配置项 | 模板值 | 代码默认值 | 说明 |
|---|---|---|---|
raft.address | 127.0.0.1:8510 | 必填 | 本节点的 Raft 服务地址,格式为 host:port,必须能被其他 Store 节点访问。这里不需要配置 peer 列表:分区 Raft 组的成员由 PD 下发。 |
raft.disruptorBufferSize | 1024 | 0 | Raft 任务队列大小。设为 0 时按 rocksdb.total_memory_size 推导:将该内存量的 GB 数取最接近的 2 的幂,再乘以 32。 |
raft.max-log-file-size | 600000000000 | 50000000000 | Raft 日志的最大字节数。 |
raft.snapshotInterval | 1800 | 300 | 生成 Raft 快照的时间间隔,单位秒。 |
raft.snapshotLogIndexMargin | 未设置 | 0 | 距上次快照的最小 applied index 差值,达到后才真正生成快照。设为 0 关闭该判断。 |
raft.rpc-timeout | 未设置 | 10000 | Raft RPC 超时时间,单位毫秒。 |
raft.metrics | 未设置 | true | 采集 JRaft 节点指标,可通过 /metrics/raft 读取。 |
raft.useRocksDBSegmentLogStorage | 未设置 | true | 使用 RocksDB 分段日志存储保存 Raft 日志。 |
raft.maxSegmentFileSize | 未设置 | 67108864 | 分段日志文件大小,单位字节(64 MB)。 |
raft.maxReplicatorInflightMsgs | 未设置 | 256 | 每个 follower 的最大在途复制请求数。 |
raft.maxEntriesSize | 未设置 | 256 | 单次 AppendEntries 请求包含的最大条目数。 |
raft.maxBodySize | 未设置 | 524288 | 单次 AppendEntries 请求的最大字节数。 |
ave-logEntry-size-ratio | 未设置 | 0.95 | 估算日志条目平均大小时的平滑系数。注意该配置项位于顶层,不在 raft 下。 |
存储与标签
| 配置项 | 模板值 | 代码默认值 | 说明 |
|---|---|---|---|
app.data-path | ./storage | store | RocksDB 数据目录。用逗号分隔多个路径可将分区分散到多块磁盘。 |
app.raft-path | 已注释 | 空 | Raft 日志和快照目录。为空时回退到 app.data-path。 |
app.fake-pd | 未设置 | false | 内置 PD 模式,仅用于单机测试,不要用于生产。 |
app.placeholder-size | 未设置 | 10 | 启动时在每个数据路径下创建的 placeholder 占位文件大小,单位 GB,便于紧急情况下释放空间。设为 0 关闭。 |
app.label.<name> | 未设置 | 无 | 随 store 心跳上报给 PD 的自定义键值标签。节点会自动追加 rest.port。 |
RocksDB
| 配置项 | 模板值 | 代码默认值 | 说明 |
|---|---|---|---|
rocksdb.total_memory_size | 32000000000 | 51539607552 | 本节点所有 RocksDB 实例共享的内存预算。缺失或为 0 时使用 JVM 最大堆内存。 |
rocksdb.write_buffer_size | 32000000 | 33554432 | memtable 大小,单位字节。缺失或为 0 时取 total_memory_size / 1000。 |
rocksdb.min_write_buffer_number_to_merge | 16 | 16 | 落盘前合并的 memtable 数量。 |
rocksdb.write_buffer_ratio | 未设置 | 0.66 | total_memory_size 中分配给写缓存的比例,其余作为 block cache。 |
org/apache/hugegraph/rocksdb/access/RocksDBOptions.java 中定义的其他选项都可以加在同一个 rocksdb: 块下,例如 rocksdb.max_background_jobs、rocksdb.level0_file_num_compaction_trigger 或 rocksdb.bloom_filter_bits_per_key。
线程池
| 配置项 | 代码默认值 | 说明 |
|---|---|---|
thread.pool.grpc.core | 600 | 处理 gRPC 请求的核心线程数。 |
thread.pool.grpc.max | 1000 | gRPC 最大线程数。 |
thread.pool.grpc.queue | 2147483647 | gRPC 任务队列容量。 |
thread.pool.scan.core | 128 | 处理扫描的核心线程数。设为 0 时取 CPU 核数的 4 倍。 |
thread.pool.scan.max | 1000 | 扫描最大线程数。 |
thread.pool.scan.queue | 0 | 扫描任务队列容量。 |
查询下推
| 配置项 | 代码默认值 | 说明 |
|---|---|---|
query.push-down.threads | 1500 | 下推查询的线程池大小。 |
query.push-down.fetch_batch | 20000 | 单次请求拉取的行数。 |
query.push-down.fetch_timeout | 300000 | 拉取超时时间,单位毫秒。 |
query.push-down.memory_limit_count | 50000 | 排序等内存操作的行数上限。 |
query.push-down.index_size_limit_count | 50000 | 索引 sst 文件大小上限,单位 kB。 |
后台任务
| 配置项 | 代码默认值 | 说明 |
|---|---|---|
job.interruptableThreadPool.core | 128 | TTL 清理线程池的核心线程数。设为 0 时取 CPU 核数。 |
job.interruptableThreadPool.max | 256 | TTL 清理线程池的最大线程数。设为 0 时取 CPU 核数的 4 倍。 |
job.interruptableThreadPool.queue | 2147483647 | TTL 清理线程池的队列容量。 |
job.uninterruptibleThreadPool.core | 0 | 存储引擎不可中断任务线程池的核心线程数。设为 0 时取 CPU 核数。 |
job.uninterruptibleThreadPool.max | 256 | 不可中断任务线程池的最大线程数。 |
job.uninterruptibleThreadPool.queue | 2147483647 | 不可中断任务线程池的队列容量。 |
job.cleaner.batch.size | 10000 | TTL 清理任务每批删除的 key 数量。 |
job.start-time | 0 | 每日 TTL 清理执行的小时数(0 到 23)。超出该范围时回退为 19。 |
内置 PD 模式
仅用于单机开发调试,通过 app.fake-pd: true 开启。此时节点自行扮演 PD 角色,并忽略 pdserver.address。
| 配置项 | 代码默认值 | 说明 |
|---|---|---|
fake-pd.store-list | '' | 伪集群中各 Store 节点的 gRPC 地址。 |
fake-pd.peers-list | '' | 同一批节点的 Raft 地址。 |
fake-pd.partition-count | 3 | 分区数量。 |
fake-pd.shard-count | 3 | 每个分区的副本数。 |
诊断
| 配置项 | 代码默认值 | 说明 |
|---|---|---|
arthas.telnetPort | 8566 | 调用 /v1/arthasstart 后 Arthas 的 telnet 端口。 |
arthas.httpPort | 8565 | Arthas HTTP 端口。 |
arthas.ip | 0.0.0.0 | Arthas 监听地址。 |
arthas.disabledCommands | jad | 需要禁用的 Arthas 命令。 |
4.4 各节点需要区分的配置
对于多节点部署,需要为每个 Store 节点修改以下配置:
grpc.host和grpc.port(其他组件访问本节点的地址)raft.address(Raft 协议地址)server.port(REST 端口)app.data-path(数据存储路径)
pdserver.address 在所有节点上保持一致,它列出的是整个 PD 集群。
5 启动与停止
5.1 启动 Store
确保 PD 服务已经启动,然后在 Store 安装目录下执行:
启动脚本支持四个参数:
| 参数 | 取值 | 默认值 | 说明 |
|---|---|---|---|
-d | true、false | true | 守护进程模式,见下文。 |
-g | ZGC、zgc | 未设置 | 垃圾回收器。不传该参数即使用默认的 G1。除 ZGC 和 zgc 之外的任何取值都会直接退出,包括 g1,尽管脚本自身的用法提示里写了它。 |
-j | JVM 参数字符串 | 空 | 附加的 JVM 参数,例如 -j "-Xmx16g -Xms8g"。 |
-y | true、false | false | 挂载 OpenTelemetry Java agent(首次使用时下载到 plugins/),并将 trace 导出到 127.0.0.1:4317。 |
守护进程模式:
-d true(默认):以后台守护进程方式运行,脚本立即返回,并把 Java 进程号写入bin/pid。-d false:以前台模式运行,脚本通过exec替换为 Java 进程,容器或进程管理器的进程即为 Java 本身。在 Docker 或进程管理器(systemd、supervisord)下运行时请使用此参数,以便在崩溃时自动检测并重启服务。
JVM 内存方面,如果没有自行设置 JAVA_OPTIONS:-Xms512m,-Xmx 取空闲内存的一半并限制在 512 MB 到 2048 MB 之间。脚本还会加上 -XX:MetaspaceSize=256M、OOM 时把堆转储写入 logs/,以及滚动的 GC 日志 logs/gc.log。生产节点通常需要大得多的堆,请显式指定,例如 -j "-Xmx32g -Xms32g"。
当 ulimit -n 或 ulimit -u 低于 1024 时脚本会拒绝启动;在 x86_64 和 arm64 上,如果能成功下载并校验对应的动态库,脚本会预加载 jemalloc。
启动成功后,可以在 logs/hugegraph-store-server.log 中看到类似以下的日志:
5.2 停止 Store
在 Store 安装目录下执行:
脚本读取 bin/pid,向该进程发送信号,最多等待 30 秒直至进程退出,然后删除 pid 文件。如果 bin/pid 不存在,脚本直接退出且不做任何操作。
5.3 重启 Store
该脚本依次 source 停止脚本和启动脚本,并转发 5.1 中的参数。
5.4 启动顺序
- 先启动 PD。每个 Store 的
grpc.host:grpc.port都应出现在 PD 的pd.initial-store-list中,否则 PD 只会把该节点登记为Pending而不会置为Up,分区分配也就无法完成。 - 再启动 Store。Store 早于 PD 启动并不致命:心跳线程会持续重试注册,并在 PD 可用之前打印
store heartbeat error: PD UNREACHABLE。 - 最后启动 HugeGraph-Server,此时所有 Store 节点都应上报
state: "Up"。Server 需要分区就绪之后才能初始化或打开图。
compose 文件用 depends_on: condition: service_healthy 表达同样的顺序:Store 等待所有 PD 健康检查通过,Server 等待所有 Store 健康检查通过。
6 多节点部署示例
以下是一个三节点部署的配置示例:
6.1 三节点配置参考
- 3 PD 节点
- raft 端口:8610, 8611, 8612
- rpc 端口:8686, 8687, 8688
- rest 端口:8620, 8621, 8622
- 3 Store 节点
- raft 端口:8510, 8511, 8512
- rpc 端口:8500, 8501, 8502
- rest 端口:8520, 8521, 8522
6.2 Store 节点配置
对于三个 Store 节点,每个节点的主要配置差异如下:
节点 A:
节点 B:
节点 C:
所有节点都应该指向相同的 PD 集群:
同时每个 PD 节点都应列出三个 Store 的 gRPC 地址:
6.3 Docker 分布式集群配置
3 节点 Store 集群包含在 docker/docker-compose-3pd-3store-3server.yml 中。每个 Store 节点拥有独立的主机名和环境变量:
每个节点的容器内端口都是 8500/8510/8520,只有映射到宿主机的端口不同。PD 节点相应地设置 HG_PD_INITIAL_STORE_LIST: store0:8500,store1:8500,store2:8500。
Store 节点仅在所有 PD 节点通过健康检查后才会启动,其中 docker-compose 中的 healthcheck 实际访问的是 PD 的 REST 接口 /v1/health(也可以通过 Actuator 暴露的 /actuator/health 进行手动检查),并通过 depends_on: condition: service_healthy 强制执行依赖关系。
运行时日志可通过 docker logs <container-name>(如 docker logs hg-store0)直接查看,无需进入容器。
完整的部署指南请参阅 docker/README.md。
7 验证 Store 服务
确认 Store 服务是否正常运行:
如果返回 {"status":"UP"},则表示 Store 服务已成功启动。
GET /v1/health 是 Docker 镜像和 compose 文件使用的轻量检查接口,它返回 HTTP 200 且响应体为空,因此应使用 curl -fsS 并检查退出码,而不是检查输出内容:
7.1 Store REST 接口
Store 节点在 server.port 上提供以下只读接口:
| 方法 | 路径 | 描述 |
|---|---|---|
| GET | /v1/health | 存活探测,HTTP 200 且响应体为空 |
| GET | /actuator/health | Spring Boot Actuator 健康检查,返回 {"status":"UP"} |
| GET | /actuator/prometheus | Prometheus 抓取接口 |
| GET | / | 节点概览,包含 leaderCount 和 partitionCount |
| GET | /-/state | 节点状态,取值为 STARTING、ONLINE、STOPPING |
| GET | /-/echo?name=<text> | 回显检查 |
| GET | /-/scan | 当前扫描流的状态 |
| GET | /v1/partitions | 本节点上的所有 Raft 组及分区指标。加上 ?flags=accurate 可获取精确的 key 数量,但更慢。 |
| GET | /v1/partition/{id} | 按分区 id 查询单个 Raft 组,包含角色、leader、peers 和已提交索引 |
| GET | /metrics/system | 主机 CPU 和内存指标 |
| GET | /metrics/drive | 数据路径所在磁盘的指标 |
| GET | /metrics/raft | JRaft 节点指标,需要 raft.metrics: true |
Actuator 和 Prometheus 之所以可访问,是因为自带配置设置了 management.endpoints.web.exposure.include: "*" 和 management.metrics.export.prometheus.enabled: true。
节点还提供一批会修改状态或执行重负载操作的运维接口:PUT /-/state、GET /-/cleaner、GET /v1/partition/dump/{id}、GET /v1/partition/clean/{id}、POST /v1/compat?id=<partition>、GET /v1/arthasstart、POST /raft/options,以及 /fix/* 和 /test/* 两组接口。请仅在排查问题时使用,并且不要把 REST 端口暴露到不可信网络。
7.2 通过 PD 检查注册结果
也可以通过 PD API 查看集群中的 Store 节点状态:
PD 的 REST 端口默认开启 basic 认证:用户名必须是 hg、store、hubble、vermeer 之一,密码目前还不校验。不带凭据的请求会返回 {"status":-1,"error":"Unauthorized!"}。只有 /v1/health、/actuator/* 和 /v1/prom/targets/* 不需要认证。
如果 Store 配置成功,上述接口响应中应包含当前节点的状态信息,其中 state 为 Up 表示节点运行正常。如果节点长期停留在 Pending,通常是因为它没有出现在 PD 的 pd.initial-store-list 中。
下方示例仅展示 1 个 Store 节点的返回结果。如果 3 个节点都已正确配置并正在运行,则响应中的 storeId 列表应包含 3 个 ID,且 stateCountMap.Up、numOfService 和 numOfNormalService 都应为 3。
2 - HugeGraph ToolChain
测试指南:如需在本地运行工具链测试,请参考 HugeGraph 工具链本地测试指南
HugeGraph Toolchain 包含 Java/Go 客户端、Loader、Hubble、Tools、Spark Connector 和 SeaTunnel Sink/Source。先按任务选择入口,再查看对应组件的配置与命令。
| 任务 | 推荐入口 | 适合场景 |
|---|---|---|
| 图可视化 | Hubble | 在 Web 界面查看和管理图 |
| 图导入 | Loader、SeaTunnel Sink、Spark Connector | 直接导入数据,或接入已有数据管道 |
| 图导出/迁移 | Tools、SeaTunnel Source | 备份、导出、跨图迁移和持续读取 |
DeepWiki 提供实时更新的项目文档,内容更全面准确,适合快速了解项目最新情况。
2.1 - HugeGraph-Hubble Quick Start
1 HugeGraph-Hubble 概述
⚠️ 安全提醒:Hubble 监听的是明文 HTTP 端口,请勿将其暴露在公网或不受信任的网络中;应在其前面终结 HTTPS,并使用 IP/端口白名单限制访问。Hubble 自身不保存账号库:当所连接的 HugeGraph Server 开启了鉴权时,Hubble 会显示登录页并把凭据转发给 Server;当 Server 允许匿名访问时,则没有登录环节,账号相关页面也会隐藏。
版本说明:本页对应 hugegraph-toolchain
master。下文标注了依赖较新 Server、PD 或 Store 版本的功能,这些功能在旧版 Server 上不可用。测试指南:如需在本地运行 Hubble 测试,请参考 工具链本地测试指南
HugeGraph-Hubble 是 HugeGraph 的 Web 管理界面。它连接到一个 HugeGraph Server(直连,或在分布式集群中通过 PD 发现),管理图空间(GraphSpace)、图和 Schema,导入数据,执行 Gremlin 与 Cypher 查询以及内置图算法,并将结果图形化展示。
平台主要包括以下模块:
图概览
图概览列出图空间(PD 模式)和图,可以创建、克隆和清空图,加载 Demo 图,打开包含统计信息与 Schema 的图详情页,并跳转到查询工作台。
元数据建模
元数据建模用于管理单个图的 PropertyKey、VertexLabel、EdgeLabel 和 IndexLabel,提供列表与图两种视图。Schema 模板按图空间保存可复用的 Groovy Schema,可在创建图时直接套用。
数据导入
数据导入页面适合小规模试用。大批量或生产导入请使用 HugeGraph Loader。
数据源支持 FILE、HDFS、JDBC 和 KAFKA 四种类型。导入任务分四步配置,可以执行一次、按 cron 周期执行,或对 Kafka 源持续实时执行。
图查询
图查询可以按立即查询或异步任务两种模式执行 Gremlin 与 Cypher 语句,并以图(2D 或 3D)、表格或 JSON 展示结果,同时保存执行记录与收藏语句。
内置图算法
内置图算法为 Server 的 OLTP traverser 接口(交互式探索)以及 OLAP 任务(通过 HugeGraph Computer 或 Vermeer 进行集群批量计算)提供参数表单。
异步任务
异步任务列出后台任务,包括 Gremlin 与 Cypher 任务、算法任务、删除元数据、创建与重建索引、Vermeer 图加载与图计算任务,并支持查看详情、取消和删除。
系统与运维
系统与运维包含个人中心、带图空间权限预设的账号管理,以及 PD 模式下的集群概览与节点详情。
1.1 版本兼容性
Hubble 会自动探测所连接 Server 的鉴权模式与能力,自身没有单独的鉴权开关。支持的组合如下:
| HugeGraph Server / PD | 部署方式 | Hubble 兼容性 | 范围与限制 |
|---|---|---|---|
| Server 1.5.x | 单机,通常不开启鉴权 | 最低兼容 | 仅支持基础的图、Schema、数据和 Gremlin 流程。图空间、账号权限、PD/Store 拓扑、集群运维和较新的算法均不可用。 |
| Server 1.7.x 搭配同版本 PD/Store 1.7.x | 单机或分布式 | 通过兼容适配达到最低可用 | 核心管理与查询流程仍可使用,但旧版 REST/Gremlin 鉴权、权限语义、指标和算法能力的体验会有所降级。 |
| Server、PD 和 Store 1.8.x 及以上 | 推荐分布式部署 | 完整且推荐的体验 | 图空间、账号权限预设、集群运维、异步任务和算法能力处理都是针对这一代设计并验证的。 |
分布式集群中请使用版本号一致的 Server、PD 和 Store。
2 部署
有三种方式可以部署hugegraph-hubble
- 使用 docker (便于测试)
- 下载 toolchain 二进制包
- 源码编译
Hubble 运行在 Java 11 上:后端以 java.version=11 编译,Docker 镜像基于 eclipse-temurin:11-jre。bin/start-hubble.sh 只检查 PATH 中是否存在 java,因此请自行确认选用的是正确的 JDK。
2.1 使用 Docker (便于测试)
特别注意:Hubble 已不再在页面上填写 Server 的主机名和端口。Server 地址来自
conf/hugegraph-hubble.properties:pd.enabled=false时使用server.direct_url,pd.enabled=true时通过pd.peers由 PD 发现。容器内的127.0.0.1指向 hubble 容器自身,因此打包默认值server.direct_url=http://127.0.0.1:8080无法访问到另一个容器里的 Server。若 hubble 和 server 在同一 docker 网络下,推荐直接使用
container_name(如下例的server) 作为主机名。或者也可以使用 宿主机 IP 作为主机名,此时端口号为宿主机给 server 配置的端口
镜像会把打包产物复制到 /hubble,把 /hubble/conf/hugegraph-hubble.properties 中的 server.host 改写为 0.0.0.0、清空 dashboard.address,暴露 8088 端口,并以 ./bin/start-hubble.sh -f 前台方式启动。
先准备一份指向你的 Server、并让容器监听所有网卡的 hugegraph-hubble.properties:
然后把该文件挂载覆盖打包配置来启动 hubble:
或者使用 docker-compose 启动 hubble,另外如果 hubble 和 server 在同一个 docker 网络下,可以使用 server 的 container_name 进行访问,而不需要宿主机的 ip
使用docker-compose up -d,docker-compose.yml如下:
注意:
hugegraph-hubble的 docker 镜像是一个便捷发布版本,用于快速测试试用 hubble,并非ASF 官方发布物料包的方式。你可以从 ASF Release Distribution Policy 中得到更多细节。生产环境推荐使用
release tag(如1.7.0) 稳定版。使用latesttag 默认对应 master 最新代码。
2.2 下载 toolchain 二进制包
hubble项目在toolchain项目中,首先下载toolchain的 tar 包
先修改 conf/hugegraph-hubble.properties,把 Server 地址配置正确,然后运行hubble
start-hubble.sh 支持以下参数:
| 参数 | 说明 |
|---|---|
-f、--foreground [true|false] | 前台运行而不是以守护进程方式运行,Docker 镜像使用 -f |
-d、--debug | 在 8787 端口开启 JDWP 调试(server=y,suspend=n) |
脚本以 -Xms512m -Dfile.encoding=UTF-8 -Dhubble.home.path=<安装目录> 启动 JVM,把 PID 写入 bin/pid,日志输出到 logs/hugegraph-hubble.log,并最多等待 30 秒直到 http://<server.host>:<server.port>/about 有响应后才返回。
打包默认值为 server.host=localhost,即在修改之前只接受本机回环访问。启动完成后访问 http://<host>:8088。
停止服务时执行 bin/stop-hubble.sh:它先发送 SIGTERM,让关闭钩子暂停正在运行的导入任务并干净地关闭内置 H2 数据库;只有在 STOP_TIMEOUT 秒(环境变量,默认 30)后进程仍然存活时,才会升级为 SIGKILL。
2.3 源码编译
Hubble 的构建由 hugegraph-hubble/hubble-dist/pom.xml 中的 frontend-maven-plugin 安装 Node.js v18.20.8 和 Yarn v1.22.21,无需预先安装这两个工具。此外需要 JDK 11 和 Maven。
下载 toolchain 源码包
编译hubble, 它依赖 loader 和 client, 编译时需提前构建这些依赖 (后续可跳)
启动hubble
前端开发时可在 hubble-fe 目录下执行 yarn dev。后端 POM 未配置 spring-boot:run,请改为从 hubble-be/target/classes 启动 org.apache.hugegraph.HugeGraphHubble,并用 -Dhubble.home.path 指向一个可写目录。
3 平台使用流程
首页把各模块归纳为三条主线:图概览、图导入和图查询,同时显示当前运行在 PD / 集群模式还是 non-PD 单机模式。平台的模块使用流程如下:

4 平台使用说明
4.1 图管理
在 PD 模式下,【图空间管理】列出集群中的所有图空间,并可创建或编辑图空间,包括别名、可选的 Kubernetes 命名空间与计算任务,以及资源上限。在 non-PD 单机模式下只有一个名为 DEFAULT 的图空间,图空间列表会被跳过。
4.1.1 图创建
图管理模块下,点击【新建图】,填写图名称、可选的别名、可选的 Schema 模板和示例数据。图名称在其所属图空间内唯一,创建后不可修改。
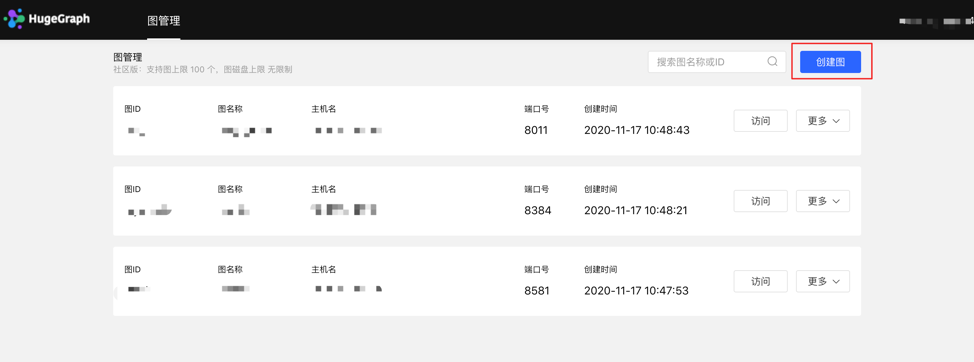
创建图填写内容如下:
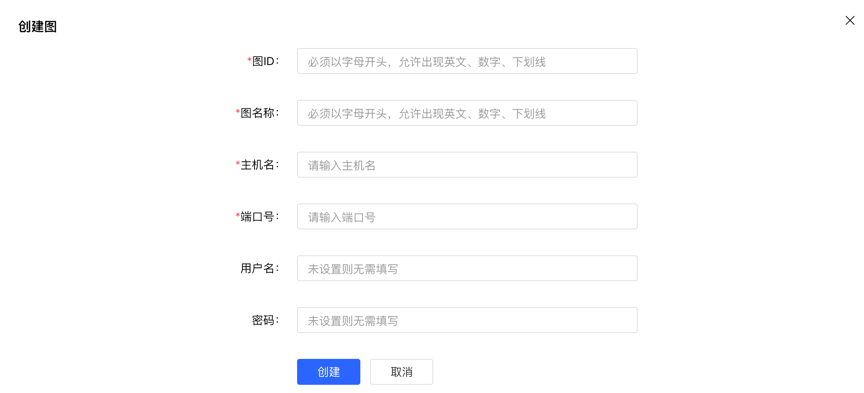
注意:Server 连接不在此页面配置,而是来自
conf/hugegraph-hubble.properties,通过server.direct_url或 PD 发现获得,Docker 下的主机名规则见 2.1 节。只有当所连接的 Server 提供建图能力(REST API 0.67 及以上)时才会显示新建图入口,旧版 Server 上图列表为只读。
4.1.2 图访问
实现图空间的信息访问,进入后,可进行图的多维查询分析、元数据管理、数据导入、算法分析等操作。【进入图分析平台】打开查询工作台,【元数据配置】打开 Schema 页面,图详情页展示顶点/边统计信息和 Schema。

4.1.3 图管理
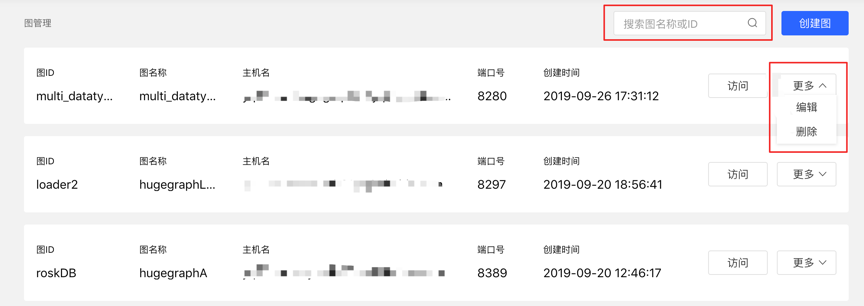
- 图列表提供卡片视图和列表视图,搜索按图名称匹配。
- 单图操作包括:查看 schema(可【导出 Groovy Schema】)、元数据配置、克隆图(仅 Schema,或 Schema 与数据)、清空 Schema 与数据、删除,以及 PD 模式下的设为默认。
- 【示例数据与资源】可在当前图中构建 Demo 图:红楼梦 Demo 图、人物与软件 Demo 图、迷你电影 Rank Demo。这些 Demo 只补齐缺失的 Schema 和元素,不会清空已有数据。
4.2 元数据建模(列表 + 图模式)
4.2.1 模块入口
从图列表进入【元数据配置】,或直接访问图的元数据页面 /graphspace/<graphspace>/graph/<graph>/meta。页面包含属性、顶点类型、边类型、顶点索引、边索引五个标签页,并可在列表视图和图视图之间切换。

4.2.2 属性类型
4.2.2.1 创建
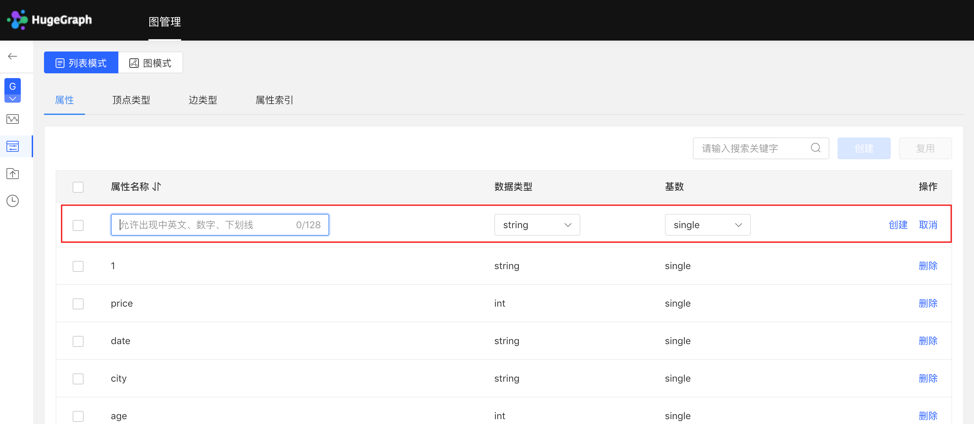
- 填写或选择属性名称、数据类型、基数,完成属性的创建。
- 创建的属性可作为顶点类型和边类型的属性。
列表模式:
图模式:
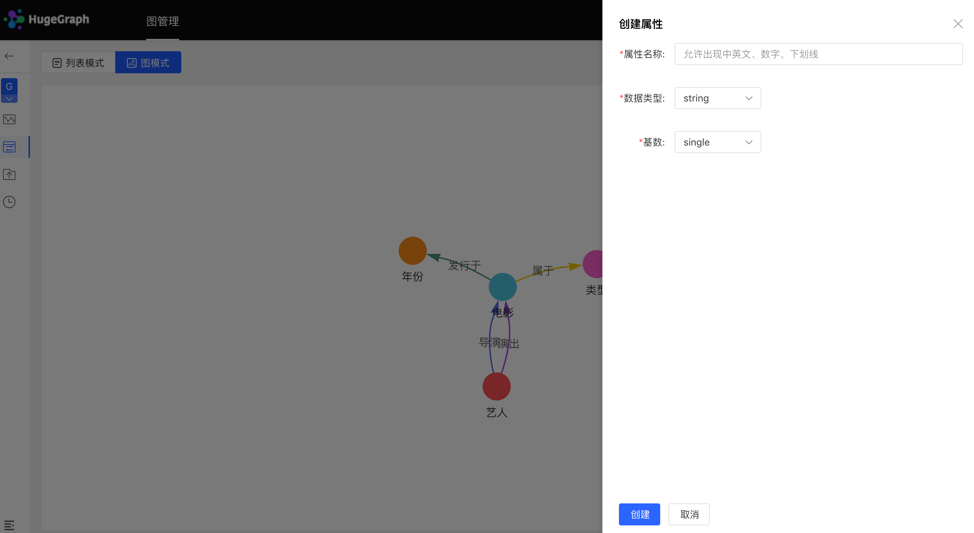
4.2.2.2 管理
- 在属性列表中可进行单条删除或批量删除操作,已被顶点类型或边类型使用的属性无法删除。
- 删除元数据会以异步任务方式执行,可在异步任务中查看进度。
4.2.3 顶点类型
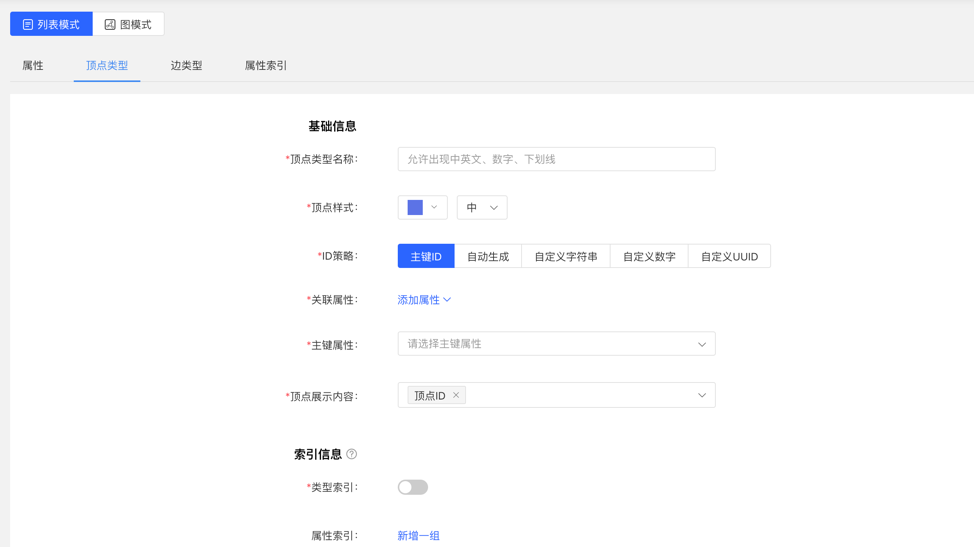
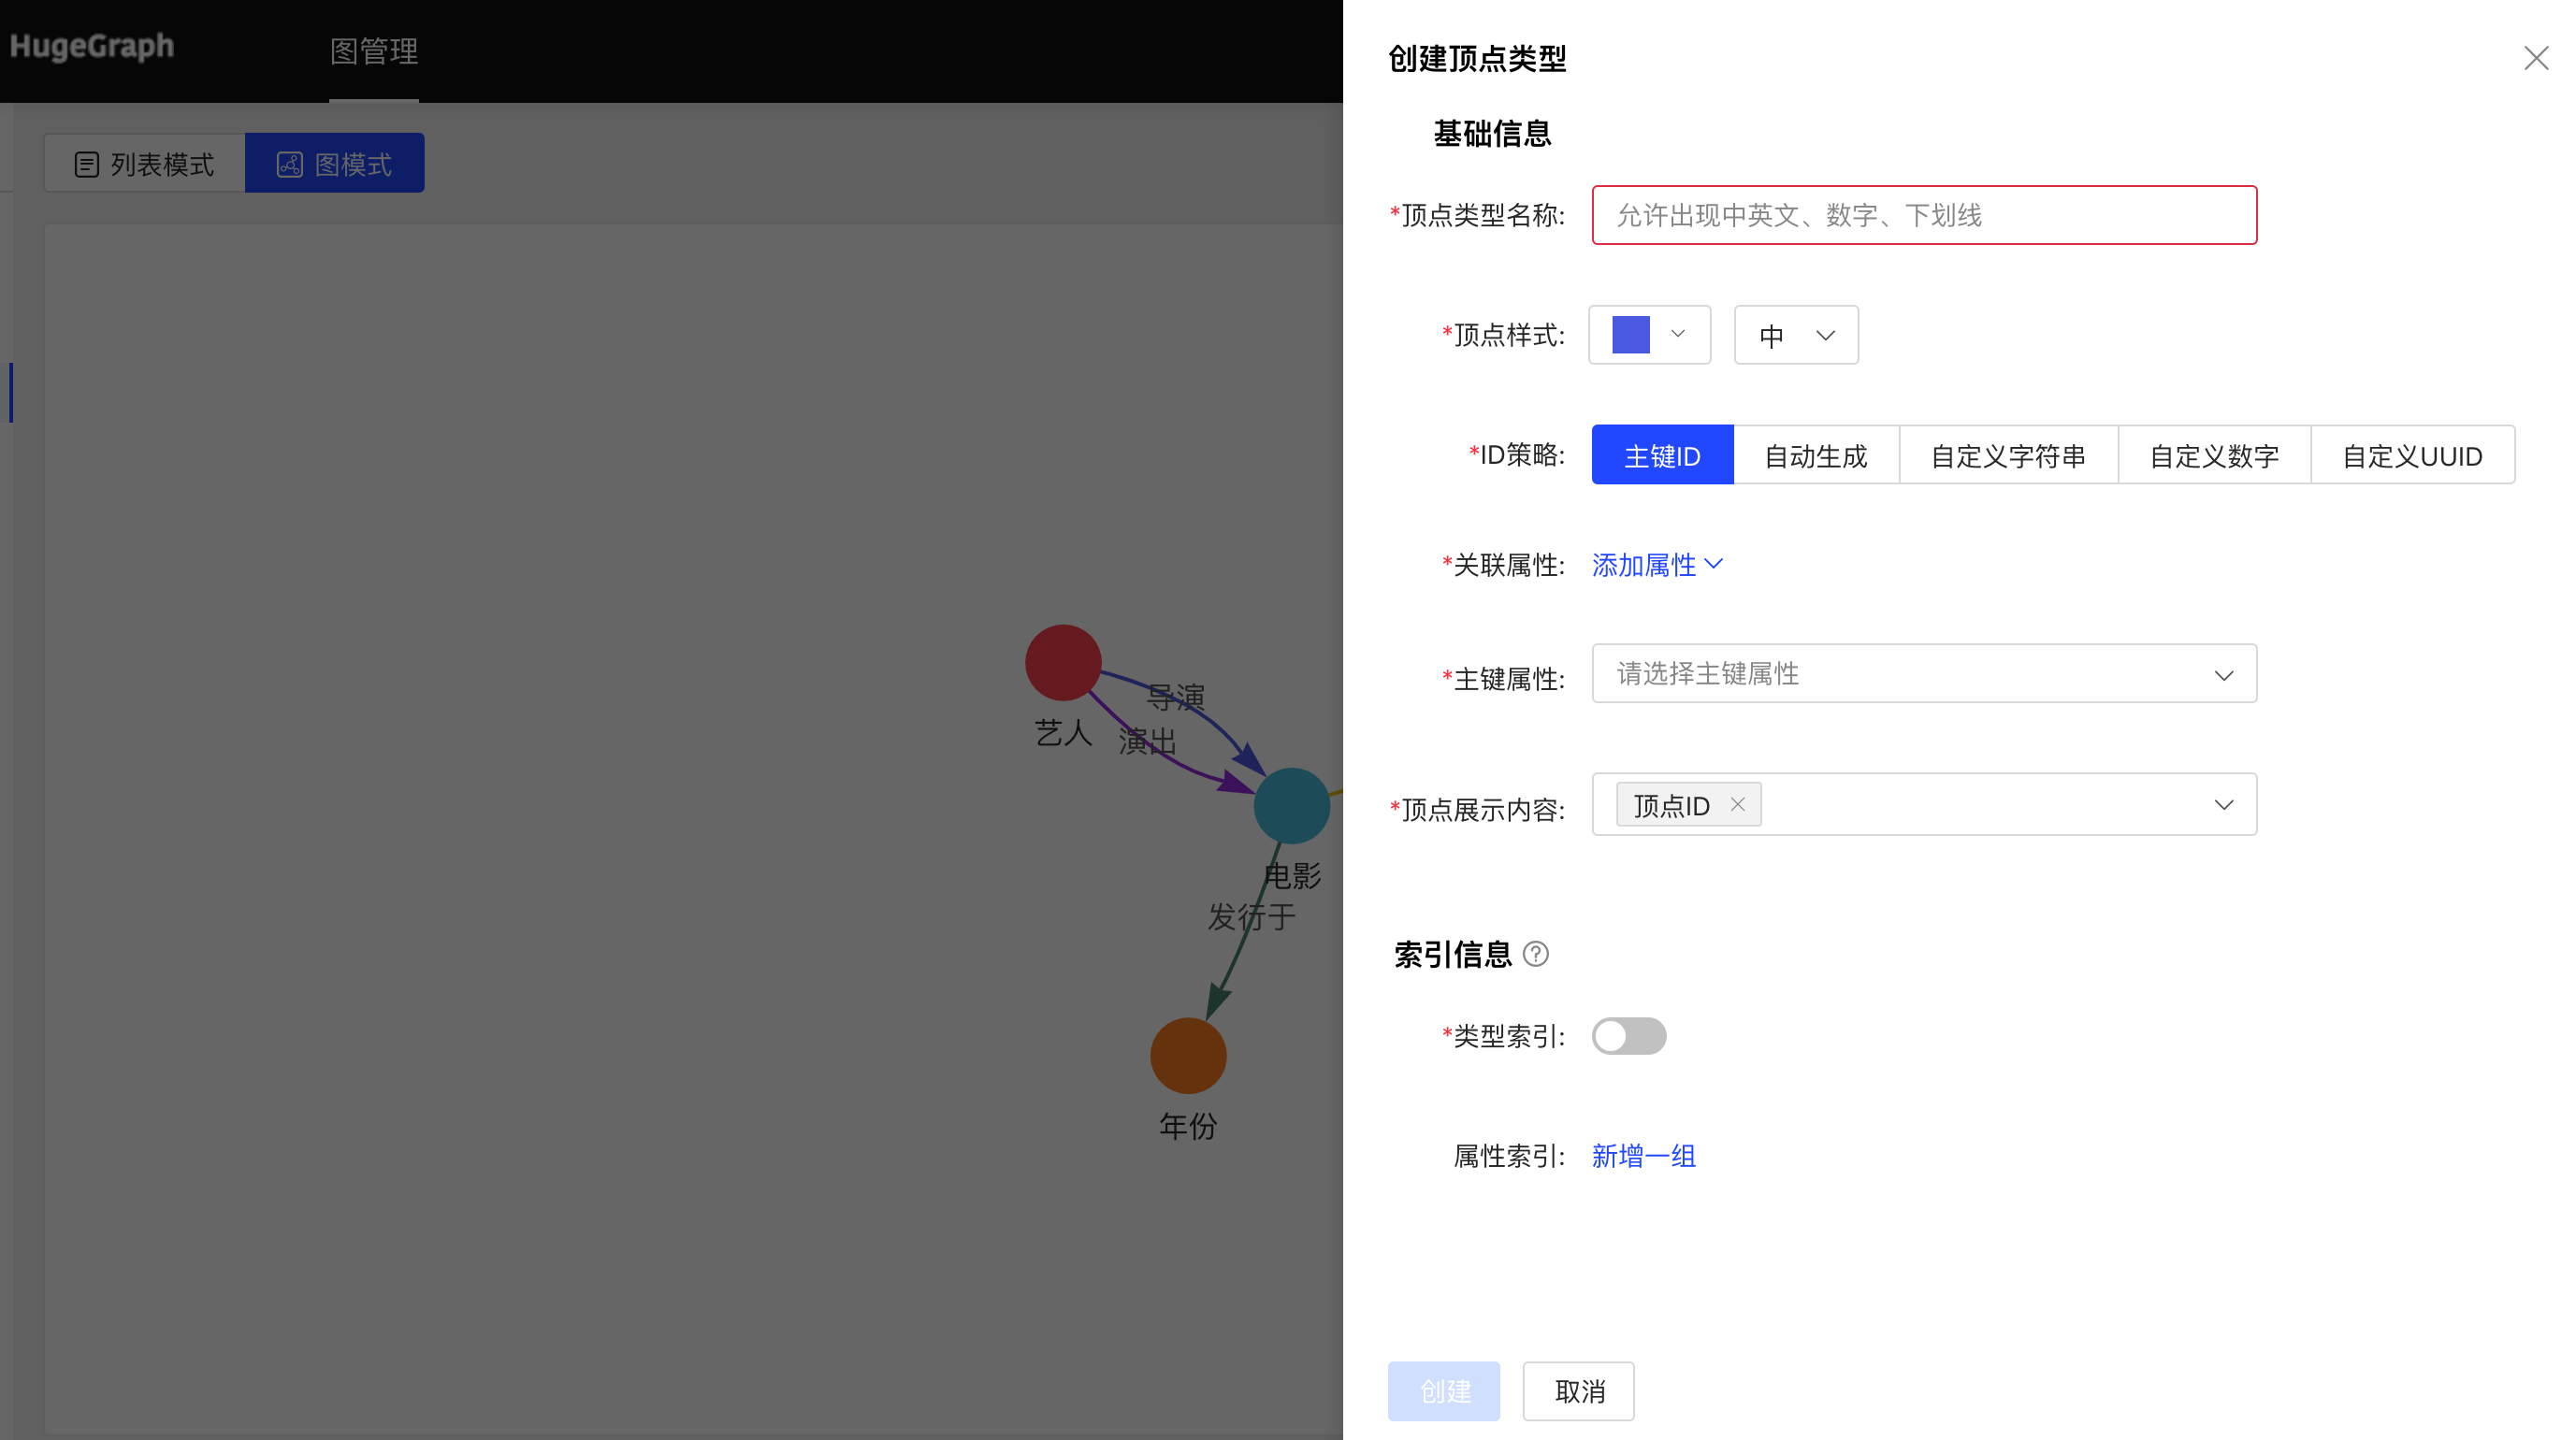
4.2.3.1 创建
- 填写或选择顶点类型名称、ID 策略、关联属性、主键属性,顶点样式、查询结果中顶点下方展示的内容,以及索引的信息:包括是否创建类型索引,及属性索引的具体内容,完成顶点类型的创建。
列表模式:
图模式:
4.2.3.2 管理
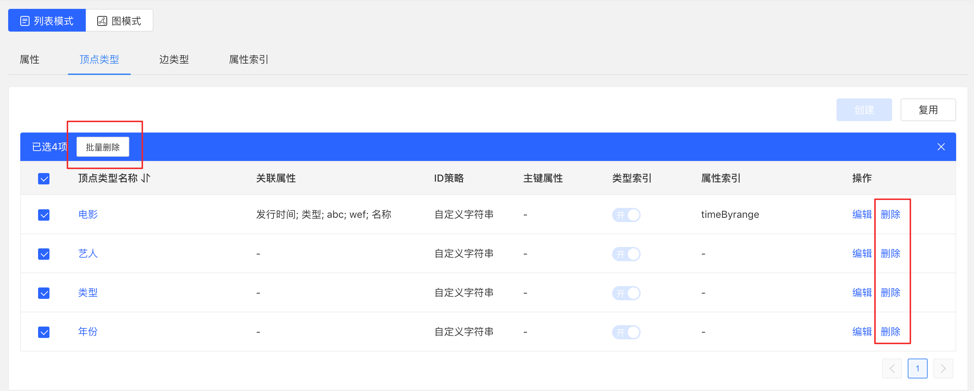
可进行编辑操作,顶点样式、关联属性、顶点展示内容、属性索引可编辑,其余不可编辑。图模式下双击顶点类型即可编辑。
可进行单条删除或批量删除操作。
4.2.4 边类型
4.2.4.1 创建
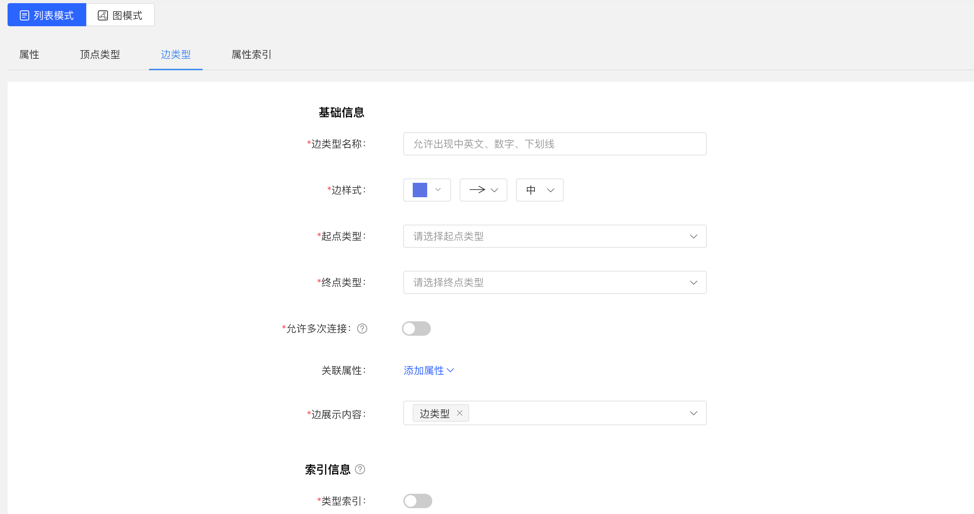
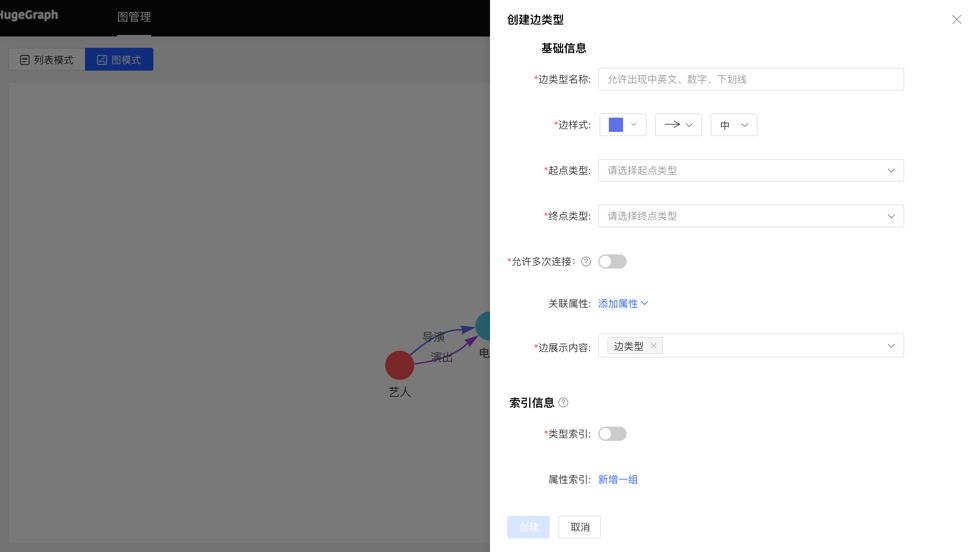
- 填写或选择边类型名称、类型(普通类型、父边类型或子边类型,用于边类型的层级关系)、起点类型、终点类型、关联属性、是否允许多次连接、边样式、查询结果中边下方展示的内容,以及索引的信息:包括是否创建类型索引,及属性索引的具体内容,完成边类型的创建。
列表模式:
图模式:
4.2.4.2 管理
- 可进行编辑操作,边样式、关联属性、边展示内容、属性索引可编辑,其余不可编辑,同顶点类型。
- 可进行单条删除或批量删除操作。
4.2.5 索引类型
展示顶点类型和边类型的顶点索引和边索引,支持二级索引、范围索引、全文索引和唯一索引。
4.2.6 Schema 模板
【Schema 模板】(/graphspace/<graphspace>/schema)按图空间维护一份可复用的模板库。示例模板由 Hubble 内置,可以使用、移除和恢复,在保存之前不会写入 Server;用户模板以 Groovy Schema 形式保存在 Server 上,可以创建、编辑和删除。创建图时可以选择已有模板,使其 Schema 立即生效。
4.3 数据导入
注意:目前推荐使用 hugegraph-loader 进行正式数据导入,hubble 内置的导入用来做测试和简单上手
数据导入的使用流程如下:

4.3.1 模块入口
左侧导航「图导入」下的【数据源管理】和【数据导入】:

4.3.2 数据源
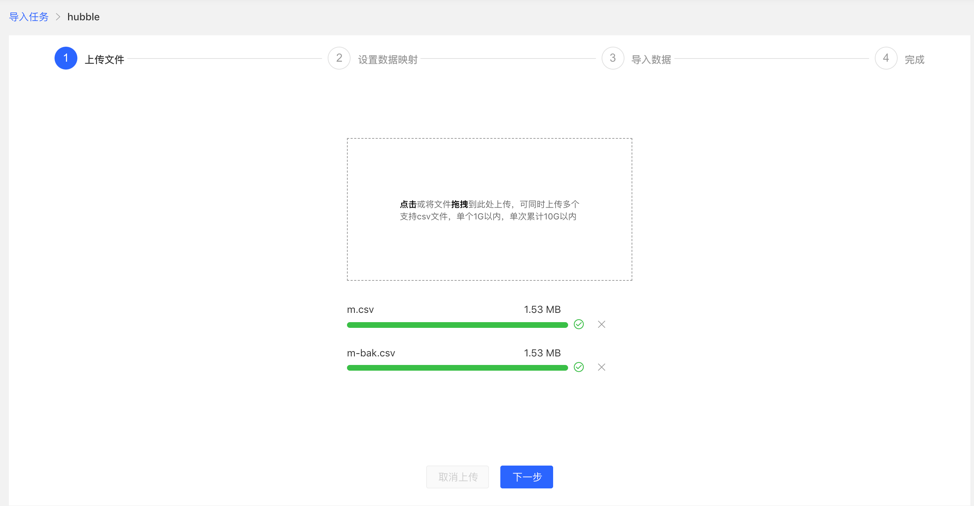
- 【数据源管理】用于登记导入任务的读取来源,支持四种类型:FILE(本地上传)、HDFS、Kafka 和 JDBC。
- FILE 类型需要上传需要构图的文件,可接受的格式由
upload_file.format_list决定,默认为csv和txt。 - 单文件与总大小上限默认分别为 1 GB 和 10 GB,未完成的上传分片会在
upload_file.max_uploading_time(默认 12 小时)后被清理。
4.3.3 创建任务
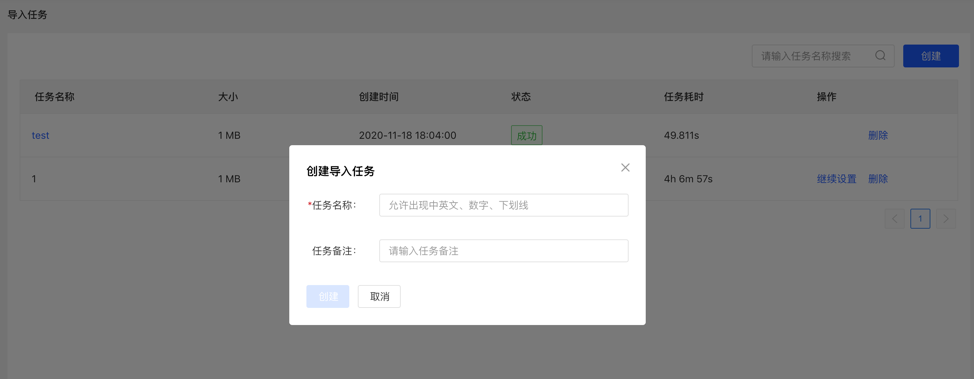
- 【数据导入】>【创建任务】分四步配置:输入基础信息、选择源端字段、选择映射字段、输入调度信息。
- 基础信息包括任务名称(1 到 48 个中文、字母、数字或
_)、目标图空间与图、源端类型和数据源。 - 可创建多个导入任务,并行导入。
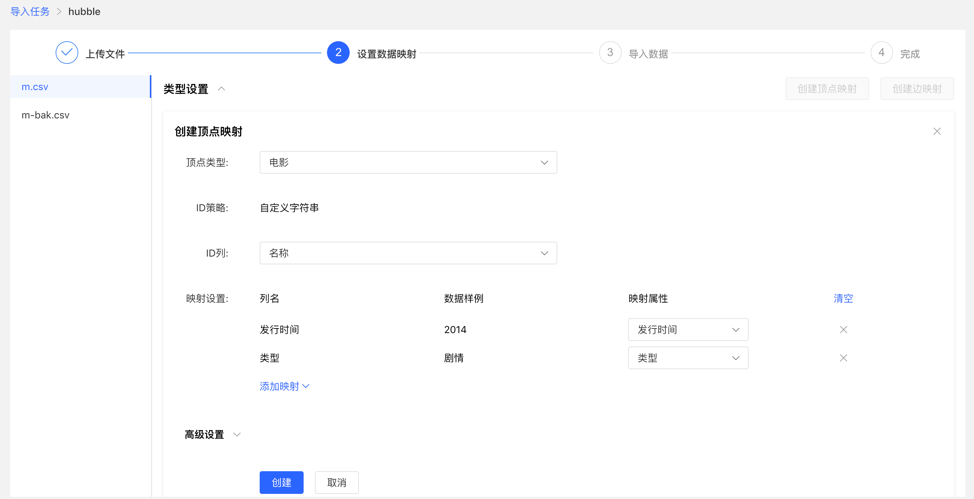
4.3.4 设置数据映射
对选定的数据源设置数据映射,包括文件设置和类型设置
文件设置:勾选或填写是否包含表头、分隔符、编码格式等源端本身的设置内容,均设置默认值,无需手动填写
类型设置:
顶点映射和边映射:
【顶点类型】 :选择顶点类型,并为其 ID 映射源端中的列数据;
【边类型】:选择边类型,为其起点类型和终点类型的 ID 列映射源端的列数据;
映射设置:为选定的顶点类型的属性映射源端中的列数据,此处,若属性名称与文件的表头名称一致,可自动匹配映射属性,无需手动填选
完成设置后,显示设置列表,方可进行下一步操作,支持映射的新增、编辑、删除操作
设置映射的填写内容:
映射列表:
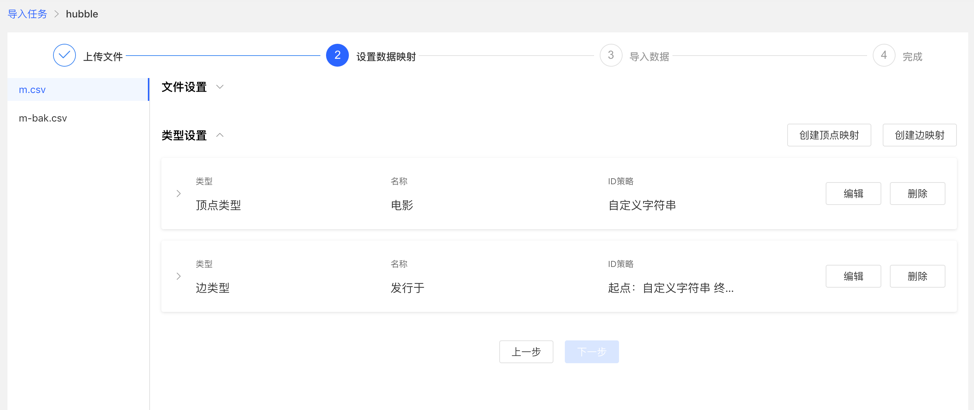
4.3.5 导入数据
最后一步选择任务的执行方式:执行一次表示一次性导入,周期执行使用 Quartz cron 表达式(例如 0 0/5 * * * ?),实时执行用于 Kafka 数据源。
- 导入设置
- 导入设置参数项如下图所示,均设置默认值,无需手动填写
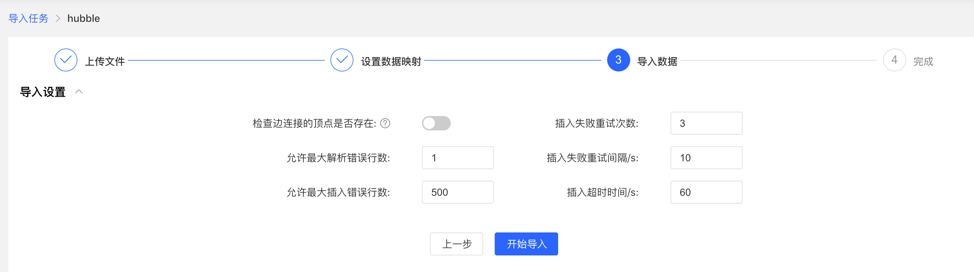
- 导入详情
- 在任务列表中运行任务即可开始导入,也可在同一列表中暂停、编辑或删除任务
- 任务的执行历史提供每次执行的执行实例 ID、导入记录数、平均速率(条/秒)、导入耗时和状态
- 若导入失败,可查看具体原因
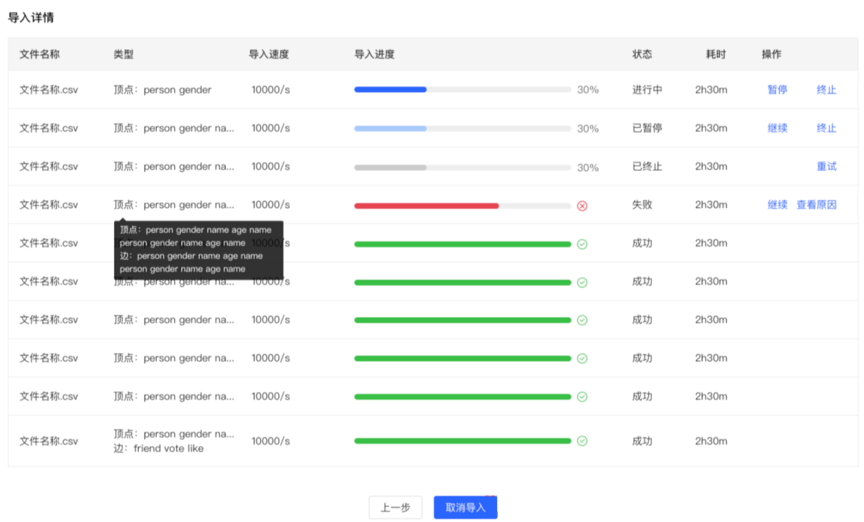
4.4 图查询
4.4.1 模块入口
左侧导航「图查询」下的【GQL 图遍历】:

4.4.2 多图切换
顶部栏承载当前图空间和图,可在不离开页面的情况下灵活切换多图的操作空间
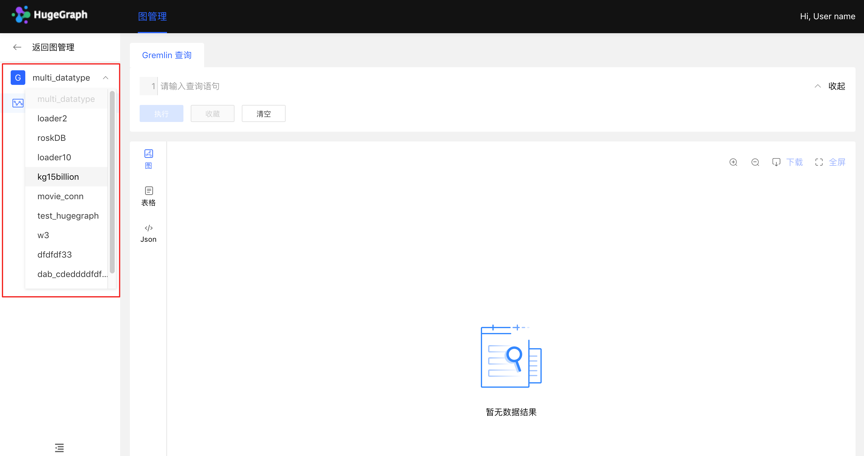
4.4.3 图分析与处理
HugeGraph 支持 Apache TinkerPop3 的图遍历查询语言 Gremlin,Gremlin 是一种通用的图数据库查询语言,通过输入 Gremlin 语句,点击执行,即可执行图数据的查询分析操作,并可实现顶点/边的创建及删除、顶点/边的属性修改等。当所连接的 Server 支持 Cypher 时,Gremlin 旁边会出现 Cypher 页签。Text2GQL 页签仅为界面预览,并未接入任何模型或查询服务,其中输入的内容不会被发送或执行。
每条语句可以按两种模式执行:立即查询直接返回结果,适合 30 秒内可完成的小规模分析;异步执行则提交一个任务,进度和结果在异步任务中查看。Ctrl/Command + Enter 可执行当前语句。
查询后,下方为图结果展示区域,提供 3 种图结果展示方式,分别为:【图模式】、【表格模式】、【Json 模式】。图画布支持 2D 与 3D 渲染。
⚠️ SEC 提醒:Hubble 允许在网页端直接输入并执行 Gremlin 原生查询语句,这赋予了使用者较高的操作权限。请避免将 Hubble 服务暴露在公网环境,建议在使用时确保图数据库服务端已开启 鉴权体系 (Auth) 并配合 IP 白名单进行严格的权限控制,防止未授权访问或恶意代码执行风险。
支持缩放、居中、全屏、布局与样式配置、图例、缩略图、撤销与重做、导出等操作。画布可导出为 JSON、CSV 或图片,导出的画布也可以再次导入。
【图模式】
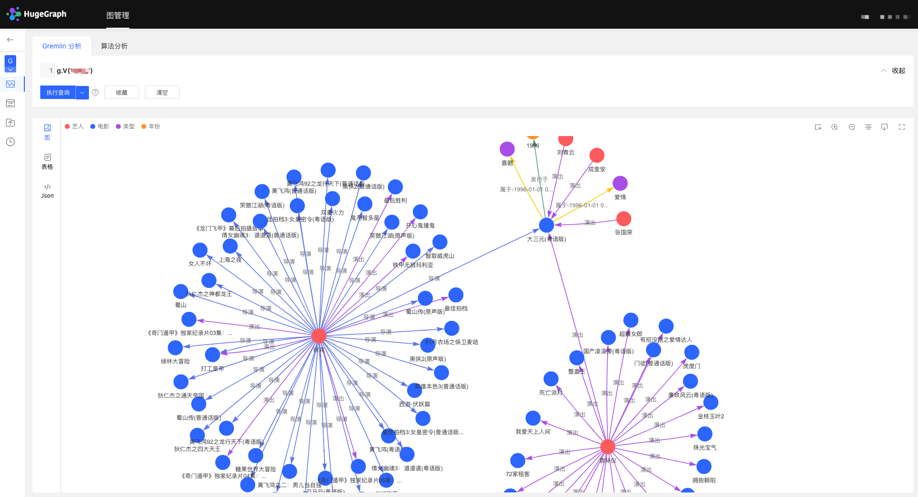
【表格模式】
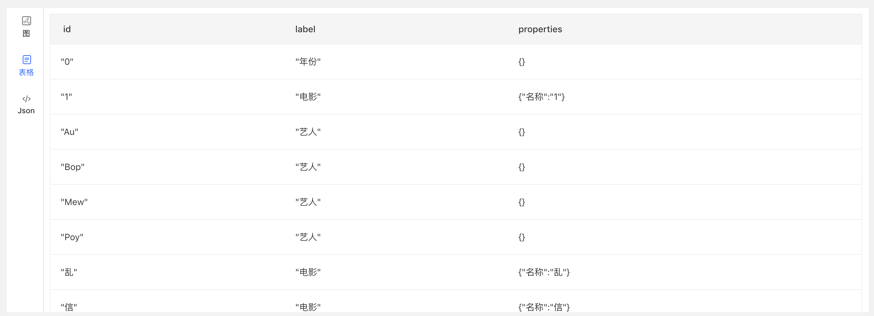
【Json 模式】
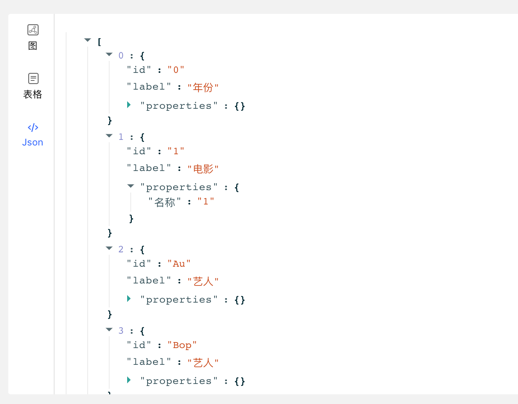
4.4.4 数据详情
点击顶点/边实体,可查看顶点/边的数据详情,包括:顶点/边类型,顶点 ID,属性及对应值,拓展图的信息展示维度,提高易用性。
4.4.5 图结果的多维路径查询
除了全局的查询外,可针对查询结果中的顶点进行深度定制化查询以及隐藏操作,实现图结果的定制化挖掘。
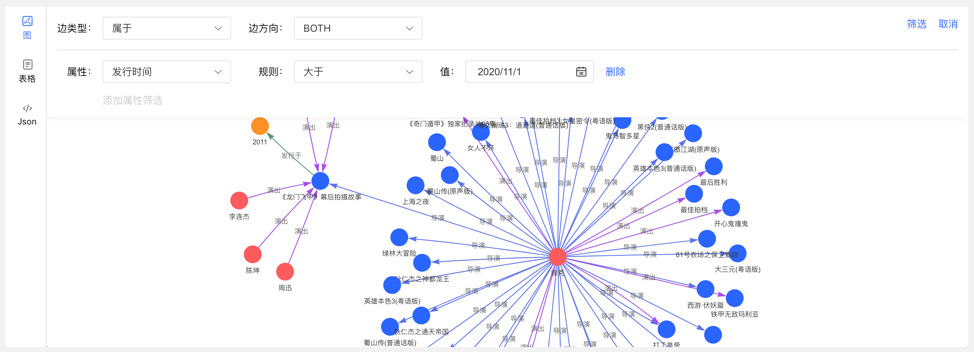
右击顶点,出现顶点的菜单入口,可进行展示、查询、隐藏等操作。
- 展开:点击后,展示与选中点关联的顶点。
- 查询:通过选择与选中点关联的边类型及边方向,在此条件下,再选择其属性及相应筛选规则,可实现定制化的路径展示。
- 隐藏:点击后,隐藏选中点及与之关联的边。
双击顶点,也可展示与选中点关联的顶点。
4.4.6 新增顶点/边
4.4.6.1 新增顶点
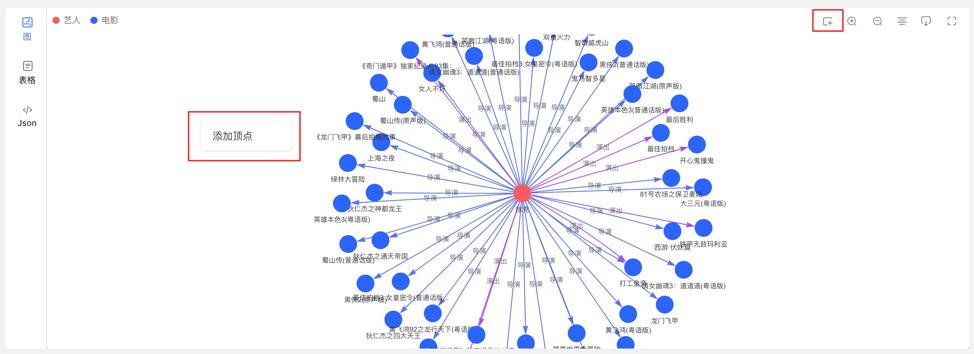
在图区可通过两个入口,动态新增顶点,如下:
- 点击图区面板,出现添加顶点入口
- 点击右上角的操作栏中的首个图标
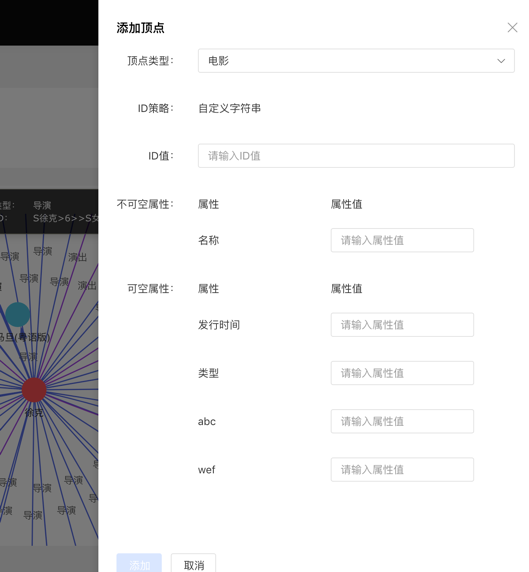
通过选择或填写顶点类型、ID 值、属性信息,完成顶点的增加。
入口如下:
添加顶点内容如下:
4.4.6.2 新增边
右击图结果中的顶点,可增加该点的出边或者入边。
4.4.7 执行记录与收藏的查询
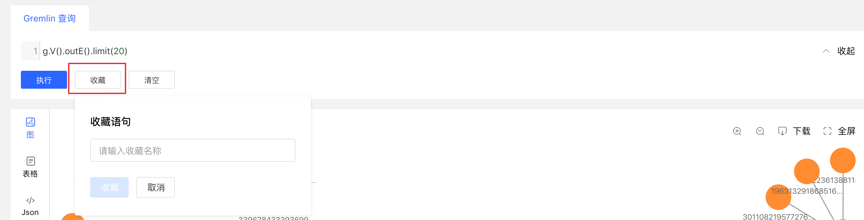
- 图区下方记载每次查询记录,包括:查询时间、执行类型、内容、状态、耗时、以及【收藏】和【加载】操作,实现图执行的全方位记录,有迹可循,并可对执行内容快速加载复用
- 提供语句的收藏功能,可对常用语句进行收藏操作,方便高频语句快速调用
4.5 异步任务
4.5.1 模块入口
左侧导航「图查询」下的【异步任务】:

4.5.2 任务管理
- 提供异步任务的统一的管理与结果查看,任务类型包括:
- gremlin:Gremlin 任务
- cypher:Cypher 任务
- computer-dis:算法任务
- remove_schema:删除元数据
- create_index:创建索引
- rebuild_index:重建索引
- vermeer-task:load:Vermeer 图加载任务
- vermeer-task:compute:Vermeer 图计算任务
- 列表显示当前图的异步任务信息,包括:任务 ID,任务名称,任务类型,创建时间,耗时,状态,操作,实现对异步任务的管理。列表每 5 秒自动刷新一次。
- 支持对任务类型和状态进行筛选
- 支持搜索任务 ID 和任务名称
- 运行中的任务可以取消,异步任务可进行删除或批量删除操作
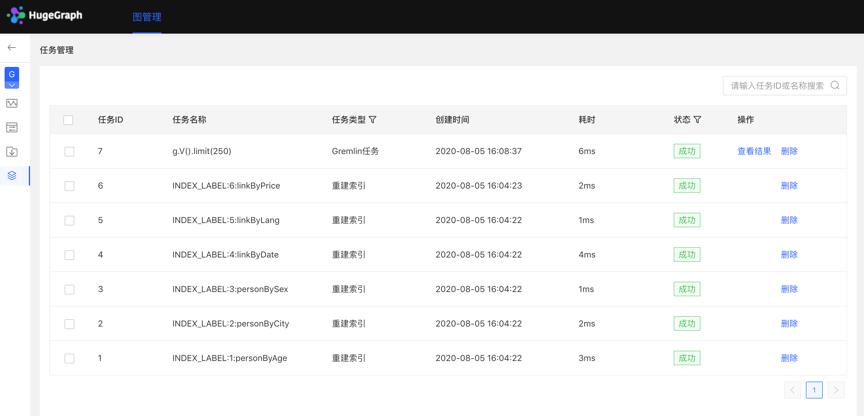
4.5.3 Gremlin 异步任务
1.创建任务
- 图查询模块支持两种执行方式:立即查询和异步任务;若用户切换到异步方式,点击执行后,在异步任务中心会建立一条异步任务;Cypher 语句同理会建立一条 Cypher 任务; 2.任务提交
- 任务提交成功后,图区部分返回提交结果和任务 ID 3.任务详情
- 提供【查看】入口,可跳转到任务详情查看当前任务具体执行情况跳转到任务中心后,直接显示当前执行的任务行
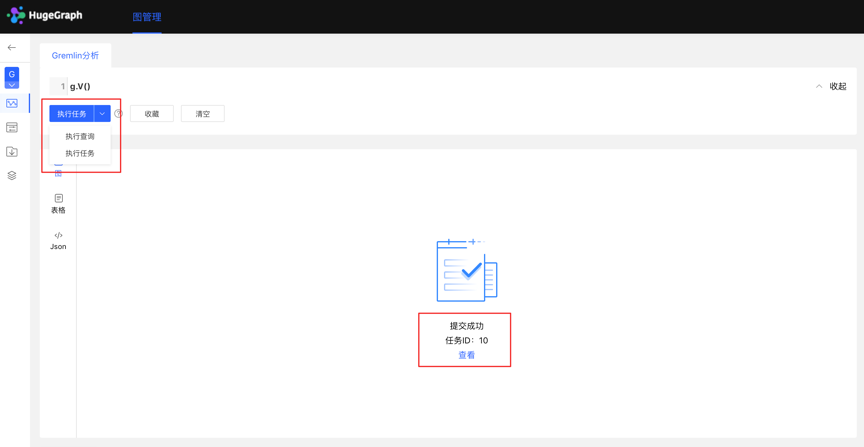
点击查看入口,跳转到任务管理列表,如下:
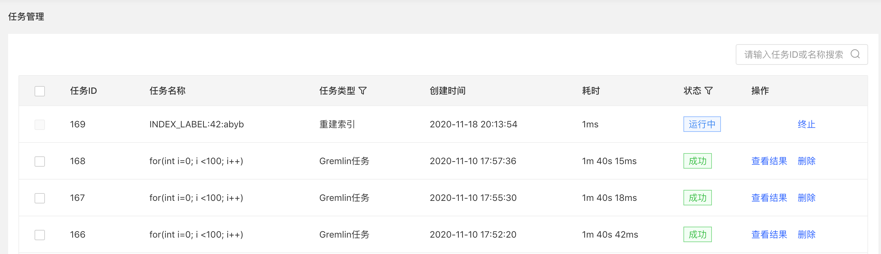
4.查看结果
- 结果通过 json 形式展示,较长的结果可以就地展开
4.5.4 算法任务
从【内置图算法】提交的批量算法会在这里以算法任务的形式出现,Vermeer 的图加载与图计算任务同理。可在列表中通过 ID 找到相应任务,打开后查看进度与结果等。算法表单本身见 4.6 节。
4.5.5 删除元数据、重建索引
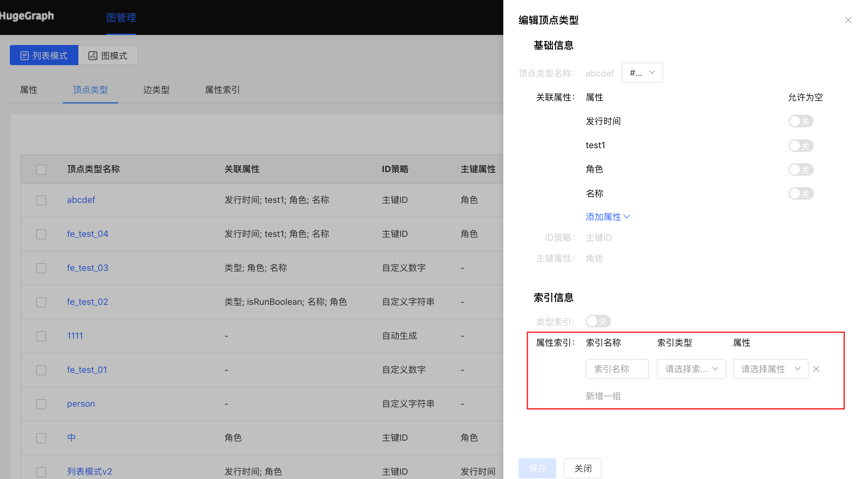
1.创建任务
- 在元数据建模模块中,删除元数据时,可建立删除元数据的异步任务
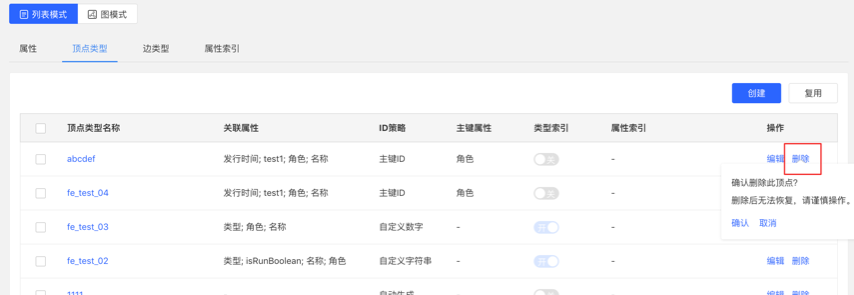
- 在编辑已有的顶点/边类型操作中,新增索引时,可建立创建索引的异步任务
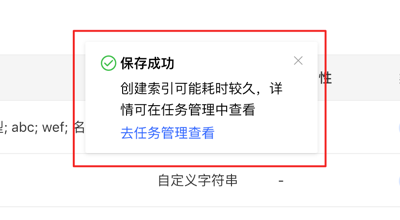
2.任务详情
- 确认/保存后,可跳转到任务中心查看当前任务的详情
4.6 内置图算法
「图查询」下的【内置图算法】为 Server 提供的算法给出参数表单,并按用途分组:探索邻居、寻找路径与连接、比较与排序、度量重要性、发现社区、分析图结构。每个算法都提供指向官方 API 文档的链接。
支持两种执行方式:
- 交互式探索调用 Server 的 OLTP traverser 接口并直接返回结果,覆盖 K-out 与 K-neighbor,单源、带权和多点形式的最短路径,路径与全部路径,定制化路径与模板路径,环与射线,交点与定制化交点,共同邻居,Jaccard 相似度,Fusiform 相似度,Adamic-Adar,资源分配,Egonet,以及 rank 与 neighbor rank 接口。
- 集群批量计算提交一个覆盖全图的异步任务,结果在异步任务中查看,覆盖 PageRank 与个性化 PageRank,度中心性、接近中心性与介数中心性,K-core,弱连通分量,标签传播,Louvain,三角形计数,聚类系数,环检测,子图匹配与 Links;在提供 Vermeer 的部署中还有对应的 Vermeer 版本。
批量算法需要 HugeGraph Computer 环境,部署要求时还包括 Kubernetes。当无法访问 Computer 时,页面会直接提示而不会提交任务。
4.7 登录与账号管理
当所连接的 Server 开启了鉴权时,Hubble 会打开 /login 登录页。请使用 HugeGraph Server 账号登录:Hubble 会把凭据转发给 Server,并在浏览器会话中保存返回的 token,自身不存储任何账号。登录尝试受限流保护,同一账号与地址连续失败三次之后,后续尝试会开始退避,初始 5 秒并逐次翻倍,最长 600 秒。当 Server 允许匿名访问时,/login 会重定向到首页,个人中心和账号管理页面也会隐藏。
【个人中心】展示账号信息并可修改密码。【账号管理】面向具备账号管理或图空间成员管理能力的账号,可创建账号并分配四种权限预设之一:超级管理员、GraphSpace 只读、GraphSpace 读写、GraphSpace 管理员。界面上不再暴露底层的 role、target、access、belong 记录。
4.8 集群运维
在 PD 模式下,【系统与运维】会为具备相应能力的账号提供【集群概览】和【节点详情】。集群概览展示拓扑、各层级的节点状态,以及在线 Store 数、PD Leader、容量、数据量、图数、分区数、副本数等集群概况。节点详情列出所有发现到的节点,支持按类型和状态筛选,并可打开单个节点查看指标、Leader 角色和 Raft 分片。节点详情在单机模式下同样可用,集群概览则需要 PD。
导航页还可以通过 dashboard.address 链接一个可选的外部监控面板。它是独立的监控入口,不配置也不会影响集群概览和节点详情。
5 配置说明
HugeGraph-Hubble 可以通过 conf/hugegraph-hubble.properties 文件进行配置。
5.1 服务配置
| 配置项 | 默认值 | 说明 |
|---|---|---|
server.host | localhost | Hubble 服务绑定的地址,Docker 镜像会改写为 0.0.0.0 |
server.port | 8088 | Hubble 服务监听的端口 |
server.protocol | http | 访问 HugeGraphServer 使用的协议,可选 http 或 https |
ssl.client_truststore_file | conf/hugegraph.truststore | 客户端 truststore 路径,server.protocol=https 时使用 |
ssl.client_truststore_password | hugegraph | 客户端 truststore 密码,server.protocol=https 时使用 |
5.2 Server 与 PD
| 配置项 | 默认值 | 说明 |
|---|---|---|
pd.enabled | false | 是否通过 PD 发现服务;单机 Server 保持为 false |
server.direct_url | http://127.0.0.1:8080 | pd.enabled=false 时连接的 Server 地址 |
pd.peers | 127.0.0.1:8686 | PD 节点地址 |
pd.server | 127.0.0.1:8620 | PD 服务地址 |
cluster | hg | Hubble 连接的集群名称 |
route.type | NODE_PORT | 服务路由方式,可选 NODE_PORT、DDS 或 BOTH |
client.request_timeout | 60 | HugeGraph 客户端请求超时时间(秒) |
client.url_cache_max_entries | 1024 | 保留用于回退的已发现 URL 数量上限 |
5.3 Gremlin 查询限制
这些设置控制查询结果限制,防止内存问题:
| 配置项 | 默认值 | 说明 |
|---|---|---|
gremlin.suffix_limit | 250 | 查询后缀最大长度 |
gremlin.vertex_degree_limit | 100 | 显示的最大顶点度数 |
gremlin.edges_total_limit | 500 | 返回的最大边数 |
gremlin.batch_query_ids | 100 | ID 批量查询大小 |
execute-history.show_limit | 500 | 展示的执行记录条数上限 |
5.4 文件上传
以下配置项不在打包的配置文件中,如需覆盖默认值请自行添加。
| 配置项 | 默认值 | 说明 |
|---|---|---|
upload_file.location | upload-files | 存放上传文件的目录 |
upload_file.format_list | csv,txt | 允许上传的文件格式 |
upload_file.single_file_size_limit | 1 GB | 单个上传文件的大小上限 |
upload_file.total_file_size_limit | 10 GB | 上传文件的总大小上限 |
upload_file.max_uploading_time | 43200 | 超过该秒数后清理未完成的上传分片 |
5.5 集群运维
以下配置项用于集群概览和节点详情页面。
| 配置项 | 默认值 | 说明 |
|---|---|---|
operations.connect_timeout_ms | 1500 | 每个运维上游的连接超时 |
operations.read_timeout_ms | 2500 | 每个运维上游的读取超时 |
operations.max_response_bytes | 1048576 | 接受的运维上游响应体大小上限 |
operations.cache_ttl_seconds | 5 | 运维快照缓存的有效期 |
operations.cache_max_entries | 1024 | 跨凭据保留的运维快照数量 |
operations.store_threads | 16 | Store 指标采集的并发任务数 |
operations.store_deadline_ms | 5000 | 一轮 Store 指标采集的截止时间 |
operations.store.allowed_targets | [http://127.0.0.1:8520,http://[::1]:8520] | Hubble 允许访问的 Store 指标来源(精确匹配) |
operations.pd.username / operations.pd.password | hubble / 空 | 仅后端使用的 PD 服务身份 |
operations.store.username / operations.store.password | hubble / 空 | 仅后端使用的 Store 服务身份 |
dashboard.address | 127.0.0.1:8092 | 可选的外部监控面板地址,留空则隐藏入口 |
operations.store.allowed_targets的默认值仅适用于本地测试。生产部署必须显式列出每一个受信任的 Store 协议、主机和端口,服务发现不会向该白名单追加来源。HTTPS 来源会保留其配置的主机名用于 TLS SNI 与证书校验。PD 和 Store 的密码请通过受保护的部署配置提供,不要写入打包的配置文件。
2.3 - HugeGraph-Loader Quick Start
1 HugeGraph-Loader 概述
HugeGraph-Loader 是 HugeGraph 的数据导入组件,能够将多种数据源的数据转化为图的顶点和边并批量导入到图数据库中。
目前支持的数据源包括:
- 本地磁盘文件或目录,支持 TEXT、CSV 和 JSON 格式的文件,支持压缩文件
- HDFS 文件或目录,支持压缩文件
- 主流关系型数据库,如 MySQL、PostgreSQL、Oracle、SQL Server
- Kafka topic
- 已有的 HugeGraph 图,用于把数据从一个图复制到另一个图
本地磁盘文件和 HDFS 文件支持断点续传。
后面会具体说明。
注意:使用 HugeGraph-Loader 需要依赖 HugeGraph Server 服务,下载和启动 Server 请参考 HugeGraph-Server Quick Start
测试指南:如需在本地运行 Loader 测试,请参考 工具链本地测试指南
2 获取 HugeGraph-Loader
可以通过以下三种方式获取 HugeGraph-Loader:
- 使用 Docker 镜像 (便于测试)
- 下载已编译的压缩包
- 克隆源码编译安装
2.1 使用 Docker 镜像 (便于测试)
我们可以使用 docker run -itd --name loader hugegraph/loader:1.7.0 部署 loader 服务。对于需要加载的数据,则可以通过挂载 -v /path/to/data/file:/loader/file 或者 docker cp 的方式将文件复制到 loader 容器内部。
或者使用 docker-compose 启动 loader, 启动命令为 docker-compose up -d, 样例的 docker-compose.yml 如下所示:
具体的数据导入流程可以参考 4.5 使用 docker 导入
注意:
hugegraph-loader 的 docker 镜像是一个便捷版本,用于快速启动 loader,并不是官方发布物料包方式。你可以从 ASF Release Distribution Policy 中得到更多细节。
推荐使用
release tag(如1.7.0) 以获取稳定版。使用latesttag 可以使用开发中的最新功能。
2.2 下载已编译的压缩包
下载最新版本的 HugeGraph-Toolchain Release 包,里面包含了 loader + tool + hubble 全套工具,如果你已经下载,可跳过重复步骤
2.3 克隆源码编译安装
克隆最新版本的 HugeGraph-Loader 源码包:
由于 Oracle ojdbc license 的限制,需要手动安装 ojdbc 到本地 maven 仓库。 访问 Oracle jdbc 下载 页面。选择 Oracle Database 12c Release 2 (12.2.0.1) drivers,如下图所示。
打开链接后,选择“ojdbc8.jar”
把 ojdbc8 安装到本地 maven 仓库,进入ojdbc8.jar所在目录,执行以下命令。
编译生成 tar 包:
3 使用流程
使用 HugeGraph-Loader 的基本流程分为以下几步:
- 编写图模型
- 准备数据文件
- 编写输入源映射文件
- 执行命令导入
3.1 编写图模型
这一步是建模的过程,用户需要对自己已有的数据和想要创建的图模型有一个清晰的构想,然后编写 schema 建立图模型。
比如想创建一个拥有两类顶点及两类边的图,顶点是"人"和"软件",边是"人认识人"和"人创造软件",并且这些顶点和边都带有一些属性,比如顶点"人"有:“姓名”、“年龄"等属性, “软件"有:“名字”、“售卖价格"等属性;边"认识"有:“日期"属性等。
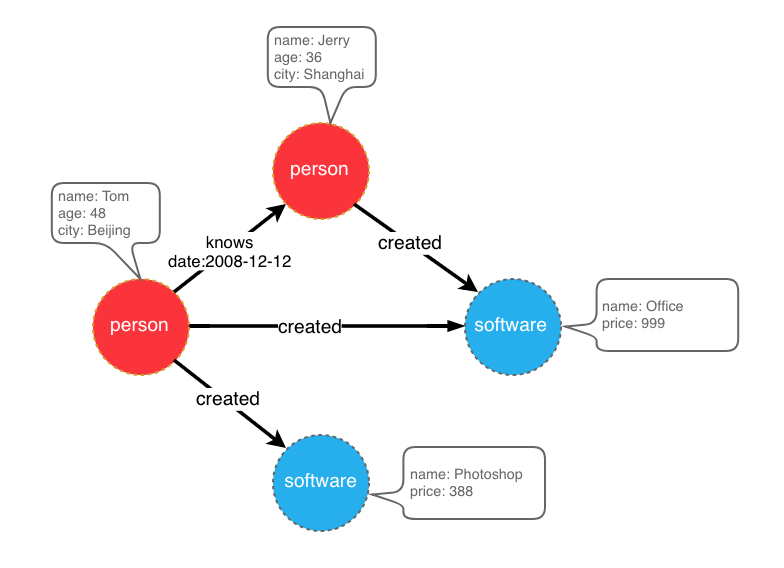
示例图模型
在设计好了图模型之后,我们可以用groovy编写出schema的定义,并保存至文件中,这里命名为schema.groovy。
关于 schema 的详细说明请参考 hugegraph-client 中对应部分。
3.2 准备数据
目前 HugeGraph-Loader 支持的数据源包括:
- 本地磁盘文件或目录
- HDFS 文件或目录
- 部分关系型数据库
- Kafka topic
- 已有的 HugeGraph 图
3.2.1 数据源结构
3.2.1.1 本地磁盘文件或目录
用户可以指定本地磁盘文件作为数据源,如果数据分散在多个文件中,也支持以某个目录作为数据源,但暂时不支持以多个目录作为数据源。
比如:我的数据分散在多个文件中,part-0、part-1 … part-n,要想执行导入,必须保证它们是放在一个目录下的。然后在 loader 的映射文件中,将path指定为该目录即可。
支持的文件格式包括:
- TEXT
- CSV
- JSON
TEXT 是自定义分隔符的文本文件,第一行通常是标题,记录了每一列的名称,也允许没有标题行(在映射文件中指定)。其余的每行代表一条记录,会被转化为一个顶点/边;行的每一列对应一个字段,会被转化为顶点/边的 id、label 或属性;
示例如下:
CSV 是分隔符为逗号,的 TEXT 文件,当列值本身包含逗号时,该列值需要用双引号包起来,如:
JSON 文件要求每一行都是一个 JSON 串,且每行的格式需保持一致。
3.2.1.2 HDFS 文件或目录
用户也可以指定 HDFS 文件或目录作为数据源,上面关于本地磁盘文件或目录的要求全部适用于这里。除此之外,鉴于 HDFS 上通常存储的都是压缩文件,loader 也提供了对压缩文件的支持,并且本地磁盘文件或目录同样支持压缩文件。
目前支持的压缩文件类型包括:GZIP、BZ2、XZ、LZMA、SNAPPY_RAW、SNAPPY_FRAMED、Z、DEFLATE、LZ4_BLOCK、LZ4_FRAMED、ORC 和 PARQUET。
3.2.1.3 主流关系型数据库
loader 还支持以部分关系型数据库作为数据源,目前支持 MySQL、PostgreSQL、Oracle 和 SQL Server。
但目前对表结构要求较为严格,如果导入过程中需要做关联查询,这样的表结构是不允许的。关联查询的意思是:在读到表的某行后,发现某列的值不能直接使用(比如外键),需要再去做一次查询才能确定该列的真实值。
举个例子:假设有三张表,person、software 和 created
如果在建模(schema)时指定 person 或 software 的 id 策略是 PRIMARY_KEY,选择以 name 作为 primary keys(注意:这是 hugegraph 中 vertexlabel 的概念),在导入边数据时,由于需要拼接出源顶点和目标顶点的 id,必须拿着 p_id/s_id 去 person/software 表中查到对应的 name,这种需要做额外查询的表结构的情况,loader 暂时是不支持的。这时可以采用以下两种方式替代:
- 仍然指定 person 和 software 的 id 策略为 PRIMARY_KEY,但是以 person 表和 software 表的 id 列作为顶点的主键属性,这样导入边时直接使用 p_id 和 s_id 和顶点的 label 拼接就能生成 id 了;
- 指定 person 和 software 的 id 策略为 CUSTOMIZE,然后直接以 person 表和 software 表的 id 列作为顶点 id,这样导入边时直接使用 p_id 和 s_id 即可;
关键点就是要让边能直接使用 p_id 和 s_id,不要再去查一次。
3.2.2 准备顶点和边数据
3.2.2.1 顶点数据
顶点数据文件由一行一行的数据组成,一般每一行作为一个顶点,每一列会作为顶点属性。下面以 CSV 格式作为示例进行说明。
- person 顶点数据(数据本身不包含 header)
- software 顶点数据(数据本身包含 header)
3.2.2.2 边数据
边数据文件由一行一行的数据组成,一般每一行作为一条边,其中有部分列会作为源顶点和目标顶点的 id,其他列作为边属性。下面以 JSON 格式作为示例进行说明。
- knows 边数据
- created 边数据
3.3 编写数据源映射文件
3.3.1 映射文件概述
输入源的映射文件用于描述如何将输入源数据与图的顶点类型/边类型建立映射关系,以JSON格式组织,由多个映射块组成,其中每一个映射块都负责将一个输入源映射为顶点和边。
具体而言,每个映射块包含一个输入源和多个顶点映射与边映射块,输入源块对应上面介绍的本地磁盘文件或目录、HDFS 文件或目录和关系型数据库,负责描述数据源的基本信息,比如数据在哪,是什么格式的,分隔符是什么等。顶点映射/边映射与该输入源绑定,可以选择输入源的哪些列,哪些列作为 id、哪些列作为属性,以及每一列映射成什么属性,列的值映射成属性的什么值等等。
以最通俗的话讲,每一个映射块描述了:要导入的文件在哪,文件的每一行要作为哪一类顶点/边,文件的哪些列是需要导入的,以及这些列对应顶点/边的什么属性等。
注意:0.11.0 版本以前的映射文件与 0.11.0 以后的格式变化较大,为表述方便,下面称 0.11.0 以前的映射文件(格式)为 1.0 版本,0.11.0 以后的为 2.0 版本。并且若无特殊说明,“映射文件”表示的是 2.0 版本的。
这里直接给出两个版本的映射文件(描述了上面图模型和数据文件)
映射文件 1.0 版本是以顶点和边为中心,设置输入源;而 2.0 版本是以输入源为中心,设置顶点和边映射。有些输入源(比如一个文件)既能生成顶点,也能生成边,如果用 1.0 版的格式写,就需要在 vertex 和 edge 映射块中各写一次 input 块,这两次的 input 块是完全一样的;而 2.0 版本只需要写一次 input。所以 2.0 版相比于 1.0 版,能省掉一些 input 的重复书写。
在 hugegraph-loader-{version} 的 bin 目录下,有一个脚本工具 mapping-convert.sh 能直接将 1.0 版本的映射文件转换为 2.0 版本的,使用方式如下:
会在 struct.json 的同级目录下生成一个 struct-v2.json。
bin 目录下还提供了 utf8-bom-to-utf8.sh,用于去掉单个数据文件、或目录下所有文件开头的 UTF-8 BOM。当 Windows 工具导出的 CSV 或 TEXT 文件因为首列表头带有不可见的 BOM 而解析失败时,可以用它处理:
3.3.2 输入源
输入源目前分为五类:FILE、HDFS、JDBC、KAFKA 和 GRAPH,由type节点区分,我们称为本地文件输入源、HDFS 输入源、JDBC 输入源和 KAFKA 输入源,图数据源,下面分别介绍。
3.3.2.1 本地文件输入源
- id: 输入源的 id,该字段用于支持一些内部功能,非必填(未填时会自动生成),强烈建议写上,对于调试大有裨益;
- skip: 是否跳过该输入源,由于 JSON 文件无法添加注释,如果某次导入时不想导入某个输入源,但又不想删除该输入源的配置,则可以设置为 true 将其跳过,默认为 false,非必填;
- input: 输入源映射块,复合结构
- type: 输入源类型,必须填 file 或 FILE;
- path: 本地文件或目录的路径,绝对路径或相对于映射文件的相对路径,建议使用绝对路径,必填;
- file_filter: 从
path中筛选复合条件的文件,复合结构,目前只支持配置扩展名,用子节点extensions表示,默认为”*",表示保留所有文件; - format: 本地文件的格式,可选值为 CSV、TEXT 及 JSON,必须大写,默认为 CSV,选填;
- header: 文件各列的列名,如不指定则会以数据文件第一行作为 header;当文件本身有标题且又指定了 header,文件的第一行会被当作普通的数据行;JSON 文件不需要指定 header,选填;
- has_header: 对 CSV 和 TEXT 格式,如果某个文件的首行与 header 完全相同,该行会被丢弃,这样目录下每个分片文件重复的表头不会被当作数据导入。如果分片文件的首行是恰好与 header 相同的真实数据,可以设为
false关闭这个检查,选填; - delimiter: 文件行的列分隔符。默认值取决于
format:CSV 为逗号",",TEXT 为制表符"\t";CSV 只接受逗号。JSON文件不需要指定,选填; - charset: 文件的编码字符集,默认
UTF-8,选填; - date_format: 自定义的日期格式,默认值为 yyyy-MM-dd HH:mm:ss,选填;如果日期是以时间戳的形式呈现的,此项须写为
timestamp(固定写法); - extra_date_formats: 备用日期格式列表,当某个值不符合
date_format时会逐个尝试,默认为空,选填; - time_zone: 设置日期数据是处于哪个时区的,默认值为
GMT+8,选填; - skipped_line: 想跳过的行,复合结构,目前只能配置要跳过的行的正则表达式,用子节点
regex描述。默认正则为(^#|^//).*|,即跳过以#或//开头的行以及空行;如果需要保留这类行,把regex改为一个不匹配任何行的表达式即可,选填; - compression: 文件的压缩格式,可选值为 NONE、GZIP、BZ2、XZ、LZMA、SNAPPY_RAW、SNAPPY_FRAMED、Z、DEFLATE、LZ4_BLOCK、LZ4_FRAMED、ORC 和 PARQUET,默认为 NONE,表示非压缩文件,选填;ORC 和 PARQUET 的 header 匹配不区分大小写;
- list_format: 当文件 (非 JSON ) 的某列是集合结构时(对应图中的 PropertyKey 的 Cardinality 为 Set 或 List),可以用此项设置该列的起始符、分隔符、结束符,复合结构:
- start_symbol: 集合结构列的起始符 (默认值是空字符串
"", JSON 格式目前不支持指定) - elem_delimiter: 集合结构列的分隔符 (默认值是
|, 且不能与delimiter相同; JSON 格式目前只支持原生,分隔) - end_symbol: 集合结构列的结束符 (默认值是空字符串
"", JSON 格式目前不支持指定) - ignored_elems: 拆分之后要丢弃的元素,默认值是
[""],即忽略空元素
- start_symbol: 集合结构列的起始符 (默认值是空字符串
3.3.2.2 HDFS 输入源
上述本地文件输入源的节点及含义这里基本都适用,下面仅列出 HDFS 输入源不一样的和特有的节点。
- type: 输入源类型,必须填 hdfs 或 HDFS,必填;
- path: HDFS 文件或目录的路径,必须是 HDFS 的绝对路径,必填;
- core_site_path: HDFS 集群的 core-site.xml 文件路径,重点要指明 NameNode 的地址(
fs.default.name),以及文件系统的实现(fs.hdfs.impl),必填; - hdfs_site_path: HDFS 集群的 hdfs-site.xml 文件路径,选填;
- dir_filter: 当
path是目录时,决定递归进入哪些子目录,复合结构,选填:- include_regex: 只读取目录名匹配该正则的目录,默认为空,即不作限制;
- exclude_regex: 跳过目录名匹配该正则的目录,默认为空;
- kerberos_config: 访问开启了 Kerberos 认证的 HDFS 集群时的配置,复合结构,选填:
- enable: 是否使用 Kerberos 认证,默认为 false;
- krb5_conf: krb5.conf 文件路径,
enable为 true 时必填; - principal: Kerberos principal,
enable为 true 时必填; - keytab: keytab 文件路径,
enable为 true 时必填;
3.3.2.3 JDBC 输入源
前面说到过支持多种关系型数据库,但由于它们的映射结构非常相似,故统称为 JDBC 输入源,然后用vendor节点区分不同的数据库。
- type: 输入源类型,必须填 jdbc 或 JDBC,必填;
- vendor: 数据库类型,可选项为 [MySQL、PostgreSQL、Oracle、SQLServer],不区分大小写,必填;
- driver: JDBC driver 类名,选填;不填时使用
vendor对应的默认 driver,见下面各表; - url: jdbc 要连接的数据库的 url,必填;
- database: 要连接的数据库名,必填;
- schema: 要连接的 schema 名,不同的数据库要求不一样,下面详细说明;
- table: 要连接的表名,
custom_sql和table参数必须填其中一个; - custom_sql: 自定义 SQL 语句,
custom_sql和table参数必须填其中一个; - username: 连接数据库的用户名,必填;
- password: 连接数据库的密码,必填;
- where: 附加到生成的 select 语句上的过滤条件,不需要写 where 关键字,选填;
- batch_size: 按页获取表数据时的一页的大小,默认为 500,选填;
MYSQL
| 节点 | 固定值或常见值 |
|---|---|
| vendor | MYSQL |
| driver | com.mysql.cj.jdbc.Driver |
| url | jdbc:mysql://127.0.0.1:3306 |
schema: 可空,若填写必须与 database 的值一样
POSTGRESQL
| 节点 | 固定值或常见值 |
|---|---|
| vendor | POSTGRESQL |
| driver | org.postgresql.Driver |
| url | jdbc:postgresql://127.0.0.1:5432 |
schema: 可空,默认值为“public”
ORACLE
| 节点 | 固定值或常见值 |
|---|---|
| vendor | ORACLE |
| driver | oracle.jdbc.driver.OracleDriver |
| url | jdbc:oracle:thin:@127.0.0.1:1521 |
schema: 可空,默认值为大写形式的用户名
SQLSERVER
| 节点 | 固定值或常见值 |
|---|---|
| vendor | SQLSERVER |
| driver | com.microsoft.sqlserver.jdbc.SQLServerDriver |
| url | jdbc:sqlserver://127.0.0.1:1433 |
schema: 必填
3.3.2.4 Kafka 输入源
- type:输入源类型,必须填
kafka或KAFKA,必填; - bootstrap_server:kafka bootstrap server 列表,必填;
- topic:订阅的 topic,必填;
- group:Kafka 消费者组,必填;
- from_beginning:是否从 topic 最早的 offset 开始读取(
auto.offset.reset=earliest),否则从最新 offset 开始,默认为 false,选填; - format:每条消息的格式,可选值为 CSV、TEXT 及 JSON,必须大写,必填;
- header:消息各列的列名;loader 不会从 topic 中读取表头行,因此 CSV 和 TEXT 格式必须指定,JSON 消息则不需要;
- delimiter:消息的列分隔符,仅 TEXT 格式使用,CSV 固定以
,分隔,选填; - charset:消息的编码字符集,默认 UTF-8,选填;
- date_format:自定义的日期格式,默认值为 yyyy-MM-dd HH:mm:ss,选填;如果日期是以时间戳的形式呈现的,此项须写为 timestamp(固定写法);
- extra_date_formats:自定义的其他日期格式列表,默认为空,选填;列表中每一项都是一个 date_format 指定日期格式的备用日期格式;
- time_zone:置日期数据是处于哪个时区的,默认值为 GMT+8,选填;
- skipped_line:想跳过的行,复合结构,目前只能配置要跳过的行的正则表达式,用子节点 regex 描述,默认不跳过任何行,选填;
- batch_size:单次拉取的最大记录数(
max.poll.records),默认为 500,选填; - early_stop:某次从 Kafka broker 拉取的记录为空,停止任务,默认为 false,仅用于调试,选填;
3.3.2.5 GRAPH 输入源
GRAPH 输入源从另一个 HugeGraph 图(通过 HugeGraph-PD 访问)读取顶点和边,并写入目标图。当映射文件中出现 GRAPH 输入源时,该文件中所有未被跳过的输入源都必须是 GRAPH 类型,并且导入期间 loader 会把目标图切换为 RESTORING 模式。
- type:输入源类型,必须填
graph或GRAPH,必填; - graphspace:源图空间名称,必填;
- graph: 源图名称,必填;
- username:HugeGraph 用户名;为空时使用命令行参数
--username; - password:HugeGraph 密码;为空时使用命令行参数
--password; - selected_vertices:要复制的顶点 label 列表,每一项形如
{"label": "...", "properties": [...], "query": {...}},其中properties限定要复制的属性,query是传给源图的可选过滤条件; - ignored_vertices:要跳过的顶点 label 列表,每一项形如
{"label": "...", "properties": [...]}; - selected_edges:要复制的边 label 列表,每一项结构与
selected_vertices相同; - ignored_edges:要跳过的边 label 列表,每一项结构与
ignored_vertices相同; - pd-peers:源集群的 HugeGraph-PD 节点地址;为空时使用
--pd-peers; - meta-endpoints:源集群 Meta 服务端点;为空时使用
--meta-endpoints; - cluster:源集群名称;为空时使用
--cluster; - batch_size:批量读取源图数据的批次大小,默认为500;
3.3.3 顶点和边映射
顶点和边映射的节点(JSON 文件中的一个 key)有很多相同的部分,下面先介绍相同部分,再分别介绍顶点映射和边映射的特有节点。
相同部分的节点
- label: 待导入的顶点/边数据所属的
label,必填; - skip: 是否跳过该顶点/边映射,输入源和其他映射不受影响,默认为 false,选填;
- field_mapping: 将输入源列的列名映射为顶点/边的属性名,选填;
- value_mapping: 将输入源的数据值映射为顶点/边的属性值,选填;
- selected: 选择某些列插入,其他未选中的不插入,不能与
ignored同时存在,选填; - ignored: 忽略某些列,使其不参与插入,不能与
selected同时存在,选填; - null_values: 可以指定一些字符串代表空值,比如"NULL”,如果该列对应的顶点/边属性又是一个可空属性,那在构造顶点/边时不会设置该属性的值,选填;
- update_strategies: 如果数据需要按特定方式批量更新时可以对每个属性指定具体的更新策略 (具体见下),选填;
- unfold: 是否将列展开,展开的每一列都会与其他列一起组成一行,相当于是展开成了多行;比如文件的某一列(id 列)的值是
[1,2,3],其他列的值是18,Beijing,当设置了 unfold 之后,这一行就会变成 3 行,分别是:1,18,Beijing,2,18,Beijing和3,18,Beijing。需要注意的是此项只会展开被选作为 id 的列。默认 false,选填;
更新策略支持 8 种 : (需要全大写)
- 数值累加 :
SUM - 两个数字/日期取更大的:
BIGGER - 两个数字/日期取更小:
SMALLER - Set属性取并集:
UNION - Set属性取交集:
INTERSECTION - List属性追加元素:
APPEND - List/Set属性删除元素:
ELIMINATE - 覆盖已有属性:
OVERRIDE
注意: 如果新导入的属性值为空,会采用已有的旧数据而不会采用空值,效果可以参考如下示例
注意 : 采用了批量更新的策略后, 磁盘读请求数会大幅上升, 导入速度相比纯写覆盖会慢数倍 (此时HDD磁盘IOPS会成为瓶颈, 建议采用SSD以保证速度)
顶点映射的特有节点
- id: 指定某一列作为顶点的 id 列,当顶点 id 策略为
CUSTOMIZE时,必填;当 id 策略为PRIMARY_KEY时,必须为空;
边映射的特有节点
- source: 选择输入源某几列作为源顶点的 id 列,当源顶点的 id 策略为
CUSTOMIZE时,必须指定某一列作为顶点的 id 列;当源顶点的 id 策略为PRIMARY_KEY时,必须指定一列或多列用于拼接生成顶点的 id,也就是说,不管是哪种 id 策略,此项必填; - target: 指定某几列作为目标顶点的 id 列,与 source 类似,不再赘述;
- unfold_source: 是否展开文件的 source 列,效果与顶点映射中的类似,不再赘述;
- unfold_target: 是否展开文件的 target 列,效果与顶点映射中的类似,不再赘述;
3.4 执行命令导入
准备好图模型、数据文件以及输入源映射关系文件后,接下来就可以将数据文件导入到图数据库中。
导入过程由用户提交的命令控制,用户可以通过不同的参数控制执行的具体流程。
3.4.1 参数说明
| 参数 | 默认值 | 是否必传 | 描述信息 |
|---|---|---|---|
-f 或 --file | Y | 配置脚本的路径 | |
-g 或 --graph | hugegraph | 图名称 | |
--graphspace | DEFAULT | 图空间 | |
-s 或 --schema | schema 文件路径;已有 Schema 时可以不传 | ||
-h 或 --host 或 -i | localhost | HugeGraphServer 的地址 | |
-p 或 --port | 8080 | HugeGraphServer 的端口号 | |
--username | null | 当 HugeGraphServer 开启了权限认证时,当前图的 username | |
--password | null | 当 HugeGraphServer 开启了权限认证时,当前图的 password | |
--create-graph | false | 是否在图不存在时自动创建 | |
--token | null | 当 HugeGraphServer 开启了权限认证时,当前图的 token | |
--protocol | http | 向服务端发请求的协议,可选 http 或 https | |
--pd-peers | PD 服务节点地址 | ||
--pd-token | 访问 PD 服务的 token | ||
--meta-endpoints | 元信息存储服务地址 | ||
--direct | false | 是否直连 HugeGraph-Store | |
--route-type | NODE_PORT | 路由选择方式(可选值:NODE_PORT / DDS / BOTH) | |
--cluster | hg | 集群名 | |
--trust-store-file | 请求协议为 https 时,客户端的证书文件路径 | ||
--trust-store-password | 请求协议为 https 时,客户端证书密码 | ||
--clear-all-data | false | 导入数据前是否清除服务端的原有数据 | |
--clear-timeout | 240 | 导入数据前清除服务端的原有数据的超时时间 | |
--incremental-mode | false | 是否使用断点续导模式,仅输入源为 FILE 和 HDFS 支持该模式,启用该模式能从上一次导入停止的地方开始导入 | |
--failure-mode | false | 失败模式为 true 时,会导入之前失败了的数据,一般来说失败数据文件需要在人工更正编辑好后,再次进行导入 | |
--batch-insert-threads | CPUs | 批量插入线程池大小 (CPUs 是当前 OS 可用逻辑核个数) | |
--single-insert-threads | 8 | 单条插入线程池的大小 | |
--max-conn | 4 * CPUs | HugeClient 与 HugeGraphServer 的最大 HTTP 连接数;保持默认值时会自动提升到 4 * --batch-insert-threads | |
--max-conn-per-route | 2 * CPUs | HugeClient 与 HugeGraphServer 每个路由的最大 HTTP 连接数;保持默认值时会自动提升到 2 * --batch-insert-threads | |
--batch-size | 500 | 导入数据时每个批次包含的数据条数 | |
--max-parse-errors | 1 | 最多允许多少行数据解析错误,达到该值则程序退出 | |
--max-insert-errors | 500 | 最多允许多少行数据插入错误,达到该值则程序退出 | |
--timeout | 60 | 插入结果返回的超时时间(秒) | |
--shutdown-timeout | 10 | 多线程停止的等待时间(秒) | |
--retry-times | 3 | 发生超时时的最大重试次数 | |
--retry-interval | 10 | 重试之前的间隔时间(秒) | |
--check-vertex | false | 插入边时是否检查边所连接的顶点是否存在 | |
--print-progress | true | 是否在控制台实时打印导入条数 | |
--dry-run | false | 打开该模式,只解析不导入,通常用于测试 | |
--help 或 -help | false | 打印帮助信息 | |
--parser-threads 或 --parallel-count | max(2,CPUs/2) | 并行读取管线数;--parallel-count 已弃用 | |
--start-file | 0 | 用于部分(分片)导入的起始文件索引 | |
--end-file | -1 | 用于部分导入的截止文件索引 | |
--scatter-sources | false | 分散(并行)读取多个数据源以优化 I/O 性能 | |
--cdc-flush-interval | 30000 | Flink CDC 的数据刷新间隔 | |
--cdc-sink-parallelism | 1 | Flink CDC 写入端(Sink)的并行度 | |
--max-read-errors | 1 | 程序退出前允许的最大读取错误行数 | |
--max-read-lines | -1L | 最大读取行数限制;一旦达到此行数,导入任务将停止 | |
--test-mode | false | 是否开启测试模式 | |
--use-prefilter | false | 是否预先过滤顶点 | |
--short-id | 将自定义顶点 ID 映射为更短的生成 ID,格式为 label:field:type,其中 type 可选 boolean、byte、int、long、float、double、text、blob、date、uuid;可以重复指定以覆盖多个 label | ||
--vertex-edge-limit | -1L | 单个顶点的最大边数限制 | |
--sink-type | true | 仅 spark-loader 使用:true 通过 HugeGraph server API 写入,false 生成 HFile 并直接 bulkload 到 HBase | |
--vertex-partitions | 64 | HBase 顶点表的预分区数量,配合 --sink-type false 使用 | |
--edge-partitions | 64 | HBase 边表的预分区数量,配合 --sink-type false 使用 | |
--vertex-table-name | HBase 顶点表名称,配合 --sink-type false 使用 | ||
--edge-table-name | HBase 边表名称,配合 --sink-type false 使用 | ||
--hbase-zk-quorum | HBase Zookeeper 集群地址,配合 --sink-type false 使用 | ||
--hbase-zk-port | HBase Zookeeper 端口号,配合 --sink-type false 使用 | ||
--hbase-zk-parent | HBase Zookeeper 根路径,配合 --sink-type false 使用 | ||
--restore | false | 将图模式设置为恢复模式 (RESTORING) | |
--backend | hstore | 自动创建图(如果不存在)时的后端存储类型 | |
--serializer | binary | 自动创建图(如果不存在)时的序列化器类型 | |
--scheduler-type | distributed | 自动创建图(如果不存在)时的任务调度器类型 | |
--batch-failure-fallback | true | 批量插入失败时是否回退至单条插入模式 |
参数少于三个时 loader 会直接打印用法并退出,因此只传
-f struct.json是不够的。
3.4.2 断点续导模式
通常情况下,Loader 任务都需要较长时间执行,如果因为某些原因导致导入中断进程退出,而下次希望能从中断的点继续导,这就是使用断点续导的场景。
用户设置命令行参数 –incremental-mode 为 true 即打开了断点续导模式。断点续导的关键在于进度文件,导入进程退出的时候,会把退出时刻的导入进度
记录到进度文件中,进度文件位于 ${struct} 目录下,文件名形如 load-progress_${timestamp} ,${struct} 为映射文件的前缀,${timestamp} 为导入开始
的时刻,格式为 yyyyMMdd-HHmmss。比如:在 2019-10-10 12:30:30 开始的一次导入任务,使用的映射文件为 struct-example.json,则进度文件的路径为与 struct-example.json
同级的 struct-example/load-progress_20191010-123030。当目录下存在多个进度文件时,续导会读取按文件名排序的最后一个,也就是最新的那个。
注意:进度文件的生成与 –incremental-mode 是否打开无关,每次导入结束都会生成一个进度文件。
如果数据文件格式都是合法的,是用户自己停止(CTRL + C 或 kill,kill -9 不支持)的导入任务,也就是说没有错误记录的情况下,下一次导入只需要设置 为断点续导即可。
但如果是因为太多数据不合法或者网络异常,达到了 –max-read-errors、–max-parse-errors 或 –max-insert-errors 的限制,Loader 会把这些失败的原始行记录到 失败文件中,用户对失败文件中的数据行修改后,设置 –failure-mode 为 true 即可把这些"失败文件"也当作输入源进行导入(不影响正常的文件的导入), 当然如果修改后的数据行仍然有问题,则会被再次记录到失败文件中(不用担心会有重复行,关闭文件时会去重)。失败模式下上述三个错误上限会被解除,因此会扫描整个失败文件。
每个输入源(即映射文件 structs 中的每一项)都会有自己的失败文件,文件名为该输入源的 id 加后缀 .error,保存在 ${struct}/failure-data 目录下。
每一条失败记录写为两行:一行以 #### READ ERROR:、#### PARSE ERROR: 或 #### INSERT ERROR: 开头的提示行,紧接着是原始数据行。当输入源有 header 时,header 会以 JSON 形式写入同目录下的 ${id}.header 文件,以便失败文件能按正确的列重新读取。
比如映射文件中 id 为 1 的输入源包含顶点映射 person,id 为 3 的输入源包含边映射 knows,它们各有一些错误行,当 Loader 退出后,在 ${struct}/failure-data 目录下会看到如下文件:
- 1.error: 输入源 1 的失败数据行,每行前面都有对应的提示行
- 1.header: 输入源 1 的 header,仅当该输入源有 header 时才会生成
- 3.error: 输入源 3 的失败数据行
- 3.header: 输入源 3 的 header
内容为空的
.error文件会在 Loader 退出时删除,因此只有真正出现失败行的输入源才会留下文件。增量模式下新的失败行会追加到已有文件,其他模式下该文件会被重新写入。
3.4.3 logs 目录文件说明
程序执行过程中各日志及错误数据会写入 hugegraph-loader.log 文件中。
3.4.4 执行命令
运行 bin/hugegraph-loader.sh 并传入参数
脚本在设置了 JAVA_HOME 时使用其中的 JVM,否则使用 PATH 上的 java。它会把 JVM_OPTS 环境变量的内容,以及 -Xmx10g 和由 lib/ 生成的 classpath 一起传给 JVM,因此需要追加 JVM 参数时可以设置 JVM_OPTS。日志由 conf/log4j2.xml 配置。
4 完整示例
下面给出的是 hugegraph-loader 包中 example 目录下的例子。(GitHub 地址)
4.1 准备数据
顶点文件:example/file/vertex_person.csv
顶点文件:example/file/vertex_software.txt
边文件:example/file/edge_knows.json
边文件:example/file/edge_created.json
4.2 编写 schema
4.3 编写输入源映射文件example/file/struct.json
4.4 执行命令导入
导入结束后,会出现类似如下统计信息:
4.5 使用 docker 导入
4.5.1 使用 docker exec 直接导入数据
4.5.1.1 数据准备
如果仅仅尝试使用 loader, 我们可以使用内置的 example 数据集进行导入,无需自己额外准备数据
如果使用自定义的数据,则在使用 loader 导入数据之前,我们需要将数据复制到容器内部。
首先我们可以根据 4.1-4.3 的步骤准备数据,将准备好的数据通过 docker cp 复制到 loader 容器内部。
假设我们已经按照上述的步骤准备好了对应的数据集,存放在 hugegraph-dataset 文件夹下,文件结构如下:
将文件复制到容器内部
4.5.1.2 数据导入
以内置的 example 数据集为例,我们可以使用以下的命令对数据进行导入。
如果需要导入自己准备的数据集,则只需要修改 -f 配置脚本的路径 以及 -s schema 文件路径即可。
其他的参数可以参照 3.4.1 参数说明
如果导入用户自定义的数据集,按照刚才的例子,则使用:
如果
loader和server位于同一 docker 网络,则可以指定-h {server_container_name}, 否则需要指定server的宿主机的 ip (在我们的例子中,server_container_name为server).
然后我们可以观察到结果:
也可以使用 curl 或者 hubble观察导入结果,此处以 curl 为例:
如果想检查边的导入结果,可以使用 curl "http://localhost:8080/graphs/hugegraph/graph/edges" | gunzip
4.5.2 进入 docker 容器进行导入
除了直接使用 docker exec 导入数据,我们也可以进入容器进行数据导入,基本流程与 4.5.1 相同
使用 docker exec -it loader bash进入容器内部,并执行命令
执行的结果如 4.5.1 所示
4.6 使用 spark-loader 导入
Spark 版本:Spark 3+,其他版本未测试。 当前源码使用 Spark 3.2.2 和 Scala 2.12;其他组合需自行验证。
spark-loader 的参数分为两部分,注意:因二者参数名缩写存在重合部分,请使用参数全称。两种参数之间无需保证先后顺序。
- hugegraph 参数(参考:hugegraph-loader 参数说明 )
- Spark 任务提交参数(参考:Submitting Applications)
示例:
bin/hugegraph-spark-loader.sh 通过 ${SPARK_HOME}/bin/spark-submit 提交 org.apache.hugegraph.loader.spark.HugeGraphSparkLoader,因此 SPARK_HOME 必须指向一个 Spark 安装目录。lib/ 下的所有 jar 都会加入 classpath。Spark 应用名默认为 hugegraph-spark-loader,可以通过 APP_NAME 环境变量修改。
bin/get-params.sh 负责拆分命令行:只有下列参数会交给 loader,其余参数原样传给 spark-submit。该拆分只识别参数全称,因此 -f、-g 这类缩写不会被识别。
--file 单独处理:使用 --deploy-mode cluster 时,映射文件会通过 --files 分发到 executor,loader 只收到它的文件名;其他情况下路径原样传入。
该模式下 loader 只读取 FILE、HDFS 和 JDBC 输入源,KAFKA 和 GRAPH 输入源会被拒绝。
默认情况下(--sink-type true),每个 Spark 分区各自创建一个 HugeClient,通过 HugeGraph server API 写入顶点和边。使用 --sink-type false 时,loader 会生成 HFile 并直接 bulkload 到 HBase,此时表名和 ZooKeeper 配置取自 --vertex-table-name、--edge-table-name、--hbase-zk-quorum、--hbase-zk-port、--hbase-zk-parent、--vertex-partitions 和 --edge-partitions。
4.7 使用 flink-cdc-loader 导入
当前源码使用 Flink 1.13.5、flink-connector-mysql-cdc 2.2.1 和 Scala 2.12;其他组合需自行验证。
bin/hugegraph-flinkcdc-loader.sh 通过 ${FLINK_HOME}/bin/flink run 提交 org.apache.hugegraph.loader.flink.HugeGraphFlinkCDCLoader,因此必须设置 FLINK_HOME。该任务用 Flink CDC 捕获 MySQL 的变更事件并应用到图上,从而让图与源表保持同步。
映射文件格式与命令行 loader 相同,但每个输入源都必须是 MySQL 的 JDBC 输入源:loader 从中读取 url、database、table、username 和 password,并从 url 解析出主机和端口。顶点和边映射的用法不变。3.4.1 中的 --cdc-flush-interval 和 --cdc-sink-parallelism 只在该模式下生效。
命令行同样由 bin/get-params.sh 按 4.6 的方式拆分,非 loader 参数会传给 flink run。
示例:
2.4 - 图导入
需要把文件、数据库或消息数据写入 HugeGraph 时,从这里选择工具。直接导入可使用 Loader;已有 Source、Transform、Sink 管道时使用 SeaTunnel Sink;Spark 作业可使用 Spark Connector。
2.4.1 - 使用 SeaTunnel Sink 导入图数据
SeaTunnel 可以把数据库、Kafka 等数据源接入 HugeGraph。连接器分为两部分:Source 负责读取,Sink 负责写入[1][2],中间可以接 SeaTunnel 的数据转换组件。需要从 HugeGraph 导出或迁移数据时,请查看SeaTunnel Source 导出与迁移文档。
版本要求:本文面向 SeaTunnel 3.0+。 所有示例使用
mappings
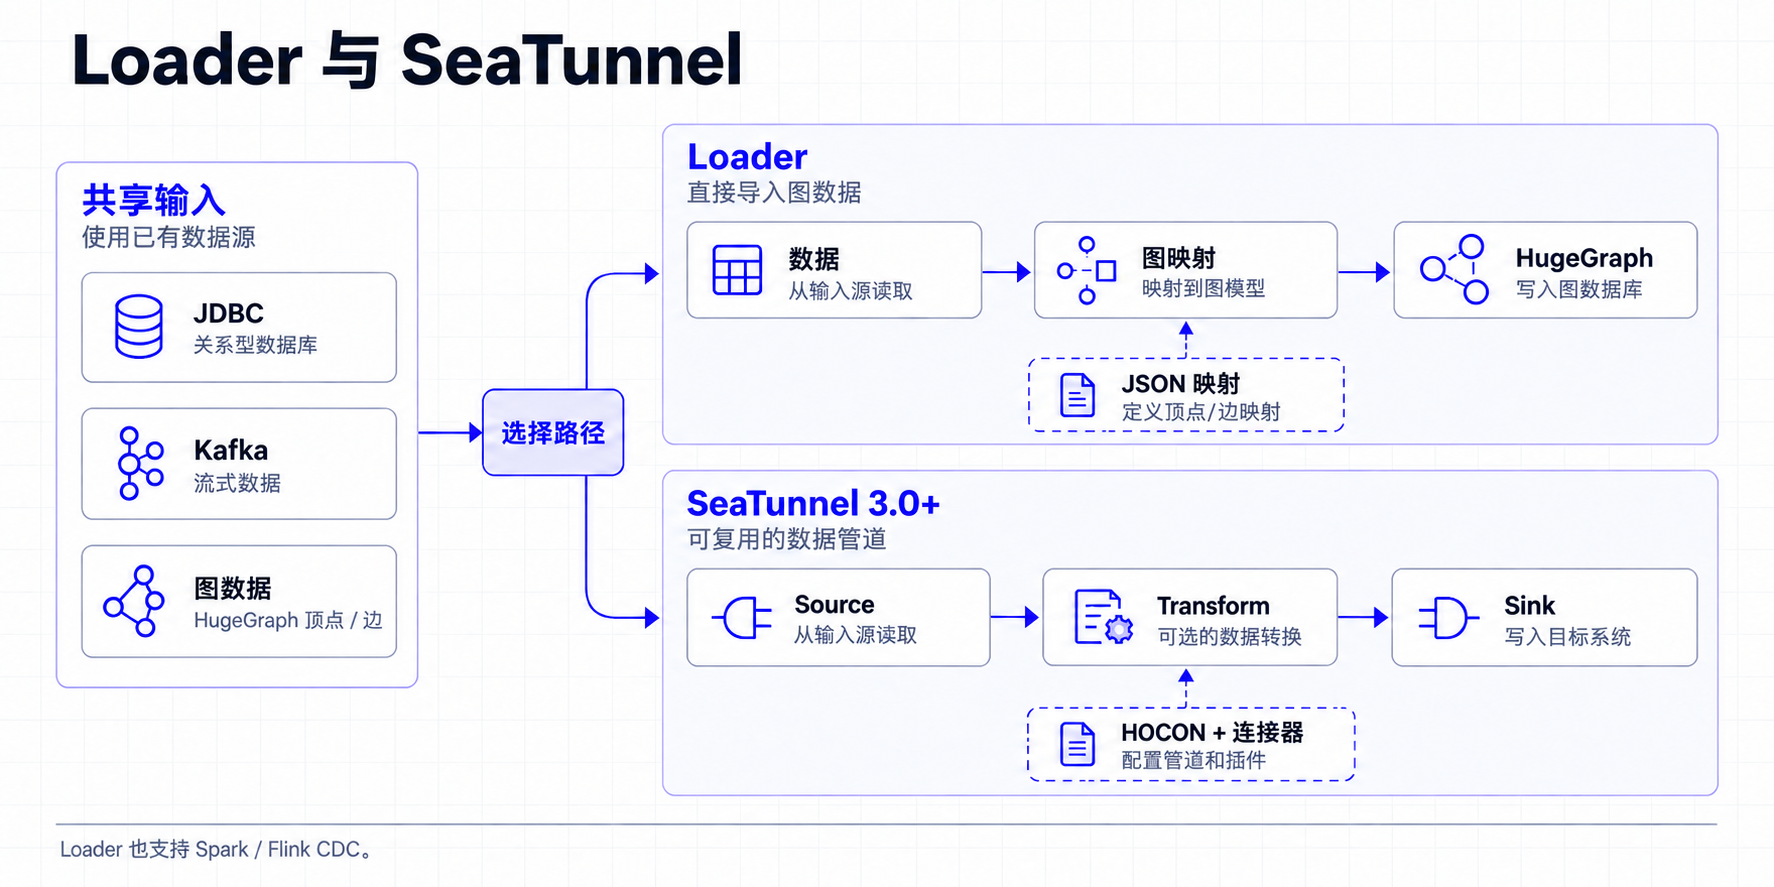
点击配图可查看原图。
1 与 Loader 和 Tools 的区别
HugeGraph-Loader 适合把常见数据直接导入 HugeGraph;HugeGraph-Tools 主要用于单机图管理、备份和导出;SeaTunnel 则把任务组织成 Source → Transform → Sink,适合复用已有的连接器、转换步骤和数据处理管道。
表格标记
✅ 原生支持;⚠️ 有条件支持,或需要额外组件/外部平台;❌ 不提供该能力
| 对比点 | Loader | Tools | SeaTunnel |
|---|---|---|---|
| 任务覆盖 | ✅ 直接导入图数据 | ✅ 备份、恢复和导出 | ✅ 导入、导出与迁移,可组合 Source、Transform、Sink |
| 任务配置 | JSON 映射文件,描述输入源、顶点和边 | 命令行参数和运维命令 | HOCON 作业文件[3],组合 Source、Transform 和 Sink |
| 默认部署 | ✅ 单机 CLI;⚠️ 可借助 Spark Loader 扩展 | ✅ 单机 CLI | ✅ 单机;✅ 分布式 |
| 执行引擎 | ⚠️ 以 CLI 为主,Spark Loader 是独立扩展 | ❌ 不提供 Spark/Flink 执行引擎 | ✅ HugeGraph Source/Sink 支持 Zeta、Spark、Flink[1][2][7][8][9][10] |
| 前端与可观测性 | ❌ 无内置前端,查看 CLI 日志 | ❌ 无内置前端,查看 CLI 日志 | ✅ 内置 Web UI 作业面板,方便查看任务状态和运行情况 |
| 输入与输出 | ⚠️ 围绕图导入,支持常见文件、JDBC、Kafka 等 | ⚠️ 围绕图数据和备份文件,支持常见存储 | ✅ 数十种连接器,含 JDBC、Kafka、SQL-CDC 等 |
| 调度与资源管理 | ❌ 无统一的跨任务调度和资源分配机制 | ❌ 无统一的跨任务调度和资源分配机制 | ⚠️ 可结合 DolphinScheduler 做调度和任务管理 |
| 易用性 | ✅ 专注导入,配置简单;后续提供二进制 CLI 后更方便快速使用 | ✅ 命令直接,适合单机运维 | ⚠️ 配置和运行组件较多,适合长期数据管道 |
| 高性能导入 | ✅ 支持 bypass-server 等优化;特定后端和硬件条件下,实测峰值可达 100~200 万条/秒,需按实际场景压测 | ⚠️ 重点是备份和导出,不以批量导入吞吐为主要目标 | ✅ 依靠并行度、分布式引擎和连接器扩展吞吐 |
SeaTunnel 覆盖 Loader 的图导入和 Tools 的导出、迁移场景,可以把两类任务放进同一条可扩展管道,还支持 SQL-CDC 和数十种输入输出类型。默认情况下,Loader 和 Tools 都在单机运行;SeaTunnel 同时支持单机和分布式部署,可随着数据量和任务数量扩展。Tools 的 schedule-backup 可以创建 crontab 任务,但它不负责统一的任务编排和资源管理。
已有 Spark/Flink 每日任务
HugeGraph Source 和 Sink 在 SeaTunnel 3.0.0-release 中都支持 SeaTunnel Engine(Zeta)、Spark 和 Flink。若把每日任务改成 SeaTunnel 作业,并用对应引擎提交,数据可以在 Source → Transform → Sink 之间直接传递,不需要先落盘再交给 Loader。若保留现有 Spark/Flink DAG,SeaTunnel 不会自动接管内存中的 DataFrame 或 Stream,需要改造成 SeaTunnel 作业,或让 Source 读取已有系统中的数据
Loader 和 Tools 的优势是专注、直接、上手快。需要直接导入图数据时可先用 Loader;需要备份、恢复、导出或日常运维时可用 Tools。如果已经有 SeaTunnel 作业,通常在原管道中接入 HugeGraph 更方便。需要更高导入吞吐时,Loader 的 bypass-server 和其他导入优化更合适;Loader 在特定后端、数据规模和硬件条件下实测峰值可达 100~200 万条/秒,不能直接当作通用性能承诺,仍需单独压测。新建 SeaTunnel 任务使用 3.0+ 和 mappings。使用其他版本时,请重新核对连接器配置。
2 准备环境
2.1 获取 SeaTunnel 3.0+
SeaTunnel 3.0+ 官方开发文档列出 JDK 8 和 JDK 11;本文统一使用 JDK 11,并设置 JAVA_HOME。从 SeaTunnel 3.0+[4] 获取源码,按上游开发环境文档[5]构建发行包:
解压 seatunnel-dist/target/ 中生成的二进制包,后续命令都在解压后的 SeaTunnel 安装目录执行。需要更新功能时,可以切换到其他版本;引擎与连接器插件应来自同一次构建,避免混用不同版本的 JAR。
本文使用 SeaTunnel 自带的 Zeta 引擎和 local 模式[6][7]。确认安装目录的 connectors/ 中包含 HugeGraph,以及所需的 JDBC 或 Kafka 连接器[11][12];如果自定义构建没有包含它们,需补齐同一次构建产出的插件。JDBC 示例还需要将 MySQL 驱动 JAR 放入 lib/,驱动类为 com.mysql.cj.jdbc.Driver。
2.2 准备 HugeGraph 和数据源
先启动 HugeGraph Server,创建可用于测试的图。本文示例使用 hugegraph 图、DEFAULT 图空间,请按服务端实际配置修改;图空间名称区分大小写。启用了身份验证时,在 HugeGraph Source 和 Sink 中填写 username、password。
下面的图模型贯穿 JDBC 和 Kafka 示例。mappings 默认会创建缺失的 PropertyKey、VertexLabel 和 EdgeLabel;已有图模型必须与配置兼容。
| 图元素 | 名称与属性 |
|---|---|
| 属性 | name 为 Text,age 和 since 为 Int |
| 顶点 | person,主键为 name,属性为 name、age |
| 边 | knows,从 person 指向 person,属性为 since |
所有示例中的 mysql、kafka、hugegraph 都是占位主机名,需替换为 SeaTunnel 运行环境可访问的地址。容器中的 127.0.0.1 指向容器自身;同一 Docker 网络可使用服务名。host 只填主机名或 IP,端口单独填写。
3 从关系库导入(sql2graph)
用两个任务完成导入:先把 person 表写成顶点,再把 knows 表写成边。这样写边时,两个端点都已经存在。
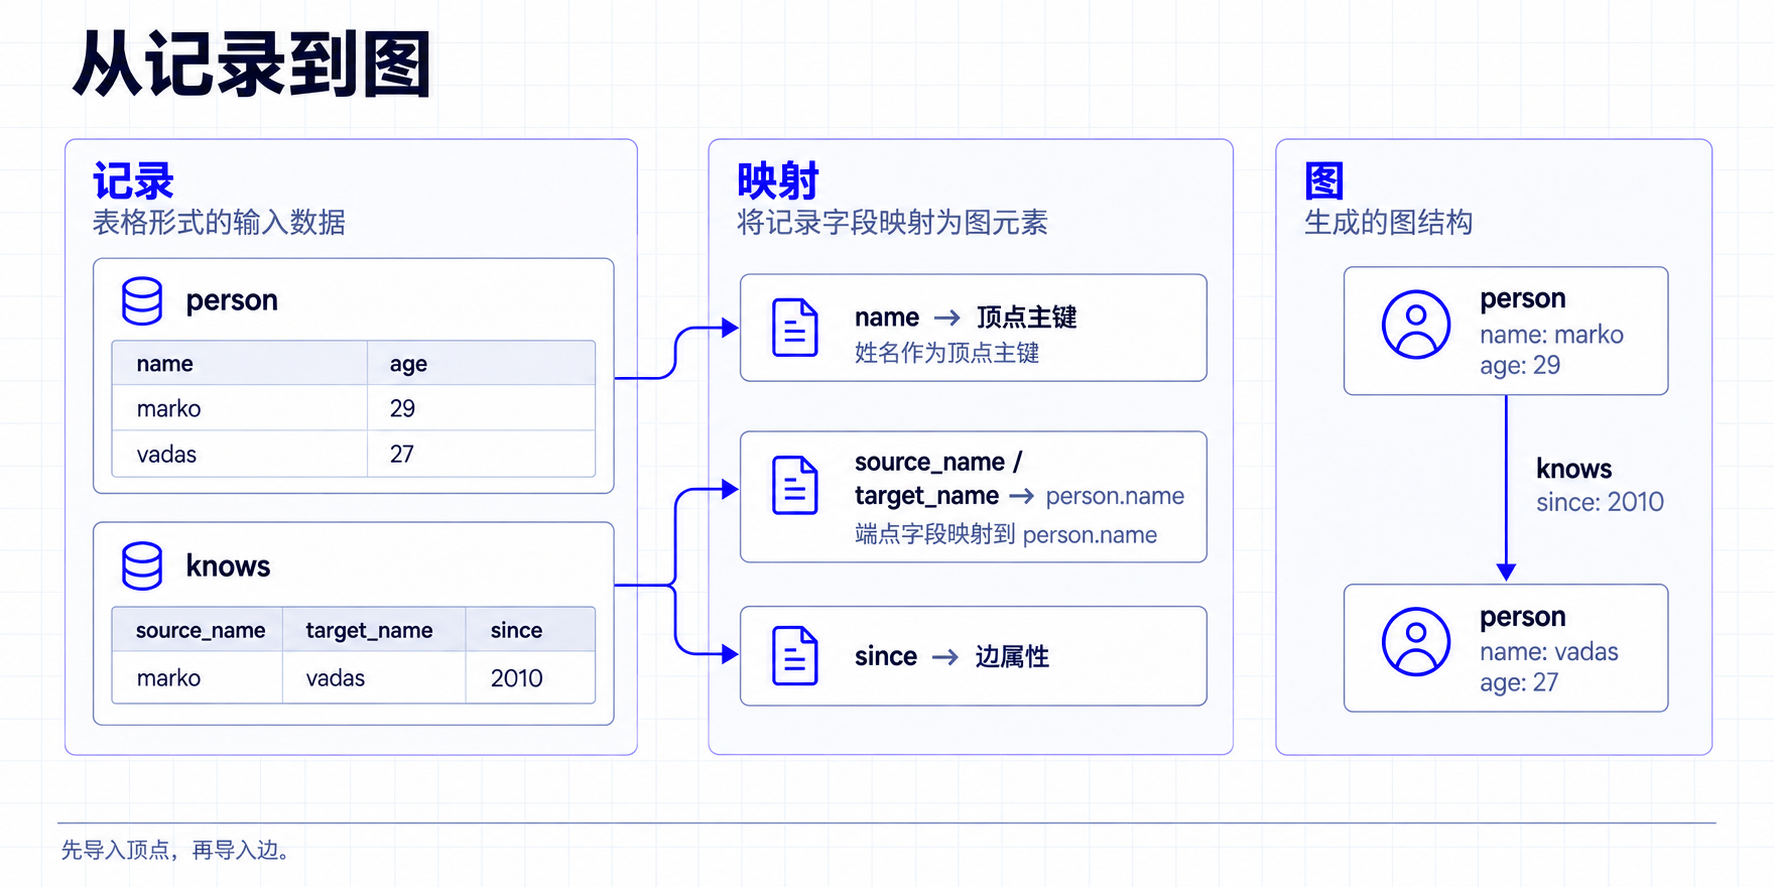
3.1 导入顶点
在 MySQL 的 demo 数据库中准备示例数据,并让配置中的账号有读取权限:
保存为 config/sql2graph-person.conf,将数据库账号和密码替换为实际值:
在 Hubble 或 Gremlin 中检查结果,应能查到 marko 和 vadas 及其年龄:
idFields = ["name"] 表示使用名字生成主键。重复导入同一个 name 会写到同一个顶点;properties 指定要写入的源字段。
3.2 导入边
准备关系表,其中两个端点字段对应前面导入的 person.name:
确认顶点任务成功后,再执行边任务:
下面的查询应返回 marko 到 vadas 的 knows 边,属性 since 为 2010:
sourceConfig 和 targetConfig 指定端点字段,fieldMapping 将它们对应到顶点主键 name,properties = ["since"] 只写边属性。示例启用 check_vertex = true,并关闭失败后逐条跳过的回退(batch_failure_fallback = false);端点不存在或写入失败时,任务会报错。
如果关系表只有数字外键,而图的主键使用姓名,请先在 SQL 中关联出姓名,再交给 Sink。MySQL CDC 接入方式见 MySQL CDC Source[13]。
4 从 Kafka 导入(kafka2graph)
Kafka 适合持续接收事件。先创建 user-events topic,再写入以下 JSON 消息,每条消息对应一个 person 顶点:
保存为 config/kafka2graph.conf:
用第 3.1 节的 Gremlin 查询检查数据。流式任务会持续运行;checkpoint.interval 每 10 秒保存一次任务状态,sink.flush.interval 让 Zeta 每 5 秒触发一次刷新,避免少量消息一直等到批次填满。
HugeGraph Sink 是 at-least-once(至少一次) 写入,故障恢复可能重放记录。使用 PRIMARY_KEY 能让相同 name 落到同一个顶点,但不等于所有更新操作都具备 exactly-once 语义。定时刷新由 Zeta 提供,不适用于 Spark 或 Flink 引擎。
5 常用配置与排错
下表适用于本文使用的 SeaTunnel 3.0+ 版本:
| 配置 | 用途 |
|---|---|
host、port | 分别指定 HugeGraph 主机和端口 |
graph_name、graph_space | 选择已创建的图与图空间 |
mappings | 定义输入字段如何生成顶点或边 |
properties | 每个 mapping 内要写入的源字段列表 |
schema_save_mode | mappings 默认自动创建缺失的 Schema;已有 Schema 仍需兼容 |
batch_size | 单批记录数,默认 500 |
env.sink.flush.interval | Zeta 定时刷新间隔,单位毫秒 |
check_vertex | 写边时检查端点,本文的边任务设为 true |
batch_failure_fallback[2] | 默认 true,批量失败后逐条重试,最多跳过 max_insert_errors 条失败记录;本文示例显式设为 false,让批量失败直接终止任务 |
max_insert_errors | 逐条回退时允许跳过的失败记录数;默认 500,-1 表示不限制,仅在开启 batch_failure_fallback 时生效 |
遇到问题时可按下面检查:
- 不识别
mappings或找不到 HugeGraph Source:检查引擎与 HugeGraph connector 是否来自同一次 3.0+ 构建。 - 连接失败:检查主机、端口、图空间、认证信息,以及 SeaTunnel 所在环境能否访问服务。
- Schema 不兼容:检查标签的 ID 策略、属性类型和边端点。自动创建不会把已有
PRIMARY_KEY标签改成CUSTOMIZE_STRING。 - Kafka 少量数据未及时出现:确认使用 Zeta,并在
env中设置sink.flush.interval。此版本的batch_interval_ms仅为兼容保留,不能代替它。
6 选型小结
选工具时,先看要完成的工作:图管理、Gremlin、备份或克隆可用 Tools;直接导入图可先看 Loader;需要复用 Source、Transform、Sink 管道时选 SeaTunnel。使用 SeaTunnel 的图读取和迁移能力时,请按本文使用的 3.0+ 版本准备环境。
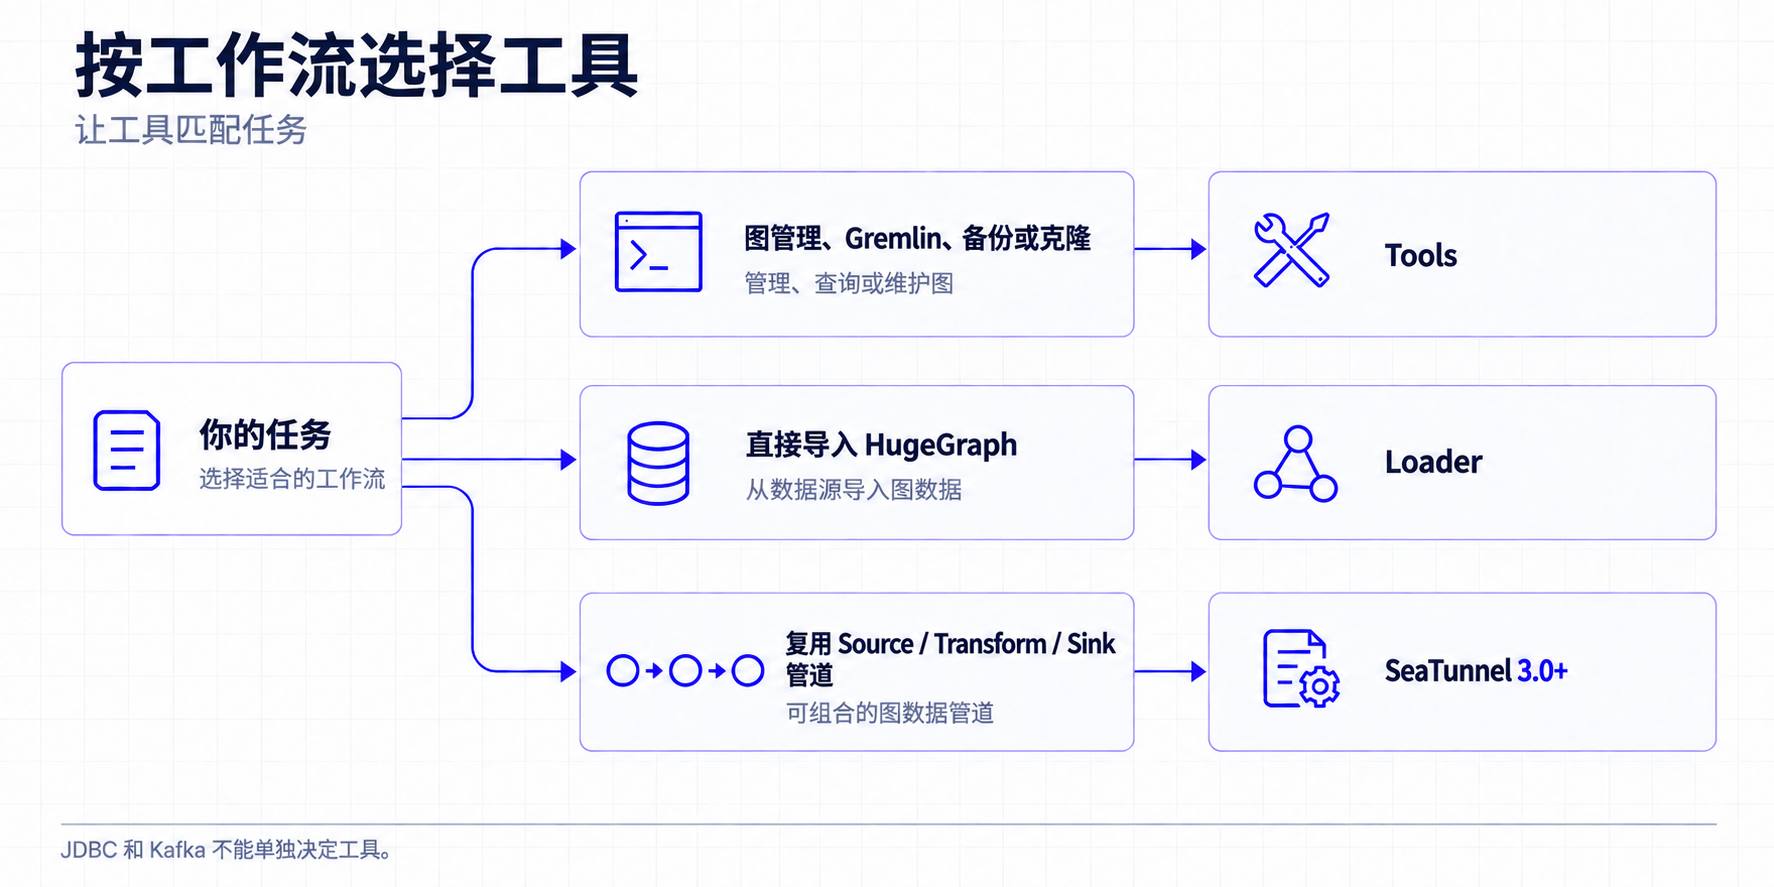
7 参考文档
HugeGraph 连接器
[1] HugeGraph Source
[2] HugeGraph Sink
配置与部署
[3] HOCON 作业文件配置说明
[4] SeaTunnel 3.0.0-release 分支
[5] SeaTunnel 开发环境文档
[6] SeaTunnel 本地部署
执行引擎
[7] SeaTunnel 引擎概览
[8] SeaTunnel Spark 引擎
[9] SeaTunnel Flink 引擎
[10] Connector V2 多引擎说明
数据源连接器
[11] JDBC Source
[12] Kafka Source
[13] MySQL CDC Source
旧版本兼容
[14] SeaTunnel 2.3.13 HugeGraph Sink
旧版本说明
本文面向 SeaTunnel 3.0+,文中的 Source、
mappings和图迁移示例不适用于 2.3.13。2.3.13 已过时,仅提供 HugeGraph Sink,配置使用schema_config,并且需要提前创建图模型。如必须使用 2.3.13,请参考官方 Sink 文档[14],不要套用本文配置
2.5 - Tools Quick Start
1 HugeGraph-Tools概述
HugeGraph-Tools 是 HugeGraph 的自动化部署、管理和备份/还原组件。
测试指南:如需在本地运行 Tools 测试,请参考 工具链本地测试指南
2 获取 HugeGraph-Tools
HugeGraph-Tools 包含在 Toolchain 发布包中,可以下载发布包,也可以从源码编译。
- 下载二进制tar包
- 下载源码编译安装
2.1 下载二进制tar包
下载最新版本的 HugeGraph-Toolchain 包, 然后进入 tools 子目录
2.2 下载源码编译安装
源码编译前请确保安装了wget命令
下载最新版本的 HugeGraph-Toolchain 源码包, 然后根目录编译或者单独编译 tool 子模块:
编译生成 tar 包:
生成的 tar 包位于 hugegraph-tools/target/apache-hugegraph-tools-${version}.tar.gz,同时会在 hugegraph-tools/apache-hugegraph-tools-${version} 生成解压后的目录(包含 bin/ 和 lib/)
3 使用
3.1 功能概览
解压后,进入 apache-hugegraph-tools-${version} 目录,可以使用bin/hugegraph或者bin/hugegraph help来查看 usage 信息,使用bin/hugegraph help <子命令>查看单个子命令的 usage。主要分为:
- 图管理类,graph-mode-set、graph-mode-get、graph-list、graph-get、graph-clear、graph-create、graph-clone 和 graph-drop
- 异步任务管理类,task-list、task-get、task-delete、task-cancel 和 task-clear
- Gremlin类,gremlin-execute 和 gremlin-schedule
- 备份/恢复类,backup、restore、migrate、schedule-backup 和 dump
- 认证数据备份/恢复类,auth-backup 和 auth-restore
- 安装部署类,deploy、clear、start-all 和 stop-all
3.2 [options]-全局变量
options是 HugeGraph-Tools 的全局变量,可以在 hugegraph-tools/bin/hugegraph 中配置,包括:
- –graph,HugeGraph-Tools 操作的图的名字,默认值是 hugegraph
- –url,HugeGraph-Server 的服务地址,默认是 http://127.0.0.1:8080
- –user,当 HugeGraph-Server 开启认证时,传递用户名
- –password,当 HugeGraph-Server 开启认证时,传递用户的密码
- –timeout,连接 HugeGraph-Server 时的超时时间,默认是 30s
- –trust-store-file,证书文件的路径,当 –url 使用 https 时,HugeGraph-Client 使用的 truststore 文件,默认为空,代表使用 hugegraph-tools 内置的 truststore 文件 conf/hugegraph.truststore
- –trust-store-password,证书文件的密码,当 –url 使用 https 时,HugeGraph-Client 使用的 truststore 的密码,默认为空,代表使用 hugegraph-tools 内置的 truststore 文件的密码
- –throw-mode,HugeGraph-Tools 出错时是否直接抛出异常,而不是打印错误信息后退出,默认为 false(主要用于测试)
连接协议由 –url 的 scheme 决定:使用
https://...即通过 https 连接。–trust-store-file 和 –trust-store-password 只能在 –url 使用 https 时设置,–user 和 –password 必须同时提供或同时省略。
上述全局变量,也可以通过环境变量来设置。一种方式是在命令行使用 export 设置临时环境变量,在该命令行关闭之前均有效
| 全局变量 | 环境变量 | 示例 |
|---|---|---|
| –url | HUGEGRAPH_URL | export HUGEGRAPH_URL=http://127.0.0.1:8080 |
| –graph | HUGEGRAPH_GRAPH | export HUGEGRAPH_GRAPH=hugegraph |
| –user | HUGEGRAPH_USERNAME | export HUGEGRAPH_USERNAME=admin |
| –password | HUGEGRAPH_PASSWORD | export HUGEGRAPH_PASSWORD=test |
| –timeout | HUGEGRAPH_TIMEOUT | export HUGEGRAPH_TIMEOUT=30 |
| –trust-store-file | HUGEGRAPH_TRUST_STORE_FILE | export HUGEGRAPH_TRUST_STORE_FILE=/tmp/trust-store |
| –trust-store-password | HUGEGRAPH_TRUST_STORE_PASSWORD | export HUGEGRAPH_TRUST_STORE_PASSWORD=xxxx |
另一种方式是在 bin/hugegraph 脚本中设置环境变量:
bin/hugegraph 还会读取 JAVA_HOME(未设置时打印警告,https 需要它)和 JAVA_OPTIONS(JVM 参数,为空时脚本使用 -Xms512m,并根据机器空闲内存计算 -Xmx)。
3.3 图管理类,graph-mode-set、graph-mode-get、graph-list、graph-get、graph-clear、graph-create、graph-clone和graph-drop
- graph-mode-set,设置图的 restore mode
- –graph-mode 或者 -m,必填项,指定将要设置的模式,合法值包括 [NONE, RESTORING, MERGING, LOADING]
- graph-mode-get,获取图的 restore mode
- graph-list,列出某个 HugeGraph-Server 中全部的图
- graph-get,获取某个图及其存储后端类型
- graph-clear,清除某个图的全部 schema 和 data
- –confirm-message 或者 -c,必填项,删除确认信息,需要手动输入,二次确认防止误删,“I’m sure to delete all data”,包括双引号
- graph-create,使用配置文件创建新图
- –name 或者 -n,选填项,新图的名称,默认为 g
- –file 或者 -f,图配置文件的路径,文件内容会作为新图的配置发送给 HugeGraph-Server
- graph-clone,克隆已存在的图
- –name 或者 -n,选填项,新克隆图的名称,默认为 g
- –clone-graph-name,选填项,要克隆的源图名称,默认为 hugegraph
- graph-drop,删除图(不同于 graph-clear,这会完全删除图)
- –confirm-message 或者 -c,必填项,确认消息 “I’m sure to drop the graph”,包括双引号
graph-create、graph-clone、graph-clear 和 graph-drop 会将 –timeout 提升到至少 300 秒。
当需要把备份的图原样恢复到一个新的图中的时候,需要先将图模式设置为 RESTORING 模式;当需要将备份的图合并到已存在的图中时,需要先将图模式设置为 MERGING 模式。
3.4 异步任务管理类,task-list、task-get、task-delete、task-cancel 和 task-clear
- task-list,列出某个图中的异步任务,可以根据任务的状态过滤
- –status,选填项,指定要查看的任务的状态,即按状态过滤任务,合法值包括 [UNKNOWN, NEW, QUEUED, RESTORING, RUNNING, SUCCESS, CANCELLED, FAILED](不区分大小写)
- –limit,选填项,指定要获取的任务的数目,默认为 -1,意思为获取全部符合条件的任务,显式传入的值必须为正数
- task-get,获取某个异步任务的详细信息
- –task-id,必填项,指定异步任务的 ID
- task-delete,删除某个异步任务的信息
- –task-id,必填项,指定异步任务的 ID
- task-cancel,取消某个异步任务的执行
- –task-id,必填项,要取消的异步任务的 ID
- task-clear,清理完成的异步任务
- –force,选填项,设置时,表示清理全部异步任务,未执行完成的先取消,然后清除所有异步任务。默认只清理已完成的异步任务
3.5 Gremlin类,gremlin-execute和gremlin-schedule
- gremlin-execute,发送 Gremlin 语句到 HugeGraph-Server 来执行查询或修改操作,同步执行,结束后返回结果
- –file 或者 -f,指定要执行的脚本文件,UTF-8编码,与 –script 互斥
- –script 或者 -s,指定要执行的脚本字符串,与 –file 互斥
- –aliases 或者 -a,Gremlin 别名设置,格式为:key1=value1,key2=value2,…
- –bindings 或者 -b,Gremlin 绑定设置,格式为:key1=value1,key2=value2,…
- –language 或者 -l,Gremlin 脚本的语言,默认为 gremlin-groovy
–file 和 –script 二者互斥,必须设置其中之一
- gremlin-schedule,发送 Gremlin 语句到 HugeGraph-Server 来执行查询或修改操作,异步执行,任务提交后立刻返回异步任务id
- –file 或者 -f,指定要执行的脚本文件,UTF-8编码,与 –script 互斥
- –script 或者 -s,指定要执行的脚本字符串,与 –file 互斥
- –bindings 或者 -b,Gremlin 绑定设置,格式为:key1=value1,key2=value2,…
- –language 或者 -l,Gremlin 脚本的语言,默认为 gremlin-groovy
–file 和 –script 二者互斥,必须设置其中之一
3.6 备份/恢复类
- backup,将某张图中的 schema 或者 data 备份到 HugeGraph 系统之外,以 JSON 形式存在本地磁盘或者 HDFS
- –format,备份的格式,可选值包括 [json, text],默认为 json
- –all-properties,是否备份顶点/边全部的属性,仅在 –format 为 text 是有效,默认 false
- –label,要备份的顶点 label 或者边 label,仅在 –format 为 text 时生效;设置该项时,–huge-types 必须只包含一种类型,且该类型必须是 vertex 或者 edge,否则命令会失败
- –properties,要备份的顶点/边的属性,逗号分隔,仅在 –format 为 text 是有效,只有备份顶点或者边的时候有效
- –compress,备份时是否压缩数据,默认为 true
- –directory 或者 -d,存储 schema 或者 data 的目录,本地目录时,默认为’./{graphName}’,HDFS 时,默认为 ‘{fs.default.name}/{graphName}’
- –huge-types 或者 -t,要备份的数据类型,逗号分隔,可选值为 ‘all’ 或者 一个或多个 [vertex,edge,vertex_label,edge_label,property_key,index_label] 的组合,‘all’ 代表全部6种类型,即顶点、边和所有schema,‘schema’ 代表 4 种 schema 类型 [vertex_label, edge_label, property_key, index_label]
- –log 或者 -l,指定日志目录,默认为 ./logs
- –retry,指定失败重试次数,默认为 3
- –thread-num 或者 -T,使用的线程数,默认为 Math.min(10, Math.max(4, CPUs / 2))
- –split-size 或者 -s,指定在备份时对顶点或者边分块的大小,默认为 1048576,且不能小于 1048576(1M)
- -D,用 -Dkey=value 的模式指定动态参数,用来备份数据到 HDFS 时,指定 HDFS 的配置项,例如:-Dfs.default.name=hdfs://localhost:9000
当 –timeout 小于 120 秒时,backup(以及 migrate 中的备份步骤)会使用 120 秒
- restore,将 JSON 格式存储的 schema 或者 data 恢复到一个新图中(RESTORING 模式)或者合并到已存在的图中(MERGING 模式)
- –directory 或者 -d,存储 schema 或者 data 的目录,本地目录时,默认为’./{graphName}’,HDFS 时,默认为 ‘{fs.default.name}/{graphName}’
- –clean,是否在恢复图完成后删除 –directory 指定的目录,默认为 false
- –huge-types 或者 -t,要恢复的数据类型,逗号分隔,可选值为 ‘all’ 或者 一个或多个 [vertex,edge,vertex_label,edge_label,property_key,index_label] 的组合,‘all’ 代表全部6种类型,即顶点、边和所有schema,‘schema’ 代表 4 种 schema 类型 [vertex_label, edge_label, property_key, index_label]
- –log 或者 -l,指定日志目录,默认为 ./logs
- –retry,指定失败重试次数,默认为 3
- –thread-num 或者 -T,使用的线程数,默认为 Math.min(10, Math.max(4, CPUs / 2))
- -D,用 -Dkey=value 的模式指定动态参数,用来从 HDFS 恢复图时,指定 HDFS 的配置项,例如:-Dfs.default.name=hdfs://localhost:9000
只有当 –format 为 json 执行 backup 时,才可以使用 restore 命令恢复 restore 要求图处于 RESTORING 或 MERGING 模式(先用 graph-mode-set 设置),否则命令会失败
- migrate,将当前连接的图迁移至另一个 HugeGraphServer 中
- –target-graph,目标图的名字,默认为 hugegraph
- –target-url,目标图所在的 HugeGraphServer,默认为 http://127.0.0.1:8081
- –target-user,访问目标图的用户名
- –target-password,访问目标图的密码
- –target-timeout,访问目标图的超时时间
- –target-trust-store-file,访问目标图使用的 truststore 文件
- –target-trust-store-password,访问目标图使用的 truststore 的密码
- –directory 或者 -d,迁移过程中,存储源图的 schema 或者 data 的目录,本地目录时,默认为’./{graphName}’,HDFS 时,默认为 ‘{fs.default.name}/{graphName}’
- –huge-types 或者 -t,要迁移的数据类型,逗号分隔,可选值为 ‘all’ 或者 一个或多个 [vertex,edge,vertex_label,edge_label,property_key,index_label] 的组合,‘all’ 代表全部6种类型,即顶点、边和所有schema,‘schema’ 代表 4 种 schema 类型 [vertex_label, edge_label, property_key, index_label]
- –log 或者 -l,指定日志目录,默认为 ./logs
- –retry,指定失败重试次数,默认为 3
- –thread-num 或者 -T,使用的线程数,默认为 Math.min(10, Math.max(4, CPUs / 2))
- –split-size 或者 -s,指定迁移过程中对源图进行备份时顶点或者边分块的大小,默认为 1048576,且不能小于 1048576(1M)
- -D,用 -Dkey=value 的模式指定动态参数,用来在迁移图过程中需要备份数据到 HDFS 时,指定 HDFS 的配置项,例如:-Dfs.default.name=hdfs://localhost:9000
- –graph-mode 或者 -m,将源图恢复到目标图时将目标图设置的模式,合法值包括 [RESTORING, MERGING],默认为 RESTORING。迁移期间目标图会被切换到该模式,迁移结束后恢复为原来的模式
- –keep-local-data,是否保留在迁移图的过程中产生的源图的备份,默认为 false,即默认迁移图结束后不保留产生的源图备份
- schedule-backup,周期性对图执行备份操作,并保留一定数目的最新备份(目前仅支持本地文件系统)
- –directory 或者 -d,必填项,指定备份数据的目录
- –backup-num,选填项,指定保存的最新的备份的数目,默认为 3
- –interval,选填项,指定进行备份的周期,格式同 Linux crontab 格式,默认为 “0 0 * * *"(每天 00:00)
schedule-backup 会添加一条 crontab 任务,定期执行
backup -t all并写入{directory}/{graph}/hugegraph-backup-{yyMMddHHmm}/,只保留最新的 –backup-num 份备份。相对路径的 –directory 会相对于 hugegraph-tools 的根目录解析,且{directory}/{graph}必须尚不存在 - dump,把整张图的顶点和边全部导出,默认以
vertex vertex-edge1 vertex-edge2...的 JSON 格式存储。 用户也可以自定义存储格式。在hugegraph-tools/src/main/java/org/apache/hugegraph/formatter下实现一个继承自Formatter的类,例如CustomFormatter,使用时指定该类为 formatter:bin/hugegraph dump -f CustomFormatter- –formatter 或者 -f,指定使用的 formatter,默认为 JsonFormatter
- –directory 或者 -d,存储 schema 或者 data 的目录,本地目录时,默认为’./{graphName}’,HDFS 时,默认为 ‘{fs.default.name}/{graphName}’
- –log 或者 -l,指定日志目录,默认为 ./logs
- –retry,指定失败重试次数,默认为 3
- –thread-num 或者 -T,使用的线程数,默认为 Math.min(10, Math.max(4, CPUs / 2))
- –split-size 或者 -s,指定在备份时对顶点或者边分块的大小,默认为 1048576,且不能小于 1048576(1M)
- -D,用 -Dkey=value 的模式指定动态参数,用来备份数据到 HDFS 时,指定 HDFS 的配置项,例如:-Dfs.default.name=hdfs://localhost:9000
3.7 认证数据备份/恢复类
- auth-backup,备份认证数据到指定目录
- –types 或者 -t,要备份的认证数据类型,逗号分隔,可选值为 ‘all’ 或者一个或多个 [user, group, target, belong, access] 的组合,‘all’ 代表全部5种类型;包含 ‘belong’ 时必须同时包含 ‘user’ 和 ‘group’,包含 ‘access’ 时必须同时包含 ‘group’ 和 ’target’
- –directory,备份数据存储目录,本地目录时,默认为 ‘./auth-backup-restore’,HDFS 时,默认为 ‘{fs.default.name}/auth-backup-restore’(该选项没有 -d 短写)
- –retry,指定失败重试次数,默认为 3
- -D,用 -Dkey=value 的模式指定动态参数,用来备份数据到 HDFS 时,指定 HDFS 的配置项,例如:-Dfs.default.name=hdfs://localhost:9000
- auth-restore,从指定目录恢复认证数据
- –types 或者 -t,要恢复的认证数据类型,逗号分隔,可选值为 ‘all’ 或者一个或多个 [user, group, target, belong, access] 的组合,‘all’ 代表全部5种类型;包含 ‘belong’ 时必须同时包含 ‘user’ 和 ‘group’,包含 ‘access’ 时必须同时包含 ‘group’ 和 ’target’
- –directory,备份数据存储目录,本地目录时,默认为 ‘./auth-backup-restore’,HDFS 时,默认为 ‘{fs.default.name}/auth-backup-restore’(该选项没有 -d 短写)
- –retry,指定失败重试次数,默认为 3
- –strategy,冲突处理策略,可选值为 [stop, ignore],默认为 stop。stop 表示遇到冲突时停止恢复,ignore 表示忽略冲突继续恢复
- –init-password,恢复用户时设置的初始密码,当 –types 包含 user 时必填
- -D,用 -Dkey=value 的模式指定动态参数,用来从 HDFS 恢复数据时,指定 HDFS 的配置项,例如:-Dfs.default.name=hdfs://localhost:9000
3.8 安装部署类
- deploy,一键下载、安装和启动 HugeGraph-Server 和 HugeGraph-Studio
- -v,必填项,指定要安装的 HugeGraph-Server 和 HugeGraph-Studio 版本,必须是 bin/version-map.yaml 中列出的版本之一(0.6、0.7、0.8、0.9、0.10),脚本据此映射到对应的 server 和 studio 发布版本
- -p,必填项,指定安装的 HugeGraph-Server 和 HugeGraph-Studio 目录
- -u,选填项,指定下载 HugeGraph-Server 和 HugeGraph-Studio 压缩包的链接
- clear,清理 HugeGraph-Server 和 HugeGraph-Studio 目录和tar包(若对应的 server 或 studio 进程仍在运行则拒绝执行,删除每一项前都会提示确认)
- -p,必填项,指定要清理的 HugeGraph-Server 和 HugeGraph-Studio 的目录
- start-all,一键启动 HugeGraph-Server 和 HugeGraph-Studio
- -v,必填项,指定已安装的 HugeGraph-Server 和 HugeGraph-Studio 版本,取值同 deploy
- -p,必填项,指定安装了 HugeGraph-Server 和 HugeGraph-Studio 的目录
- stop-all,一键关闭 HugeGraph-Server 和 HugeGraph-Studio
deploy、start-all、clear 和 stop-all 由
bin/hugegraph直接转交给bin/deploy.sh、bin/start-all.sh、bin/clear.sh和bin/stop-all.sh执行,因此 3.2 中的全局变量和环境变量对它们不生效。
deploy命令中有可选参数 -u,提供时会使用指定的下载地址替代默认下载地址下载 tar 包,并且将地址写入
~/hugegraph-download-url-prefix文件中;之后如果不指定地址时,会优先从~/hugegraph-download-url-prefix指定的地址下载 tar 包;如果 -u 和~/hugegraph-download-url-prefix都没有时,会从默认下载地址https://github.com/hugegraph进行下载
3.9 具体命令参数
各子命令的具体参数如下:
3.10 具体命令示例
1. gremlin语句
2. 查看task情况
3. 图模式查看和设置
4. 清理图
5. 图备份
6. 周期性的备份
7. 图恢复
8. 图迁移
2.6 - 图导出/迁移
需要备份、导出或在两张图之间迁移数据时,从这里选择工具。Tools 适合单机运维和备份;SeaTunnel Source 适合把图数据接入可扩展的数据管道。
2.6.1 - 使用 SeaTunnel Source 导出与迁移图数据
如果你需要把数据从一张 HugeGraph 图复制到另一张图,使用 graph2graph:HugeGraph Source 从源图(A 图)读取顶点和边,数据经过可选的 Transform 后,由 HugeGraph Sink 写入目标图(B 图)。数据方向是 A 图 → HugeGraph Source →(可选 Transform)→ HugeGraph Sink → B 图。如果要把图数据导出到文件、JDBC、Kafka 等其他系统,则使用 graph2any,由下游 Sink 接收 Source 读取的数据。本文介绍这两类任务。
版本要求:本文面向 SeaTunnel 3.0+
开始前请先完成导入页中的通用环境准备和配置,其中包含 JDK、HOCON、插件安装和图模型说明。
1 迁移 HugeGraph 图(graph2graph)
下面从源图迁移 person 顶点和 knows 边。请使用独立的目标图:本节采用 CUSTOMIZE_STRING 保留顶点 ID,不要复用前面已经创建为 PRIMARY_KEY 的 person 标签。
这两个任务只迁移指定标签和属性,不会完整复制源图的索引、TTL 等全部 Schema 配置。运行期间应暂停源图写入,避免两个任务读到不同时间的数据;完成后核对顶点、边数量及抽样属性。
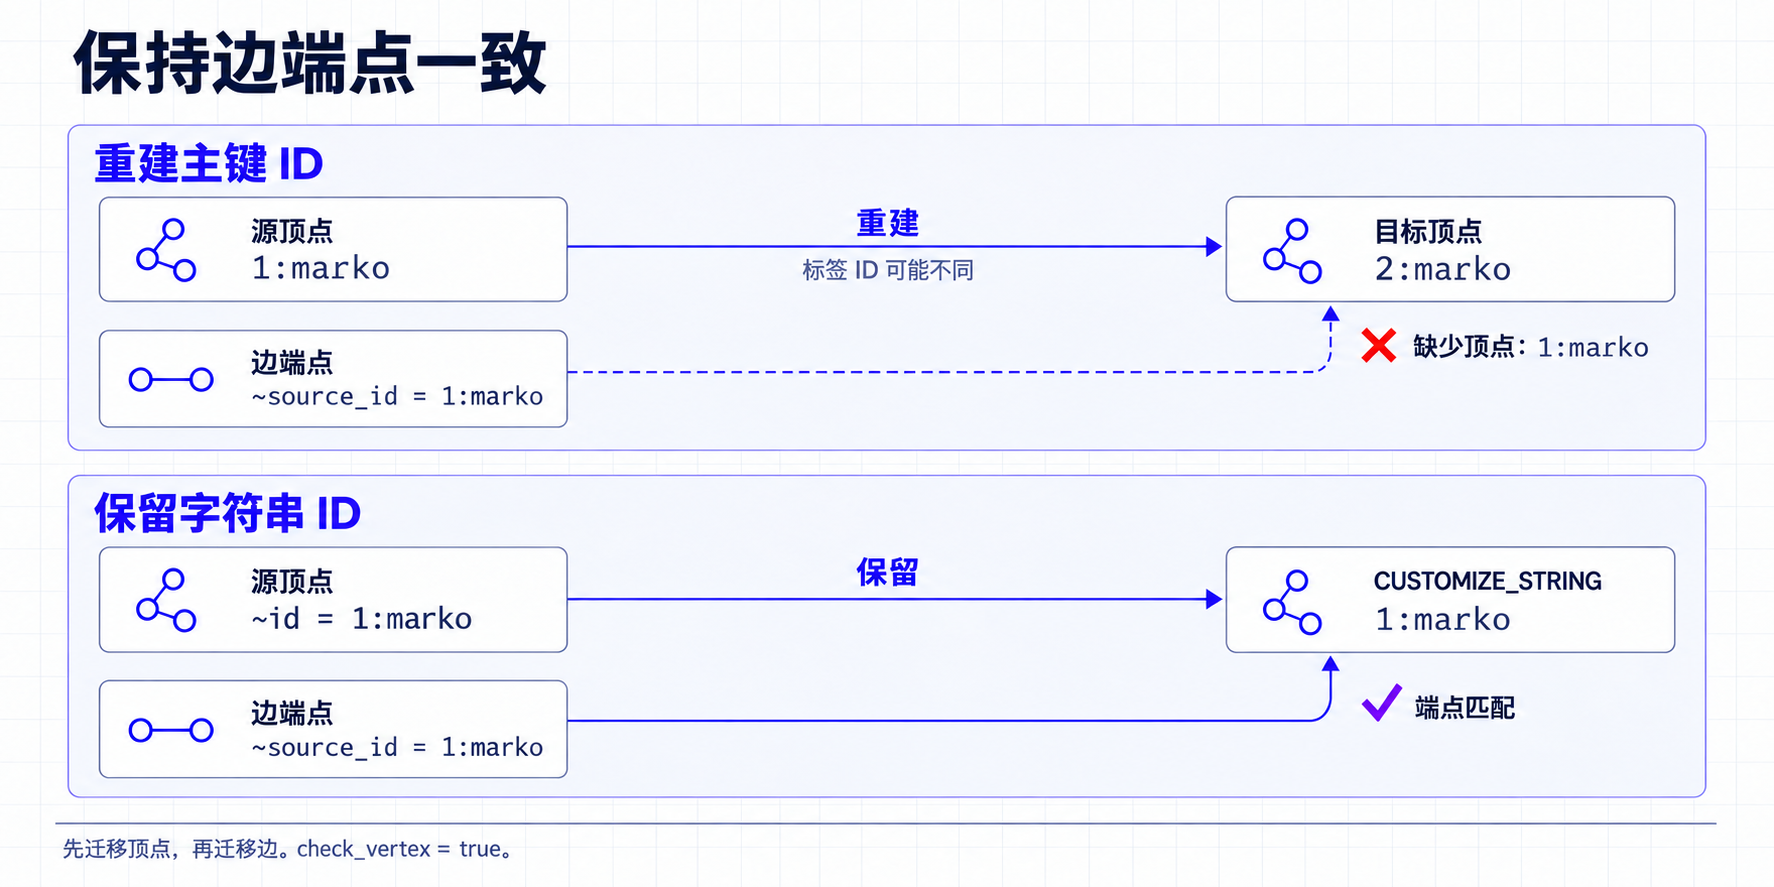
1.1 先迁移顶点
Source 自动补充 ~id 保留列,Sink 把原 ID 作为字符串保存。无需在 schema.fields 中声明 ~id,手动声明保留列会被拒绝。
1.2 再迁移边
确认顶点任务成功后,使用 Source 自动补充的 ~source_id 和 ~target_id 定位端点。因为上一任务保留了原 ID,这两列可以直接引用目标图中的顶点。
本例打开端点检查,并让写入错误直接导致任务失败。默认的 check_vertex = false 不保证最终一致:缺少端点可能产生悬空边,因此不能用任务成功代替迁移结果检查。
为什么保留 ID? HugeGraph 的
PRIMARY_KEYID 包含顶点标签的内部 ID,两张图可能不同。例如源图顶点是1:marko,目标图重新按主键生成的可能是2:marko。如果重新生成顶点 ID 后仍复用源图的边端点,边就会连错。本例将原 ID 保存为字符串,因此会改变目标图的 ID 策略
若要一次读取全部标签,省略 Source 的 label 后会读取 label_type(默认 VERTEX)下的全部 label,每个 label 输出一张表。这时需用 sourceTable 将各 Sink 映射绑定到对应表,例如 sourceTable = "default.person";具体值以 Writer 日志中的完整表名为准。不能直接套用本节的单标签配置。其他限制见 HugeGraph Source 文档。
2 导出到其他系统(graph2any)
graph2any 使用 HugeGraph Source[1] 读取顶点或边,再交给下游 Sink。下面示例将 person 顶点导出为本地 JSON 文件;导出到 JDBC、Kafka 等系统时,替换 LocalFile[2] 及其配置即可。
保存为 config/graph2file-person.conf,在 SeaTunnel 安装目录执行:
导出边时,将 Source 的 label 改为边标签、label_type 改为 EDGE,并在 schema.fields 中声明边属性。Source 会额外输出 ~source_id、~source_label、~target_id 和 ~target_label,这些保留列可直接写入文件或交给下游转换步骤。
本页只介绍数据行的读取和写出,不会自动复制源图的索引、TTL 或其他 Schema 设置。完整 Source 参数和通用环境说明请回到SeaTunnel 图导入文档[3]。
3 参考文档
连接器
[1] HugeGraph Source
[2] LocalFile Sink
关联文档
[3] SeaTunnel 图导入文档
2.7 - HugeGraph-Spark-Connector Quick Start
1 HugeGraph-Spark-Connector 概述
HugeGraph-Spark-Connector 使用 Spark DataFrame API 将批量数据写入 HugeGraph。当前实现提供顶点和边的写入器。
目前尚未实现从 HugeGraph 读取数据:表只实现了 SupportsWrite,因此不支持 spark.read.format(...)。连接器支持 CUSTOMIZE 和 PRIMARY_KEY 两种顶点 id 策略,AUTOMATIC 策略会被拒绝。
2 环境要求
- Java 8+
- Maven 3.6+
- Spark 3.2.x(模块基于 Spark 3.2.2 编译,依赖范围为
provided,因此需要由 Spark 运行环境提供 Spark 的 jar) - Scala 2.12(基于 Scala 2.12.11 编译)
3 编译
3.1 不执行测试的编译
以下命令均在仓库根目录执行。
3.2 执行默认测试的编译
两条命令都会在 hugegraph-spark-connector/target/hugegraph-spark-connector-${revision}-jar-with-dependencies.jar 生成一个包含依赖的 jar(不包含 Spark 本身)。如果不通过 Maven 管理依赖,可以把它传给 spark-submit --jars。
4 使用方法
先在 pom.xml 中添加依赖,并将 ${revision} 换成实际使用的发布版本:
format 必须写完整类名 org.apache.hugegraph.spark.connector.DataSource,连接器没有通过 Spark 的 DataSourceRegister 服务注册短名称。当 HugeGraphServer 开启鉴权时,需要在下面的示例中加上 .option("username", ...) 和 .option("token", ...)。
4.1 Schema 定义示例
假设我们有一个图,其 schema 定义如下:
4.2 写入顶点数据(Scala)
4.3 写入边数据(Scala)
4.4 写入 PRIMARY_KEY id 策略的顶点(Scala)
对于使用 primaryKeys(...) 的顶点标签,不要设置 id 选项:id 由主键列拼接生成。不属于 schema 的列可以通过 ignored-fields 丢弃。
4.5 写入两端 id 策略不同的边(Scala)
source-name 和 target-name 各自遵循对应顶点标签的 id 策略。下面的例子中,person 使用自定义字符串 id(一列),software 使用主键(其 name 列):
关于保存模式:SaveMode.Overwrite 和 SaveMode.Append 都只是插入数据,overwrite 路径不会先删除图中已有的数据。
5 配置参数
选项名匹配时不区分大小写并会去掉首尾空格。data-type 和 label 必填;当 data-type 为 edge 时 source-name 和 target-name 必填;其余选项都有默认值。
5.1 客户端配置
客户端配置用于配置 hugegraph-client。
| 参数 | 默认值 | 说明 |
|---|---|---|
host | localhost | HugeGraphServer 的地址,可以是主机名或 IP,也可以带 http:// / https:// 前缀 |
port | 8080 | HugeGraphServer 的端口 |
graph | hugegraph | 图名称 |
protocol | http | 向服务器发送请求的协议,可选 http 或 https |
username | null | 当 HugeGraphServer 开启权限认证时,当前图的用户名。未设置时使用图名称作为用户名 |
token | null | 当 HugeGraphServer 开启权限认证时,当前图的 token |
timeout | 60 | 插入结果返回的超时时间(秒) |
max-conn | CPUS * 4 | HugeClient 与 HugeGraphServer 之间的最大 HTTP 连接数 |
max-conn-per-route | CPUS * 2 | HugeClient 与 HugeGraphServer 之间每个路由的最大 HTTP 连接数 |
trust-store-file | null | 当请求协议为 https 时,客户端的证书文件路径。https 下未设置时,连接器会读取 JVM 系统属性 connector.home.path 指向目录下的 conf/hugegraph.truststore,此时该属性必须设置 |
trust-store-token | null | 当请求协议为 https 时,客户端的证书密码。https 下未设置时使用 hugegraph |
5.2 图数据配置
图数据配置用于说明 DataFrame 如何映射到顶点或边。
| 参数 | 默认值 | 说明 |
|---|---|---|
data-type | 必填。图数据类型,必须是 vertex 或 edge | |
label | 必填。要导入的顶点/边数据所属的标签 | |
id | 指定某一列作为顶点的 id 列。当顶点 id 策略为 CUSTOMIZE 时,必填;当 id 策略为 PRIMARY_KEY 时,必须为空。不支持 AUTOMATIC id 策略 | |
source-name | 当 data-type 为 edge 时必填。选择输入源的某些列作为源顶点的 id 列。当源顶点的 id 策略为 CUSTOMIZE 时,必须指定某一列作为顶点的 id 列;当源顶点的 id 策略为 PRIMARY_KEY 时,必须指定一列或多列用于拼接生成顶点的 id,即无论使用哪种 id 策略,此项都是必填的。多列之间用 , 分隔(delimiter 选项对此项不生效) | |
target-name | 当 data-type 为 edge 时必填。指定某些列作为目标顶点的 id 列,与 source-name 类似 | |
selected-fields | 选择某些列进行插入,其他未选择的列不插入,不能与 ignored-fields 同时存在 | |
ignored-fields | 忽略某些列使其不参与插入,不能与 selected-fields 同时存在 | |
batch-size | 500 | 导入数据时每批数据的条目数。按 Spark task 生效:每个分区的写入器在缓冲区累积到该数量的顶点/边时向服务端提交一次,commit 时再提交剩余部分 |
5.3 通用配置
通用配置包含一些常用的配置项。
| 参数 | 默认值 | 说明 |
|---|---|---|
delimiter | , | selected-fields 和 ignored-fields 的分隔符。source-name 和 target-name 始终按 , 拆分 |
6 注意事项与限制
- 每个 Spark 写入 task 会创建自己的 HugeClient,写入前把图切换到
LOADING模式,commit 或 abort 时恢复为NONE模式。 - 顶点 id 长度限制为 128 字节(UTF-8),对自定义字符串 id 和由主键拼接出的 id 都生效。
- 不支持
AUTOMATIC顶点 id 策略,创建写入器时会抛出IllegalArgumentException,写入失败。 - 暂不支持
SET或LIST基数的属性,只会转换SINGLE基数的值。 - 日期属性:字符串值必须使用
yyyy-MM-dd HH:mm:ss格式,按GMT+8时区解析;数值会被当作毫秒时间戳。 - 以字符串形式给出的布尔属性接受
true、1、yes、y和false、0、no、n(不区分大小写)。 - 自定义字符串 id 或任一主键值为空字符串的行会被跳过;为 null 时则会报错。
7 许可证
与 HugeGraph 一样,hugegraph-spark-connector 也采用 Apache 2.0 许可证。
3 - HugeGraph-AI
hugegraph-ai 提供 HugeGraph 的 Python 客户端、图机器学习工具,以及面向知识图谱构建和 GraphRAG 的 LLM 工具。
Apache License 2.0 · Ask DeepWiki
模块
- hugegraph-llm:知识图谱构建、GraphRAG 和自然语言图查询。
- hugegraph-ml:从 HugeGraph 读取图数据并运行图学习模型。
- hugegraph-python-client:管理 Schema、图数据和 Gremlin 查询的 Python SDK。
- vermeer-python-client:调用 Vermeer 图计算服务的 Python SDK。
仓库使用 uv workspace,其成员是 hugegraph-llm 和 hugegraph-python-client。hugegraph-ml 和 vermeer-python-client 是可编辑的路径依赖,不在 workspace members 中。当前仓库版本为 1.7.0。
环境要求
- HugeGraph-LLM:Python 3.10 或 3.11(
>=3.10,<3.12) - HugeGraph-ML:Python 3.10 或更高版本
- HugeGraph Python 客户端、Vermeer Python 客户端:Python 3.9 或更高版本
uv0.7 或更高版本- HugeGraph Server 1.3 或更高版本(推荐 1.5 或更高版本)
可选依赖组
根项目为每个模块声明一个 extra,另有几个组合项:
| Extra | 安装内容 |
|---|---|
llm | hugegraph-llm |
ml | hugegraph-ml |
python-client | hugegraph-python-client |
vermeer | vermeer-python-client |
dev | pytest、pytest-cov、coverage、pylint、ruff、mypy、ty、pre-commit |
nk-llm | hugegraph-llm、hugegraph-python-client,以及编译镜像所需的 Nuitka |
all | 四个模块包 |
hugegraph-llm 自身还声明了 vectordb extra,用于安装 pymilvus 和 qdrant-client。
Docker Compose 部署
仓库提供同时启动 HugeGraph Server 和 RAG 服务的 Compose 文件:
默认地址:
- HugeGraph Server:
http://localhost:8080 - RAG 服务和 Web 界面:
http://localhost:8001
从源码启动 RAG 服务
uv sync 会创建根目录下的 .venv。不要在 hugegraph-llm 子目录另建一套环境,否则容易绕过 workspace 锁定的依赖。
安装 ML 依赖
示例脚本位于 hugegraph-ml/src/hugegraph_ml/examples/。
后续阅读
3.1 - HugeGraph-LLM
HugeGraph-LLM 用于知识图谱构建、GraphRAG 和自然语言图查询。演示服务把 Gradio 页面和 FastAPI 接口挂在同一个进程上,默认监听 8001 端口。
环境要求
AI 总结项目文档:Ask DeepWiki
- Python 3.10 或 3.11(
>=3.10,<3.12) uv0.7 或更高版本- HugeGraph Server 1.3 或更高版本(推荐 1.5 或更高版本)
Docker Compose 部署
在 HugeGraph-AI 仓库根目录准备环境文件:
启动后可访问:
- HugeGraph Server:
http://localhost:8080 - RAG 服务和 Web 页面:
http://localhost:8001
Compose 文件会把 ${PROJECT_PATH}/hugegraph-llm/.env 挂载到容器内的 /home/work/hugegraph-llm/.env,因此该文件必须在容器启动前存在。资源目录 hugegraph-llm/src/hugegraph_llm/resources 也可以用同样方式挂载,该挂载默认被注释掉。
容器镜像
| 镜像 | 构建文件 | 内容 |
|---|---|---|
hugegraph/rag | docker/Dockerfile.llm | 包含源码的 Python 3.10 运行环境,入口是 python -m hugegraph_llm.demo.rag_demo.app --host 0.0.0.0 --port 8001 |
hugegraph/rag-bin | docker/Dockerfile.nk | 基于 nk-llm extra 用 Nuitka 编译的二进制,入口是 ./app.dist/app.bin |
两个镜像都暴露 8001 端口,以非 root 用户 work 运行,为 hugegraph-llm/src/hugegraph_llm/resources 声明数据卷,并使用 curl -f http://localhost:8001/ 作为健康检查。
scripts/build_llm_image.sh 会用 docker/Dockerfile.llm 构建并打上 hugegraph/graphrag:1.7.0 标签。
Kubernetes 部署
docker/charts/hg-llm 是 RAG 服务的 Helm chart,部署 hugegraph/graphrag 镜像。默认发布 NodePort 类型的 Service,把节点端口 8039 和服务端口 8080 映射到容器端口 8001,名称固定为 hg-llm-service。Ingress 和水平自动扩缩容已定义但默认关闭。
chart 中 image.tag 仍默认为 v0.0.1,因此需要通过 --set image.tag=1.7.0 或修改 values.yaml 指向实际构建的标签。
chart 的 values.yaml 中,.env 和提示词 YAML 的挂载默认被注释掉。要使用自定义配置,先创建两个 ConfigMap,再取消对应 volumes 和 volumeMounts 段落的注释:
从源码启动
依赖应从仓库根目录按 workspace 安装:
自定义监听地址和端口:
设置 HG_DEV_RELOAD=1 可让 uvicorn 以自动重载方式启动,便于开发调试。
服务以 hugegraph-llm/.env 保存模型、HugeGraph 和登录配置。提示词放在 hugegraph-llm/src/hugegraph_llm/resources/demo/config_prompt.yaml。缺少文件时,配置代码会按默认值创建。
.env 路径按以下顺序解析:先看是否设置了 HUGEGRAPH_LLM_ENV_PATH;未设置时,从源码运行则使用 hugegraph-llm/.env;否则使用当前工作目录下的 .env。
主要功能
构建 RAG 索引
Web 页面的第一个标签页可以处理文本或文件,并执行以下操作:
- 切分文本并写入 chunk 向量索引。
- 按给定 Schema 从文本抽取顶点和边。
- 将抽取结果写入 HugeGraph,并更新顶点向量索引。
文本可以在 text 子页直接输入,也可以在 file 子页上传。上传支持 .txt、.docx 和 .pdf,并可一次选择多个文件。加密 PDF 以及没有可提取文本层的扫描件 PDF 会被拒绝。
Schema 可以是内联 JSON,也可以是现有图名。通过 REST API 使用图名时,必须同时传入匹配的 client_config.graph;内联 JSON 不会连接 HugeGraph,也不能附带 client_config。
该标签页还提供两个生成器。Graph Schema Generator 根据查询示例和少样本示例生成 Schema。Graph Extraction Prompt Generator 根据描述的场景和选定的参考示例生成抽取提示词。Graph Extraction Split Type 下拉框可在抽取前选择 document、paragraph 或 sentence 粒度。
GraphRAG
查询流程可以组合直接回答、chunk 向量召回和图召回。图召回先抽取关键词并匹配顶点,再尝试 Text2Gremlin;生成或执行失败时可回退到预定义的图遍历方式。请求参数可控制返回数量、向量距离阈值、模板数量和重排序方式。
同一标签页还有批量回归测试面板,可从 .xlsx 或 .csv 文件读取问题、逐条作答,并返回可下载的结果文件。上传控件旁提供模板文件下载。
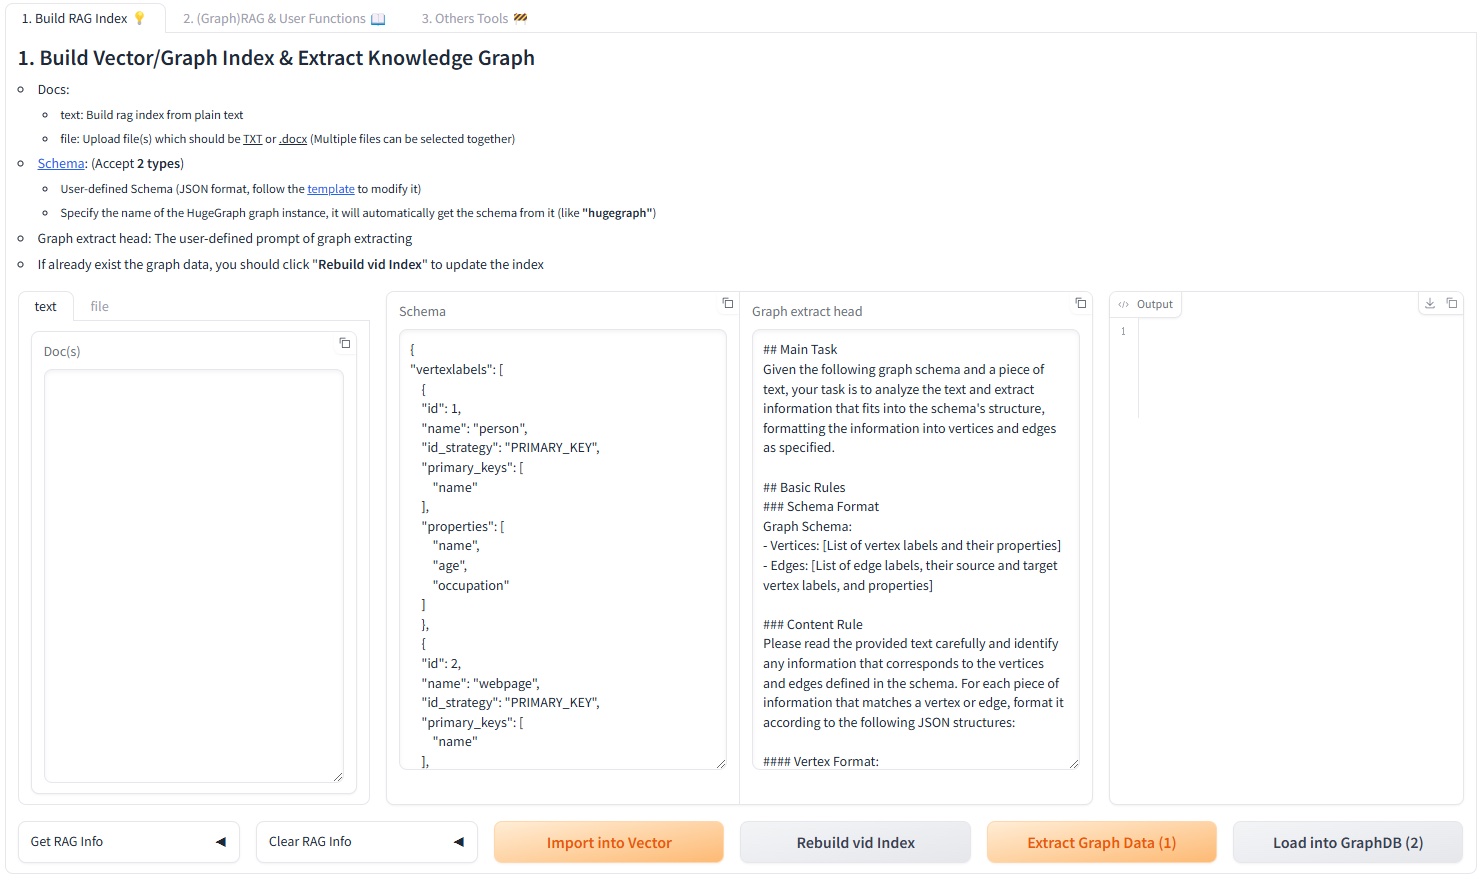
Text2Gremlin
POST /text2gremlin 根据自然语言、图 Schema 和可选示例生成 Gremlin。自定义提示词必须保留 {query}、{schema}、{example} 和 {vertices} 四个占位符。
对应的页面标签可以先用问题与 Gremlin 对照文件(.json 或 .csv)构建示例向量索引。未上传文件时使用内置的 resources/demo/text2gremlin.csv。
图工具与管理工具
Graph Tools 标签页可直接执行 Gremlin 查询、手动触发图备份,以及初始化 HugeGraph 演示数据。Admin Tools 标签页在校验 ADMIN_TOKEN 后展示 logs/llm-server.log 的末尾内容,并可刷新或清空该文件。
进程运行期间还有两个后台任务:每天 01:00 执行图备份的定时任务,以及持续更新顶点 id 向量的任务。
模型与向量后端
聊天、信息抽取和 Text2Gremlin 可以分别使用 OpenAI 兼容接口、Ollama 或 LiteLLM。嵌入模型可独立选择,同样支持这三种提供方。重排序支持 Cohere 和 SiliconFlow。
默认向量索引使用 FAISS。CUR_VECTOR_INDEX 可选 Faiss、Milvus 或 Qdrant,Web 页面的 5. Set up the vector engine. 面板提供同样的选择。Milvus 和 Qdrant 需要安装可选依赖:
页面操作流程见使用流程,完整环境变量见配置参考,HTTP 请求格式见REST API。
程序化调用
原有的 RAGPipeline 和 KgBuilder 类已被流水线调度器取代。通过 SchedulerSingleton 按名称调用流程:
已注册的流程名包括 rag_raw、rag_vector_only、rag_graph_only、rag_graph_vector、text2gremlin、build_examples_index、build_vector_index、graph_extract、import_graph_data、update_vid_embeddings、get_graph_index_info、build_schema 和 prompt_generate。schedule_stream_flow 是对应的异步流式版本。
开发检查
先在仓库根目录安装模块和开发工具,再运行与 CI 一致的检查:
Git hook 通过 pre-commit 启用:
3.2 - HugeGraph-ML
HugeGraph-ML 从 HugeGraph 读取图数据并转换为 DGL 图,供节点嵌入、节点分类、图分类、链接预测和欺诈检测等任务使用。模型实现位于 hugegraph-ml/src/hugegraph_ml/models/。
环境要求
- Python 3.10 或更高版本
- HugeGraph Server 1.0 或更高版本,推荐 1.5 及以上版本
uv0.7 或更高版本
所有服务端访问都通过同一仓库中的 hugegraph-python-client(即 pyhugegraph 包)完成。HugeGraph2DGL 使用 Gremlin 接口的 g.V().hasLabel(...) 和 g.E().hasLabel(...) 拉取点边,数据集导入函数则通过 schema 接口和顶点、边的批量接口写入,每批 500 条。
ML 依赖在仓库根目录的 [tool.uv] constraint-dependencies 中固定版本:
| 依赖 | 版本约束 |
|---|---|
torch | ==2.2.0 |
dgl | ~=2.1.0 |
ogb | ~=1.3.6 |
torchdata | ~=0.7.0 |
catboost | ~=1.2.3 |
category-encoders | ~=2.6.3 |
numpy | ~=1.24.4 |
pandas | ~=2.2.3 |
上述约束安装的是 CPU 版本。每个任务都有 gpu 参数,默认值 -1 表示使用 CPU;只有自行安装 CUDA 版的 torch 和 dgl 之后,才可以传入设备编号。
安装
HugeGraph-ML 是根项目的路径依赖,但不属于 uv workspace members。应在仓库根目录选择 ml extra,不要在子目录建立另一套锁文件。
已实现模型
下列模块均位于 hugegraph-ml/src/hugegraph_ml/models/。models/__init__.py 不做任何再导出,需要直接从模块文件导入。
| 模型 | 模块 | 入口类 | 用途 | 论文 |
|---|---|---|---|---|
| AGNN | agnn.py | AGNN | 节点分类 | 1803.03735 |
| APPNP | appnp.py | APPNP | 节点分类 | 1810.05997 |
| ARMA | arma.py | ARMA4NC | 节点分类 | 1901.01343 |
| BGNN | bgnn.py | BGNNPredictor | 梯度提升与 GNN 结合处理节点特征,自带示例执行回归任务 | 2101.08543 |
| BGRL | bgrl.py | BGRL | 自监督节点嵌入 | 2102.06514 |
| CARE-GNN | care_gnn.py | CAREGNN | 欺诈检测 | 2008.08692 |
| Cluster-GCN | cluster_gcn.py | SAGE | 基于子图采样的节点分类 | 1905.07953 |
| C&S | correct_and_smooth.py | MLP、CorrectAndSmooth、LabelPropagation | 对基础预测结果做校正与平滑 | 2010.13993 |
| DAGNN | dagnn.py | DAGNN | 节点分类 | 2007.09296 |
| DeeperGCN | deepergcn.py | DeeperGCN | 带边特征的节点分类 | 2006.07739 |
| DGI | dgi.py | DGI | 自监督节点嵌入 | 1809.10341 |
| DiffPool | diffpool.py | DiffPool | 图分类 | 1806.08804 |
| GATNE | gatne.py | DGLGATNE | 异构网络嵌入 | 1905.01669 |
| GIN | gin_global_pool.py | GIN | 图分类 | |
| GRACE | grace.py | GRACE | 自监督节点嵌入 | 2006.04131 |
| GRAND | grand.py | GRAND | 节点分类 | 2005.11079 |
| JKNet | jknet.py | JKNet | 节点分类 | 1806.03536 |
| MLP | mlp.py | MLPClassifier | 基于已学习嵌入的下游分类器 | |
| P-GNN | pgnn.py | PGNN | 链接预测 | you19b |
| SEAL | seal.py | DGCNN、SEALData | 链接预测 | 1802.09691 |
GIN 的 pooling 参数可取 sum(默认)、mean、max、global_attention 和 set2set。
读取图数据
hugegraph-ml/src/hugegraph_ml/data/hugegraph2dgl.py 中的 HugeGraph2DGL 会创建 PyHugeClient,并把查询结果转换为 DGL 对象:
| 方法 | 返回值 | 说明 |
|---|---|---|
convert_graph(vertex_label, edge_label, feat_key="feat", label_key="label", mask_keys=None) | dgl.DGLGraph | mask_keys 为空时取 ["train_mask", "val_mask", "test_mask"] |
convert_hetero_graph(vertex_labels, edge_labels, feat_key="feat", label_key="label", mask_keys=None) | DGL 异构图 | 参数为标签列表 |
convert_graph_dataset(graph_vertex_label, vertex_label, edge_label, feat_key="feat", label_key="label") | HugeGraphDataset | info 中写入 n_graphs、max_n_nodes、n_feat_dim、n_classes |
convert_graph_nx(vertex_label, edge_label) | networkx.Graph | P-GNN 使用 |
convert_graph_with_edge_feat(vertex_label, edge_label, node_feat_key="feat", edge_feat_key="edge_feat", label_key="label", mask_keys=None) | dgl.DGLGraph | 同时填充 edata["feat"] |
convert_graph_ogb(vertex_label, edge_label, split_label) | (dgl.DGLGraph, split_edge) | SEAL 使用 |
convert_hetero_graph_bgnn(vertex_labels, edge_labels, feat_key="feat", label_key="class", cat_key="cat_features", mask_keys=None) | DGL 异构图 | BGNN 使用 |
节点特征写入 ndata["feat"],标签写入 ndata["label"],各掩码写入 ndata[<mask key>]。NodeEmbed 只要求 feat;NodeClassify、NodeClassifyWithEdge 和 NodeClassifyWithSample 要求 feat、label、train_mask、val_mask 和 test_mask,缺少任意一项都会抛出 ValueError。
导入示例数据集
hugegraph_ml.utils.dgl2hugegraph_utils 负责把 DGL、OGB 和 NetworkX 数据集写入 HugeGraph,供转换层读取。这些函数都接受与 HugeGraph2DGL 相同的 url、graph、user、pwd 和 graphspace 参数,并且多数会先把数据集名转为大写再匹配。
| 函数 | 支持的数据集 | 创建的标签 |
|---|---|---|
import_graph_from_dgl | CORA、CITESEER、PUBMED | <NAME>_vertex、<NAME>_edge |
import_graphs_from_dgl | MUTAG、COLLAB、NCI1、PROTEINS、PTC、ENZYMES、DD | <NAME>_graph_vertex、<NAME>_vertex、<NAME>_edge |
import_hetero_graph_from_dgl | ACM | <NAME>_<ntype>_v、<NAME>_<etype>_e |
import_hetero_graph_from_dgl_no_feat | AMAZONGATNE | <NAME>_<ntype>_v、<NAME>_<etype>_e |
import_hetero_graph_from_dgl_bgnn | AVAZU | <NAME>_<ntype>_v、<NAME>_<etype>_e |
import_graph_from_nx | CAVEMAN | <NAME>_vertex、<NAME>_edge |
import_graph_from_dgl_with_edge_feat | CORA、CITESEER、PUBMED | <NAME>_edge_feat_vertex、<NAME>_edge_feat_edge |
import_graph_from_ogb | ogbl-collab,不做大写转换 | <NAME>_vertex、<NAME>_edge |
import_split_edge_from_ogb | ogbl-collab,不做大写转换 | <NAME>_split_edge |
传入其他名称会抛出 ValueError("dataset not supported")。import_split_edge_from_ogb 还需要顶点导入返回的 idx_to_vertex_id 映射和 max_nodes 上限。
clear_all_data() 会清空目标图中的全部点和边。测试 fixture 先调用它,再导入 CORA、MUTAG 和 ACM,结束时再次调用。
AMAZONGATNE 和 AVAZU 不会自动下载,压缩包地址写在 import_hetero_graph_from_dgl_no_feat 和 import_hetero_graph_from_dgl_bgnn 上方的注释里。
任务
任务类位于 hugegraph-ml/src/hugegraph_ml/tasks/,均接收转换后的图和模型实例。
| 类 | 模块 | 入口方法 |
|---|---|---|
NodeEmbed | node_embed.py | train_and_embed(add_self_loop=True, lr=1e-3, weight_decay=0, n_epochs=200, patience=inf, gpu=-1),返回 ndata["feat"] 被替换为嵌入结果的图 |
NodeClassify | node_classify.py | 先 train(lr, weight_decay, n_epochs, patience, early_stopping_monitor, gpu),再 evaluate() 返回 {"accuracy": ..., "loss": ...} |
NodeClassifyWithEdge | node_classify_with_edge.py | 结构相同,适用于同时读取 edata["feat"] 的模型 |
NodeClassifyWithSample | node_classify_with_sample.py | 基于 ClusterGCNSampler 分区的训练,仅使用 CPU,没有 gpu 参数 |
GraphClassify | graph_classify.py | train(batch_size=20, lr, weight_decay, n_epochs, patience, early_stopping_monitor, clip=2.0, gpu),在 HugeGraphDataset 上按 70/20/10 划分 |
DetectorCaregnn | fraud_detector_caregnn.py | CARE-GNN 训练,evaluate() 输出 recall 和 ROC AUC,并读取 ndata["feature"] 而非 ndata["feat"] |
HeteroSampleEmbedGATNE | hetero_sample_embed_gatne.py | train_and_embed(lr=1e-3, n_epochs=200, gpu=-1) |
LinkPredictionPGNN | link_prediction_pgnn.py | train(lr, weight_decay, n_epochs, gpu) |
LinkPredictionSeal | link_prediction_seal.py | 构造函数内部已调用 data_prepare(),随后执行 train(lr=1e-3, n_epochs=200, gpu=-1) |
patience 默认值为 float("inf")。utils/early_stopping.py 中的 EarlyStopping 可以监控 loss 或 accuracy,保存最优权重并在训练结束时恢复。
可运行示例
脚本位于 hugegraph-ml/src/hugegraph_ml/examples/。在 hugegraph-ml/src 目录下执行:
每个脚本同时提供同名函数,可以导入后用较小的 epoch 数调用。
| 脚本 | 模型 | 任务 | 读取的标签 |
|---|---|---|---|
agnn_example.py | AGNN | NodeClassify | CORA_vertex、CORA_edge |
appnp_example.py | APPNP | NodeClassify | CORA_vertex、CORA_edge |
arma_example.py | ARMA4NC | NodeClassify | CORA_vertex、CORA_edge |
bgnn_example.py | BGNNPredictor | 模型自带的 fit() | AVAZU__N_v、AVAZU__E_e |
bgrl_example.py | BGRL | NodeEmbed、NodeClassify | CORA_vertex、CORA_edge |
care_gnn_example.py | CAREGNN | DetectorCaregnn | AMAZON_user_v 以及 AMAZON_net_upu_e、AMAZON_net_usu_e、AMAZON_net_uvu_e |
cluster_gcn_example.py | SAGE | NodeClassifyWithSample | CORA_vertex、CORA_edge |
correct_and_smooth_example.py | correct_and_smooth 中的 MLP | NodeClassify | CORA_vertex、CORA_edge |
dagnn_example.py | DAGNN | NodeClassify | CORA_vertex、CORA_edge |
deepergcn_example.py | DeeperGCN | NodeClassifyWithEdge | 通过 convert_graph_with_edge_feat 读取 CORA_vertex、CORA_edge |
dgi_example.py | DGI | NodeEmbed、NodeClassify | CORA_vertex、CORA_edge |
diffpool_example.py | DiffPool | GraphClassify | MUTAG_graph_vertex、MUTAG_vertex、MUTAG_edge |
gatne_example.py | DGLGATNE | HeteroSampleEmbedGATNE | AMAZONGATNE__N_v、AMAZONGATNE_1_e、AMAZONGATNE_2_e |
gin_example.py | GIN | GraphClassify | MUTAG_graph_vertex、MUTAG_vertex、MUTAG_edge |
grace_example.py | GRACE | NodeEmbed、NodeClassify | CORA_vertex、CORA_edge |
grand_example.py | GRAND | NodeClassify | CORA_vertex、CORA_edge |
jknet_example.py | JKNet | NodeClassify | CORA_vertex、CORA_edge |
pgnn_example.py | PGNN | LinkPredictionPGNN | CAVEMAN_vertex、CAVEMAN_edge |
seal_example.py | DGCNN | LinkPredictionSeal | ogbl-collab_vertex、ogbl-collab_edge、ogbl-collab_split_edge |
DGI 节点嵌入示例
先把 DGL 的 Cora 数据集导入 HugeGraph。数据集名会先转为大写,因此 cora 和 CORA 都会生成 CORA_vertex 和 CORA_edge 标签:
读取图并训练 DGI:
evaluate() 返回类似 {'accuracy': 0.82, 'loss': 0.5714246034622192} 的字典。完整脚本是 hugegraph-ml/src/hugegraph_ml/examples/dgi_example.py。
GRAND 节点分类示例
GRAND 每次增强采样都会返回一组 logits,NodeClassify 会对列表中的每个元素分别应用掩码后再计算损失。完整脚本是 hugegraph-ml/src/hugegraph_ml/examples/grand_example.py。
排查问题
- 连接失败:检查 HugeGraph Server 地址、端口和认证信息。
- Schema 不匹配:示例默认使用
CORA_vertex和CORA_edge,自有数据需要传入实际标签。 ValueError: Graph is missing required node attribute ...:节点分类任务需要ndata中包含feat、label、train_mask、val_mask和test_mask。请导入带掩码的数据集,或给convert_graph传入自定义的mask_keys。ValueError: dataset not supported:导入函数只接受上表列出的名称,且import_graph_from_ogb匹配ogbl-collab时不做大写转换。- DGL 或 PyTorch 导入失败:回到仓库根目录重新执行
uv sync --extra ml,并确认当前 Python 来自根目录.venv。 bgrl_example.py目前在导入阶段就会失败:它从hugegraph_ml.models.bgrl导入MLP_Predictor,而该模块中的类名是MLPPredictor。care_gnn_example.py读取AMAZON_user_v和三个AMAZON_net_*_e边标签,仓库内没有对应的导入函数,需要自行准备该数据集后再运行。
3.3 - HugeGraph-LLM 使用流程
本文说明 HugeGraph-LLM Web 页面的处理流程。服务启动方式见 HugeGraph-LLM。
0. 配置面板
标签页上方是可折叠的配置面板,共五个部分:1. Set up the HugeGraph server.、2. Set up the LLM.、3. Set up the Embedding.、4. Set up the Reranker. 和 5. Set up the vector engine.。每部分都有独立的应用按钮,应用后会把受支持的字段写回 .env。页面顶部还会显示当前提示词语言。
1. 构建 RAG 索引
第一个标签页负责两类索引:
- 将文档切分后写入 chunk 向量索引。
- 按 Schema 从文档抽取顶点和边,写入 HugeGraph,并维护顶点向量索引。
flowchart TD
    A[输入文档] --> B[文本切分]
    B --> C[生成 chunk 向量]
    C --> D[写入向量索引]
    B --> E[LLM 按 Schema 抽取顶点和边]
    E --> F[写入 HugeGraph]
    F --> G[更新顶点向量索引]
输入来自 text 子页或 file 子页。上传支持 .txt、.docx 和 .pdf,可一次选择多个文件。
页面包含文档、Schema、抽取提示词和结果区域。常用操作有:
Import into Vector:切分文档并建立 chunk 向量索引。Extract Graph Data (1):按 Schema 抽取图数据。Load into GraphDB (2):把抽取结果写入 HugeGraph,并自动更新顶点向量。Update Vid Embedding:重新生成顶点向量,通常只在图中已有数据时才需要单独执行。
这些按钮旁的 Graph Extraction Split Type 下拉框可选 document、paragraph 或 sentence。document 把输入整体作为一个单元,另外两种会在抽取前先切分长文档。
页面还可以查看或清除 chunk 索引、顶点索引和图数据。清除操作会删除已有数据,执行前先确认当前图和索引是否仍被其他查询使用。
主控件下方还有两个折叠的辅助工具:
Graph Schema Generator:根据查询示例和少样本示例生成 Schema,填入 Graph Schema 字段。Graph Extraction Prompt Generator:根据期望场景(例如社交关系、金融知识图谱)和选定的参考示例生成 Graph Extract Prompt Header。
2. GraphRAG 查询
第二个标签页提供四种回答范围:
- 直接使用 LLM 回答。
- 只使用 chunk 向量召回。
- 只使用图召回。
- 合并图召回与向量召回。
flowchart TD
    Q[问题] --> V[查询 chunk 向量索引]
    Q --> K[抽取关键词]
    K --> M[匹配图顶点]
    M --> T[生成并执行 Gremlin]
    T -->|失败| B[BFS 图遍历回退]
    T --> R[整理图结果]
    B --> R
    V --> S[合并与重排序]
    R --> S
    S --> A[生成答案]
图召回先用关键词精确匹配 HugeGraph 顶点,找不到时再用顶点向量做近似匹配。匹配结果会进入 Text2Gremlin;生成或执行失败时,流程可以回退到预定义的图遍历。
Template Num 控制 Text2Gremlin 在图召回中的参与方式:
- 小于 0:完全跳过 Text2Gremlin,图召回直接使用预定义的图遍历。
- 等于 0:不带任何示例生成 Gremlin(zero-shot)。
- 大于 0:从示例索引中取相应数量的相近示例,并采用带模板的生成结果。示例数量会被限制在 0 到 10 之间。
该标签页的其他控件还有 Rerank method(bleu 或 reranker)、Graph Ratio、Near neighbor first 和 Query related information,以及可编辑的 Query Prompt 和 Keywords Extraction Prompt。
单条问答面板下方是批量回归测试面板。上传 .xlsx 或 .csv 问题文件,设置 Max Lines To Show,点击 Generate Answer (Batch)。答案会显示在预览表格中,并可下载为文件。上传控件旁提供模板文件下载。
3. Text2Gremlin
第三个标签页分为两部分。上半部分用问题与 Gremlin 对照文件(.json 或 .csv)构建示例向量索引;未上传文件时使用内置的 resources/demo/text2gremlin.csv。
下半部分把自然语言转换成 Gremlin:
- 读取当前图的 Schema。
- 从示例向量索引取回相近的自然语言与 Gremlin 对。
- 把问题、Schema、示例和已匹配顶点填入提示词。
- 调用 LLM 生成 Gremlin,并按所选输出类型决定是否执行。
Number of refer examples 设置取回的示例数量,范围 0 到 10,默认 2。结果显示在四个字段中:带模板的 Gremlin、不带模板的 Gremlin,以及两者各自的执行输出。
自定义提示词必须包含 {query}、{schema}、{example} 和 {vertices}。缺少任一占位符时,REST API 会拒绝请求。
4. 图工具与管理工具
Graph Tools 标签页可直接对当前图执行 Gremlin 查询、手动触发图备份,并通过 beta 操作初始化 HugeGraph 演示数据。后台还有两个任务:每天 01:00 自动备份图数据,以及在进程运行期间持续更新顶点 id 向量。
Admin Tools 需要密码。输入已配置的 ADMIN_TOKEN 后可查看 logs/llm-server.log 的末尾内容(每 60 秒自动刷新),并可手动刷新或清空该文件。ADMIN_TOKEN 为空或仍是占位值 xxxx 时,访问会被拒绝。
设置 ENABLE_LOGIN=True 后,Web 页面会要求基础认证,用户名固定为 rag,密码是 USER_TOKEN;REST API 则要求把 USER_TOKEN 作为 Bearer token。日志接口还要求单独配置安全的 ADMIN_TOKEN。
5. 提示词语言
在 hugegraph-llm/.env 中设置:
修改后重启服务。该配置选择内置提示词语言,不会自动翻译输入文档,也不是 /rag 请求体字段。
6. REST 调用
Web 页面和 REST API 使用同一套流程。需要程序集成时使用 /rag、/rag/graph、/graph/extract 和 /text2gremlin;请求结构见 REST API。
3.4 - 配置参考
HugeGraph-LLM 从 hugegraph-llm/.env 读取运行配置。提示词单独保存在 hugegraph-llm/src/hugegraph_llm/resources/demo/config_prompt.yaml,不会写入 .env。
.env 路径按以下顺序解析:
- 若设置了环境变量
HUGEGRAPH_LLM_ENV_PATH,则使用该路径,开头的~会被展开。 - 从源码运行时,使用
hugegraph-llm/.env。 - 以已安装的包运行时,使用当前工作目录下的
.env。
运行以下命令可按配置类的默认值创建或更新文件:
--update 默认开启,因此不带参数运行效果相同。该命令会写入 HugeGraph、管理员、LLM 和索引配置,然后重新生成提示词 YAML。若 .env 已存在,会先询问是否覆盖。
.env 包含密钥和密码,不要提交到版本库。
基础选项
| 配置项 | 默认值 | 说明 |
|---|---|---|
LANGUAGE | EN | 提示词语言,可选 EN、CN |
CHAT_LLM_TYPE | openai | 回答模型,可选 openai、litellm、ollama/local |
EXTRACT_LLM_TYPE | openai | 信息抽取模型,取值同上 |
TEXT2GQL_LLM_TYPE | openai | Text2Gremlin 模型,取值同上 |
EMBEDDING_TYPE | openai | 嵌入模型,取值同上,也可以留空 |
RERANKER_TYPE | 空 | 可选 cohere、siliconflow |
KEYWORD_EXTRACT_TYPE | llm | 可选 llm、textrank、hybrid |
WINDOW_SIZE | 3 | TextRank 滑窗,范围 1 到 10 |
HYBRID_LLM_WEIGHTS | 0.5 | hybrid 模式中 LLM 结果的权重,范围 0 到 1 |
OpenAI 兼容接口
聊天、抽取和 Text2Gremlin 可以使用不同端点、密钥和模型。
| 用途 | API 地址 | 密钥 | 模型 | 最大 token 默认值 |
|---|---|---|---|---|
| 回答 | OPENAI_CHAT_API_BASE | OPENAI_CHAT_API_KEY | OPENAI_CHAT_LANGUAGE_MODEL | OPENAI_CHAT_TOKENS=8192 |
| 抽取 | OPENAI_EXTRACT_API_BASE | OPENAI_EXTRACT_API_KEY | OPENAI_EXTRACT_LANGUAGE_MODEL | OPENAI_EXTRACT_TOKENS=256 |
| Text2Gremlin | OPENAI_TEXT2GQL_API_BASE | OPENAI_TEXT2GQL_API_KEY | OPENAI_TEXT2GQL_LANGUAGE_MODEL | OPENAI_TEXT2GQL_TOKENS=4096 |
| 嵌入 | OPENAI_EMBEDDING_API_BASE | OPENAI_EMBEDDING_API_KEY | OPENAI_EMBEDDING_MODEL | 不适用 |
API 地址默认是 https://api.openai.com/v1;三个语言模型默认是 gpt-4.1-mini,嵌入模型默认是 text-embedding-3-small。
OPENAI_BASE_URL 和 OPENAI_API_KEY 可作为通用回退值。嵌入模型另有 OPENAI_EMBEDDING_BASE_URL 和 OPENAI_EMBEDDING_API_KEY 回退值。
LiteLLM
| 用途 | API 地址 | 密钥 | 模型 | 最大 token 默认值 |
|---|---|---|---|---|
| 回答 | LITELLM_CHAT_API_BASE | LITELLM_CHAT_API_KEY | LITELLM_CHAT_LANGUAGE_MODEL | LITELLM_CHAT_TOKENS=8192 |
| 抽取 | LITELLM_EXTRACT_API_BASE | LITELLM_EXTRACT_API_KEY | LITELLM_EXTRACT_LANGUAGE_MODEL | LITELLM_EXTRACT_TOKENS=256 |
| Text2Gremlin | LITELLM_TEXT2GQL_API_BASE | LITELLM_TEXT2GQL_API_KEY | LITELLM_TEXT2GQL_LANGUAGE_MODEL | LITELLM_TEXT2GQL_TOKENS=4096 |
| 嵌入 | LITELLM_EMBEDDING_API_BASE | LITELLM_EMBEDDING_API_KEY | LITELLM_EMBEDDING_MODEL | 不适用 |
三个语言模型默认是 openai/gpt-4.1-mini,嵌入模型默认是 openai/text-embedding-3-small。模型名通常使用 供应商/模型 格式,具体取值由 LiteLLM 服务决定。
Ollama
| 用途 | 主机 | 端口 | 模型 |
|---|---|---|---|
| 回答 | OLLAMA_CHAT_HOST | OLLAMA_CHAT_PORT | OLLAMA_CHAT_LANGUAGE_MODEL |
| 抽取 | OLLAMA_EXTRACT_HOST | OLLAMA_EXTRACT_PORT | OLLAMA_EXTRACT_LANGUAGE_MODEL |
| Text2Gremlin | OLLAMA_TEXT2GQL_HOST | OLLAMA_TEXT2GQL_PORT | OLLAMA_TEXT2GQL_LANGUAGE_MODEL |
| 嵌入 | OLLAMA_EMBEDDING_HOST | OLLAMA_EMBEDDING_PORT | OLLAMA_EMBEDDING_MODEL |
主机默认是 127.0.0.1,端口默认是 11434,模型名没有默认值。使用前先在 Ollama 中拉取对应模型。
重排序
| 配置项 | 默认值 | 说明 |
|---|---|---|
COHERE_BASE_URL | https://api.cohere.com/v1/rerank | Cohere rerank 接口;CO_API_URL 可作为回退值 |
RERANKER_API_KEY | 空 | Cohere 或 SiliconFlow 密钥 |
RERANKER_MODEL | 空 | 服务端支持的模型名 |
HugeGraph 连接与召回限制
| 配置项 | 默认值 | 说明 |
|---|---|---|
GRAPH_URL | 127.0.0.1:8080 | HugeGraph 地址,不拆分为 IP 和端口 |
GRAPH_NAME | hugegraph | 图名 |
GRAPH_USER | admin | 用户名 |
GRAPH_PWD | xxx | 密码 |
GRAPH_SPACE | 空 | GraphSpace 名称 |
LIMIT_PROPERTY | False | 是否限制返回属性;配置类按字符串读取 |
MAX_GRAPH_PATH | 10 | 最大图路径长度 |
MAX_GRAPH_ITEMS | 30 | 图召回的最大项目数 |
EDGE_LIMIT_PRE_LABEL | 8 | 每个边标签的返回上限 |
VECTOR_DIS_THRESHOLD | 0.9 | 向量距离阈值;超过阈值的结果会被忽略 |
TOPK_PER_KEYWORD | 1 | 每个关键词的候选数 |
TOPK_RETURN_RESULTS | 20 | 重排序后返回的结果数 |
向量索引后端
| 配置项 | 默认值 | 说明 |
|---|---|---|
CUR_VECTOR_INDEX | Faiss | 当前使用的向量库:Faiss、Milvus 或 Qdrant |
QDRANT_HOST | 空 | |
QDRANT_PORT | 6333 | |
QDRANT_API_KEY | 空 | |
MILVUS_HOST | 空 | |
MILVUS_PORT | 19530 | |
MILVUS_USER | 空 | |
MILVUS_PASSWORD | 空 |
FAISS 在本地运行,无需额外依赖。未安装可选依赖就选择 Milvus 或 Qdrant 时,会报错并指出缺少的包,因此需要先安装:
Web 页面的 5. Set up the vector engine. 面板提供同样的选择,并会保存所选引擎的连接配置。
登录与日志接口
| 配置项 | 默认值 | 说明 |
|---|---|---|
ENABLE_LOGIN | False | 是否要求 Bearer token;配置类按字符串读取 |
USER_TOKEN | 4321 | Web 页面和普通 API 的 token |
ADMIN_TOKEN | xxxx | /logs 使用的管理员 token |
ADMIN_TOKEN 为空或仍为 xxxx 时,/logs 会直接返回 403。生产环境应同时替换用户 token 和管理员 token。
最小 OpenAI 配置
配置加载
配置类先提供代码默认值,再从 .env 和进程环境读取覆盖值。Web 页面和配置 API 可以在运行时更新当前设置,并把受支持的字段同步回 .env。手工改动 .env 后应重启服务;提示词 YAML 可由页面加载逻辑刷新。
.env 中的未知键会被忽略而不是报错,空值会回退到代码默认值,键名匹配不区分大小写。
配置定义位于:
hugegraph-llm/src/hugegraph_llm/config/llm_config.pyhugegraph-llm/src/hugegraph_llm/config/hugegraph_config.pyhugegraph-llm/src/hugegraph_llm/config/index_config.pyhugegraph-llm/src/hugegraph_llm/config/admin_config.pyhugegraph-llm/src/hugegraph_llm/config/prompt_config.pyhugegraph-llm/src/hugegraph_llm/config/models/base_config.py:加载与文件同步逻辑
3.5 - HugeGraph-LLM REST API
HugeGraph-LLM 演示进程同时提供 Web 页面和 REST API。默认地址是 http://localhost:8001:
所有接口都使用 POST:
| 路径 | 成功状态码 | 用途 |
|---|---|---|
/rag | 200 | 按所选召回方式回答问题 |
/rag/graph | 200 | 只做图召回,不生成最终答案 |
/graph/extract | 200 | 从文本抽取顶点和边 |
/text2gremlin | 200 | 由自然语言生成 Gremlin |
/config/graph | 201 | 更新 HugeGraph 连接 |
/config/llm | 201 | 更新语言模型 |
/config/embedding | 201 | 更新嵌入模型 |
/config/rerank | 201 | 更新重排序模型 |
/logs | 200 | 流式返回服务日志 |
认证
在 .env 中启用登录:
启用后,请求需要 Bearer token:
同一开关也会给 Gradio 页面加上基础认证,用户名固定为 rag,密码是 USER_TOKEN。token 不正确时返回 401,并带上 WWW-Authenticate: Bearer 响应头。ENABLE_LOGIN 保持 False 时所有接口都不做鉴权。
RAG
POST /rag
根据开关返回一种或多种回答。未显式指定时只启用 graph_only。
响应只包含已启用的回答字段:
其他可选参数包括 graph_ratio(默认 0.5)、rerank_method(bleu 或 reranker,默认 bleu)、near_neighbor_first(默认 false)、custom_priority_info,以及三个自定义提示词字段 answer_prompt、keywords_extract_prompt 和 gremlin_prompt。省略提示词字段时使用 config_prompt.yaml 中的值。
gremlin_tmpl_num 决定图召回阶段 Text2Gremlin 的执行方式:小于 0 表示跳过 Text2Gremlin,直接使用预定义的图遍历;等于 0 表示不带示例生成 Gremlin;大于 0 表示从示例索引中取相应数量的示例。
query 为空或只有空白字符时返回 400。
POST /rag/graph
只执行图召回,不生成最终自然语言答案:
响应的 graph_recall 可能包含 query、keywords、match_vids、graph_result_flag、gremlin、graph_result 和 vertex_degree_list。设置 get_vertex_only=true 可在顶点匹配后提前返回,此时接口会把 match_vids 替换为完整的顶点详情。
query 为空返回 400,请求类型错误返回 400,其他失败返回 500。
图抽取
POST /graph/extract
使用内联 Schema 时不会连接 HugeGraph:
请求字段:
| 字段 | 默认值 | 说明 |
|---|---|---|
texts | 必填 | 字符串或字符串数组;空白项会被丢弃,全部为空时报错 |
schema | 必填 | 内联 JSON 对象或字符串,或现有图名 |
example_prompt | 提示词 YAML 中的值 | 抽取提示词头部 |
extract_type | property_graph | 目前仅接受该值 |
language | zh | zh 或 en,用于文本切分 |
split_type | document | document、paragraph 或 sentence |
include_meta | false | 在 meta 中加入 vertex_count、edge_count 和 text_count |
client_config | 无 | 仅在 schema 为图名时允许传入 |
内联 Schema 必须是包含 vertexlabels 和 edgelabels 两个列表的对象。每个顶点标签需要非空的 name 和非空的 properties 列表;每条边标签需要非空的 name、source_label 和 target_label。propertykeys 可选,若存在必须是列表。
若 schema 传现有图名,必须同时传入 client_config,且 client_config.graph 必须和图名相同。这里的 client_config 只接受 graph、user、pwd 和 gs,未知字段会被拒绝,且没有 url 字段:
成功响应固定包含 status(始终为 succeeded)、result.vertices、result.edges、warnings 和 meta。include_meta 不为 true 时 meta 为空。
Text2Gremlin
POST /text2gremlin
output_types 可包含:
match_resulttemplate_gremlinraw_gremlintemplate_execution_resultraw_execution_result
省略该字段时默认只返回 template_gremlin;传空数组表示由实现返回全部输出。自定义 gremlin_prompt 必须包含 {query}、{schema}、{example} 和 {vertices},缺少占位符时请求校验失败,并会列出缺失的占位符。
example_num 默认是 0,表示不使用模板,取值会被限制在 0 到 10 之间。client_config 只在单次请求内覆盖 HugeGraph 连接,生成时使用的 Schema 是当前生效的图名。query 为空返回 400,生成失败返回 500。
运行时配置
POST /config/graph
user 和 pwd 默认是空字符串,gs 可选。
POST /config/llm 与 POST /config/embedding
两个端点使用同一个请求模型。/config/llm 会把 chat_llm_type、extract_llm_type 和 text2gql_llm_type 一起设为相同的值;要分别设置各任务的类型,只能通过 .env 或 Web 页面。OpenAI 或 LiteLLM 示例:
Ollama 请求仍要提供公共字段;api_key 和 api_base 可传空字符串:
POST /config/rerank
reranker_type 可选 cohere、siliconflow。Cohere 还可以传 cohere_base_url。
四个配置端点成功时都返回 201。它们会改动进程当前配置,并可能同步到 .env。/config/llm、/config/embedding 和 /config/rerank 在应用过程中抛出异常时会回滚到原有取值,/config/graph 不会。
/rag、/rag/graph 和 /text2gremlin 的 client_config 只在单次请求期间覆盖 HugeGraph 连接,且仅应用请求中实际出现的字段。当前实现仍会临时改动进程全局设置,不适合用不同连接并发发起长请求。
日志
POST /logs
该接口要求 .env 中的 ADMIN_TOKEN 已改成安全值。请求体示例:
log_file 默认是 llm-server.log,只能是 logs/ 目录下的文件名,不能是绝对路径、不能包含路径分隔符,也不能解析为 . 或 ..。非法文件名返回 400。
ADMIN_TOKEN 未设置或仍是占位值时,在比对 token 之前就返回 403;token 不匹配时返回内容为 Invalid admin_token 的 403 响应。
成功时返回 text/plain 流:先回放文件末尾 125 行,然后像 tail -f 一样持续输出新内容。
3.6 - Vermeer Python 客户端
vermeer-python-client 是 Vermeer 的 Python SDK。Vermeer 是使用 Go 编写、以内存计算为主的图计算引擎。该 SDK 封装了 Vermeer master 的 REST API,可以在 Python 中列出图、提交加载和计算任务、读取任务状态。导入时使用的包名是 pyvermeer。
模块没有固定 Vermeer 服务端版本,它通过 HTTP 访问 Vermeer master,调用的接口见 API 概览。
环境要求
- 单独使用该模块需要 Python 3.9 或更高版本;HugeGraph-AI 仓库整体要求 Python 3.10 或更高版本
- 一个可通过 HTTP 访问的 Vermeer master。默认 HTTP 端口为
6688;Docker 部署需发布6688:6688,见 Vermeer 快速开始。 uv(推荐)或pip
运行时依赖:requests、urllib3、python-dateutil、decorator、rich 和 setuptools。
安装
打包元数据中的发行包名是 vermeer-python-client,其版本号独立于仓库版本号管理。该包尚未发布到 PyPI,请从源码安装。
在 HugeGraph-AI 仓库根目录,使用 vermeer extra 把它安装到共用的虚拟环境中:
vermeer-python-client 是以可编辑路径依赖的方式接入的,并不是 uv workspace member,因此在仓库根目录直接执行 uv sync 不会安装它,必须显式指定该 extra(或使用 --all-extras)。
单独安装该模块:
连接 Vermeer master
构造函数参数:
| 参数 | 类型 | 默认值 | 说明 |
|---|---|---|---|
ip | str | 必填 | Vermeer master 的主机名或 IP 地址 |
port | int | 必填 | Vermeer master 的 REST 端口 |
token | str | 必填 | 原样作为 Authorization 请求头发送 |
timeout | (float, float) 或 None | None | 连接超时和读取超时,单位为秒 |
log_level | str | "INFO" | 应用到共享 VermeerClient 日志器的级别 |
连接前需要了解的行为:
- 当 master 不校验鉴权时,
token可以是空字符串,但不能是None,否则会话会抛出ValueError("Vermeer Token must be provided.")。 timeout是(连接超时, 读取超时)二元组。VermeerConfig自身的默认值是(0.5, 15.0),但客户端总是把自己的参数传下去,因此不传timeout时实际存入的是None,请求会一直等待。需要超时就显式传入该二元组。- 基础 URL 固定拼接为
http://{ip}:{port}/,即客户端只使用明文 HTTP。 - 每个请求都会设置
Content-Type: application/json,并把params序列化进请求体,GET请求也是如此。 - 底层会话在 HTTP 500、502、504 时最多重试 3 次,退避系数为
0.1。 log_level设置的是名为VermeerClient的共享日志器的级别。它的控制台 handler 固定为INFO,因此目前DEBUG级别的记录不会打印到控制台。
端到端示例
模块自带一个可运行的示例:vermeer-python-client/src/pyvermeer/demo/task_demo.py。下面的版本在其基础上增加了带超时和失败处理的任务状态轮询,等待加载成功后再读取图,并从环境变量读取 HugeGraph 密码:
加载任务以 loaded 表示成功;error 或 canceled 会中止示例,不再读取图。可按数据量调整 poll_timeout(此处为 300 秒)。轮询期限与 HTTP 连接、读取超时相互独立,已发出的请求及 SDK 重试可能使实际等待时间超过该期限。超时只停止客户端等待,不会取消服务端任务。
不要把真实的 HugeGraph 密码写死在脚本或配置文件中,请像上面这样从环境变量或凭据管理系统读取。
模块自带的 task_demo.py 使用 8688。运行前,请将其中 PyVermeerClient 的 port 改为 6688,与默认 master HTTP 端口保持一致。根据安装后所在的目录选择对应命令:
仓库根目录安装(在 hugegraph-ai/ 下运行):
独立安装(在 hugegraph-ai/vermeer-python-client/ 下运行):
API 概览
PyVermeerClient 以属性的方式暴露各个 API 组,目前注册了 graph 和 tasks 两个组。
client.graph
| 方法 | Vermeer 接口 | 返回值 |
|---|---|---|
get_graphs() | GET /graphs | GraphsResponse |
get_graph(graph_name) | GET /graphs/{graph_name} | GraphResponse |
client.tasks
| 方法 | Vermeer 接口 | 返回值 |
|---|---|---|
get_tasks() | GET /tasks | TasksResponse |
get_task(task_id) | GET /task/{task_id} | TaskResponse |
create_task(create_task) | POST /tasks/create | TaskCreateResponse |
pyvermeer/api/master.py 和 pyvermeer/api/worker.py 目前只有许可证头,也没有注册到客户端上。因此尽管 pyvermeer/structure/ 下已经有 MasterResponse 和 WorkersResponse,master 和 worker 信息暂时还无法通过客户端获取。
client.send_request(method, endpoint, params) 是这两个组共用的请求入口。对于还没有封装的 Vermeer 接口,可以直接调用它,返回值是解析后的 JSON 字典。
请求与响应对象
TaskCreateRequest(task_type, graph_name, params) 序列化为 {"task_type": ..., "graph": ..., "params": ...}。注意 graph_name 在报文中的字段名是 graph,与 Vermeer REST API 的请求体一致。
所有响应类型都继承 BaseResponse,提供 errcode、message 属性和 to_dict() 方法。errcode 为 0 表示成功,1 表示错误,-1 表示响应体中没有该字段。
GraphsResponse.graphs和GraphResponse.graph返回VermeerGraph对象,包含name、space_name、status、create_time、update_time、vertex_count、edge_count、workers、worker_group、use_out_edges、use_property、use_out_degree、use_undirected、on_disk和backend_option。TasksResponse.tasks、TaskResponse.task和TaskCreateResponse.task返回TaskInfo对象,包含id、state、create_user、create_type、create_time、start_time、update_time、graph_name、space_name、type、params和workers。- 时间字段由
python-dateutil解析为datetime对象,空字符串会解析为None。
任务参数
客户端不会校验 params,键和值都会原样传给 Vermeer,因此可用的参数名由引擎决定,而不是由 SDK 决定。加载参数以及各算法的参数请参考 Vermeer 快速开始。
使用流程与直接调用 REST API 相同:先创建 load 任务把图读入 Vermeer,等待任务完成,再针对已加载的图创建计算任务。
异常
pyvermeer.utils.exception 定义了四种异常,都由底层的 requests 或 JSON 解析失败包装而来:
| 异常 | 触发场景 |
|---|---|
ConnectError | requests.ConnectionError,无法连接 master |
TimeOutError | requests.Timeout,连接或读取超时 |
JsonDecodeError | 响应体不是合法的 JSON |
UnknownError | 请求过程中的其他失败 |
客户端不检查响应的 HTTP 状态码,请通过返回对象的 errcode 和 message 判断是成功还是 Vermeer 端返回了错误。
代码检查
在 HugeGraph-AI 仓库根目录执行格式化和静态检查:
源码位于 vermeer-python-client/src/pyvermeer/。该模块目前没有测试用例。
参考
4 - HugeGraph 图计算(OLAP)
HugeGraph-Computer 仓库包含两套 OLAP 系统:Go 实现的内存图计算平台 Vermeer,以及 Java 实现的分布式 BSP 框架 Computer。
DeepWiki 提供实时更新的项目文档,内容更全面准确,适合快速了解项目最新情况。
4.1 - HugeGraph-Vermeer Quick Start
一、Vermeer 概述
1.1 运行架构
Vermeer 是一个 Go编写的高性能内存优先的图计算框架 (一次启动,任意执行),支持 15+ OLAP 图算法的极速计算 (大部分秒~分钟级别完成执行),包含 master 和 worker 两种角色。master 目前只有一个 (可增加 HA),worker 可以有多个。
master 是负责通信、转发、汇总的节点,计算量和占用资源量较少。worker 是计算节点,用于存储图数据和运行计算任务,占用大量内存和 cpu。grpc 和 rest 模块分别负责内部通信和外部调用。
该框架的运行配置可以通过命令行参数传入,也可以通过位于 config/ 目录下的配置文件指定,--env 参数可以指定使用哪个配置文件,例如 --env=master 指定使用 master.ini。需要注意 master 需要指定监听的端口号,worker 需要指定监听端口号和 master 的 ip:port。
master 默认 HTTP 端口为 6688,用于 REST API 和 Python 客户端;worker 连接 master 使用 gRPC 端口 6689。下面的 Docker 示例通过 6688:6688 发布 HTTP 端口,请保留 master 配置中的 http_peer=0.0.0.0:6688。
1.2 运行方法
下面两种 Docker 启动方式都需要先准备一个宿主机配置目录,包含项目提供的 master.ini 和 worker.ini。在 worker.ini 已有的 [default] 节中修改 master_peer,保留其余配置:
在 worker 容器内,默认的 127.0.0.1:6689 指向 worker 自身。两个示例中的 vermeer-master 都会在共享 Docker 网络内解析到 master 容器。请保留 master.ini 中的 grpc_peer=0.0.0.0:6689,并将上述配置目录挂载到两个容器的 /go/bin/config。仅发布 HTTP 端口 6688 不会配置 worker 的 gRPC 连接。
- 方案一:Docker Compose(推荐)
在 Vermeer 根目录执行以下步骤。可以使用仓库已有的 docker-compose.yaml,也可以根据下面的示例创建。无论使用哪一种,都必须在启动服务前完成下文要求的端口和挂载配置修改:
启动前,无论使用仓库自带的文件还是上面的示例,都需要修改 docker-compose.yaml:
- Ports:在
services.vermeer-master下补上ports: ["6688:6688"](如果尚无此映射),让宿主机上的 curl 和 Python 客户端能够访问 master 的 HTTP API。 - Volumes:将
vermeer-master和vermeer-worker中挂载到/go/bin/config的条目都设为/home/user/config:/go/bin/config,其中/home/user/config应替换为上面准备的配置目录的绝对路径。不论原挂载使用的是~/(仓库自带文件)还是~/.config(上面的示例),都需要替换。 - Subnet:根据实际情况修改子网IP。请注意,每个容器需要访问的端口在config文件中指定,具体请参照项目
config文件夹下内容。
在项目目录构建镜像并启动(或者先用 docker build 再 docker-compose up)
查看日志 / 停止 / 删除:
- 方案二:通过 docker run 单独启动(手动创建网络并分配静态 IP)
将 CONFIG_DIR 设为上面准备的配置目录,其中 worker.ini 已设置 master_peer=vermeer-master:6689。确保该目录对 Docker 进程具有适当的读取/执行权限。
构建镜像:
创建自定义 bridge 网络(一次性操作):
运行 master(调整 CONFIG_DIR 为您的绝对配置路径,可以根据实际情况调整IP):
运行 worker:
查看日志 / 停止 / 删除:
- 方案三:从源码构建
构建。具体请参照 Vermeer Readme。
在进入文件夹目录后输入 ./vermeer --env=master 或 ./vermeer --env=worker01
启动 master 后,在宿主机验证 HTTP 端口:
请求应返回 HTTP 200,JSON 响应中的 errcode 为 0。
二、任务创建类 rest api
2.1 简介
此类 rest api 提供所有创建任务的功能,包括读取图数据和多种计算功能,提供异步返回和同步返回两种接口。返回的内容均包含所创建任务的信息。使用 vermeer 的整体流程是先创建读取图的任务,待图读取完毕后创建计算任务执行计算。图不会自动被删除,在一个图上运行多个计算任务无需多次重复读取,如需删除可用删除图接口。任务状态可分为读取任务状态和计算任务状态。通常情况下客户端仅需了解创建、任务中、任务结束和任务错误四种状态。图状态是图是否可用的判断依据,若图正在读取中或图状态错误,无法使用该图创建计算任务。图删除接口仅在 loaded 和 error 状态且该图无计算任务时可用。
可以使用的 url 如下:
- 异步返回接口 POST http://master_ip:port/tasks/create 仅返回任务创建是否成功,需通过主动查询任务状态判断是否完成。
- 同步返回接口 POST http://master_ip:port/tasks/create/sync 在任务结束后返回。
2.2 加载图数据
具体参数参考 Vermeer 参数列表文档。
vermeer提供三种加载方式:
- 从本地加载
可以预先获取数据集,例如 twitter-2010 数据集。获取方式:https://snap.stanford.edu/data/twitter-2010.html,第一个 twitter-2010.txt.gz 即可。
request 示例:
- 从hugegraph加载
request 示例:
⚠️ 安全警告:切勿在配置文件或代码中存储真实密码。请改用环境变量或安全的凭据管理系统。
- 从hdfs加载
request 示例:
2.3 输出计算结果
所有的 vermeer 计算任务均支持多种结果输出方式,可自定义输出方式:local、hdfs、afs 或 hugegraph,在发送请求时的 params 参数下加入对应参数,即可生效。指定 output.need_statistics 为 1 时,支持计算结果统计信息输出,结果会写在接口任务信息内。统计模式算子目前支持 “count” 和 “modularity” 。但仅针对社区发现算法适用。
具体参数参考 Vermeer 参数列表文档。
request 示例:
三、支持的算法
3.1 PageRank
PageRank 算法又称网页排名算法,是一种由搜索引擎根据网页(节点)之间相互的超链接进行计算的技
术,用来体现网页(节点)的相关性和重要性。
- 如果一个网页被很多其他网页链接到,说明这个网页比较重要,也就是其 PageRank 值会相对较高。
- 如果一个 PageRank 值很高的网页链接到其他网页,那么被链接到的网页的 PageRank 值会相应地提高。
PageRank 算法适用于网页排序、社交网络重点人物发掘等场景。
request 示例:
3.2 WCC(弱连通分量)
弱连通分量,计算无向图中所有联通的子图,输出各顶点所属的弱联通子图 id,表明各个点之间的连通性,区分不同的连通社区。
request 示例:
3.3 LPA(标签传播)
标签传递算法,是一种图聚类算法,常用在社交网络中,用于发现潜在的社区。
request 示例:
3.4 Degree Centrality(度中心性)
度中心性算法,算法用于计算图中每个节点的度中心性值,支持无向图和有向图。度中心性是衡量节点重要性的重要指标,节点与其它节点的边越多,则节点的度中心性值越大,节点在图中的重要性也就越高。在无向图中,度中心性的计算是基于边信息统计节点出现次数,得出节点的度中心性的值,在有向图中则基于边的方向进行筛选,基于输入边或输出边信息统计节点出现次数,得到节点的入度值或出度值。它表明各个点的重要性,一般越重要的点度数越高。
request 示例:
3.5 Closeness Centrality(紧密中心性)
紧密中心性(Closeness Centrality)用于计算一个节点到所有其他可达节点的最短距离的倒数,进行累积后归一化的值。紧密中心度可以用来衡量信息从该节点传输到其他节点的时间长短。节点的“Closeness Centrality”越大,其在所在图中的位置越靠近中心,适用于社交网络中关键节点发掘等场景。
request 示例:
3.6 Betweenness Centrality(中介中心性算法)
中介中心性算法(Betweeness Centrality)判断一个节点具有"桥梁"节点的值,值越大说明它作为图中两点间必经路径的可能性越大,典型的例子包括社交网络中的共同关注的人。适用于衡量社群围绕某个节点的聚集程度。
request 示例:
3.7 Triangle Count(三角形计数)
三角形计数算法,用于计算通过每个顶点的三角形个数,适用于计算用户之间的关系,关联性是不是成三角形。三角形越多,代表图中节点关联程度越高,组织关系越严密。社交网络中的三角形表示存在有凝聚力的社区,识别三角形有助于理解网络中个人或群体的聚类和相互联系。在金融网络或交易网络中,三角形的存在可能表示存在可疑或欺诈活动,三角形计数可以帮助识别可能需要进一步调查的交易模式。
输出的结果为 每个顶点对应一个 Triangle Count,即为每个顶点所在三角形的个数。
注:该算法为无向图算法,忽略边的方向。
request 示例:
3.8 K-Core
K-Core 算法,标记所有度数为 K 的顶点,适用于图的剪枝,查找图的核心部分。
request 示例:
3.9 SSSP(单元最短路径)
单源最短路径算法,求一个点到其他所有点的最短距离。
request 示例:
3.10 KOUT
以一个点为起点,获取这个点的 k 层的节点。
request 示例:
3.11 Louvain
Louvain 算法是一种基于模块度的社区发现算法。其基本思想是网络中节点尝试遍历所有邻居的社区标签,并选择最大化模块度增量的社区标签。在最大化模块度之后,每个社区看成一个新的节点,重复直到模块度不再增大。
Vermeer 上实现的分布式 Louvain 算法受节点顺序、并行计算等因素影响,并且由于 Louvain 算法由于其遍历顺序的随机导致社区压缩也具有一定的随机性,导致重复多次执行可能存在不同的结果。但整体趋势不会有大的变化。
request 示例:
3.12 Jaccard 相似度系数
Jaccard index , 又称为 Jaccard 相似系数(Jaccard similarity coefficient)用于比较有限样本集之间的相似性与差异性。Jaccard 系数值越大,样本相似度越高。用于计算一个给定的源点,与图中其他所有点的 Jaccard 相似系数。
request 示例:
3.13 Personalized PageRank
个性化的 pagerank 的目标是要计算所有节点相对于用户 u 的相关度。从用户 u 对应的节点开始游走,每到一个节点都以 1-d 的概率停止游走并从 u 重新开始,或者以 d 的概率继续游走,从当前节点指向的节点中按照均匀分布随机选择一个节点往下游走。用于给定一个起点,计算此起点开始游走的个性化 pagerank 得分。适用于社交推荐等场景。
由于计算需要使用出度,需要在读取图时需要设置 load.use_out_degree 为 1。
request 示例:
3.14 全图 Kout
计算图的所有节点的k度邻居(不包含自己以及1~k-1度的邻居),由于全图kout算法内存膨胀比较厉害,目前k限制在1和2,另外,全局kout算法支持过滤功能( 参数如:“compute.filter”:“risk_level==1”),在计算第k度的是时候进行过滤条件的判断,符合过滤条件的进入最终结果集,算法最终输出是符合条件的邻居个数。
request 示例:
3.15 集聚系数 clustering coefficient
集聚系数表示一个图中节点聚集程度的系数。在现实的网络中,尤其是在特定的网络中,由于相对高密度连接点的关系,节点总是趋向于建立一组严密的组织关系。集聚系数算法(Cluster Coefficient)用于计算图中节点的聚集程度。本算法为局部集聚系数。局部集聚系数可以测量图中每一个结点附近的集聚程度。
request 示例:
3.16 SCC(强连通分量)
在有向图的数学理论中,如果一个图的每一个顶点都可从该图其他任意一点到达,则称该图是强连通的。在任意有向图中能够实现强连通的部分我们称其为强连通分量。它表明各个点之间的连通性,区分不同的连通社区。
🚧, 后续随时更新完善,欢迎随时提出建议和意见。
4.2 - HugeGraph-Computer Quick Start
1 HugeGraph-Computer 概述
HugeGraph-Computer 是分布式图处理系统 (OLAP). 它是 Pregel的一个实现。它可以运行在 Kubernetes(K8s)/Yarn 上。(它侧重可支持百亿~千亿的图数据量下进行图计算, 会使用磁盘进行排序和加速, 这是它和 Vermeer 相对最大的区别之一)
特性
- 支持分布式 MPP 图计算,集成 HugeGraph 作为图输入输出存储。
- 算法基于 BSP(Bulk Synchronous Parallel) 模型,通过多次并行迭代进行计算,每一次迭代都是一次超步。
- 自动内存管理。该框架永远不会出现 OOM(内存不足),因为如果它没有足够的内存来容纳所有数据,它会将一些数据拆分到磁盘。
- 边的部分或超级节点的消息可以在内存中,所以你永远不会丢失它。
- 您可以从 HDFS 或 HugeGraph 或任何其他系统加载数据。
- 您可以将结果输出到 HDFS 或 HugeGraph,或任何其他系统。
- 易于开发新算法。您只需要像在单个服务器中一样专注于仅顶点处理,而不必担心消息传输和内存存储管理。
2 依赖
2.1 安装 Java 11 (JDK 11)
必须在 ≥ Java 11 的环境上启动 Computer,然后自行配置。
在往下阅读之前务必执行 java -version 命令查看 jdk 版本
3 开始
3.1 在本地运行 PageRank 算法
要使用 HugeGraph-Computer 运行算法,必须装有 Java 11 或更高版本。
还需要首先部署 HugeGraph-Server 和 Etcd.
有两种方式可以获取 HugeGraph-Computer:
- 下载已编译的压缩包
- 克隆源码编译打包
3.1.1 下载已编译的压缩包
下载最新版本的 HugeGraph-Computer release 包:
3.1.2 克隆源码编译打包
克隆最新版本的 HugeGraph-Computer 源码包:
编译生成 tar 包:
3.1.3 启动 master 节点
您可以使用
-c参数指定配置文件,更多 computer 配置请看:Computer 配置选项
3.1.4 启动 worker 节点
3.1.5 查询算法结果
2.5.1 为 server 启用 OLAP 索引查询
如果没有启用 OLAP 索引,则需要启用,更多参考:modify-graphs-read-mode
3.1.5.2 查询 page_rank 属性值:
3.2 在 Kubernetes 中运行 PageRank 算法
要使用 HugeGraph-Computer 运行算法,您需要先部署 HugeGraph-Server
3.2.1 安装 HugeGraph-Computer CRD
3.2.2 显示 CRD
3.2.3 安装 hugegraph-computer-operator&etcd-server
3.2.4 等待 hugegraph-computer-operator&etcd-server 部署完成
3.2.5 提交作业
更多 computer crd spec 请看:Computer CRD
更多 Computer 配置请看:Computer 配置选项
3.2.6 显示作业
3.2.7 显示节点日志
3.2.8 显示作业的成功事件
NOTE: it will only be saved for one hour
3.2.9 查询算法结果
如果输出到 Hugegraph-Server 则与 Locally 模式一致,如果输出到 HDFS ,请检查 hugegraph-computerresults{jobId}目录下的结果文件。
4 内置算法文档
4.1 支持的算法列表:
中心性算法:
- PageRank
- BetweennessCentrality
- ClosenessCentrality
- DegreeCentrality
社区算法:
- ClusteringCoefficient
- Kcore
- Lpa
- TriangleCount
- Wcc
路径算法:
- RingsDetection
- RingsDetectionWithFilter
更多算法请看:Built-In algorithms
4.2 算法描述
TODO
5 算法开发指南
TODO
6 注意事项
- 如果 computer-k8s 模块下面的某些类不存在,你需要运行
mvn compile来提前生成对应的类。
4.3 - HugeGraph-Computer 配置参考
Computer 配置选项
表格中的默认值来自 computer-api 模块的 ComputerOptions.java。分发包的 conf/computer.properties 显式覆盖某项时,表格以“代码默认值(打包:实际值)”标注;程序启动后以配置文件中的值为准。
1. 基础配置
HugeGraph-Computer 核心作业设置。
| 配置项 | 默认值 | 说明 |
|---|---|---|
| hugegraph.url | http://127.0.0.1:8080 | HugeGraph 服务器 URL,用于加载数据和写回结果。 |
| hugegraph.name | hugegraph | 图名称,用于加载数据和写回结果。 |
| hugegraph.username | "" (空) | HugeGraph 认证用户名(如果未启用认证则留空)。 |
| hugegraph.password | "" (空) | HugeGraph 认证密码(如果未启用认证则留空)。 |
| job.id | local_0001 (打包: local_001) | YARN 集群或 K8s 集群上的作业标识符。 |
| job.namespace | "" (空) | 作业命名空间,可以分隔不同的数据源。该项由运行系统管理。 |
| job.workers_count | 1 | 执行一个图算法作业的 Worker 数量。在 K8s 中由 Operator 设置。 |
| job.partitions_count | 1 | 执行一个图算法作业的分区数量。 |
| job.partitions_thread_nums | 4 | 分区并行计算的线程数量。 |
2. 算法配置
计算逻辑的算法特定配置。
| 配置项 | 默认值 | 说明 |
|---|---|---|
| algorithm.params_class | ComputerOptions.Null 占位类 | 必填。用于在算法运行前传递算法参数的类。 |
| algorithm.result_class | ComputerOptions.Null 占位类 | 顶点值的类,用于存储顶点的计算结果。 |
| algorithm.message_class | ComputerOptions.Null 占位类 | 计算顶点时传递的消息类。 |
3. 输入配置
从 HugeGraph 或其他数据源加载输入数据的配置。
3.1 输入源
| 配置项 | 默认值 | 说明 |
|---|---|---|
| input.source_type | hugegraph-server | 加载输入数据的源类型,允许值:[‘hugegraph-server’, ‘hugegraph-loader’]。‘hugegraph-loader’ 表示使用 hugegraph-loader 从 HDFS 或文件加载数据。如果使用 ‘hugegraph-loader’,请配置 ‘input.loader_struct_path’ 和 ‘input.loader_schema_path’。 |
| input.loader_struct_path | "" (空) | Loader 输入的结构路径,仅在 input.source_type=hugegraph-loader 时生效。 |
| input.loader_schema_path | "" (空) | Loader 输入的 Schema 路径,仅在 input.source_type=hugegraph-loader 时生效。 |
3.2 输入分片
| 配置项 | 默认值 | 说明 |
|---|---|---|
| input.split_size | 1048576 (1 MB) | 输入分片大小(字节)。 |
| input.split_max_splits | 10000000 | 最大输入分片数量。 |
| input.split_page_size | 500 | 流式加载输入分片数据的页面大小。 |
| input.split_fetch_timeout | 300 | 获取输入分片的超时时间(秒)。 |
3.3 输入处理
| 配置项 | 默认值 | 说明 |
|---|---|---|
| input.filter_class | org.apache.hugegraph.computer.core.input.filter.DefaultInputFilter | 创建输入过滤器对象的类。输入过滤器用于根据用户需求过滤顶点边。 |
| input.edge_direction | OUT | 要加载的边的方向,允许值:[OUT, IN, BOTH]。当值为 BOTH 时,将加载 OUT 和 IN 两个方向的边。 |
| input.edge_freq | MULTIPLE | 一对顶点之间可以存在的边的频率,允许值:[SINGLE, SINGLE_PER_LABEL, MULTIPLE]。SINGLE 表示一对顶点之间只能存在一条边(通过 sourceId + targetId 标识);SINGLE_PER_LABEL 表示每个边标签在一对顶点之间可以有一条边(通过 sourceId + edgeLabel + targetId 标识);MULTIPLE 表示一对顶点之间可以存在多条边(通过 sourceId + edgeLabel + sortValues + targetId 标识)。 |
| input.max_edges_in_one_vertex | 200 | 允许附加到一个顶点的最大邻接边数量。邻接边将作为一个批处理单元一起存储和传输。 |
3.4 输入性能
| 配置项 | 默认值 | 说明 |
|---|---|---|
| input.send_thread_nums | 4 | 并行发送顶点或边的线程数量。 |
4. 快照与存储配置
HugeGraph-Computer 支持快照功能,可将顶点/边分区保存到本地存储或 MinIO 对象存储,用于断点恢复或加速重复计算。
4.1 基础快照配置
| 配置项 | 默认值 | 说明 |
|---|---|---|
| snapshot.write | false | 是否写入输入顶点/边分区的快照。 |
| snapshot.load | false | 是否从顶点/边分区的快照加载。 |
| snapshot.name | "" (空) | 用户自定义的快照名称,用于区分不同的快照。 |
4.2 MinIO 集成(可选)
MinIO 可用作 K8s 部署中快照的分布式对象存储后端。
| 配置项 | 默认值 | 说明 |
|---|---|---|
| snapshot.minio_endpoint | "" (空) | MinIO 服务端点(例如 http://minio:9000)。使用 MinIO 时必填。 |
| snapshot.minio_access_key | minioadmin | MinIO 认证访问密钥。 |
| snapshot.minio_secret_key | minioadmin | MinIO 认证密钥。 |
| snapshot.minio_bucket_name | "" (空) | 用于存储快照数据的 MinIO 存储桶名称。 |
使用场景:
- 断点恢复:作业失败后从快照恢复,避免重新加载数据
- 重复计算:多次运行同一算法时从快照加载数据以加速启动
- A/B 测试:保存同一数据集的多个快照版本,测试不同的算法参数
示例:本地快照(在 computer.properties 中):
示例:MinIO 快照(在 K8s CRD computerConf 中):
5. Worker 与 Master 配置
Worker 和 Master 计算逻辑的配置。
5.1 Master 配置
| 配置项 | 默认值 | 说明 |
|---|---|---|
| master.computation_class | org.apache.hugegraph.computer.core.master.DefaultMasterComputation | Master 计算是可以决定是否继续下一个超步的计算。它在每个超步结束时在 master 上运行。 |
5.2 Worker 计算
| 配置项 | 默认值 | 说明 |
|---|---|---|
| worker.computation_class | org.apache.hugegraph.computer.core.config.Null | 创建 worker 计算对象的类。Worker 计算用于在每个超步中计算每个顶点。 |
| worker.combiner_class | org.apache.hugegraph.computer.core.config.Null | Combiner 可以将消息组合为一个顶点的一个值。例如,PageRank 算法可以将一个顶点的消息组合为一个求和值。 |
| worker.partitioner | org.apache.hugegraph.computer.core.graph.partition.HashPartitioner | 分区器,决定顶点应该在哪个分区中,以及分区应该在哪个 worker 中。 |
5.3 Worker 组合器
| 配置项 | 默认值 | 说明 |
|---|---|---|
| worker.vertex_properties_combiner_class | org.apache.hugegraph.computer.core.combiner.OverwritePropertiesCombiner | 组合器可以在输入步骤将同一顶点的多个属性组合为一个属性。 |
| worker.edge_properties_combiner_class | org.apache.hugegraph.computer.core.combiner.OverwritePropertiesCombiner | 组合器可以在输入步骤将同一边的多个属性组合为一个属性。 |
5.4 Worker 缓冲区
| 配置项 | 默认值 | 说明 |
|---|---|---|
| worker.received_buffers_bytes_limit | 104857600 (100 MB) | 接收数据缓冲区的限制字节数。所有缓冲区的总大小不能超过此限制。如果接收缓冲区达到此限制,它们将被合并到文件中(溢出到磁盘)。 |
| worker.write_buffer_capacity | 52428800 (50 MB) | 用于存储顶点或消息的写缓冲区的初始大小。 |
| worker.write_buffer_threshold | 52428800 (50 MB) | 写缓冲区的阈值。超过它将触发排序。写缓冲区用于存储顶点或消息。 |
5.5 Worker 数据与超时
| 配置项 | 默认值 | 说明 |
|---|---|---|
| worker.data_dirs | [jobs] | 用逗号分隔的目录,接收的顶点和消息可以持久化到其中。 |
| worker.wait_sort_timeout | 600000 (10 分钟) | 消息处理程序等待排序线程对一批缓冲区进行排序的最大超时时间(毫秒)。 |
| worker.wait_finish_messages_timeout | 86400000 (24 小时) | 消息处理程序等待所有 worker 完成消息的最大超时时间(毫秒)。 |
6. I/O 与输出配置
输出计算结果的配置。
6.1 输出类与结果
| 配置项 | 默认值 | 说明 |
|---|---|---|
| output.output_class | org.apache.hugegraph.computer.core.output.LogOutput | 输出每个顶点计算结果的类。在迭代计算后调用。 |
| output.result_name | value | 该值由 WORKER_COMPUTATION_CLASS 创建的实例的 #name() 动态分配。 |
| output.result_write_type | OLAP_COMMON | 输出到 HugeGraph 的结果写入类型,允许值:[OLAP_COMMON, OLAP_SECONDARY, OLAP_RANGE]。 |
6.2 输出行为
| 配置项 | 默认值 | 说明 |
|---|---|---|
| output.with_adjacent_edges | false | 是否输出顶点的邻接边。 |
| output.with_vertex_properties | false | 是否输出顶点的属性。 |
| output.with_edge_properties | false | 是否输出边的属性。 |
6.3 批量输出
| 配置项 | 默认值 | 说明 |
|---|---|---|
| output.batch_size | 500 | 输出的批处理大小。 |
| output.batch_threads | 1 | 用于批量输出的线程数量。 |
| output.single_threads | 1 | 用于单个输出的线程数量。 |
6.4 HDFS 输出
| 配置项 | 默认值 | 说明 |
|---|---|---|
| output.hdfs_url | hdfs://127.0.0.1:9000 | 输出的 HDFS URL。 |
| output.hdfs_user | hadoop | 输出的 HDFS 用户。 |
| output.hdfs_path_prefix | /hugegraph-computer/results | HDFS 输出结果的目录。 |
| output.hdfs_delimiter | , (逗号) | HDFS 输出的分隔符。 |
| output.hdfs_merge_partitions | true | 是否合并多个分区的输出文件。 |
| output.hdfs_replication | 3 | HDFS 的副本数。 |
| output.hdfs_core_site_path | "" (空) | HDFS core site 路径。 |
| output.hdfs_site_path | "" (空) | HDFS site 路径。 |
| output.hdfs_kerberos_enable | false | 是否为 HDFS 启用 Kerberos 认证。 |
| output.hdfs_kerberos_principal | "" (空) | HDFS 的 Kerberos 认证 principal。 |
| output.hdfs_kerberos_keytab | "" (空) | HDFS 的 Kerberos 认证 keytab 文件。 |
| output.hdfs_krb5_conf | /etc/krb5.conf | Kerberos 配置文件路径。 |
6.5 重试与超时
| 配置项 | 默认值 | 说明 |
|---|---|---|
| output.retry_times | 3 | 输出失败时的重试次数。 |
| output.retry_interval | 10 | 输出失败时的重试间隔(秒)。 |
| output.thread_pool_shutdown_timeout | 60 | 输出线程池关闭的超时时间(秒)。 |
7. 网络与传输配置
Worker 和 Master 之间网络通信的配置。
7.1 服务器配置
| 配置项 | 默认值 | 说明 |
|---|---|---|
| transport.server_host | 127.0.0.1 | 监听传输数据的主机名或 IP,由运行系统管理。 |
| transport.server_port | 0 | 监听传输数据的端口;0 表示分配随机端口。该项由运行系统管理。 |
| transport.server_threads | 4 | 服务器传输线程的数量。 |
7.2 客户端配置
| 配置项 | 默认值 | 说明 |
|---|---|---|
| transport.client_threads | 4 | 客户端传输线程的数量。 |
| transport.client_connect_timeout | 3000 | 客户端连接到服务器的超时时间(毫秒)。 |
7.3 协议配置
| 配置项 | 默认值 | 说明 |
|---|---|---|
| transport.provider_class | org.apache.hugegraph.computer.core.network.netty.NettyTransportProvider | 传输提供程序,目前仅支持 Netty。 |
| transport.io_mode | AUTO | 网络 IO 模式,允许值:[NIO, EPOLL, AUTO]。AUTO 表示自动选择适当的模式。 |
| transport.tcp_keep_alive | true | 是否启用 TCP keep-alive。 |
| transport.transport_epoll_lt | false | 是否启用 EPOLL 水平触发(仅在 io_mode=EPOLL 时有效)。 |
7.4 缓冲区配置
| 配置项 | 默认值 | 说明 |
|---|---|---|
| transport.send_buffer_size | 0 | Socket 发送缓冲区大小(字节)。0 表示使用系统默认值。 |
| transport.receive_buffer_size | 0 | Socket 接收缓冲区大小(字节)。0 表示使用系统默认值。 |
| transport.write_buffer_high_mark | 67108864 (64 MB) | 写缓冲区的高水位标记(字节)。如果排队字节数 > write_buffer_high_mark,将触发发送不可用。 |
| transport.write_buffer_low_mark | 33554432 (32 MB) | 写缓冲区的低水位标记(字节)。如果排队字节数 < write_buffer_low_mark,将触发发送可用。 |
7.5 流量控制
| 配置项 | 默认值 | 说明 |
|---|---|---|
| transport.max_pending_requests | 8 | 客户端未接收 ACK 的最大数量。如果未接收 ACK 的数量 >= max_pending_requests,将触发发送不可用。 |
| transport.min_pending_requests | 6 | 客户端未接收 ACK 的最小数量。如果未接收 ACK 的数量 < min_pending_requests,将触发发送可用。 |
| transport.min_ack_interval | 200 | 服务器回复 ACK 的最小间隔(毫秒)。 |
7.6 超时配置
| 配置项 | 默认值 | 说明 |
|---|---|---|
| transport.close_timeout | 10000 | 关闭服务器或关闭客户端的超时时间(毫秒)。 |
| transport.sync_request_timeout | 10000 | 发送同步请求后等待响应的超时时间(毫秒)。 |
| transport.finish_session_timeout | 0 | 完成会话的超时时间(毫秒)。0 表示使用 (transport.sync_request_timeout × transport.max_pending_requests)。 |
| transport.write_socket_timeout | 3000 | 将数据写入 socket 缓冲区的超时时间(毫秒)。 |
| transport.server_idle_timeout | 360000 (6 分钟) | 服务器空闲的最大超时时间(毫秒)。 |
7.7 心跳配置
| 配置项 | 默认值 | 说明 |
|---|---|---|
| transport.heartbeat_interval | 20000 (20 秒) | 客户端心跳之间的最小间隔(毫秒)。 |
| transport.max_timeout_heartbeat_count | 120 | 客户端超时心跳的最大次数。如果连续等待心跳响应超时的次数 > max_timeout_heartbeat_count,通道将从客户端关闭。 |
7.8 高级网络设置
| 配置项 | 默认值 | 说明 |
|---|---|---|
| transport.max_syn_backlog | 511 | 服务器端 SYN 队列的容量。0 表示使用系统默认值。 |
| transport.recv_file_mode | true | 是否启用接收缓冲文件模式。如果启用,将使用零拷贝从 socket 接收缓冲区并写入文件。注意:需要操作系统支持零拷贝(例如 Linux sendfile/splice)。 |
| transport.network_retries | 3 | 网络通信不稳定时的重试次数。 |
8. 存储与持久化配置
HGKV(HugeGraph Key-Value)存储引擎和值文件的配置。
8.1 HGKV 配置
| 配置项 | 默认值 | 说明 |
|---|---|---|
| hgkv.max_file_size | 2147483648 (2 GB) | 每个 HGKV 文件的最大字节数。 |
| hgkv.max_data_block_size | 65536 (64 KB) | HGKV 文件数据块的最大字节大小。 |
| hgkv.max_merge_files | 10 | 一次合并的最大文件数。 |
| hgkv.temp_file_dir | /tmp/hgkv | 此文件夹用于在文件合并过程中存储临时文件。 |
8.2 值文件配置
| 配置项 | 默认值 | 说明 |
|---|---|---|
| valuefile.max_segment_size | 1073741824 (1 GB) | 值文件每个段的最大字节数。 |
9. BSP 与协调配置
批量同步并行(BSP)协议和 etcd 协调的配置。
| 配置项 | 默认值 | 说明 |
|---|---|---|
| bsp.etcd_endpoints | http://localhost:2379 | etcd 端点;多个地址用逗号分隔。K8s 部署中由 Operator 设置。 |
| bsp.max_super_step | 10 (打包: 2) | 算法的最大超步数。 |
| bsp.register_timeout | 300000 (打包: 100000) | 等待 master 和 worker 注册的最大超时时间(毫秒)。 |
| bsp.wait_workers_timeout | 86400000 (24 小时) | 等待 worker BSP 事件的最大超时时间(毫秒)。 |
| bsp.wait_master_timeout | 86400000 (24 小时) | 等待 master BSP 事件的最大超时时间(毫秒)。 |
| bsp.log_interval | 30000 (30 秒) | 等待 BSP 事件时打印日志的日志间隔(毫秒)。 |
10. 性能调优配置
性能优化的配置。
| 配置项 | 默认值 | 说明 |
|---|---|---|
| allocator.max_vertices_per_thread | 10000 | 每个内存分配器中每个线程处理的最大顶点数。 |
| sort.thread_nums | 4 | 执行内部排序的线程数量。 |
11. 系统管理配置
以下配置由运行系统管理,不应由作业配置覆盖。
以下配置项由 K8s Operator、Driver 或运行时系统自动管理。手动修改将导致集群通信失败或作业调度错误。
| 配置项 | 管理者 | 说明 |
|---|---|---|
| bsp.etcd_endpoints | K8s Operator | 自动设置为 operator 的 etcd 服务地址 |
| transport.server_host | 运行时 | 自动设置为 pod/容器主机名 |
| transport.server_port | 运行时 | 自动分配随机端口 |
| job.namespace | K8s Operator | 自动设置为作业命名空间 |
| job.id | K8s Operator | 自动从 CRD 设置为作业 ID |
| job.workers_count | K8s Operator | 自动从 CRD workerInstances 设置 |
| rpc.server_host | 运行时 | RPC 服务器主机名(系统管理) |
| rpc.server_port | 运行时 | RPC 服务器端口(系统管理) |
| rpc.remote_url | 运行时 | RPC 远程 URL(系统管理) |
为什么禁止修改:
- BSP/RPC 配置:必须与实际部署的 etcd/RPC 服务匹配。手动覆盖会破坏协调。
- 作业配置:必须与 K8s CRD 规范匹配。不匹配会导致 worker 数量错误。
- 传输配置:必须使用实际的 pod 主机名/端口。手动值会阻止 worker 间通信。
K8s Operator 配置选项
注意:选项需要通过环境变量设置进行转换,例如 k8s.internal_etcd_url => INTERNAL_ETCD_URL
| 配置项 | 默认值 | 说明 |
|---|---|---|
| k8s.auto_destroy_pod | true | 作业完成或失败时是否自动销毁所有 pod。 |
| k8s.close_reconciler_timeout | 120 | 关闭 reconciler 的最大超时时间(毫秒)。 |
| k8s.internal_etcd_url | http://127.0.0.1:2379 | operator 系统的内部 etcd URL。 |
| k8s.max_reconcile_retry | 3 | reconcile 的最大重试次数。 |
| k8s.probe_backlog | 50 | 服务健康探针的最大积压。 |
| k8s.probe_port | 9892 | controller 绑定的用于服务健康探针的端口。 |
| k8s.ready_check_internal | 1000 | 检查就绪的时间间隔(毫秒)。 |
| k8s.ready_timeout | 30000 | 检查就绪的最大超时时间(毫秒)。 |
| k8s.reconciler_count | 10 | reconciler 线程的最大数量。 |
| k8s.resync_period | 600000 | 被监视资源进行 reconcile 的最小频率。 |
| k8s.timezone | Asia/Shanghai | computer 作业和 operator 的时区。 |
| k8s.watch_namespace | hugegraph-computer-system | 监视自定义资源的命名空间。使用 ‘*’ 监视所有命名空间。 |
HugeGraph-Computer CRD
| 字段 | 默认值 | 说明 | 必填 |
|---|---|---|---|
| algorithmName | 算法名称。 | true | |
| jobId | 作业 ID。 | true | |
| image | 算法镜像。 | true | |
| computerConf | computer 配置选项的映射。 | true | |
| workerInstances | worker 实例数量,将覆盖 ‘job.workers_count’ 选项。 | true | |
| pullPolicy | Always | 镜像拉取策略,详情请参考:https://kubernetes.io/docs/concepts/containers/images/#image-pull-policy | false |
| pullSecrets | 镜像拉取密钥,详情请参考:https://kubernetes.io/docs/concepts/containers/images/#specifying-imagepullsecrets-on-a-pod | false | |
| masterCpu | master 的 CPU 限制,单位可以是 ’m’ 或无单位,详情请参考:https://kubernetes.io/docs/concepts/configuration/manage-resources-containers/#meaning-of-cpu | false | |
| workerCpu | worker 的 CPU 限制,单位可以是 ’m’ 或无单位,详情请参考:https://kubernetes.io/docs/concepts/configuration/manage-resources-containers/#meaning-of-cpu | false | |
| masterMemory | master 的内存限制,单位可以是 Ei、Pi、Ti、Gi、Mi、Ki 之一,详情请参考:https://kubernetes.io/docs/concepts/configuration/manage-resources-containers/#meaning-of-memory | false | |
| workerMemory | worker 的内存限制,单位可以是 Ei、Pi、Ti、Gi、Mi、Ki 之一,详情请参考:https://kubernetes.io/docs/concepts/configuration/manage-resources-containers/#meaning-of-memory | false | |
| log4jXml | computer 作业的 log4j.xml 内容。 | false | |
| jarFile | computer 算法的 jar 路径。 | false | |
| remoteJarUri | computer 算法的远程 jar URI,将覆盖算法镜像。 | false | |
| jvmOptions | computer 作业的 Java 启动参数。 | false | |
| envVars | 请参考:https://kubernetes.io/docs/tasks/inject-data-application/define-interdependent-environment-variables/ | false | |
| envFrom | 请参考:https://kubernetes.io/docs/tasks/inject-data-application/define-environment-variable-container/ | false | |
| masterCommand | bin/start-computer.sh | master 的运行命令,等同于 Docker 的 ‘Entrypoint’ 字段。 | false |
| masterArgs | ["-r master", “-d k8s”] | master 的运行参数,等同于 Docker 的 ‘Cmd’ 字段。 | false |
| workerCommand | bin/start-computer.sh | worker 的运行命令,等同于 Docker 的 ‘Entrypoint’ 字段。 | false |
| workerArgs | ["-r worker", “-d k8s”] | worker 的运行参数,等同于 Docker 的 ‘Cmd’ 字段。 | false |
| volumes | 请参考:https://kubernetes.io/docs/concepts/storage/volumes/ | false | |
| volumeMounts | 请参考:https://kubernetes.io/docs/concepts/storage/volumes/ | false | |
| secretPaths | k8s-secret 名称和挂载路径的映射。 | false | |
| configMapPaths | k8s-configmap 名称和挂载路径的映射。 | false | |
| podTemplateSpec | 请参考:https://kubernetes.io/docs/reference/kubernetes-api/workload-resources/pod-template-v1/#PodTemplateSpec | false | |
| securityContext | 请参考:https://kubernetes.io/docs/tasks/configure-pod-container/security-context/ | false |
KubeDriver 配置选项
| 配置项 | 默认值 | 说明 |
|---|---|---|
| k8s.build_image_bash_path | 用于构建镜像的命令路径。 | |
| k8s.enable_internal_algorithm | true | 是否启用内部算法。 |
| k8s.framework_image_url | hugegraph/hugegraph-computer:latest | computer 框架的镜像 URL。 |
| k8s.image_repository_password | 登录镜像仓库的密码。 | |
| k8s.image_repository_registry | 登录镜像仓库的地址。 | |
| k8s.image_repository_url | hugegraph/hugegraph-computer | 镜像仓库的 URL。 |
| k8s.image_repository_username | 登录镜像仓库的用户名。 | |
| k8s.internal_algorithm | [pageRank] | 所有内部算法的名称列表。注意:算法名称在这里使用驼峰命名法(例如 pageRank),但算法实现返回下划线命名法(例如 page_rank)。 |
| k8s.internal_algorithm_image_url | hugegraph/hugegraph-computer:latest | 内部算法的镜像 URL。 |
| k8s.jar_file_dir | /cache/jars/ | 算法 jar 将上传到的目录。 |
| k8s.kube_config | ~/.kube/config | k8s 配置文件的路径。 |
| k8s.log4j_xml_path | computer 作业的 log4j.xml 路径。 | |
| k8s.namespace | hugegraph-computer-system | hugegraph-computer 系统的命名空间。 |
| k8s.pull_secret_names | [] | 拉取镜像的 pull-secret 名称。 |
5 - HugeGraph Client
Java 和 Go Client 位于 HugeGraph Toolchain 仓库,Python Client 位于 HugeGraph-AI 仓库。三者的安装方式和 API 不完全相同,请进入对应页面查看。
5.1 - HugeGraph-Java-Client
1 HugeGraph-Client 概述
HugeGraph Java Client 将 Java API 转换为 HugeGraph Server 的 REST 请求,支持管理 Schema 和图数据、执行 Gremlin 及调用 Traverser API。详细接口见 Client API,本文给出 Java 项目的接入示例。
其他语言可使用 Go Client 或 HugeGraph-AI 仓库中的 Python Client。
2 环境要求
- JDK 11(当前 CI 使用版本;源码目标版本为 Java 8)
- Maven 3.6+
3 使用流程
使用 HugeGraph-Client 的基本步骤如下:
- 新建Eclipse/ IDEA Maven 项目;
- 在 pom 文件中添加 HugeGraph-Client 依赖;
- 创建类,调用 HugeGraph-Client 接口;
详细使用过程见下节完整示例。
4 完整示例
4.1 新建 Maven 工程
可以选择 Eclipse 或者 Intellij Idea 创建工程:
4.2 添加 hugegraph-client 依赖
添加 hugegraph-client 依赖
Client 与 Server 的开发版本可能不同。升级前应按对应发布说明核对兼容性。
4.3 Example
4.3.1 SingleExample
4.3.2 BatchExample
4.4 运行 Example
运行 Example 之前需要启动 Server, 启动过程见HugeGraph-Server Quick Start
4.5 详细 API 说明
5.2 - HugeGraph Python 客户端快速入门
hugegraph-python-client 是 HugeGraph 的 Python SDK,可管理 Schema、读写图数据并执行 Gremlin 查询。HugeGraph-LLM 和 HugeGraph-ML 也使用这个客户端。
该模块位于 hugegraph-ai 仓库的 hugegraph-python-client/ 目录下,导入名为 pyhugegraph。
环境要求
- 客户端本身要求 Python 3.9 或更高版本。HugeGraph-AI workspace 要求 Python 3.10 或更高版本,CI 在 3.10 和 3.11 上运行客户端测试。
- HugeGraph Server 1.5.0 或更高版本。客户端会拒绝连接更低版本的 Server,此类场景请改用 v1.3.x 客户端。
uv(推荐)或pip
运行时依赖为 decorator、requests、setuptools、urllib3 和 rich。
安装
发布到 PyPI 的包名是 hugegraph-python:
PyPI 上的发布版本落后于仓库代码。在源码中该发行包声明为
hugegraph-python-client,版本号与 HugeGraph-AI 其他模块保持一致,需要最新代码时请从源码安装。
如需使用仓库中的最新代码,请从 HugeGraph-AI 仓库根目录同步 workspace。hugegraph-python-client 是 workspace 成员,通过 python-client extra 暴露,因此仅执行 uv sync 不会安装它:
连接并写入数据
客户端参数
PyHugeClient(url, graph, user, pwd, graphspace=None, timeout=None)
| 参数 | 类型 | 默认值 | 说明 |
|---|---|---|---|
url | str | 必填 | HugeGraph Server 的基础 URL。若未带协议头,客户端会自动补上 http://,因此 127.0.0.1:8080 也可以使用。 |
graph | str | 必填 | 图名称,是第二个位置参数。 |
user | str | 必填 | 用户名,以 HTTP Basic Auth 发送。 |
pwd | str | 必填 | 密码,以 HTTP Basic Auth 发送。 |
graphspace | str 或 None | None | GraphSpace 名称,None 的解析规则见下文。 |
timeout | tuple[float, float] 或 None | None | (连接, 读取) 超时时间,单位为秒。None 会取 (0.5, 15.0)。 |
每个 HTTP 会话在收到 500、502、504 响应时会重试 3 次,退避因子为 0.1。
Server 版本与 GraphSpace
客户端在构造时解析 GraphSpace:
- 传入非空的
graphspace字符串时直接开启 GraphSpace 模式。 - 否则客户端会请求
GET {url}/versions并读取versions.core。 - Server 版本低于 1.5.0 时抛出
RuntimeError,提示升级 Server 或改用 v1.3.x 客户端。 - Server 版本高于 1.5.0 时会把
graphspace设为DEFAULT并开启 GraphSpace 模式,同时在日志中打印警告。版本恰好为 1.5.0 时保持关闭。 - 若因网络原因探测失败,GraphSpace 模式保持关闭。
该模式决定请求前缀:开启时为 /graphspaces/<graphspace>/graphs/<graph>/...,关闭时为 /graphs/<graph>/...。
客户端提供的 Manager
每个访问器都会惰性创建对应的 Manager,并为其分配独立的 HTTP 会话。
| 访问器 | Manager | 覆盖范围 |
|---|---|---|
client.schema() | SchemaManager | 属性、顶点标签、边标签、索引标签 |
client.graph() | GraphManager | 顶点与边的增删改查、批量写入、分页 |
client.gremlin() | GremlinManager | 执行 Gremlin |
client.graphs() | GraphsManager | 图列表、图信息、配置、清空数据 |
client.traverser() | TraverserManager | 遍历与路径算法 |
client.variable() | VariableManager | 图变量 |
client.task() | TaskManager | 异步任务的查询、取消、删除 |
client.auth() | AuthManager | 用户、用户组、资源、归属、权限 |
client.metrics() | MetricsManager | Server 指标 |
client.version() | VersionManager | Server 版本 |
pyhugegraph.api 中还提供了 RankManager、RebuildManager 和 ServicesManager,但 PyHugeClient 暂未提供对应的访问器,需要时可自行传入 session 构造。
常用操作
构建 Schema
Schema 构建器采用链式调用,最后调用 create(),也可以用 append()、eliminate() 和 remove() 修改已有定义。
查询 Schema
读取、更新和删除图数据
图接口直接接收属性字典,不支持链式的属性构建器:
addVertex 返回 VertexData,包含 id、label、type 和 properties。addEdge 返回 EdgeData,包含 id、label、type、outV、outVLabel、inV、inVLabel 和 properties。
传给客户端的顶点 ID 可以是字符串、整数或 uuid.UUID。布尔值会被拒绝,整数必须落在 Java signed long 范围内。
批量写入
addVertices 接收 (label, properties) 二元组,addEdges 接收 (label, out_id, in_id, out_label, in_label, properties) 六元组。两者返回的对象只携带生成的 ID。
分页与条件查询
执行 Gremlin
exec 会根据图名称和解析出的 GraphSpace 自动绑定 graph 与 g 别名,并返回服务端响应中的 result 字段。响应缺少 requestId、status 或 result 时抛出 ResponseParseError。
图遍历
TraverserManager 封装了 Server 的 traverser 接口,方法名使用蛇形命名。
基于 POST 的接口需要传入请求体:advanced_paths、customized_paths、template_paths、customized_crosspoints 和 fusiform_similarity。
图变量
异步任务
Server 指标与图信息
认证与授权
AuthManager 与 Server 的路由保持一致:用户、资源、归属和权限挂载在 /graphspaces/{graphspace}/auth/... 下,用户组仍在 Server 级别的 /auth/groups。在 HugeGraph 1.7.0 及以上版本必须能解析出 graphspace,否则这些调用会在发出请求前抛出 ValueError。
方法命名
Manager 中以驼峰命名的方法(例如 addVertex、getVertexById)会在构造时自动生成蛇形命名别名,graph.add_vertex(...) 与 graph.addVertex(...) 指向同一个方法。驼峰写法已在 debug 日志中标记为废弃,新代码建议使用蛇形命名。
错误处理
异常定义在 pyhugegraph.utils.exceptions 中:
| 异常 | 触发条件 |
|---|---|
NotAuthorizedError | Server 返回 401 |
NotFoundError | Server 返回 404,或缺少必填参数 |
ServerError | 其他非 2xx 响应,异常信息中附带服务端消息 |
ResponseParseError | 成功响应无法解析为预期结构 |
ServiceUnavailableError | Server 返回 ServiceUnavailableException |
InvalidParameterError、CreateError、RemoveError、UpdateError、DataFormatError | 由各构建器和数据结构抛出 |
请求体与响应体写入日志时,会对密码、token 和 secret 等字段做脱敏处理。
接口参数会随 HugeGraph REST API 版本变化。遇到不兼容时,先核对当前 Server 的 REST API 文档与客户端测试用例。
开发检查
在 HugeGraph-AI 仓库根目录运行格式与静态检查:
按照 CI 的方式运行测试:
CI 的集成测试作业使用 hugegraph/hugegraph:1.7.0 镜像。需要非默认空间时,还可以设置 HUGEGRAPH_GRAPHSPACE。
源码与测试位于 hugegraph-python-client/src/pyhugegraph/ 和 hugegraph-python-client/src/tests/,可直接运行的示例在 hugegraph-python-client/src/pyhugegraph/example/hugegraph_example.py。
5.3 - HugeGraph Go 客户端快速入门
HugeGraph Go Client 是 Toolchain 仓库中的 Go SDK,目前提供版本查询、Schema(PropertyKey、VertexLabel、EdgeLabel)、顶点和 Gremlin API。边数据 API 尚未实现。
该模块仍在开发中。接口范围以
hugegraph-client-go/api/v1下的源码为准。
环境要求
- Go 1.19 或更高版本
- 可访问的 HugeGraph Server,默认示例地址为
http://127.0.0.1:8080
安装
在 Go module 项目中执行:
初始化客户端
NewCommonClient 要求 Host 是 IP 地址,Port 在 1 到 65535 之间;客户端始终使用明文 HTTP 连接。未启用认证时,用户名和密码留空;只有两者都设置时才会发送 Basic Auth。
GraphSpace 只在 Vertex API(此时请求路径为 /graphspaces/{space}/graphs/{graph}/...)和 Gremlin 默认 aliases 中生效(空值按 DEFAULT 处理)。Schema 相关入口和 Version() 始终请求 /graphs/{graph}/... 和 /versions,与 GraphSpace 无关。默认图空间填写 DEFAULT;将 GraphSpace 留空时,Vertex API 会回退到旧版 Server 使用的 /graphs/{graph} 路径。
Version() 返回的 Versions 包含 HugeGraph Server、Core、Gremlin 和 REST API 版本。若使用源码提供的 NewDefaultCommonClient(),默认连接 127.0.0.1:8080 下的 hugegraph 图,使用 admin/pa 认证,并挂载一个打印全部请求和响应体的 ColorLogger;生产代码通常应显式传入配置。
配置项
hugegraph.Config 包含以下字段:
| 字段 | 类型 | 说明 |
|---|---|---|
Host | string | HugeGraph Server 的 IP 地址,不支持主机名 |
Port | int | HugeGraph Server 的 REST 端口,取值 1 到 65535 |
GraphSpace | string | 图空间,仅 Vertex API 和 Gremlin 默认 aliases 使用;不需要时填空字符串 |
Graph | string | Server 上配置的图名 |
Username | string | Server 用户名,未启用认证时填空字符串 |
Password | string | Server 密码,未启用认证时填空字符串 |
Transport | http.RoundTripper | 自定义 HTTP transport,为 nil 时使用 http.DefaultTransport |
Logger | hgtransport.Logger | 请求/响应日志,为 nil 时不记录日志 |
hgtransport 包提供四种 logger:TextLogger(纯文本)、ColorLogger(终端彩色)、CurlLogger(可执行的 curl 命令)和 JSONLogger(JSON 行)。它们的字段相同:Output(io.Writer)、EnableRequestBody 和 EnableResponseBody。
已实现的入口
CommonClient 当前公开以下入口:
| 入口 | 用途 |
|---|---|
Version() | 查询服务端版本 |
Schema() | 查询完整 Schema |
Propertykey | Create、GetAll、GetByName、UpdateUserdata、DeleteByName |
VertexLabel | Create、GetAll、GetByName、UpdateUserdata、DeleteByName |
EdgeLabel | Create、GetAll、DeleteByName |
Vertex | Create、BatchCreate、UpdateProperties(通过 WithAction 指定 append 或 eliminate) |
Gremlin | Get 和 Post。Post 默认 language 为 gremlin-groovy,根据 GraphSpace 和 Graph 自动填充 graph/g aliases,并在 Data 中返回解析后的结果;Get 只返回状态码,并把原始响应打印到 stdout。 |
每个操作都通过挂在操作本身上的 With... 函数式选项传参,例如 client.Gremlin.Post.WithGremlin(...) 或 client.Propertykey.GetByName.WithName(...)。
Vertex相关操作的入参是internal/model包中的model.Vertex[any]。Go 不允许从其他 module 导入internal包,因此目前VertexAPI 只能在客户端 module 内部调用;其测试文件也已全部注释。
完整调用方式可参考各 API 目录中的测试,例如 version_test.go、gemlin_test.go 和 vertexlabel_test.go。