This is the multi-page printable view of this section. Click here to print.
Quick Start
- 1: HugeGraph (OLTP)
- 2: HugeGraph ToolChain
- 2.1: HugeGraph-Hubble Quick Start
- 2.2: HugeGraph-Loader Quick Start
- 2.3: HugeGraph-Tools Quick Start
- 2.4: HugeGraph-Spark-Connector Quick Start
- 3: HugeGraph-AI
- 3.1: HugeGraph-LLM
- 3.2: HugeGraph-ML
- 3.3: GraphRAG UI Details
- 3.4: 配置参考
- 3.5: REST API 参考
- 4: HugeGraph Computing (OLAP)
- 5: HugeGraph Client
1 - HugeGraph (OLTP)
DeepWiki 提供实时更新的项目文档,内容更全面准确,适合快速了解项目最新情况。
GitHub 访问: https://github.com/apache/hugegraph
1.1 - HugeGraph-Server Quick Start
1 HugeGraph-Server 概述
HugeGraph-Server 是 HugeGraph 项目的核心部分,包含 graph-core、backend、API 等子模块。
Core 模块是 Tinkerpop 接口的实现,Backend 模块用于管理数据存储,1.7.0+ 版本支持的后端包括:RocksDB(单机默认)、HStore(分布式)、HBase 和 Memory。API 模块提供 HTTP Server,将 Client 的 HTTP 请求转化为对 Core 的调用。
⚠️ 重要变更: 从 1.7.0 版本开始,MySQL、PostgreSQL、Cassandra、ScyllaDB 等遗留后端已被移除。如需使用这些后端,请使用 1.5.x 或更早版本。
文档中会出现
HugeGraph-Server及HugeGraphServer这两种写法,其他组件也类似。 这两种写法含义上并明显差异,可以这么区分:HugeGraph-Server表示服务端相关组件代码,HugeGraphServer表示服务进程。
2 依赖
2.1 安装 Java 11 (JDK 11)
请考虑在 Java 11 的环境上启动 HugeGraph-Server(在 1.5.0 版前,会保留对 Java 8 的基本兼容)
在往下阅读之前先执行 java -version 命令确认 jdk 版本
注:使用 Java 8 启动 HugeGraph-Server 会失去一些安全性的保障,也会降低性能相关指标 (请尽早升级/迁移,1.7.0 不再支持)
3 部署
有四种方式可以部署 HugeGraph-Server 组件:
- 方式 1:使用 Docker 容器 (便于测试)
- 方式 2:下载 tar 包
- 方式 3:源码编译
- 方式 4:使用 tools 工具部署 (Outdated)
注意 生产或对外网暴露访问的环境必须使用 Java 11 并开启 Auth 权限认证, 否则会有安全隐患。
3.1 使用 Docker 容器 (便于测试)
可参考 Docker 部署方式。
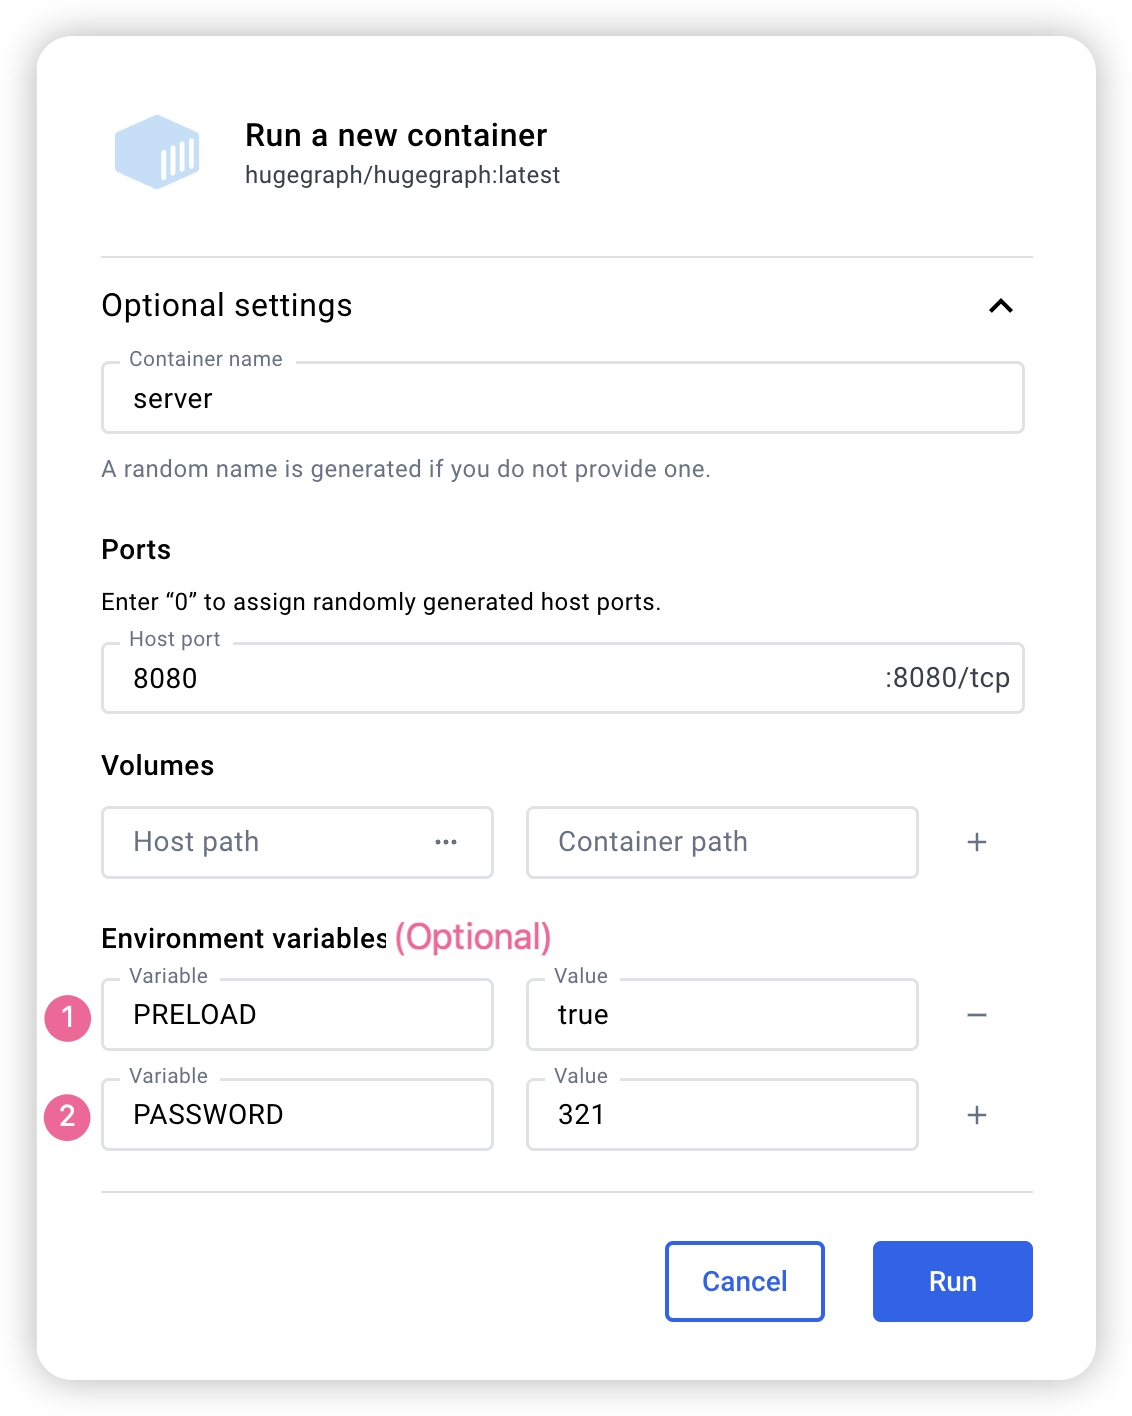
我们可以使用 docker run -itd --name=server -p 8080:8080 -e PASSWORD=xxx hugegraph/hugegraph:1.7.0 去快速启动一个内置了 RocksDB 的 Hugegraph server.
可选项:
- 可以使用
docker exec -it server bash进入容器完成一些操作 - 可以使用
docker run -itd --name=server -p 8080:8080 -e PRELOAD="true" hugegraph/hugegraph:1.7.0在启动的时候预加载一个内置的样例图。可以通过RESTful API进行验证。具体步骤可以参考 5.1.9 - 可以使用
-e PASSWORD=xxx设置是否开启鉴权模式以及 admin 的密码,具体步骤可以参考 Config Authentication
如果使用 docker desktop,则可以按照如下的方式设置可选项:
另外,如果我们希望能够在一个文件中管理除了 server 之外的其他 Hugegraph 相关的实例,我们也可以使用 docker-compose完成部署,使用命令 docker-compose up -d,(当然只配置 server 也是可以的)以下是一个样例的 docker-compose.yml:
version: '3'
services:
  server:
    image: hugegraph/hugegraph:1.7.0
    container_name: server
    environment:
      - PASSWORD=xxx
    #  - PASSWORD=xxx 为可选参数,设置的时候可以开启鉴权模式,并设置密码
    #  - PRELOAD=true
    #  - PRELOAD=true 为可选参数,为 True 时可以在启动的时候预加载一个内置的样例图
    ports:
      - 8080:8080
注意:
hugegraph 的 docker 镜像是一个便捷版本,用于快速启动 hugegraph,并不是官方发布物料包方式。你可以从 ASF Release Distribution Policy 中得到更多细节。
推荐使用
release tag(如1.7.0/1.x.0) 以获取稳定版。使用latesttag 可以使用开发中的最新功能。
3.2 下载 tar 包
# use the latest version, here is 1.7.0 for example
wget https://downloads.apache.org/hugegraph/{version}/apache-hugegraph-incubating-{version}.tar.gz
tar zxf *hugegraph*.tar.gz
3.3 源码编译
源码编译前请确保本机有安装 wget/curl 命令
下载 HugeGraph 源代码
git clone https://github.com/apache/hugegraph.git
编译打包生成 tar 包
cd hugegraph
# (Optional) use "-P stage" param if you build failed with the latest code(during pre-release period)
mvn package -DskipTests
执行日志如下:
......
[INFO] Reactor Summary for hugegraph 1.5.0:
[INFO]
[INFO] hugegraph .......................................... SUCCESS [  2.405 s]
[INFO] hugegraph-core ..................................... SUCCESS [ 13.405 s]
[INFO] hugegraph-api ...................................... SUCCESS [ 25.943 s]
[INFO] hugegraph-cassandra ................................ SUCCESS [ 54.270 s]
[INFO] hugegraph-scylladb ................................. SUCCESS [  1.032 s]
[INFO] hugegraph-rocksdb .................................. SUCCESS [ 34.752 s]
[INFO] hugegraph-mysql .................................... SUCCESS [  1.778 s]
[INFO] hugegraph-palo ..................................... SUCCESS [  1.070 s]
[INFO] hugegraph-hbase .................................... SUCCESS [ 32.124 s]
[INFO] hugegraph-postgresql ............................... SUCCESS [  1.823 s]
[INFO] hugegraph-dist ..................................... SUCCESS [ 17.426 s]
[INFO] hugegraph-example .................................. SUCCESS [  1.941 s]
[INFO] hugegraph-test ..................................... SUCCESS [01:01 min]
[INFO] ------------------------------------------------------------------------
[INFO] BUILD SUCCESS
[INFO] ------------------------------------------------------------------------
......
执行成功后,在 hugegraph 目录下生成 *hugegraph-*.tar.gz 文件,就是编译生成的 tar 包。
过时的 tools 工具安装
#### 3.4 使用 tools 工具部署 (Outdated)

HugeGraph-Tools 提供了一键部署的命令行工具,用户可以使用该工具快速地一键下载、解压、配置并启动 HugeGraph-Server 和 HugeGraph-Hubble,最新的 HugeGraph-Toolchain 中已经包含所有的这些工具,直接下载它解压就有工具包集合了

```bash
# download toolchain package, it includes loader + tool + hubble, please check the latest version (here is 1.7.0)
wget https://downloads.apache.org/hugegraph/1.7.0/apache-hugegraph-toolchain-incubating-1.7.0.tar.gz
tar zxf *hugegraph-*.tar.gz
# enter the tool's package
cd *hugegraph*/*tool*
注:
${version}为版本号,最新版本号可参考 Download 页面,或直接从 Download 页面点击链接下载
HugeGraph-Tools 的总入口脚本是 bin/hugegraph,用户可以使用 help 子命令查看其用法,这里只介绍一键部署的命令。
bin/hugegraph deploy -v {hugegraph-version} -p {install-path} [-u {download-path-prefix}]
{hugegraph-version} 表示要部署的 HugeGraphServer 及 HugeGraphStudio 的版本,用户可查看 conf/version-mapping.yaml 文件获取版本信息,{install-path} 指定 HugeGraphServer 及 HugeGraphStudio 的安装目录,{download-path-prefix} 可选,指定 HugeGraphServer 及 HugeGraphStudio tar 包的下载地址,不提供时使用默认下载地址,比如要启动 0.6 版本的 HugeGraph-Server 及 HugeGraphStudio 将上述命令写为 bin/hugegraph deploy -v 0.6 -p services 即可。
4 配置
如果需要快速启动 HugeGraph 仅用于测试,那么只需要进行少数几个配置项的修改即可(见下一节)。
5 启动
5.1 使用启动脚本启动
启动分为"首次启动"和"非首次启动",这么区分是因为在第一次启动前需要初始化后端数据库,然后启动服务。
而在人为停掉服务后,或者其他原因需要再次启动服务时,因为后端数据库是持久化存在的,直接启动服务即可。
HugeGraphServer 启动时会连接后端存储并尝试检查后端存储版本号,如果未初始化后端或者后端已初始化但版本不匹配时(旧版本数据),HugeGraphServer 会启动失败,并给出错误信息。
如果需要外部访问 HugeGraphServer,请修改 rest-server.properties 的 restserver.url 配置项(默认为 http://127.0.0.1:8080),修改成机器名或 IP 地址。
由于各种后端所需的配置(hugegraph.properties)及启动步骤略有不同,下面逐一对各后端的配置及启动做介绍。
注: 如果想要开启 HugeGraph 权限系统,在启动 Server 之前应按照 Server 鉴权配置 进行配置。(尤其是生产环境/外网环境须开启)
5.1.1 分布式存储 (HStore)
点击展开/折叠 分布式存储 配置及启动方法
分布式存储是 HugeGraph 1.5.0 之后推出的新特性,它基于 HugeGraph-PD 和 HugeGraph-Store 组件实现了分布式的数据存储和计算。
要使用分布式存储引擎,需要先部署 HugeGraph-PD 和 HugeGraph-Store,详见 HugeGraph-PD 快速入门 和 HugeGraph-Store 快速入门。
确保 PD 和 Store 服务均已启动后
- 修改 HugeGraph-Server 的
hugegraph.properties配置:
backend=hstore
serializer=binary
task.scheduler_type=distributed

# PD 服务地址,多个 PD 地址用逗号分割,配置 PD 的 RPC 端口
pd.peers=127.0.0.1:8686,127.0.0.1:8687,127.0.0.1:8688
# 简单示例(带鉴权)
gremlin.graph=org.apache.hugegraph.auth.HugeFactoryAuthProxy

# 指定存储 hstore(必须)
backend=hstore
serializer=binary
store=hugegraph

# 指定任务调度器(1.7.0及之前,hstore 存储必须)
task.scheduler_type=distributed

# pd config
pd.peers=127.0.0.1:8686
- 修改 HugeGraph-Server 的
rest-server.properties配置:
usePD=true
# 注意,1.7.0 必须在 rest-server.properties 配置 pd.peers
pd.peers=127.0.0.1:8686,127.0.0.1:8687,127.0.0.1:8688

# 若需要 auth
# auth.authenticator=org.apache.hugegraph.auth.StandardAuthenticator
如果配置多个 HugeGraph-Server 节点,需要为每个节点修改 rest-server.properties 配置文件,例如:
节点 1(主节点):
usePD=true
restserver.url=http://127.0.0.1:8081
gremlinserver.url=http://127.0.0.1:8181
pd.peers=127.0.0.1:8686

rpc.server_host=127.0.0.1
rpc.server_port=8091

server.id=server-1
server.role=master
节点 2(工作节点):
usePD=true
restserver.url=http://127.0.0.1:8082
gremlinserver.url=http://127.0.0.1:8182
pd.peers=127.0.0.1:8686

rpc.server_host=127.0.0.1
rpc.server_port=8092

server.id=server-2
server.role=worker
同时,还需要修改每个节点的 gremlin-server.yaml 中的端口配置:
节点 1:
host: 127.0.0.1
port: 8181
节点 2:
host: 127.0.0.1
port: 8182
初始化数据库:
cd *hugegraph-${version}
bin/init-store.sh
启动 Server:
bin/start-hugegraph.sh
使用分布式存储引擎的启动顺序为:
- 启动 HugeGraph-PD
- 启动 HugeGraph-Store
- 初始化数据库(仅首次)
- 启动 HugeGraph-Server
验证服务是否正常启动:
curl http://localhost:8081/graphs
# 应返回:{"graphs":["hugegraph"]}
停止服务的顺序应该与启动顺序相反:
- 停止 HugeGraph-Server
- 停止 HugeGraph-Store
- 停止 HugeGraph-PD
bin/stop-hugegraph.sh
5.1.2 RocksDB / ToplingDB
点击展开/折叠 RocksDB 配置及启动方法
RocksDB 是一个嵌入式的数据库,不需要手动安装部署,要求 GCC 版本 >= 4.3.0(GLIBCXX_3.4.10),如不满足,需要提前升级 GCC
修改 hugegraph.properties
backend=rocksdb
serializer=binary
rocksdb.data_path=.
rocksdb.wal_path=.
初始化数据库(第一次启动时或在 conf/graphs/ 下手动添加了新配置时需要进行初始化)
cd *hugegraph-${version}
bin/init-store.sh
启动 server
bin/start-hugegraph.sh
Starting HugeGraphServer...
Connecting to HugeGraphServer (http://127.0.0.1:8080/graphs)....OK
提示的 url 与 rest-server.properties 中配置的 restserver.url 一致
ToplingDB (Beta): 作为 RocksDB 的高性能替代方案,配置方式请参考: ToplingDB Quick Start
5.1.3 HBase
点击展开/折叠 HBase 配置及启动方法
用户需自行安装 HBase,要求版本 2.0 以上,下载地址
修改 hugegraph.properties
backend=hbase
serializer=hbase

# hbase backend config
hbase.hosts=localhost
hbase.port=2181
# Note: recommend to modify the HBase partition number by the actual/env data amount & RS amount before init store
# it may influence the loading speed a lot
#hbase.enable_partition=true
#hbase.vertex_partitions=10
#hbase.edge_partitions=30
初始化数据库(第一次启动时或在 conf/graphs/ 下手动添加了新配置时需要进行初始化)
cd *hugegraph-${version}
bin/init-store.sh
启动 server
bin/start-hugegraph.sh
Starting HugeGraphServer...
Connecting to HugeGraphServer (http://127.0.0.1:8080/graphs)....OK
更多其它后端配置可参考配置项介绍
5.1.4 MySQL
⚠️ 已废弃: 此后端从 HugeGraph 1.7.0 版本开始已移除。如需使用,请参考 1.5.x 版本文档。
点击展开/折叠 MySQL 配置及启动方法
由于 MySQL 是在 GPL 协议下,与 Apache 协议不兼容,用户需自行安装 MySQL,下载地址
下载 MySQL 的驱动包,比如 mysql-connector-java-8.0.30.jar,并放入 HugeGraph-Server 的 lib 目录下。
修改 hugegraph.properties,配置数据库 URL,用户名和密码,store 是数据库名,如果没有会被自动创建。
backend=mysql
serializer=mysql

store=hugegraph

# mysql backend config
jdbc.driver=com.mysql.cj.jdbc.Driver
jdbc.url=jdbc:mysql://127.0.0.1:3306
jdbc.username=
jdbc.password=
jdbc.reconnect_max_times=3
jdbc.reconnect_interval=3
jdbc.ssl_mode=false
初始化数据库(第一次启动时或在 conf/graphs/ 下手动添加了新配置时需要进行初始化)
cd *hugegraph-${version}
bin/init-store.sh
启动 server
bin/start-hugegraph.sh
Starting HugeGraphServer...
Connecting to HugeGraphServer (http://127.0.0.1:8080/graphs)....OK
5.1.5 Cassandra
⚠️ 已废弃: 此后端从 HugeGraph 1.7.0 版本开始已移除。如需使用,请参考 1.5.x 版本文档。
点击展开/折叠 Cassandra 配置及启动方法
用户需自行安装 Cassandra,要求版本 3.0 以上,下载地址
修改 hugegraph.properties
backend=cassandra
serializer=cassandra

# cassandra backend config
cassandra.host=localhost
cassandra.port=9042
cassandra.username=
cassandra.password=
#cassandra.connect_timeout=5
#cassandra.read_timeout=20

#cassandra.keyspace.strategy=SimpleStrategy
#cassandra.keyspace.replication=3
初始化数据库(第一次启动时或在 conf/graphs/ 下手动添加了新配置时需要进行初始化)
cd *hugegraph-${version}
bin/init-store.sh
Initing HugeGraph Store...
2017-12-01 11:26:51 1424  [main] [INFO ] org.apache.hugegraph.HugeGraph [] - Opening backend store: 'cassandra'
2017-12-01 11:26:52 2389  [main] [INFO ] org.apache.hugegraph.backend.store.cassandra.CassandraStore [] - Failed to connect keyspace: hugegraph, try init keyspace later
2017-12-01 11:26:52 2472  [main] [INFO ] org.apache.hugegraph.backend.store.cassandra.CassandraStore [] - Failed to connect keyspace: hugegraph, try init keyspace later
2017-12-01 11:26:52 2557  [main] [INFO ] org.apache.hugegraph.backend.store.cassandra.CassandraStore [] - Failed to connect keyspace: hugegraph, try init keyspace later
2017-12-01 11:26:53 2797  [main] [INFO ] org.apache.hugegraph.backend.store.cassandra.CassandraStore [] - Store initialized: huge_graph
2017-12-01 11:26:53 2945  [main] [INFO ] org.apache.hugegraph.backend.store.cassandra.CassandraStore [] - Store initialized: huge_schema
2017-12-01 11:26:53 3044  [main] [INFO ] org.apache.hugegraph.backend.store.cassandra.CassandraStore [] - Store initialized: huge_index
2017-12-01 11:26:53 3046  [pool-3-thread-1] [INFO ] org.apache.hugegraph.backend.Transaction [] - Clear cache on event 'store.init'
2017-12-01 11:26:59 9720  [main] [INFO ] org.apache.hugegraph.HugeGraph [] - Opening backend store: 'cassandra'
2017-12-01 11:27:00 9805  [main] [INFO ] org.apache.hugegraph.backend.store.cassandra.CassandraStore [] - Failed to connect keyspace: hugegraph1, try init keyspace later
2017-12-01 11:27:00 9886  [main] [INFO ] org.apache.hugegraph.backend.store.cassandra.CassandraStore [] - Failed to connect keyspace: hugegraph1, try init keyspace later
2017-12-01 11:27:00 9955  [main] [INFO ] org.apache.hugegraph.backend.store.cassandra.CassandraStore [] - Failed to connect keyspace: hugegraph1, try init keyspace later
2017-12-01 11:27:00 10175 [main] [INFO ] org.apache.hugegraph.backend.store.cassandra.CassandraStore [] - Store initialized: huge_graph
2017-12-01 11:27:00 10321 [main] [INFO ] org.apache.hugegraph.backend.store.cassandra.CassandraStore [] - Store initialized: huge_schema
2017-12-01 11:27:00 10413 [main] [INFO ] org.apache.hugegraph.backend.store.cassandra.CassandraStore [] - Store initialized: huge_index
2017-12-01 11:27:00 10413 [pool-3-thread-1] [INFO ] org.apache.hugegraph.backend.Transaction [] - Clear cache on event 'store.init'
启动 server
bin/start-hugegraph.sh
Starting HugeGraphServer...
Connecting to HugeGraphServer (http://127.0.0.1:8080/graphs)....OK
5.1.6 Memory
点击展开/折叠 Memory 配置及启动方法
修改 hugegraph.properties
backend=memory
serializer=text
Memory 后端的数据是保存在内存中无法持久化的,不需要初始化后端,这也是唯一一个不需要初始化的后端。
启动 server
bin/start-hugegraph.sh
Starting HugeGraphServer...
Connecting to HugeGraphServer (http://127.0.0.1:8080/graphs)....OK
提示的 url 与 rest-server.properties 中配置的 restserver.url 一致
5.1.7 ScyllaDB
⚠️ 已废弃: 此后端从 HugeGraph 1.7.0 版本开始已移除。如需使用,请参考 1.5.x 版本文档。
点击展开/折叠 ScyllaDB 配置及启动方法
用户需自行安装 ScyllaDB,推荐版本 2.1 以上,下载地址
修改 hugegraph.properties
backend=scylladb
serializer=scylladb

# cassandra backend config
cassandra.host=localhost
cassandra.port=9042
cassandra.username=
cassandra.password=
#cassandra.connect_timeout=5
#cassandra.read_timeout=20

#cassandra.keyspace.strategy=SimpleStrategy
#cassandra.keyspace.replication=3
由于 scylladb 数据库本身就是基于 cassandra 的"优化版",如果用户未安装 scylladb,也可以直接使用 cassandra 作为后端存储,只需要把 backend 和 serializer 修改为 scylladb,host 和 post 指向 cassandra 集群的 seeds 和 port 即可,但是并不建议这样做,这样发挥不出 scylladb 本身的优势了。
初始化数据库(第一次启动时或在 conf/graphs/ 下手动添加了新配置时需要进行初始化)
cd *hugegraph-${version}
bin/init-store.sh
启动 server
bin/start-hugegraph.sh
Starting HugeGraphServer...
Connecting to HugeGraphServer (http://127.0.0.1:8080/graphs)....OK
5.1.8 启动 server 的时候创建示例图
在脚本启动时候携带 -p true参数,表示 preload, 即创建示例图图
bin/start-hugegraph.sh -p true
Starting HugeGraphServer in daemon mode...
Connecting to HugeGraphServer (http://127.0.0.1:8080/graphs)......OK
并且使用 RESTful API 请求 HugeGraphServer 得到如下结果:
> curl "http://localhost:8080/graphs/hugegraph/graph/vertices" | gunzip

{"vertices":[{"id":"2:lop","label":"software","type":"vertex","properties":{"name":"lop","lang":"java","price":328}},{"id":"1:josh","label":"person","type":"vertex","properties":{"name":"josh","age":32,"city":"Beijing"}},{"id":"1:marko","label":"person","type":"vertex","properties":{"name":"marko","age":29,"city":"Beijing"}},{"id":"1:peter","label":"person","type":"vertex","properties":{"name":"peter","age":35,"city":"Shanghai"}},{"id":"1:vadas","label":"person","type":"vertex","properties":{"name":"vadas","age":27,"city":"Hongkong"}},{"id":"2:ripple","label":"software","type":"vertex","properties":{"name":"ripple","lang":"java","price":199}}]}
代表创建示例图成功。
5.2 使用 Docker
在 3.1 使用 Docker 容器中,我们已经介绍了如何使用 docker 部署 hugegraph-server, 我们还可以使用其他的后端存储或者设置参数在 sever 启动的时候加载样例图
5.2.1 使用 Cassandra 作为后端
⚠️ 已废弃: Cassandra 后端从 HugeGraph 1.7.0 版本开始已移除。如需使用,请参考 1.5.x 版本文档。
点击展开/折叠 Cassandra 配置及启动方法
在使用 Docker 的时候,我们可以使用 Cassandra 作为后端存储。我们更加推荐直接使用 docker-compose 来对于 server 以及 Cassandra 进行统一管理
样例的 docker-compose.yml 可以在 github 中获取,使用 docker-compose up -d 启动。(如果使用 cassandra 4.0 版本作为后端存储,则需要大约两个分钟初始化,请耐心等待)
version: "3"

services:
  server:
    image: hugegraph/hugegraph
    container_name: cas-server
    ports:
      - 8080:8080
    environment:
      hugegraph.backend: cassandra
      hugegraph.serializer: cassandra
      hugegraph.cassandra.host: cas-cassandra
      hugegraph.cassandra.port: 9042
    networks:
      - ca-network
    depends_on:
      - cassandra
    healthcheck:
      test: ["CMD", "bin/gremlin-console.sh", "--" ,"-e", "scripts/remote-connect.groovy"]
      interval: 10s
      timeout: 30s
      retries: 3

  cassandra:
    image: cassandra:4
    container_name: cas-cassandra
    ports:
      - 7000:7000
      - 9042:9042
    security_opt:
      - seccomp:unconfined
    networks:
      - ca-network
    healthcheck:
      test: ["CMD", "cqlsh", "--execute", "describe keyspaces;"]
      interval: 10s
      timeout: 30s
      retries: 5

networks:
  ca-network:

volumes:
  hugegraph-data:
在这个 yaml 中,需要在环境变量中以 hugegraph.<parameter_name>的形式进行参数传递,配置 Cassandra 相关的参数。
具体来说,在 hugegraph.properties 配置文件中,提供了 backend=xxx, cassandra.host=xxx 等配置项,为了配置这些配置项,在传递环境变量的过程之中,我们需要在这些配置项前加上 hugegrpah.,即 hugegraph.backend 和 hugegraph.cassandra.host。
其他配置可以参照 4 配置
5.2.2 启动 server 的时候创建示例图
在 docker 启动的时候设置环境变量 PRELOAD=true, 从而实现启动脚本的时候加载数据。
使用
docker run使用
docker run -itd --name=server -p 8080:8080 -e PRELOAD=true hugegraph/hugegraph:1.7.0使用
docker-compose创建
docker-compose.yml,具体文件如下,在环境变量中设置 PRELOAD=true。其中,example.groovy是一个预定义的脚本,用于预加载样例数据。如果有需要,可以通过挂载新的example.groovy脚本改变预加载的数据。version: '3' services: server: image: hugegraph/hugegraph:1.7.0 container_name: server environment: - PRELOAD=true - PASSWORD=xxx volumes: - /path/to/yourscript:/hugegraph/scripts/example.groovy ports: - 8080:8080使用命令
docker-compose up -d启动容器
使用 RESTful API 请求 HugeGraphServer 得到如下结果:
> curl "http://localhost:8080/graphs/hugegraph/graph/vertices" | gunzip

{"vertices":[{"id":"2:lop","label":"software","type":"vertex","properties":{"name":"lop","lang":"java","price":328}},{"id":"1:josh","label":"person","type":"vertex","properties":{"name":"josh","age":32,"city":"Beijing"}},{"id":"1:marko","label":"person","type":"vertex","properties":{"name":"marko","age":29,"city":"Beijing"}},{"id":"1:peter","label":"person","type":"vertex","properties":{"name":"peter","age":35,"city":"Shanghai"}},{"id":"1:vadas","label":"person","type":"vertex","properties":{"name":"vadas","age":27,"city":"Hongkong"}},{"id":"2:ripple","label":"software","type":"vertex","properties":{"name":"ripple","lang":"java","price":199}}]}
代表创建示例图成功。
6 访问 Server
6.1 服务启动状态校验
jps 查看服务进程
jps
6475 HugeGraphServer
curl 请求 RESTful API
echo `curl -o /dev/null -s -w %{http_code} "http://localhost:8080/graphs/hugegraph/graph/vertices"`
返回结果 200,代表 server 启动正常
6.2 请求 Server
HugeGraphServer 的 RESTful API 包括多种类型的资源,典型的包括 graph、schema、gremlin、traverser 和 task
graph包含vertices、edgesschema包含vertexlabels、propertykeys、edgelabels、indexlabelsgremlin包含各种Gremlin语句,如g.v(),可以同步或者异步执行traverser包含各种高级查询,包括最短路径、交叉点、N 步可达邻居等task包含异步任务的查询和删除
6.2.1 获取 hugegraph 的顶点及相关属性
curl http://localhost:8080/graphs/hugegraph/graph/vertices
说明
由于图的点和边很多,对于 list 型的请求,比如获取所有顶点,获取所有边等,Server 会将数据压缩再返回,所以使用 curl 时得到一堆乱码,可以重定向至
gunzip进行解压。推荐使用 Chrome 浏览器 + Restlet 插件发送 HTTP 请求进行测试。curl "http://localhost:8080/graphs/hugegraph/graph/vertices" | gunzip当前 HugeGraphServer 的默认配置只能是本机访问,可以修改配置,使其能在其他机器访问。
vim conf/rest-server.properties

restserver.url=http://0.0.0.0:8080
响应体如下:
{
    "vertices": [
        {
            "id": "2lop",
            "label": "software",
            "type": "vertex",
            "properties": {
                "price": [
                    {
                        "id": "price",
                        "value": 328
                    }
                ],
                "name": [
                    {
                        "id": "name",
                        "value": "lop"
                    }
                ],
                "lang": [
                    {
                        "id": "lang",
                        "value": "java"
                    }
                ]
            }
        },
        {
            "id": "1josh",
            "label": "person",
            "type": "vertex",
            "properties": {
                "name": [
                    {
                        "id": "name",
                        "value": "josh"
                    }
                ],
                "age": [
                    {
                        "id": "age",
                        "value": 32
                    }
                ]
            }
        },
        ...
    ]
}
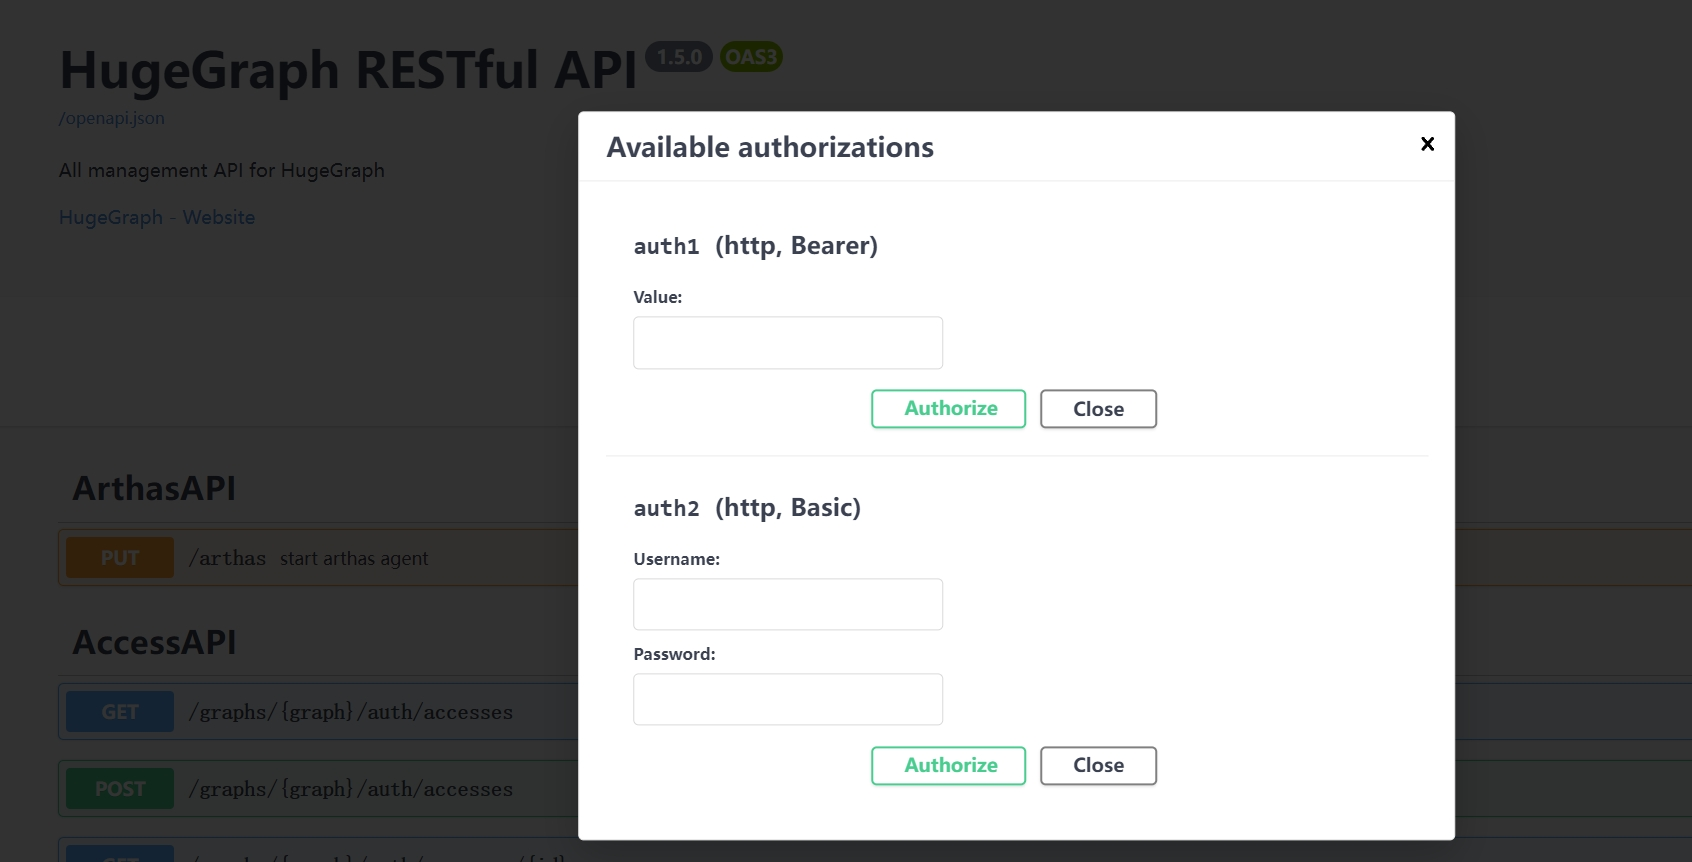
详细的 API 请参考 RESTful-API 文档。
另外也可以通过访问 localhost:8080/swagger-ui/index.html 查看 API。
在使用 Swagger UI 调试 HugeGraph 提供的 API 时,如果 HugeGraph Server 开启了鉴权模式,可以在 Swagger 页面输入鉴权信息。
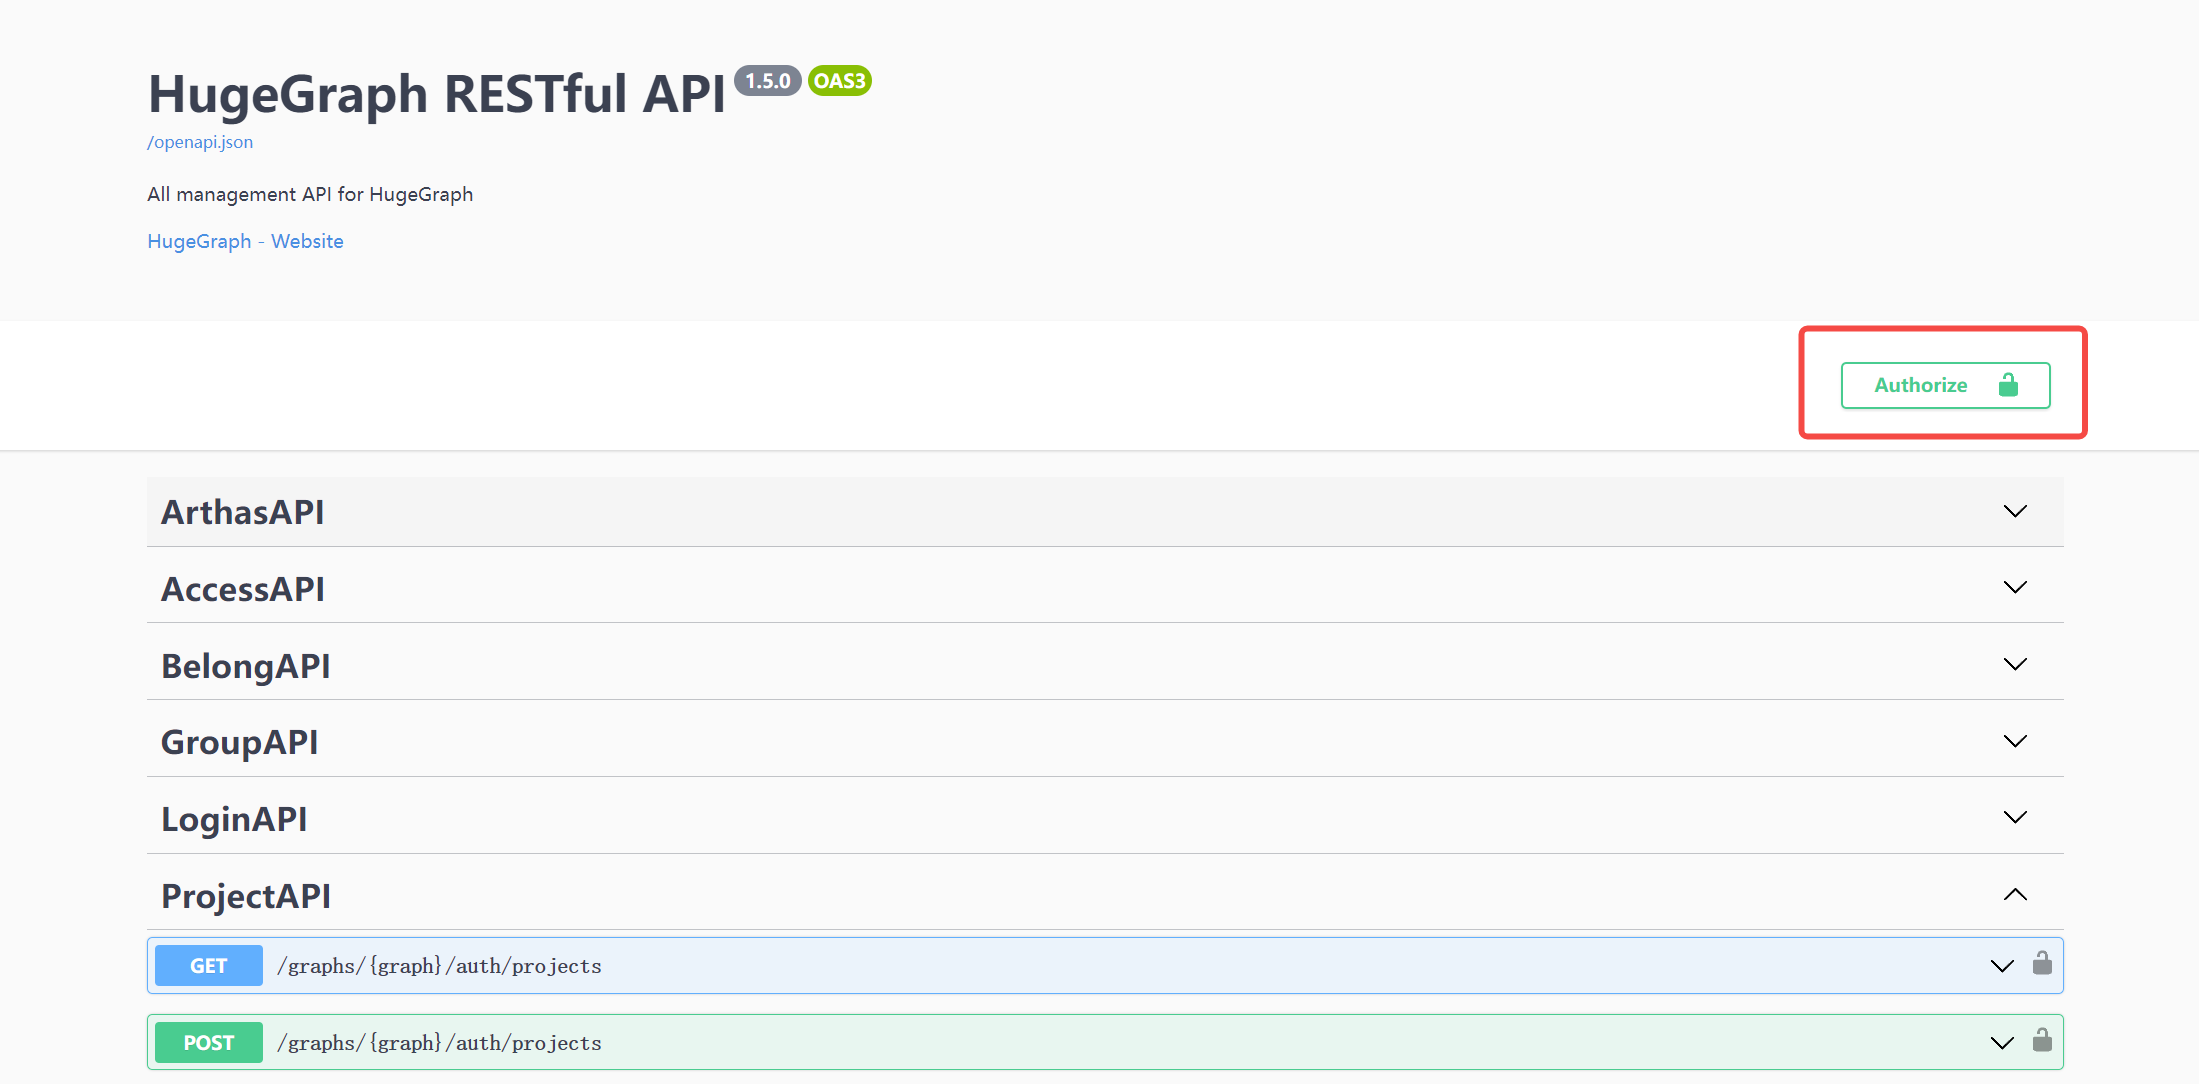
当前 HugeGraph 支持基于 Basic 和 Bearer 两种形式设置鉴权信息。
7 停止 Server
$cd *hugegraph-${version}
$bin/stop-hugegraph.sh
8 使用 IntelliJ IDEA 调试 Server
1.2 - HugeGraph-PD Quick Start
1 HugeGraph-PD 概述
HugeGraph-PD (Placement Driver) 是 HugeGraph 分布式版本的元数据管理组件,负责管理图数据的分布和存储节点的协调。它在分布式 HugeGraph 中扮演着核心角色,维护集群状态并协调 HugeGraph-Store 存储节点。
2 依赖
2.1 前置条件
- 操作系统:Linux 或 MacOS(Windows 尚未经过完整测试)
- Java 版本:≥ 11
- Maven 版本:≥ 3.5.0
3 部署
有两种方式可以部署 HugeGraph-PD 组件:
- 方式 1:下载 tar 包
- 方式 2:源码编译
3.1 下载 tar 包
从 Apache HugeGraph 官方下载页面下载最新版本的 HugeGraph-PD:
# 用最新版本号替换 {version},例如 1.5.0
wget https://downloads.apache.org/hugegraph/{version}/apache-hugegraph-incubating-{version}.tar.gz
tar zxf apache-hugegraph-incubating-{version}.tar.gz
cd apache-hugegraph-incubating-{version}/apache-hugegraph-pd-incubating-{version}
3.2 源码编译
# 1. 克隆源代码
git clone https://github.com/apache/hugegraph.git

# 2. 编译项目
cd hugegraph
mvn clean install -DskipTests=true

# 3. 编译成功后,PD 模块的构建产物将位于
#    apache-hugegraph-incubating-{version}/apache-hugegraph-pd-incubating-{version}
#    target/apache-hugegraph-incubating-{version}.tar.gz
4 配置
PD 的主要配置文件为 conf/application.yml,以下是关键配置项:
spring:
  application:
    name: hugegraph-pd

grpc:
  # 集群模式下的 gRPC 端口
  port: 8686
  host: 127.0.0.1

server:
  # REST 服务端口号
  port: 8620

pd:
  # 存储路径
  data-path: ./pd_data
  # 自动扩容的检查周期(秒)
  patrol-interval: 1800
  # 初始 store 列表,在列表内的 store 自动激活
  initial-store-count: 1
  # store 的配置信息,格式为 IP:gRPC端口
  initial-store-list: 127.0.0.1:8500

raft:
  # 集群模式
  address: 127.0.0.1:8610
  # 集群中所有 PD 节点的 raft 地址
  peers-list: 127.0.0.1:8610

store:
  # store 下线时间(秒)。超过该时间,认为 store 永久不可用,分配副本到其他机器
  max-down-time: 172800
  # 是否开启 store 监控数据存储
  monitor_data_enabled: true
  # 监控数据的间隔
  monitor_data_interval: 1 minute
  # 监控数据的保留时间
  monitor_data_retention: 1 day
  initial-store-count: 1

partition:
  # 默认每个分区副本数
  default-shard-count: 1
  # 默认每机器最大副本数
  store-max-shard-count: 12
对于多节点部署,需要修改各节点的端口和地址配置,确保各节点之间能够正常通信。
5 启动与停止
5.1 启动 PD
在 PD 安装目录下执行:
./bin/start-hugegraph-pd.sh
启动成功后,可以在 logs/hugegraph-pd-stdout.log 中看到类似以下的日志:
2024-xx-xx xx:xx:xx [main] [INFO] o.a.h.p.b.HugePDServer - Started HugePDServer in x.xxx seconds (JVM running for x.xxx)
5.2 停止 PD
在 PD 安装目录下执行:
./bin/stop-hugegraph-pd.sh
6 验证
确认 PD 服务是否正常运行:
curl http://localhost:8620/actuator/health
如果返回 {"status":"UP"},则表示 PD 服务已成功启动。
1.3 - HugeGraph-Store Quick Start
1 HugeGraph-Store 概述
HugeGraph-Store 是 HugeGraph 分布式版本的存储节点组件,负责实际存储和管理图数据。它与 HugeGraph-PD 协同工作,共同构成 HugeGraph 的分布式存储引擎,提供高可用性和水平扩展能力。
2 依赖
2.1 前置条件
- 操作系统:Linux 或 MacOS(Windows 尚未经过完整测试)
- Java 版本:≥ 11
- Maven 版本:≥ 3.5.0
- 已部署的 HugeGraph-PD(如果是多节点部署)
3 部署
有两种方式可以部署 HugeGraph-Store 组件:
- 方式 1:下载 tar 包
- 方式 2:源码编译
3.1 下载 tar 包
从 Apache HugeGraph 官方下载页面下载最新版本的 HugeGraph-Store:
# 用最新版本号替换 {version},例如 1.5.0
wget https://downloads.apache.org/hugegraph/{version}/apache-hugegraph-incubating-{version}.tar.gz
tar zxf apache-hugegraph-incubating-{version}.tar.gz
cd apache-hugegraph-incubating-{version}/apache-hugegraph-hstore-incubating-{version}
3.2 源码编译
# 1. 克隆源代码
git clone https://github.com/apache/hugegraph.git

# 2. 编译项目
cd hugegraph
mvn clean install -DskipTests=true

# 3. 编译成功后,Store 模块的构建产物将位于
#    apache-hugegraph-incubating-{version}/apache-hugegraph-hstore-incubating-{version}
#    target/apache-hugegraph-incubating-{version}.tar.gz
4 配置
Store 的主要配置文件为 conf/application.yml,以下是关键配置项:
pdserver:
  # PD 服务地址,多个 PD 地址用逗号分割(配置 PD 的 gRPC 端口)
  address: 127.0.0.1:8686

grpc:
  # gRPC 的服务地址
  host: 127.0.0.1
  port: 8500
  netty-server:
    max-inbound-message-size: 1000MB

raft:
  # raft 缓存队列大小
  disruptorBufferSize: 1024
  address: 127.0.0.1:8510
  max-log-file-size: 600000000000
  # 快照生成时间间隔,单位秒
  snapshotInterval: 1800

server:
  # REST 服务地址
  port: 8520

app:
  # 存储路径,支持多个路径,逗号分割
  data-path: ./storage
  #raft-path: ./storage

spring:
  application:
    name: store-node-grpc-server
  profiles:
    active: default
    include: pd

logging:
  config: 'file:./conf/log4j2.xml'
  level:
    root: info
对于多节点部署,需要为每个 Store 节点修改以下配置:
- 每个节点的
grpc.port(RPC 端口) - 每个节点的
raft.address(Raft 协议端口) - 每个节点的
server.port(REST 端口) - 每个节点的
app.data-path(数据存储路径)
5 启动与停止
5.1 启动 Store
确保 PD 服务已经启动,然后在 Store 安装目录下执行:
./bin/start-hugegraph-store.sh
启动成功后,可以在 logs/hugegraph-store-server.log 中看到类似以下的日志:
2024-xx-xx xx:xx:xx [main] [INFO] o.a.h.s.n.StoreNodeApplication - Started StoreNodeApplication in x.xxx seconds (JVM running for x.xxx)
5.2 停止 Store
在 Store 安装目录下执行:
./bin/stop-hugegraph-store.sh
6 多节点部署示例
以下是一个三节点部署的配置示例:
6.1 三节点配置参考
- 3 PD 节点
- raft 端口:8610, 8611, 8612
- rpc 端口:8686, 8687, 8688
- rest 端口:8620, 8621, 8622
- 3 Store 节点
- raft 端口:8510, 8511, 8512
- rpc 端口:8500, 8501, 8502
- rest 端口:8520, 8521, 8522
6.2 Store 节点配置
对于三个 Store 节点,每个节点的主要配置差异如下:
节点 A:
grpc:
  port: 8500
raft:
  address: 127.0.0.1:8510
server:
  port: 8520
app:
  data-path: ./storage-a
节点 B:
grpc:
  port: 8501
raft:
  address: 127.0.0.1:8511
server:
  port: 8521
app:
  data-path: ./storage-b
节点 C:
grpc:
  port: 8502
raft:
  address: 127.0.0.1:8512
server:
  port: 8522
app:
  data-path: ./storage-c
所有节点都应该指向相同的 PD 集群:
pdserver:
  address: 127.0.0.1:8686,127.0.0.1:8687,127.0.0.1:8688
7 验证 Store 服务
确认 Store 服务是否正常运行:
curl http://localhost:8520/actuator/health
如果返回 {"status":"UP"},则表示 Store 服务已成功启动。
此外,可以通过 PD 的 API 查看集群中的 Store 节点状态:
curl http://localhost:8620/v1/stores
如果Store配置成功,上述接口的响应中应该包含当前节点的状态信息,状态为Up表示节点正常运行,这里只展示了一个节点配置成功的响应,如果三个节点都配置成功并正在运行,响应中storeId列表应该包含三个id,并且stateCountMap中Up、numOfService、numOfNormalService三个字段应该为3。
{
  "message": "OK",
  "data": {
    "stores": [
      {
        "storeId": 8319292642220586694,
        "address": "127.0.0.1:8500",
        "raftAddress": "127.0.0.1:8510",
        "version": "",
        "state": "Up",
        "deployPath": "/Users/{your_user_name}/hugegraph/apache-hugegraph-incubating-1.5.0/apache-hugegraph-store-incubating-1.5.0/lib/hg-store-node-1.5.0.jar",
        "dataPath": "./storage",
        "startTimeStamp": 1754027127969,
        "registedTimeStamp": 1754027127969,
        "lastHeartBeat": 1754027909444,
        "capacity": 494384795648,
        "available": 346535829504,
        "partitionCount": 0,
        "graphSize": 0,
        "keyCount": 0,
        "leaderCount": 0,
        "serviceName": "127.0.0.1:8500-store",
        "serviceVersion": "",
        "serviceCreatedTimeStamp": 1754027127000,
        "partitions": []
      }
    ],
    "stateCountMap": {
      "Up": 1
    },
    "numOfService": 1,
    "numOfNormalService": 1
  },
  "status": 0
}
2 - HugeGraph ToolChain
测试指南:如需在本地运行工具链测试,请参考 HugeGraph 工具链本地测试指南
DeepWiki 提供实时更新的项目文档,内容更全面准确,适合快速了解项目最新情况。
2.1 - HugeGraph-Hubble Quick Start
1 HugeGraph-Hubble 概述
特别注意: 当前版本的 Hubble 还没有添加 Auth/Login 相关界面和接口和单独防护, 在下一个 Release 版 (> 1.5) 会加入, 请留意避免把它暴露在公网环境或不受信任的网络中,以免引起相关 SEC 问题 (另外也可以使用 IP & 端口白名单 + HTTPS)
测试指南:如需在本地运行 Hubble 测试,请参考 工具链本地测试指南
HugeGraph-Hubble 是 HugeGraph 的一站式可视化分析平台,平台涵盖了从数据建模,到数据快速导入, 再到数据的在线、离线分析、以及图的统一管理的全过程,实现了图应用的全流程向导式操作,旨在提升用户的使用流畅度, 降低用户的使用门槛,提供更为高效易用的使用体验。
平台主要包括以下模块:
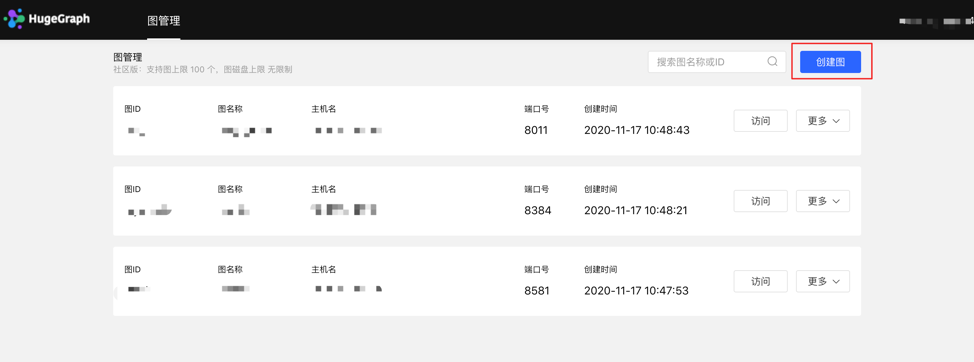
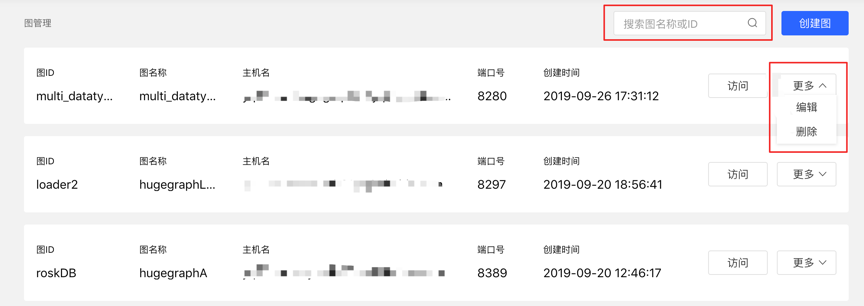
图管理
图管理模块通过图的创建,连接平台与图数据,实现多图的统一管理,并实现图的访问、编辑、删除、查询操作。
元数据建模
元数据建模模块通过创建属性库,顶点类型,边类型,索引类型,实现图模型的构建与管理,平台提供两种模式,列表模式和图模式,可实时展示元数据模型,更加直观。同时还提供了跨图的元数据复用功能,省去相同元数据繁琐的重复创建过程,极大地提升建模效率,增强易用性。
图分析
通过输入图遍历语言 Gremlin 可实现图数据的高性能通用分析,并提供顶点的定制化多维路径查询等功能,提供 3 种图结果展示方式,包括:图形式、表格形式、Json 形式,多维度展示数据形态,满足用户使用的多种场景需求。提供运行记录及常用语句收藏等功能,实现图操作的可追溯,以及查询输入的复用共享,快捷高效。支持图数据的导出,导出格式为 Json 格式。
任务管理
对于需要遍历全图的 Gremlin 任务,索引的创建与重建等耗时较长的异步任务,平台提供相应的任务管理功能,实现异步任务的统一的管理与结果查看。
数据导入 (BETA)
注: 数据导入功能目前适合初步试用,正式数据导入请使用 hugegraph-loader, 性能/稳定性/功能全面许多
数据导入是将用户的业务数据转化为图的顶点和边并插入图数据库中,平台提供了向导式的可视化导入模块,通过创建导入任务, 实现导入任务的管理及多个导入任务的并行运行,提高导入效能。进入导入任务后,只需跟随平台步骤提示,按需上传文件,填写内容, 就可轻松实现图数据的导入过程,同时支持断点续传,错误重试机制等,降低导入成本,提升效率。
2 部署
有三种方式可以部署hugegraph-hubble
- 使用 docker (便于测试)
- 下载 toolchain 二进制包
- 源码编译
2.1 使用 Docker (便于测试)
特别注意: docker 模式下,若 hubble 和 server 在同一宿主机,hubble 页面中设置 server 的
hostname不能设置为localhost/127.0.0.1,因这会指向 hubble 容器内部而非宿主机,导致无法连接到 server.若 hubble 和 server 在同一 docker 网络下,推荐直接使用
container_name(如下例的server) 作为主机名。或者也可以使用 宿主机 IP 作为主机名,此时端口号为宿主机给 server 配置的端口
我们可以使用 docker run -itd --name=hubble -p 8088:8088 hugegraph/hubble:1.5.0 快速启动 hubble.
或者使用 docker-compose 启动 hubble,另外如果 hubble 和 server 在同一个 docker 网络下,可以使用 server 的 contain_name 进行访问,而不需要宿主机的 ip
使用docker-compose up -d,docker-compose.yml如下:
version: '3'
services:
  server:
    image: hugegraph/hugegraph:1.5.0
    container_name: server
    environment:
      - PASSWORD=xxx
    ports:
      - 8080:8080

  hubble:
    image: hugegraph/hubble:1.5.0
    container_name: hubble
    ports:
      - 8088:8088
注意:
hugegraph-hubble的 docker 镜像是一个便捷发布版本,用于快速测试试用 hubble,并非ASF 官方发布物料包的方式。你可以从 ASF Release Distribution Policy 中得到更多细节。生产环境推荐使用
release tag(如1.5.0) 稳定版。使用latesttag 默认对应 master 最新代码。
2.2 下载 toolchain 二进制包
hubble项目在toolchain项目中,首先下载toolchain的 tar 包
wget https://downloads.apache.org/hugegraph/{version}/apache-hugegraph-toolchain-incubating-{version}.tar.gz
tar -xvf apache-hugegraph-toolchain-incubating-{version}.tar.gz
cd apache-hugegraph-toolchain-incubating-{version}.tar.gz/apache-hugegraph-hubble-incubating-{version}
运行hubble
bin/start-hubble.sh
随后我们可以看到
starting HugeGraphHubble ..............timed out with http status 502
2023-08-30 20:38:34 [main] [INFO ] o.a.h.HugeGraphHubble [] - Starting HugeGraphHubble v1.0.0 on cpu05 with PID xxx (~/apache-hugegraph-toolchain-incubating-1.0.0/apache-hugegraph-hubble-incubating-1.0.0/lib/hubble-be-1.0.0.jar started by $USER in ~/apache-hugegraph-toolchain-incubating-1.0.0/apache-hugegraph-hubble-incubating-1.0.0)
...
2023-08-30 20:38:38 [main] [INFO ] c.z.h.HikariDataSource [] - hugegraph-hubble-HikariCP - Start completed.
2023-08-30 20:38:41 [main] [INFO ] o.a.c.h.Http11NioProtocol [] - Starting ProtocolHandler ["http-nio-0.0.0.0-8088"]
2023-08-30 20:38:41 [main] [INFO ] o.a.h.HugeGraphHubble [] - Started HugeGraphHubble in 7.379 seconds (JVM running for 8.499)
然后使用浏览器访问 ip:8088 可看到hubble页面,通过bin/stop-hubble.sh则可以停止服务
2.3 源码编译
注意: 目前已在 hugegraph-hubble/hubble-be/pom.xml 中引入插件 frontend-maven-plugin,编译 hubble 时不需要用户本地环境提前安装 Nodejs V16.x 与 yarn 环境,可直接按下述步骤执行
下载 toolchain 源码包
git clone https://github.com/apache/hugegraph-toolchain.git
编译hubble, 它依赖 loader 和 client, 编译时需提前构建这些依赖 (后续可跳)
cd hugegraph-toolchain
sudo pip install -r hugegraph-hubble/hubble-dist/assembly/travis/requirements.txt
mvn install -pl hugegraph-client,hugegraph-loader -am -Dmaven.javadoc.skip=true -DskipTests -ntp

cd hugegraph-hubble
mvn -e package -Dmaven.javadoc.skip=true -Dmaven.test.skip=true -ntp
cd apache-hugegraph-hubble-incubating*
启动hubble
bin/start-hubble.sh -d
3 平台使用流程
平台的模块使用流程如下:

4 平台使用说明
4.1 图管理
4.1.1 图创建
图管理模块下,点击【创建图】,通过填写图 ID、图名称、主机名、端口号、用户名、密码的信息,实现多图的连接。
创建图填写内容如下:

注意:如果使用 docker 启动
hubble,且server和hubble位于同一宿主机,不能直接使用localhost/127.0.0.1作为主机名。如果hubble和server在同一 docker 网络下,则可以直接使用 container_name 作为主机名,端口则为 8080。或者也可以使用宿主机 ip 作为主机名,此时端口为宿主机为 server 配置的端口
4.1.2 图访问
实现图空间的信息访问,进入后,可进行图的多维查询分析、元数据管理、数据导入、算法分析等操作。

4.1.3 图管理
- 用户通过对图的概览、搜索以及单图的信息编辑与删除,实现图的统一管理。
- 搜索范围:可对图名称和 ID 进行搜索。
4.2 元数据建模(列表 + 图模式)
4.2.1 模块入口
左侧导航处:

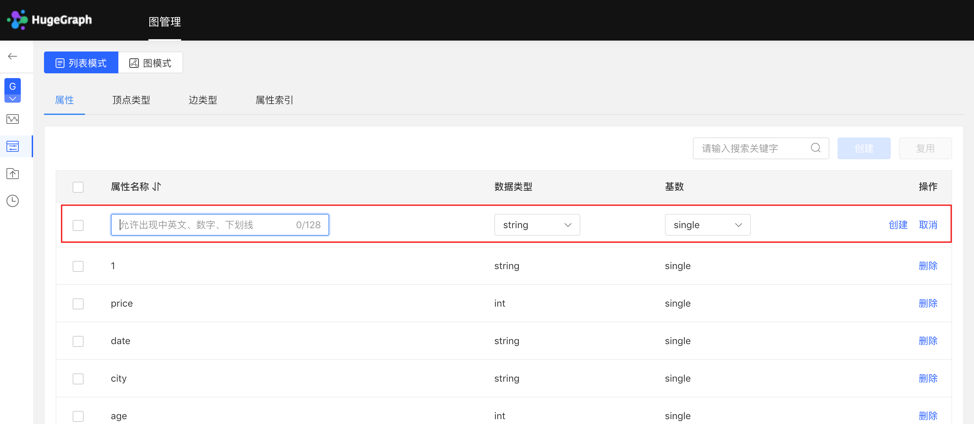
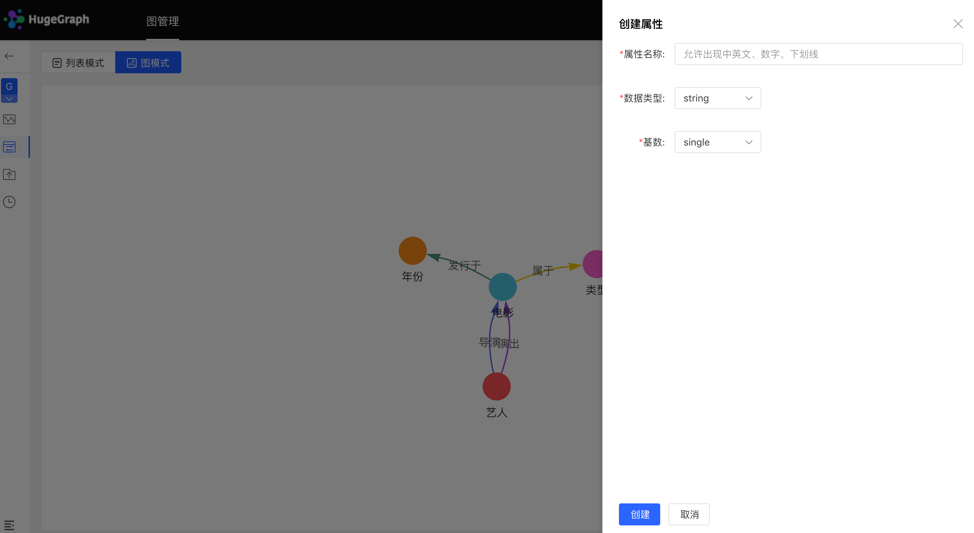
4.2.2 属性类型
4.2.2.1 创建
- 填写或选择属性名称、数据类型、基数,完成属性的创建。
- 创建的属性可作为顶点类型和边类型的属性。
列表模式:
图模式:
4.2.2.2 复用
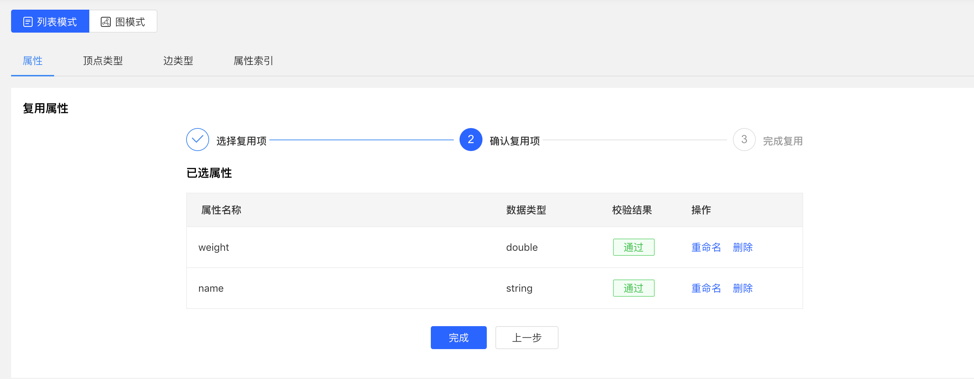
- 平台提供【复用】功能,可直接复用其他图的元数据。
- 选择需要复用的图 ID,继续选择需要复用的属性,之后平台会进行是否冲突的校验,通过后,可实现元数据的复用。
选择复用项:
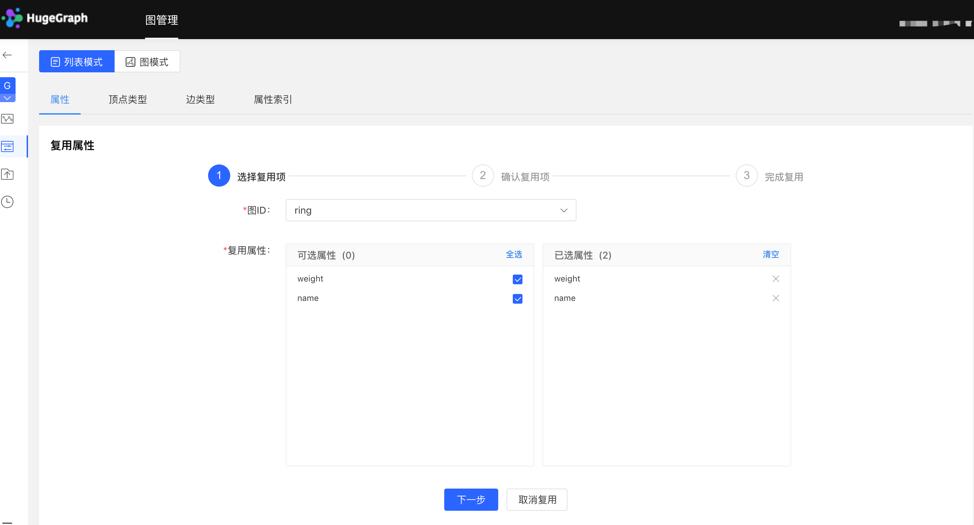
校验复用项:
4.2.2.3 管理
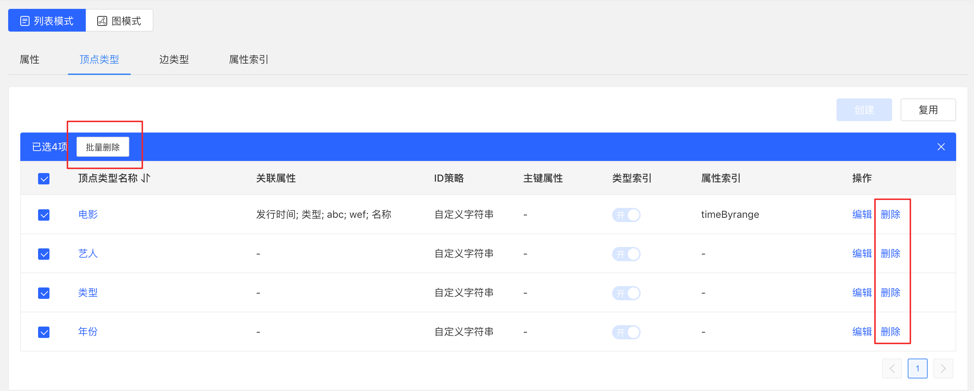
- 在属性列表中可进行单条删除或批量删除操作。
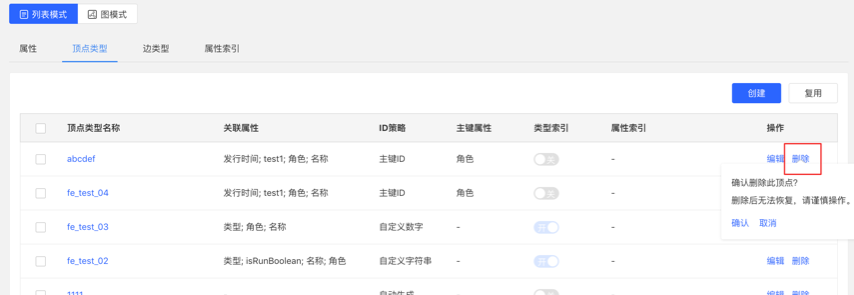
4.2.3 顶点类型
4.2.3.1 创建
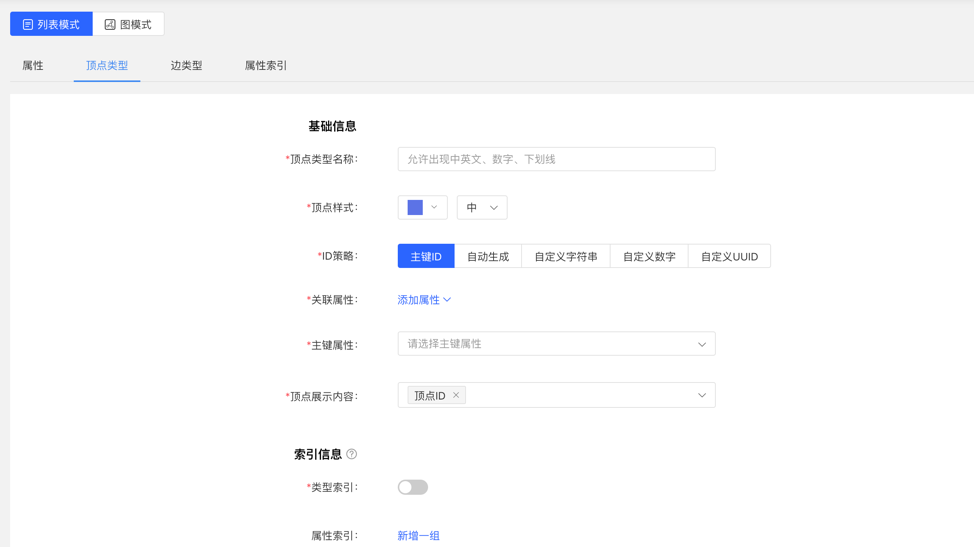
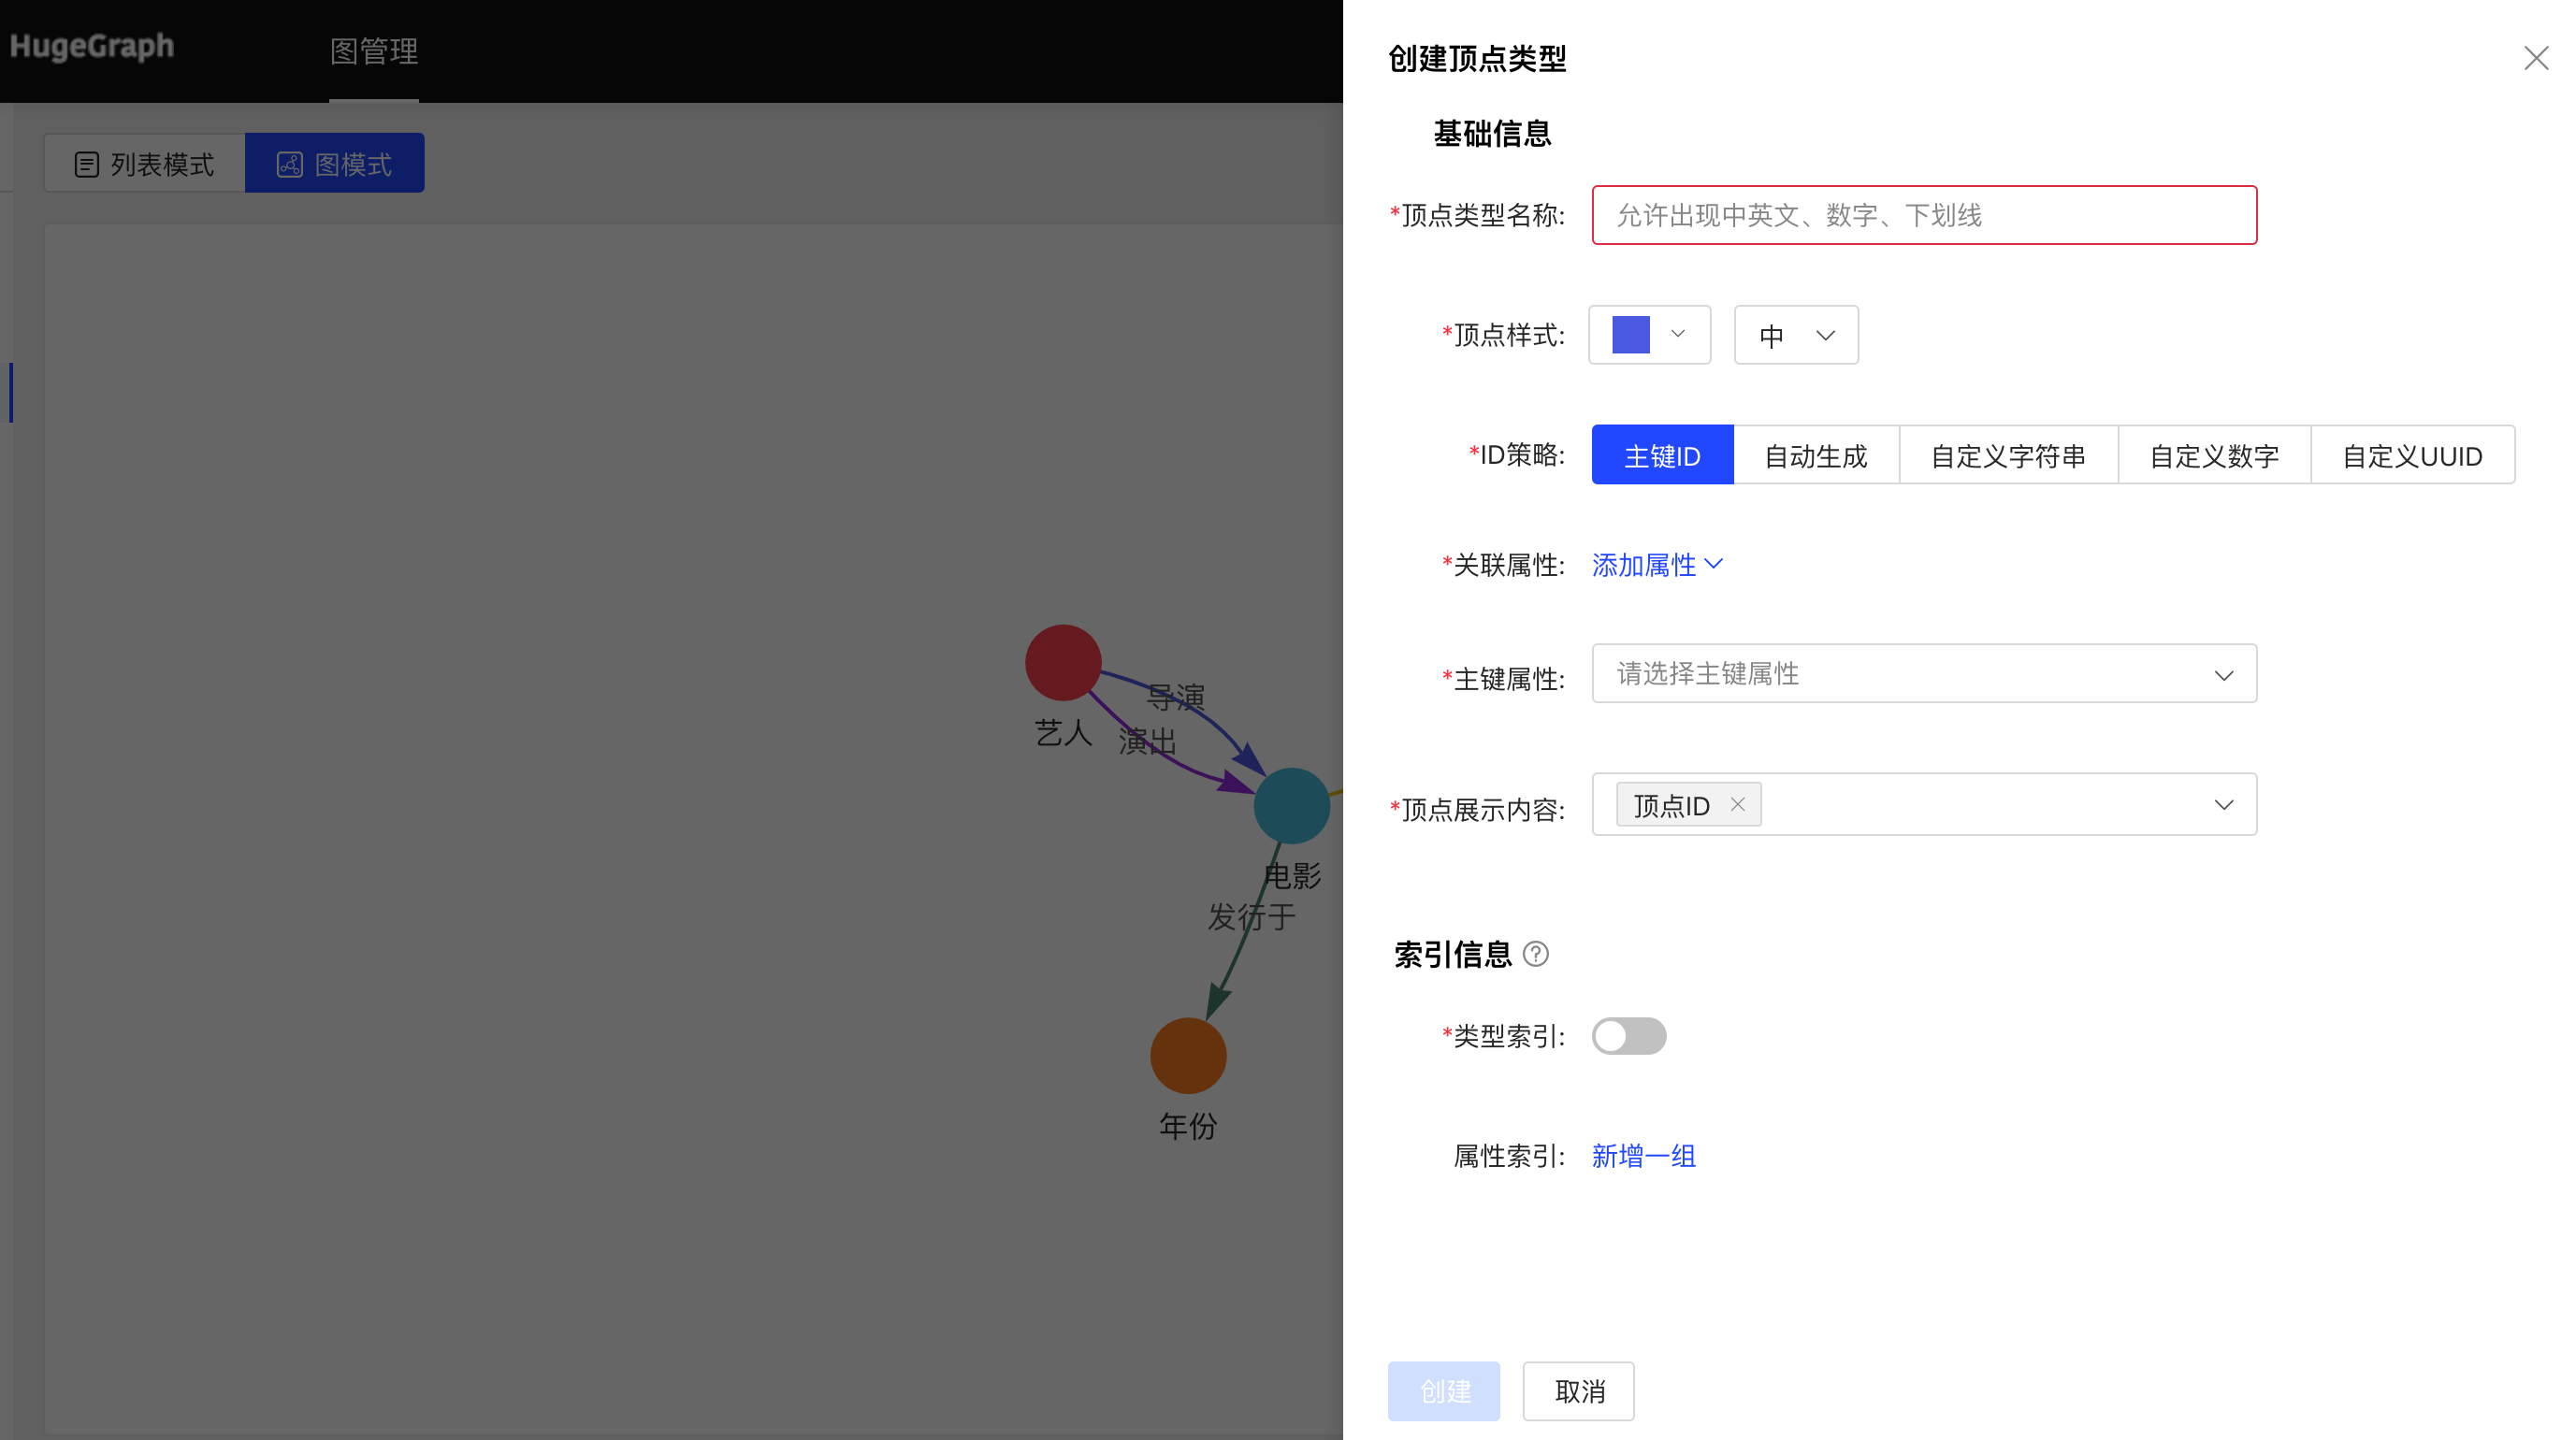
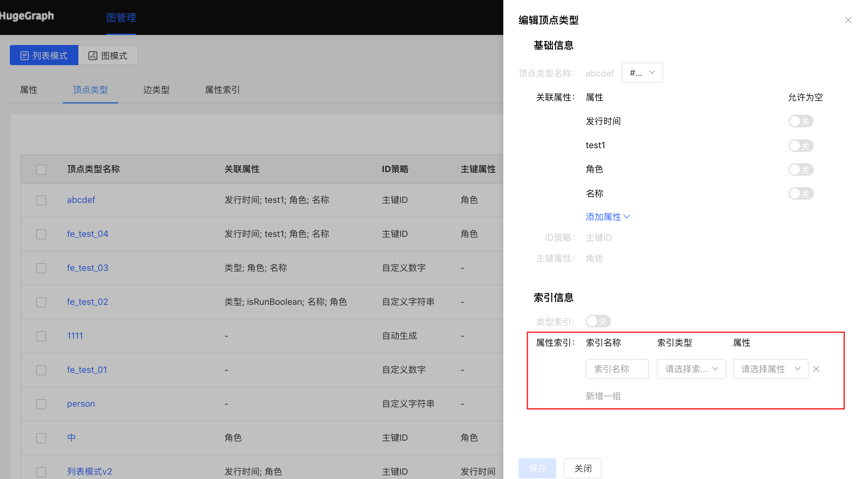
- 填写或选择顶点类型名称、ID 策略、关联属性、主键属性,顶点样式、查询结果中顶点下方展示的内容,以及索引的信息:包括是否创建类型索引,及属性索引的具体内容,完成顶点类型的创建。
列表模式:
图模式:
4.2.3.2 复用
- 顶点类型的复用,会将此类型关联的属性和属性索引一并复用。
- 复用功能使用方法类似属性的复用,见 3.2.2.2。
4.2.3.3 管理
可进行编辑操作,顶点样式、关联类型、顶点展示内容、属性索引可编辑,其余不可编辑。
可进行单条删除或批量删除操作。
4.2.4 边类型
4.2.4.1 创建
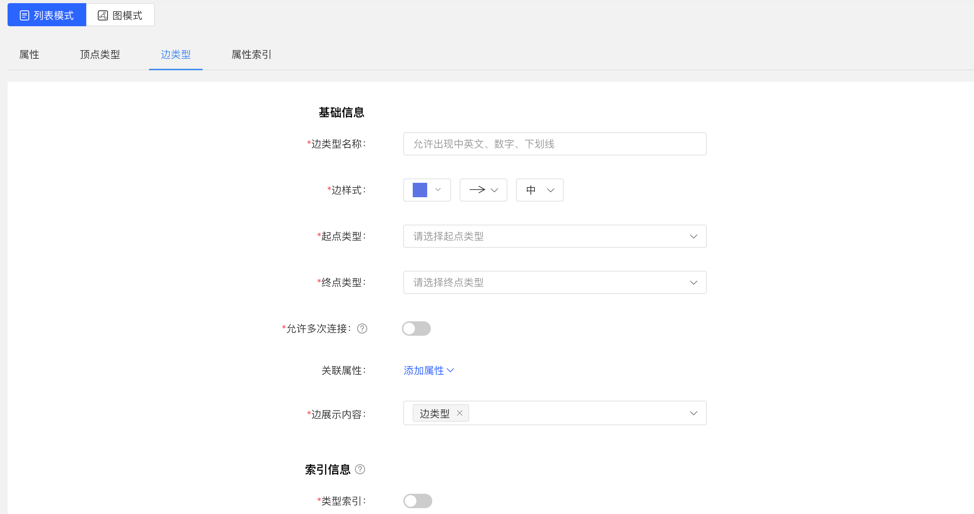
- 填写或选择边类型名称、起点类型、终点类型、关联属性、是否允许多次连接、边样式、查询结果中边下方展示的内容,以及索引的信息:包括是否创建类型索引,及属性索引的具体内容,完成边类型的创建。
列表模式:
图模式:
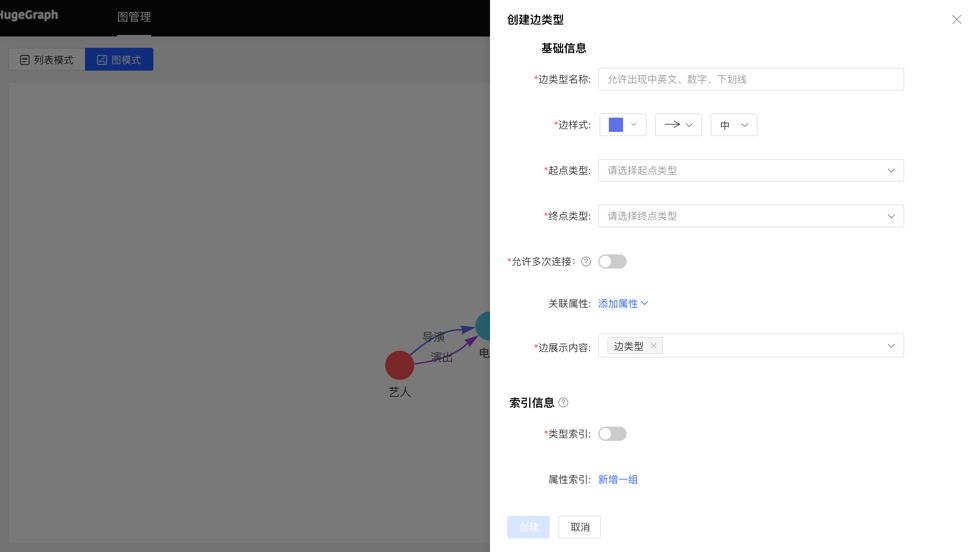
4.2.4.2 复用
- 边类型的复用,会将此类型的起点类型、终点类型、关联的属性和属性索引一并复用。
- 复用功能使用方法类似属性的复用,见 3.2.2.2。
4.2.4.3 管理
- 可进行编辑操作,边样式、关联属性、边展示内容、属性索引可编辑,其余不可编辑,同顶点类型。
- 可进行单条删除或批量删除操作。
4.2.5 索引类型
展示顶点类型和边类型的顶点索引和边索引。
4.3 数据导入
注意:目前推荐使用 hugegraph-loader 进行正式数据导入,hubble 内置的导入用来做测试和简单上手
数据导入的使用流程如下:

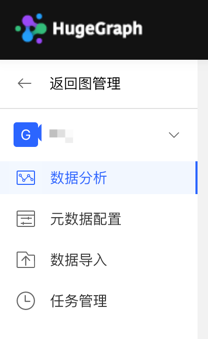
4.3.1 模块入口
左侧导航处:

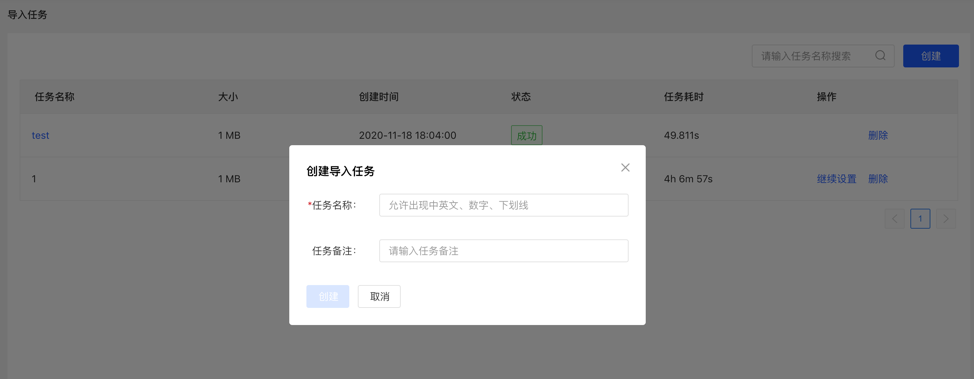
4.3.2 创建任务
- 填写任务名称和备注(非必填),可以创建导入任务。
- 可创建多个导入任务,并行导入。
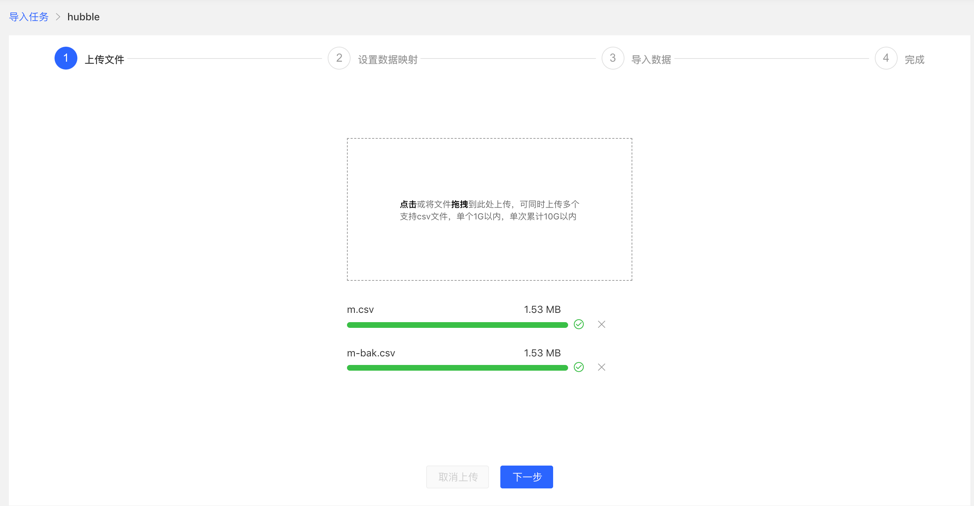
4.3.3 上传文件
- 上传需要构图的文件,目前支持的格式为 CSV,后续会不断更新。
- 可同时上传多个文件。
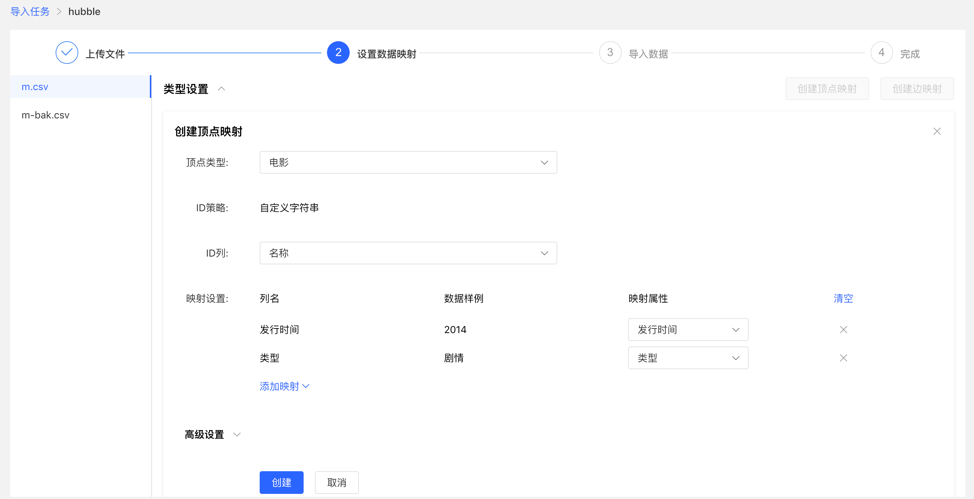
4.3.4 设置数据映射
对上传的文件分别设置数据映射,包括文件设置和类型设置
文件设置:勾选或填写是否包含表头、分隔符、编码格式等文件本身的设置内容,均设置默认值,无需手动填写
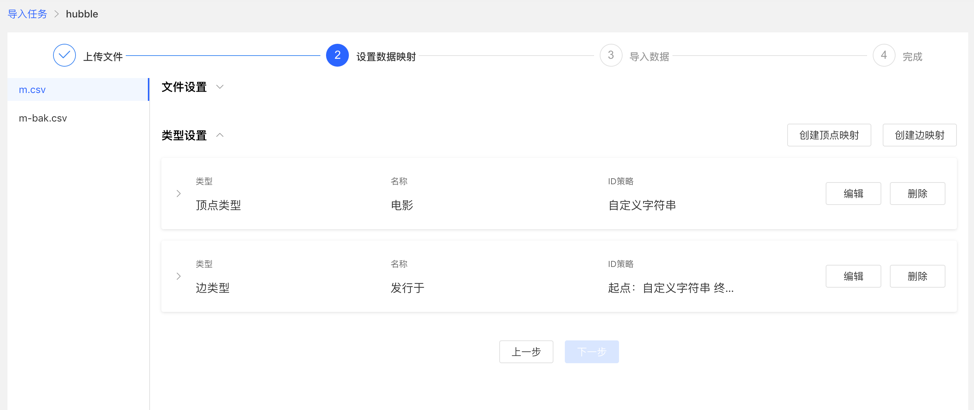
类型设置:
顶点映射和边映射:
【顶点类型】 :选择顶点类型,并为其 ID 映射上传文件中列数据;
【边类型】:选择边类型,为其起点类型和终点类型的 ID 列映射上传文件的列数据;
映射设置:为选定的顶点类型的属性映射上传文件中的列数据,此处,若属性名称与文件的表头名称一致,可自动匹配映射属性,无需手动填选
完成设置后,显示设置列表,方可进行下一步操作,支持映射的新增、编辑、删除操作
设置映射的填写内容:
映射列表:
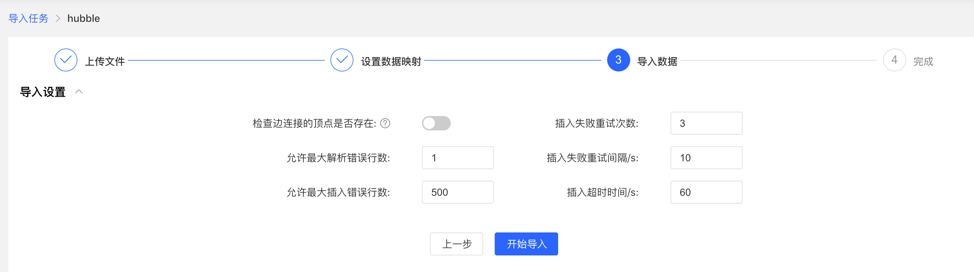
4.3.5 导入数据
导入前需要填写导入设置参数,填写完成后,可开始向图库中导入数据
- 导入设置
- 导入设置参数项如下图所示,均设置默认值,无需手动填写
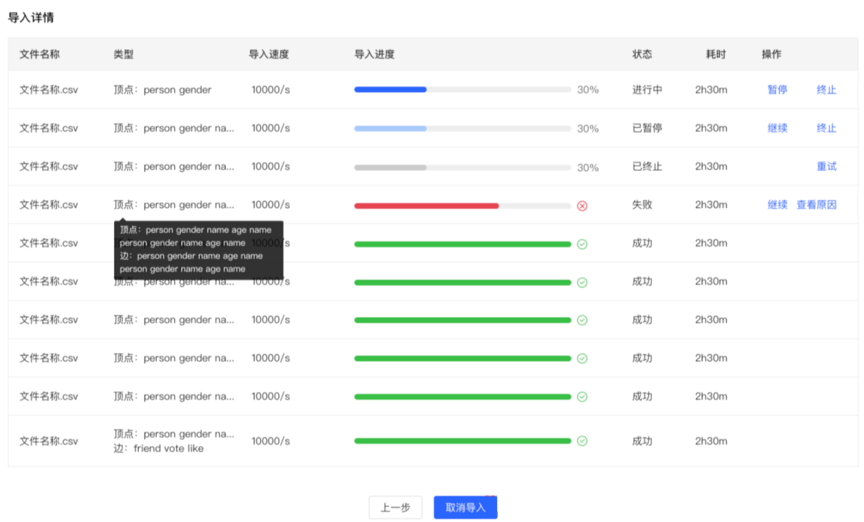
- 导入详情
- 点击开始导入,开始文件的导入任务
- 导入详情中提供每个上传文件设置的映射类型、导入速度、导入的进度、耗时以及当前任务的具体状态,并可对每个任务进行暂停、继续、停止等操作
- 若导入失败,可查看具体原因
4.4 数据分析
4.4.1 模块入口
左侧导航处:
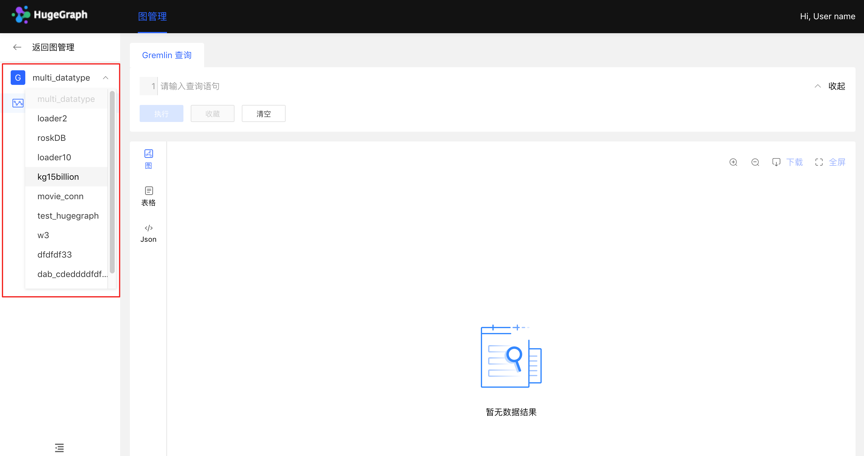
4.4.2 多图切换
通过左侧切换入口,灵活切换多图的操作空间
4.4.3 图分析与处理
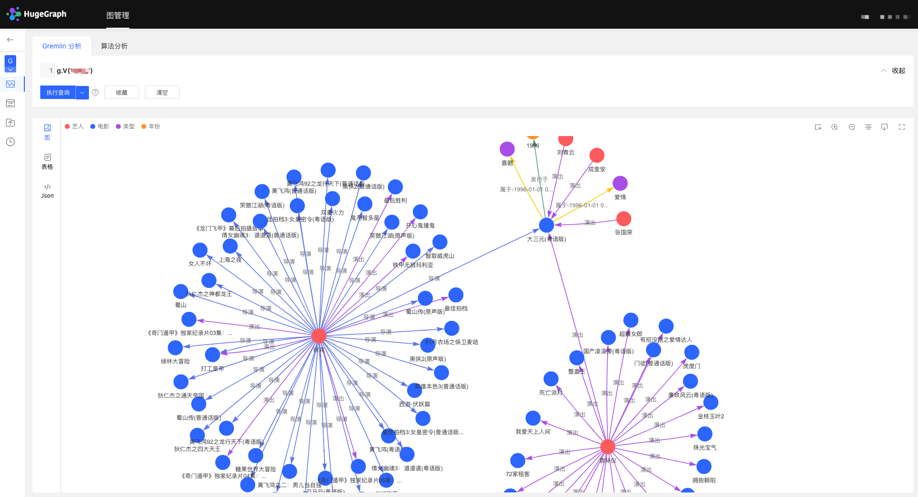
HugeGraph 支持 Apache TinkerPop3 的图遍历查询语言 Gremlin,Gremlin 是一种通用的图数据库查询语言,通过输入 Gremlin 语句,点击执行,即可执行图数据的查询分析操作,并可实现顶点/边的创建及删除、顶点/边的属性修改等。
Gremlin 查询后,下方为图结果展示区域,提供 3 种图结果展示方式,分别为:【图模式】、【表格模式】、【Json 模式】。
支持缩放、居中、全屏、导出等操作。
【图模式】
【表格模式】
【Json 模式】

4.4.4 数据详情
点击顶点/边实体,可查看顶点/边的数据详情,包括:顶点/边类型,顶点 ID,属性及对应值,拓展图的信息展示维度,提高易用性。
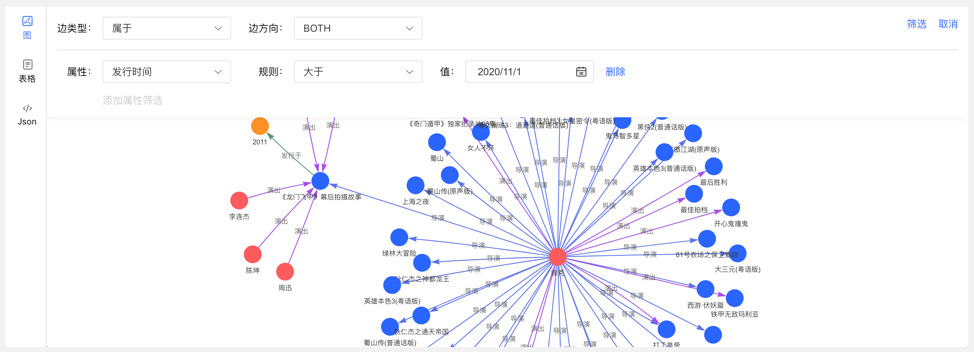
4.4.5 图结果的多维路径查询
除了全局的查询外,可针对查询结果中的顶点进行深度定制化查询以及隐藏操作,实现图结果的定制化挖掘。
右击顶点,出现顶点的菜单入口,可进行展示、查询、隐藏等操作。
- 展开:点击后,展示与选中点关联的顶点。
- 查询:通过选择与选中点关联的边类型及边方向,在此条件下,再选择其属性及相应筛选规则,可实现定制化的路径展示。
- 隐藏:点击后,隐藏选中点及与之关联的边。
双击顶点,也可展示与选中点关联的顶点。
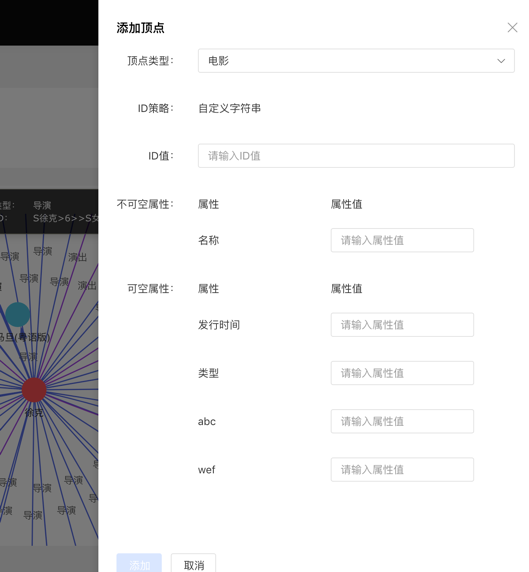
4.4.6 新增顶点/边
4.4.6.1 新增顶点
在图区可通过两个入口,动态新增顶点,如下:
- 点击图区面板,出现添加顶点入口
- 点击右上角的操作栏中的首个图标
通过选择或填写顶点类型、ID 值、属性信息,完成顶点的增加。
入口如下:
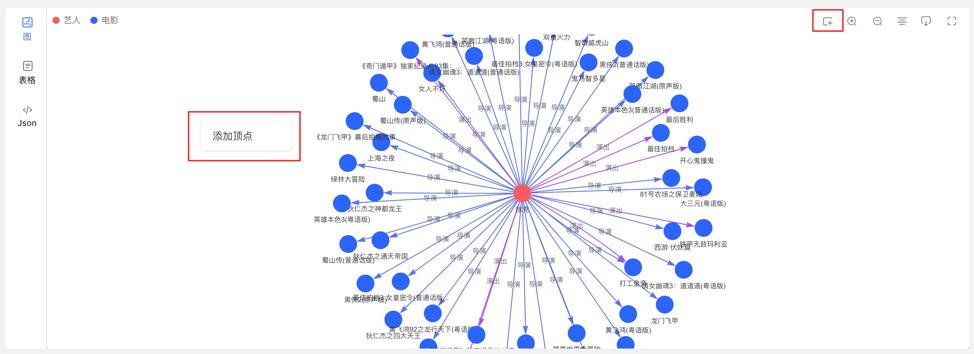
添加顶点内容如下:
4.4.6.2 新增边
右击图结果中的顶点,可增加该点的出边或者入边。
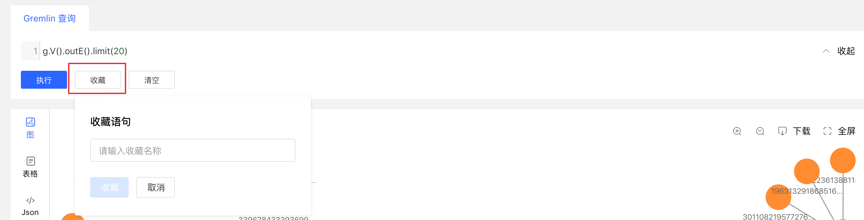
4.4.7 执行记录与收藏的查询
- 图区下方记载每次查询记录,包括:查询时间、执行类型、内容、状态、耗时、以及【收藏】和【加载】操作,实现图执行的全方位记录,有迹可循,并可对执行内容快速加载复用
- 提供语句的收藏功能,可对常用语句进行收藏操作,方便高频语句快速调用
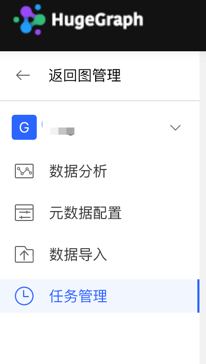
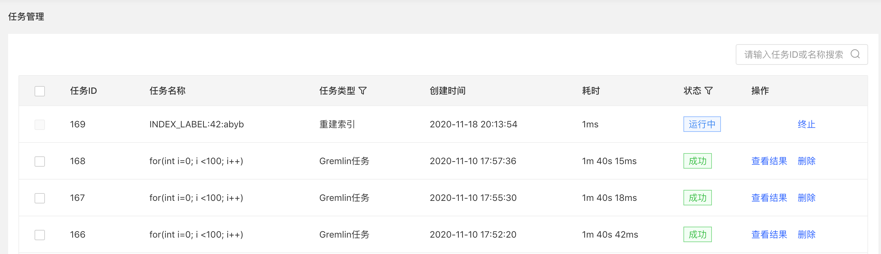
4.5 任务管理
4.5.1 模块入口
左侧导航处:
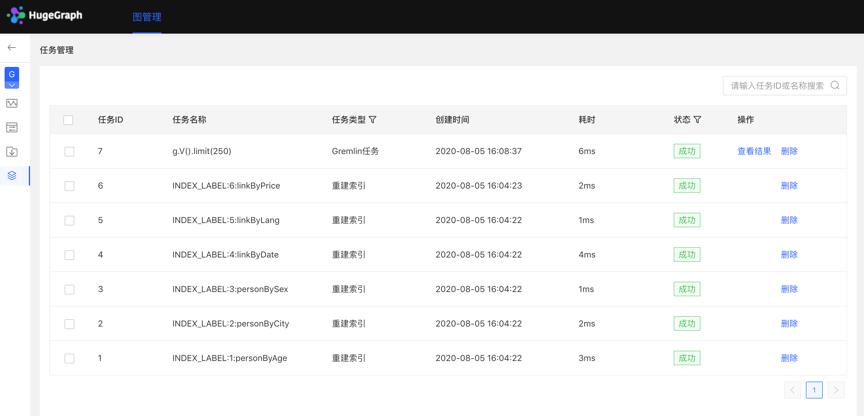
4.5.2 任务管理
- 提供异步任务的统一的管理与结果查看,异步任务包括 4 类,分别为:
- gremlin:Gremlin 任务务
- algorithm:OLAP 算法任务务
- remove_schema:删除元数据
- rebuild_index:重建索引
- 列表显示当前图的异步任务信息,包括:任务 ID,任务名称,任务类型,创建时间,耗时,状态,操作,实现对异步任务的管理。
- 支持对任务类型和状态进行筛选
- 支持搜索任务 ID 和任务名称
- 可对异步任务进行删除或批量删除操作
4.5.3 Gremlin 异步任务
1.创建任务
- 数据分析模块,目前支持两种 Gremlin 操作,Gremlin 查询和 Gremlin 任务;若用户切换到 Gremlin 任务,点击执行后,在异步任务中心会建立一条异步任务; 2.任务提交
- 任务提交成功后,图区部分返回提交结果和任务 ID 3.任务详情
- 提供【查看】入口,可跳转到任务详情查看当前任务具体执行情况跳转到任务中心后,直接显示当前执行的任务行
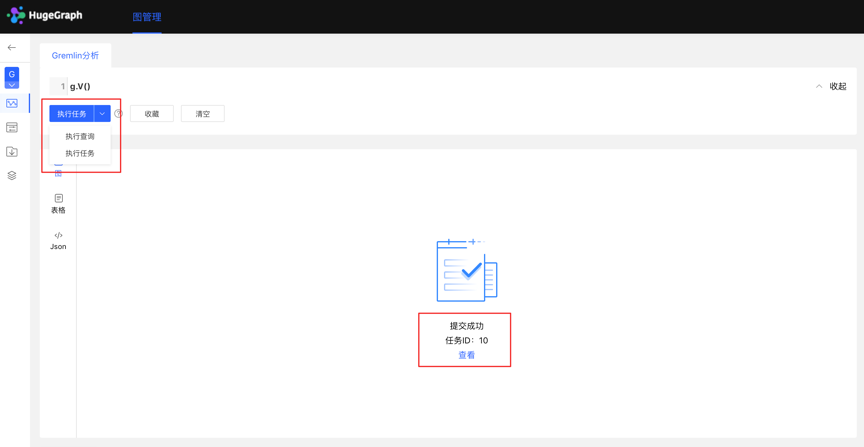
点击查看入口,跳转到任务管理列表,如下:
4.查看结果
- 结果通过 json 形式展示
4.5.4 OLAP 算法任务
Hubble 上暂未提供可视化的 OLAP 算法执行,可调用 RESTful API 进行 OLAP 类算法任务,在任务管理中通过 ID 找到相应任务,查看进度与结果等。
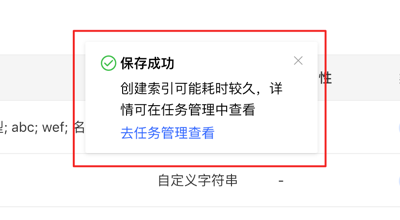
4.5.5 删除元数据、重建索引
1.创建任务
- 在元数据建模模块中,删除元数据时,可建立删除元数据的异步任务
- 在编辑已有的顶点/边类型操作中,新增索引时,可建立创建索引的异步任务
2.任务详情
- 确认/保存后,可跳转到任务中心查看当前任务的详情
5 配置说明
HugeGraph-Hubble 可以通过 conf/hugegraph-hubble.properties 文件进行配置。
5.1 服务器配置
| 配置项 | 默认值 | 说明 |
|---|---|---|
hubble.host | 0.0.0.0 | Hubble 服务绑定的地址 |
hubble.port | 8088 | Hubble 服务监听的端口 |
5.2 Gremlin 查询限制
这些设置控制查询结果限制,防止内存问题:
| 配置项 | 默认值 | 说明 |
|---|---|---|
gremlin.suffix_limit | 250 | 查询后缀最大长度 |
gremlin.vertex_degree_limit | 100 | 显示的最大顶点度数 |
gremlin.edges_total_limit | 500 | 返回的最大边数 |
gremlin.batch_query_ids | 100 | ID 批量查询大小 |
2.2 - HugeGraph-Loader Quick Start
1 HugeGraph-Loader 概述
HugeGraph-Loader 是 HugeGraph 的数据导入组件,能够将多种数据源的数据转化为图的顶点和边并批量导入到图数据库中。
目前支持的数据源包括:
- 本地磁盘文件或目录,支持 TEXT、CSV 和 JSON 格式的文件,支持压缩文件
- HDFS 文件或目录,支持压缩文件
- 主流关系型数据库,如 MySQL、PostgreSQL、Oracle、SQL Server
本地磁盘文件和 HDFS 文件支持断点续传。
后面会具体说明。
注意:使用 HugeGraph-Loader 需要依赖 HugeGraph Server 服务,下载和启动 Server 请参考 HugeGraph-Server Quick Start
测试指南:如需在本地运行 Loader 测试,请参考 工具链本地测试指南
2 获取 HugeGraph-Loader
有两种方式可以获取 HugeGraph-Loader:
- 使用 Docker 镜像 (便于测试)
- 下载已编译的压缩包
- 克隆源码编译安装
2.1 使用 Docker 镜像 (便于测试)
我们可以使用 docker run -itd --name loader hugegraph/loader:1.5.0 部署 loader 服务。对于需要加载的数据,则可以通过挂载 -v /path/to/data/file:/loader/file 或者 docker cp 的方式将文件复制到 loader 容器内部。
或者使用 docker-compose 启动 loader, 启动命令为 docker-compose up -d, 样例的 docker-compose.yml 如下所示:
version: '3'

services:
  server:
    image: hugegraph/hugegraph:1.5.0
    container_name: server
    environment:
      - PASSWORD=xxx
    ports:
      - 8080:8080

  hubble:
    image: hugegraph/hubble:1.5.0
    container_name: hubble
    ports:
      - 8088:8088

  loader:
    image: hugegraph/loader:1.5.0
    container_name: loader
    # mount your own data here
    # volumes:
      # - /path/to/data/file:/loader/file
具体的数据导入流程可以参考 4.5 使用 docker 导入
注意:
hugegraph-loader 的 docker 镜像是一个便捷版本,用于快速启动 loader,并不是官方发布物料包方式。你可以从 ASF Release Distribution Policy 中得到更多细节。
推荐使用
release tag(如1.5.0) 以获取稳定版。使用latesttag 可以使用开发中的最新功能。
2.2 下载已编译的压缩包
下载最新版本的 HugeGraph-Toolchain Release 包,里面包含了 loader + tool + hubble 全套工具,如果你已经下载,可跳过重复步骤
wget https://downloads.apache.org/hugegraph/{version}/apache-hugegraph-toolchain-incubating-{version}.tar.gz
tar zxf *hugegraph*.tar.gz
2.3 克隆源码编译安装
克隆最新版本的 HugeGraph-Loader 源码包:
# 1. get from github
git clone https://github.com/apache/hugegraph-toolchain.git

# 2. get from direct url (please choose the **latest release** version)
wget https://downloads.apache.org/hugegraph/{version}/apache-hugegraph-toolchain-incubating-{version}-src.tar.gz
点击展开/折叠 手动安装 ojdbc 方法
由于 Oracle ojdbc license 的限制,需要手动安装 ojdbc 到本地 maven 仓库。 访问 Oracle jdbc 下载 页面。选择 Oracle Database 12c Release 2 (12.2.0.1) drivers,如下图所示。
打开链接后,选择“ojdbc8.jar”
把 ojdbc8 安装到本地 maven 仓库,进入ojdbc8.jar所在目录,执行以下命令。
mvn install:install-file -Dfile=./ojdbc8.jar -DgroupId=com.oracle -DartifactId=ojdbc8 -Dversion=12.2.0.1 -Dpackaging=jar
编译生成 tar 包:
cd hugegraph-loader
mvn clean package -DskipTests
3 使用流程
使用 HugeGraph-Loader 的基本流程分为以下几步:
- 编写图模型
- 准备数据文件
- 编写输入源映射文件
- 执行命令导入
3.1 编写图模型
这一步是建模的过程,用户需要对自己已有的数据和想要创建的图模型有一个清晰的构想,然后编写 schema 建立图模型。
比如想创建一个拥有两类顶点及两类边的图,顶点是"人"和"软件",边是"人认识人"和"人创造软件",并且这些顶点和边都带有一些属性,比如顶点"人"有:“姓名”、“年龄"等属性, “软件"有:“名字”、“售卖价格"等属性;边"认识"有:“日期"属性等。
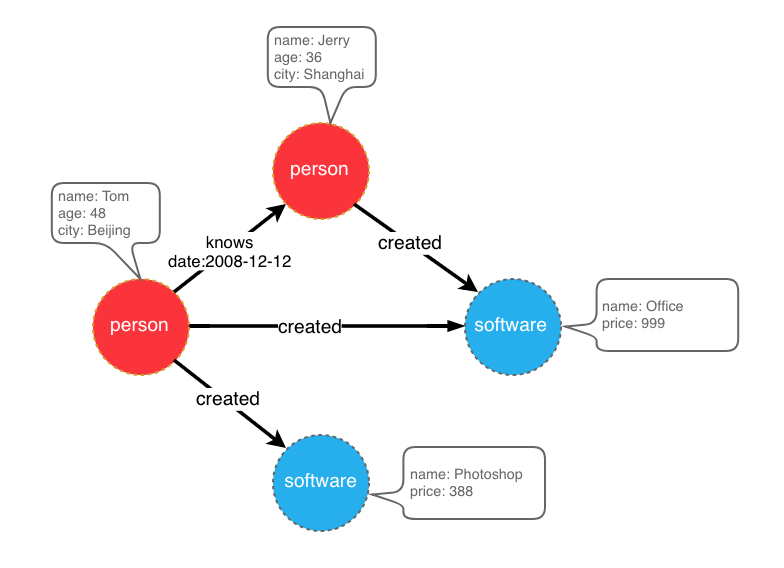
示例图模型
在设计好了图模型之后,我们可以用groovy编写出schema的定义,并保存至文件中,这里命名为schema.groovy。
// 创建一些属性
schema.propertyKey("name").asText().ifNotExist().create();
schema.propertyKey("age").asInt().ifNotExist().create();
schema.propertyKey("city").asText().ifNotExist().create();
schema.propertyKey("date").asText().ifNotExist().create();
schema.propertyKey("price").asDouble().ifNotExist().create();

// 创建 person 顶点类型,其拥有三个属性:name, age, city,主键是 name
schema.vertexLabel("person").properties("name", "age", "city").primaryKeys("name").ifNotExist().create();
// 创建 software 顶点类型,其拥有两个属性:name, price,主键是 name
schema.vertexLabel("software").properties("name", "price").primaryKeys("name").ifNotExist().create();

// 创建 knows 边类型,这类边是从 person 指向 person 的
schema.edgeLabel("knows").sourceLabel("person").targetLabel("person").ifNotExist().create();
// 创建 created 边类型,这类边是从 person 指向 software 的
schema.edgeLabel("created").sourceLabel("person").targetLabel("software").ifNotExist().create();
关于 schema 的详细说明请参考 hugegraph-client 中对应部分。
3.2 准备数据
目前 HugeGraph-Loader 支持的数据源包括:
- 本地磁盘文件或目录
- HDFS 文件或目录
- 部分关系型数据库
- Kafka topic
3.2.1 数据源结构
3.2.1.1 本地磁盘文件或目录
用户可以指定本地磁盘文件作为数据源,如果数据分散在多个文件中,也支持以某个目录作为数据源,但暂时不支持以多个目录作为数据源。
比如:我的数据分散在多个文件中,part-0、part-1 … part-n,要想执行导入,必须保证它们是放在一个目录下的。然后在 loader 的映射文件中,将path指定为该目录即可。
支持的文件格式包括:
- TEXT
- CSV
- JSON
TEXT 是自定义分隔符的文本文件,第一行通常是标题,记录了每一列的名称,也允许没有标题行(在映射文件中指定)。其余的每行代表一条记录,会被转化为一个顶点/边;行的每一列对应一个字段,会被转化为顶点/边的 id、label 或属性;
示例如下:
id|name|lang|price|ISBN
1|lop|java|328|ISBN978-7-107-18618-5
2|ripple|java|199|ISBN978-7-100-13678-5
CSV 是分隔符为逗号,的 TEXT 文件,当列值本身包含逗号时,该列值需要用双引号包起来,如:
marko,29,Beijing
"li,nary",26,"Wu,han"
JSON 文件要求每一行都是一个 JSON 串,且每行的格式需保持一致。
{"source_name": "marko", "target_name": "vadas", "date": "20160110", "weight": 0.5}
{"source_name": "marko", "target_name": "josh", "date": "20130220", "weight": 1.0}
3.2.1.2 HDFS 文件或目录
用户也可以指定 HDFS 文件或目录作为数据源,上面关于本地磁盘文件或目录的要求全部适用于这里。除此之外,鉴于 HDFS 上通常存储的都是压缩文件,loader 也提供了对压缩文件的支持,并且本地磁盘文件或目录同样支持压缩文件。
目前支持的压缩文件类型包括:GZIP、BZ2、XZ、LZMA、SNAPPY_RAW、SNAPPY_FRAMED、Z、DEFLATE、LZ4_BLOCK、LZ4_FRAMED、ORC 和 PARQUET。
3.2.1.3 主流关系型数据库
loader 还支持以部分关系型数据库作为数据源,目前支持 MySQL、PostgreSQL、Oracle 和 SQL Server。
但目前对表结构要求较为严格,如果导入过程中需要做关联查询,这样的表结构是不允许的。关联查询的意思是:在读到表的某行后,发现某列的值不能直接使用(比如外键),需要再去做一次查询才能确定该列的真实值。
举个例子:假设有三张表,person、software 和 created
// person 表结构
id | name | age | city
// software 表结构
id | name | lang | price
// created 表结构
id | p_id | s_id | date
如果在建模(schema)时指定 person 或 software 的 id 策略是 PRIMARY_KEY,选择以 name 作为 primary keys(注意:这是 hugegraph 中 vertexlabel 的概念),在导入边数据时,由于需要拼接出源顶点和目标顶点的 id,必须拿着 p_id/s_id 去 person/software 表中查到对应的 name,这种需要做额外查询的表结构的情况,loader 暂时是不支持的。这时可以采用以下两种方式替代:
- 仍然指定 person 和 software 的 id 策略为 PRIMARY_KEY,但是以 person 表和 software 表的 id 列作为顶点的主键属性,这样导入边时直接使用 p_id 和 s_id 和顶点的 label 拼接就能生成 id 了;
- 指定 person 和 software 的 id 策略为 CUSTOMIZE,然后直接以 person 表和 software 表的 id 列作为顶点 id,这样导入边时直接使用 p_id 和 s_id 即可;
关键点就是要让边能直接使用 p_id 和 s_id,不要再去查一次。
3.2.2 准备顶点和边数据
3.2.2.1 顶点数据
顶点数据文件由一行一行的数据组成,一般每一行作为一个顶点,每一列会作为顶点属性。下面以 CSV 格式作为示例进行说明。
- person 顶点数据(数据本身不包含 header)
Tom,48,Beijing
Jerry,36,Shanghai
- software 顶点数据(数据本身包含 header)
name,price
Photoshop,999
Office,388
3.2.2.2 边数据
边数据文件由一行一行的数据组成,一般每一行作为一条边,其中有部分列会作为源顶点和目标顶点的 id,其他列作为边属性。下面以 JSON 格式作为示例进行说明。
- knows 边数据
{"source_name": "Tom", "target_name": "Jerry", "date": "2008-12-12"}
- created 边数据
{"source_name": "Tom", "target_name": "Photoshop"}
{"source_name": "Tom", "target_name": "Office"}
{"source_name": "Jerry", "target_name": "Office"}
3.3 编写数据源映射文件
3.3.1 映射文件概述
输入源的映射文件用于描述如何将输入源数据与图的顶点类型/边类型建立映射关系,以JSON格式组织,由多个映射块组成,其中每一个映射块都负责将一个输入源映射为顶点和边。
具体而言,每个映射块包含一个输入源和多个顶点映射与边映射块,输入源块对应上面介绍的本地磁盘文件或目录、HDFS 文件或目录和关系型数据库,负责描述数据源的基本信息,比如数据在哪,是什么格式的,分隔符是什么等。顶点映射/边映射与该输入源绑定,可以选择输入源的哪些列,哪些列作为 id、哪些列作为属性,以及每一列映射成什么属性,列的值映射成属性的什么值等等。
以最通俗的话讲,每一个映射块描述了:要导入的文件在哪,文件的每一行要作为哪一类顶点/边,文件的哪些列是需要导入的,以及这些列对应顶点/边的什么属性等。
注意:0.11.0 版本以前的映射文件与 0.11.0 以后的格式变化较大,为表述方便,下面称 0.11.0 以前的映射文件(格式)为 1.0 版本,0.11.0 以后的为 2.0 版本。并且若无特殊说明,“映射文件”表示的是 2.0 版本的。
点击展开/折叠 2.0 版本的映射文件的框架
{
  "version": "2.0",
  "structs": [
    {
      "id": "1",
      "input": {
      },
      "vertices": [
        {},
        {}
      ],
      "edges": [
        {},
        {}
      ]
    }
  ]
}
这里直接给出两个版本的映射文件(描述了上面图模型和数据文件)
点击展开/折叠 2.0 版本的映射文件
{
  "version": "2.0",
  "structs": [
    {
      "id": "1",
      "skip": false,
      "input": {
        "type": "FILE",
        "path": "vertex_person.csv",
        "file_filter": {
          "extensions": [
            "*"
          ]
        },
        "format": "CSV",
        "delimiter": ",",
        "date_format": "yyyy-MM-dd HH:mm:ss",
        "time_zone": "GMT+8",
        "skipped_line": {
          "regex": "(^#|^//).*|"
        },
        "compression": "NONE",
        "header": [
          "name",
          "age",
          "city"
        ],
        "charset": "UTF-8",
        "list_format": {
          "start_symbol": "[",
          "elem_delimiter": "|",
          "end_symbol": "]"
        }
      },
      "vertices": [
        {
          "label": "person",
          "skip": false,
          "id": null,
          "unfold": false,
          "field_mapping": {},
          "value_mapping": {},
          "selected": [],
          "ignored": [],
          "null_values": [
            ""
          ],
          "update_strategies": {}
        }
      ],
      "edges": []
    },
    {
      "id": "2",
      "skip": false,
      "input": {
        "type": "FILE",
        "path": "vertex_software.csv",
        "file_filter": {
          "extensions": [
            "*"
          ]
        },
        "format": "CSV",
        "delimiter": ",",
        "date_format": "yyyy-MM-dd HH:mm:ss",
        "time_zone": "GMT+8",
        "skipped_line": {
          "regex": "(^#|^//).*|"
        },
        "compression": "NONE",
        "header": null,
        "charset": "UTF-8",
        "list_format": {
          "start_symbol": "",
          "elem_delimiter": ",",
          "end_symbol": ""
        }
      },
      "vertices": [
        {
          "label": "software",
          "skip": false,
          "id": null,
          "unfold": false,
          "field_mapping": {},
          "value_mapping": {},
          "selected": [],
          "ignored": [],
          "null_values": [
            ""
          ],
          "update_strategies": {}
        }
      ],
      "edges": []
    },
    {
      "id": "3",
      "skip": false,
      "input": {
        "type": "FILE",
        "path": "edge_knows.json",
        "file_filter": {
          "extensions": [
            "*"
          ]
        },
        "format": "JSON",
        "delimiter": null,
        "date_format": "yyyy-MM-dd HH:mm:ss",
        "time_zone": "GMT+8",
        "skipped_line": {
          "regex": "(^#|^//).*|"
        },
        "compression": "NONE",
        "header": null,
        "charset": "UTF-8",
        "list_format": null
      },
      "vertices": [],
      "edges": [
        {
          "label": "knows",
          "skip": false,
          "source": [
            "source_name"
          ],
          "unfold_source": false,
          "target": [
            "target_name"
          ],
          "unfold_target": false,
          "field_mapping": {
            "source_name": "name",
            "target_name": "name"
          },
          "value_mapping": {},
          "selected": [],
          "ignored": [],
          "null_values": [
            ""
          ],
          "update_strategies": {}
        }
      ]
    },
    {
      "id": "4",
      "skip": false,
      "input": {
        "type": "FILE",
        "path": "edge_created.json",
        "file_filter": {
          "extensions": [
            "*"
          ]
        },
        "format": "JSON",
        "delimiter": null,
        "date_format": "yyyy-MM-dd HH:mm:ss",
        "time_zone": "GMT+8",
        "skipped_line": {
          "regex": "(^#|^//).*|"
        },
        "compression": "NONE",
        "header": null,
        "charset": "UTF-8",
        "list_format": null
      },
      "vertices": [],
      "edges": [
        {
          "label": "created",
          "skip": false,
          "source": [
            "source_name"
          ],
          "unfold_source": false,
          "target": [
            "target_name"
          ],
          "unfold_target": false,
          "field_mapping": {
            "source_name": "name",
            "target_name": "name"
          },
          "value_mapping": {},
          "selected": [],
          "ignored": [],
          "null_values": [
            ""
          ],
          "update_strategies": {}
        }
      ]
    }
  ]
}
点击展开/折叠 1.0 版本的映射文件
{
  "vertices": [
    {
      "label": "person",
      "input": {
        "type": "file",
        "path": "vertex_person.csv",
        "format": "CSV",
        "header": ["name", "age", "city"],
        "charset": "UTF-8"
      }
    },
    {
      "label": "software",
      "input": {
        "type": "file",
        "path": "vertex_software.csv",
        "format": "CSV"
      }
    }
  ],
  "edges": [
    {
      "label": "knows",
      "source": ["source_name"],
      "target": ["target_name"],
      "input": {
        "type": "file",
        "path": "edge_knows.json",
        "format": "JSON"
      },
      "field_mapping": {
        "source_name": "name",
        "target_name": "name"
      }
    },
    {
      "label": "created",
      "source": ["source_name"],
      "target": ["target_name"],
      "input": {
        "type": "file",
        "path": "edge_created.json",
        "format": "JSON"
      },
      "field_mapping": {
        "source_name": "name",
        "target_name": "name"
      }
    }
  ]
}
映射文件 1.0 版本是以顶点和边为中心,设置输入源;而 2.0 版本是以输入源为中心,设置顶点和边映射。有些输入源(比如一个文件)既能生成顶点,也能生成边,如果用 1.0 版的格式写,就需要在 vertex 和 edge 映射块中各写一次 input 块,这两次的 input 块是完全一样的;而 2.0 版本只需要写一次 input。所以 2.0 版相比于 1.0 版,能省掉一些 input 的重复书写。
在 hugegraph-loader-{version} 的 bin 目录下,有一个脚本工具 mapping-convert.sh 能直接将 1.0 版本的映射文件转换为 2.0 版本的,使用方式如下:
bin/mapping-convert.sh struct.json
会在 struct.json 的同级目录下生成一个 struct-v2.json。
3.3.2 输入源
输入源目前分为五类:FILE、HDFS、JDBC、KAFKA 和 GRAPH,由type节点区分,我们称为本地文件输入源、HDFS 输入源、JDBC 输入源和 KAFKA 输入源,图数据源,下面分别介绍。
3.3.2.1 本地文件输入源
- id: 输入源的 id,该字段用于支持一些内部功能,非必填(未填时会自动生成),强烈建议写上,对于调试大有裨益;
- skip: 是否跳过该输入源,由于 JSON 文件无法添加注释,如果某次导入时不想导入某个输入源,但又不想删除该输入源的配置,则可以设置为 true 将其跳过,默认为 false,非必填;
- input: 输入源映射块,复合结构
- type: 输入源类型,必须填 file 或 FILE;
- path: 本地文件或目录的路径,绝对路径或相对于映射文件的相对路径,建议使用绝对路径,必填;
- file_filter: 从
path中筛选复合条件的文件,复合结构,目前只支持配置扩展名,用子节点extensions表示,默认为”*",表示保留所有文件; - format: 本地文件的格式,可选值为 CSV、TEXT 及 JSON,必须大写,必填;
- header: 文件各列的列名,如不指定则会以数据文件第一行作为 header;当文件本身有标题且又指定了 header,文件的第一行会被当作普通的数据行;JSON 文件不需要指定 header,选填;
- delimiter: 文件行的列分隔符,默认以逗号
","作为分隔符,JSON文件不需要指定,选填; - charset: 文件的编码字符集,默认
UTF-8,选填; - date_format: 自定义的日期格式,默认值为 yyyy-MM-dd HH:mm:ss,选填;如果日期是以时间戳的形式呈现的,此项须写为
timestamp(固定写法); - time_zone: 设置日期数据是处于哪个时区的,默认值为
GMT+8,选填; - skipped_line: 想跳过的行,复合结构,目前只能配置要跳过的行的正则表达式,用子节点
regex描述,默认不跳过任何行,选填; - compression: 文件的压缩格式,可选值为 NONE、GZIP、BZ2、XZ、LZMA、SNAPPY_RAW、SNAPPY_FRAMED、Z、DEFLATE、LZ4_BLOCK、LZ4_FRAMED、ORC 和 PARQUET,默认为 NONE,表示非压缩文件,选填;
- list_format: 当文件 (非 JSON ) 的某列是集合结构时(对应图中的 PropertyKey 的 Cardinality 为 Set 或 List),可以用此项设置该列的起始符、分隔符、结束符,复合结构:
- start_symbol: 集合结构列的起始符 (默认值是
[, JSON 格式目前不支持指定) - elem_delimiter: 集合结构列的分隔符 (默认值是
|, JSON 格式目前只支持原生,分隔) - end_symbol: 集合结构列的结束符 (默认值是
], JSON 格式目前不支持指定)
- start_symbol: 集合结构列的起始符 (默认值是
3.3.2.2 HDFS 输入源
上述本地文件输入源的节点及含义这里基本都适用,下面仅列出 HDFS 输入源不一样的和特有的节点。
- type: 输入源类型,必须填 hdfs 或 HDFS,必填;
- path: HDFS 文件或目录的路径,必须是 HDFS 的绝对路径,必填;
- core_site_path: HDFS 集群的 core-site.xml 文件路径,重点要指明 NameNode 的地址(
fs.default.name),以及文件系统的实现(fs.hdfs.impl);
3.3.2.3 JDBC 输入源
前面说到过支持多种关系型数据库,但由于它们的映射结构非常相似,故统称为 JDBC 输入源,然后用vendor节点区分不同的数据库。
- type: 输入源类型,必须填 jdbc 或 JDBC,必填;
- vendor: 数据库类型,可选项为 [MySQL、PostgreSQL、Oracle、SQLServer],不区分大小写,必填;
- driver: jdbc 使用的 driver 类型,必填;
- url: jdbc 要连接的数据库的 url,必填;
- database: 要连接的数据库名,必填;
- schema: 要连接的 schema 名,不同的数据库要求不一样,下面详细说明;
- table: 要连接的表名,
custom_sql和table参数必须填其中一个; - custom_sql: 自定义 SQL 语句,
custom_sql和table参数必须填其中一个; - username: 连接数据库的用户名,必填;
- password: 连接数据库的密码,必填;
- batch_size: 按页获取表数据时的一页的大小,默认为 500,选填;
MYSQL
| 节点 | 固定值或常见值 |
|---|---|
| vendor | MYSQL |
| driver | com.mysql.cj.jdbc.Driver |
| url | jdbc:mysql://127.0.0.1:3306 |
schema: 可空,若填写必须与 database 的值一样
POSTGRESQL
| 节点 | 固定值或常见值 |
|---|---|
| vendor | POSTGRESQL |
| driver | org.postgresql.Driver |
| url | jdbc:postgresql://127.0.0.1:5432 |
schema: 可空,默认值为“public”
ORACLE
| 节点 | 固定值或常见值 |
|---|---|
| vendor | ORACLE |
| driver | oracle.jdbc.driver.OracleDriver |
| url | jdbc:oracle:thin:@127.0.0.1:1521 |
schema: 可空,默认值与用户名相同
SQLSERVER
| 节点 | 固定值或常见值 |
|---|---|
| vendor | SQLSERVER |
| driver | com.microsoft.sqlserver.jdbc.SQLServerDriver |
| url | jdbc:sqlserver://127.0.0.1:1433 |
schema: 必填
3.3.2.4 Kafka 输入源
- type:输入源类型,必须填
kafka或KAFKA,必填; - bootstrap_server:设置 kafka bootstrap server 列表;
- topic:订阅的 topic;
- group:Kafka 消费者组;
- from_beginning:设置是否从头开始读取;
- format:本地文件的格式,可选值为 CSV、TEXT 及 JSON,必须大写,必填;
- header:文件各列的列名,如不指定则会以数据文件第一行作为 header;当文件本身有标题且又指定了 header,文件的第一行会被当作普通的数据行;JSON 文件不需要指定 header,选填;
- delimiter:文件行的列分隔符,默认以逗号”,“作为分隔符,JSON 文件不需要指定,选填;
- charset:文件的编码字符集,默认 UTF-8,选填;
- date_format:自定义的日期格式,默认值为 yyyy-MM-dd HH:mm:ss,选填;如果日期是以时间戳的形式呈现的,此项须写为 timestamp(固定写法);
- extra_date_formats:自定义的其他日期格式列表,默认为空,选填;列表中每一项都是一个 date_format 指定日期格式的备用日期格式;
- time_zone:置日期数据是处于哪个时区的,默认值为 GMT+8,选填;
- skipped_line:想跳过的行,复合结构,目前只能配置要跳过的行的正则表达式,用子节点 regex 描述,默认不跳过任何行,选填;
- early_stop:某次从 Kafka broker 拉取的记录为空,停止任务,默认为 false,仅用于调试,选填;
3.3.2.5 GRAPH 输入源
- type:输入源类型,必须填
graph或GRAPH,必填; - graphspace:源图空间名称,默认为
DEFAULT; - graph: 源图名称,必填;
- username:HugeGraph 用户名;
- password:HugeGraph 密码;
- selected_vertices:要同步的顶点筛选规则;
- ignored_vertices:要忽略的顶点筛选规则;
- selected_edges:要同步的边筛选规则;
- ignored_edges:要忽略的边筛选规则;
- pd-peers:HugeGraph-PD 节点地址;
- meta-endpoints:源集群 Meta服务端点;
- cluster:源集群名称;
- batch_size:批量读取源图数据的批次大小,默认为500;
3.3.3 顶点和边映射
顶点和边映射的节点(JSON 文件中的一个 key)有很多相同的部分,下面先介绍相同部分,再分别介绍顶点映射和边映射的特有节点。
相同部分的节点
- label: 待导入的顶点/边数据所属的
label,必填; - field_mapping: 将输入源列的列名映射为顶点/边的属性名,选填;
- value_mapping: 将输入源的数据值映射为顶点/边的属性值,选填;
- selected: 选择某些列插入,其他未选中的不插入,不能与
ignored同时存在,选填; - ignored: 忽略某些列,使其不参与插入,不能与
selected同时存在,选填; - null_values: 可以指定一些字符串代表空值,比如"NULL”,如果该列对应的顶点/边属性又是一个可空属性,那在构造顶点/边时不会设置该属性的值,选填;
- update_strategies: 如果数据需要按特定方式批量更新时可以对每个属性指定具体的更新策略 (具体见下),选填;
- unfold: 是否将列展开,展开的每一列都会与其他列一起组成一行,相当于是展开成了多行;比如文件的某一列(id 列)的值是
[1,2,3],其他列的值是18,Beijing,当设置了 unfold 之后,这一行就会变成 3 行,分别是:1,18,Beijing,2,18,Beijing和3,18,Beijing。需要注意的是此项只会展开被选作为 id 的列。默认 false,选填;
更新策略支持 8 种 : (需要全大写)
- 数值累加 :
SUM - 两个数字/日期取更大的:
BIGGER - 两个数字/日期取更小:
SMALLER - Set属性取并集:
UNION - Set属性取交集:
INTERSECTION - List属性追加元素:
APPEND - List/Set属性删除元素:
ELIMINATE - 覆盖已有属性:
OVERRIDE
注意: 如果新导入的属性值为空,会采用已有的旧数据而不会采用空值,效果可以参考如下示例
// JSON 文件中以如下方式指定更新策略
{
  "vertices": [
    {
      "label": "person",
      "update_strategies": {
        "age": "SMALLER",
        "set": "UNION"
      },
      "input": {
        "type": "file",
        "path": "vertex_person.txt",
        "format": "TEXT",
        "header": ["name", "age", "set"]
      }
    }
  ]
}

// 1.写入一行带 OVERRIDE 更新策略的数据 (这里 null 代表空)
'a b null null'

// 2.再写一行
'null null c d'

// 3.最后可以得到
'a b c d'

// 如果没有更新策略,则会得到
'null null c d'
注意 : 采用了批量更新的策略后, 磁盘读请求数会大幅上升, 导入速度相比纯写覆盖会慢数倍 (此时HDD磁盘IOPS会成为瓶颈, 建议采用SSD以保证速度)
顶点映射的特有节点
- id: 指定某一列作为顶点的 id 列,当顶点 id 策略为
CUSTOMIZE时,必填;当 id 策略为PRIMARY_KEY时,必须为空;
边映射的特有节点
- source: 选择输入源某几列作为源顶点的 id 列,当源顶点的 id 策略为
CUSTOMIZE时,必须指定某一列作为顶点的 id 列;当源顶点的 id 策略为PRIMARY_KEY时,必须指定一列或多列用于拼接生成顶点的 id,也就是说,不管是哪种 id 策略,此项必填; - target: 指定某几列作为目标顶点的 id 列,与 source 类似,不再赘述;
- unfold_source: 是否展开文件的 source 列,效果与顶点映射中的类似,不再赘述;
- unfold_target: 是否展开文件的 target 列,效果与顶点映射中的类似,不再赘述;
3.4 执行命令导入
准备好图模型、数据文件以及输入源映射关系文件后,接下来就可以将数据文件导入到图数据库中。
导入过程由用户提交的命令控制,用户可以通过不同的参数控制执行的具体流程。
3.4.1 参数说明
| 参数 | 默认值 | 是否必传 | 描述信息 |
|---|---|---|---|
-f 或 --file | Y | 配置脚本的路径 | |
-g 或 --graph | Y | 图名称 | |
--graphspace | DEFAULT | 图空间 | |
-s 或 --schema | Y | schema 文件路径 | |
-h 或 --host 或 -i | localhost | HugeGraphServer 的地址 | |
-p 或 --port | 8080 | HugeGraphServer 的端口号 | |
--username | null | 当 HugeGraphServer 开启了权限认证时,当前图的 username | |
--password | null | 当 HugeGraphServer 开启了权限认证时,当前图的 password | |
--create-graph | false | 是否在图不存在时自动创建 | |
--token | null | 当 HugeGraphServer 开启了权限认证时,当前图的 token | |
--protocol | http | 向服务端发请求的协议,可选 http 或 https | |
--pd-peers | PD 服务节点地址 | ||
--pd-token | 访问 PD 服务的 token | ||
--meta-endpoints | 元信息存储服务地址 | ||
--direct | false | 是否直连 HugeGraph-Store | |
--route-type | NODE_PORT | 路由选择方式(可选值:NODE_PORT / DDS / BOTH) | |
--cluster | hg | 集群名 | |
--trust-store-file | 请求协议为 https 时,客户端的证书文件路径 | ||
--trust-store-password | 请求协议为 https 时,客户端证书密码 | ||
--clear-all-data | false | 导入数据前是否清除服务端的原有数据 | |
--clear-timeout | 240 | 导入数据前清除服务端的原有数据的超时时间 | |
--incremental-mode | false | 是否使用断点续导模式,仅输入源为 FILE 和 HDFS 支持该模式,启用该模式能从上一次导入停止的地方开始导入 | |
--failure-mode | false | 失败模式为 true 时,会导入之前失败了的数据,一般来说失败数据文件需要在人工更正编辑好后,再次进行导入 | |
--batch-insert-threads | CPUs | 批量插入线程池大小 (CPUs 是当前 OS 可用逻辑核个数) | |
--single-insert-threads | 8 | 单条插入线程池的大小 | |
--max-conn | 4 * CPUs | HugeClient 与 HugeGraphServer 的最大 HTTP 连接数,调整线程的时候建议同时调整此项 | |
--max-conn-per-route | 2 * CPUs | HugeClient 与 HugeGraphServer 每个路由的最大 HTTP 连接数,调整线程的时候建议同时调整此项 | |
--batch-size | 500 | 导入数据时每个批次包含的数据条数 | |
--max-parse-errors | 1 | 最多允许多少行数据解析错误,达到该值则程序退出 | |
--max-insert-errors | 500 | 最多允许多少行数据插入错误,达到该值则程序退出 | |
--timeout | 60 | 插入结果返回的超时时间(秒) | |
--shutdown-timeout | 10 | 多线程停止的等待时间(秒) | |
--retry-times | 0 | 发生特定异常时的重试次数 | |
--retry-interval | 10 | 重试之前的间隔时间(秒) | |
--check-vertex | false | 插入边时是否检查边所连接的顶点是否存在 | |
--print-progress | true | 是否在控制台实时打印导入条数 | |
--dry-run | false | 打开该模式,只解析不导入,通常用于测试 | |
--help 或 -help | false | 打印帮助信息 | |
--parser-threads 或 --parallel-count | max(2,CPUS) | 并行读取数据文件最大线程数 | |
--start-file | 0 | 用于部分(分片)导入的起始文件索引 | |
--end-file | -1 | 用于部分导入的截止文件索引 | |
--scatter-sources | false | 分散(并行)读取多个数据源以优化 I/O 性能 | |
--cdc-flush-interval | 30000 | Flink CDC 的数据刷新间隔 | |
--cdc-sink-parallelism | 1 | Flink CDC 写入端(Sink)的并行度 | |
--max-read-errors | 1 | 程序退出前允许的最大读取错误行数 | |
--max-read-lines | -1L | 最大读取行数限制;一旦达到此行数,导入任务将停止 | |
--test-mode | false | 是否开启测试模式 | |
--use-prefilter | false | 是否预先过滤顶点 | |
--short-id | [] | 将自定义 ID 映射为更短的 ID | |
--vertex-edge-limit | -1L | 单个顶点的最大边数限制 | |
--sink-type | true | 是否输出至不同的存储 | |
--vertex-partitions | 64 | HBase 顶点表的预分区数量 | |
--edge-partitions | 64 | HBase 边表的预分区数量 | |
--vertex-table-name | HBase 顶点表名称 | ||
--edge-table-name | HBase 边表名称 | ||
--hbase-zk-quorum | HBase Zookeeper 集群地址 | ||
--hbase-zk-port | HBase Zookeeper 端口号 | ||
--hbase-zk-parent | HBase Zookeeper 根路径 | ||
--restore | false | 将图模式设置为恢复模式 (RESTORING) | |
--backend | hstore | 自动创建图(如果不存在)时的后端存储类型 | |
--serializer | binary | 自动创建图(如果不存在)时的序列化器类型 | |
--scheduler-type | distributed | 自动创建图(如果不存在)时的任务调度器类型 | |
--batch-failure-fallback | true | 批量插入失败时是否回退至单条插入模式 |
3.4.2 断点续导模式
通常情况下,Loader 任务都需要较长时间执行,如果因为某些原因导致导入中断进程退出,而下次希望能从中断的点继续导,这就是使用断点续导的场景。
用户设置命令行参数 –incremental-mode 为 true 即打开了断点续导模式。断点续导的关键在于进度文件,导入进程退出的时候,会把退出时刻的导入进度
记录到进度文件中,进度文件位于 ${struct} 目录下,文件名形如 load-progress ${date} ,${struct} 为映射文件的前缀,${date} 为导入开始
的时刻。比如:在 2019-10-10 12:30:30 开始的一次导入任务,使用的映射文件为 struct-example.json,则进度文件的路径为与 struct-example.json
同级的 struct-example/load-progress 2019-10-10 12:30:30。
注意:进度文件的生成与 –incremental-mode 是否打开无关,每次导入结束都会生成一个进度文件。
如果数据文件格式都是合法的,是用户自己停止(CTRL + C 或 kill,kill -9 不支持)的导入任务,也就是说没有错误记录的情况下,下一次导入只需要设置 为断点续导即可。
但如果是因为太多数据不合法或者网络异常,达到了 –max-parse-errors 或 –max-insert-errors 的限制,Loader 会把这些插入失败的原始行记录到 失败文件中,用户对失败文件中的数据行修改后,设置 –reload-failure 为 true 即可把这些"失败文件"也当作输入源进行导入(不影响正常的文件的导入), 当然如果修改后的数据行仍然有问题,则会被再次记录到失败文件中(不用担心会有重复行)。
每个顶点映射或边映射有数据插入失败时都会产生自己的失败文件,失败文件又分为解析失败文件(后缀 .parse-error)和插入失败文件(后缀 .insert-error),
它们被保存在 ${struct}/current 目录下。比如映射文件中有一个顶点映射 person 和边映射 knows,它们各有一些错误行,当 Loader 退出后,在
${struct}/current 目录下会看到如下文件:
- person-b4cd32ab.parse-error: 顶点映射 person 解析错误的数据
- person-b4cd32ab.insert-error: 顶点映射 person 插入错误的数据
- knows-eb6b2bac.parse-error: 边映射 knows 解析错误的数据
- knows-eb6b2bac.insert-error: 边映射 knows 插入错误的数据
.parse-error 和 .insert-error 并不总是一起存在的,只有存在解析出错的行才会有 .parse-error 文件,只有存在插入出错的行才会有 .insert-error 文件。
3.4.3 logs 目录文件说明
程序执行过程中各日志及错误数据会写入 hugegraph-loader.log 文件中。
3.4.4 执行命令
运行 bin/hugegraph-loader 并传入参数
bin/hugegraph-loader -g {GRAPH_NAME} -f ${INPUT_DESC_FILE} -s ${SCHEMA_FILE} -h {HOST} -p {PORT}
4 完整示例
下面给出的是 hugegraph-loader 包中 example 目录下的例子。(GitHub 地址)
4.1 准备数据
顶点文件:example/file/vertex_person.csv
marko,29,Beijing
vadas,27,Hongkong
josh,32,Beijing
peter,35,Shanghai
"li,nary",26,"Wu,han"
tom,null,NULL
顶点文件:example/file/vertex_software.txt
id|name|lang|price|ISBN
1|lop|java|328|ISBN978-7-107-18618-5
2|ripple|java|199|ISBN978-7-100-13678-5
边文件:example/file/edge_knows.json
{"source_name": "marko", "target_name": "vadas", "date": "20160110", "weight": 0.5}
{"source_name": "marko", "target_name": "josh", "date": "20130220", "weight": 1.0}
边文件:example/file/edge_created.json
{"aname": "marko", "bname": "lop", "date": "20171210", "weight": 0.4}
{"aname": "josh", "bname": "lop", "date": "20091111", "weight": 0.4}
{"aname": "josh", "bname": "ripple", "date": "20171210", "weight": 1.0}
{"aname": "peter", "bname": "lop", "date": "20170324", "weight": 0.2}
4.2 编写 schema
点击展开/折叠 schema 文件:example/file/schema.groovy
schema.propertyKey("name").asText().ifNotExist().create();
schema.propertyKey("age").asInt().ifNotExist().create();
schema.propertyKey("city").asText().ifNotExist().create();
schema.propertyKey("weight").asDouble().ifNotExist().create();
schema.propertyKey("lang").asText().ifNotExist().create();
schema.propertyKey("date").asText().ifNotExist().create();
schema.propertyKey("price").asDouble().ifNotExist().create();

schema.vertexLabel("person").properties("name", "age", "city").primaryKeys("name").ifNotExist().create();
schema.vertexLabel("software").properties("name", "lang", "price").primaryKeys("name").ifNotExist().create();

schema.indexLabel("personByAge").onV("person").by("age").range().ifNotExist().create();
schema.indexLabel("personByCity").onV("person").by("city").secondary().ifNotExist().create();
schema.indexLabel("personByAgeAndCity").onV("person").by("age", "city").secondary().ifNotExist().create();
schema.indexLabel("softwareByPrice").onV("software").by("price").range().ifNotExist().create();

schema.edgeLabel("knows").sourceLabel("person").targetLabel("person").properties("date", "weight").ifNotExist().create();
schema.edgeLabel("created").sourceLabel("person").targetLabel("software").properties("date", "weight").ifNotExist().create();

schema.indexLabel("createdByDate").onE("created").by("date").secondary().ifNotExist().create();
schema.indexLabel("createdByWeight").onE("created").by("weight").range().ifNotExist().create();
schema.indexLabel("knowsByWeight").onE("knows").by("weight").range().ifNotExist().create();
4.3 编写输入源映射文件example/file/struct.json
点击展开/折叠 源映射文件 example/file/struct.json
{
  "vertices": [
    {
      "label": "person",
      "input": {
        "type": "file",
        "path": "example/file/vertex_person.csv",
        "format": "CSV",
        "header": ["name", "age", "city"],
        "charset": "UTF-8",
        "skipped_line": {
          "regex": "(^#|^//).*"
        }
      },
      "null_values": ["NULL", "null", ""]
    },
    {
      "label": "software",
      "input": {
        "type": "file",
        "path": "example/file/vertex_software.txt",
        "format": "TEXT",
        "delimiter": "|",
        "charset": "GBK"
      },
      "id": "id",
      "ignored": ["ISBN"]
    }
  ],
  "edges": [
    {
      "label": "knows",
      "source": ["source_name"],
      "target": ["target_name"],
      "input": {
        "type": "file",
        "path": "example/file/edge_knows.json",
        "format": "JSON",
        "date_format": "yyyyMMdd"
      },
      "field_mapping": {
        "source_name": "name",
        "target_name": "name"
      }
    },
    {
      "label": "created",
      "source": ["source_name"],
      "target": ["target_id"],
      "input": {
        "type": "file",
        "path": "example/file/edge_created.json",
        "format": "JSON",
        "date_format": "yyyy-MM-dd"
      },
      "field_mapping": {
        "source_name": "name"
      }
    }
  ]
}
4.4 执行命令导入
sh bin/hugegraph-loader.sh -g hugegraph -f example/file/struct.json -s example/file/schema.groovy
导入结束后,会出现类似如下统计信息:
vertices/edges has been loaded this time : 8/6
--------------------------------------------------
count metrics
     input read success            : 14
     input read failure            : 0
     vertex parse success          : 8
     vertex parse failure          : 0
     vertex insert success         : 8
     vertex insert failure         : 0
     edge parse success            : 6
     edge parse failure            : 0
     edge insert success           : 6
     edge insert failure           : 0
4.5 使用 docker 导入
4.5.1 使用 docker exec 直接导入数据
4.5.1.1 数据准备
如果仅仅尝试使用 loader, 我们可以使用内置的 example 数据集进行导入,无需自己额外准备数据
如果使用自定义的数据,则在使用 loader 导入数据之前,我们需要将数据复制到容器内部。
首先我们可以根据 4.1-4.3 的步骤准备数据,将准备好的数据通过 docker cp 复制到 loader 容器内部。
假设我们已经按照上述的步骤准备好了对应的数据集,存放在 hugegraph-dataset 文件夹下,文件结构如下:
tree -f hugegraph-dataset/

hugegraph-dataset
├── hugegraph-dataset/edge_created.json
├── hugegraph-dataset/edge_knows.json
├── hugegraph-dataset/schema.groovy
├── hugegraph-dataset/struct.json
├── hugegraph-dataset/vertex_person.csv
└── hugegraph-dataset/vertex_software.txt
将文件复制到容器内部
docker cp hugegraph-dataset loader:/loader/dataset
docker exec -it loader ls /loader/dataset

edge_created.json  edge_knows.json  schema.groovy  struct.json  vertex_person.csv  vertex_software.txt
4.5.1.2 数据导入
以内置的 example 数据集为例,我们可以使用以下的命令对数据进行导入。
如果需要导入自己准备的数据集,则只需要修改 -f 配置脚本的路径 以及 -s schema 文件路径即可。
其他的参数可以参照 3.4.1 参数说明
docker exec -it loader bin/hugegraph-loader.sh -g hugegraph -f example/file/struct.json -s example/file/schema.groovy -h server -p 8080
如果导入用户自定义的数据集,按照刚才的例子,则使用:
docker exec -it loader bin/hugegraph-loader.sh -g hugegraph -f /loader/dataset/struct.json -s /loader/dataset/schema.groovy -h server -p 8080
如果
loader和server位于同一 docker 网络,则可以指定-h {server_container_name}, 否则需要指定server的宿主机的 ip (在我们的例子中,server_container_name为server).
然后我们可以观察到结果:
HugeGraphLoader worked in NORMAL MODE
vertices/edges loaded this time : 8/6
--------------------------------------------------
count metrics
    input read success            : 14
    input read failure            : 0
    vertex parse success          : 8
    vertex parse failure          : 0
    vertex insert success         : 8
    vertex insert failure         : 0
    edge parse success            : 6
    edge parse failure            : 0
    edge insert success           : 6
    edge insert failure           : 0
--------------------------------------------------
meter metrics
    total time                    : 0.199s
    read time                     : 0.046s
    load time                     : 0.153s
    vertex load time              : 0.077s
    vertex load rate(vertices/s)  : 103
    edge load time                : 0.112s
    edge load rate(edges/s)       : 53
也可以使用 curl 或者 hubble观察导入结果,此处以 curl 为例:
> curl "http://localhost:8080/graphs/hugegraph/graph/vertices" | gunzip
{"vertices":[{"id":1,"label":"software","type":"vertex","properties":{"name":"lop","lang":"java","price":328.0}},{"id":2,"label":"software","type":"vertex","properties":{"name":"ripple","lang":"java","price":199.0}},{"id":"1:tom","label":"person","type":"vertex","properties":{"name":"tom"}},{"id":"1:josh","label":"person","type":"vertex","properties":{"name":"josh","age":32,"city":"Beijing"}},{"id":"1:marko","label":"person","type":"vertex","properties":{"name":"marko","age":29,"city":"Beijing"}},{"id":"1:peter","label":"person","type":"vertex","properties":{"name":"peter","age":35,"city":"Shanghai"}},{"id":"1:vadas","label":"person","type":"vertex","properties":{"name":"vadas","age":27,"city":"Hongkong"}},{"id":"1:li,nary","label":"person","type":"vertex","properties":{"name":"li,nary","age":26,"city":"Wu,han"}}]}
如果想检查边的导入结果,可以使用 curl "http://localhost:8080/graphs/hugegraph/graph/edges" | gunzip
4.5.2 进入 docker 容器进行导入
除了直接使用 docker exec 导入数据,我们也可以进入容器进行数据导入,基本流程与 4.5.1 相同
使用 docker exec -it loader bash进入容器内部,并执行命令
sh bin/hugegraph-loader.sh -g hugegraph -f example/file/struct.json -s example/file/schema.groovy -h server -p 8080
执行的结果如 4.5.1 所示
4.6 使用 spark-loader 导入
Spark 版本:Spark 3+,其他版本未测试。 HugeGraph Toolchain 版本:toolchain-1.0.0
spark-loader 的参数分为两部分,注意:因二者参数名缩写存在重合部分,请使用参数全称。两种参数之间无需保证先后顺序。
- hugegraph 参数(参考:hugegraph-loader 参数说明 )
- Spark 任务提交参数(参考:Submitting Applications)
示例:
sh bin/hugegraph-spark-loader.sh --master yarn \
--deploy-mode cluster --name spark-hugegraph-loader --file ./hugegraph.json \
--username admin --token admin --host xx.xx.xx.xx --port 8093 \
--graph graph-test --num-executors 6 --executor-cores 16 --executor-memory 15g
2.3 - HugeGraph-Tools Quick Start
1 HugeGraph-Tools概述
HugeGraph-Tools 是 HugeGraph 的自动化部署、管理和备份/还原组件。
测试指南:如需在本地运行 Tools 测试,请参考 工具链本地测试指南
2 获取 HugeGraph-Tools
有两种方式可以获取 HugeGraph-Tools:(它被包含子 Toolchain 中)
- 下载二进制tar包
- 下载源码编译安装
2.1 下载二进制tar包
下载最新版本的 HugeGraph-Toolchain 包, 然后进入 tools 子目录
wget https://downloads.apache.org/hugegraph/1.0.0/apache-hugegraph-toolchain-incubating-1.0.0.tar.gz
tar zxf *hugegraph*.tar.gz
2.2 下载源码编译安装
源码编译前请确保安装了wget命令
下载最新版本的 HugeGraph-Toolchain 源码包, 然后根目录编译或者单独编译 tool 子模块:
# 1. get from github
git clone https://github.com/apache/hugegraph-toolchain.git

# 2. get from direct  (e.g. here is 1.0.0, please choose the latest version)
wget https://downloads.apache.org/hugegraph/1.0.0/apache-hugegraph-toolchain-incubating-1.0.0-src.tar.gz
编译生成 tar 包:
cd hugegraph-tools
mvn package -DskipTests
生成 tar 包 hugegraph-tools-${version}.tar.gz
3 使用
3.1 功能概览
解压后,进入 hugegraph-tools 目录,可以使用bin/hugegraph或者bin/hugegraph help来查看 usage 信息。主要分为:
- 图管理类,graph-mode-set、graph-mode-get、graph-list、graph-get、graph-clear、graph-create、graph-clone 和 graph-drop
- 异步任务管理类,task-list、task-get、task-delete、task-cancel 和 task-clear
- Gremlin类,gremlin-execute 和 gremlin-schedule
- 备份/恢复类,backup、restore、migrate、schedule-backup 和 dump
- 认证数据备份/恢复类,auth-backup 和 auth-restore
- 安装部署类,deploy、clear、start-all 和 stop-all
Usage: hugegraph [options] [command] [command options]
3.2 [options]-全局变量
options是 HugeGraph-Tools 的全局变量,可以在 hugegraph-tools/bin/hugegraph 中配置,包括:
- –graph,HugeGraph-Tools 操作的图的名字,默认值是 hugegraph
- –url,HugeGraph-Server 的服务地址,默认是 http://127.0.0.1:8080
- –user,当 HugeGraph-Server 开启认证时,传递用户名
- –password,当 HugeGraph-Server 开启认证时,传递用户的密码
- –timeout,连接 HugeGraph-Server 时的超时时间,默认是 30s
- –trust-store-file,证书文件的路径,当 –url 使用 https 时,HugeGraph-Client 使用的 truststore 文件,默认为空,代表使用 hugegraph-tools 内置的 truststore 文件 conf/hugegraph.truststore
- –trust-store-password,证书文件的密码,当 –url 使用 https 时,HugeGraph-Client 使用的 truststore 的密码,默认为空,代表使用 hugegraph-tools 内置的 truststore 文件的密码
上述全局变量,也可以通过环境变量来设置。一种方式是在命令行使用 export 设置临时环境变量,在该命令行关闭之前均有效
| 全局变量 | 环境变量 | 示例 |
|---|---|---|
| –url | HUGEGRAPH_URL | export HUGEGRAPH_URL=http://127.0.0.1:8080 |
| –graph | HUGEGRAPH_GRAPH | export HUGEGRAPH_GRAPH=hugegraph |
| –user | HUGEGRAPH_USERNAME | export HUGEGRAPH_USERNAME=admin |
| –password | HUGEGRAPH_PASSWORD | export HUGEGRAPH_PASSWORD=test |
| –timeout | HUGEGRAPH_TIMEOUT | export HUGEGRAPH_TIMEOUT=30 |
| –trust-store-file | HUGEGRAPH_TRUST_STORE_FILE | export HUGEGRAPH_TRUST_STORE_FILE=/tmp/trust-store |
| –trust-store-password | HUGEGRAPH_TRUST_STORE_PASSWORD | export HUGEGRAPH_TRUST_STORE_PASSWORD=xxxx |
另一种方式是在 bin/hugegraph 脚本中设置环境变量:
#!/bin/bash

# Set environment here if needed
#export HUGEGRAPH_URL=
#export HUGEGRAPH_GRAPH=
#export HUGEGRAPH_USERNAME=
#export HUGEGRAPH_PASSWORD=
#export HUGEGRAPH_TIMEOUT=
#export HUGEGRAPH_TRUST_STORE_FILE=
#export HUGEGRAPH_TRUST_STORE_PASSWORD=
3.3 图管理类,graph-mode-set、graph-mode-get、graph-list、graph-get、graph-clear、graph-create、graph-clone和graph-drop
- graph-mode-set,设置图的 restore mode
- –graph-mode 或者 -m,必填项,指定将要设置的模式,合法值包括 [NONE, RESTORING, MERGING, LOADING]
- graph-mode-get,获取图的 restore mode
- graph-list,列出某个 HugeGraph-Server 中全部的图
- graph-get,获取某个图及其存储后端类型
- graph-clear,清除某个图的全部 schema 和 data
- –confirm-message 或者 -c,必填项,删除确认信息,需要手动输入,二次确认防止误删,“I’m sure to delete all data”,包括双引号
- graph-create,使用配置文件创建新图
- –name 或者 -n,选填项,新图的名称,默认为 hugegraph
- –file 或者 -f,必填项,图配置文件的路径
- graph-clone,克隆已存在的图
- –name 或者 -n,选填项,新克隆图的名称,默认为 hugegraph
- –clone-graph-name,选填项,要克隆的源图名称,默认为 hugegraph
- graph-drop,删除图(不同于 graph-clear,这会完全删除图)
- –confirm-message 或者 -c,必填项,确认消息 “I’m sure to drop the graph”,包括双引号
当需要把备份的图原样恢复到一个新的图中的时候,需要先将图模式设置为 RESTORING 模式;当需要将备份的图合并到已存在的图中时,需要先将图模式设置为 MERGING 模式。
3.4 异步任务管理类,task-list、task-get和task-delete
- task-list,列出某个图中的异步任务,可以根据任务的状态过滤
- –status,选填项,指定要查看的任务的状态,即按状态过滤任务
- –limit,选填项,指定要获取的任务的数目,默认为 -1,意思为获取全部符合条件的任务
- task-get,获取某个异步任务的详细信息
- –task-id,必填项,指定异步任务的 ID
- task-delete,删除某个异步任务的信息
- –task-id,必填项,指定异步任务的 ID
- task-cancel,取消某个异步任务的执行
- –task-id,要取消的异步任务的 ID
- task-clear,清理完成的异步任务
- –force,选填项,设置时,表示清理全部异步任务,未执行完成的先取消,然后清除所有异步任务。默认只清理已完成的异步任务
3.5 Gremlin类,gremlin-execute和gremlin-schedule
- gremlin-execute,发送 Gremlin 语句到 HugeGraph-Server 来执行查询或修改操作,同步执行,结束后返回结果
- –file 或者 -f,指定要执行的脚本文件,UTF-8编码,与 –script 互斥
- –script 或者 -s,指定要执行的脚本字符串,与 –file 互斥
- –aliases 或者 -a,Gremlin 别名设置,格式为:key1=value1,key2=value2,…
- –bindings 或者 -b,Gremlin 绑定设置,格式为:key1=value1,key2=value2,…
- –language 或者 -l,Gremlin 脚本的语言,默认为 gremlin-groovy
–file 和 –script 二者互斥,必须设置其中之一
- gremlin-schedule,发送 Gremlin 语句到 HugeGraph-Server 来执行查询或修改操作,异步执行,任务提交后立刻返回异步任务id
- –file 或者 -f,指定要执行的脚本文件,UTF-8编码,与 –script 互斥
- –script 或者 -s,指定要执行的脚本字符串,与 –file 互斥
- –bindings 或者 -b,Gremlin 绑定设置,格式为:key1=value1,key2=value2,…
- –language 或者 -l,Gremlin 脚本的语言,默认为 gremlin-groovy
–file 和 –script 二者互斥,必须设置其中之一
3.6 备份/恢复类
- backup,将某张图中的 schema 或者 data 备份到 HugeGraph 系统之外,以 JSON 形式存在本地磁盘或者 HDFS
- –format,备份的格式,可选值包括 [json, text],默认为 json
- –all-properties,是否备份顶点/边全部的属性,仅在 –format 为 text 是有效,默认 false
- –label,要备份的顶点/边的类型,仅在 –format 为 text 是有效,只有备份顶点或者边的时候有效
- –properties,要备份的顶点/边的属性,逗号分隔,仅在 –format 为 text 是有效,只有备份顶点或者边的时候有效
- –compress,备份时是否压缩数据,默认为 true
- –directory 或者 -d,存储 schema 或者 data 的目录,本地目录时,默认为’./{graphName}’,HDFS 时,默认为 ‘{fs.default.name}/{graphName}’
- –huge-types 或者 -t,要备份的数据类型,逗号分隔,可选值为 ‘all’ 或者 一个或多个 [vertex,edge,vertex_label,edge_label,property_key,index_label] 的组合,‘all’ 代表全部6种类型,即顶点、边和所有schema
- –log 或者 -l,指定日志目录,默认为当前目录
- –retry,指定失败重试次数,默认为 3
- –thread-num 或者 -T,使用的线程数,默认为 Math.min(10, Math.max(4, CPUs / 2))
- –split-size 或者 -s,指定在备份时对顶点或者边分块的大小,默认为 1048576
- -D,用 -Dkey=value 的模式指定动态参数,用来备份数据到 HDFS 时,指定 HDFS 的配置项,例如:-Dfs.default.name=hdfs://localhost:9000
- restore,将 JSON 格式存储的 schema 或者 data 恢复到一个新图中(RESTORING 模式)或者合并到已存在的图中(MERGING 模式)
- –directory 或者 -d,存储 schema 或者 data 的目录,本地目录时,默认为’./{graphName}’,HDFS 时,默认为 ‘{fs.default.name}/{graphName}’
- –clean,是否在恢复图完成后删除 –directory 指定的目录,默认为 false
- –huge-types 或者 -t,要恢复的数据类型,逗号分隔,可选值为 ‘all’ 或者 一个或多个 [vertex,edge,vertex_label,edge_label,property_key,index_label] 的组合,‘all’ 代表全部6种类型,即顶点、边和所有schema
- –log 或者 -l,指定日志目录,默认为当前目录
- –retry,指定失败重试次数,默认为 3
- –thread-num 或者 -T,使用的线程数,默认为 Math.min(10, Math.max(4, CPUs / 2))
- -D,用 -Dkey=value 的模式指定动态参数,用来从 HDFS 恢复图时,指定 HDFS 的配置项,例如:-Dfs.default.name=hdfs://localhost:9000
只有当 –format 为 json 执行 backup 时,才可以使用 restore 命令恢复
- migrate, 将当前连接的图迁移至另一个 HugeGraphServer 中
- –target-graph,目标图的名字,默认为 hugegraph
- –target-url,目标图所在的 HugeGraphServer,默认为 http://127.0.0.1:8081
- –target-username,访问目标图的用户名
- –target-password,访问目标图的密码
- –target-timeout,访问目标图的超时时间
- –target-trust-store-file,访问目标图使用的 truststore 文件
- –target-trust-store-password,访问目标图使用的 truststore 的密码
- –directory 或者 -d,迁移过程中,存储源图的 schema 或者 data 的目录,本地目录时,默认为’./{graphName}’,HDFS 时,默认为 ‘{fs.default.name}/{graphName}’
- –huge-types 或者 -t,要迁移的数据类型,逗号分隔,可选值为 ‘all’ 或者 一个或多个 [vertex,edge,vertex_label,edge_label,property_key,index_label] 的组合,‘all’ 代表全部6种类型,即顶点、边和所有schema
- –log 或者 -l,指定日志目录,默认为当前目录
- –retry,指定失败重试次数,默认为 3
- –split-size 或者 -s,指定迁移过程中对源图进行备份时顶点或者边分块的大小,默认为 1048576
- -D,用 -Dkey=value 的模式指定动态参数,用来在迁移图过程中需要备份数据到 HDFS 时,指定 HDFS 的配置项,例如:-Dfs.default.name=hdfs://localhost:9000
- –graph-mode 或者 -m,将源图恢复到目标图时将目标图设置的模式,合法值包括 [RESTORING, MERGING]
- –keep-local-data,是否保留在迁移图的过程中产生的源图的备份,默认为 false,即默认迁移图结束后不保留产生的源图备份
- schedule-backup,周期性对图执行备份操作,并保留一定数目的最新备份(目前仅支持本地文件系统)
- –directory 或者 -d,必填项,指定备份数据的目录
- –backup-num,选填项,指定保存的最新的备份的数目,默认为 3
- –interval,选填项,指定进行备份的周期,格式同 Linux crontab 格式
- dump,把整张图的顶点和边全部导出,默认以
vertex vertex-edge1 vertex-edge2...JSON格式存储。 用户也可以自定义存储格式,只需要在hugegraph-tools/src/main/java/com/baidu/hugegraph/formatter目录下实现一个继承自Formatter的类,例如CustomFormatter,使用时指定该类为formatter即可,例如bin/hugegraph dump -f CustomFormatter- –formatter 或者 -f,指定使用的 formatter,默认为 JsonFormatter
- –directory 或者 -d,存储 schema 或者 data 的目录,默认为当前目录
- –log 或者 -l,指定日志目录,默认为当前目录
- –retry,指定失败重试次数,默认为 3
- –split-size 或者 -s,指定在备份时对顶点或者边分块的大小,默认为 1048576
- -D,用 -Dkey=value 的模式指定动态参数,用来备份数据到 HDFS 时,指定 HDFS 的配置项,例如:-Dfs.default.name=hdfs://localhost:9000
3.7 认证数据备份/恢复类
- auth-backup,备份认证数据到指定目录
- –types 或者 -t,要备份的认证数据类型,逗号分隔,可选值为 ‘all’ 或者一个或多个 [user, group, target, belong, access] 的组合,‘all’ 代表全部5种类型
- –directory 或者 -d,备份数据存储目录,默认为当前目录
- –log 或者 -l,指定日志目录,默认为当前目录
- –retry,指定失败重试次数,默认为 3
- –thread-num 或者 -T,使用的线程数,默认为 Math.min(10, Math.max(4, CPUs / 2))
- -D,用 -Dkey=value 的模式指定动态参数,用来备份数据到 HDFS 时,指定 HDFS 的配置项,例如:-Dfs.default.name=hdfs://localhost:9000
- auth-restore,从指定目录恢复认证数据
- –types 或者 -t,要恢复的认证数据类型,逗号分隔,可选值为 ‘all’ 或者一个或多个 [user, group, target, belong, access] 的组合,‘all’ 代表全部5种类型
- –directory 或者 -d,备份数据存储目录,默认为当前目录
- –log 或者 -l,指定日志目录,默认为当前目录
- –retry,指定失败重试次数,默认为 3
- –thread-num 或者 -T,使用的线程数,默认为 Math.min(10, Math.max(4, CPUs / 2))
- –strategy,冲突处理策略,可选值为 [stop, ignore],默认为 stop。stop 表示遇到冲突时停止恢复,ignore 表示忽略冲突继续恢复
- –init-password,恢复用户时设置的初始密码,恢复用户数据时必填
- -D,用 -Dkey=value 的模式指定动态参数,用来从 HDFS 恢复数据时,指定 HDFS 的配置项,例如:-Dfs.default.name=hdfs://localhost:9000
3.8 安装部署类
- deploy,一键下载、安装和启动 HugeGraph-Server 和 HugeGraph-Studio
- -v,必填项,指明安装的 HugeGraph-Server 和 HugeGraph-Studio 的版本号,最新的是 0.9
- -p,必填项,指定安装的 HugeGraph-Server 和 HugeGraph-Studio 目录
- -u,选填项,指定下载 HugeGraph-Server 和 HugeGraph-Studio 压缩包的链接
- clear,清理 HugeGraph-Server 和 HugeGraph-Studio 目录和tar包
- -p,必填项,指定要清理的 HugeGraph-Server 和 HugeGraph-Studio 的目录
- start-all,一键启动 HugeGraph-Server 和 HugeGraph-Studio,并启动监控,服务死掉时自动拉起服务
- -v,必填项,指明要启动的 HugeGraph-Server 和 HugeGraph-Studio 的版本号,最新的是 0.9
- -p,必填项,指定安装了 HugeGraph-Server 和 HugeGraph-Studio 的目录
- stop-all,一键关闭 HugeGraph-Server 和 HugeGraph-Studio
deploy命令中有可选参数 -u,提供时会使用指定的下载地址替代默认下载地址下载 tar 包,并且将地址写入
~/hugegraph-download-url-prefix文件中;之后如果不指定地址时,会优先从~/hugegraph-download-url-prefix指定的地址下载 tar 包;如果 -u 和~/hugegraph-download-url-prefix都没有时,会从默认下载地址进行下载
3.9 具体命令参数
各子命令的具体参数如下:
Usage: hugegraph [options] [command] [command options]
  Options:
    --graph
      Name of graph
      Default: hugegraph
    --password
      Password of user
    --timeout
      Connection timeout
      Default: 30
    --trust-store-file
      The path of client truststore file used when https protocol is enabled
    --trust-store-password
      The password of the client truststore file used when the https protocol
      is enabled
    --url
      The URL of HugeGraph-Server
      Default: http://127.0.0.1:8080
    --user
      Name of user
  Commands:
    graph-list      List all graphs
      Usage: graph-list

    graph-get      Get graph info
      Usage: graph-get

    graph-clear      Clear graph schema and data
      Usage: graph-clear [options]
        Options:
        * --confirm-message, -c
            Confirm message of graph clear is "I'm sure to delete all data".
            (Note: include "")

    graph-mode-set      Set graph mode
      Usage: graph-mode-set [options]
        Options:
        * --graph-mode, -m
            Graph mode, include: [NONE, RESTORING, MERGING]
            Possible Values: [NONE, RESTORING, MERGING, LOADING]

    graph-mode-get      Get graph mode
      Usage: graph-mode-get

    task-list      List tasks
      Usage: task-list [options]
        Options:
          --limit
            Limit number, no limit if not provided
            Default: -1
          --status
            Status of task

    task-get      Get task info
      Usage: task-get [options]
        Options:
        * --task-id
            Task id
            Default: 0

    task-delete      Delete task
      Usage: task-delete [options]
        Options:
        * --task-id
            Task id
            Default: 0

    task-cancel      Cancel task
      Usage: task-cancel [options]
        Options:
        * --task-id
            Task id
            Default: 0

    task-clear      Clear completed tasks
      Usage: task-clear [options]
        Options:
          --force
            Force to clear all tasks, cancel all uncompleted tasks firstly,
            and delete all completed tasks
            Default: false

    gremlin-execute      Execute Gremlin statements
      Usage: gremlin-execute [options]
        Options:
          --aliases, -a
            Gremlin aliases, valid format is: 'key1=value1,key2=value2...'
            Default: {}
          --bindings, -b
            Gremlin bindings, valid format is: 'key1=value1,key2=value2...'
            Default: {}
          --file, -f
            Gremlin Script file to be executed, UTF-8 encoded, exclusive to
            --script
          --language, -l
            Gremlin script language
            Default: gremlin-groovy
          --script, -s
            Gremlin script to be executed, exclusive to --file

    gremlin-schedule      Execute Gremlin statements as asynchronous job
      Usage: gremlin-schedule [options]
        Options:
          --bindings, -b
            Gremlin bindings, valid format is: 'key1=value1,key2=value2...'
            Default: {}
          --file, -f
            Gremlin Script file to be executed, UTF-8 encoded, exclusive to
            --script
          --language, -l
            Gremlin script language
            Default: gremlin-groovy
          --script, -s
            Gremlin script to be executed, exclusive to --file

    backup      Backup graph schema/data. If directory is on HDFS, use -D to
            set HDFS params. For exmaple:
            -Dfs.default.name=hdfs://localhost:9000
      Usage: backup [options]
        Options:
          --all-properties
            All properties to be backup flag
            Default: false
          --compress
            compress flag
            Default: true
          --directory, -d
            Directory of graph schema/data, default is './{graphname}' in
            local file system or '{fs.default.name}/{graphname}' in HDFS
          --format
            File format, valid is [json, text]
            Default: json
          --huge-types, -t
            Type of schema/data. Concat with ',' if more than one. 'all' means
            all vertices, edges and schema, in other words, 'all' equals with
            'vertex,edge,vertex_label,edge_label,property_key,index_label'
            Default: [PROPERTY_KEY, VERTEX_LABEL, EDGE_LABEL, INDEX_LABEL, VERTEX, EDGE]
          --label
            Vertex or edge label, only valid when type is vertex or edge
          --log, -l
            Directory of log
            Default: ./logs
          --properties
            Vertex or edge properties to backup, only valid when type is
            vertex or edge
            Default: []
          --retry
            Retry times, default is 3
            Default: 3
          --split-size, -s
            Split size of shard
            Default: 1048576
          -D
            HDFS config parameters
            Syntax: -Dkey=value
            Default: {}

    schedule-backup      Schedule backup task
      Usage: schedule-backup [options]
        Options:
          --backup-num
            The number of latest backups to keep
            Default: 3
        * --directory, -d
            The directory of backups stored
          --interval
            The interval of backup, format is: "a b c d e". 'a' means minute
            (0 - 59), 'b' means hour (0 - 23), 'c' means day of month (1 -
            31), 'd' means month (1 - 12), 'e' means day of week (0 - 6)
            (Sunday=0), "*" means all
            Default: "0 0 * * *"

    dump      Dump graph to files
      Usage: dump [options]
        Options:
          --directory, -d
            Directory of graph schema/data, default is './{graphname}' in
            local file system or '{fs.default.name}/{graphname}' in HDFS
          --formatter, -f
            Formatter to customize format of vertex/edge
            Default: JsonFormatter
          --log, -l
            Directory of log
            Default: ./logs
          --retry
            Retry times, default is 3
            Default: 3
          --split-size, -s
            Split size of shard
            Default: 1048576
          -D
            HDFS config parameters
            Syntax: -Dkey=value
            Default: {}

    restore      Restore graph schema/data. If directory is on HDFS, use -D to
            set HDFS params if needed. For
            exmaple:-Dfs.default.name=hdfs://localhost:9000
      Usage: restore [options]
        Options:
          --clean
            Whether to remove the directory of graph data after restored
            Default: false
          --directory, -d
            Directory of graph schema/data, default is './{graphname}' in
            local file system or '{fs.default.name}/{graphname}' in HDFS
          --huge-types, -t
            Type of schema/data. Concat with ',' if more than one. 'all' means
            all vertices, edges and schema, in other words, 'all' equals with
            'vertex,edge,vertex_label,edge_label,property_key,index_label'
            Default: [PROPERTY_KEY, VERTEX_LABEL, EDGE_LABEL, INDEX_LABEL, VERTEX, EDGE]
          --log, -l
            Directory of log
            Default: ./logs
          --retry
            Retry times, default is 3
            Default: 3
          -D
            HDFS config parameters
            Syntax: -Dkey=value
            Default: {}

    migrate      Migrate graph
      Usage: migrate [options]
        Options:
          --directory, -d
            Directory of graph schema/data, default is './{graphname}' in
            local file system or '{fs.default.name}/{graphname}' in HDFS
          --graph-mode, -m
            Mode used when migrating to target graph, include: [RESTORING,
            MERGING]
            Default: RESTORING
            Possible Values: [NONE, RESTORING, MERGING, LOADING]
          --huge-types, -t
            Type of schema/data. Concat with ',' if more than one. 'all' means
            all vertices, edges and schema, in other words, 'all' equals with
            'vertex,edge,vertex_label,edge_label,property_key,index_label'
            Default: [PROPERTY_KEY, VERTEX_LABEL, EDGE_LABEL, INDEX_LABEL, VERTEX, EDGE]
          --keep-local-data
            Whether to keep the local directory of graph data after restored
            Default: false
          --log, -l
            Directory of log
            Default: ./logs
          --retry
            Retry times, default is 3
            Default: 3
          --split-size, -s
            Split size of shard
            Default: 1048576
          --target-graph
            The name of target graph to migrate
            Default: hugegraph
          --target-password
            The password of target graph to migrate
          --target-timeout
            The timeout to connect target graph to migrate
            Default: 0
          --target-trust-store-file
            The trust store file of target graph to migrate
          --target-trust-store-password
            The trust store password of target graph to migrate
          --target-url
            The url of target graph to migrate
            Default: http://127.0.0.1:8081
          --target-user
            The username of target graph to migrate
          -D
            HDFS config parameters
            Syntax: -Dkey=value
            Default: {}

    deploy      Install HugeGraph-Server and HugeGraph-Studio
      Usage: deploy [options]
        Options:
        * -p
            Install path of HugeGraph-Server and HugeGraph-Studio
          -u
            Download url prefix path of HugeGraph-Server and HugeGraph-Studio
        * -v
            Version of HugeGraph-Server and HugeGraph-Studio

    start-all      Start HugeGraph-Server and HugeGraph-Studio
      Usage: start-all [options]
        Options:
        * -p
            Install path of HugeGraph-Server and HugeGraph-Studio
        * -v
            Version of HugeGraph-Server and HugeGraph-Studio

    clear      Clear HugeGraph-Server and HugeGraph-Studio
      Usage: clear [options]
        Options:
        * -p
            Install path of HugeGraph-Server and HugeGraph-Studio

    stop-all      Stop HugeGraph-Server and HugeGraph-Studio
      Usage: stop-all

    help      Print usage
      Usage: help
3.10 具体命令示例
1. gremlin语句
# 同步执行gremlin
./bin/hugegraph --url http://127.0.0.1:8080 --graph hugegraph gremlin-execute --script 'g.V().count()'

# 异步执行gremlin
./bin/hugegraph --url http://127.0.0.1:8080 --graph hugegraph gremlin-schedule --script 'g.V().count()'
2. 查看task情况
./bin/hugegraph --url http://127.0.0.1:8080 --graph hugegraph task-list

./bin/hugegraph --url http://127.0.0.1:8080 --graph hugegraph task-list --limit 5

./bin/hugegraph --url http://127.0.0.1:8080 --graph hugegraph task-list --status success
3. 图模式查看和设置
./bin/hugegraph --url http://127.0.0.1:8080 --graph hugegraph graph-mode-set -m RESTORING MERGING NONE

./bin/hugegraph --url http://127.0.0.1:8080 --graph hugegraph graph-mode-set -m RESTORING

./bin/hugegraph --url http://127.0.0.1:8080 --graph hugegraph graph-mode-get

./bin/hugegraph --url http://127.0.0.1:8080 --graph hugegraph graph-list
4. 清理图
./bin/hugegraph --url http://127.0.0.1:8080 --graph hugegraph graph-clear -c "I'm sure to delete all data"
5. 图备份
./bin/hugegraph --url http://127.0.0.1:8080 --graph hugegraph backup -t all --directory ./backup-test
6. 周期性的备份
./bin/hugegraph --url http://127.0.0.1:8080 --graph hugegraph --interval */2 * * * * schedule-backup -d ./backup-0.10.2
7. 图恢复
# 设置图模式
./bin/hugegraph --url http://127.0.0.1:8080 --graph hugegraph graph-mode-set -m RESTORING

# 恢复图
./bin/hugegraph --url http://127.0.0.1:8080 --graph hugegraph restore -t all --directory ./backup-test

# 恢复图模式
./bin/hugegraph --url http://127.0.0.1:8080 --graph hugegraph graph-mode-set -m NONE
8. 图迁移
./bin/hugegraph --url http://127.0.0.1:8080 --graph hugegraph migrate --target-url http://127.0.0.1:8090 --target-graph hugegraph
2.4 - HugeGraph-Spark-Connector Quick Start
1 HugeGraph-Spark-Connector 概述
HugeGraph-Spark-Connector 是一个用于在 Spark 中以标准格式读写 HugeGraph 数据的连接器应用程序。
2 环境要求
- Java 8+
- Maven 3.6+
- Spark 3.x
- Scala 2.12
3 编译
3.1 不执行测试的编译
mvn clean package -DskipTests
3.2 执行默认测试的编译
mvn clean package
4 使用方法
首先在你的 pom.xml 中添加依赖:
<dependency>
    <groupId>org.apache.hugegraph</groupId>
    <artifactId>hugegraph-spark-connector</artifactId>
    <version>${revision}</version>
</dependency>
4.1 Schema 定义示例
假设我们有一个图,其 schema 定义如下:
schema.propertyKey("name").asText().ifNotExist().create()
schema.propertyKey("age").asInt().ifNotExist().create()
schema.propertyKey("city").asText().ifNotExist().create()
schema.propertyKey("weight").asDouble().ifNotExist().create()
schema.propertyKey("lang").asText().ifNotExist().create()
schema.propertyKey("date").asText().ifNotExist().create()
schema.propertyKey("price").asDouble().ifNotExist().create()

schema.vertexLabel("person")
        .properties("name", "age", "city")
        .useCustomizeStringId()
        .nullableKeys("age", "city")
        .ifNotExist()
        .create()

schema.vertexLabel("software")
        .properties("name", "lang", "price")
        .primaryKeys("name")
        .ifNotExist()
        .create()

schema.edgeLabel("knows")
        .sourceLabel("person")
        .targetLabel("person")
        .properties("date", "weight")
        .ifNotExist()
        .create()

schema.edgeLabel("created")
        .sourceLabel("person")
        .targetLabel("software")
        .properties("date", "weight")
        .ifNotExist()
        .create()
4.2 写入顶点数据(Scala)
val df = sparkSession.createDataFrame(Seq(
  Tuple3("marko", 29, "Beijing"),
  Tuple3("vadas", 27, "HongKong"),
  Tuple3("Josh", 32, "Beijing"),
  Tuple3("peter", 35, "ShangHai"),
  Tuple3("li,nary", 26, "Wu,han"),
  Tuple3("Bob", 18, "HangZhou"),
)) toDF("name", "age", "city")

df.show()

df.write
  .format("org.apache.hugegraph.spark.connector.DataSource")
  .option("host", "127.0.0.1")
  .option("port", "8080")
  .option("graph", "hugegraph")
  .option("data-type", "vertex")
  .option("label", "person")
  .option("id", "name")
  .option("batch-size", 2)
  .mode(SaveMode.Overwrite)
  .save()
4.3 写入边数据(Scala)
val df = sparkSession.createDataFrame(Seq(
  Tuple4("marko", "vadas", "20160110", 0.5),
  Tuple4("peter", "Josh", "20230801", 1.0),
  Tuple4("peter", "li,nary", "20130220", 2.0)
)).toDF("source", "target", "date", "weight")

df.show()

df.write
  .format("org.apache.hugegraph.spark.connector.DataSource")
  .option("host", "127.0.0.1")
  .option("port", "8080")
  .option("graph", "hugegraph")
  .option("data-type", "edge")
  .option("label", "knows")
  .option("source-name", "source")
  .option("target-name", "target")
  .option("batch-size", 2)
  .mode(SaveMode.Overwrite)
  .save()
5 配置参数
5.1 客户端配置
客户端配置用于配置 hugegraph-client。
| 参数 | 默认值 | 说明 |
|---|---|---|
host | localhost | HugeGraphServer 的地址 |
port | 8080 | HugeGraphServer 的端口 |
graph | hugegraph | 图空间名称 |
protocol | http | 向服务器发送请求的协议,可选 http 或 https |
username | null | 当 HugeGraphServer 开启权限认证时,当前图的用户名 |
token | null | 当 HugeGraphServer 开启权限认证时,当前图的 token |
timeout | 60 | 插入结果返回的超时时间(秒) |
max-conn | CPUS * 4 | HugeClient 与 HugeGraphServer 之间的最大 HTTP 连接数 |
max-conn-per-route | CPUS * 2 | HugeClient 与 HugeGraphServer 之间每个路由的最大 HTTP 连接数 |
trust-store-file | null | 当请求协议为 https 时,客户端的证书文件路径 |
trust-store-token | null | 当请求协议为 https 时,客户端的证书密码 |
5.2 图数据配置
图数据配置用于设置图空间的配置。
| 参数 | 默认值 | 说明 |
|---|---|---|
data-type | 图数据类型,必须是 vertex 或 edge | |
label | 要导入的顶点/边数据所属的标签 | |
id | 指定某一列作为顶点的 id 列。当顶点 id 策略为 CUSTOMIZE 时,必填;当 id 策略为 PRIMARY_KEY 时,必须为空 | |
source-name | 选择输入源的某些列作为源顶点的 id 列。当源顶点的 id 策略为 CUSTOMIZE 时,必须指定某一列作为顶点的 id 列;当源顶点的 id 策略为 PRIMARY_KEY 时,必须指定一列或多列用于拼接生成顶点的 id,即无论使用哪种 id 策略,此项都是必填的 | |
target-name | 指定某些列作为目标顶点的 id 列,与 source-name 类似 | |
selected-fields | 选择某些列进行插入,其他未选择的列不插入,不能与 ignored-fields 同时存在 | |
ignored-fields | 忽略某些列使其不参与插入,不能与 selected-fields 同时存在 | |
batch-size | 500 | 导入数据时每批数据的条目数 |
5.3 通用配置
通用配置包含一些常用的配置项。
| 参数 | 默认值 | 说明 |
|---|---|---|
delimiter | , | source-name、target-name、selected-fields 或 ignored-fields 的分隔符 |
6 许可证
与 HugeGraph 一样,hugegraph-spark-connector 也采用 Apache 2.0 许可证。
3 - HugeGraph-AI
![]()
![]()
DeepWiki 提供实时更新的项目文档,内容更全面准确,适合快速了解项目最新情况。
hugegraph-ai 整合了 HugeGraph 与人工智能功能,为开发者构建 AI 驱动的图应用提供全面支持。
✨ 核心功能
- GraphRAG:利用图增强检索构建智能问答系统
- Text2Gremlin:自然语言到图查询的转换,支持 REST API
- 知识图谱构建:使用大语言模型从文本自动构建图谱
- 图机器学习:集成 21 种图学习算法(GCN、GAT、GraphSAGE 等)
- Python 客户端:易于使用的 HugeGraph Python 操作接口
- AI 智能体:提供智能图分析与推理能力
🎉 v1.5.0 新特性
- Text2Gremlin REST API:通过 REST 端点将自然语言查询转换为 Gremlin 命令
- 多模型向量支持:每个图实例可以使用独立的嵌入模型
- 双语提示支持:支持英文和中文提示词切换(EN/CN)
- 半自动 Schema 生成:从文本数据智能推断 Schema
- 半自动 Prompt 生成:上下文感知的提示词模板
- 增强的 Reranker 支持:集成 Cohere 和 SiliconFlow 重排序器
- LiteLLM 多供应商支持:统一接口支持 OpenAI、Anthropic、Gemini 等
🚀 快速开始
[!NOTE] 如需完整的部署指南和详细示例,请参阅 hugegraph-llm/README.md。
环境要求
- Python 3.10+(hugegraph-llm 必需)
- uv 0.7+(推荐的包管理器)
- HugeGraph Server 1.5+(必需)
- Docker(可选,用于容器化部署)
方案一:Docker 部署(推荐)
# 克隆仓库
git clone https://github.com/apache/hugegraph-ai.git
cd hugegraph-ai

# 设置环境并启动服务
cp docker/env.template docker/.env
# 编辑 docker/.env 设置你的 PROJECT_PATH
cd docker
docker-compose -f docker-compose-network.yml up -d

# 访问服务:
# - HugeGraph Server: http://localhost:8080
# - RAG 服务: http://localhost:8001
方案二:源码安装
# 1. 启动 HugeGraph Server
docker run -itd --name=server -p 8080:8080 hugegraph/hugegraph

# 2. 克隆并设置项目
git clone https://github.com/apache/hugegraph-ai.git
cd hugegraph-ai/hugegraph-llm

# 3. 安装依赖
uv venv && source .venv/bin/activate
uv pip install -e .

# 4. 启动演示
python -m hugegraph_llm.demo.rag_demo.app
# 访问 http://127.0.0.1:8001
基本用法示例
GraphRAG - 问答
from hugegraph_llm.operators.graph_rag_task import RAGPipeline

# 初始化 RAG 工作流
graph_rag = RAGPipeline()

# 对你的图进行提问
result = (graph_rag
    .extract_keywords(text="给我讲讲 Al Pacino 的故事。")
    .keywords_to_vid()
    .query_graphdb(max_deep=2, max_graph_items=30)
    .synthesize_answer()
    .run())
知识图谱构建
from hugegraph_llm.models.llms.init_llm import LLMs
from hugegraph_llm.operators.kg_construction_task import KgBuilder

# 从文本构建知识图谱
TEXT = "你的文本内容..."
builder = KgBuilder(LLMs().get_chat_llm())

(builder
    .import_schema(from_hugegraph="hugegraph")
    .chunk_split(TEXT)
    .extract_info(extract_type="property_graph")
    .commit_to_hugegraph()
    .run())
图机器学习
from pyhugegraph.client import PyHugeClient
# 连接 HugeGraph 并运行机器学习算法
# 详细示例请参阅 hugegraph-ml 文档
📦 模块
hugegraph-llm 
用于图应用的大语言模型集成:
- GraphRAG:基于图数据的检索增强生成
- 知识图谱构建:从文本自动构建知识图谱
- 自然语言接口:使用自然语言查询图
- AI 智能体:智能图分析与推理
hugegraph-ml
包含 21 种算法的图机器学习:
- 节点分类:GCN、GAT、GraphSAGE、APPNP、AGNN、ARMA、DAGNN、DeeperGCN、GRAND、JKNet、Cluster-GCN
- 图分类:DiffPool、GIN
- 图嵌入:DGI、BGRL、GRACE
- 链接预测:SEAL、P-GNN、GATNE
- 欺诈检测:CARE-GNN、BGNN
- 后处理:C&S(Correct & Smooth)
hugegraph-python-client
用于 HugeGraph 操作的 Python 客户端:
- Schema 管理:定义顶点/边标签和属性
- CRUD 操作:创建、读取、更新、删除图数据
- Gremlin 查询:执行图遍历查询
- REST API:完整的 HugeGraph REST API 覆盖
📚 了解更多
🔗 相关项目
- hugegraph - 核心图数据库
- hugegraph-toolchain - 开发工具(加载器、仪表盘等)
- hugegraph-computer - 图计算系统
🤝 贡献
我们欢迎贡献!详情请参阅我们的贡献指南。
开发设置:
- 使用 GitHub Desktop 更轻松地管理 PR
- 提交 PR 前运行
./style/code_format_and_analysis.sh - 报告错误前检查现有问题
📄 许可证
hugegraph-ai 采用 Apache 2.0 许可证。
📞 联系我们
- GitHub Issues:报告错误或请求功能(响应最快)
- 电子邮件:dev@hugegraph.apache.org(需要订阅)
- 微信:关注 “Apache HugeGraph” 微信公众号

3.1 - HugeGraph-LLM
本文为中文翻译版本,内容基于英文版进行,我们欢迎您随时提出修改建议。我们推荐您阅读 AI 仓库 README 以获取最新信息,官网会定期同步更新。
连接图数据库与大语言模型的桥梁
AI 总结项目文档:
🎯 概述
HugeGraph-LLM 是一个功能强大的工具包,它融合了图数据库和大型语言模型的优势,实现了 HugeGraph 与 LLM 之间的无缝集成,助力开发者构建智能应用。
核心功能
- 🏗️ 知识图谱构建:利用 LLM 和 HugeGraph 自动构建知识图谱。
- 🗣️ 自然语言查询:通过自然语言(Gremlin/Cypher)操作图数据库。
- 🔍 图增强 RAG:借助知识图谱提升问答准确性(GraphRAG 和 Graph Agent)。
更多源码文档,请访问我们的 DeepWiki 页面(推荐)。
📋 环境要求
[!IMPORTANT]
- Python:3.10+(未在 3.12 版本测试)
- HugeGraph Server:1.3+(推荐 1.5+)
- UV 包管理器:0.7+
🚀 快速开始
请选择您偏好的部署方式:
方案一:Docker Compose(推荐)
这是同时启动 HugeGraph Server 和 RAG 服务的最快方法:
# 1. 设置环境
cp docker/env.template docker/.env
# 编辑 docker/.env,将 PROJECT_PATH 设置为您的实际项目路径

# 2. 部署服务
cd docker
docker-compose -f docker-compose-network.yml up -d

# 3. 验证部署
docker-compose -f docker-compose-network.yml ps

# 4. 访问服务
# HugeGraph Server: http://localhost:8080
# RAG 服务: http://localhost:8001
方案二:独立 Docker 容器
如果您希望对各组件进行更精细的控制:
可用镜像
hugegraph/rag:开发镜像,可访问源代码hugegraph/rag-bin:生产优化的二进制文件(使用 Nuitka 编译)
# 1. 创建网络
docker network create -d bridge hugegraph-net

# 2. 启动 HugeGraph Server
docker run -itd --name=server -p 8080:8080 --network hugegraph-net hugegraph/hugegraph

# 3. 启动 RAG 服务
docker pull hugegraph/rag:latest
docker run -itd --name rag \
  -v /path/to/your/hugegraph-llm/.env:/home/work/hugegraph-llm/.env \
  -p 8001:8001 --network hugegraph-net hugegraph/rag

# 4. 监控日志
docker logs -f rag
方案三:从源码构建
适用于开发和自定义场景:
# 1. 启动 HugeGraph Server
docker run -itd --name=server -p 8080:8080 hugegraph/hugegraph

# 2. 安装 UV 包管理器
curl -LsSf https://astral.sh/uv/install.sh | sh

# 3. 克隆并设置项目
git clone https://github.com/apache/hugegraph-ai.git
cd hugegraph-ai/hugegraph-llm

# 4. 创建虚拟环境并安装依赖
uv venv && source .venv/bin/activate
uv pip install -e .

# 5. 启动 RAG 演示
python -m hugegraph_llm.demo.rag_demo.app
# 访问: http://127.0.0.1:8001

# 6. (可选) 自定义主机/端口
python -m hugegraph_llm.demo.rag_demo.app --host 127.0.0.1 --port 18001
额外设置(可选)
# 下载 NLTK 停用词以优化文本处理
python ./hugegraph_llm/operators/common_op/nltk_helper.py

# 更新配置文件
python -m hugegraph_llm.config.generate --update
[!TIP] 查看我们的快速入门指南获取详细用法示例和查询逻辑解释。
💡 用法示例
知识图谱构建
交互式 Web 界面
使用 Gradio 界面进行可视化知识图谱构建:
输入选项:
- 文本:直接输入文本用于 RAG 索引创建
- 文件:上传 TXT 或 DOCX 文件(支持多选)
Schema 配置:
- 自定义 Schema:遵循我们模板的 JSON 格式
- HugeGraph Schema:使用现有图实例的 Schema(例如,“hugegraph”)
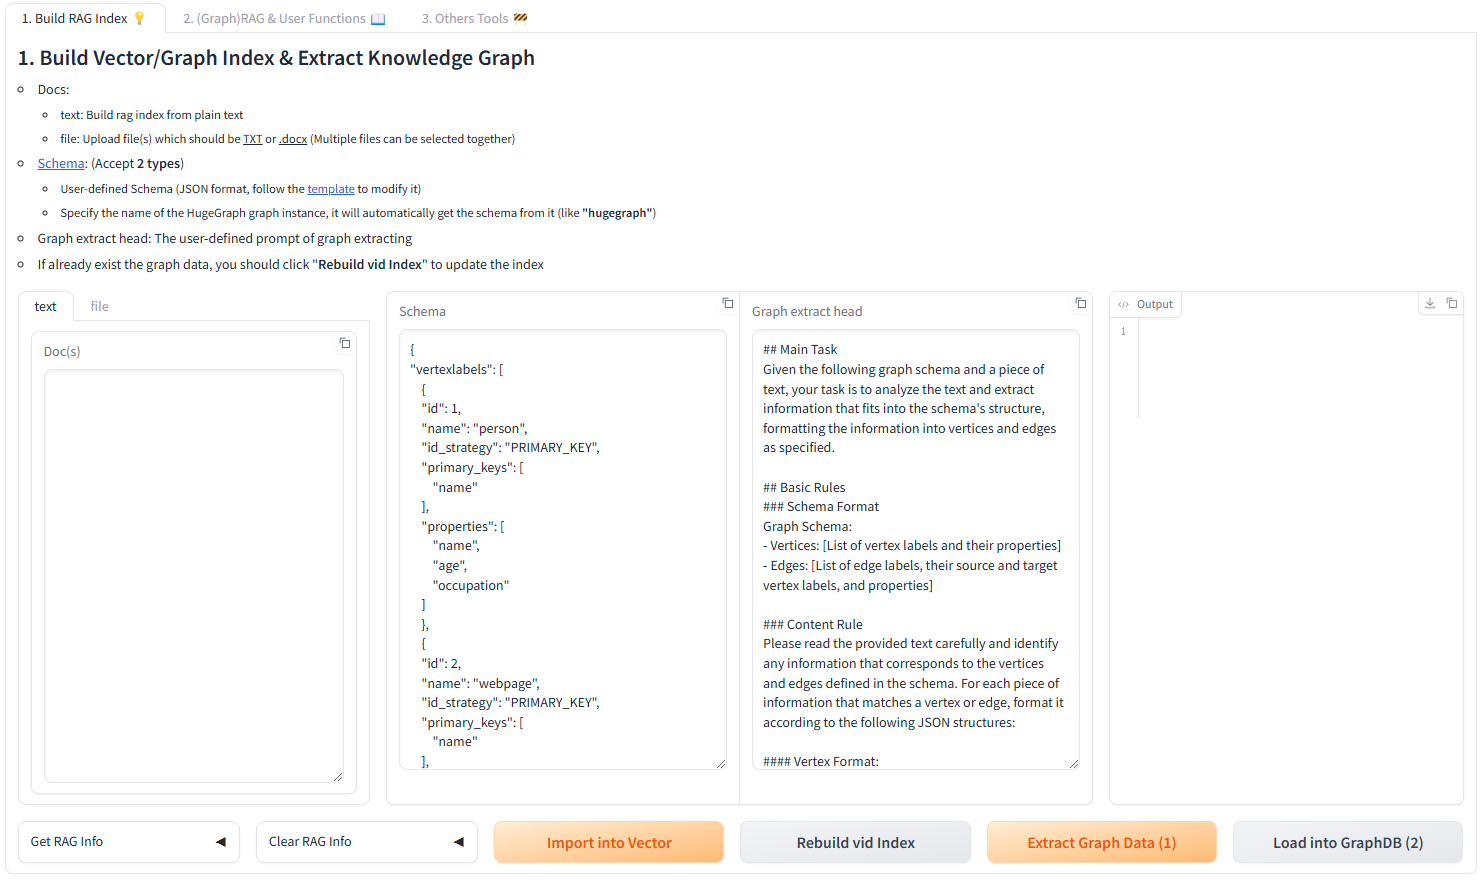
代码构建
使用 KgBuilder 类通过代码构建知识图谱:
from hugegraph_llm.models.llms.init_llm import LLMs
from hugegraph_llm.operators.kg_construction_task import KgBuilder

# 初始化并链式操作
TEXT = "在此处输入您的文本内容..."
builder = KgBuilder(LLMs().get_chat_llm())

(
    builder
    .import_schema(from_hugegraph="talent_graph").print_result()
    .chunk_split(TEXT).print_result()
    .extract_info(extract_type="property_graph").print_result()
    .commit_to_hugegraph()
    .run()
)
工作流:
graph LR
    A[导入 Schema] --> B[文本分块]
    B --> C[提取信息]
    C --> D[提交到 HugeGraph]
    D --> E[执行工作流]

    style A fill:#fff2cc
    style B fill:#d5e8d4
    style C fill:#dae8fc
    style D fill:#f8cecc
    style E fill:#e1d5e7
图增强 RAG
利用 HugeGraph 进行检索增强生成:
from hugegraph_llm.operators.graph_rag_task import RAGPipeline

# 初始化 RAG 工作流
graph_rag = RAGPipeline()

# 执行 RAG 工作流
(
    graph_rag
    .extract_keywords(text="给我讲讲 Al Pacino 的故事。")
    .keywords_to_vid()
    .query_graphdb(max_deep=2, max_graph_items=30)
    .merge_dedup_rerank()
    .synthesize_answer(vector_only_answer=False, graph_only_answer=True)
    .run(verbose=True)
)
RAG 工作流:
graph TD
    A[用户查询] --> B[提取关键词]
    B --> C[匹配图节点]
    C --> D[检索图上下文]
    D --> E[重排序结果]
    E --> F[生成答案]

    style A fill:#e3f2fd
    style B fill:#f3e5f5
    style C fill:#e8f5e8
    style D fill:#fff3e0
    style E fill:#fce4ec
    style F fill:#e0f2f1
🔧 配置
运行演示后,将自动生成配置文件:
- 环境:
hugegraph-llm/.env - 提示:
hugegraph-llm/src/hugegraph_llm/resources/demo/config_prompt.yaml
[!NOTE] 使用 Web 界面时,配置更改会自动保存。对于手动更改,刷新页面即可加载更新。
LLM 提供商配置
本项目使用 LiteLLM 实现多提供商 LLM 支持,可统一访问 OpenAI、Anthropic、Google、Cohere 以及 100 多个其他提供商。
方案一:直接 LLM 连接(OpenAI、Ollama)
# .env 配置
chat_llm_type=openai           # 或 ollama/local
openai_api_key=sk-xxx
openai_api_base=https://api.openai.com/v1
openai_language_model=gpt-4o-mini
openai_max_tokens=4096
方案二:LiteLLM 多提供商支持
LiteLLM 作为多个 LLM 提供商的统一代理:
# .env 配置
chat_llm_type=litellm
extract_llm_type=litellm
text2gql_llm_type=litellm

# LiteLLM 设置
litellm_api_base=http://localhost:4000  # LiteLLM 代理服务器
litellm_api_key=sk-1234                  # LiteLLM API 密钥

# 模型选择(提供商/模型格式)
litellm_language_model=anthropic/claude-3-5-sonnet-20241022
litellm_max_tokens=4096
支持的提供商:OpenAI、Anthropic、Google(Gemini)、Azure、Cohere、Bedrock、Vertex AI、Hugging Face 等。
完整提供商列表和配置详情,请访问 LiteLLM Providers。
Reranker 配置
Reranker 通过重新排序检索结果来提高 RAG 准确性。支持的提供商:
# Cohere Reranker
reranker_type=cohere
cohere_api_key=your-cohere-key
cohere_rerank_model=rerank-english-v3.0

# SiliconFlow Reranker
reranker_type=siliconflow
siliconflow_api_key=your-siliconflow-key
siliconflow_rerank_model=BAAI/bge-reranker-v2-m3
Text2Gremlin 配置
将自然语言转换为 Gremlin 查询:
from hugegraph_llm.operators.graph_rag_task import Text2GremlinPipeline

# 初始化工作流
text2gremlin = Text2GremlinPipeline()

# 生成 Gremlin 查询
result = (
    text2gremlin
    .query_to_gremlin(query="查找所有由 Francis Ford Coppola 执导的电影")
    .execute_gremlin_query()
    .run()
)
REST API 端点:有关 HTTP 端点详情,请参阅 REST API 文档。
📚 其他资源
- 图可视化:使用 HugeGraph Hubble 进行数据分析和 Schema 管理
- API 文档:浏览我们的 REST API 端点以进行集成
- 社区:加入我们的讨论并为项目做出贡献
许可证:Apache License 2.0 | 社区:Apache HugeGraph
3.2 - HugeGraph-ML
HugeGraph-ML 将 HugeGraph 与流行的图学习库集成,支持直接在图数据上进行端到端的机器学习工作流。
概述
hugegraph-ml 提供了统一接口,用于将图神经网络和机器学习算法应用于存储在 HugeGraph 中的数据。它通过无缝转换 HugeGraph 数据到主流 ML 框架兼容格式,消除了复杂的数据导出/导入流程。
核心功能
- 直接 HugeGraph 集成:无需手动导出即可直接从 HugeGraph 查询图数据
- 21 种算法实现:全面覆盖节点分类、图分类、嵌入和链接预测
- DGL 后端:利用深度图库(DGL)进行高效训练
- 端到端工作流:从数据加载到模型训练和评估
- 模块化任务:可复用的常见 ML 场景任务抽象
环境要求
- Python:3.9+(独立模块)
- HugeGraph Server:1.0+(推荐:1.5+)
- UV 包管理器:0.7+(用于依赖管理)
安装
1. 启动 HugeGraph Server
# 方案一:Docker(推荐)
docker run -itd --name=hugegraph -p 8080:8080 hugegraph/hugegraph

# 方案二:二进制包
# 参见 https://hugegraph.apache.org/docs/download/download/
2. 克隆并设置
git clone https://github.com/apache/hugegraph-ai.git
cd hugegraph-ai/hugegraph-ml
3. 安装依赖
# uv sync 自动创建 .venv 并安装所有依赖
uv sync

# 激活虚拟环境
source .venv/bin/activate
4. 导航到源代码目录
cd ./src
[!NOTE] 所有示例均假定您在已激活的虚拟环境中。
已实现算法
HugeGraph-ML 目前实现了跨多个类别的 21 种图机器学习算法:
节点分类(11 种算法)
基于网络结构和特征预测图节点的标签。
| 算法 | 论文 | 描述 |
|---|---|---|
| GCN | Kipf & Welling, 2017 | 图卷积网络 |
| GAT | Veličković et al., 2018 | 图注意力网络 |
| GraphSAGE | Hamilton et al., 2017 | 归纳式表示学习 |
| APPNP | Klicpera et al., 2019 | 个性化 PageRank 传播 |
| AGNN | Thekumparampil et al., 2018 | 基于注意力的 GNN |
| ARMA | Bianchi et al., 2019 | 自回归移动平均滤波器 |
| DAGNN | Liu et al., 2020 | 深度自适应图神经网络 |
| DeeperGCN | Li et al., 2020 | 非常深的 GCN 架构 |
| GRAND | Feng et al., 2020 | 图随机神经网络 |
| JKNet | Xu et al., 2018 | 跳跃知识网络 |
| Cluster-GCN | Chiang et al., 2019 | 通过聚类实现可扩展 GCN 训练 |
图分类(2 种算法)
基于结构和节点特征对整个图进行分类。
| 算法 | 论文 | 描述 |
|---|---|---|
| DiffPool | Ying et al., 2018 | 可微分图池化 |
| GIN | Xu et al., 2019 | 图同构网络 |
图嵌入(3 种算法)
学习用于下游任务的无监督节点表示。
| 算法 | 论文 | 描述 |
|---|---|---|
| DGI | Veličković et al., 2019 | 深度图信息最大化(对比学习) |
| BGRL | Thakoor et al., 2021 | 自举图表示学习 |
| GRACE | Zhu et al., 2020 | 图对比学习 |
链接预测(3 种算法)
预测图中缺失或未来的连接。
| 算法 | 论文 | 描述 |
|---|---|---|
| SEAL | Zhang & Chen, 2018 | 子图提取和标注 |
| P-GNN | You et al., 2019 | 位置感知 GNN |
| GATNE | Cen et al., 2019 | 属性多元异构网络嵌入 |
欺诈检测(2 种算法)
检测图中的异常节点(例如欺诈账户)。
| 算法 | 论文 | 描述 |
|---|---|---|
| CARE-GNN | Dou et al., 2020 | 抗伪装 GNN |
| BGNN | Zheng et al., 2021 | 二部图神经网络 |
后处理(1 种算法)
通过标签传播改进预测。
| 算法 | 论文 | 描述 |
|---|---|---|
| C&S | Huang et al., 2020 | 校正与平滑(预测优化) |
使用示例
示例 1:使用 DGI 进行节点嵌入
使用深度图信息最大化(DGI)在 Cora 数据集上进行无监督节点嵌入。
步骤 1:导入数据集(如需)
from hugegraph_ml.utils.dgl2hugegraph_utils import import_graph_from_dgl

# 从 DGL 导入 Cora 数据集到 HugeGraph
import_graph_from_dgl("cora")
步骤 2:转换图数据
from hugegraph_ml.data.hugegraph2dgl import HugeGraph2DGL

# 将 HugeGraph 数据转换为 DGL 格式
hg2d = HugeGraph2DGL()
graph = hg2d.convert_graph(vertex_label="CORA_vertex", edge_label="CORA_edge")
步骤 3:初始化模型
from hugegraph_ml.models.dgi import DGI

# 创建 DGI 模型
model = DGI(n_in_feats=graph.ndata["feat"].shape[1])
步骤 4:训练并生成嵌入
from hugegraph_ml.tasks.node_embed import NodeEmbed

# 训练模型并生成节点嵌入
node_embed_task = NodeEmbed(graph=graph, model=model)
embedded_graph = node_embed_task.train_and_embed(
    add_self_loop=True,
    n_epochs=300,
    patience=30
)
步骤 5:下游任务(节点分类)
from hugegraph_ml.models.mlp import MLPClassifier
from hugegraph_ml.tasks.node_classify import NodeClassify

# 使用嵌入进行节点分类
model = MLPClassifier(
    n_in_feat=embedded_graph.ndata["feat"].shape[1],
    n_out_feat=embedded_graph.ndata["label"].unique().shape[0]
)
node_clf_task = NodeClassify(graph=embedded_graph, model=model)
node_clf_task.train(lr=1e-3, n_epochs=400, patience=40)
print(node_clf_task.evaluate())
预期输出:
{'accuracy': 0.82, 'loss': 0.5714246034622192}
完整示例:参见 dgi_example.py
示例 2:使用 GRAND 进行节点分类
使用 GRAND 模型直接对节点进行分类(无需单独的嵌入步骤)。
from hugegraph_ml.data.hugegraph2dgl import HugeGraph2DGL
from hugegraph_ml.models.grand import GRAND
from hugegraph_ml.tasks.node_classify import NodeClassify

# 加载图
hg2d = HugeGraph2DGL()
graph = hg2d.convert_graph(vertex_label="CORA_vertex", edge_label="CORA_edge")

# 初始化 GRAND 模型
model = GRAND(
    n_in_feats=graph.ndata["feat"].shape[1],
    n_out_feats=graph.ndata["label"].unique().shape[0]
)

# 训练和评估
node_clf_task = NodeClassify(graph=graph, model=model)
node_clf_task.train(lr=1e-2, n_epochs=1500, patience=100)
print(node_clf_task.evaluate())
完整示例:参见 grand_example.py
核心组件
HugeGraph2DGL 转换器
无缝将 HugeGraph 数据转换为 DGL 图格式:
from hugegraph_ml.data.hugegraph2dgl import HugeGraph2DGL

hg2d = HugeGraph2DGL()
graph = hg2d.convert_graph(
    vertex_label="person",      # 要提取的顶点标签
    edge_label="knows",         # 要提取的边标签
    directed=False              # 图的方向性
)
任务抽象
用于常见 ML 工作流的可复用任务对象:
| 任务 | 类 | 用途 |
|---|---|---|
| 节点嵌入 | NodeEmbed | 生成无监督节点嵌入 |
| 节点分类 | NodeClassify | 预测节点标签 |
| 图分类 | GraphClassify | 预测图级标签 |
| 链接预测 | LinkPredict | 预测缺失边 |
最佳实践
- 从小数据集开始:在扩展之前先在小图(例如 Cora、Citeseer)上测试您的流程
- 使用早停:设置
patience参数以避免过拟合 - 调整超参数:根据数据集大小调整学习率、隐藏维度和周期数
- 监控 GPU 内存:大图可能需要批量训练(例如 Cluster-GCN)
- 验证 Schema:确保顶点/边标签与您的 HugeGraph schema 匹配
故障排除
| 问题 | 解决方案 |
|---|---|
| 连接 HugeGraph “Connection refused” | 验证服务器是否在 8080 端口运行 |
| CUDA 内存不足 | 减少批大小或使用仅 CPU 模式 |
| 模型收敛问题 | 尝试不同的学习率(1e-2、1e-3、1e-4) |
| DGL 的 ImportError | 运行 uv sync 重新安装依赖 |
贡献
添加新算法:
- 在
src/hugegraph_ml/models/your_model.py创建模型文件 - 继承基础模型类并实现
forward()方法 - 在
src/hugegraph_ml/examples/添加示例脚本 - 更新此文档并添加算法详情
另见
- HugeGraph-AI 概述 - 完整 AI 生态系统
- HugeGraph-LLM - RAG 和知识图谱构建
- GitHub 仓库 - 源代码和示例
3.3 - GraphRAG UI Details
接续主文档介绍基础 UI 功能及详情,欢迎随时更新和改进,谢谢
1. 项目核心逻辑
构建 RAG 索引职责:
- 文本分割和向量化
- 从文本中提取图(构建知识图谱)并对顶点进行向量化
(Graph)RAG 和用户功能职责:
- 根据查询从构建的知识图谱和向量数据库中检索相关内容,用于补充提示词。
2. (处理流程)构建 RAG 索引
从文本构建知识图谱、分块向量和图顶点向量。
graph TD;
    A[原始文本] --> B[文本分割]
    B --> C[向量化]
    C --> D[存储到向量数据库]

    A --> F[文本分割]
    F --> G[LLM 基于 schema 和分割后的文本提取图]
    G --> H[将图存储到图数据库,\n自动对顶点进行向量化\n并存储到向量数据库]

    I[从图数据库检索顶点] --> J[对顶点进行向量化并存储到向量数据库\n注意:增量更新]
四个输入字段:
- 文档: 输入文本
- Schema: 图的 schema,可以以 JSON 格式的 schema 提供,或提供图名称(如果数据库中已存在)。
- 图提取提示词头部: 提示词的头部
- 输出: 显示结果
按钮:
获取 RAG 信息
- 获取向量索引信息: 检索向量索引信息
- 获取图索引信息: 检索图索引信息
清除 RAG 数据
- 清除分块向量索引: 清除分块向量
- 清除图顶点向量索引: 清除图顶点向量
- 清除图数据: 清除图数据
导入到向量: 将文档中的文本转换为向量(需要先对文本进行分块,然后将分块转换为向量)
提取图数据 (1): 基于 Schema,使用图提取提示词头部和分块内容作为提示词,从文档中提取图数据
加载到图数据库 (2): 将提取的图数据存储到数据库(自动调用更新顶点嵌入以将向量存储到向量数据库)
更新顶点嵌入: 将图顶点转换为向量
执行流程:
- 在文档字段中输入文本。
- 点击导入到向量按钮,对文本进行分割和向量化,存储到向量数据库。
- 在 Schema 字段中输入图的 Schema。
- 点击提取图数据 (1) 按钮,将文本提取为图。
- 点击加载到图数据库 (2) 按钮,将提取的图存储到图数据库(这会自动调用更新顶点嵌入以将向量存储到向量数据库)。
- 点击更新顶点嵌入按钮,将图顶点向量化并存储到向量数据库。
3. (处理流程)(Graph)RAG 和用户功能
前一个模块中的导入到向量按钮将文本(分块)转换为向量,更新顶点嵌入按钮将图顶点转换为向量。这些向量分别存储,用于在本模块中补充查询(答案生成)的上下文。换句话说,前一个模块为 RAG 准备数据(向量化),而本模块执行 RAG。
本模块包含两个部分:
- HugeGraph RAG 查询
- (批量)回测
第一部分处理单个查询,第二部分同时处理多个查询。以下是第一部分的说明。
graph TD;
    A[问题] --> B[将问题向量化并在向量数据库中搜索最相似的分块]

    A --> F[使用 LLM 提取关键词]
    F --> G[在图数据库中使用关键词精确匹配顶点;\n在向量数据库中执行模糊匹配(图顶点)]
    G --> H[使用匹配的顶点和查询通过 LLM 生成 Gremlin 查询]
    H --> I[执行 Gremlin 查询;如果成功则完成;如果失败则回退到 BFS]

    B --> J[对结果排序]
    I --> J
    J --> K[生成答案]
输入字段:
- 问题: 输入查询
- 查询提示词: 用于向 LLM 提出最终问题的提示词模板
- 关键词提取提示词: 用于从问题中提取关键词的提示词模板
- 模板数量: < 0 表示禁用 text2gql;= 0 表示不使用模板(零样本);> 0 表示使用指定数量的模板
查询范围选择:
- 基础 LLM 答案: 不使用 RAG 功能
- 仅向量答案: 仅使用基于向量的检索(在向量数据库中查询分块向量)
- 仅图答案: 仅使用基于图的检索(在向量数据库中查询图顶点向量和图数据库)
- 图-向量答案: 同时使用基于图和基于向量的检索
执行流程:
仅图答案:
- 使用关键词提取提示词从问题中提取关键词。
使用提取的关键词:
- 首先,在图数据库中进行精确匹配。
- 如果未找到匹配,在向量数据库(图顶点向量)中进行模糊匹配以检索相关顶点。
text2gql: 调用 text2gql 相关接口,使用匹配的顶点作为实体,将问题转换为 Gremlin 查询并在图数据库中执行。
BFS: 如果 text2gql 失败(LLM 生成的查询可能无效),回退到使用预定义的Gremlin 查询模板执行图查询(本质上是 BFS 遍历)。
仅向量答案:
- 将查询转换为向量。
- 在向量数据库的分块向量数据集中搜索最相似的内容。
排序和答案生成:
- 执行检索后,对搜索结果进行排序以构建最终的提示词。
- 基于不同的提示词配置生成答案,并在不同的输出字段中显示:
- 基础 LLM 答案
- 仅向量答案
- 仅图答案
- 图-向量答案
4. (处理流程)Text2Gremlin
将自然语言查询转换为 Gremlin 查询。
本模块包含两个部分:
- 构建向量模板索引(可选): 将示例文件中的查询/gremlin 对进行向量化并存储到向量数据库中,用于生成 Gremlin 查询时参考。
- 自然语言转 Gremlin: 将自然语言查询转换为 Gremlin 查询。
第一部分较为简单,因此重点介绍第二部分。
graph TD;
    A[Gremlin 对文件] --> C[向量化查询]
    C --> D[存储到向量数据库]

    F[自然语言查询] --> G[在向量数据库中搜索最相似的查询\n(如果向量数据库中不存在 Gremlin 对,\n将自动使用默认文件进行向量化)\n并检索对应的 Gremlin]
    G --> H[将匹配的对添加到提示词中\n并使用 LLM 生成与自然语言查询\n对应的 Gremlin]
第二部分的输入字段:
- 自然语言查询: 输入要转换为 Gremlin 的自然语言文本。
- Schema: 输入图 schema。
执行流程:
- 在自然语言查询字段中输入查询(自然语言)。
- 在Schema字段中输入图 schema。
- 点击Text2Gremlin按钮,执行以下逻辑:
- 将查询转换为向量。
- 构建提示词:
- 检索图 schema。
- 在向量数据库中查询示例向量,检索与输入查询相似的查询-gremlin 对(如果向量数据库中缺少示例,将自动使用resources文件夹中的示例进行初始化)。
- 使用构建的提示词生成 Gremlin 查询。
5. 图工具
输入 Gremlin 查询以执行相应操作。
6. 语言切换 (v1.5.0+)
HugeGraph-LLM 支持双语提示词,以提高跨语言的准确性。
在英文和中文之间切换
系统语言影响:
- 系统提示词:LLM 使用的内部提示词
- 关键词提取:特定语言的提取逻辑
- 答案生成:响应格式和风格
配置方法一:环境变量
编辑您的 .env 文件:
# 英文提示词(默认)
LANGUAGE=EN

# 中文提示词
LANGUAGE=CN
更改语言设置后重启服务。
配置方法二:Web UI(动态)
如果您的部署中可用,使用 Web UI 中的设置面板切换语言,无需重启:
- 导航到设置或配置选项卡
- 选择语言:
EN或CN - 点击保存 - 更改立即生效
特定语言的行为
| 语言 | 关键词提取 | 答案风格 | 使用场景 |
|---|---|---|---|
EN | 英文 NLP 模型 | 专业、简洁 | 国际用户、英文文档 |
CN | 中文 NLP 模型 | 自然的中文表达 | 中文用户、中文文档 |
[!TIP] 将
LANGUAGE设置与您的主要文档语言匹配,以获得最佳 RAG 准确性。
REST API 语言覆盖
使用 REST API 时,您可以为每个请求指定自定义提示词,以覆盖默认语言设置:
curl -X POST http://localhost:8001/rag \
  -H "Content-Type: application/json" \
  -d '{
    "query": "告诉我关于阿尔·帕西诺的信息",
    "graph_only": true,
    "keywords_extract_prompt": "请从以下文本中提取关键实体...",
    "answer_prompt": "请根据以下上下文回答问题..."
  }'
完整参数详情请参阅 REST API 参考。
3.4 - 配置参考
本文档提供 HugeGraph-LLM 所有配置选项的完整参考。
配置文件
- 环境文件:
.env(从模板创建或自动生成) - 提示词配置:
src/hugegraph_llm/resources/demo/config_prompt.yaml
[!TIP] 运行
python -m hugegraph_llm.config.generate --update可自动生成或更新带有默认值的配置文件。
环境变量概览
1. 语言和模型类型选择
# 提示词语言(影响系统提示词和生成文本)
LANGUAGE=EN                     # 选项: EN | CN

# 不同任务的 LLM 类型
CHAT_LLM_TYPE=openai           # 对话/RAG: openai | litellm | ollama/local
EXTRACT_LLM_TYPE=openai        # 实体抽取: openai | litellm | ollama/local
TEXT2GQL_LLM_TYPE=openai       # 文本转 Gremlin: openai | litellm | ollama/local

# 嵌入模型类型
EMBEDDING_TYPE=openai          # 选项: openai | litellm | ollama/local

# Reranker 类型(可选)
RERANKER_TYPE=                 # 选项: cohere | siliconflow | (留空表示无)
2. OpenAI 配置
每个 LLM 任务(chat、extract、text2gql)都有独立配置:
2.1 Chat LLM(RAG 答案生成)
OPENAI_CHAT_API_BASE=https://api.openai.com/v1
OPENAI_CHAT_API_KEY=sk-your-api-key-here
OPENAI_CHAT_LANGUAGE_MODEL=gpt-4o-mini
OPENAI_CHAT_TOKENS=8192        # 对话响应的最大 tokens
2.2 Extract LLM(实体和关系抽取)
OPENAI_EXTRACT_API_BASE=https://api.openai.com/v1
OPENAI_EXTRACT_API_KEY=sk-your-api-key-here
OPENAI_EXTRACT_LANGUAGE_MODEL=gpt-4o-mini
OPENAI_EXTRACT_TOKENS=1024     # 抽取任务的最大 tokens
2.3 Text2GQL LLM(自然语言转 Gremlin)
OPENAI_TEXT2GQL_API_BASE=https://api.openai.com/v1
OPENAI_TEXT2GQL_API_KEY=sk-your-api-key-here
OPENAI_TEXT2GQL_LANGUAGE_MODEL=gpt-4o-mini
OPENAI_TEXT2GQL_TOKENS=4096    # 查询生成的最大 tokens
2.4 嵌入模型
OPENAI_EMBEDDING_API_BASE=https://api.openai.com/v1
OPENAI_EMBEDDING_API_KEY=sk-your-api-key-here
OPENAI_EMBEDDING_MODEL=text-embedding-3-small
[!NOTE] 您可以为每个任务使用不同的 API 密钥/端点,以优化成本或使用专用模型。
3. LiteLLM 配置(多供应商支持)
LiteLLM 支持统一访问 100 多个 LLM 供应商(OpenAI、Anthropic、Google、Azure 等)。
3.1 Chat LLM
LITELLM_CHAT_API_BASE=http://localhost:4000       # LiteLLM 代理 URL
LITELLM_CHAT_API_KEY=sk-litellm-key              # LiteLLM API 密钥
LITELLM_CHAT_LANGUAGE_MODEL=anthropic/claude-3-5-sonnet-20241022
LITELLM_CHAT_TOKENS=8192
3.2 Extract LLM
LITELLM_EXTRACT_API_BASE=http://localhost:4000
LITELLM_EXTRACT_API_KEY=sk-litellm-key
LITELLM_EXTRACT_LANGUAGE_MODEL=openai/gpt-4o-mini
LITELLM_EXTRACT_TOKENS=256
3.3 Text2GQL LLM
LITELLM_TEXT2GQL_API_BASE=http://localhost:4000
LITELLM_TEXT2GQL_API_KEY=sk-litellm-key
LITELLM_TEXT2GQL_LANGUAGE_MODEL=openai/gpt-4o-mini
LITELLM_TEXT2GQL_TOKENS=4096
3.4 嵌入模型
LITELLM_EMBEDDING_API_BASE=http://localhost:4000
LITELLM_EMBEDDING_API_KEY=sk-litellm-key
LITELLM_EMBEDDING_MODEL=openai/text-embedding-3-small
模型格式: 供应商/模型名称
示例:
openai/gpt-4o-minianthropic/claude-3-5-sonnet-20241022google/gemini-2.0-flash-expazure/gpt-4
完整列表请参阅 LiteLLM Providers。
4. Ollama 配置(本地部署)
使用 Ollama 运行本地 LLM,确保隐私和成本控制。
4.1 Chat LLM
OLLAMA_CHAT_HOST=127.0.0.1
OLLAMA_CHAT_PORT=11434
OLLAMA_CHAT_LANGUAGE_MODEL=llama3.1:8b
4.2 Extract LLM
OLLAMA_EXTRACT_HOST=127.0.0.1
OLLAMA_EXTRACT_PORT=11434
OLLAMA_EXTRACT_LANGUAGE_MODEL=llama3.1:8b
4.3 Text2GQL LLM
OLLAMA_TEXT2GQL_HOST=127.0.0.1
OLLAMA_TEXT2GQL_PORT=11434
OLLAMA_TEXT2GQL_LANGUAGE_MODEL=qwen2.5-coder:7b
4.4 嵌入模型
OLLAMA_EMBEDDING_HOST=127.0.0.1
OLLAMA_EMBEDDING_PORT=11434
OLLAMA_EMBEDDING_MODEL=nomic-embed-text
[!TIP] 下载模型:
ollama pull llama3.1:8b或ollama pull qwen2.5-coder:7b
5. Reranker 配置
Reranker 通过根据相关性重新排序检索结果来提高 RAG 准确性。
5.1 Cohere Reranker
RERANKER_TYPE=cohere
COHERE_BASE_URL=https://api.cohere.com/v1/rerank
RERANKER_API_KEY=your-cohere-api-key
RERANKER_MODEL=rerank-english-v3.0
可用模型:
rerank-english-v3.0(英文)rerank-multilingual-v3.0(100+ 种语言)
5.2 SiliconFlow Reranker
RERANKER_TYPE=siliconflow
RERANKER_API_KEY=your-siliconflow-api-key
RERANKER_MODEL=BAAI/bge-reranker-v2-m3
6. HugeGraph 连接
配置与 HugeGraph 服务器实例的连接。
# 服务器连接
GRAPH_IP=127.0.0.1
GRAPH_PORT=8080
GRAPH_NAME=hugegraph            # 图实例名称
GRAPH_USER=admin                # 用户名
GRAPH_PWD=admin-password        # 密码
GRAPH_SPACE=                    # 图空间(可选,用于多租户)
7. 查询参数
控制图遍历行为和结果限制。
# 图遍历限制
MAX_GRAPH_PATH=10               # 图查询的最大路径深度
MAX_GRAPH_ITEMS=30              # 从图中检索的最大项数
EDGE_LIMIT_PRE_LABEL=8          # 每个标签类型的最大边数

# 属性过滤
LIMIT_PROPERTY=False            # 限制结果中的属性(True/False)
8. 向量搜索配置
配置向量相似性搜索参数。
# 向量搜索阈值
VECTOR_DIS_THRESHOLD=0.9        # 最小余弦相似度(0-1,越高越严格)
TOPK_PER_KEYWORD=1              # 每个提取关键词的 Top-K 结果
9. Rerank 配置
# Rerank 结果限制
TOPK_RETURN_RESULTS=20          # 重排序后的 top 结果数
配置优先级
系统按以下顺序加载配置(后面的来源覆盖前面的):
- 默认值(在
*_config.py文件中) - 环境变量(来自
.env文件) - 运行时更新(通过 Web UI 或 API 调用)
配置示例
最小配置(OpenAI)
# 语言
LANGUAGE=EN

# LLM 类型
CHAT_LLM_TYPE=openai
EXTRACT_LLM_TYPE=openai
TEXT2GQL_LLM_TYPE=openai
EMBEDDING_TYPE=openai

# OpenAI 凭据(所有任务共用一个密钥)
OPENAI_API_BASE=https://api.openai.com/v1
OPENAI_API_KEY=sk-your-api-key-here
OPENAI_LANGUAGE_MODEL=gpt-4o-mini
OPENAI_EMBEDDING_MODEL=text-embedding-3-small

# HugeGraph 连接
GRAPH_IP=127.0.0.1
GRAPH_PORT=8080
GRAPH_NAME=hugegraph
GRAPH_USER=admin
GRAPH_PWD=admin
生产环境配置(LiteLLM + Reranker)
# 双语支持
LANGUAGE=EN

# 灵活使用 LiteLLM
CHAT_LLM_TYPE=litellm
EXTRACT_LLM_TYPE=litellm
TEXT2GQL_LLM_TYPE=litellm
EMBEDDING_TYPE=litellm

# LiteLLM 代理
LITELLM_CHAT_API_BASE=http://localhost:4000
LITELLM_CHAT_API_KEY=sk-litellm-master-key
LITELLM_CHAT_LANGUAGE_MODEL=anthropic/claude-3-5-sonnet-20241022
LITELLM_CHAT_TOKENS=8192

LITELLM_EXTRACT_API_BASE=http://localhost:4000
LITELLM_EXTRACT_API_KEY=sk-litellm-master-key
LITELLM_EXTRACT_LANGUAGE_MODEL=openai/gpt-4o-mini
LITELLM_EXTRACT_TOKENS=256

LITELLM_TEXT2GQL_API_BASE=http://localhost:4000
LITELLM_TEXT2GQL_API_KEY=sk-litellm-master-key
LITELLM_TEXT2GQL_LANGUAGE_MODEL=openai/gpt-4o-mini
LITELLM_TEXT2GQL_TOKENS=4096

LITELLM_EMBEDDING_API_BASE=http://localhost:4000
LITELLM_EMBEDDING_API_KEY=sk-litellm-master-key
LITELLM_EMBEDDING_MODEL=openai/text-embedding-3-small

# Cohere Reranker 提高准确性
RERANKER_TYPE=cohere
COHERE_BASE_URL=https://api.cohere.com/v1/rerank
RERANKER_API_KEY=your-cohere-key
RERANKER_MODEL=rerank-multilingual-v3.0

# 带认证的 HugeGraph
GRAPH_IP=prod-hugegraph.example.com
GRAPH_PORT=8080
GRAPH_NAME=production_graph
GRAPH_USER=rag_user
GRAPH_PWD=secure-password
GRAPH_SPACE=prod_space

# 优化的查询参数
MAX_GRAPH_PATH=15
MAX_GRAPH_ITEMS=50
VECTOR_DIS_THRESHOLD=0.85
TOPK_RETURN_RESULTS=30
本地/离线配置(Ollama)
# 语言
LANGUAGE=EN

# 全部通过 Ollama 使用本地模型
CHAT_LLM_TYPE=ollama/local
EXTRACT_LLM_TYPE=ollama/local
TEXT2GQL_LLM_TYPE=ollama/local
EMBEDDING_TYPE=ollama/local

# Ollama 端点
OLLAMA_CHAT_HOST=127.0.0.1
OLLAMA_CHAT_PORT=11434
OLLAMA_CHAT_LANGUAGE_MODEL=llama3.1:8b

OLLAMA_EXTRACT_HOST=127.0.0.1
OLLAMA_EXTRACT_PORT=11434
OLLAMA_EXTRACT_LANGUAGE_MODEL=llama3.1:8b

OLLAMA_TEXT2GQL_HOST=127.0.0.1
OLLAMA_TEXT2GQL_PORT=11434
OLLAMA_TEXT2GQL_LANGUAGE_MODEL=qwen2.5-coder:7b

OLLAMA_EMBEDDING_HOST=127.0.0.1
OLLAMA_EMBEDDING_PORT=11434
OLLAMA_EMBEDDING_MODEL=nomic-embed-text

# 离线环境不使用 reranker
RERANKER_TYPE=

# 本地 HugeGraph
GRAPH_IP=127.0.0.1
GRAPH_PORT=8080
GRAPH_NAME=hugegraph
GRAPH_USER=admin
GRAPH_PWD=admin
配置验证
修改 .env 后,验证配置:
- 通过 Web UI:访问
http://localhost:8001并检查设置面板 - 通过 Python:
from hugegraph_llm.config import settings
print(settings.llm_config)
print(settings.hugegraph_config)
- 通过 REST API:
curl http://localhost:8001/config
故障排除
| 问题 | 解决方案 |
|---|---|
| “API key not found” | 检查 .env 中的 *_API_KEY 是否正确设置 |
| “Connection refused” | 验证 GRAPH_IP 和 GRAPH_PORT 是否正确 |
| “Model not found” | 对于 Ollama:运行 ollama pull <模型名称> |
| “Rate limit exceeded” | 减少 MAX_GRAPH_ITEMS 或使用不同的 API 密钥 |
| “Embedding dimension mismatch” | 删除现有向量并使用正确模型重建 |
另见
3.5 - REST API 参考
HugeGraph-LLM 提供 REST API 端点,用于将 RAG 和 Text2Gremlin 功能集成到您的应用程序中。
基础 URL
http://localhost:8001
启动服务时更改主机/端口:
python -m hugegraph_llm.demo.rag_demo.app --host 127.0.0.1 --port 8001
认证
目前 API 支持可选的基于令牌的认证:
# 在 .env 中启用认证
ENABLE_LOGIN=true
USER_TOKEN=your-user-token
ADMIN_TOKEN=your-admin-token
在请求头中传递令牌:
Authorization: Bearer <token>
RAG 端点
1. 完整 RAG 查询
POST /rag
执行完整的 RAG 工作流,包括关键词提取、图检索、向量搜索、重排序和答案生成。
请求体
{
  "query": "给我讲讲阿尔·帕西诺的电影",
  "raw_answer": false,
  "vector_only": false,
  "graph_only": true,
  "graph_vector_answer": false,
  "graph_ratio": 0.5,
  "rerank_method": "cohere",
  "near_neighbor_first": false,
  "gremlin_tmpl_num": 5,
  "max_graph_items": 30,
  "topk_return_results": 20,
  "vector_dis_threshold": 0.9,
  "topk_per_keyword": 1,
  "custom_priority_info": "",
  "answer_prompt": "",
  "keywords_extract_prompt": "",
  "gremlin_prompt": "",
  "client_config": {
    "url": "127.0.0.1:8080",
    "graph": "hugegraph",
    "user": "admin",
    "pwd": "admin",
    "gs": ""
  }
}
参数说明:
| 字段 | 类型 | 必需 | 默认值 | 描述 |
|---|---|---|---|---|
query | string | 是 | - | 用户的自然语言问题 |
raw_answer | boolean | 否 | false | 返回 LLM 答案而不检索 |
vector_only | boolean | 否 | false | 仅使用向量搜索(无图) |
graph_only | boolean | 否 | false | 仅使用图检索(无向量) |
graph_vector_answer | boolean | 否 | false | 结合图和向量结果 |
graph_ratio | float | 否 | 0.5 | 图与向量结果的比例(0-1) |
rerank_method | string | 否 | "" | 重排序器:“cohere”、“siliconflow”、"" |
near_neighbor_first | boolean | 否 | false | 优先选择直接邻居 |
gremlin_tmpl_num | integer | 否 | 5 | 尝试的 Gremlin 模板数量 |
max_graph_items | integer | 否 | 30 | 图检索的最大项数 |
topk_return_results | integer | 否 | 20 | 重排序后的 Top-K |
vector_dis_threshold | float | 否 | 0.9 | 向量相似度阈值(0-1) |
topk_per_keyword | integer | 否 | 1 | 每个关键词的 Top-K 向量 |
custom_priority_info | string | 否 | "" | 要优先考虑的自定义上下文 |
answer_prompt | string | 否 | "" | 自定义答案生成提示词 |
keywords_extract_prompt | string | 否 | "" | 自定义关键词提取提示词 |
gremlin_prompt | string | 否 | "" | 自定义 Gremlin 生成提示词 |
client_config | object | 否 | null | 覆盖图连接设置 |
响应
{
  "query": "给我讲讲阿尔·帕西诺的电影",
  "graph_only": {
    "answer": "阿尔·帕西诺主演了《教父》(1972 年),由弗朗西斯·福特·科波拉执导...",
    "context": ["《教父》是 1972 年的犯罪电影...", "..."],
    "graph_paths": ["..."],
    "keywords": ["阿尔·帕西诺", "电影"]
  }
}
示例(curl)
curl -X POST http://localhost:8001/rag \
  -H "Content-Type: application/json" \
  -d '{
    "query": "给我讲讲阿尔·帕西诺",
    "graph_only": true,
    "max_graph_items": 30
  }'
2. 仅图检索
POST /rag/graph
检索图上下文而不生成答案。用于调试或自定义处理。
请求体
{
  "query": "阿尔·帕西诺的电影",
  "max_graph_items": 30,
  "topk_return_results": 20,
  "vector_dis_threshold": 0.9,
  "topk_per_keyword": 1,
  "gremlin_tmpl_num": 5,
  "rerank_method": "cohere",
  "near_neighbor_first": false,
  "custom_priority_info": "",
  "gremlin_prompt": "",
  "get_vertex_only": false,
  "client_config": {
    "url": "127.0.0.1:8080",
    "graph": "hugegraph",
    "user": "admin",
    "pwd": "admin",
    "gs": ""
  }
}
额外参数:
| 字段 | 类型 | 默认值 | 描述 |
|---|---|---|---|
get_vertex_only | boolean | false | 仅返回顶点 ID,不返回完整详情 |
响应
{
  "graph_recall": {
    "query": "阿尔·帕西诺的电影",
    "keywords": ["阿尔·帕西诺", "电影"],
    "match_vids": ["1:阿尔·帕西诺", "2:教父"],
    "graph_result_flag": true,
    "gremlin": "g.V('1:阿尔·帕西诺').outE().inV().limit(30)",
    "graph_result": [
      {"id": "1:阿尔·帕西诺", "label": "person", "properties": {"name": "阿尔·帕西诺"}},
      {"id": "2:教父", "label": "movie", "properties": {"title": "教父"}}
    ],
    "vertex_degree_list": [5, 12]
  }
}
示例(curl)
curl -X POST http://localhost:8001/rag/graph \
  -H "Content-Type: application/json" \
  -d '{
    "query": "阿尔·帕西诺",
    "max_graph_items": 30,
    "get_vertex_only": false
  }'
Text2Gremlin 端点
3. 自然语言转 Gremlin
POST /text2gremlin
将自然语言查询转换为可执行的 Gremlin 命令。
请求体
{
  "query": "查找所有由弗朗西斯·福特·科波拉执导的电影",
  "example_num": 5,
  "gremlin_prompt": "",
  "output_types": ["GREMLIN", "RESULT"],
  "client_config": {
    "url": "127.0.0.1:8080",
    "graph": "hugegraph",
    "user": "admin",
    "pwd": "admin",
    "gs": ""
  }
}
参数说明:
| 字段 | 类型 | 必需 | 默认值 | 描述 |
|---|---|---|---|---|
query | string | 是 | - | 自然语言查询 |
example_num | integer | 否 | 5 | 使用的示例模板数量 |
gremlin_prompt | string | 否 | "" | Gremlin 生成的自定义提示词 |
output_types | array | 否 | null | 输出类型:[“GREMLIN”, “RESULT”, “CYPHER”] |
client_config | object | 否 | null | 图连接覆盖 |
输出类型:
GREMLIN:生成的 Gremlin 查询RESULT:图的执行结果CYPHER:Cypher 查询(如果请求)
响应
{
  "gremlin": "g.V().has('person','name','弗朗西斯·福特·科波拉').out('directed').hasLabel('movie').values('title')",
  "result": [
    "教父",
    "教父 2",
    "现代启示录"
  ]
}
示例(curl)
curl -X POST http://localhost:8001/text2gremlin \
  -H "Content-Type: application/json" \
  -d '{
    "query": "查找所有由弗朗西斯·福特·科波拉执导的电影",
    "output_types": ["GREMLIN", "RESULT"]
  }'
配置端点
4. 更新图连接
POST /config/graph
动态更新 HugeGraph 连接设置。
请求体
{
  "url": "127.0.0.1:8080",
  "name": "hugegraph",
  "user": "admin",
  "pwd": "admin",
  "gs": ""
}
响应
{
  "status_code": 201,
  "message": "图配置更新成功"
}
5. 更新 LLM 配置
POST /config/llm
运行时更新聊天/提取 LLM 设置。
请求体(OpenAI)
{
  "llm_type": "openai",
  "api_key": "sk-your-api-key",
  "api_base": "https://api.openai.com/v1",
  "language_model": "gpt-4o-mini",
  "max_tokens": 4096
}
请求体(Ollama)
{
  "llm_type": "ollama/local",
  "host": "127.0.0.1",
  "port": 11434,
  "language_model": "llama3.1:8b"
}
6. 更新嵌入配置
POST /config/embedding
更新嵌入模型设置。
请求体
{
  "llm_type": "openai",
  "api_key": "sk-your-api-key",
  "api_base": "https://api.openai.com/v1",
  "language_model": "text-embedding-3-small"
}
7. 更新 Reranker 配置
POST /config/rerank
配置重排序器设置。
请求体(Cohere)
{
  "reranker_type": "cohere",
  "api_key": "your-cohere-key",
  "reranker_model": "rerank-multilingual-v3.0",
  "cohere_base_url": "https://api.cohere.com/v1/rerank"
}
请求体(SiliconFlow)
{
  "reranker_type": "siliconflow",
  "api_key": "your-siliconflow-key",
  "reranker_model": "BAAI/bge-reranker-v2-m3"
}
错误响应
所有端点返回标准 HTTP 状态码:
| 代码 | 含义 |
|---|---|
| 200 | 成功 |
| 201 | 已创建(配置已更新) |
| 400 | 错误请求(无效参数) |
| 500 | 内部服务器错误 |
| 501 | 未实现 |
错误响应格式:
{
  "detail": "描述错误的消息"
}
Python 客户端示例
import requests

BASE_URL = "http://localhost:8001"

# 1. 配置图连接
graph_config = {
    "url": "127.0.0.1:8080",
    "name": "hugegraph",
    "user": "admin",
    "pwd": "admin"
}
requests.post(f"{BASE_URL}/config/graph", json=graph_config)

# 2. 执行 RAG 查询
rag_request = {
    "query": "给我讲讲阿尔·帕西诺",
    "graph_only": True,
    "max_graph_items": 30
}
response = requests.post(f"{BASE_URL}/rag", json=rag_request)
print(response.json())

# 3. 从自然语言生成 Gremlin
text2gql_request = {
    "query": "查找所有与阿尔·帕西诺合作的导演",
    "output_types": ["GREMLIN", "RESULT"]
}
response = requests.post(f"{BASE_URL}/text2gremlin", json=text2gql_request)
print(response.json())
另见
- 配置参考 - 完整的 .env 配置指南
- HugeGraph-LLM 概述 - 架构和功能
- 快速入门指南 - Web UI 入门
4 - HugeGraph Computing (OLAP)
DeepWiki 提供实时更新的项目文档,内容更全面准确,适合快速了解项目最新情况。
GitHub 访问: https://github.com/apache/hugegraph-computer
4.1 - HugeGraph-Vermeer Quick Start
一、Vermeer 概述
1.1 运行架构
Vermeer 是一个 Go编写的高性能内存优先的图计算框架 (一次启动,任意执行),支持 15+ OLAP 图算法的极速计算 (大部分秒~分钟级别完成执行),包含 master 和 worker 两种角色。master 目前只有一个 (可增加 HA),worker 可以有多个。
master 是负责通信、转发、汇总的节点,计算量和占用资源量较少。worker 是计算节点,用于存储图数据和运行计算任务,占用大量内存和 cpu。grpc 和 rest 模块分别负责内部通信和外部调用。
该框架的运行配置可以通过命令行参数传入,也可以通过位于 config/ 目录下的配置文件指定,--env 参数可以指定使用哪个配置文件,例如 --env=master 指定使用 master.ini。需要注意 master 需要指定监听的端口号,worker 需要指定监听端口号和 master 的 ip:port。
1.2 运行方法
- 方案一:Docker Compose(推荐)
确保docker-compose.yaml存在于您的项目根目录中。如果没有,以下是一个示例:
services:
  vermeer-master:
    image: hugegraph/vermeer
    container_name: vermeer-master
    volumes:
      - ~/.config:/go/bin/config # Change here to your actual config path
    command: --env=master
    networks:
      vermeer_network:
        ipv4_address: 172.20.0.10 # Assign a static IP for the master

  vermeer-worker:
    image: hugegraph/vermeer
    container_name: vermeer-worker
    volumes:
      - ~/:/go/bin/config # Change here to your actual config path
    command: --env=worker
    networks:
      vermeer_network:
        ipv4_address: 172.20.0.11 # Assign a static IP for the worker

networks:
  vermeer_network:
    driver: bridge
    ipam:
      config:
        - subnet: 172.20.0.0/24 # Define the subnet for your network
修改 docker-compose.yaml
- Volume:例如将两处 ~/:/go/bin/config 改为 /home/user/config:/go/bin/config(或您自己的配置目录)。
- Subnet:根据实际情况修改子网IP。请注意,每个容器需要访问的端口在config文件中指定,具体请参照项目
config文件夹下内容。
在项目目录构建镜像并启动(或者先用 docker build 再 docker-compose up)
# 构建镜像(在项目根 vermeer 目录)
docker build -t hugegraph/vermeer .

# 启动(在 vermeer 根目录)
docker-compose up -d
# 或使用新版 CLI:
# docker compose up -d
查看日志 / 停止 / 删除:
docker-compose logs -f
docker-compose down
- 方案二:通过 docker run 单独启动(手动创建网络并分配静态 IP)
确保CONFIG_DIR对Docker进程具有适当的读取/执行权限。
构建镜像:
docker build -t hugegraph/vermeer .
创建自定义 bridge 网络(一次性操作):
docker network create --driver bridge \
  --subnet 172.20.0.0/24 \
  vermeer_network
运行 master(调整 CONFIG_DIR 为您的绝对配置路径,可以根据实际情况调整IP):
CONFIG_DIR=/home/user/config

docker run -d \
  --name vermeer-master \
  --network vermeer_network --ip 172.20.0.10 \
  -v ${CONFIG_DIR}:/go/bin/config \
  hugegraph/vermeer \
  --env=master
运行 worker:
docker run -d \
  --name vermeer-worker \
  --network vermeer_network --ip 172.20.0.11 \
  -v ${CONFIG_DIR}:/go/bin/config \
  hugegraph/vermeer \
  --env=worker
查看日志 / 停止 / 删除:
docker logs -f vermeer-master
docker logs -f vermeer-worker

docker stop vermeer-master vermeer-worker
docker rm vermeer-master vermeer-worker

# 删除自定义网络(如果需要)
docker network rm vermeer_network
- 方案三:从源码构建
构建。具体请参照 Vermeer Readme。
go build
在进入文件夹目录后输入 ./vermeer --env=master 或 ./vermeer --env=worker01
二、任务创建类 rest api
2.1 简介
此类 rest api 提供所有创建任务的功能,包括读取图数据和多种计算功能,提供异步返回和同步返回两种接口。返回的内容均包含所创建任务的信息。使用 vermeer 的整体流程是先创建读取图的任务,待图读取完毕后创建计算任务执行计算。图不会自动被删除,在一个图上运行多个计算任务无需多次重复读取,如需删除可用删除图接口。任务状态可分为读取任务状态和计算任务状态。通常情况下客户端仅需了解创建、任务中、任务结束和任务错误四种状态。图状态是图是否可用的判断依据,若图正在读取中或图状态错误,无法使用该图创建计算任务。图删除接口仅在 loaded 和 error 状态且该图无计算任务时可用。
可以使用的 url 如下:
- 异步返回接口 POST http://master_ip:port/tasks/create 仅返回任务创建是否成功,需通过主动查询任务状态判断是否完成。
- 同步返回接口 POST http://master_ip:port/tasks/create/sync 在任务结束后返回。
2.2 加载图数据
具体参数参考 Vermeer 参数列表文档。
vermeer提供三种加载方式:
- 从本地加载
可以预先获取数据集,例如 twitter-2010 数据集。获取方式:https://snap.stanford.edu/data/twitter-2010.html,第一个 twitter-2010.txt.gz 即可。
request 示例:
POST http://localhost:8688/tasks/create
{
 "task_type": "load",
 "graph": "testdb",
 "params": {
  "load.parallel": "50",
  "load.type": "local",
  "load.vertex_files": "{\"localhost\":\"data/twitter-2010.v_[0,99]\"}",
  "load.edge_files": "{\"localhost\":\"data/twitter-2010.e_[0,99]\"}",
  "load.use_out_degree": "1",
  "load.use_outedge": "1"
 }
}
- 从hugegraph加载
request 示例:
⚠️ 安全警告:切勿在配置文件或代码中存储真实密码。请改用环境变量或安全的凭据管理系统。
POST http://localhost:8688/tasks/create
{
  "task_type": "load",
  "graph": "testdb",
  "params": {
    "load.parallel": "50",
    "load.type": "hugegraph",
    "load.hg_pd_peers": "[\"<your-hugegraph-ip>:8686\"]",
    "load.hugegraph_name": "DEFAULT/hugegraph2/g",
    "load.hugegraph_username": "admin",
    "load.hugegraph_password": "<your-password-here>",
    "load.use_out_degree": "1",
    "load.use_outedge": "1"
  }
}
- 从hdfs加载
request 示例:
POST http://localhost:8688/tasks/create
{
  "task_type": "load",
  "graph": "testdb",
  "params": {
    "load.parallel": "50",
    "load.type": "hdfs",
    "load.hdfs_namenode": "name_node1:9000",
    "load.hdfs_conf_path": "/path/to/conf",
    "load.krb_realm": "EXAMPLE.COM",
    "load.krb_name": "user@EXAMPLE.COM",
    "load.krb_keytab_path": "/path/to/keytab",
    "load.krb_conf_path": "/path/to/krb5.conf",
    "load.hdfs_use_krb": "1",
    "load.vertex_files": "/data/graph/vertices",
    "load.edge_files": "/data/graph/edges",
    "load.use_out_degree": "1",
    "load.use_outedge": "1"
  }
}
2.3 输出计算结果
所有的 vermeer 计算任务均支持多种结果输出方式,可自定义输出方式:local、hdfs、afs 或 hugegraph,在发送请求时的 params 参数下加入对应参数,即可生效。指定 output.need_statistics 为 1 时,支持计算结果统计信息输出,结果会写在接口任务信息内。统计模式算子目前支持 “count” 和 “modularity” 。但仅针对社区发现算法适用。
具体参数参考 Vermeer 参数列表文档。
request 示例:
POST http://localhost:8688/tasks/create
{
 "task_type": "compute",
 "graph": "testdb",
 "params": {
 "compute.algorithm": "pagerank",
 "compute.parallel": "10",
 "compute.max_step": "10",
 "output.type": "local",
 "output.parallel": "1",
 "output.file_path": "result/pagerank"
  }
}
三、支持的算法
3.1 PageRank
PageRank 算法又称网页排名算法,是一种由搜索引擎根据网页(节点)之间相互的超链接进行计算的技
术,用来体现网页(节点)的相关性和重要性。
- 如果一个网页被很多其他网页链接到,说明这个网页比较重要,也就是其 PageRank 值会相对较高。
- 如果一个 PageRank 值很高的网页链接到其他网页,那么被链接到的网页的 PageRank 值会相应地提高。
PageRank 算法适用于网页排序、社交网络重点人物发掘等场景。
request 示例:
POST http://localhost:8688/tasks/create
{
 "task_type": "compute",
 "graph": "testdb",
 "params": {
 "compute.algorithm": "pagerank",
 "compute.parallel":"10",
 "output.type":"local",
 "output.parallel":"1",
 "output.file_path":"result/pagerank",
 "compute.max_step":"10"
 }
}
3.2 WCC(弱连通分量)
弱连通分量,计算无向图中所有联通的子图,输出各顶点所属的弱联通子图 id,表明各个点之间的连通性,区分不同的连通社区。
request 示例:
POST http://localhost:8688/tasks/create
{
 "task_type": "compute",
 "graph": "testdb",
 "params": {
 "compute.algorithm": "wcc",
 "compute.parallel":"10",
 "output.type":"local",
 "output.parallel":"1",
 "output.file_path":"result/wcc",
 "compute.max_step":"10"
 }
}
3.3 LPA(标签传播)
标签传递算法,是一种图聚类算法,常用在社交网络中,用于发现潜在的社区。
request 示例:
POST http://localhost:8688/tasks/create
{
 "task_type": "compute",
 "graph": "testdb",
 "params": {
 "compute.algorithm": "lpa",
 "compute.parallel":"10",
 "output.type":"local",
 "output.parallel":"1",
 "output.file_path":"result/lpa",
 "compute.max_step":"10"
 }
}
3.4 Degree Centrality(度中心性)
度中心性算法,算法用于计算图中每个节点的度中心性值,支持无向图和有向图。度中心性是衡量节点重要性的重要指标,节点与其它节点的边越多,则节点的度中心性值越大,节点在图中的重要性也就越高。在无向图中,度中心性的计算是基于边信息统计节点出现次数,得出节点的度中心性的值,在有向图中则基于边的方向进行筛选,基于输入边或输出边信息统计节点出现次数,得到节点的入度值或出度值。它表明各个点的重要性,一般越重要的点度数越高。
request 示例:
POST http://localhost:8688/tasks/create
{
 "task_type": "compute",
 "graph": "testdb",
 "params": {
 "compute.algorithm": "degree",
 "compute.parallel":"10",
 "output.type":"local",
 "output.parallel":"1",
 "output.file_path":"result/degree",
 "degree.direction":"both"
 }
}
3.5 Closeness Centrality(紧密中心性)
紧密中心性(Closeness Centrality)用于计算一个节点到所有其他可达节点的最短距离的倒数,进行累积后归一化的值。紧密中心度可以用来衡量信息从该节点传输到其他节点的时间长短。节点的“Closeness Centrality”越大,其在所在图中的位置越靠近中心,适用于社交网络中关键节点发掘等场景。
request 示例:
POST http://localhost:8688/tasks/create
{
 "task_type": "compute",
 "graph": "testdb",
 "params": {
 "compute.algorithm": "closeness_centrality",
 "compute.parallel":"10",
 "output.type":"local",
 "output.parallel":"1",
 "output.file_path":"result/closeness_centrality",
 "closeness_centrality.sample_rate":"0.01"
 }
}
3.6 Betweenness Centrality(中介中心性算法)
中介中心性算法(Betweeness Centrality)判断一个节点具有"桥梁"节点的值,值越大说明它作为图中两点间必经路径的可能性越大,典型的例子包括社交网络中的共同关注的人。适用于衡量社群围绕某个节点的聚集程度。
request 示例:
POST http://localhost:8688/tasks/create
{
 "task_type": "compute",
 "graph": "testdb",
 "params": {
 "compute.algorithm": "betweenness_centrality",
 "compute.parallel":"10",
 "output.type":"local",
 "output.parallel":"1",
 "output.file_path":"result/betweenness_centrality",
 "betweenness_centrality.sample_rate":"0.01"
 }
}
3.7 Triangle Count(三角形计数)
三角形计数算法,用于计算通过每个顶点的三角形个数,适用于计算用户之间的关系,关联性是不是成三角形。三角形越多,代表图中节点关联程度越高,组织关系越严密。社交网络中的三角形表示存在有凝聚力的社区,识别三角形有助于理解网络中个人或群体的聚类和相互联系。在金融网络或交易网络中,三角形的存在可能表示存在可疑或欺诈活动,三角形计数可以帮助识别可能需要进一步调查的交易模式。
输出的结果为 每个顶点对应一个 Triangle Count,即为每个顶点所在三角形的个数。
注:该算法为无向图算法,忽略边的方向。
request 示例:
POST http://localhost:8688/tasks/create
{
 "task_type": "compute",
 "graph": "testdb",
 "params": {
 "compute.algorithm": "triangle_count",
 "compute.parallel":"10",
 "output.type":"local",
 "output.parallel":"1",
 "output.file_path":"result/triangle_count"
 }
}
3.8 K-Core
K-Core 算法,标记所有度数为 K 的顶点,适用于图的剪枝,查找图的核心部分。
request 示例:
POST http://localhost:8688/tasks/create
{
 "task_type": "compute",
 "graph": "testdb",
 "params": {
 "compute.algorithm": "kcore",
 "compute.parallel":"10",
 "output.type":"local",
 "output.parallel":"1",
 "output.file_path":"result/kcore",
 "kcore.degree_k":"5"
 }
}
3.9 SSSP(单元最短路径)
单源最短路径算法,求一个点到其他所有点的最短距离。
request 示例:
POST http://localhost:8688/tasks/create
{
 "task_type": "compute",
 "graph": "testdb",
 "params": {
 "compute.algorithm": "sssp",
 "compute.parallel":"10",
 "output.type":"local",
 "output.parallel":"1",
 "output.file_path":"result/degree",
 "sssp.source":"tom"
 }
}
3.10 KOUT
以一个点为起点,获取这个点的 k 层的节点。
request 示例:
POST http://localhost:8688/tasks/create
{
 "task_type": "compute",
 "graph": "testdb",
 "params": {
 "compute.algorithm": "kout",
 "compute.parallel":"10",
 "output.type":"local",
 "output.parallel":"1",
 "output.file_path":"result/kout",
 "kout.source":"tom",
 "compute.max_step":"6"
 }
}
3.11 Louvain
Louvain 算法是一种基于模块度的社区发现算法。其基本思想是网络中节点尝试遍历所有邻居的社区标签,并选择最大化模块度增量的社区标签。在最大化模块度之后,每个社区看成一个新的节点,重复直到模块度不再增大。
Vermeer 上实现的分布式 Louvain 算法受节点顺序、并行计算等因素影响,并且由于 Louvain 算法由于其遍历顺序的随机导致社区压缩也具有一定的随机性,导致重复多次执行可能存在不同的结果。但整体趋势不会有大的变化。
request 示例:
POST http://localhost:8688/tasks/create
{
 "task_type": "compute",
 "graph": "testdb",
 "params": {
 "compute.algorithm": "louvain",
 "compute.parallel":"10",
 "compute.max_step":"1000",
 "louvain.threshold":"0.0000001",
 "louvain.resolution":"1.0",
 "louvain.step":"10",
 "output.type":"local",
 "output.parallel":"1",
 "output.file_path":"result/louvain"
  }
 }
3.12 Jaccard 相似度系数
Jaccard index , 又称为 Jaccard 相似系数(Jaccard similarity coefficient)用于比较有限样本集之间的相似性与差异性。Jaccard 系数值越大,样本相似度越高。用于计算一个给定的源点,与图中其他所有点的 Jaccard 相似系数。
request 示例:
POST http://localhost:8688/tasks/create
{
 "task_type": "compute",
 "graph": "testdb",
 "params": {
 "compute.algorithm": "jaccard",
 "compute.parallel":"10",
 "compute.max_step":"2",
 "jaccard.source":"123",
 "output.type":"local",
 "output.parallel":"1",
 "output.file_path":"result/jaccard"
 }
}
3.13 Personalized PageRank
个性化的 pagerank 的目标是要计算所有节点相对于用户 u 的相关度。从用户 u 对应的节点开始游走,每到一个节点都以 1-d 的概率停止游走并从 u 重新开始,或者以 d 的概率继续游走,从当前节点指向的节点中按照均匀分布随机选择一个节点往下游走。用于给定一个起点,计算此起点开始游走的个性化 pagerank 得分。适用于社交推荐等场景。
由于计算需要使用出度,需要在读取图时需要设置 load.use_out_degree 为 1。
request 示例:
POST http://localhost:8688/tasks/create
{
 "task_type": "compute",
 "graph": "testdb",
 "params": {
 "compute.algorithm": "ppr",
 "compute.parallel":"100",
 "compute.max_step":"10",
 "ppr.source":"123",
 "ppr.damping":"0.85",
 "ppr.diff_threshold":"0.00001",
 "output.type":"local",
 "output.parallel":"1",
 "output.file_path":"result/ppr"
 }
}
3.14 全图 Kout
计算图的所有节点的k度邻居(不包含自己以及1~k-1度的邻居),由于全图kout算法内存膨胀比较厉害,目前k限制在1和2,另外,全局kout算法支持过滤功能( 参数如:“compute.filter”:“risk_level==1”),在计算第k度的是时候进行过滤条件的判断,符合过滤条件的进入最终结果集,算法最终输出是符合条件的邻居个数。
request 示例:
POST http://localhost:8688/tasks/create
{
 "task_type": "compute",
 "graph": "testdb",
 "params": {
 "compute.algorithm": "kout_all",
 "compute.parallel":"10",
 "output.type":"local",
 "output.parallel":"10",
 "output.file_path":"result/kout",
 "compute.max_step":"2",
 "compute.filter":"risk_level==1"
 }
}
3.15 集聚系数 clustering coefficient
集聚系数表示一个图中节点聚集程度的系数。在现实的网络中,尤其是在特定的网络中,由于相对高密度连接点的关系,节点总是趋向于建立一组严密的组织关系。集聚系数算法(Cluster Coefficient)用于计算图中节点的聚集程度。本算法为局部集聚系数。局部集聚系数可以测量图中每一个结点附近的集聚程度。
request 示例:
POST http://localhost:8688/tasks/create
{
 "task_type": "compute",
 "graph": "testdb",
 "params": {
 "compute.algorithm": "clustering_coefficient",
 "compute.parallel":"100",
 "compute.max_step":"10",
 "output.type":"local",
 "output.parallel":"1",
 "output.file_path":"result/cc"
 }
}
3.16 SCC(强连通分量)
在有向图的数学理论中,如果一个图的每一个顶点都可从该图其他任意一点到达,则称该图是强连通的。在任意有向图中能够实现强连通的部分我们称其为强连通分量。它表明各个点之间的连通性,区分不同的连通社区。
POST http://localhost:8688/tasks/create
{
 "task_type": "compute",
 "graph": "testdb",
 "params": {
 "compute.algorithm": "scc",
 "compute.parallel":"10",
 "output.type":"local",
 "output.parallel":"1",
 "output.file_path":"result/scc",
 "compute.max_step":"200"
 }
}
🚧, 后续随时更新完善,欢迎随时提出建议和意见。
4.2 - HugeGraph-Computer Quick Start
1 HugeGraph-Computer 概述
HugeGraph-Computer 是分布式图处理系统 (OLAP). 它是 Pregel的一个实现。它可以运行在 Kubernetes(K8s)/Yarn 上。(它侧重可支持百亿~千亿的图数据量下进行图计算, 会使用磁盘进行排序和加速, 这是它和 Vermeer 相对最大的区别之一)
特性
- 支持分布式 MPP 图计算,集成 HugeGraph 作为图输入输出存储。
- 算法基于 BSP(Bulk Synchronous Parallel) 模型,通过多次并行迭代进行计算,每一次迭代都是一次超步。
- 自动内存管理。该框架永远不会出现 OOM(内存不足),因为如果它没有足够的内存来容纳所有数据,它会将一些数据拆分到磁盘。
- 边的部分或超级节点的消息可以在内存中,所以你永远不会丢失它。
- 您可以从 HDFS 或 HugeGraph 或任何其他系统加载数据。
- 您可以将结果输出到 HDFS 或 HugeGraph,或任何其他系统。
- 易于开发新算法。您只需要像在单个服务器中一样专注于仅顶点处理,而不必担心消息传输和内存存储管理。
2 依赖
2.1 安装 Java 11 (JDK 11)
必须在 ≥ Java 11 的环境上启动 Computer,然后自行配置。
在往下阅读之前务必执行 java -version 命令查看 jdk 版本
3 开始
3.1 在本地运行 PageRank 算法
要使用 HugeGraph-Computer 运行算法,必须装有 Java 11 或更高版本。
还需要首先部署 HugeGraph-Server 和 Etcd.
有两种方式可以获取 HugeGraph-Computer:
- 下载已编译的压缩包
- 克隆源码编译打包
3.1.1 下载已编译的压缩包
下载最新版本的 HugeGraph-Computer release 包:
wget https://downloads.apache.org/hugegraph/${version}/apache-hugegraph-computer-incubating-${version}.tar.gz
tar zxvf apache-hugegraph-computer-incubating-${version}.tar.gz -C hugegraph-computer
3.1.2 克隆源码编译打包
克隆最新版本的 HugeGraph-Computer 源码包:
$ git clone https://github.com/apache/hugegraph-computer.git
编译生成 tar 包:
cd hugegraph-computer
mvn clean package -DskipTests
3.1.3 启动 master 节点
您可以使用
-c参数指定配置文件,更多 computer 配置请看:Computer Config Options
cd hugegraph-computer
bin/start-computer.sh -d local -r master
3.1.4 启动 worker 节点
bin/start-computer.sh -d local -r worker
3.1.5 查询算法结果
2.5.1 为 server 启用 OLAP 索引查询
如果没有启用 OLAP 索引,则需要启用,更多参考:modify-graphs-read-mode
PUT http://localhost:8080/graphs/hugegraph/graph_read_mode
"ALL"
3.1.5.2 查询 page_rank 属性值:
curl "http://localhost:8080/graphs/hugegraph/graph/vertices?page&limit=3" | gunzip
3.2 在 Kubernetes 中运行 PageRank 算法
要使用 HugeGraph-Computer 运行算法,您需要先部署 HugeGraph-Server
3.2.1 安装 HugeGraph-Computer CRD
# Kubernetes version >= v1.16
kubectl apply -f https://raw.githubusercontent.com/apache/hugegraph-computer/master/computer-k8s-operator/manifest/hugegraph-computer-crd.v1.yaml
# Kubernetes version < v1.16
kubectl apply -f https://raw.githubusercontent.com/apache/hugegraph-computer/master/computer-k8s-operator/manifest/hugegraph-computer-crd.v1beta1.yaml
3.2.2 显示 CRD
kubectl get crd
NAME CREATED AT
hugegraphcomputerjobs.hugegraph.apache.org 2021-09-16T08:01:08Z
3.2.3 安装 hugegraph-computer-operator&etcd-server
kubectl apply -f https://raw.githubusercontent.com/apache/hugegraph-computer/master/computer-k8s-operator/manifest/hugegraph-computer-operator.yaml
3.2.4 等待 hugegraph-computer-operator&etcd-server 部署完成
kubectl get pod -n hugegraph-computer-operator-system
NAME READY STATUS RESTARTS AGE
hugegraph-computer-operator-controller-manager-58c5545949-jqvzl 1/1 Running 0 15h
hugegraph-computer-operator-etcd-28lm67jxk5 1/1 Running 0 15h
3.2.5 提交作业
更多 computer crd spec 请看:Computer CRD
更多 Computer 配置请看:Computer Config Options
cat <<EOF | kubectl apply --filename -
apiVersion: hugegraph.apache.org/v1
kind: HugeGraphComputerJob
metadata:
namespace: hugegraph-computer-operator-system
name: &jobName pagerank-sample
spec:
jobId: *jobName
algorithmName: page_rank
image: hugegraph/hugegraph-computer:latest # algorithm image url
jarFile: /hugegraph/hugegraph-computer/algorithm/builtin-algorithm.jar # algorithm jar path
pullPolicy: Always
workerCpu: "4"
workerMemory: "4Gi"
workerInstances: 5
computerConf:
job.partitions_count: "20"
algorithm.params_class: org.apache.hugegraph.computer.algorithm.centrality.pagerank.PageRankParams
hugegraph.url: http://${hugegraph-server-host}:${hugegraph-server-port} # hugegraph server url
hugegraph.name: hugegraph # hugegraph graph name
EOF
3.2.6 显示作业
kubectl get hcjob/pagerank-sample -n hugegraph-computer-operator-system
NAME JOBID JOBSTATUS
pagerank-sample pagerank-sample RUNNING
3.2.7 显示节点日志
# Show the master log
kubectl logs -l component=pagerank-sample-master -n hugegraph-computer-operator-system
# Show the worker log
kubectl logs -l component=pagerank-sample-worker -n hugegraph-computer-operator-system
# Show diagnostic log of a job
# 注意: 诊断日志仅在作业失败时存在,并且只会保存一小时。
kubectl get event --field-selector reason=ComputerJobFailed --field-selector involvedObject.name=pagerank-sample -n hugegraph-computer-operator-system
3.2.8 显示作业的成功事件
NOTE: it will only be saved for one hour
kubectl get event --field-selector reason=ComputerJobSucceed --field-selector involvedObject.name=pagerank-sample -n hugegraph-computer-operator-system
3.2.9 查询算法结果
如果输出到 Hugegraph-Server 则与 Locally 模式一致,如果输出到 HDFS ,请检查 hugegraph-computerresults{jobId}目录下的结果文件。
4 内置算法文档
4.1 支持的算法列表:
中心性算法:
- PageRank
- BetweennessCentrality
- ClosenessCentrality
- DegreeCentrality
社区算法:
- ClusteringCoefficient
- Kcore
- Lpa
- TriangleCount
- Wcc
路径算法:
- RingsDetection
- RingsDetectionWithFilter
更多算法请看:Built-In algorithms
4.2 算法描述
TODO
5 算法开发指南
TODO
6 注意事项
- 如果 computer-k8s 模块下面的某些类不存在,你需要运行
mvn compile来提前生成对应的类。
4.3 - HugeGraph-Computer 配置参考
Computer 配置选项
默认值说明:
- 以下配置项显示的是代码默认值(定义在
ComputerOptions.java中)- 当打包配置文件(
conf/computer.properties分发包中)指定了不同的值时,会以值 (打包: 值)的形式标注- 示例:
300000 (打包: 100000)表示代码默认值为 300000,但分发包默认值为 100000- 对于生产环境部署,除非明确覆盖,否则打包默认值优先生效
1. 基础配置
HugeGraph-Computer 核心作业设置。
| 配置项 | 默认值 | 说明 |
|---|---|---|
| hugegraph.url | http://127.0.0.1:8080 | HugeGraph 服务器 URL,用于加载数据和写回结果。 |
| hugegraph.name | hugegraph | 图名称,用于加载数据和写回结果。 |
| hugegraph.username | "" (空) | HugeGraph 认证用户名(如果未启用认证则留空)。 |
| hugegraph.password | "" (空) | HugeGraph 认证密码(如果未启用认证则留空)。 |
| job.id | local_0001 (打包: local_001) | YARN 集群或 K8s 集群上的作业标识符。 |
| job.namespace | "" (空) | 作业命名空间,可以分隔不同的数据源。🔒 由系统管理 - 不要手动修改。 |
| job.workers_count | 1 | 执行一个图算法作业的 Worker 数量。🔒 在 K8s 中由系统管理 - 不要手动修改。 |
| job.partitions_count | 1 | 执行一个图算法作业的分区数量。 |
| job.partitions_thread_nums | 4 | 分区并行计算的线程数量。 |
2. 算法配置
计算逻辑的算法特定配置。
| 配置项 | 默认值 | 说明 |
|---|---|---|
| algorithm.params_class | org.apache.hugegraph.computer.core.config.Null | ⚠️ 必填 在算法运行前用于传递算法参数的类。 |
| algorithm.result_class | org.apache.hugegraph.computer.core.config.Null | 顶点值的类,用于存储顶点的计算结果。 |
| algorithm.message_class | org.apache.hugegraph.computer.core.config.Null | 计算顶点时传递的消息类。 |
3. 输入配置
从 HugeGraph 或其他数据源加载输入数据的配置。
3.1 输入源
| 配置项 | 默认值 | 说明 |
|---|---|---|
| input.source_type | hugegraph-server | 加载输入数据的源类型,允许值:[‘hugegraph-server’, ‘hugegraph-loader’]。‘hugegraph-loader’ 表示使用 hugegraph-loader 从 HDFS 或文件加载数据。如果使用 ‘hugegraph-loader’,请配置 ‘input.loader_struct_path’ 和 ‘input.loader_schema_path’。 |
| input.loader_struct_path | "" (空) | Loader 输入的结构路径,仅在 input.source_type=loader 启用时生效。 |
| input.loader_schema_path | "" (空) | Loader 输入的 schema 路径,仅在 input.source_type=loader 启用时生效。 |
3.2 输入分片
| 配置项 | 默认值 | 说明 |
|---|---|---|
| input.split_size | 1048576 (1 MB) | 输入分片大小(字节)。 |
| input.split_max_splits | 10000000 | 最大输入分片数量。 |
| input.split_page_size | 500 | 流式加载输入分片数据的页面大小。 |
| input.split_fetch_timeout | 300 | 获取输入分片的超时时间(秒)。 |
3.3 输入处理
| 配置项 | 默认值 | 说明 |
|---|---|---|
| input.filter_class | org.apache.hugegraph.computer.core.input.filter.DefaultInputFilter | 创建输入过滤器对象的类。输入过滤器用于根据用户需求过滤顶点边。 |
| input.edge_direction | OUT | 要加载的边的方向,允许值:[OUT, IN, BOTH]。当值为 BOTH 时,将加载 OUT 和 IN 两个方向的边。 |
| input.edge_freq | MULTIPLE | 一对顶点之间可以存在的边的频率,允许值:[SINGLE, SINGLE_PER_LABEL, MULTIPLE]。SINGLE 表示一对顶点之间只能存在一条边(通过 sourceId + targetId 标识);SINGLE_PER_LABEL 表示每个边标签在一对顶点之间可以有一条边(通过 sourceId + edgeLabel + targetId 标识);MULTIPLE 表示一对顶点之间可以存在多条边(通过 sourceId + edgeLabel + sortValues + targetId 标识)。 |
| input.max_edges_in_one_vertex | 200 | 允许附加到一个顶点的最大邻接边数量。邻接边将作为一个批处理单元一起存储和传输。 |
3.4 输入性能
| 配置项 | 默认值 | 说明 |
|---|---|---|
| input.send_thread_nums | 4 | 并行发送顶点或边的线程数量。 |
4. 快照与存储配置
HugeGraph-Computer 支持快照功能,可将顶点/边分区保存到本地存储或 MinIO 对象存储,用于断点恢复或加速重复计算。
4.1 基础快照配置
| 配置项 | 默认值 | 说明 |
|---|---|---|
| snapshot.write | false | 是否写入输入顶点/边分区的快照。 |
| snapshot.load | false | 是否从顶点/边分区的快照加载。 |
| snapshot.name | "" (空) | 用户自定义的快照名称,用于区分不同的快照。 |
4.2 MinIO 集成(可选)
MinIO 可用作 K8s 部署中快照的分布式对象存储后端。
| 配置项 | 默认值 | 说明 |
|---|---|---|
| snapshot.minio_endpoint | "" (空) | MinIO 服务端点(例如 http://minio:9000)。使用 MinIO 时必填。 |
| snapshot.minio_access_key | minioadmin | MinIO 认证访问密钥。 |
| snapshot.minio_secret_key | minioadmin | MinIO 认证密钥。 |
| snapshot.minio_bucket_name | "" (空) | 用于存储快照数据的 MinIO 存储桶名称。 |
使用场景:
- 断点恢复:作业失败后从快照恢复,避免重新加载数据
- 重复计算:多次运行同一算法时从快照加载数据以加速启动
- A/B 测试:保存同一数据集的多个快照版本,测试不同的算法参数
示例:本地快照(在 computer.properties 中):
snapshot.write=true
snapshot.name=pagerank-snapshot-20260201
示例:MinIO 快照(在 K8s CRD computerConf 中):
computerConf:
snapshot.write: "true"
snapshot.name: "pagerank-snapshot-v1"
snapshot.minio_endpoint: "http://minio:9000"
snapshot.minio_access_key: "my-access-key"
snapshot.minio_secret_key: "my-secret-key"
snapshot.minio_bucket_name: "hugegraph-snapshots"
5. Worker 与 Master 配置
Worker 和 Master 计算逻辑的配置。
5.1 Master 配置
| 配置项 | 默认值 | 说明 |
|---|---|---|
| master.computation_class | org.apache.hugegraph.computer.core.master.DefaultMasterComputation | Master 计算是可以决定是否继续下一个超步的计算。它在每个超步结束时在 master 上运行。 |
5.2 Worker 计算
| 配置项 | 默认值 | 说明 |
|---|---|---|
| worker.computation_class | org.apache.hugegraph.computer.core.config.Null | 创建 worker 计算对象的类。Worker 计算用于在每个超步中计算每个顶点。 |
| worker.combiner_class | org.apache.hugegraph.computer.core.config.Null | Combiner 可以将消息组合为一个顶点的一个值。例如,PageRank 算法可以将一个顶点的消息组合为一个求和值。 |
| worker.partitioner | org.apache.hugegraph.computer.core.graph.partition.HashPartitioner | 分区器,决定顶点应该在哪个分区中,以及分区应该在哪个 worker 中。 |
5.3 Worker 组合器
| 配置项 | 默认值 | 说明 |
|---|---|---|
| worker.vertex_properties_combiner_class | org.apache.hugegraph.computer.core.combiner.OverwritePropertiesCombiner | 组合器可以在输入步骤将同一顶点的多个属性组合为一个属性。 |
| worker.edge_properties_combiner_class | org.apache.hugegraph.computer.core.combiner.OverwritePropertiesCombiner | 组合器可以在输入步骤将同一边的多个属性组合为一个属性。 |
5.4 Worker 缓冲区
| 配置项 | 默认值 | 说明 |
|---|---|---|
| worker.received_buffers_bytes_limit | 104857600 (100 MB) | 接收数据缓冲区的限制字节数。所有缓冲区的总大小不能超过此限制。如果接收缓冲区达到此限制,它们将被合并到文件中(溢出到磁盘)。 |
| worker.write_buffer_capacity | 52428800 (50 MB) | 用于存储顶点或消息的写缓冲区的初始大小。 |
| worker.write_buffer_threshold | 52428800 (50 MB) | 写缓冲区的阈值。超过它将触发排序。写缓冲区用于存储顶点或消息。 |
5.5 Worker 数据与超时
| 配置项 | 默认值 | 说明 |
|---|---|---|
| worker.data_dirs | [jobs] | 用逗号分隔的目录,接收的顶点和消息可以持久化到其中。 |
| worker.wait_sort_timeout | 600000 (10 分钟) | 消息处理程序等待排序线程对一批缓冲区进行排序的最大超时时间(毫秒)。 |
| worker.wait_finish_messages_timeout | 86400000 (24 小时) | 消息处理程序等待所有 worker 完成消息的最大超时时间(毫秒)。 |
6. I/O 与输出配置
输出计算结果的配置。
6.1 输出类与结果
| 配置项 | 默认值 | 说明 |
|---|---|---|
| output.output_class | org.apache.hugegraph.computer.core.output.LogOutput | 输出每个顶点计算结果的类。在迭代计算后调用。 |
| output.result_name | value | 该值由 WORKER_COMPUTATION_CLASS 创建的实例的 #name() 动态分配。 |
| output.result_write_type | OLAP_COMMON | 输出到 HugeGraph 的结果写入类型,允许值:[OLAP_COMMON, OLAP_SECONDARY, OLAP_RANGE]。 |
6.2 输出行为
| 配置项 | 默认值 | 说明 |
|---|---|---|
| output.with_adjacent_edges | false | 是否输出顶点的邻接边。 |
| output.with_vertex_properties | false | 是否输出顶点的属性。 |
| output.with_edge_properties | false | 是否输出边的属性。 |
6.3 批量输出
| 配置项 | 默认值 | 说明 |
|---|---|---|
| output.batch_size | 500 | 输出的批处理大小。 |
| output.batch_threads | 1 | 用于批量输出的线程数量。 |
| output.single_threads | 1 | 用于单个输出的线程数量。 |
6.4 HDFS 输出
| 配置项 | 默认值 | 说明 |
|---|---|---|
| output.hdfs_url | hdfs://127.0.0.1:9000 | 输出的 HDFS URL。 |
| output.hdfs_user | hadoop | 输出的 HDFS 用户。 |
| output.hdfs_path_prefix | /hugegraph-computer/results | HDFS 输出结果的目录。 |
| output.hdfs_delimiter | , (逗号) | HDFS 输出的分隔符。 |
| output.hdfs_merge_partitions | true | 是否合并多个分区的输出文件。 |
| output.hdfs_replication | 3 | HDFS 的副本数。 |
| output.hdfs_core_site_path | "" (空) | HDFS core site 路径。 |
| output.hdfs_site_path | "" (空) | HDFS site 路径。 |
| output.hdfs_kerberos_enable | false | 是否为 HDFS 启用 Kerberos 认证。 |
| output.hdfs_kerberos_principal | "" (空) | HDFS 的 Kerberos 认证 principal。 |
| output.hdfs_kerberos_keytab | "" (空) | HDFS 的 Kerberos 认证 keytab 文件。 |
| output.hdfs_krb5_conf | /etc/krb5.conf | Kerberos 配置文件路径。 |
6.5 重试与超时
| 配置项 | 默认值 | 说明 |
|---|---|---|
| output.retry_times | 3 | 输出失败时的重试次数。 |
| output.retry_interval | 10 | 输出失败时的重试间隔(秒)。 |
| output.thread_pool_shutdown_timeout | 60 | 输出线程池关闭的超时时间(秒)。 |
7. 网络与传输配置
Worker 和 Master 之间网络通信的配置。
7.1 服务器配置
| 配置项 | 默认值 | 说明 |
|---|---|---|
| transport.server_host | 127.0.0.1 | 🔒 由系统管理 监听传输数据的服务器主机名或 IP。不要手动修改。 |
| transport.server_port | 0 | 🔒 由系统管理 监听传输数据的服务器端口。如果设置为 0,系统将分配一个随机端口。不要手动修改。 |
| transport.server_threads | 4 | 服务器传输线程的数量。 |
7.2 客户端配置
| 配置项 | 默认值 | 说明 |
|---|---|---|
| transport.client_threads | 4 | 客户端传输线程的数量。 |
| transport.client_connect_timeout | 3000 | 客户端连接到服务器的超时时间(毫秒)。 |
7.3 协议配置
| 配置项 | 默认值 | 说明 |
|---|---|---|
| transport.provider_class | org.apache.hugegraph.computer.core.network.netty.NettyTransportProvider | 传输提供程序,目前仅支持 Netty。 |
| transport.io_mode | AUTO | 网络 IO 模式,允许值:[NIO, EPOLL, AUTO]。AUTO 表示自动选择适当的模式。 |
| transport.tcp_keep_alive | true | 是否启用 TCP keep-alive。 |
| transport.transport_epoll_lt | false | 是否启用 EPOLL 水平触发(仅在 io_mode=EPOLL 时有效)。 |
7.4 缓冲区配置
| 配置项 | 默认值 | 说明 |
|---|---|---|
| transport.send_buffer_size | 0 | Socket 发送缓冲区大小(字节)。0 表示使用系统默认值。 |
| transport.receive_buffer_size | 0 | Socket 接收缓冲区大小(字节)。0 表示使用系统默认值。 |
| transport.write_buffer_high_mark | 67108864 (64 MB) | 写缓冲区的高水位标记(字节)。如果排队字节数 > write_buffer_high_mark,将触发发送不可用。 |
| transport.write_buffer_low_mark | 33554432 (32 MB) | 写缓冲区的低水位标记(字节)。如果排队字节数 < write_buffer_low_mark,将触发发送可用。 |
7.5 流量控制
| 配置项 | 默认值 | 说明 |
|---|---|---|
| transport.max_pending_requests | 8 | 客户端未接收 ACK 的最大数量。如果未接收 ACK 的数量 >= max_pending_requests,将触发发送不可用。 |
| transport.min_pending_requests | 6 | 客户端未接收 ACK 的最小数量。如果未接收 ACK 的数量 < min_pending_requests,将触发发送可用。 |
| transport.min_ack_interval | 200 | 服务器回复 ACK 的最小间隔(毫秒)。 |
7.6 超时配置
| 配置项 | 默认值 | 说明 |
|---|---|---|
| transport.close_timeout | 10000 | 关闭服务器或关闭客户端的超时时间(毫秒)。 |
| transport.sync_request_timeout | 10000 | 发送同步请求后等待响应的超时时间(毫秒)。 |
| transport.finish_session_timeout | 0 | 完成会话的超时时间(毫秒)。0 表示使用 (transport.sync_request_timeout × transport.max_pending_requests)。 |
| transport.write_socket_timeout | 3000 | 将数据写入 socket 缓冲区的超时时间(毫秒)。 |
| transport.server_idle_timeout | 360000 (6 分钟) | 服务器空闲的最大超时时间(毫秒)。 |
7.7 心跳配置
| 配置项 | 默认值 | 说明 |
|---|---|---|
| transport.heartbeat_interval | 20000 (20 秒) | 客户端心跳之间的最小间隔(毫秒)。 |
| transport.max_timeout_heartbeat_count | 120 | 客户端超时心跳的最大次数。如果连续等待心跳响应超时的次数 > max_timeout_heartbeat_count,通道将从客户端关闭。 |
7.8 高级网络设置
| 配置项 | 默认值 | 说明 |
|---|---|---|
| transport.max_syn_backlog | 511 | 服务器端 SYN 队列的容量。0 表示使用系统默认值。 |
| transport.recv_file_mode | true | 是否启用接收缓冲文件模式。如果启用,将使用零拷贝从 socket 接收缓冲区并写入文件。注意:需要操作系统支持零拷贝(例如 Linux sendfile/splice)。 |
| transport.network_retries | 3 | 网络通信不稳定时的重试次数。 |
8. 存储与持久化配置
HGKV(HugeGraph Key-Value)存储引擎和值文件的配置。
8.1 HGKV 配置
| 配置项 | 默认值 | 说明 |
|---|---|---|
| hgkv.max_file_size | 2147483648 (2 GB) | 每个 HGKV 文件的最大字节数。 |
| hgkv.max_data_block_size | 65536 (64 KB) | HGKV 文件数据块的最大字节大小。 |
| hgkv.max_merge_files | 10 | 一次合并的最大文件数。 |
| hgkv.temp_file_dir | /tmp/hgkv | 此文件夹用于在文件合并过程中存储临时文件。 |
8.2 值文件配置
| 配置项 | 默认值 | 说明 |
|---|---|---|
| valuefile.max_segment_size | 1073741824 (1 GB) | 值文件每个段的最大字节数。 |
9. BSP 与协调配置
批量同步并行(BSP)协议和 etcd 协调的配置。
| 配置项 | 默认值 | 说明 |
|---|---|---|
| bsp.etcd_endpoints | http://localhost:2379 | 🔒 在 K8s 中由系统管理 访问 etcd 的端点。对于多个端点,使用逗号分隔列表:http://host1:port1,http://host2:port2。不要在 K8s 部署中手动修改。 |
| bsp.max_super_step | 10 (打包: 2) | 算法的最大超步数。 |
| bsp.register_timeout | 300000 (打包: 100000) | 等待 master 和 worker 注册的最大超时时间(毫秒)。 |
| bsp.wait_workers_timeout | 86400000 (24 小时) | 等待 worker BSP 事件的最大超时时间(毫秒)。 |
| bsp.wait_master_timeout | 86400000 (24 小时) | 等待 master BSP 事件的最大超时时间(毫秒)。 |
| bsp.log_interval | 30000 (30 秒) | 等待 BSP 事件时打印日志的日志间隔(毫秒)。 |
10. 性能调优配置
性能优化的配置。
| 配置项 | 默认值 | 说明 |
|---|---|---|
| allocator.max_vertices_per_thread | 10000 | 每个内存分配器中每个线程处理的最大顶点数。 |
| sort.thread_nums | 4 | 执行内部排序的线程数量。 |
11. 系统管理配置
⚠️ 由系统管理的配置项 - 禁止用户手动修改。
以下配置项由 K8s Operator、Driver 或运行时系统自动管理。手动修改将导致集群通信失败或作业调度错误。
| 配置项 | 管理者 | 说明 |
|---|---|---|
| bsp.etcd_endpoints | K8s Operator | 自动设置为 operator 的 etcd 服务地址 |
| transport.server_host | 运行时 | 自动设置为 pod/容器主机名 |
| transport.server_port | 运行时 | 自动分配随机端口 |
| job.namespace | K8s Operator | 自动设置为作业命名空间 |
| job.id | K8s Operator | 自动从 CRD 设置为作业 ID |
| job.workers_count | K8s Operator | 自动从 CRD workerInstances 设置 |
| rpc.server_host | 运行时 | RPC 服务器主机名(系统管理) |
| rpc.server_port | 运行时 | RPC 服务器端口(系统管理) |
| rpc.remote_url | 运行时 | RPC 远程 URL(系统管理) |
为什么禁止修改:
- BSP/RPC 配置:必须与实际部署的 etcd/RPC 服务匹配。手动覆盖会破坏协调。
- 作业配置:必须与 K8s CRD 规范匹配。不匹配会导致 worker 数量错误。
- 传输配置:必须使用实际的 pod 主机名/端口。手动值会阻止 worker 间通信。
K8s Operator 配置选项
注意:选项需要通过环境变量设置进行转换,例如 k8s.internal_etcd_url => INTERNAL_ETCD_URL
| 配置项 | 默认值 | 说明 |
|---|---|---|
| k8s.auto_destroy_pod | true | 作业完成或失败时是否自动销毁所有 pod。 |
| k8s.close_reconciler_timeout | 120 | 关闭 reconciler 的最大超时时间(毫秒)。 |
| k8s.internal_etcd_url | http://127.0.0.1:2379 | operator 系统的内部 etcd URL。 |
| k8s.max_reconcile_retry | 3 | reconcile 的最大重试次数。 |
| k8s.probe_backlog | 50 | 服务健康探针的最大积压。 |
| k8s.probe_port | 9892 | controller 绑定的用于服务健康探针的端口。 |
| k8s.ready_check_internal | 1000 | 检查就绪的时间间隔(毫秒)。 |
| k8s.ready_timeout | 30000 | 检查就绪的最大超时时间(毫秒)。 |
| k8s.reconciler_count | 10 | reconciler 线程的最大数量。 |
| k8s.resync_period | 600000 | 被监视资源进行 reconcile 的最小频率。 |
| k8s.timezone | Asia/Shanghai | computer 作业和 operator 的时区。 |
| k8s.watch_namespace | hugegraph-computer-system | 监视自定义资源的命名空间。使用 ‘*’ 监视所有命名空间。 |
HugeGraph-Computer CRD
| 字段 | 默认值 | 说明 | 必填 |
|---|---|---|---|
| algorithmName | 算法名称。 | true | |
| jobId | 作业 ID。 | true | |
| image | 算法镜像。 | true | |
| computerConf | computer 配置选项的映射。 | true | |
| workerInstances | worker 实例数量,将覆盖 ‘job.workers_count’ 选项。 | true | |
| pullPolicy | Always | 镜像拉取策略,详情请参考:https://kubernetes.io/docs/concepts/containers/images/#image-pull-policy | false |
| pullSecrets | 镜像拉取密钥,详情请参考:https://kubernetes.io/docs/concepts/containers/images/#specifying-imagepullsecrets-on-a-pod | false | |
| masterCpu | master 的 CPU 限制,单位可以是 ’m’ 或无单位,详情请参考:https://kubernetes.io/docs/concepts/configuration/manage-resources-containers/#meaning-of-cpu | false | |
| workerCpu | worker 的 CPU 限制,单位可以是 ’m’ 或无单位,详情请参考:https://kubernetes.io/docs/concepts/configuration/manage-resources-containers/#meaning-of-cpu | false | |
| masterMemory | master 的内存限制,单位可以是 Ei、Pi、Ti、Gi、Mi、Ki 之一,详情请参考:https://kubernetes.io/docs/concepts/configuration/manage-resources-containers/#meaning-of-memory | false | |
| workerMemory | worker 的内存限制,单位可以是 Ei、Pi、Ti、Gi、Mi、Ki 之一,详情请参考:https://kubernetes.io/docs/concepts/configuration/manage-resources-containers/#meaning-of-memory | false | |
| log4jXml | computer 作业的 log4j.xml 内容。 | false | |
| jarFile | computer 算法的 jar 路径。 | false | |
| remoteJarUri | computer 算法的远程 jar URI,将覆盖算法镜像。 | false | |
| jvmOptions | computer 作业的 Java 启动参数。 | false | |
| envVars | 请参考:https://kubernetes.io/docs/tasks/inject-data-application/define-interdependent-environment-variables/ | false | |
| envFrom | 请参考:https://kubernetes.io/docs/tasks/inject-data-application/define-environment-variable-container/ | false | |
| masterCommand | bin/start-computer.sh | master 的运行命令,等同于 Docker 的 ‘Entrypoint’ 字段。 | false |
| masterArgs | ["-r master", “-d k8s”] | master 的运行参数,等同于 Docker 的 ‘Cmd’ 字段。 | false |
| workerCommand | bin/start-computer.sh | worker 的运行命令,等同于 Docker 的 ‘Entrypoint’ 字段。 | false |
| workerArgs | ["-r worker", “-d k8s”] | worker 的运行参数,等同于 Docker 的 ‘Cmd’ 字段。 | false |
| volumes | 请参考:https://kubernetes.io/docs/concepts/storage/volumes/ | false | |
| volumeMounts | 请参考:https://kubernetes.io/docs/concepts/storage/volumes/ | false | |
| secretPaths | k8s-secret 名称和挂载路径的映射。 | false | |
| configMapPaths | k8s-configmap 名称和挂载路径的映射。 | false | |
| podTemplateSpec | 请参考:https://kubernetes.io/docs/reference/kubernetes-api/workload-resources/pod-template-v1/#PodTemplateSpec | false | |
| securityContext | 请参考:https://kubernetes.io/docs/tasks/configure-pod-container/security-context/ | false |
KubeDriver 配置选项
| 配置项 | 默认值 | 说明 |
|---|---|---|
| k8s.build_image_bash_path | 用于构建镜像的命令路径。 | |
| k8s.enable_internal_algorithm | true | 是否启用内部算法。 |
| k8s.framework_image_url | hugegraph/hugegraph-computer:latest | computer 框架的镜像 URL。 |
| k8s.image_repository_password | 登录镜像仓库的密码。 | |
| k8s.image_repository_registry | 登录镜像仓库的地址。 | |
| k8s.image_repository_url | hugegraph/hugegraph-computer | 镜像仓库的 URL。 |
| k8s.image_repository_username | 登录镜像仓库的用户名。 | |
| k8s.internal_algorithm | [pageRank] | 所有内部算法的名称列表。注意:算法名称在这里使用驼峰命名法(例如 pageRank),但算法实现返回下划线命名法(例如 page_rank)。 |
| k8s.internal_algorithm_image_url | hugegraph/hugegraph-computer:latest | 内部算法的镜像 URL。 |
| k8s.jar_file_dir | /cache/jars/ | 算法 jar 将上传到的目录。 |
| k8s.kube_config | ~/.kube/config | k8s 配置文件的路径。 |
| k8s.log4j_xml_path | computer 作业的 log4j.xml 路径。 | |
| k8s.namespace | hugegraph-computer-system | hugegraph-computer 系统的命名空间。 |
| k8s.pull_secret_names | [] | 拉取镜像的 pull-secret 名称。 |
5 - HugeGraph Client
5.1 - HugeGraph-Java-Client
1 HugeGraph-Client 概述
HugeGraph-Client 向 HugeGraph-Server 发出 HTTP 请求,获取并解析 Server 的执行结果。
提供了 Java/Go/Python 版,
用户可以使用 Client-API 编写代码操作 HugeGraph,比如元数据和图数据的增删改查,或者执行 gremlin 语句等。
后文主要是 Java 使用示例 (其他语言 SDK 可参考对应 READEME 页面)
现在已经支持基于 Go/Python 语言的 HugeGraph Client SDK (version >=1.2.0)
2 环境要求
- java 11 (兼容 java 8)
- maven 3.5+
3 使用流程
使用 HugeGraph-Client 的基本步骤如下:
- 新建Eclipse/ IDEA Maven 项目;
- 在 pom 文件中添加 HugeGraph-Client 依赖;
- 创建类,调用 HugeGraph-Client 接口;
详细使用过程见下节完整示例。
4 完整示例
4.1 新建 Maven 工程
可以选择 Eclipse 或者 Intellij Idea 创建工程:
4.2 添加 hugegraph-client 依赖
添加 hugegraph-client 依赖
<dependencies>
<dependency>
<groupId>org.apache.hugegraph</groupId>
<artifactId>hugegraph-client</artifactId>
<!-- Update to the latest release version -->
<version>1.7.0</version>
</dependency>
</dependencies>
注:Graph 所有组件版本号均保持一致
4.3 Example
4.3.1 SingleExample
import java.io.IOException;
import java.util.Iterator;
import java.util.List;
import org.apache.hugegraph.driver.GraphManager;
import org.apache.hugegraph.driver.GremlinManager;
import org.apache.hugegraph.driver.HugeClient;
import org.apache.hugegraph.driver.SchemaManager;
import org.apache.hugegraph.structure.constant.T;
import org.apache.hugegraph.structure.graph.Edge;
import org.apache.hugegraph.structure.graph.Path;
import org.apache.hugegraph.structure.graph.Vertex;
import org.apache.hugegraph.structure.gremlin.Result;
import org.apache.hugegraph.structure.gremlin.ResultSet;
public class SingleExample {
public static void main(String[] args) throws IOException {
// If connect failed will throw a exception.
HugeClient hugeClient = HugeClient.builder("http://localhost:8080",
"DEFAULT",
"hugegraph")
.configUser("username", "password")
// 这是示例,生产环境需要使用安全的凭证
.build();
SchemaManager schema = hugeClient.schema();
schema.propertyKey("name").asText().ifNotExist().create();
schema.propertyKey("age").asInt().ifNotExist().create();
schema.propertyKey("city").asText().ifNotExist().create();
schema.propertyKey("weight").asDouble().ifNotExist().create();
schema.propertyKey("lang").asText().ifNotExist().create();
schema.propertyKey("date").asDate().ifNotExist().create();
schema.propertyKey("price").asInt().ifNotExist().create();
schema.vertexLabel("person")
.properties("name", "age", "city")
.primaryKeys("name")
.ifNotExist()
.create();
schema.vertexLabel("software")
.properties("name", "lang", "price")
.primaryKeys("name")
.ifNotExist()
.create();
schema.indexLabel("personByCity")
.onV("person")
.by("city")
.secondary()
.ifNotExist()
.create();
schema.indexLabel("personByAgeAndCity")
.onV("person")
.by("age", "city")
.secondary()
.ifNotExist()
.create();
schema.indexLabel("softwareByPrice")
.onV("software")
.by("price")
.range()
.ifNotExist()
.create();
schema.edgeLabel("knows")
.sourceLabel("person")
.targetLabel("person")
.properties("date", "weight")
.ifNotExist()
.create();
schema.edgeLabel("created")
.sourceLabel("person").targetLabel("software")
.properties("date", "weight")
.ifNotExist()
.create();
schema.indexLabel("createdByDate")
.onE("created")
.by("date")
.secondary()
.ifNotExist()
.create();
schema.indexLabel("createdByWeight")
.onE("created")
.by("weight")
.range()
.ifNotExist()
.create();
schema.indexLabel("knowsByWeight")
.onE("knows")
.by("weight")
.range()
.ifNotExist()
.create();
GraphManager graph = hugeClient.graph();
Vertex marko = graph.addVertex(T.LABEL, "person", "name", "marko",
"age", 29, "city", "Beijing");
Vertex vadas = graph.addVertex(T.LABEL, "person", "name", "vadas",
"age", 27, "city", "Hongkong");
Vertex lop = graph.addVertex(T.LABEL, "software", "name", "lop",
"lang", "java", "price", 328);
Vertex josh = graph.addVertex(T.LABEL, "person", "name", "josh",
"age", 32, "city", "Beijing");
Vertex ripple = graph.addVertex(T.LABEL, "software", "name", "ripple",
"lang", "java", "price", 199);
Vertex peter = graph.addVertex(T.LABEL, "person", "name", "peter",
"age", 35, "city", "Shanghai");
marko.addEdge("knows", vadas, "date", "2016-01-10", "weight", 0.5);
marko.addEdge("knows", josh, "date", "2013-02-20", "weight", 1.0);
marko.addEdge("created", lop, "date", "2017-12-10", "weight", 0.4);
josh.addEdge("created", lop, "date", "2009-11-11", "weight", 0.4);
josh.addEdge("created", ripple, "date", "2017-12-10", "weight", 1.0);
peter.addEdge("created", lop, "date", "2017-03-24", "weight", 0.2);
GremlinManager gremlin = hugeClient.gremlin();
System.out.println("==== Path ====");
ResultSet resultSet = gremlin.gremlin("g.V().outE().path()").execute();
Iterator<Result> results = resultSet.iterator();
results.forEachRemaining(result -> {
System.out.println(result.getObject().getClass());
Object object = result.getObject();
if (object instanceof Vertex) {
System.out.println(((Vertex) object).id());
} else if (object instanceof Edge) {
System.out.println(((Edge) object).id());
} else if (object instanceof Path) {
List<Object> elements = ((Path) object).objects();
elements.forEach(element -> {
System.out.println(element.getClass());
System.out.println(element);
});
} else {
System.out.println(object);
}
});
hugeClient.close();
}
}
4.3.2 BatchExample
import java.util.ArrayList;
import java.util.List;
import org.apache.hugegraph.driver.GraphManager;
import org.apache.hugegraph.driver.HugeClient;
import org.apache.hugegraph.driver.SchemaManager;
import org.apache.hugegraph.structure.graph.Edge;
import org.apache.hugegraph.structure.graph.Vertex;
public class BatchExample {
public static void main(String[] args) {
// If connect failed will throw a exception.
HugeClient hugeClient = HugeClient.builder("http://localhost:8080",
"DEFAULT",
"hugegraph")
.configUser("username", "password")
// 这是示例,生产环境需要使用安全的凭证
.build();
SchemaManager schema = hugeClient.schema();
schema.propertyKey("name").asText().ifNotExist().create();
schema.propertyKey("age").asInt().ifNotExist().create();
schema.propertyKey("lang").asText().ifNotExist().create();
schema.propertyKey("date").asDate().ifNotExist().create();
schema.propertyKey("price").asInt().ifNotExist().create();
schema.vertexLabel("person")
.properties("name", "age")
.primaryKeys("name")
.ifNotExist()
.create();
schema.vertexLabel("person")
.properties("price")
.nullableKeys("price")
.append();
schema.vertexLabel("software")
.properties("name", "lang", "price")
.primaryKeys("name")
.ifNotExist()
.create();
schema.indexLabel("softwareByPrice")
.onV("software").by("price")
.range()
.ifNotExist()
.create();
schema.edgeLabel("knows")
.link("person", "person")
.properties("date")
.ifNotExist()
.create();
schema.edgeLabel("created")
.link("person", "software")
.properties("date")
.ifNotExist()
.create();
schema.indexLabel("createdByDate")
.onE("created").by("date")
.secondary()
.ifNotExist()
.create();
// get schema object by name
System.out.println(schema.getPropertyKey("name"));
System.out.println(schema.getVertexLabel("person"));
System.out.println(schema.getEdgeLabel("knows"));
System.out.println(schema.getIndexLabel("createdByDate"));
// list all schema objects
System.out.println(schema.getPropertyKeys());
System.out.println(schema.getVertexLabels());
System.out.println(schema.getEdgeLabels());
System.out.println(schema.getIndexLabels());
GraphManager graph = hugeClient.graph();
Vertex marko = new Vertex("person").property("name", "marko")
.property("age", 29);
Vertex vadas = new Vertex("person").property("name", "vadas")
.property("age", 27);
Vertex lop = new Vertex("software").property("name", "lop")
.property("lang", "java")
.property("price", 328);
Vertex josh = new Vertex("person").property("name", "josh")
.property("age", 32);
Vertex ripple = new Vertex("software").property("name", "ripple")
.property("lang", "java")
.property("price", 199);
Vertex peter = new Vertex("person").property("name", "peter")
.property("age", 35);
Edge markoKnowsVadas = new Edge("knows").source(marko).target(vadas)
.property("date", "2016-01-10");
Edge markoKnowsJosh = new Edge("knows").source(marko).target(josh)
.property("date", "2013-02-20");
Edge markoCreateLop = new Edge("created").source(marko).target(lop)
.property("date",
"2017-12-10");
Edge joshCreateRipple = new Edge("created").source(josh).target(ripple)
.property("date",
"2017-12-10");
Edge joshCreateLop = new Edge("created").source(josh).target(lop)
.property("date", "2009-11-11");
Edge peterCreateLop = new Edge("created").source(peter).target(lop)
.property("date",
"2017-03-24");
List<Vertex> vertices = new ArrayList<>();
vertices.add(marko);
vertices.add(vadas);
vertices.add(lop);
vertices.add(josh);
vertices.add(ripple);
vertices.add(peter);
List<Edge> edges = new ArrayList<>();
edges.add(markoKnowsVadas);
edges.add(markoKnowsJosh);
edges.add(markoCreateLop);
edges.add(joshCreateRipple);
edges.add(joshCreateLop);
edges.add(peterCreateLop);
vertices = graph.addVertices(vertices);
vertices.forEach(vertex -> System.out.println(vertex));
edges = graph.addEdges(edges, false);
edges.forEach(edge -> System.out.println(edge));
hugeClient.close();
}
}
4.4 运行 Example
运行 Example 之前需要启动 Server, 启动过程见HugeGraph-Server Quick Start
4.5 详细 API 说明
5.2 - HugeGraph Python 客户端快速入门
hugegraph-python-client 是 HugeGraph 图数据库的 Python 客户端/SDK。
它用于定义图结构、对图数据执行 CRUD 操作、管理 Schema 以及执行 Gremlin 查询。hugegraph-llm 和 hugegraph-ml 模块都依赖于这个基础库。
安装
安装已发布的包(稳定版)
要安装 hugegraph-python-client,您可以使用 uv/pip 或从源码构建:
# uv 是可选的,您可以直接使用 pip
uv pip install hugegraph-python # 注意:可能不是最新版本,建议从源码安装
# WIP:我们很快会将 'hugegraph-python-client' 作为包名
从源码安装(最新代码)
要从源码安装,请克隆仓库并安装所需的依赖项:
git clone https://github.com/apache/hugegraph-ai.git
cd hugegraph-ai/hugegraph-python-client
# 普通安装
uv pip install .
# (可选) 安装开发版本
uv pip install -e .
使用示例
定义图结构
您可以使用 hugegraph-python-client 来定义图结构。以下是如何定义图的示例:
from pyhugegraph.client import PyHugeClient
# 初始化客户端
# 对于 HugeGraph API 版本 ≥ v3:(或启用 graphspace 功能)
# - 如果启用了 graphspace,则 'graphspace' 参数变得相关(默认名称为 'DEFAULT')
# - 否则,graphspace 参数是可选的,可以忽略。
client = PyHugeClient("127.0.0.1", "8080", user="admin", pwd="admin", graph="hugegraph", graphspace="DEFAULT")
""""
注意:
可以参考您 HugeGraph 版本的官方 REST-API 文档以获取准确的详细信息。
如果某些 API 与预期不符,请提交 issue 或联系我们。
"""
schema = client.schema()
schema.propertyKey("name").asText().ifNotExist().create()
schema.propertyKey("birthDate").asText().ifNotExist().create()
schema.vertexLabel("Person").properties("name", "birthDate").usePrimaryKeyId().primaryKeys("name").ifNotExist().create()
schema.vertexLabel("Movie").properties("name").usePrimaryKeyId().primaryKeys("name").ifNotExist().create()
schema.edgeLabel("ActedIn").sourceLabel("Person").targetLabel("Movie").ifNotExist().create()
print(schema.getVertexLabels())
print(schema.getEdgeLabels())
print(schema.getRelations())
# 初始化图
g = client.graph()
v_al_pacino = g.addVertex("Person", {"name": "Al Pacino", "birthDate": "1940-04-25"})
v_robert = g.addVertex("Person", {"name": "Robert De Niro", "birthDate": "1943-08-17"})
v_godfather = g.addVertex("Movie", {"name": "The Godfather"})
v_godfather2 = g.addVertex("Movie", {"name": "The Godfather Part II"})
v_godfather3 = g.addVertex("Movie", {"name": "The Godfather Coda The Death of Michael Corleone"})
g.addEdge("ActedIn", v_al_pacino.id, v_godfather.id, {})
g.addEdge("ActedIn", v_al_pacino.id, v_godfather2.id, {})
g.addEdge("ActedIn", v_al_pacino.id, v_godfather3.id, {})
g.addEdge("ActedIn", v_robert.id, v_godfather2.id, {})
res = g.getVertexById(v_al_pacino.id).label
print(res)
g.close()
Schema 管理
hugegraph-python-client 提供了全面的 Schema 管理功能。
定义属性键 (Property Key)
# 定义属性键
client.schema().propertyKey('name').dataType('STRING').cardinality('SINGLE').create()
定义顶点标签 (Vertex Label)
# 定义顶点标签
client.schema().vertexLabel('person').properties('name', 'age').primaryKeys('name').create()
定义边标签 (Edge Label)
# 定义边标签
client.schema().edgeLabel('knows').sourceLabel('person').targetLabel('person').properties('since').create()
定义索引标签 (Index Label)
# 定义索引标签
client.schema().indexLabel('personByName').onV('person').by('name').secondary().create()
CRUD 操作
客户端允许您对图数据执行 CRUD 操作。以下是如何创建、读取、更新和删除顶点和边的示例:
创建顶点和边
# 创建顶点
v1 = client.graph().addVertex('person').property('name', 'John').property('age', 29).create()
v2 = client.graph().addVertex('person').property('name', 'Jane').property('age', 25).create()
# 创建边
client.graph().addEdge(v1, 'knows', v2).property('since', '2020').create()
读取顶点和边
# 通过 ID 获取顶点
vertex = client.graph().getVertexById(v1.id)
print(vertex)
# 通过 ID 获取边
edge = client.graph().getEdgeById(edge.id) # 假设 edge 对象已定义并有 id 属性
print(edge)
更新顶点和边
# 更新顶点
client.graph().updateVertex(v1.id).property('age', 30).update()
# 更新边
client.graph().updateEdge(edge.id).property('since', '2021').update() # 假设 edge 对象已定义并有 id 属性
删除顶点和边
# 删除顶点
client.graph().deleteVertex(v1.id)
# 删除边
client.graph().deleteEdge(edge.id) # 假设 edge 对象已定义并有 id 属性
执行 Gremlin 查询
客户端还支持执行 Gremlin 查询:
# 执行 Gremlin 查询
g = client.gremlin()
res = g.exec("g.V().limit(5)")
print(res)
其他信息正在建设中 🚧 (欢迎为此添加更多文档,用户可以参考 java-client-doc 获取类似用法)
API 文档参考
贡献
- 欢迎为
hugegraph-python-client做出贡献。请参阅 贡献指南 获取更多信息。 - 代码格式:请在提交 PR 前运行
./style/code_format_and_analysis.sh来格式化您的代码。
感谢所有已经为 hugegraph-python-client 做出贡献的人!
5.3 - HugeGraph Go 客户端快速入门
基于 Go 语言的 HugeGraph Client SDK 工具。
软件架构
(软件架构说明)
安装教程
go get github.com/apache/hugegraph-toolchain/hugegraph-client-go
已实现 API
| API | 说明 |
|---|---|
| schema | 获取模型 schema |
| version | 获取版本信息 |
使用说明
1. 初始化客户端
package main
import (
"log"
"os"
"github.com/apache/hugegraph-toolchain/hugegraph-client-go"
"github.com/apache/hugegraph-toolchain/hugegraph-client-go/hgtransport"
)
func main() {
client, err := hugegraph.NewCommonClient(hugegraph.Config{
Host: "127.0.0.1",
Port: 8080,
Graph: "hugegraph",
Username: "", // 根据实际情况填写用户名
Password: "", // 根据实际情况填写密码
Logger: &hgtransport.ColorLogger{
Output: os.Stdout,
EnableRequestBody: true,
EnableResponseBody: true,
},
})
if err != nil {
log.Fatalf("Error creating the client: %s\n", err)
}
// 使用 client 进行操作...
_ = client // 避免 "imported and not used" 错误
}
2. 获取 HugeGraph 版本
使用 SDK 获取版本信息
package main
import (
"fmt"
"log"
"os"
"github.com/apache/hugegraph-toolchain/hugegraph-client-go"
"github.com/apache/hugegraph-toolchain/hugegraph-client-go/hgtransport"
)
// initClient 初始化并返回一个 HugeGraph 客户端实例
func initClient() *hugegraph.CommonClient {
client, err := hugegraph.NewCommonClient(hugegraph.Config{
Host: "127.0.0.1",
Port: 8080,
Graph: "hugegraph",
Username: "",
Password: "",
Logger: &hgtransport.ColorLogger{
Output: os.Stdout,
EnableRequestBody: true,
EnableResponseBody: true,
},
})
if err != nil {
log.Fatalf("Error creating the client: %s\n", err)
}
return client
}
func getVersion() {
client := initClient()
// 假设 client 有一个 Version 方法返回版本信息和一个错误
// res, err := client.Version() // 实际调用
// 模拟返回,因为原始 README 中的 client.Version() 返回类型与此处使用不完全匹配
type VersionInfo struct {
Versions struct {
Version string `json:"version"`
Core string `json:"core"`
Gremlin string `json:"gremlin"`
API string `json:"api"`
} `json:"versions"`
// Body io.ReadCloser // 假设有 Body 用于关闭,根据实际 SDK 调整
}
// 模拟 API 调用和返回
res := &VersionInfo{
Versions: struct {
Version string `json:"version"`
Core string `json:"core"`
Gremlin string `json:"gremlin"`
API string `json:"api"`
}{
Version: "1.0.0", // 示例版本
Core: "1.0.0",
Gremlin: "3.x.x",
API: "v1",
},
}
// err := error(nil) // 假设没有错误
// if err != nil {
// log.Fatalf("Error getting the response: %s\n", err)
// }
// defer res.Body.Close() // 如果有 Body,需要关闭
fmt.Println(res.Versions)
fmt.Println(res.Versions.Version)
}
func main() {
getVersion()
}
返回值的结构
package main
// VersionResponse 定义了版本 API 返回的结构体
type VersionResponse struct {
Versions struct {
Version string `json:"version"` // hugegraph version
Core string `json:"core"` // hugegraph core version
Gremlin string `json:"gremlin"` // hugegraph gremlin version
API string `json:"api"` // hugegraph api version
} `json:"versions"`
}