How to Contribute to HugeGraph
Thanks for taking the time to contribute! As an open source project, HugeGraph is looking forward to be contributed from everyone, and we are also grateful to all the contributors.
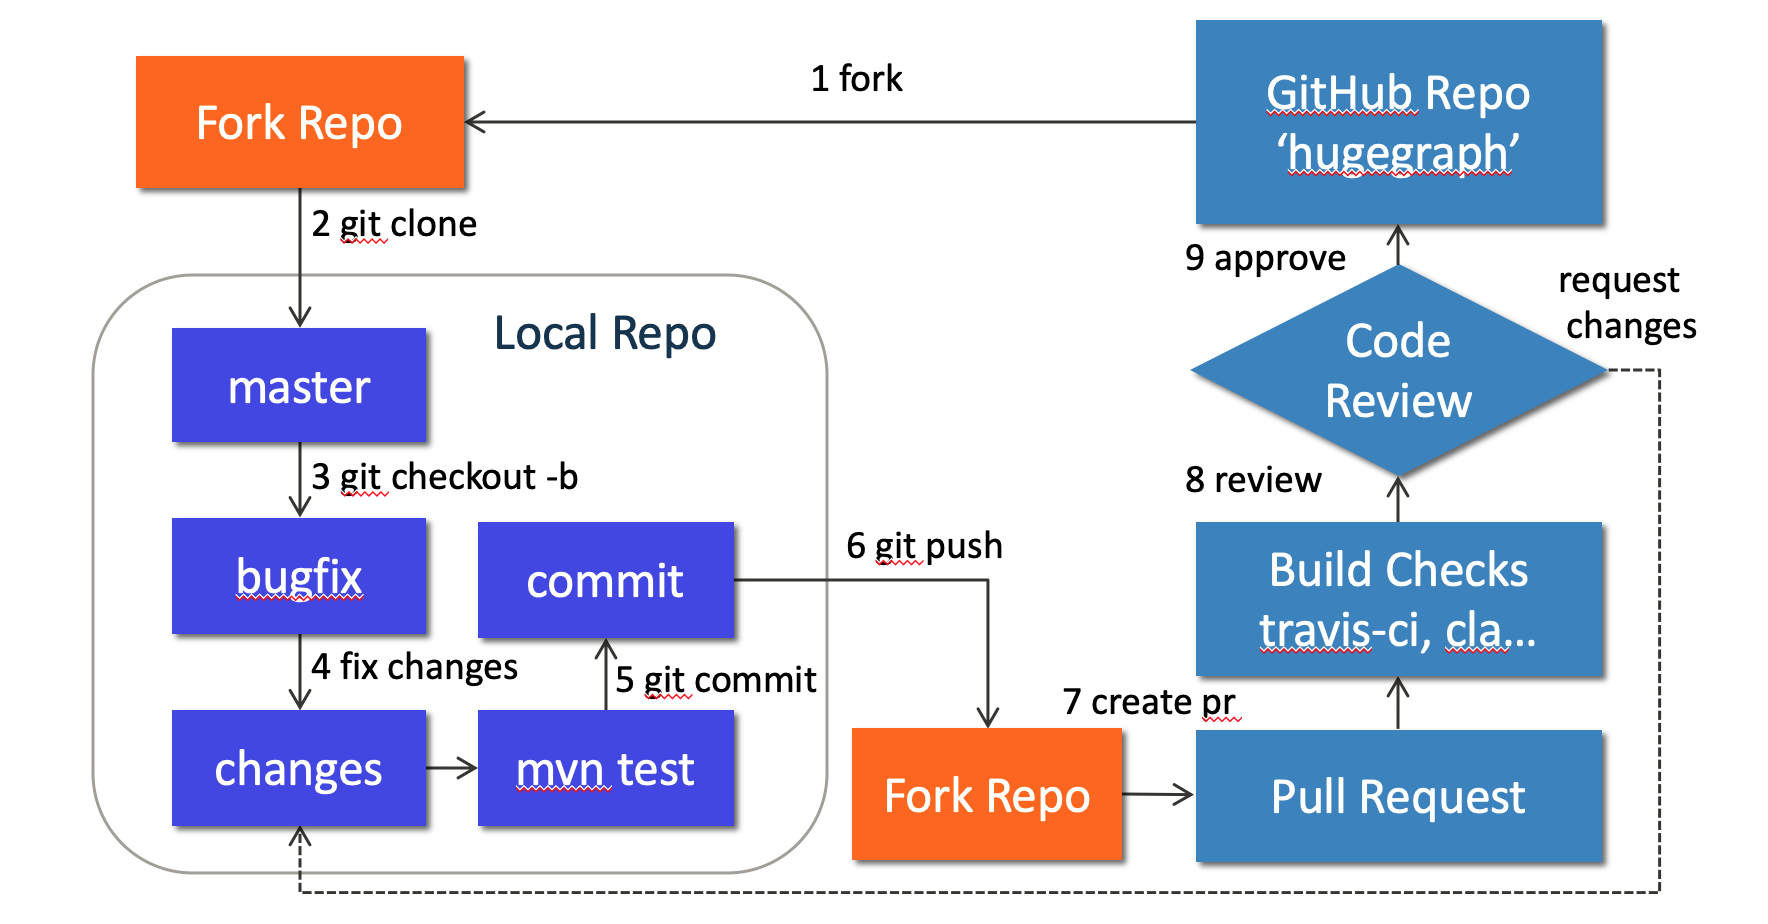
The following is a contribution guide for HugeGraph:
1. Preparation
Optional: You can use GitHub desktop to greatly simplify the commit and update process.
We can contribute by reporting issues, submitting code patches or any other feedback.
Before submitting the code, we need to do some preparation:
Sign up or login to GitHub: https://github.com
Fork HugeGraph repo from GitHub: https://github.com/apache/hugegraph/fork
Clone code from fork repo to local: https://github.com/${GITHUB_USER_NAME}/hugegraph
# clone code from remote to local repo
git clone https://github.com/${GITHUB_USER_NAME}/hugegraph
Configure local HugeGraph repo
cd hugegraph

# add upstream to synchronize the latest code
git remote add hugegraph https://github.com/apache/hugegraph

# set name and email to push code to github
git config user.name "{full-name}" # like "Jermy Li"
git config user.email "{email-address-of-github}" # like "jermy@apache.org"
2. Create an Issue on GitHub
If you encounter bugs or have any questions, please go to GitHub Issues to report them and feel free to create an issue.
3. Make changes of code locally
3.1 Create a new branch
Please don’t use master branch for development. We should create a new branch instead:
# checkout master branch
git checkout master
# pull the latest code from official hugegraph
git pull hugegraph
# create new branch: bugfix-branch
git checkout -b bugfix-branch
3.2 Change the code
Assume that we need to modify some files like “HugeGraph.java” and “HugeFactory.java”:
# modify code to fix a bug
vim hugegraph-core/src/main/java/org/apache/hugegraph/HugeGraph.java
vim hugegraph-core/src/main/java/org/apache/hugegraph/HugeFactory.java
# run test locally (optional)
mvn test -Pcore-test,memory
Note: In order to be consistent with the code style easily, if you use IDEA as your IDE, you can import our code style configuration file.
3.2.1 Check licenses
If we want to add new third-party dependencies to the HugeGraph project, we need to do the following things:
- Find the third-party dependent repository, put the dependent
licensefile into ./hugegraph-dist/release-docs/licenses/ path. - Declare the dependency in ./hugegraph-dist/release-docs/LICENSE
LICENSEinformation. - Find the NOTICE file in the repository and append it to ./hugegraph-dist/release-docs/NOTICE file (skip this step if there is no NOTICE file).
- Execute locally ./hugegraph-dist/scripts/dependency/regenerate_known_dependencies.sh to update the dependency list known-dependencies.txt (or manually update) .
Example: A new third-party dependency is introduced into the project -> ant-1.9.1.jar
- The project source code is located at: https://github.com/apache/ant/tree/rel/1.9.1
- LICENSE file: https://github.com/apache/ant/blob/rel/1.9.1/LICENSE
- NOTICE file: https://github.com/apache/ant/blob/rel/1.9.1/NOTICE
The license information of ant-1.9.1.jar needs to be specified in the LICENSE file, and the notice information needs to be specified in the NOTICE file. The detailed LICENSE file corresponding to ant-1.9.1.jar needs to be copied to our licenses/ directory. Finally update the known-dependencies.txt file.
3.3 Commit changes to git repo
After the code has been completed, we submit them to the local git repo:
# add files to local git index
git add hugegraph-core/src/main/java/org/apache/hugegraph/HugeGraph.java
git add hugegraph-core/src/main/java/org/apache/hugegraph/HugeFactory.java
# commit to local git repo
git commit
Please edit the commit message after running git commit, we can explain what and how to fix a bug or implement a feature, the following is an example:
Fix bug: run deploy multiple times

fix #ISSUE_ID
Please remember to fill in the issue id, which was generated by GitHub after issue creation.
3.4 Push commit to GitHub fork repo
Push the local commit to GitHub fork repo:
# push the local commit to fork repo
git push origin bugfix-branch:bugfix-branch
Note that since GitHub requires submitting code through username + token (instead of using username + password directly), you need to create a GitHub token from https://github.com/settings/tokens:

4. Create a Pull Request
Go to the web page of GitHub fork repo, there would be a chance to create a Pull Request after pushing to a new branch, just click button “Compare & pull request” to do it. Then edit the description for proposed changes, which can just be copied from the commit message.
Note: please make sure the email address you used to submit the code is bound to the GitHub account. For how to bind the email address, please refer to https://github.com/settings/emails:

5. Code review
Maintainers will start the code review after all the automatic checks are passed:
- Check: Contributor License Agreement is signed
- Check: Travis CI builds is passed (automatically Test and Deploy)
The commit will be accepted and merged if there is no problem after review.
Please click on “Details” to find the problem if any check does not pass.
If there are checks not passed or changes requested, then continue to modify the code and push again.
6. More changes after review
If we have not passed the review, don’t be discouraged. Usually a commit needs to be reviewed several times before being accepted! Please follow the review comments and make further changes.
After the further changes, we submit them to the local repo:
# commit all updated files in a new commit,
# please feel free to enter any appropriate commit message, note that
# we will squash all commits in the pull request as one commit when
# merging into the master branch.
git commit -a
If there are conflicts that prevent the code from being merged, we need to rebase on master branch:
# synchronize the latest code
git checkout master
git pull hugegraph
# rebase on master
git checkout bugfix-branch
git rebase -i master
And push it to GitHub fork repo again:
# force push the local commit to fork repo
git push -f origin bugfix-branch:bugfix-branch
GitHub will automatically update the Pull Request after we push it, just wait for code review.