HugeGraph-AI


DeepWiki provides real-time updated project documentation with more comprehensive and accurate content, suitable for quickly understanding the latest project information.
📖 https://deepwiki.com/apache/hugegraph-ai
hugegraph-ai integrates HugeGraph with artificial intelligence capabilities, providing comprehensive support for developers to build AI-powered graph applications.
✨ Key Features
- GraphRAG: Build intelligent question-answering systems with graph-enhanced retrieval
- Text2Gremlin: Natural language to graph query conversion with REST API
- Knowledge Graph Construction: Automated graph building from text using LLMs
- Graph ML: Integration with 21 graph learning algorithms (GCN, GAT, GraphSAGE, etc.)
- Python Client: Easy-to-use Python interface for HugeGraph operations
- AI Agents: Intelligent graph analysis and reasoning capabilities
🎉 What’s New in v1.5.0
- Text2Gremlin REST API: Convert natural language queries to Gremlin commands via REST endpoints
- Multi-Model Vector Support: Each graph instance can use independent embedding models
- Bilingual Prompt Support: Switch between English and Chinese prompts (EN/CN)
- Semi-Automatic Schema Generation: Intelligent schema inference from text data
- Semi-Automatic Prompt Generation: Context-aware prompt templates
- Enhanced Reranker Support: Integration with Cohere and SiliconFlow rerankers
- LiteLLM Multi-Provider Support: Unified interface for OpenAI, Anthropic, Gemini, and more
🚀 Quick Start
[!NOTE]
For a complete deployment guide and detailed examples, please refer to hugegraph-llm/README.md
Prerequisites
- Python 3.10+ (required for hugegraph-llm)
- uv 0.7+ (recommended package manager)
- HugeGraph Server 1.5+ (required)
- Docker (optional, for containerized deployment)
Option 1: Docker Deployment (Recommended)
# Clone the repository
git clone https://github.com/apache/hugegraph-ai.git
cd hugegraph-ai

# Set up environment and start services
cp docker/env.template docker/.env
# Edit docker/.env to set your PROJECT_PATH
cd docker
docker-compose -f docker-compose-network.yml up -d

# Access services:
# - HugeGraph Server: http://localhost:8080
# - RAG Service: http://localhost:8001
Option 2: Source Installation
# 1. Start HugeGraph Server
docker run -itd --name=server -p 8080:8080 hugegraph/hugegraph

# 2. Clone and set up the project
git clone https://github.com/apache/hugegraph-ai.git
cd hugegraph-ai/hugegraph-llm

# 3. Install dependencies
uv venv && source .venv/bin/activate
uv pip install -e .

# 4. Start the demo
python -m hugegraph_llm.demo.rag_demo.app
# Visit http://127.0.0.1:8001
Basic Usage Examples
GraphRAG - Question Answering
from hugegraph_llm.operators.graph_rag_task import RAGPipeline

# Initialize RAG pipeline
graph_rag = RAGPipeline()

# Ask questions about your graph
result = (graph_rag
    .extract_keywords(text="Tell me about Al Pacino.")
    .keywords_to_vid()
    .query_graphdb(max_deep=2, max_graph_items=30)
    .synthesize_answer()
    .run())
Knowledge Graph Construction
from hugegraph_llm.models.llms.init_llm import LLMs
from hugegraph_llm.operators.kg_construction_task import KgBuilder

# Build KG from text
TEXT = "Your text content here..."
builder = KgBuilder(LLMs().get_chat_llm())

(builder
    .import_schema(from_hugegraph="hugegraph")
    .chunk_split(TEXT)
    .extract_info(extract_type="property_graph")
    .commit_to_hugegraph()
    .run())
Graph Machine Learning
from pyhugegraph.client import PyHugeClient
# Connect to HugeGraph and run ML algorithms
# See hugegraph-ml documentation for detailed examples
📦 Modules
Large language model integration for graph applications:
- GraphRAG: Retrieval-augmented generation with graph data
- Knowledge Graph Construction: Build KGs from text automatically
- Natural Language Interface: Query graphs using natural language
- AI Agents: Intelligent graph analysis and reasoning
Graph machine learning with 21 implemented algorithms:
- Node Classification: GCN, GAT, GraphSAGE, APPNP, AGNN, ARMA, DAGNN, DeeperGCN, GRAND, JKNet, Cluster-GCN
- Graph Classification: DiffPool, GIN
- Graph Embedding: DGI, BGRL, GRACE
- Link Prediction: SEAL, P-GNN, GATNE
- Fraud Detection: CARE-GNN, BGNN
- Post-Processing: C&S (Correct & Smooth)
Python client for HugeGraph operations:
- Schema Management: Define vertex/edge labels and properties
- CRUD Operations: Create, read, update, delete graph data
- Gremlin Queries: Execute graph traversal queries
- REST API: Complete HugeGraph REST API coverage
📚 Learn More
🤝 Contributing
We welcome contributions! Please see our contribution guidelines for details.
Development Setup:
- Use GitHub Desktop for easier PR management
- Run
./style/code_format_and_analysis.sh before submitting PRs - Check existing issues before reporting bugs

📄 License
hugegraph-ai is licensed under Apache 2.0 License.
1 - HugeGraph-LLM
Please refer to the AI repository README for the most up-to-date documentation, and the official website regularly is updated and synchronized.
Bridge the gap between Graph Databases and Large Language Models
AI summarizes the project documentation:
🎯 Overview
HugeGraph-LLM is a comprehensive toolkit that combines the power of graph databases with large language models.
It enables seamless integration between HugeGraph and LLMs for building intelligent applications.
Key Features
- 🏗️ Knowledge Graph Construction - Build KGs automatically using LLMs + HugeGraph
- 🗣️ Natural Language Querying - Operate graph databases using natural language (Gremlin/Cypher)
- 🔍 Graph-Enhanced RAG - Leverage knowledge graphs to improve answer accuracy (GraphRAG & Graph Agent)
For detailed source code doc, visit our DeepWiki page. (Recommended)
📋 Prerequisites
[!IMPORTANT]
- Python: 3.10+ (not tested on 3.12)
- HugeGraph Server: 1.3+ (recommended: 1.5+)
- UV Package Manager: 0.7+
🚀 Quick Start
Choose your preferred deployment method:
Option 1: Docker Compose (Recommended)
The fastest way to get started with both HugeGraph Server and RAG Service:
# 1. Set up environment
cp docker/env.template docker/.env
# Edit docker/.env and set PROJECT_PATH to your actual project path

# 2. Deploy services
cd docker
docker-compose -f docker-compose-network.yml up -d

# 3. Verify deployment
docker-compose -f docker-compose-network.yml ps

# 4. Access services
# HugeGraph Server: http://localhost:8080
# RAG Service: http://localhost:8001
Option 2: Individual Docker Containers
For more control over individual components:
Available Images
hugegraph/rag - Development image with source code accesshugegraph/rag-bin - Production-optimized binary (compiled with Nuitka)
# 1. Create network
docker network create -d bridge hugegraph-net

# 2. Start HugeGraph Server
docker run -itd --name=server -p 8080:8080 --network hugegraph-net hugegraph/hugegraph

# 3. Start RAG Service
docker pull hugegraph/rag:latest
docker run -itd --name rag \
  -v /path/to/your/hugegraph-llm/.env:/home/work/hugegraph-llm/.env \
  -p 8001:8001 --network hugegraph-net hugegraph/rag

# 4. Monitor logs
docker logs -f rag
Option 3: Build from Source
For development and customization:
# 1. Start HugeGraph Server
docker run -itd --name=server -p 8080:8080 hugegraph/hugegraph

# 2. Install UV package manager
curl -LsSf https://astral.sh/uv/install.sh | sh

# 3. Clone and setup project
git clone https://github.com/apache/hugegraph-ai.git
cd hugegraph-ai/hugegraph-llm

# 4. Create virtual environment and install dependencies
uv venv && source .venv/bin/activate
uv pip install -e .

# 5. Launch RAG demo
python -m hugegraph_llm.demo.rag_demo.app
# Access at: http://127.0.0.1:8001

# 6. (Optional) Custom host/port
python -m hugegraph_llm.demo.rag_demo.app --host 127.0.0.1 --port 18001
Additional Setup (Optional)
# Download NLTK stopwords for better text processing
python ./hugegraph_llm/operators/common_op/nltk_helper.py

# Update configuration files
python -m hugegraph_llm.config.generate --update
[!TIP]
Check our Quick Start Guide for detailed usage examples and query logic explanations.
💡 Usage Examples
Knowledge Graph Construction
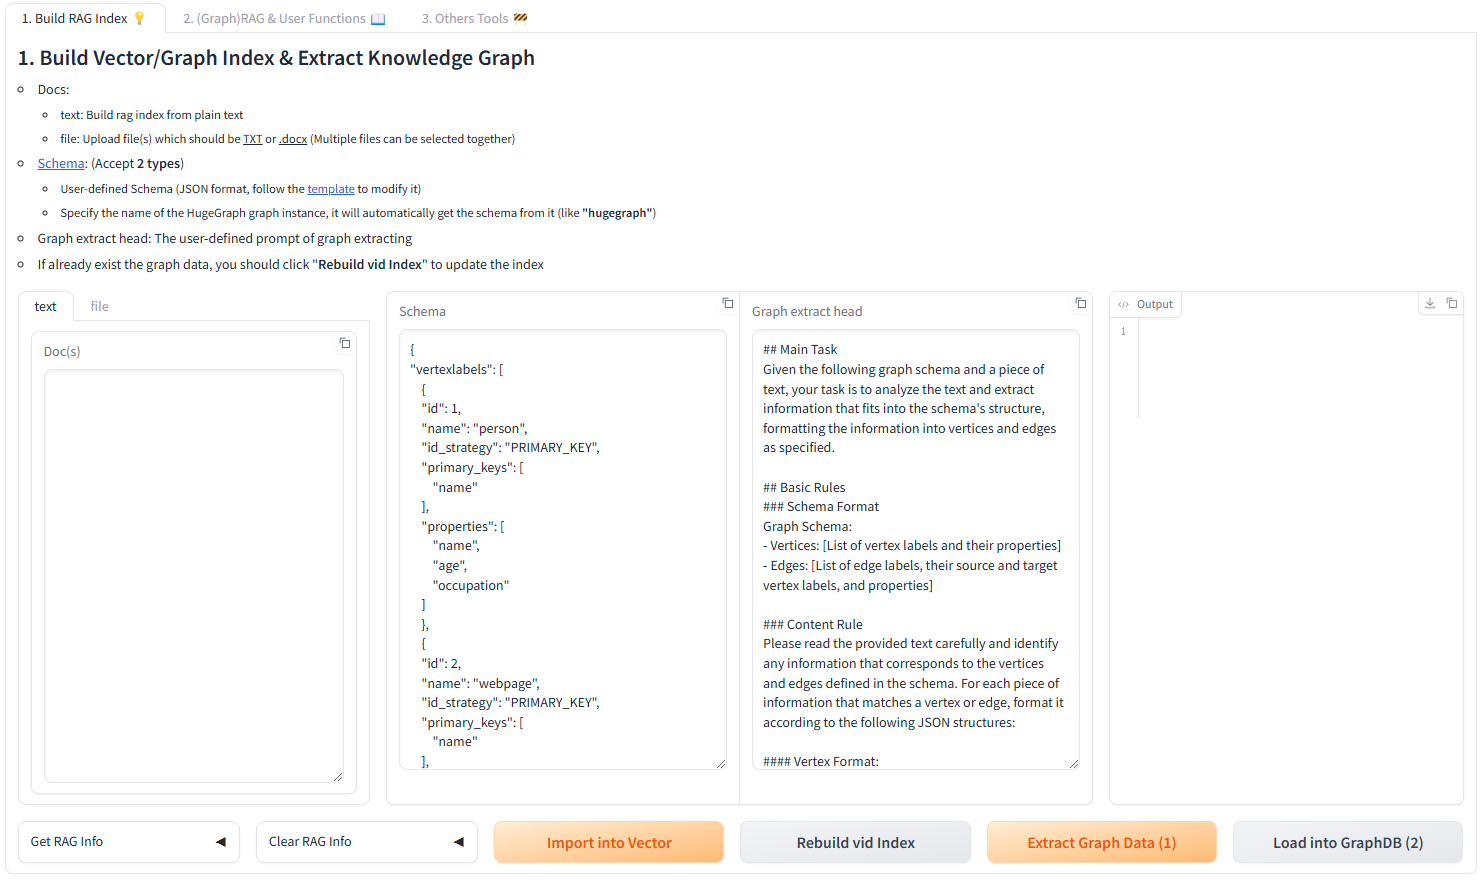
Interactive Web Interface
Use the Gradio interface for visual knowledge graph building:
Input Options:
- Text: Direct text input for RAG index creation
- Files: Upload TXT or DOCX files (multiple selection supported)
Schema Configuration:
- Custom Schema: JSON format following our template
- HugeGraph Schema: Use existing graph instance schema (e.g., “hugegraph”)
Programmatic Construction
Build knowledge graphs with code using the KgBuilder class:
from hugegraph_llm.models.llms.init_llm import LLMs
from hugegraph_llm.operators.kg_construction_task import KgBuilder

# Initialize and chain operations
TEXT = "Your input text here..."
builder = KgBuilder(LLMs().get_chat_llm())

(
    builder
    .import_schema(from_hugegraph="talent_graph").print_result()
    .chunk_split(TEXT).print_result()
    .extract_info(extract_type="property_graph").print_result()
    .commit_to_hugegraph()
    .run()
)
Pipeline Workflow:
graph LR
    A[Import Schema] --> B[Chunk Split]
    B --> C[Extract Info]
    C --> D[Commit to HugeGraph]
    D --> E[Execute Pipeline]

    style A fill:#fff2cc
    style B fill:#d5e8d4
    style C fill:#dae8fc
    style D fill:#f8cecc
    style E fill:#e1d5e7
Graph-Enhanced RAG
Leverage HugeGraph for retrieval-augmented generation:
from hugegraph_llm.operators.graph_rag_task import RAGPipeline

# Initialize RAG pipeline
graph_rag = RAGPipeline()

# Execute RAG workflow
(
    graph_rag
    .extract_keywords(text="Tell me about Al Pacino.")
    .keywords_to_vid()
    .query_graphdb(max_deep=2, max_graph_items=30)
    .merge_dedup_rerank()
    .synthesize_answer(vector_only_answer=False, graph_only_answer=True)
    .run(verbose=True)
)
RAG Pipeline Flow:
graph TD
    A[User Query] --> B[Extract Keywords]
    B --> C[Match Graph Nodes]
    C --> D[Retrieve Graph Context]
    D --> E[Rerank Results]
    E --> F[Generate Answer]

    style A fill:#e3f2fd
    style B fill:#f3e5f5
    style C fill:#e8f5e8
    style D fill:#fff3e0
    style E fill:#fce4ec
    style F fill:#e0f2f1
🔧 Configuration
After running the demo, configuration files are automatically generated:
- Environment:
hugegraph-llm/.env - Prompts:
hugegraph-llm/src/hugegraph_llm/resources/demo/config_prompt.yaml
[!NOTE]
Configuration changes are automatically saved when using the web interface. For manual changes, simply refresh the page to load updates.
LLM Provider Configuration
This project uses LiteLLM for multi-provider LLM support, enabling unified access to OpenAI, Anthropic, Google, Cohere, and 100+ other providers.
Option 1: Direct LLM Connection (OpenAI, Ollama)
# .env configuration
chat_llm_type=openai           # or ollama/local
openai_api_key=sk-xxx
openai_api_base=https://api.openai.com/v1
openai_language_model=gpt-4o-mini
openai_max_tokens=4096
Option 2: LiteLLM Multi-Provider Support
LiteLLM acts as a unified proxy for multiple LLM providers:
# .env configuration
chat_llm_type=litellm
extract_llm_type=litellm
text2gql_llm_type=litellm

# LiteLLM settings
litellm_api_base=http://localhost:4000  # LiteLLM proxy server
litellm_api_key=sk-1234                  # LiteLLM API key

# Model selection (provider/model format)
litellm_language_model=anthropic/claude-3-5-sonnet-20241022
litellm_max_tokens=4096
Supported Providers: OpenAI, Anthropic, Google (Gemini), Azure, Cohere, Bedrock, Vertex AI, Hugging Face, and more.
For full provider list and configuration details, visit LiteLLM Providers.
Reranker Configuration
Rerankers improve RAG accuracy by reordering retrieved results. Supported providers:
# Cohere Reranker
reranker_type=cohere
cohere_api_key=your-cohere-key
cohere_rerank_model=rerank-english-v3.0

# SiliconFlow Reranker
reranker_type=siliconflow
siliconflow_api_key=your-siliconflow-key
siliconflow_rerank_model=BAAI/bge-reranker-v2-m3
Text2Gremlin Configuration
Convert natural language to Gremlin queries:
from hugegraph_llm.operators.graph_rag_task import Text2GremlinPipeline

# Initialize pipeline
text2gremlin = Text2GremlinPipeline()

# Generate Gremlin query
result = (
    text2gremlin
    .query_to_gremlin(query="Find all movies directed by Francis Ford Coppola")
    .execute_gremlin_query()
    .run()
)
REST API Endpoint: See the REST API documentation for HTTP endpoint details.
📚 Additional Resources
- Graph Visualization: Use HugeGraph Hubble for data analysis and schema management
- API Documentation: Explore our REST API endpoints for integration
- Community: Join our discussions and contribute to the project
License: Apache License 2.0 | Community: Apache HugeGraph
2 - HugeGraph-ML
HugeGraph-ML integrates HugeGraph with popular graph learning libraries, enabling end-to-end machine learning workflows directly on graph data.
Overview
hugegraph-ml provides a unified interface for applying graph neural networks and machine learning algorithms to data stored in HugeGraph. It eliminates the need for complex data export/import pipelines by seamlessly converting HugeGraph data to formats compatible with leading ML frameworks.
Key Features
- Direct HugeGraph Integration: Query graph data directly from HugeGraph without manual exports
- 21 Implemented Algorithms: Comprehensive coverage of node classification, graph classification, embedding, and link prediction
- DGL Backend: Leverages Deep Graph Library (DGL) for efficient training
- End-to-End Workflows: From data loading to model training and evaluation
- Modular Tasks: Reusable task abstractions for common ML scenarios
Prerequisites
- Python: 3.9+ (standalone module)
- HugeGraph Server: 1.0+ (recommended: 1.5+)
- UV Package Manager: 0.7+ (for dependency management)
Installation
1. Start HugeGraph Server
# Option 1: Docker (recommended)
docker run -itd --name=hugegraph -p 8080:8080 hugegraph/hugegraph

# Option 2: Binary packages
# See https://hugegraph.apache.org/docs/download/download/
2. Clone and Setup
git clone https://github.com/apache/hugegraph-ai.git
cd hugegraph-ai/hugegraph-ml
3. Install Dependencies
# uv sync automatically creates .venv and installs all dependencies
uv sync

# Activate virtual environment
source .venv/bin/activate
4. Navigate to Source Directory
[!NOTE]
All examples assume you’re in the activated virtual environment.
Implemented Algorithms
HugeGraph-ML currently implements 21 graph machine learning algorithms across multiple categories:
Node Classification (11 algorithms)
Predict labels for graph nodes based on network structure and features.
| Algorithm | Paper | Description |
|---|
| GCN | Kipf & Welling, 2017 | Graph Convolutional Networks |
| GAT | Veličković et al., 2018 | Graph Attention Networks |
| GraphSAGE | Hamilton et al., 2017 | Inductive representation learning |
| APPNP | Klicpera et al., 2019 | Personalized PageRank propagation |
| AGNN | Thekumparampil et al., 2018 | Attention-based GNN |
| ARMA | Bianchi et al., 2019 | Autoregressive moving average filters |
| DAGNN | Liu et al., 2020 | Deep adaptive graph neural networks |
| DeeperGCN | Li et al., 2020 | Very deep GCN architectures |
| GRAND | Feng et al., 2020 | Graph random neural networks |
| JKNet | Xu et al., 2018 | Jumping knowledge networks |
| Cluster-GCN | Chiang et al., 2019 | Scalable GCN training via clustering |
Graph Classification (2 algorithms)
Classify entire graphs based on their structure and node features.
Graph Embedding (3 algorithms)
Learn unsupervised node representations for downstream tasks.
Link Prediction (3 algorithms)
Predict missing or future connections in graphs.
Fraud Detection (2 algorithms)
Detect anomalous nodes in graphs (e.g., fraudulent accounts).
Post-Processing (1 algorithm)
Improve predictions via label propagation.
Usage Examples
Example 1: Node Embedding with DGI
Perform unsupervised node embedding on the Cora dataset using Deep Graph Infomax (DGI).
Step 1: Import Dataset (if needed)
from hugegraph_ml.utils.dgl2hugegraph_utils import import_graph_from_dgl

# Import Cora dataset from DGL to HugeGraph
import_graph_from_dgl("cora")
Step 2: Convert Graph Data
from hugegraph_ml.data.hugegraph2dgl import HugeGraph2DGL

# Convert HugeGraph data to DGL format
hg2d = HugeGraph2DGL()
graph = hg2d.convert_graph(vertex_label="CORA_vertex", edge_label="CORA_edge")
Step 3: Initialize Model
from hugegraph_ml.models.dgi import DGI

# Create DGI model
model = DGI(n_in_feats=graph.ndata["feat"].shape[1])
Step 4: Train and Generate Embeddings
from hugegraph_ml.tasks.node_embed import NodeEmbed

# Train model and generate node embeddings
node_embed_task = NodeEmbed(graph=graph, model=model)
embedded_graph = node_embed_task.train_and_embed(
    add_self_loop=True,
    n_epochs=300,
    patience=30
)
Step 5: Downstream Task (Node Classification)
from hugegraph_ml.models.mlp import MLPClassifier
from hugegraph_ml.tasks.node_classify import NodeClassify

# Use embeddings for node classification
model = MLPClassifier(
    n_in_feat=embedded_graph.ndata["feat"].shape[1],
    n_out_feat=embedded_graph.ndata["label"].unique().shape[0]
)
node_clf_task = NodeClassify(graph=embedded_graph, model=model)
node_clf_task.train(lr=1e-3, n_epochs=400, patience=40)
print(node_clf_task.evaluate())
Expected Output:
{'accuracy': 0.82, 'loss': 0.5714246034622192}
Full Example: See dgi_example.py
Example 2: Node Classification with GRAND
Directly classify nodes using the GRAND model (no separate embedding step needed).
from hugegraph_ml.data.hugegraph2dgl import HugeGraph2DGL
from hugegraph_ml.models.grand import GRAND
from hugegraph_ml.tasks.node_classify import NodeClassify

# Load graph
hg2d = HugeGraph2DGL()
graph = hg2d.convert_graph(vertex_label="CORA_vertex", edge_label="CORA_edge")

# Initialize GRAND model
model = GRAND(
    n_in_feats=graph.ndata["feat"].shape[1],
    n_out_feats=graph.ndata["label"].unique().shape[0]
)

# Train and evaluate
node_clf_task = NodeClassify(graph=graph, model=model)
node_clf_task.train(lr=1e-2, n_epochs=1500, patience=100)
print(node_clf_task.evaluate())
Full Example: See grand_example.py
Core Components
HugeGraph2DGL Converter
Seamlessly converts HugeGraph data to DGL graph format:
from hugegraph_ml.data.hugegraph2dgl import HugeGraph2DGL

hg2d = HugeGraph2DGL()
graph = hg2d.convert_graph(
    vertex_label="person",      # Vertex label to extract
    edge_label="knows",         # Edge label to extract
    directed=False              # Graph directionality
)
Task Abstractions
Reusable task objects for common ML workflows:
| Task | Class | Purpose |
|---|
| Node Embedding | NodeEmbed | Generate unsupervised node embeddings |
| Node Classification | NodeClassify | Predict node labels |
| Graph Classification | GraphClassify | Predict graph-level labels |
| Link Prediction | LinkPredict | Predict missing edges |
Best Practices
- Start with Small Datasets: Test your pipeline on small graphs (e.g., Cora, Citeseer) before scaling
- Use Early Stopping: Set
patience parameter to avoid overfitting - Tune Hyperparameters: Adjust learning rate, hidden dimensions, and epochs based on dataset size
- Monitor GPU Memory: Large graphs may require batch training (e.g., Cluster-GCN)
- Validate Schema: Ensure vertex/edge labels match your HugeGraph schema
Troubleshooting
| Issue | Solution |
|---|
| “Connection refused” to HugeGraph | Verify server is running on port 8080 |
| CUDA out of memory | Reduce batch size or use CPU-only mode |
| Model convergence issues | Try different learning rates (1e-2, 1e-3, 1e-4) |
| ImportError for DGL | Run uv sync to reinstall dependencies |
Contributing
To add a new algorithm:
- Create model file in
src/hugegraph_ml/models/your_model.py - Inherit from base model class and implement
forward() method - Add example script in
src/hugegraph_ml/examples/ - Update this documentation with algorithm details
See Also
3 - Configuration Reference
This document provides a comprehensive reference for all configuration options in HugeGraph-LLM.
Configuration Files
- Environment File:
.env (created from template or auto-generated) - Prompt Configuration:
src/hugegraph_llm/resources/demo/config_prompt.yaml
[!TIP]
Run python -m hugegraph_llm.config.generate --update to auto-generate or update configuration files with defaults.
Environment Variables Overview
1. Language and Model Type Selection
# Prompt language (affects system prompts and generated text)
LANGUAGE=EN                     # Options: EN | CN

# LLM Type for different tasks
CHAT_LLM_TYPE=openai           # Chat/RAG: openai | litellm | ollama/local
EXTRACT_LLM_TYPE=openai        # Entity extraction: openai | litellm | ollama/local
TEXT2GQL_LLM_TYPE=openai       # Text2Gremlin: openai | litellm | ollama/local

# Embedding type
EMBEDDING_TYPE=openai          # Options: openai | litellm | ollama/local

# Reranker type (optional)
RERANKER_TYPE=                 # Options: cohere | siliconflow | (empty for none)
2. OpenAI Configuration
Each LLM task (chat, extract, text2gql) has independent configuration:
2.1 Chat LLM (RAG Answer Generation)
OPENAI_CHAT_API_BASE=https://api.openai.com/v1
OPENAI_CHAT_API_KEY=sk-your-api-key-here
OPENAI_CHAT_LANGUAGE_MODEL=gpt-4o-mini
OPENAI_CHAT_TOKENS=8192        # Max tokens for chat responses
OPENAI_EXTRACT_API_BASE=https://api.openai.com/v1
OPENAI_EXTRACT_API_KEY=sk-your-api-key-here
OPENAI_EXTRACT_LANGUAGE_MODEL=gpt-4o-mini
OPENAI_EXTRACT_TOKENS=1024     # Max tokens for extraction
2.3 Text2GQL LLM (Natural Language to Gremlin)
OPENAI_TEXT2GQL_API_BASE=https://api.openai.com/v1
OPENAI_TEXT2GQL_API_KEY=sk-your-api-key-here
OPENAI_TEXT2GQL_LANGUAGE_MODEL=gpt-4o-mini
OPENAI_TEXT2GQL_TOKENS=4096    # Max tokens for query generation
2.4 Embedding Model
OPENAI_EMBEDDING_API_BASE=https://api.openai.com/v1
OPENAI_EMBEDDING_API_KEY=sk-your-api-key-here
OPENAI_EMBEDDING_MODEL=text-embedding-3-small
[!NOTE]
You can use different API keys/endpoints for each task to optimize costs or use specialized models.
3. LiteLLM Configuration (Multi-Provider Support)
LiteLLM enables unified access to 100+ LLM providers (OpenAI, Anthropic, Google, Azure, etc.).
3.1 Chat LLM
LITELLM_CHAT_API_BASE=http://localhost:4000       # LiteLLM proxy URL
LITELLM_CHAT_API_KEY=sk-litellm-key              # LiteLLM API key
LITELLM_CHAT_LANGUAGE_MODEL=anthropic/claude-3-5-sonnet-20241022
LITELLM_CHAT_TOKENS=8192
LITELLM_EXTRACT_API_BASE=http://localhost:4000
LITELLM_EXTRACT_API_KEY=sk-litellm-key
LITELLM_EXTRACT_LANGUAGE_MODEL=openai/gpt-4o-mini
LITELLM_EXTRACT_TOKENS=256
3.3 Text2GQL LLM
LITELLM_TEXT2GQL_API_BASE=http://localhost:4000
LITELLM_TEXT2GQL_API_KEY=sk-litellm-key
LITELLM_TEXT2GQL_LANGUAGE_MODEL=openai/gpt-4o-mini
LITELLM_TEXT2GQL_TOKENS=4096
3.4 Embedding
LITELLM_EMBEDDING_API_BASE=http://localhost:4000
LITELLM_EMBEDDING_API_KEY=sk-litellm-key
LITELLM_EMBEDDING_MODEL=openai/text-embedding-3-small
Model Format: provider/model-name
Examples:
openai/gpt-4o-minianthropic/claude-3-5-sonnet-20241022google/gemini-2.0-flash-expazure/gpt-4
See LiteLLM Providers for the complete list.
4. Ollama Configuration (Local Deployment)
Run local LLMs with Ollama for privacy and cost control.
4.1 Chat LLM
OLLAMA_CHAT_HOST=127.0.0.1
OLLAMA_CHAT_PORT=11434
OLLAMA_CHAT_LANGUAGE_MODEL=llama3.1:8b
OLLAMA_EXTRACT_HOST=127.0.0.1
OLLAMA_EXTRACT_PORT=11434
OLLAMA_EXTRACT_LANGUAGE_MODEL=llama3.1:8b
4.3 Text2GQL LLM
OLLAMA_TEXT2GQL_HOST=127.0.0.1
OLLAMA_TEXT2GQL_PORT=11434
OLLAMA_TEXT2GQL_LANGUAGE_MODEL=qwen2.5-coder:7b
4.4 Embedding
OLLAMA_EMBEDDING_HOST=127.0.0.1
OLLAMA_EMBEDDING_PORT=11434
OLLAMA_EMBEDDING_MODEL=nomic-embed-text
[!TIP]
Download models: ollama pull llama3.1:8b or ollama pull qwen2.5-coder:7b
5. Reranker Configuration
Rerankers improve RAG accuracy by reordering retrieved results based on relevance.
5.1 Cohere Reranker
RERANKER_TYPE=cohere
COHERE_BASE_URL=https://api.cohere.com/v1/rerank
RERANKER_API_KEY=your-cohere-api-key
RERANKER_MODEL=rerank-english-v3.0
Available models:
rerank-english-v3.0 (English)rerank-multilingual-v3.0 (100+ languages)
5.2 SiliconFlow Reranker
RERANKER_TYPE=siliconflow
RERANKER_API_KEY=your-siliconflow-api-key
RERANKER_MODEL=BAAI/bge-reranker-v2-m3
6. HugeGraph Connection
Configure connection to your HugeGraph server instance.
# Server connection
GRAPH_IP=127.0.0.1
GRAPH_PORT=8080
GRAPH_NAME=hugegraph            # Graph instance name
GRAPH_USER=admin                # Username
GRAPH_PWD=admin-password        # Password
GRAPH_SPACE=                    # Graph space (optional, for multi-tenancy)
7. Query Parameters
Control graph traversal behavior and result limits.
# Graph traversal limits
MAX_GRAPH_PATH=10               # Max path depth for graph queries
MAX_GRAPH_ITEMS=30              # Max items to retrieve from graph
EDGE_LIMIT_PRE_LABEL=8          # Max edges per label type

# Property filtering
LIMIT_PROPERTY=False            # Limit properties in results (True/False)
8. Vector Search Configuration
Configure vector similarity search parameters.
# Vector search thresholds
VECTOR_DIS_THRESHOLD=0.9        # Min cosine similarity (0-1, higher = stricter)
TOPK_PER_KEYWORD=1              # Top-K results per extracted keyword
9. Rerank Configuration
# Rerank result limits
TOPK_RETURN_RESULTS=20          # Number of top results after reranking
Configuration Priority
The system loads configuration in the following order (later sources override earlier ones):
- Default Values (in
*_config.py files) - Environment Variables (from
.env file) - Runtime Updates (via Web UI or API calls)
Example Configurations
Minimal Setup (OpenAI)
# Language
LANGUAGE=EN

# LLM Types
CHAT_LLM_TYPE=openai
EXTRACT_LLM_TYPE=openai
TEXT2GQL_LLM_TYPE=openai
EMBEDDING_TYPE=openai

# OpenAI Credentials (single key for all tasks)
OPENAI_API_BASE=https://api.openai.com/v1
OPENAI_API_KEY=sk-your-api-key-here
OPENAI_LANGUAGE_MODEL=gpt-4o-mini
OPENAI_EMBEDDING_MODEL=text-embedding-3-small

# HugeGraph Connection
GRAPH_IP=127.0.0.1
GRAPH_PORT=8080
GRAPH_NAME=hugegraph
GRAPH_USER=admin
GRAPH_PWD=admin
Production Setup (LiteLLM + Reranker)
# Bilingual support
LANGUAGE=EN

# LiteLLM for flexibility
CHAT_LLM_TYPE=litellm
EXTRACT_LLM_TYPE=litellm
TEXT2GQL_LLM_TYPE=litellm
EMBEDDING_TYPE=litellm

# LiteLLM Proxy
LITELLM_CHAT_API_BASE=http://localhost:4000
LITELLM_CHAT_API_KEY=sk-litellm-master-key
LITELLM_CHAT_LANGUAGE_MODEL=anthropic/claude-3-5-sonnet-20241022
LITELLM_CHAT_TOKENS=8192

LITELLM_EXTRACT_API_BASE=http://localhost:4000
LITELLM_EXTRACT_API_KEY=sk-litellm-master-key
LITELLM_EXTRACT_LANGUAGE_MODEL=openai/gpt-4o-mini
LITELLM_EXTRACT_TOKENS=256

LITELLM_TEXT2GQL_API_BASE=http://localhost:4000
LITELLM_TEXT2GQL_API_KEY=sk-litellm-master-key
LITELLM_TEXT2GQL_LANGUAGE_MODEL=openai/gpt-4o-mini
LITELLM_TEXT2GQL_TOKENS=4096

LITELLM_EMBEDDING_API_BASE=http://localhost:4000
LITELLM_EMBEDDING_API_KEY=sk-litellm-master-key
LITELLM_EMBEDDING_MODEL=openai/text-embedding-3-small

# Cohere Reranker for better accuracy
RERANKER_TYPE=cohere
COHERE_BASE_URL=https://api.cohere.com/v1/rerank
RERANKER_API_KEY=your-cohere-key
RERANKER_MODEL=rerank-multilingual-v3.0

# HugeGraph with authentication
GRAPH_IP=prod-hugegraph.example.com
GRAPH_PORT=8080
GRAPH_NAME=production_graph
GRAPH_USER=rag_user
GRAPH_PWD=secure-password
GRAPH_SPACE=prod_space

# Optimized query parameters
MAX_GRAPH_PATH=15
MAX_GRAPH_ITEMS=50
VECTOR_DIS_THRESHOLD=0.85
TOPK_RETURN_RESULTS=30
Local/Offline Setup (Ollama)
# Language
LANGUAGE=EN

# All local models via Ollama
CHAT_LLM_TYPE=ollama/local
EXTRACT_LLM_TYPE=ollama/local
TEXT2GQL_LLM_TYPE=ollama/local
EMBEDDING_TYPE=ollama/local

# Ollama endpoints
OLLAMA_CHAT_HOST=127.0.0.1
OLLAMA_CHAT_PORT=11434
OLLAMA_CHAT_LANGUAGE_MODEL=llama3.1:8b

OLLAMA_EXTRACT_HOST=127.0.0.1
OLLAMA_EXTRACT_PORT=11434
OLLAMA_EXTRACT_LANGUAGE_MODEL=llama3.1:8b

OLLAMA_TEXT2GQL_HOST=127.0.0.1
OLLAMA_TEXT2GQL_PORT=11434
OLLAMA_TEXT2GQL_LANGUAGE_MODEL=qwen2.5-coder:7b

OLLAMA_EMBEDDING_HOST=127.0.0.1
OLLAMA_EMBEDDING_PORT=11434
OLLAMA_EMBEDDING_MODEL=nomic-embed-text

# No reranker for offline setup
RERANKER_TYPE=

# Local HugeGraph
GRAPH_IP=127.0.0.1
GRAPH_PORT=8080
GRAPH_NAME=hugegraph
GRAPH_USER=admin
GRAPH_PWD=admin
Configuration Validation
After modifying .env, verify your configuration:
- Via Web UI: Visit
http://localhost:8001 and check the settings panel - Via Python:
from hugegraph_llm.config import settings
print(settings.llm_config)
print(settings.hugegraph_config)
- Via REST API:
curl http://localhost:8001/config
Troubleshooting
| Issue | Solution |
|---|
| “API key not found” | Check *_API_KEY is set correctly in .env |
| “Connection refused” | Verify GRAPH_IP and GRAPH_PORT are correct |
| “Model not found” | For Ollama: run ollama pull <model-name> |
| “Rate limit exceeded” | Reduce MAX_GRAPH_ITEMS or use different API keys |
| “Embedding dimension mismatch” | Delete existing vectors and rebuild with correct model |
See Also
4 - GraphRAG UI Details
Follow up main doc to introduce the basic UI function & details, welcome to update and improve at any time, thanks
1. Core Logic of the Project
Build RAG Index Responsibilities:
- Split and vectorize text
- Extract text into a graph (construct a knowledge graph) and vectorize the vertices
(Graph)RAG & User Functions Responsibilities:
- Retrieve relevant content from the constructed knowledge graph and vector database based on the query to supplement the prompt.
2. (Processing Flow) Build RAG Index
Construct a knowledge graph, chunk vector, and graph vid vector from the text.

graph TD;
    A[Raw Text] --> B[Text Segmentation]
    B --> C[Vectorization]
    C --> D[Store in Vector Database]

    A --> F[Text Segmentation]
    F --> G[LLM extracts graph based on schema \nand segmented text]
    G --> H[Store graph in Graph Database, \nautomatically vectorize vertices \nand store in Vector Database]

    I[Retrieve vertices from Graph Database] --> J[Vectorize vertices and store in Vector Database \nNote: Incremental update]
- Doc(s): Input text
- Schema: The schema of the graph, which can be provided as a JSON-formatted schema or as the graph name (if it exists in the database).
- Graph Extract Prompt Header: The header of the prompt
- Output: Display results
Get RAG Info
Clear RAG Data
- Clear Chunks Vector Index: Clear chunk vector
- Clear Graph Vid Vector Index: Clear graph vid vector
- Clear Graph Data: Clear Graph Data
Import into Vector: Convert the text in Doc(s) into vectors (requires chunking the text first and then converting the chunks into vectors)
Extract Graph Data (1): Extract graph data from Doc(s) based on the Schema, using the Graph Extract Prompt Header and chunked content as the prompt
Load into GraphDB (2): Store the extracted graph data into the database (automatically calls Update Vid Embedding to store vectors in the vector database)
Update Vid Embedding: Convert graph vid into vectors
Execution Flow:
- Input text into the Doc(s) field.
- Click the Import into Vector button to split and vectorize the text, storing it in the vector database.
- Input the graph Schema into the Schema field.
- Click the Extract Graph Data (1) button to extract the text into a graph.
- Click the Load into GraphDB (2) button to store the extracted graph into the graph database (this automatically calls Update Vid Embedding to store the vectors in the vector database).
- Click the Update Vid Embedding button to vectorize the graph vertices and store them in the vector database.
3. (Processing Flow) (Graph)RAG & User Functions
The Import into Vector button in the previous module converts text (chunks) into vectors, and the Update Vid Embedding button converts graph vid into vectors. These vectors are stored separately to supplement the context for queries (answer generation) in this module. In other words, the previous module prepares the data for RAG (vectorization), while this module executes RAG.
This module consists of two parts:
- HugeGraph RAG Query
- (Batch) Back-testing
The first part handles single queries, while the second part handles multiple queries at once. Below is an explanation of the first part.

graph TD;
A[Question] --> B[Vectorize the question and search \nfor the most similar chunk in the Vector Database (chunk)]
A --> F[Extract keywords using LLM]
F --> G[Match vertices precisely in Graph Database \nusing keywords; perform fuzzy matching in \nVector Database (graph vid)]
G --> H[Generate Gremlin query using matched vertices and query with LLM]
H --> I[Execute Gremlin query; if successful, finish; if failed, fallback to BFS]
B --> J[Sort results]
I --> J
J --> K[Generate answer]
- Question: Input the query
- Query Prompt: The prompt template used to ask the final question to the LLM
- Keywords Extraction Prompt: The prompt template for extracting keywords from the question
- Template Num: < 0 means disable text2gql; = 0 means no template(zero-shot); > 0 means using the specified number of templates
Query Scope Selection:
- Basic LLM Answer: Does not use RAG functionality
- Vector-only Answer: Uses only vector-based retrieval (queries chunk vectors in the vector database)
- Graph-only Answer: Uses only graph-based retrieval (queries graph vid vectors in the vector database and the graph database)
- Graph-Vector Answer: Uses both graph-based and vector-based retrieval

Execution Flow:
Graph-only Answer:
- Extract keywords from the question using the Keywords Extraction Prompt.

Use the extracted keywords to:
First, perform an exact match in the graph database.
If no match is found, perform a fuzzy match in the vector database (graph vid vector) to retrieve relevant vertices.
text2gql: Call the text2gql-related interface, using the matched vertices as entities to convert the question into a Gremlin query and execute it in the graph database.
BFS: If text2gql fails (LLM-generated queries might be invalid), fall back to executing a graph query using a predefined Gremlin query template (essentially a BFS traversal).
Vector-only Answer:
Sorting and Answer Generation:
After executing the retrieval, sort the search (retrieval) results to construct the final prompt.
Generate answers based on different prompt configurations and display them in different output fields:
- Basic LLM Answer
- Vector-only Answer
- Graph-only Answer
- Graph-Vector Answer

4. (Processing Flow) Text2Gremlin
Converts natural language queries into Gremlin queries.
This module consists of two parts:
- Build Vector Template Index (Optional): Vectorizes query/gremlin pairs from sample files and stores them in the vector database for reference when generating Gremlin queries.
- Natural Language to Gremlin: Converts natural language queries into Gremlin queries.
The first part is straightforward, so the focus is on the second part.

graph TD;
A[Gremlin Pairs File] --> C[Vectorize query]
C --> D[Store in Vector Database]
F[Natural Language Query] --> G[Search for the most similar query \nin the Vector Database \n(If no Gremlin pairs exist in the Vector Database, \ndefault files will be automatically vectorized) \nand retrieve the corresponding Gremlin]
G --> H[Add the matched pair to the prompt \nand use LLM to generate the Gremlin \ncorresponding to the Natural Language Query]
- Natural Language Query: Input the natural language text to be converted into Gremlin.

- Schema: Input the graph schema.
Execution Flow:
Input the query (natural language) into the Natural Language Query field.
Input the graph schema into the Schema field.
Click the Text2Gremlin button, and the following execution logic applies:
Convert the query into a vector.
Construct the prompt:
- Retrieve the graph schema.
- Query the vector database for example vectors, retrieving query-gremlin pairs similar to the input query (if the vector database lacks examples, it automatically initializes with examples from the resources folder).

- Generate the Gremlin query using the constructed prompt.
Input Gremlin queries to execute corresponding operations.
6. Language Switching (v1.5.0+)
HugeGraph-LLM supports bilingual prompts for improved accuracy across languages.
Switching Between English and Chinese
The system language affects:
- System prompts: Internal prompts used by the LLM
- Keyword extraction: Language-specific extraction logic
- Answer generation: Response formatting and style
Configuration Method 1: Environment Variable
Edit your .env file:
# English prompts (default)
LANGUAGE=EN

# Chinese prompts
LANGUAGE=CN
Restart the service after changing the language setting.
Configuration Method 2: Web UI (Dynamic)
If available in your deployment, use the settings panel in the Web UI to switch languages without restarting:
- Navigate to the Settings or Configuration tab
- Select Language:
EN or CN - Click Save - changes apply immediately
Language-Specific Behavior
| Language | Keyword Extraction | Answer Style | Use Case |
|---|
EN | English NLP models | Professional, concise | International users, English documents |
CN | Chinese NLP models | Natural Chinese phrasing | Chinese users, Chinese documents |
[!TIP]
Match the LANGUAGE setting to your primary document language for best RAG accuracy.
REST API Language Override
When using the REST API, you can specify custom prompts per request to override the default language setting:
curl -X POST http://localhost:8001/rag \
  -H "Content-Type: application/json" \
  -d '{
    "query": "告诉我关于阿尔·帕西诺的信息",
    "graph_only": true,
    "keywords_extract_prompt": "请从以下文本中提取关键实体...",
    "answer_prompt": "请根据以下上下文回答问题..."
  }'
See the REST API Reference for complete parameter details.
5 - REST API Reference
HugeGraph-LLM provides REST API endpoints for integrating RAG and Text2Gremlin capabilities into your applications.
Base URL
Change host/port as configured when starting the service:
python -m hugegraph_llm.demo.rag_demo.app --host 127.0.0.1 --port 8001
Authentication
Currently, the API supports optional token-based authentication:
# Enable authentication in .env
ENABLE_LOGIN=true
USER_TOKEN=your-user-token
ADMIN_TOKEN=your-admin-token
Pass tokens in request headers:
Authorization: Bearer <token>
RAG Endpoints
1. Complete RAG Query
POST /rag
Execute a full RAG pipeline including keyword extraction, graph retrieval, vector search, reranking, and answer generation.
Request Body
{
  "query": "Tell me about Al Pacino's movies",
  "raw_answer": false,
  "vector_only": false,
  "graph_only": true,
  "graph_vector_answer": false,
  "graph_ratio": 0.5,
  "rerank_method": "cohere",
  "near_neighbor_first": false,
  "gremlin_tmpl_num": 5,
  "max_graph_items": 30,
  "topk_return_results": 20,
  "vector_dis_threshold": 0.9,
  "topk_per_keyword": 1,
  "custom_priority_info": "",
  "answer_prompt": "",
  "keywords_extract_prompt": "",
  "gremlin_prompt": "",
  "client_config": {
    "url": "127.0.0.1:8080",
    "graph": "hugegraph",
    "user": "admin",
    "pwd": "admin",
    "gs": ""
  }
}
Parameters:
| Field | Type | Required | Default | Description |
|---|
query | string | Yes | - | User’s natural language question |
raw_answer | boolean | No | false | Return LLM answer without retrieval |
vector_only | boolean | No | false | Use only vector search (no graph) |
graph_only | boolean | No | false | Use only graph retrieval (no vector) |
graph_vector_answer | boolean | No | false | Combine graph and vector results |
graph_ratio | float | No | 0.5 | Ratio of graph vs vector results (0-1) |
rerank_method | string | No | "" | Reranker: “cohere”, “siliconflow”, "" |
near_neighbor_first | boolean | No | false | Prioritize direct neighbors |
gremlin_tmpl_num | integer | No | 5 | Number of Gremlin templates to try |
max_graph_items | integer | No | 30 | Max items from graph retrieval |
topk_return_results | integer | No | 20 | Top-K after reranking |
vector_dis_threshold | float | No | 0.9 | Vector similarity threshold (0-1) |
topk_per_keyword | integer | No | 1 | Top-K vectors per keyword |
custom_priority_info | string | No | "" | Custom context to prioritize |
answer_prompt | string | No | "" | Custom answer generation prompt |
keywords_extract_prompt | string | No | "" | Custom keyword extraction prompt |
gremlin_prompt | string | No | "" | Custom Gremlin generation prompt |
client_config | object | No | null | Override graph connection settings |
Response
{
  "query": "Tell me about Al Pacino's movies",
  "graph_only": {
    "answer": "Al Pacino starred in The Godfather (1972), directed by Francis Ford Coppola...",
    "context": ["The Godfather is a 1972 crime film...", "..."],
    "graph_paths": ["..."],
    "keywords": ["Al Pacino", "movies"]
  }
}
Example (curl)
curl -X POST http://localhost:8001/rag \
  -H "Content-Type: application/json" \
  -d '{
    "query": "Tell me about Al Pacino",
    "graph_only": true,
    "max_graph_items": 30
  }'
2. Graph Retrieval Only
POST /rag/graph
Retrieve graph context without generating an answer. Useful for debugging or custom processing.
Request Body
{
  "query": "Al Pacino movies",
  "max_graph_items": 30,
  "topk_return_results": 20,
  "vector_dis_threshold": 0.9,
  "topk_per_keyword": 1,
  "gremlin_tmpl_num": 5,
  "rerank_method": "cohere",
  "near_neighbor_first": false,
  "custom_priority_info": "",
  "gremlin_prompt": "",
  "get_vertex_only": false,
  "client_config": {
    "url": "127.0.0.1:8080",
    "graph": "hugegraph",
    "user": "admin",
    "pwd": "admin",
    "gs": ""
  }
}
Additional Parameter:
| Field | Type | Default | Description |
|---|
get_vertex_only | boolean | false | Return only vertex IDs without full details |
Response
{
  "graph_recall": {
    "query": "Al Pacino movies",
    "keywords": ["Al Pacino", "movies"],
    "match_vids": ["1:Al Pacino", "2:The Godfather"],
    "graph_result_flag": true,
    "gremlin": "g.V('1:Al Pacino').outE().inV().limit(30)",
    "graph_result": [
      {"id": "1:Al Pacino", "label": "person", "properties": {"name": "Al Pacino"}},
      {"id": "2:The Godfather", "label": "movie", "properties": {"title": "The Godfather"}}
    ],
    "vertex_degree_list": [5, 12]
  }
}
Example (curl)
curl -X POST http://localhost:8001/rag/graph \
  -H "Content-Type: application/json" \
  -d '{
    "query": "Al Pacino",
    "max_graph_items": 30,
    "get_vertex_only": false
  }'
Text2Gremlin Endpoint
3. Natural Language to Gremlin
POST /text2gremlin
Convert natural language queries to executable Gremlin commands.
Request Body
{
  "query": "Find all movies directed by Francis Ford Coppola",
  "example_num": 5,
  "gremlin_prompt": "",
  "output_types": ["GREMLIN", "RESULT"],
  "client_config": {
    "url": "127.0.0.1:8080",
    "graph": "hugegraph",
    "user": "admin",
    "pwd": "admin",
    "gs": ""
  }
}
Parameters:
| Field | Type | Required | Default | Description |
|---|
query | string | Yes | - | Natural language query |
example_num | integer | No | 5 | Number of example templates to use |
gremlin_prompt | string | No | "" | Custom prompt for Gremlin generation |
output_types | array | No | null | Output types: [“GREMLIN”, “RESULT”, “CYPHER”] |
client_config | object | No | null | Graph connection override |
Output Types:
GREMLIN: Generated Gremlin queryRESULT: Execution result from graphCYPHER: Cypher query (if requested)
Response
{
  "gremlin": "g.V().has('person','name','Francis Ford Coppola').out('directed').hasLabel('movie').values('title')",
  "result": [
    "The Godfather",
    "The Godfather Part II",
    "Apocalypse Now"
  ]
}
Example (curl)
curl -X POST http://localhost:8001/text2gremlin \
  -H "Content-Type: application/json" \
  -d '{
    "query": "Find all movies directed by Francis Ford Coppola",
    "output_types": ["GREMLIN", "RESULT"]
  }'
Configuration Endpoints
4. Update Graph Connection
POST /config/graph
Dynamically update HugeGraph connection settings.
Request Body
{
  "url": "127.0.0.1:8080",
  "name": "hugegraph",
  "user": "admin",
  "pwd": "admin",
  "gs": ""
}
Response
{
  "status_code": 201,
  "message": "Graph configuration updated successfully"
}
5. Update LLM Configuration
POST /config/llm
Update chat/extract LLM settings at runtime.
Request Body (OpenAI)
{
  "llm_type": "openai",
  "api_key": "sk-your-api-key",
  "api_base": "https://api.openai.com/v1",
  "language_model": "gpt-4o-mini",
  "max_tokens": 4096
}
Request Body (Ollama)
{
  "llm_type": "ollama/local",
  "host": "127.0.0.1",
  "port": 11434,
  "language_model": "llama3.1:8b"
}
6. Update Embedding Configuration
POST /config/embedding
Update embedding model settings.
Request Body
{
  "llm_type": "openai",
  "api_key": "sk-your-api-key",
  "api_base": "https://api.openai.com/v1",
  "language_model": "text-embedding-3-small"
}
7. Update Reranker Configuration
POST /config/rerank
Configure reranker settings.
Request Body (Cohere)
{
  "reranker_type": "cohere",
  "api_key": "your-cohere-key",
  "reranker_model": "rerank-multilingual-v3.0",
  "cohere_base_url": "https://api.cohere.com/v1/rerank"
}
Request Body (SiliconFlow)
{
  "reranker_type": "siliconflow",
  "api_key": "your-siliconflow-key",
  "reranker_model": "BAAI/bge-reranker-v2-m3"
}
Error Responses
All endpoints return standard HTTP status codes:
| Code | Meaning |
|---|
| 200 | Success |
| 201 | Created (config updated) |
| 400 | Bad Request (invalid parameters) |
| 500 | Internal Server Error |
| 501 | Not Implemented |
Error response format:
{
  "detail": "Error message describing what went wrong"
}
Python Client Example
import requests

BASE_URL = "http://localhost:8001"

# 1. Configure graph connection
graph_config = {
    "url": "127.0.0.1:8080",
    "name": "hugegraph",
    "user": "admin",
    "pwd": "admin"
}
requests.post(f"{BASE_URL}/config/graph", json=graph_config)

# 2. Execute RAG query
rag_request = {
    "query": "Tell me about Al Pacino",
    "graph_only": True,
    "max_graph_items": 30
}
response = requests.post(f"{BASE_URL}/rag", json=rag_request)
print(response.json())

# 3. Generate Gremlin from natural language
text2gql_request = {
    "query": "Find all directors who worked with Al Pacino",
    "output_types": ["GREMLIN", "RESULT"]
}
response = requests.post(f"{BASE_URL}/text2gremlin", json=text2gql_request)
print(response.json())
See Also