HugeGraph-Loader Quick Start
1 HugeGraph-Loader Overview
HugeGraph-Loader is the data import component of HugeGraph, which can convert data from various data sources into graph vertices and edges and import them into the graph database in batches.
Currently supported data sources include:
- Local disk file or directory, supports TEXT, CSV and JSON format files, supports compressed files
- HDFS file or directory supports compressed files
- Mainstream relational databases, such as MySQL, PostgreSQL, Oracle, SQL Server
Local disk files and HDFS files support resumable uploads.
It will be explained in detail below.
Note: HugeGraph-Loader requires HugeGraph Server service, please refer to HugeGraph-Server Quick Start to download and start Server
2 Get HugeGraph-Loader
There are two ways to get HugeGraph-Loader:
- Use docker image (Convenient for Test/Dev)
- Download the compiled tarball
- Clone source code then compile and install
2.1 Use Docker image (Convenient for Test/Dev)
We can deploy the loader service using docker run -itd --name loader hugegraph/loader:1.5.0. For the data that needs to be loaded, it can be copied into the loader container either by mounting -v /path/to/data/file:/loader/file or by using docker cp.
Alternatively, to start the loader using docker-compose, the command is docker-compose up -d. An example of the docker-compose.yml is as follows:
version: '3'

services:
  server:
    image: hugegraph/hugegraph:1.3.0
    container_name: server
    ports:
      - 8080:8080

  loader:
    image: hugegraph/loader:1.3.0
    container_name: loader
    # mount your own data here
    # volumes:
      # - /path/to/data/file:/loader/file
The specific data loading process can be referenced under 4.5 User Docker to load data
Note:
The docker image of hugegraph-loader is a convenience release to start hugegraph-loader quickly, but not official distribution artifacts. You can find more details from ASF Release Distribution Policy.
Recommend to use
release tag(like1.5.0) for the stable version. Uselatesttag to experience the newest functions in development.
2.2 Download the compiled archive
Download the latest version of the HugeGraph-Toolchain release package:
wget https://downloads.apache.org/incubator/hugegraph/{version}/apache-hugegraph-toolchain-incubating-{version}.tar.gz
tar zxf *hugegraph*.tar.gz
2.3 Clone source code to compile and install
Clone the latest version of HugeGraph-Loader source package:
# 1. get from github
git clone https://github.com/apache/hugegraph-toolchain.git

# 2. get from direct  (e.g. here is 1.0.0, please choose the latest version)
wget https://downloads.apache.org/incubator/hugegraph/{version}/apache-hugegraph-toolchain-incubating-{version}-src.tar.gz
click to fold/collapse hwo to install ojdbc
Due to the license limitation of the Oracle OJDBC, you need to manually install ojdbc to the local maven repository.
Visit the Oracle jdbc downloads page. Select Oracle Database 12c Release 2 (12.2.0.1) drivers, as shown in the following figure.
After opening the link, select “ojdbc8.jar”.
Install ojdbc8 to the local maven repository, enter the directory where ojdbc8.jar is located, and execute the following command.
mvn install:install-file -Dfile=./ojdbc8.jar -DgroupId=com.oracle -DartifactId=ojdbc8 -Dversion=12.2.0.1 -Dpackaging=jar
Compile and generate tar package:
cd hugegraph-loader
mvn clean package -DskipTests
3 How to use
The basic process of using HugeGraph-Loader is divided into the following steps:
- Write graph schema
- Prepare data files
- Write input source map files
- Execute command import
3.1 Construct graph schema
This step is the modeling process. Users need to have a clear idea of their existing data and the graph model they want to create, and then write the schema to build the graph model.
For example, if you want to create a graph with two types of vertices and two types of edges, the vertices are “people” and “software”, the edges are “people know people” and “people create software”, and these vertices and edges have some attributes, For example, the vertex “person” has: “name”, “age” and other attributes, “Software” includes: “name”, “sale price” and other attributes; side “knowledge” includes: “date” attribute and so on.
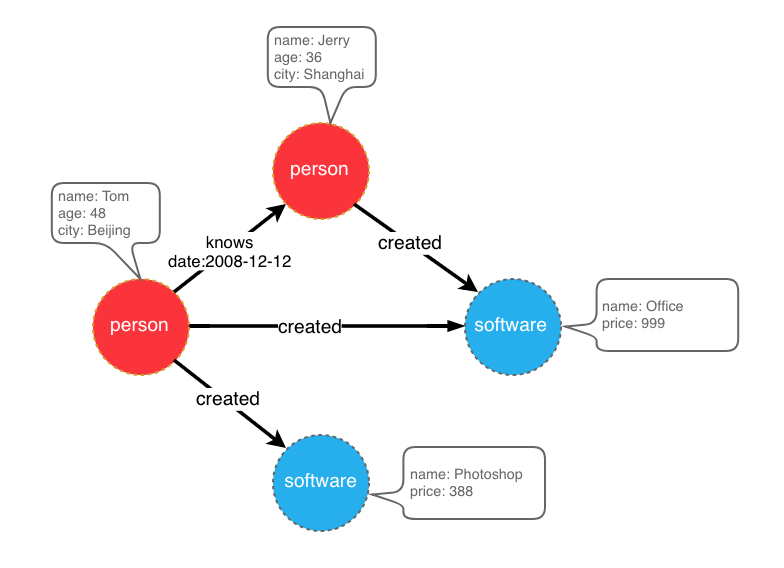
graph model example
After designing the graph model, we can use groovy to write the definition of schema and save it to a file, here named schema.groovy.
// Create some properties
schema.propertyKey("name").asText().ifNotExist().create();
schema.propertyKey("age").asInt().ifNotExist().create();
schema.propertyKey("city").asText().ifNotExist().create();
schema.propertyKey("date").asText().ifNotExist().create();
schema.propertyKey("price").asDouble().ifNotExist().create();

// Create the person vertex type, which has three attributes: name, age, city, and the primary key is name
schema.vertexLabel("person").properties("name", "age", "city").primaryKeys("name").ifNotExist().create();
// Create a software vertex type, which has two properties: name, price, the primary key is name
schema.vertexLabel("software").properties("name", "price").primaryKeys("name").ifNotExist().create();

// Create the knows edge type, which goes from person to person
schema.edgeLabel("knows").sourceLabel("person").targetLabel("person").ifNotExist().create();
// Create the created edge type, which points from person to software
schema.edgeLabel("created").sourceLabel("person").targetLabel("software").ifNotExist().create();
Please refer to the corresponding section in hugegraph-client for the detailed description of the schema.
3.2 Prepare data
The data sources currently supported by HugeGraph-Loader include:
- local disk file or directory
- HDFS file or directory
- Partial relational database
- Kafka topic
3.2.1 Data source structure
3.2.1.1 Local disk file or directory
The user can specify a local disk file as the data source. If the data is scattered in multiple files, a certain directory is also supported as the data source, but multiple directories are not supported as the data source for the time being.
For example, my data is scattered in multiple files, part-0, part-1 … part-n. To perform the import, it must be ensured that they are placed in one directory. Then in the loader’s mapping file, specify path as the directory.
Supported file formats include:
- TEXT
- CSV
- JSON
TEXT is a text file with custom delimiters, the first line is usually the header, and the name of each column is recorded, and no header line is allowed (specified in the mapping file). Each remaining row represents a record, which will be converted into a vertex/edge; each column of the row corresponds to a field, which will be converted into the id, label or attribute of the vertex/edge;
An example is as follows:
id|name|lang|price|ISBN
1|lop|java|328|ISBN978-7-107-18618-5
2|ripple|java|199|ISBN978-7-100-13678-5
CSV is a TEXT file with commas , as delimiters. When a column value itself contains a comma, the column value needs to be enclosed in double quotes, for example:
marko,29,Beijing
"li,nary",26,"Wu,han"
The JSON file requires that each line is a JSON string, and the format of each line needs to be consistent.
{"source_name": "marko", "target_name": "vadas", "date": "20160110", "weight": 0.5}
{"source_name": "marko", "target_name": "josh", "date": "20130220", "weight": 1.0}
3.2.1.2 HDFS file or directory
Users can also specify HDFS files or directories as data sources, all of the above requirements for local disk files or directories apply here. In addition, since HDFS usually stores compressed files, loader also provides support for compressed files, and local disk file or directory also supports compressed files.
Currently supported compressed file types include: GZIP, BZ2, XZ, LZMA, SNAPPY_RAW, SNAPPY_FRAMED, Z, DEFLATE, LZ4_BLOCK, LZ4_FRAMED, ORC, and PARQUET.
3.2.1.3 Mainstream relational database
The loader also supports some relational databases as data sources, and currently supports MySQL, PostgreSQL, Oracle, and SQL Server.
However, the requirements for the table structure are relatively strict at present. If association query needs to be done during the import process, such a table structure is not allowed. The associated query means: after reading a row of the table, it is found that the value of a certain column cannot be used directly (such as a foreign key), and you need to do another query to determine the true value of the column.
For example, Suppose there are three tables, person, software and created
// person schema
id | name | age | city
// software schema
id | name | lang | price
// created schema
id | p_id | s_id | date
If the id strategy of person or software is specified as PRIMARY_KEY when modeling (schema), choose name as the primary key (note: this is the concept of vertex-label in hugegraph), when importing edge data, the source vertex and target need to be spliced out. For the id of the vertex, you must go to the person/software table with p_id/s_id to find the corresponding name. In the case of the schema that requires additional query, the loader does not support it temporarily. In this case, the following two methods can be used instead:
- The id strategy of person and software is still specified as PRIMARY_KEY, but the id column of the person table and software table is used as the primary key attribute of the vertex, so that the id can be generated by directly splicing p_id and s_id with the label of the vertex when importing an edge;
- Specify the id policy of person and software as CUSTOMIZE, and then directly use the id column of the person table and the software table as the vertex id, so that p_id and s_id can be used directly when importing edges;
The key point is to make the edge use p_id and s_id directly, don’t check it again.
3.2.2 Prepare vertex and edge data
3.2.2.1 Vertex Data
The vertex data file consists of data line by line. Generally, each line is used as a vertex, and each column is used as a vertex attribute. The following description uses CSV format as an example.
- person vertex data (the data itself does not contain a header)
Tom,48,Beijing
Jerry,36,Shanghai
- software vertex data (the data itself contains the header)
name,price
Photoshop,999
Office,388
3.2.2.2 Edge data
The edge data file consists of data line by line. Generally, each line is used as an edge. Some columns are used as the IDs of the source and target vertices, and other columns are used as edge attributes. The following uses JSON format as an example.
- knows edge data
{"source_name": "Tom", "target_name": "Jerry", "date": "2008-12-12"}
- created edge data
{"source_name": "Tom", "target_name": "Photoshop"}
{"source_name": "Tom", "target_name": "Office"}
{"source_name": "Jerry", "target_name": "Office"}
3.3 Write data source mapping file
3.3.1 Mapping file overview
The mapping file of the input source is used to describe how to establish the mapping relationship between the input source data and the vertex type/edge type of the graph. It is organized in JSON format and consists of multiple mapping blocks, each of which is responsible for mapping an input source. Mapped to vertices and edges.
Specifically, each mapping block contains an input source and multiple vertex mapping and edge mapping blocks, and the input source block corresponds to the local disk file or directory, HDFS file or directory and relational database are responsible for describing the basic information of the data source, such as where the data is, what format, what is the delimiter, etc. The vertex map/edge map is bound to the input source, which columns of the input source can be selected, which columns are used as ids, which columns are used as attributes, and what attributes are mapped to each column, the values of the columns are mapped to what values of attributes, and so on.
In the simplest terms, each mapping block describes: where is the file to be imported, which type of vertices/edges each line of the file is to be used as which columns of the file need to be imported, and the corresponding vertices/edges of these columns. what properties, etc.
Note: The format of the mapping file before version 0.11.0 and the format after 0.11.0 has changed greatly. For the convenience of expression, the mapping file (format) before 0.11.0 is called version 1.0, and the version after 0.11.0 is version 2.0. And unless otherwise specified, the “map file” refers to version 2.0.
Click to expand/collapse the skeleton of the map file for version 2.0
{
  "version": "2.0",
  "structs": [
    {
      "id": "1",
      "input": {
      },
      "vertices": [
        {},
        {}
      ],
      "edges": [
        {},
        {}
      ]
    }
  ]
}
Two versions of the mapping file are given directly here (the above graph model and data file are described)
Click to expand/collapse the mapping file for version 2.0
{
  "version": "2.0",
  "structs": [
    {
      "id": "1",
      "skip": false,
      "input": {
        "type": "FILE",
        "path": "vertex_person.csv",
        "file_filter": {
          "extensions": [
            "*"
          ]
        },
        "format": "CSV",
        "delimiter": ",",
        "date_format": "yyyy-MM-dd HH:mm:ss",
        "time_zone": "GMT+8",
        "skipped_line": {
          "regex": "(^#|^//).*|"
        },
        "compression": "NONE",
        "header": [
          "name",
          "age",
          "city"
        ],
        "charset": "UTF-8",
        "list_format": {
          "start_symbol": "[",
          "elem_delimiter": "|",
          "end_symbol": "]"
        }
      },
      "vertices": [
        {
          "label": "person",
          "skip": false,
          "id": null,
          "unfold": false,
          "field_mapping": {},
          "value_mapping": {},
          "selected": [],
          "ignored": [],
          "null_values": [
            ""
          ],
          "update_strategies": {}
        }
      ],
      "edges": []
    },
    {
      "id": "2",
      "skip": false,
      "input": {
        "type": "FILE",
        "path": "vertex_software.csv",
        "file_filter": {
          "extensions": [
            "*"
          ]
        },
        "format": "CSV",
        "delimiter": ",",
        "date_format": "yyyy-MM-dd HH:mm:ss",
        "time_zone": "GMT+8",
        "skipped_line": {
          "regex": "(^#|^//).*|"
        },
        "compression": "NONE",
        "header": null,
        "charset": "UTF-8",
        "list_format": {
          "start_symbol": "",
          "elem_delimiter": ",",
          "end_symbol": ""
        }
      },
      "vertices": [
        {
          "label": "software",
          "skip": false,
          "id": null,
          "unfold": false,
          "field_mapping": {},
          "value_mapping": {},
          "selected": [],
          "ignored": [],
          "null_values": [
            ""
          ],
          "update_strategies": {}
        }
      ],
      "edges": []
    },
    {
      "id": "3",
      "skip": false,
      "input": {
        "type": "FILE",
        "path": "edge_knows.json",
        "file_filter": {
          "extensions": [
            "*"
          ]
        },
        "format": "JSON",
        "delimiter": null,
        "date_format": "yyyy-MM-dd HH:mm:ss",
        "time_zone": "GMT+8",
        "skipped_line": {
          "regex": "(^#|^//).*|"
        },
        "compression": "NONE",
        "header": null,
        "charset": "UTF-8",
        "list_format": null
      },
      "vertices": [],
      "edges": [
        {
          "label": "knows",
          "skip": false,
          "source": [
            "source_name"
          ],
          "unfold_source": false,
          "target": [
            "target_name"
          ],
          "unfold_target": false,
          "field_mapping": {
            "source_name": "name",
            "target_name": "name"
          },
          "value_mapping": {},
          "selected": [],
          "ignored": [],
          "null_values": [
            ""
          ],
          "update_strategies": {}
        }
      ]
    },
    {
      "id": "4",
      "skip": false,
      "input": {
        "type": "FILE",
        "path": "edge_created.json",
        "file_filter": {
          "extensions": [
            "*"
          ]
        },
        "format": "JSON",
        "delimiter": null,
        "date_format": "yyyy-MM-dd HH:mm:ss",
        "time_zone": "GMT+8",
        "skipped_line": {
          "regex": "(^#|^//).*|"
        },
        "compression": "NONE",
        "header": null,
        "charset": "UTF-8",
        "list_format": null
      },
      "vertices": [],
      "edges": [
        {
          "label": "created",
          "skip": false,
          "source": [
            "source_name"
          ],
          "unfold_source": false,
          "target": [
            "target_name"
          ],
          "unfold_target": false,
          "field_mapping": {
            "source_name": "name",
            "target_name": "name"
          },
          "value_mapping": {},
          "selected": [],
          "ignored": [],
          "null_values": [
            ""
          ],
          "update_strategies": {}
        }
      ]
    }
  ]
}
Click to expand/collapse the mapping file for version 1.0
{
  "vertices": [
    {
      "label": "person",
      "input": {
        "type": "file",
        "path": "vertex_person.csv",
        "format": "CSV",
        "header": ["name", "age", "city"],
        "charset": "UTF-8"
      }
    },
    {
      "label": "software",
      "input": {
        "type": "file",
        "path": "vertex_software.csv",
        "format": "CSV"
      }
    }
  ],
  "edges": [
    {
      "label": "knows",
      "source": ["source_name"],
      "target": ["target_name"],
      "input": {
        "type": "file",
        "path": "edge_knows.json",
        "format": "JSON"
      },
      "field_mapping": {
        "source_name": "name",
        "target_name": "name"
      }
    },
    {
      "label": "created",
      "source": ["source_name"],
      "target": ["target_name"],
      "input": {
        "type": "file",
        "path": "edge_created.json",
        "format": "JSON"
      },
      "field_mapping": {
        "source_name": "name",
        "target_name": "name"
      }
    }
  ]
}
The 1.0 version of the mapping file is centered on the vertex and edge, and sets the input source; while the 2.0 version is centered on the input source, and sets the vertex and edge mapping. Some input sources (such as a file) can generate both vertices and edges. If you write in the 1.0 format, you need to write an input block in each of the vertex and edge mapping blocks. The two input blocks are exactly the same; and the 2.0 version only needs to write input once. Therefore, compared with version 1.0, version 2.0 can save some repetitive writing of input.
In the bin directory of hugegraph-loader-{version}, there is a script tool mapping-convert.sh that can directly convert the mapping file of version 1.0 to version 2.0. The usage is as follows:
bin/mapping-convert.sh struct.json
A struct-v2.json will be generated in the same directory as struct.json.
3.3.2 Input Source
Input sources are currently divided into four categories: FILE, HDFS, JDBC and KAFKA, which are distinguished by the type node. We call them local file input sources, HDFS input sources, JDBC input sources, and KAFKA input sources, which are described below.
3.3.2.1 Local file input source
- id: The id of the input source. This field is used to support some internal functions. It is not required (it will be automatically generated if it is not filled in). It is strongly recommended to write it, which is very helpful for debugging;
- skip: whether to skip the input source, because the JSON file cannot add comments, if you do not want to import an input source during a certain import, but do not want to delete the configuration of the input source, you can set it to true to skip it, the default is false, not required;
- input: input source map block, composite structure
- type: an input source type, file or FILE must be filled;
- path: the path of the local file or directory, the absolute path or the relative path relative to the mapping file, it is recommended to use the absolute path, required;
- file_filter: filter files with compound conditions from
path, compound structure, currently only supports configuration extensions, represented by child nodeextensions, the default is “*”, which means to keep all files; - format: the format of the local file, the optional values are CSV, TEXT and JSON, which must be uppercase and required;
- header: the column name of each column of the file, if not specified, the first line of the data file will be used as the header; when the file itself has a header and the header is specified, the first line of the file will be treated as a normal data line; JSON The file does not need to specify a header, optional;
- delimiter: The column delimiter of the file line, the default is comma
","as the delimiter, theJSONfile does not need to be specified, optional; - charset: the encoded character set of the file, the default is
UTF-8, optional; - date_format: custom date format, the default value is yyyy-MM-dd HH:mm:ss, optional; if the date is presented in the form of a timestamp, this item must be written as
timestamp(fixed writing); - time_zone: Set which time zone the date data is in, the default value is
GMT+8, optional; - skipped_line: The line to be skipped, compound structure, currently only the regular expression of the line to be skipped can be configured, described by the child node
regex, no line is skipped by default, optional; - compression: The compression format of the file, the optional values are NONE, GZIP, BZ2, XZ, LZMA, SNAPPY_RAW, SNAPPY_FRAMED, Z, DEFLATE, LZ4_BLOCK, LZ4_FRAMED, ORC and PARQUET, the default is NONE, which means a non-compressed file, optional;
- list_format: When a column of the file (non-JSON) is a collection structure (the Cardinality of the PropertyKey in the corresponding figure is Set or List), you can use this item to set the start character, separator, and end character of the column, compound structure :
- start_symbol: The start character of the collection structure column (the default value is
[, JSON format currently does not support specification) - elem_delimiter: the delimiter of the collection structure column (the default value is
|, JSON format currently only supports native,delimiter) - end_symbol: the end character of the collection structure column (the default value is
], the JSON format does not currently support specification)
- start_symbol: The start character of the collection structure column (the default value is
3.3.2.2 HDFS input source
The nodes and meanings of the above local file input source are basically applicable here. Only the different and unique nodes of the HDFS input source are listed below.
- type: input source type, must fill in hdfs or HDFS, required;
- path: the path of the HDFS file or directory, it must be the absolute path of HDFS, required;
- core_site_path: the path of the core-site.xml file of the HDFS cluster, the key point is to specify the address of the NameNode (
fs.default.name) and the implementation of the file system (fs.hdfs.impl);
3.3.2.3 JDBC input source
As mentioned above, it supports multiple relational databases, but because their mapping structures are very similar, they are collectively referred to as JDBC input sources, and then use the vendor node to distinguish different databases.
- type: input source type, must fill in jdbc or JDBC, required;
- vendor: database type, optional options are [MySQL, PostgreSQL, Oracle, SQLServer], case-insensitive, required;
- driver: the type of driver used by jdbc, required;
- url: the url of the database that jdbc wants to connect to, required;
- database: the name of the database to be connected, required;
- schema: The name of the schema to be connected, different databases have different requirements, and the details are explained below;
- table: the name of the table to be connected, at least one of
tableorcustom_sqlis required; - custom_sql: custom SQL statement, at least one of
tableorcustom_sqlis required; - username: username to connect to the database, required;
- password: password for connecting to the database, required;
- batch_size: The size of one page when obtaining table data by page, the default is 500, optional;
MYSQL
| Node | Fixed value or common value |
|---|---|
| vendor | MYSQL |
| driver | com.mysql.cj.jdbc.Driver |
| url | jdbc:mysql://127.0.0.1:3306 |
schema: nullable, if filled in, it must be the same as the value of database
POSTGRESQL
| Node | Fixed value or common value |
|---|---|
| vendor | POSTGRESQL |
| driver | org.postgresql.Driver |
| url | jdbc:postgresql://127.0.0.1:5432 |
schema: nullable, default is “public”
ORACLE
| Node | Fixed value or common value |
|---|---|
| vendor | ORACLE |
| driver | oracle.jdbc.driver.OracleDriver |
| url | jdbc:oracle:thin:@127.0.0.1:1521 |
schema: nullable, the default value is the same as the username
SQLSERVER
| Node | Fixed value or common value |
|---|---|
| vendor | SQLSERVER |
| driver | com.microsoft.sqlserver.jdbc.SQLServerDriver |
| url | jdbc:sqlserver://127.0.0.1:1433 |
schema: required
3.3.2.4 Kafka input source
- type: input source type,
kafkaorKAFKA, required; - bootstrap_server: set the list of kafka bootstrap servers;
- topic: the topic to subscribe to;
- group: group of Kafka consumers;
- from_beginning: set whether to read from the beginning;
- format: format of the local file, options are CSV, TEXT and JSON, must be uppercase, required;
- header: column name of each column of the file, if not specified, the first line of the data file will be used as the header; when the file itself has a header and the header is specified, the first line of the file will be treated as an ordinary data line; JSON files do not need to specify the header, optional;
- delimiter: delimiter of the file line, default is comma “,” as delimiter, JSON files do not need to specify, optional;
- charset: encoding charset of the file, default is UTF-8, optional;
- date_format: customized date format, default value is yyyy-MM-dd HH:mm:ss, optional; if the date is presented in the form of timestamp, this item must be written as timestamp (fixed);
- extra_date_formats: a customized list of another date formats, empty by default, optional; each item in the list is an alternate date format to the date_format specified date format;
- time_zone: set which time zone the date data is in, default is GMT+8, optional;
- skipped_line: the line you want to skip, composite structure, currently can only configure the regular expression of the line to be skipped, described by the child node regex, the default is not to skip any line, optional;
- early_stop: the record pulled from Kafka broker at a certain time is empty, stop the task, default is false, only for debugging, optional;
3.3.3 Vertex and Edge Mapping
The nodes of vertex and edge mapping (a key in the JSON file) have a lot of the same parts. The same parts are introduced first, and then the unique nodes of vertex map and edge map are introduced respectively.
Nodes of the same section
- label:
labelto which the vertex/edge data to be imported belongs, required; - field_mapping: Map the column name of the input source column to the attribute name of the vertex/edge, optional;
- value_mapping: map the data value of the input source to the attribute value of the vertex/edge, optional;
- selected: select some columns to insert, other unselected ones are not inserted, cannot exist at the same time as
ignored, optional; - ignored: ignore some columns so that they do not participate in insertion, cannot exist at the same time as
selected, optional; - null_values: You can specify some strings to represent null values, such as “NULL”. If the vertex/edge attribute corresponding to this column is also a nullable attribute, the value of this attribute will not be set when constructing the vertex/edge, optional ;
- update_strategies: If the data needs to be updated in batches in a specific way, you can specify a specific update strategy for each attribute (see below for details), optional;
- unfold: Whether to unfold the column, each unfolded column will form a row with other columns, which is equivalent to unfolding into multiple rows; for example, the value of a certain column (id column) of the file is
[1,2,3], The values of other columns are18,Beijing. When unfold is set, this row will become 3 rows, namely:1,18,Beijing,2,18,Beijingand3,18, Beijing. Note that this will only expand the column selected as id. Default false, optional;
Update strategy supports 8 types: (requires all uppercase)
- Value accumulation:
SUM - Take the greater of the two numbers/dates:
BIGGER - Take the smaller of two numbers/dates:
SMALLER - Set property takes union:
UNION - Set attribute intersection:
INTERSECTION - List attribute append element:
APPEND - List/Set attribute delete element:
ELIMINATE - Override an existing property:
OVERRIDE
Note: If the newly imported attribute value is empty, the existing old data will be used instead of the empty value. For the effect, please refer to the following example
// The update strategy is specified in the JSON file as follows
{
  "vertices": [
    {
      "label": "person",
      "update_strategies": {
        "age": "SMALLER",
        "set": "UNION"
      },
      "input": {
        "type": "file",
        "path": "vertex_person.txt",
        "format": "TEXT",
        "header": ["name", "age", "set"]
      }
    }
  ]
}

// 1. Write a line of data with the OVERRIDE update strategy (null means empty here)
'a b null null'

// 2. Write another line
'null null c d'

// 3. Finally we can get
'a b c d'

// If there is no update strategy, you will get
'null null c d'
Note : After adopting the batch update strategy, the number of disk read requests will increase significantly, and the import speed will be several times slower than that of pure write coverage (at this time HDD disk [IOPS](https://en.wikipedia .org/wiki/IOPS) will be the bottleneck, SSD is recommended for speed)
Unique Nodes for Vertex Maps
- id: Specify a column as the id column of the vertex. When the vertex id policy is
CUSTOMIZE, it is required; when the id policy isPRIMARY_KEY, it must be empty;
Unique Nodes for Edge Maps
- source: Select certain columns of the input source as the id column of source vertex. When the id policy of the source vertex is
CUSTOMIZE, a certain column must be specified as the id column of the vertex; when the id policy of the source vertex isWhen PRIMARY_KEY, one or more columns must be specified for splicing the id of the generated vertex, that is, no matter which id strategy is used, this item is required; - target: Specify certain columns as the id columns of target vertex, similar to source, so I won’t repeat them;
- unfold_source: Whether to unfold the source column of the file, the effect is similar to that in the vertex map, and will not be repeated;
- unfold_target: Whether to unfold the target column of the file, the effect is similar to that in the vertex mapping, and will not be repeated;
3.4 Execute command import
After preparing the graph model, data file, and input source mapping relationship file, the data file can be imported into the graph database.
The import process is controlled by commands submitted by the user, and the user can control the specific process of execution through different parameters.
3.4.1 Parameter description
| Parameter | Default value | Required or not | Description |
|---|---|---|---|
-f or --file | Y | path to configure script | |
-g or --graph | Y | graph space name | |
-s or --schema | Y | schema file path | |
-h or --host | localhost | address of HugeGraphServer | |
-p or --port | 8080 | port number of HugeGraphServer | |
--username | null | When HugeGraphServer enables permission authentication, the username of the current graph | |
--token | null | When HugeGraphServer has enabled authorization authentication, the token of the current graph | |
--protocol | http | Protocol for sending requests to the server, optional http or https | |
--trust-store-file | When the request protocol is https, the client’s certificate file path | ||
--trust-store-password | When the request protocol is https, the client certificate password | ||
--clear-all-data | false | Whether to clear the original data on the server before importing data | |
--clear-timeout | 240 | Timeout for clearing the original data on the server before importing data | |
--incremental-mode | false | Whether to use the breakpoint resume mode, only the input source is FILE and HDFS support this mode, enabling this mode can start the import from the place where the last import stopped | |
--failure-mode | false | When the failure mode is true, the data that failed before will be imported. Generally speaking, the failed data file needs to be manually corrected and edited, and then imported again | |
--batch-insert-threads | CPUs | Batch insert thread pool size (CPUs is the number of logical cores available to the current OS) | |
--single-insert-threads | 8 | Size of single insert thread pool | |
--max-conn | 4 * CPUs | The maximum number of HTTP connections between HugeClient and HugeGraphServer, it is recommended to adjust this when adjusting threads | |
--max-conn-per-route | 2 * CPUs | The maximum number of HTTP connections for each route between HugeClient and HugeGraphServer, it is recommended to adjust this item at the same time when adjusting the thread | |
--batch-size | 500 | The number of data items in each batch when importing data | |
--max-parse-errors | 1 | The maximum number of lines of data parsing errors allowed, and the program exits when this value is reached | |
--max-insert-errors | 500 | The maximum number of rows of data insertion errors allowed, and the program exits when this value is reached | |
--timeout | 60 | Timeout (seconds) for inserting results to return | |
--shutdown-timeout | 10 | Waiting time for multithreading to stop (seconds) | |
--retry-times | 0 | Number of retries when a specific exception occurs | |
--retry-interval | 10 | interval before retry (seconds) | |
--check-vertex | false | Whether to check whether the vertex connected by the edge exists when inserting the edge | |
--print-progress | true | Whether to print the number of imported items in the console in real time | |
--dry-run | false | Turn on this mode, only parsing but not importing, usually used for testing | |
--help | false | print help information |
3.4.2 Breakpoint Continuation Mode
Usually, the Loader task takes a long time to execute. If the import interrupt process exits for some reason, and next time you want to continue the import from the interrupted point, this is the scenario of using breakpoint continuation.
The user sets the command line parameter –incremental-mode to true to open the breakpoint resume mode. The key to breakpoint continuation lies in the progress file. When the import process exits, the import progress at the time of exit will be recorded.
Recorded in the progress file, the progress file is located in the ${struct} directory, the file name is like load-progress ${date}, ${struct} is the prefix of the mapping file, and ${date} is the start of the import
moment. For example, for an import task started at 2019-10-10 12:30:30, the mapping file used is struct-example.json, then the path of the progress file is the same as struct-example.json
Sibling struct-example/load-progress 2019-10-10 12:30:30.
Note: The generation of progress files is independent of whether –incremental-mode is turned on or not, and a progress file is generated at the end of each import.
If the data file formats are all legal and the import task is stopped by the user (CTRL + C or kill, kill -9 is not supported), that is to say, if there is no error record, the next import only needs to be set to Continue for the breakpoint.
But if the limit of –max-parse-errors or –max-insert-errors is reached because too much data is invalid or network abnormality is reached, Loader will record these original rows that failed to insert into In the failed file, after the user modifies the data lines in the failed file, set –reload-failure to true to import these “failed files” as input sources (does not affect the normal file import), Of course, if there is still a problem with the modified data line, it will be logged again to the failure file (don’t worry about duplicate lines).
Each vertex map or edge map will generate its own failure file when data insertion fails. The failure file is divided into a parsing failure file (suffix .parse-error) and an insertion failure file (suffix .insert-error).
They are stored in the ${struct}/current directory. For example, there is a vertex mapping person, and an edge mapping knows in the mapping file, each of which has some error lines. When the Loader exits, you will see the following files in the ${struct}/current directory:
- person-b4cd32ab.parse-error: Vertex map person parses wrong data
- person-b4cd32ab.insert-error: Vertex map person inserts wrong data
- knows-eb6b2bac.parse-error: edge map knows parses wrong data
- knows-eb6b2bac.insert-error: edge map knows inserts wrong data
.parse-error and .insert-error do not always exist together. Only lines with parsing errors will have .parse-error files, and only lines with insertion errors will have .insert-error files.
3.4.3 logs directory file description
The log and error data during program execution will be written into the hugegraph-loader.log file.
3.4.4 Execute command
Run bin/hugegraph-loader and pass in parameters
bin/hugegraph-loader -g {GRAPH_NAME} -f ${INPUT_DESC_FILE} -s ${SCHEMA_FILE} -h {HOST} -p {PORT}
4 Complete example
Given below is an example in the example directory of the hugegraph-loader package. (GitHub address)
4.1 Prepare data
Vertex file: example/file/vertex_person.csv
marko,29,Beijing
vadas,27,Hongkong
josh,32,Beijing
peter,35,Shanghai
"li,nary",26,"Wu,han"
tom,null,NULL
Vertex file: example/file/vertex_software.txt
id|name|lang|price|ISBN
1|lop|java|328|ISBN978-7-107-18618-5
2|ripple|java|199|ISBN978-7-100-13678-5
Edge file: example/file/edge_knows.json
{"source_name": "marko", "target_name": "vadas", "date": "20160110", "weight": 0.5}
{"source_name": "marko", "target_name": "josh", "date": "20130220", "weight": 1.0}
Edge file: example/file/edge_created.json
{"aname": "marko", "bname": "lop", "date": "20171210", "weight": 0.4}
{"aname": "josh", "bname": "lop", "date": "20091111", "weight": 0.4}
{"aname": "josh", "bname": "ripple", "date": "20171210", "weight": 1.0}
{"aname": "peter", "bname": "lop", "date": "20170324", "weight": 0.2}
4.2 Write schema
Click to expand/collapse the schema file: example/file/schema.groovy
schema.propertyKey("name").asText().ifNotExist().create();
schema.propertyKey("age").asInt().ifNotExist().create();
schema.propertyKey("city").asText().ifNotExist().create();
schema.propertyKey("weight").asDouble().ifNotExist().create();
schema.propertyKey("lang").asText().ifNotExist().create();
schema.propertyKey("date").asText().ifNotExist().create();
schema.propertyKey("price").asDouble().ifNotExist().create();

schema.vertexLabel("person").properties("name", "age", "city").primaryKeys("name").ifNotExist().create();
schema.vertexLabel("software").properties("name", "lang", "price").primaryKeys("name").ifNotExist().create();

schema.indexLabel("personByAge").onV("person").by("age").range().ifNotExist().create();
schema.indexLabel("personByCity").onV("person").by("city").secondary().ifNotExist().create();
schema.indexLabel("personByAgeAndCity").onV("person").by("age", "city").secondary().ifNotExist().create();
schema.indexLabel("softwareByPrice").onV("software").by("price").range().ifNotExist().create();

schema.edgeLabel("knows").sourceLabel("person").targetLabel("person").properties("date", "weight").ifNotExist().create();
schema.edgeLabel("created").sourceLabel("person").targetLabel("software").properties("date", "weight").ifNotExist().create();

schema.indexLabel("createdByDate").onE("created").by("date").secondary().ifNotExist().create();
schema.indexLabel("createdByWeight").onE("created").by("weight").range().ifNotExist().create();
schema.indexLabel("knowsByWeight").onE("knows").by("weight").range().ifNotExist().create();
4.3 Write the input source mapping file example/file/struct.json
Click to expand/collapse the input source mapping file example/file/struct.json
{
  "vertices": [
    {
      "label": "person",
      "input": {
        "type": "file",
        "path": "example/file/vertex_person.csv",
        "format": "CSV",
        "header": ["name", "age", "city"],
        "charset": "UTF-8",
        "skipped_line": {
          "regex": "(^#|^//).*"
        }
      },
      "null_values": ["NULL", "null", ""]
    },
    {
      "label": "software",
      "input": {
        "type": "file",
        "path": "example/file/vertex_software.txt",
        "format": "TEXT",
        "delimiter": "|",
        "charset": "GBK"
      },
      "id": "id",
      "ignored": ["ISBN"]
    }
  ],
  "edges": [
    {
      "label": "knows",
      "source": ["source_name"],
      "target": ["target_name"],
      "input": {
        "type": "file",
        "path": "example/file/edge_knows.json",
        "format": "JSON",
        "date_format": "yyyyMMdd"
      },
      "field_mapping": {
        "source_name": "name",
        "target_name": "name"
      }
    },
    {
      "label": "created",
      "source": ["source_name"],
      "target": ["target_id"],
      "input": {
        "type": "file",
        "path": "example/file/edge_created.json",
        "format": "JSON",
        "date_format": "yyyy-MM-dd"
      },
      "field_mapping": {
        "source_name": "name"
      }
    }
  ]
}
4.4 Command to import
sh bin/hugegraph-loader.sh -g hugegraph -f example/file/struct.json -s example/file/schema.groovy
After the import is complete, statistics similar to the following will appear:
vertices/edges has been loaded this time : 8/6
--------------------------------------------------
count metrics
     input read success            : 14
     input read failure            : 0
     vertex parse success          : 8
     vertex parse failure          : 0
     vertex insert success         : 8
     vertex insert failure         : 0
     edge parse success            : 6
     edge parse failure            : 0
     edge insert success           : 6
     edge insert failure           : 0
4.5 Use Docker to load data
4.5.1 Use docker exec to load data directly
4.5.1.1 Prepare data
If you just want to try out the loader, you can import the built-in example dataset without needing to prepare additional data yourself.
If using custom data, before importing data with the loader, we need to copy the data into the container.
First, following the steps in 4.1–4.3, we can prepare the data and then use docker cp to copy the prepared data into the loader container.
Suppose we’ve prepared the corresponding dataset following the above steps, stored in the hugegraph-dataset folder with the following file structure:
tree -f hugegraph-dataset/

hugegraph-dataset
├── hugegraph-dataset/edge_created.json
├── hugegraph-dataset/edge_knows.json
├── hugegraph-dataset/schema.groovy
├── hugegraph-dataset/struct.json
├── hugegraph-dataset/vertex_person.csv
└── hugegraph-dataset/vertex_software.txt
Copy the files into the container.
docker cp hugegraph-dataset loader:/loader/dataset
docker exec -it loader ls /loader/dataset

edge_created.json  edge_knows.json  schema.groovy  struct.json  vertex_person.csv  vertex_software.txt
4.5.1.2 Data loading
Taking the built-in example dataset as an example, we can use the following command to load the data.
If you need to import your custom dataset, you need to modify the paths for -f (data script) and -s (schema) configurations.
You can refer to 3.4.1-Parameter description for the rest of the parameters.
docker exec -it loader bin/hugegraph-loader.sh -g hugegraph -f example/file/struct.json -s example/file/schema.groovy -h server -p 8080
If loading a custom dataset, following the previous example, you would use:
docker exec -it loader bin/hugegraph-loader.sh -g hugegraph -f /loader/dataset/struct.json -s /loader/dataset/schema.groovy -h server -p 8080
If
loaderandserverare in the same Docker network, you can specify-h {server_container_name}; otherwise, you need to specify the IP of theserverhost (in our example,server_container_nameisserver).
Then we can see the result:
HugeGraphLoader worked in NORMAL MODE
vertices/edges loaded this time : 8/6
--------------------------------------------------
count metrics
    input read success            : 14
    input read failure            : 0
    vertex parse success          : 8
    vertex parse failure          : 0
    vertex insert success         : 8
    vertex insert failure         : 0
    edge parse success            : 6
    edge parse failure            : 0
    edge insert success           : 6
    edge insert failure           : 0
--------------------------------------------------
meter metrics
    total time                    : 0.199s
    read time                     : 0.046s
    load time                     : 0.153s
    vertex load time              : 0.077s
    vertex load rate(vertices/s)  : 103
    edge load time                : 0.112s
    edge load rate(edges/s)       : 53
You can also use curl or hubble to observe the import result. Here’s an example using curl:
> curl "http://localhost:8080/graphs/hugegraph/graph/vertices" | gunzip
{"vertices":[{"id":1,"label":"software","type":"vertex","properties":{"name":"lop","lang":"java","price":328.0}},{"id":2,"label":"software","type":"vertex","properties":{"name":"ripple","lang":"java","price":199.0}},{"id":"1:tom","label":"person","type":"vertex","properties":{"name":"tom"}},{"id":"1:josh","label":"person","type":"vertex","properties":{"name":"josh","age":32,"city":"Beijing"}},{"id":"1:marko","label":"person","type":"vertex","properties":{"name":"marko","age":29,"city":"Beijing"}},{"id":"1:peter","label":"person","type":"vertex","properties":{"name":"peter","age":35,"city":"Shanghai"}},{"id":"1:vadas","label":"person","type":"vertex","properties":{"name":"vadas","age":27,"city":"Hongkong"}},{"id":"1:li,nary","label":"person","type":"vertex","properties":{"name":"li,nary","age":26,"city":"Wu,han"}}]}
If you want to check the import result of edges, you can use curl "http://localhost:8080/graphs/hugegraph/graph/edges" | gunzip.
4.5.2 Enter the docker container to load data
Besides using docker exec directly for data import, we can also enter the container for data loading. The basic process is similar to 4.5.1.
Enter the container by docker exec -it loader bash and execute the command:
sh bin/hugegraph-loader.sh -g hugegraph -f example/file/struct.json -s example/file/schema.groovy -h server -p 8080
The results of the execution will be similar to those shown in 4.5.1.
4.6 Import data by spark-loader
Spark version: Spark 3+, other versions has not been tested.
HugeGraph Toolchain version: toolchain-1.0.0
The parameters of spark-loader are divided into two parts. Note: Because the abbreviations of
these two-parameter names have overlapping parts, please use the full name of the parameter.
And there is no need to guarantee the order between the two parameters.
- hugegraph parameters (Reference: hugegraph-loader parameter description )
- Spark task submission parameters (Reference: Submitting Applications)
Example:
sh bin/hugegraph-spark-loader.sh --master yarn \
--deploy-mode cluster --name spark-hugegraph-loader --file ./hugegraph.json \
--username admin --token admin --host xx.xx.xx.xx --port 8093 \
--graph graph-test --num-executors 6 --executor-cores 16 --executor-memory 15g