This is the multi-page printable view of this section. .
Documentation
- 1: Introduction with HugeGraph
- 2: Download HugeGraph
- 3: Quick Start
- 3.1: Clients
- 3.1.1: HugeGraph-Client Quick Start
- 3.2: Graph computing
- 3.3: HugeGraph
- 3.3.1: HugeGraph-Server Quick Start
- 3.4: Toolchain
- 3.4.1: HugeGraph-Loader Quick Start
- 3.4.2: HugeGraph-Tools Quick Start
- 3.4.3: HugeGraph-Hubble Quick Start
- 3.1: Clients
- 4: Config
- 5: API
- 5.1: HugeGraph RESTful API
- 5.1.1: Schema API
- 5.1.2: PropertyKey API
- 5.1.3: VertexLabel API
- 5.1.4: EdgeLabel API
- 5.1.5: IndexLabel API
- 5.1.6: Rebuild API
- 5.1.7: Vertex API
- 5.1.8: Edge API
- 5.1.9: Traverser API
- 5.1.10: Rank API
- 5.1.11: Variable API
- 5.1.12: Graphs API
- 5.1.13: Task API
- 5.1.14: Gremlin API
- 5.1.15: Authentication API
- 5.1.16: Other API
- 5.2: HugeGraph Java Client
- 5.3: Gremlin-Console
- 5.1: HugeGraph RESTful API
- 6: GUIDES
- 6.1: HugeGraph Architecture Overview
- 6.2: HugeGraph Design Concepts
- 6.3: HugeGraph Plugin机制及插件扩展流程
- 6.4: Backup Restore
- 6.5: FAQ
- 7: QUERY LANGUAGE
- 7.1: HugeGraph Gremlin
- 7.2: HugeGraph Examples
- 8: PERFORMANCE
- 8.1: HugeGraph BenchMark Performance
- 8.2: HugeGraph-API Performance
- 8.2.1: v0.5.6 Stand-alone(RocksDB)
- 8.2.2: v0.5.6 Cluster(Cassandra)
- 8.2.3: v0.4.4
- 8.2.4: v0.2
- 8.3: HugeGraph-Loader Performance
- 8.4: HugeGraph 0.4.4 Benchmark
- 9: Contribution Guidelines
- 10: CHANGELOGS
- 11: Contributor Agreement
Welcome to HugeGraph docs
1 - Introduction with HugeGraph
Summary
HugeGraph is an easy-to-use, efficient, general-purpose open source graph database system(Graph Database, GitHub project address), implemented the Apache TinkerPop3 framework and is fully compatible with the Gremlin query language, With complete toolchain components, it helps users to easily build applications and products based on graph databases. HugeGraph supports fast import of more than 10 billion vertices and edges, and provides millisecond-level relational query capability (OLTP). It supports large-scale distributed graph computing (OLAP).
Typical application scenarios of HugeGraph include deep relationship exploration, association analysis, path search, feature extraction, data clustering, community detection, knowledge graph, etc., and are applicable to business fields such as network security, telecommunication fraud, financial risk control, advertising recommendation, social network and intelligence Robots etc.
Typical application scenarios of HugeGraph include deep relationship exploration, association analysis, path search, feature extraction, data clustering, community detection, knowledge graph, etc., and are applicable to business fields such as network security, telecommunication fraud, financial risk control, advertising recommendation, social network and intelligence Robots etc.
Features
HugeGraph supports graph operations in online and offline environments, supports batch import of data, supports efficient complex relationship analysis, and can be seamlessly integrated with big data platforms. HugeGraph supports multi-user parallel operations. Users can enter Gremlin query statements and get graph query results in time. They can also call HugeGraph API in user programs for graph analysis or query.
This system has the following features:
- Ease of use: HugeGraph supports Gremlin graph query language and RESTful API, provides common interfaces for graph retrieval, and has peripheral tools with complete functions to easily implement various graph-based query and analysis operations.
- Efficiency: HugeGraph has been deeply optimized in graph storage and graph computing, and provides a variety of batch import tools, which can easily complete the rapid import of tens of billions of data, and achieve millisecond-level response for graph retrieval through optimized queries. Supports simultaneous online real-time operations of thousands of users.
- Universal: HugeGraph supports the Apache Gremlin standard graph query language and the Property Graph standard graph modeling method, and supports graph-based OLTP and OLAP schemes. Integrate Apache Hadoop and Apache Spark big data platform.
- Scalable: supports distributed storage, multiple copies of data and horizontal expansion, built-in multiple back-end storage engines, and can easily expand the back-end storage engine through plug-ins.
- Open: HugeGraph code is open source (Apache 2 License), customers can modify and customize independently, and selectively give back to the open source community.
The functions of this system include but are not limited to:
- Supports batch import of data from multiple data sources (including local files, HDFS files, MySQL databases and other data sources), and supports import of multiple file formats (including TXT, CSV, JSON and other formats)
- With a visual operation interface, it can be used for operation, analysis and display diagrams, reducing the threshold for users to use
- Optimized graph interface: shortest path (Shortest Path), K-step connected subgraph (K-neighbor), K-step to reach the adjacent point (K-out), personalized recommendation algorithm PersonalRank, etc.
- Implemented based on Apache TinkerPop3 framework, supports Gremlin graph query language
- Support attribute graph, attributes can be added to vertices and edges, and support rich attribute types
- Has independent schema metadata information, has powerful graph modeling capabilities, and facilitates third-party system integration
- Support multi-vertex ID strategy: support primary key ID, support automatic ID generation, support user-defined string ID, support user-defined digital ID
- The attributes of edges and vertices can be indexed to support precise query, range query, and full-text search
- The storage system adopts plug-in mode, supporting RocksDB, Cassandra, ScyllaDB, HBase, MySQL, PostgreSQL, Palo, and InMemory, etc.
- Integrate with big data systems such as Hadoop and Spark GraphX, and support Bulk Load operations
- Support high availability HA, multiple copies of data, backup recovery, monitoring, etc.
Modules
- HugeGraph-Server: HugeGraph-Server is the core part of the HugeGraph project, including submodules such as Core, Backend, and API;
- Core: Graph engine implementation, connecting the Backend module downward and supporting the API module upward;
- Backend: Realize the storage of graph data to the backend. The supported backends include: Memory, Cassandra, ScyllaDB, RocksDB, HBase, MySQL and PostgreSQL. Users can choose one according to the actual situation;
- API: Built-in REST Server, provides RESTful API to users, and is fully compatible with Gremlin query.
- HugeGraph-Client: HugeGraph-Client provides a RESTful API client for connecting to HugeGraph-Server. Currently, only Java version is implemented. Users of other languages can implement it by themselves;
- HugeGraph-Loader: HugeGraph-Loader is a data import tool based on HugeGraph-Client, which converts ordinary text data into graph vertices and edges and inserts them into graph database;
- HugeGraph-Computer: HugeGraph-Computer is a distributed graph processing system for HugeGraph (OLAP). It is an implementation of Pregel. It runs on Kubernetes framework;
- HugeGraph-Hubble: HugeGraph-Hubble is HugeGraph’s web visualization management platform, a one-stop visual analysis platform. The platform covers the whole process from data modeling, to rapid data import, to online and offline analysis of data, and unified management of graphs;
- HugeGraph-Tools: HugeGraph-Tools is HugeGraph’s deployment and management tools, including functions such as managing graphs, backup/restore, Gremlin execution, etc.
Contact Us
- GitHub Issues: Feedback on usage issues and functional requirements (priority)
- Feedback Email: hugegraph@googlegroups.com
- WeChat public account: HugeGraph
2 - Download HugeGraph
Latest version
The latest HugeGraph: 0.12.0, released on 2021-12-31.
| components | description | download |
|---|---|---|
| HugeGraph-Server | The main program of HugeGraph | 0.12.0 |
| HugeGraph-Hubble | Web-based Visual Graphical Interface | 1.6.0 |
| HugeGraph-Loader | Data import tool | 0.12.0 |
| HugeGraph-Tools | Command line toolset | 1.6.0 |
Versions mapping
Note: The latest graph analysis and display platform is Hubble, which supports server v0.10 +.
3 - Quick Start
3.1 - Clients
3.1.1 - HugeGraph-Client Quick Start
1 Overview Of Hugegraph
HugeGraph-Client sends HTTP request to HugeGraph-Server to obtain and parse the execution result of Server. Currently only the HugeGraph-Client for Java is provided. You can use HugeGraph-Client to write Java code to operate HugeGraph, such as adding, deleting, modifying, and querying schema and graph data, or executing gremlin statements.
2 What You Need
- JDK 1.8
- Maven 3.3.9+
3 How To Use
The basic steps to use HugeGraph-Client are as follows:
- Build a new Maven project by IDEA or Eclipse
- Add HugeGraph-Client dependency in pom file;
- Create an object to invoke the interface of HugeGraph-Client
See the complete example in the following section for the detail.
4 Complete Example
4.1 Build New Maven Project
Using IDEA or Eclipse to create the project:
4.2 Add Hugegraph-Client Dependency In POM
4.3 Example
4.3.1 SingleExample
4.3.2 BatchExample
4.4 Run The Example
Before running Example, you need to start the Server. For the startup process, seeHugeGraph-Server Quick Start.
4.5 More Information About Example
3.2 - Graph computing
3.2.1 - HugeGraph-Computer Quick Start
1 HugeGraph-Computer Overview
The HugeGraph-Computer is a distributed graph processing system for HugeGraph (OLAP). It is an implementation of Pregel. It runs on Kubernetes framework.
Features
- Support distributed MPP graph computing, and integrates with HugeGraph as graph input/output storage.
- Based on BSP(Bulk Synchronous Parallel) model, an algorithm performs computing through multiple parallel iterations, every iteration is a superstep.
- Auto memory management. The framework will never be OOM(Out of Memory) since it will split some data to disk if it doesn’t have enough memory to hold all the data.
- The part of edges or the messages of super node can be in memory, so you will never lose it.
- You can load the data from HDFS or HugeGraph, or any other system.
- You can output the results to HDFS or HugeGraph, or any other system.
- Easy to develop a new algorithm. You just need to focus on a vertex only processing just like as in a single server, without worrying about message transfer and memory/storage management.
2 Get Started
2.1 Run PageRank algorithm locally
To run algorithm with HugeGraph-Computer, you need to install 64-bit JRE/JDK 11 or later versions.
You also need to deploy HugeGraph-Server and Etcd.
There are two ways to get HugeGraph-Computer:
- Download the compiled tarball
- Clone source code then compile and package
2.1 Download the compiled archive
Download the latest version of the HugeGraph-Computer release package:
2.2 Clone source code to compile and package
Clone the latest version of HugeGraph-Computer source package:
Compile and generate tar package:
2.3 Start master node
You can use
-cparameter specify the configuration file, more computer config please see:Computer Config Options
2.4 Start worker node
2.5 Query algorithm results
2.5.1 Enable OLAP index query for server
If OLAP index is not enabled, it needs to enable, more reference: modify-graphs-read-mode
2.5.2 Query page_rank property value:
2.2 Run PageRank algorithm in Kubernetes
To run algorithm with HugeGraph-Computer you need to deploy HugeGraph-Server first
2.2.1 Install HugeGraph-Computer CRD
2.2.2 Show CRD
2.2.3 Install hugegraph-computer-operator&etcd-server
2.2.4 Wait for hugegraph-computer-operator&etcd-server deployment to complete
2.2.5 Submit job
More computer crd please see: Computer CRD
More computer config please see: Computer Config Options
2.2.6 Show job
2.2.7 Show log of nodes
2.2.8 Show success event of a job
NOTE: it will only be saved for one hour
2.2.9 Query algorithm results
If the output to Hugegraph-Server is consistent with Locally, if output to HDFS, please check the result file in the directory of /hugegraph-computer/results/{jobId} directory.
3 Built-In algorithms document
3.1 Supported algorithms list:
Centrality Algorithm:
- PageRank
- BetweennessCentrality
- ClosenessCentrality
- DegreeCentrality
Community Algorithm:
- ClusteringCoefficient
- Kcore
- Lpa
- TriangleCount
- Wcc
Path Algorithm:
- RingsDetection
- RingsDetectionWithFilter
More algorithms please see: Built-In algorithms
3.2 Algorithm describe
TODO
4 Algorithm development guide
TODO
3.3 - HugeGraph
3.3.1 - HugeGraph-Server Quick Start
1 HugeGraph-Server Overview
HugeGraph-Server is the core part of the HugeGraph Project, contains submodules such as Core、Backend、API.
The Core Module is an implementation of the Tinkerpop interface; The Backend module is used to save the graph data to the data store, currently supported backends include:Memory、Cassandra、ScyllaDB、RocksDB; The API Module provides HTTP Server, which converts Client’s HTTP request into a call to Core Module.
There will be two spellings HugeGraph-Server and HugeGraphServer in the document, and other modules are similar. There is no big difference in the meaning of these two ways of writing, which can be distinguished as follows:
HugeGraph-Serverrepresents the code of server-related components,HugeGraphServerrepresents the service process.
2 Dependency
2.1 Install JDK-1.8
HugeGraph-Server developed based on jdk-1.8, project’s code uses many classes and methods in jdk-1.8, please install and configure by yourself.
Be sure to execute the java -version command to check the jdk version before reading
2.2 Install GCC-4.3.0(GLIBCXX_3.4.10) or update version (optional)
If you are using the RocksDB backend, be sure to execute the gcc --version command to check the gcc version; if you are using other backends, this is not required.
3 Deploy
There are three ways to deploy HugeGraph-Server components:
- Method 1: One-click deployment
- Method 2: Download the tarball
- Method 3: Source code compilation
3.1 One-click deployment
HugeGraph-Tools provides a command-line tool for one-click deployment, users can use this tool to quickly download、decompress、configure and start HugeGraphServer and HugeGraphStudio with one click. of course, you still have to download the tarball of HugeGraph-Tools first.
note:${version} is the version, The latest version can refer to Download Page, Or click the link to download directly from the Download page
The general entry script for HugeGraph-Tools is bin/hugegraph, Users can use the help command to view its usage, here only the commands for one-click deployment are introduced.
{hugegraph-version} indicates the version of HugeGraphServer and HugeGraphStudio to be deployed, users can view the conf/version-mapping.yaml file for version information, {install-path} specify the installation directory of HugeGraphServer and HugeGraphStudio, {download-path-prefix} optional, specify the download address of HugeGraphServer and HugeGraphStudio tarball, use default download URL if not provided, for example, to start HugeGraph-Server and HugeGraphStudio version 0.6, write the above command as bin/hugegraph deploy -v 0.6 -p services.
3.2 Download the tar tarball
3.3 Source code compilation
Download HugeGraph source code
Compile and generate tarball
The execution log is as follows:
After successful execution, hugegraph-*.tar.gz files will be generated in the hugegraph directory, which is the tarball generated by compilation.
4 Config
If you need to quickly start HugeGraph just for testing, then you only need to modify a few configuration items (see next section). for detailed configuration introduction, please refer to configuration document and introduction to configuration items
5 Startup
The startup is divided into “first startup” and “non-first startup”. This distinction is because the back-end database needs to be initialized before the first startup, and then the service is started. after the service is stopped artificially, or when the service needs to be started again for other reasons, because the backend database is persistent, you can start the service directly.
When HugeGraphServer starts, it will connect to the backend storage and try to check the version number of the backend storage. If the backend is not initialized or the backend has been initialized but the version does not match (old version data), HugeGraphServer will fail to start and give an error message.
If you need to access HugeGraphServer externally, please modify the restserver.url configuration item of rest-server.properties
(default is http://127.0.0.1:8080), change to machine name or IP address.
Since the configuration (hugegraph.properties) and startup steps required by various backends are slightly different, the following will introduce the configuration and startup of each backend one by one.
5.1 Memory
Update hugegraph.properties
The data of the Memory backend is stored in memory and cannot be persisted. It does not need to initialize the backend. This is the only backend that does not require initialization.
Start server
The prompted url is the same as the restserver.url configured in rest-server.properties
5.2 RocksDB
RocksDB is an embedded database that does not require manual installation and deployment. GCC version >= 4.3.0 (GLIBCXX_3.4.10) is required. If not, GCC needs to be upgraded in advance
Update hugegraph.properties
Initialize the database (required only on first startup)
Start server
5.3 Cassandra
users need to install Cassandra by themselves, requiring version 3.0 or above, download link
Update hugegraph.properties
Initialize the database (required only on first startup)
Start server
5.4 ScyllaDB
users need to install ScyllaDB by themselves, version 2.1 or above is recommended, download link
Update hugegraph.properties
Since the scylladb database itself is an “optimized version” based on cassandra, if the user does not have scylladb installed, they can also use cassandra as the backend storage directly. They only need to change the backend and serializer to scylladb, and the host and post point to the seeds and port of the cassandra cluster. Yes, but it is not recommended to do so, it will not take advantage of scylladb itself.
Initialize the database (required only on first startup)
Start server
5.5 HBase
users need to install HBase by themselves, requiring version 2.0 or above,download link
Update hugegraph.properties
Initialize the database (required only on first startup)
Start server
for more other backend configurations, please refer tointroduction to configuration items
6 Access server
6.1 Service startup status check
Use jps to see service process
curl request RESTfulAPI
Return 200, which means the server starts normally.
6.2 Request Server
The RESTful API of HugeGraphServer includes various types of resources, typically including graph, schema, gremlin, traverser and task.
graphcontainsvertices、edgesschemacontainsvertexlabels、propertykeys、edgelabels、indexlabelsgremlincontains variousGremlinstatements, such asg.v(), which can be executed synchronously or asynchronouslytraversercontains various advanced queries including shortest paths, intersections, N-step reachable neighbors, etc.taskcontains query and delete with asynchronous tasks
6.2.1 Get vertices and its related properties in hugegraph
explanation
Since there are many vertices and edges in the graph, for list-type requests, such as getting all vertices, getting all edges, etc., the server will compress the data and return it, so when use curl, you get a bunch of garbled characters, you can redirect to gunzip for decompression. It is recommended to use Chrome browser + Restlet plugin to send HTTP requests for testing.
The current default configuration of HugeGraphServer can only be accessed locally, and the configuration can be modified so that it can be accessed on other machines.
response body:
For detailed API, please refer toRESTful-API
7 Stop Server
3.4 - Toolchain
3.4.1 - HugeGraph-Loader Quick Start
1 HugeGraph-Loader Overview
HugeGraph-Loader is the data import component of HugeGraph, which can convert data from various data sources into graph vertices and edges and import them into the graph database in batches.
Currently supported data sources include:
- Local disk file or directory, supports TEXT, CSV and JSON format files, supports compressed files
- HDFS file or directory, supports compressed files
- Mainstream relational databases, such as MySQL, PostgreSQL, Oracle, SQL Server
Local disk files and HDFS files support resumable uploads.
It will be explained in detail below.
Note: HugeGraph-Loader requires HugeGraph Server service, please refer to HugeGraph-Server Quick Start to download and start Server
2 Get HugeGraph-Loader
There are two ways to get HugeGraph-Loader:
- Download the compiled tarball
- Clone source code then compile and install
2.1 Download the compiled archive
Download the latest version of the HugeGraph-Loader release package:
2.2 Clone source code to compile and install
Clone the latest version of HugeGraph-Loader source package:
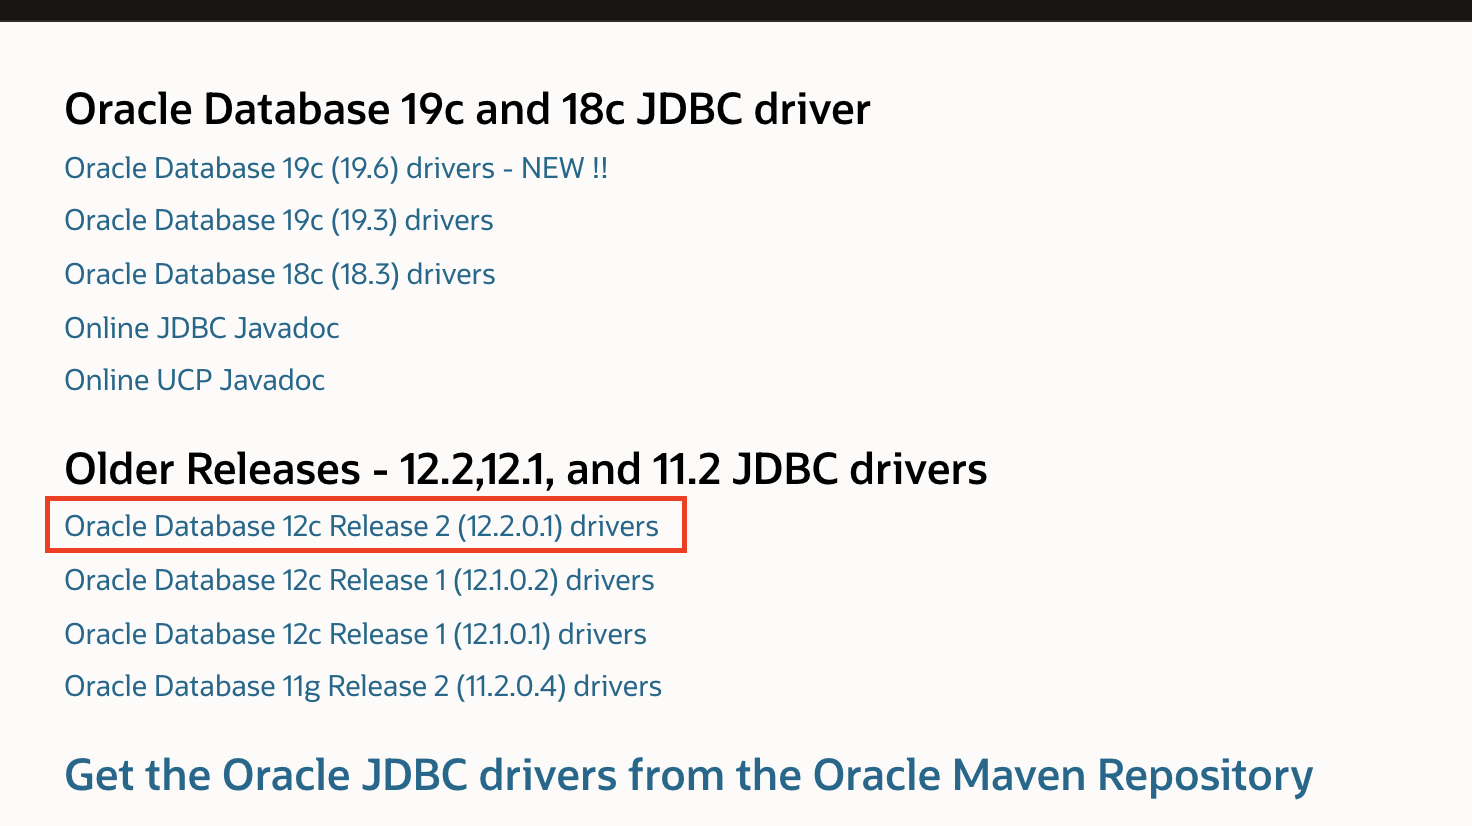
Due to the license limitation of the Oracle OJDBC, you need to manually install ojdbc to the local maven repository.
Visit the Oracle jdbc downloads page. Select Oracle Database 12c Release 2 (12.2.0.1) drivers, as shown in the following figure.
After opening the link, select “ojdbc8.jar” as shown below.
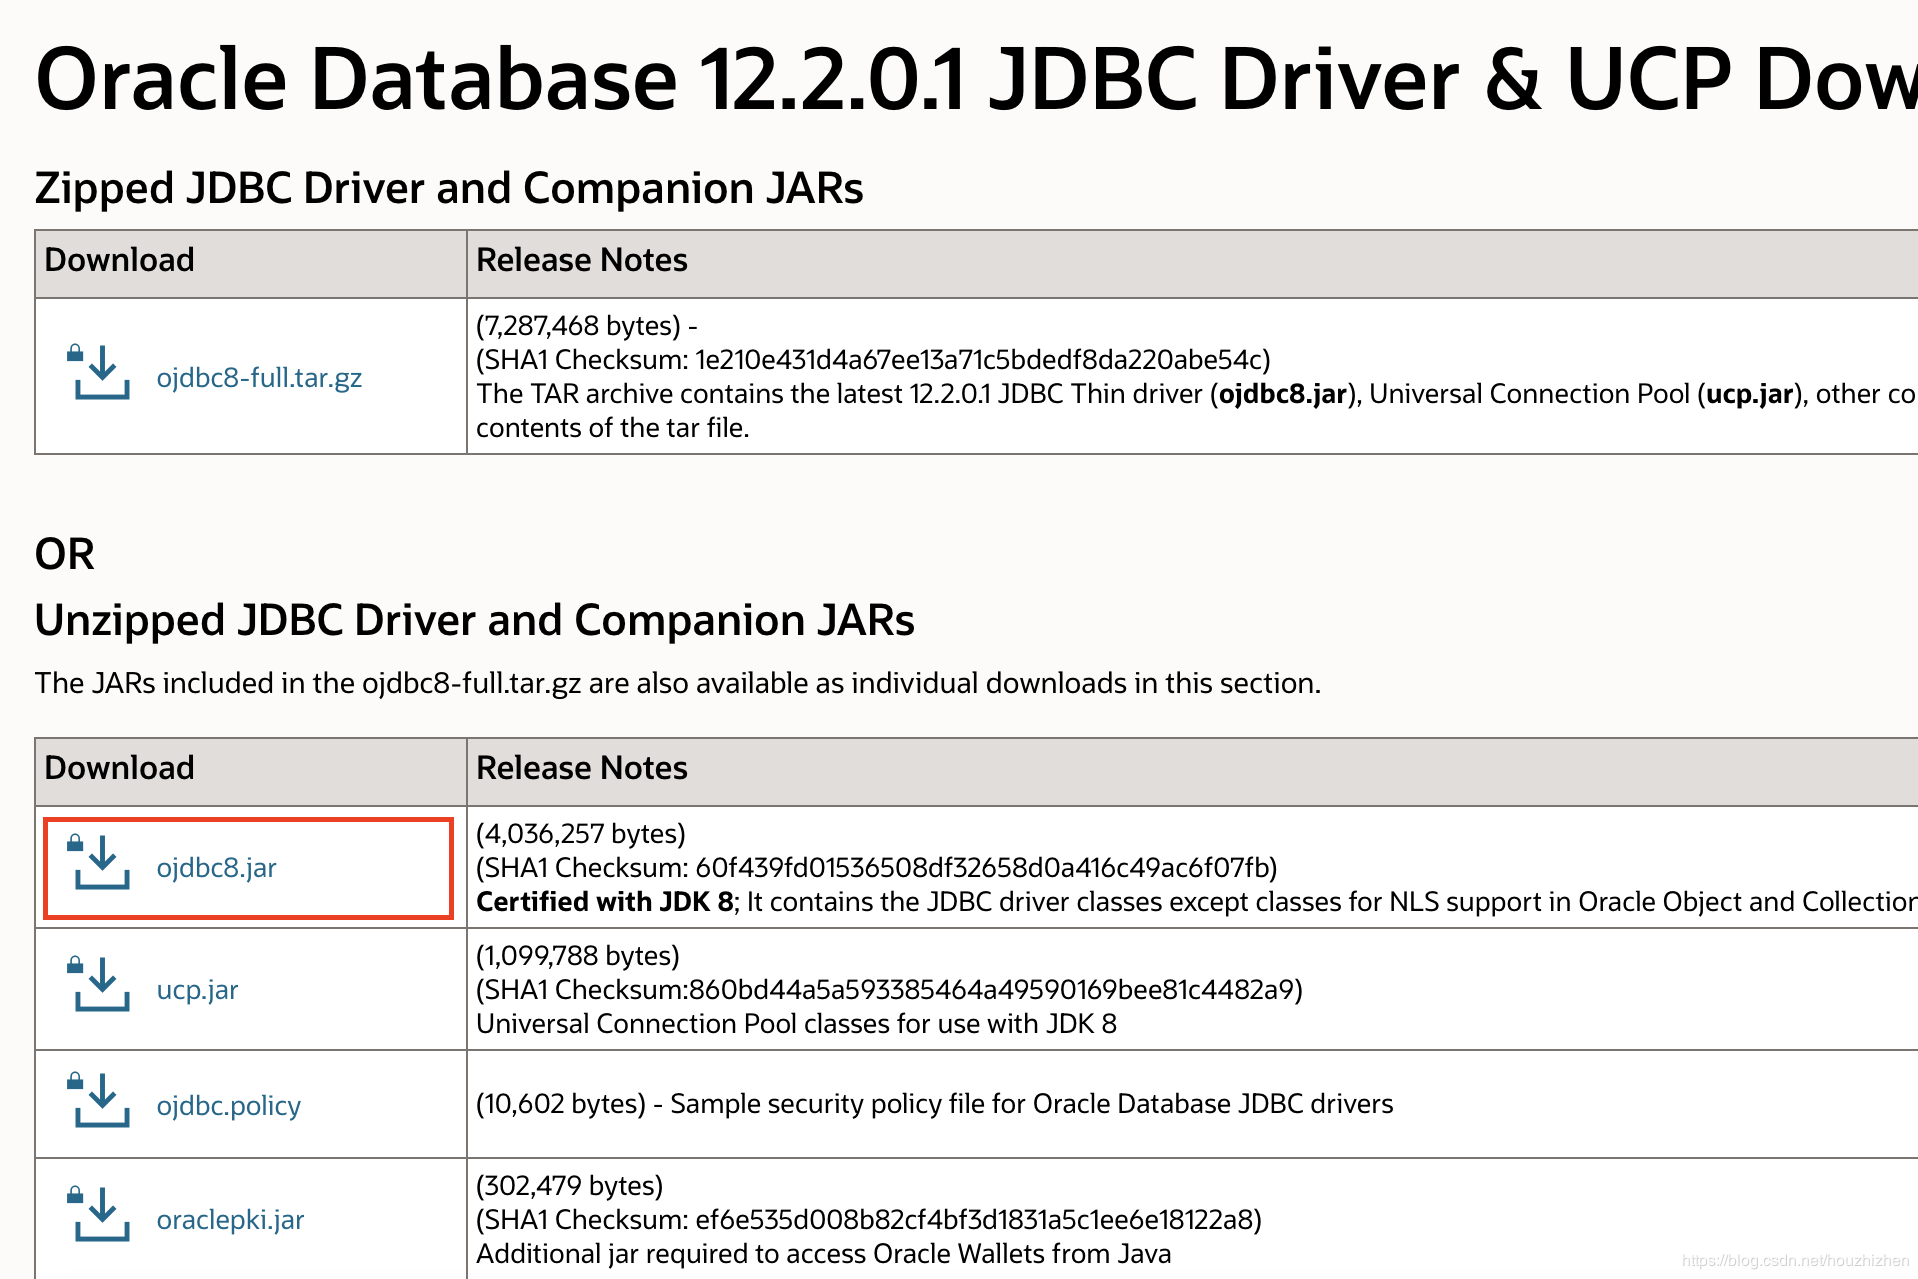
Install ojdbc8 to the local maven repository, enter the directory where ojdbc8.jar is located, and execute the following command.
Compile and generate tar package:
3 How to use
The basic process of using HugeGraph-Loader is divided into the following steps:
- Write graph schema
- Prepare data files
- Write input source map files
- Execute command import
3.1 Construct graph schema
This step is the modeling process. Users need to have a clear idea of their existing data and the graph model they want to create, and then write the schema to build the graph model.
For example, if you want to create a graph with two types of vertices and two types of edges, the vertices are “people” and “software”, the edges are “people know people” and “people create software”, and these vertices and edges have some attributes, For example, the vertex “person” has: “name”, “age” and other attributes, “Software” includes: “name”, “sale price” and other attributes; side “knowledge” includes: “date” attribute and so on.
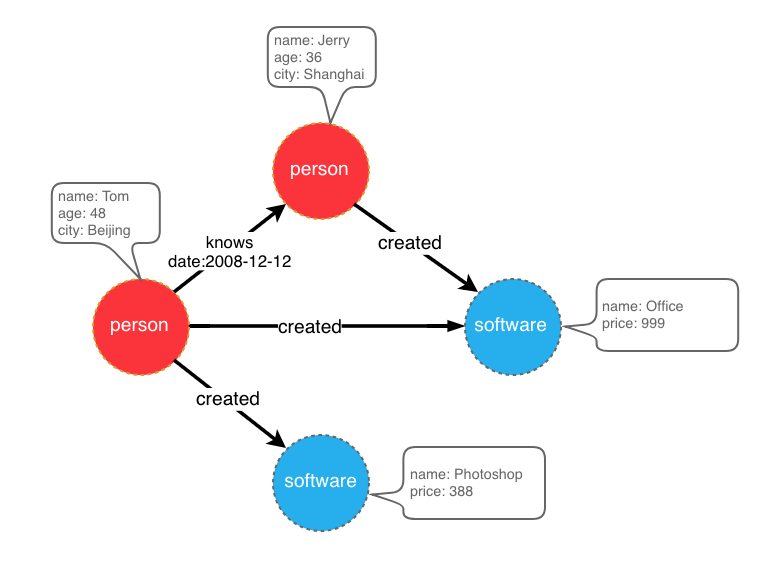
graph model example
After designing the graph model, we can use groovy to write the definition of schema and save it to a file, here named schema.groovy.
Please refer to the corresponding section in hugegraph-client for the detailed description of the schema.
3.2 Prepare data
The data sources currently supported by HugeGraph-Loader include:
- local disk file or directory
- HDFS file or directory
- Partial relational database
3.2.1 Data source structure
3.2.1.1 Local disk file or directory
The user can specify a local disk file as the data source. If the data is scattered in multiple files, a certain directory is also supported as the data source, but multiple directories are not supported as the data source for the time being.
For example: my data is scattered in multiple files, part-0, part-1 … part-n. To perform the import, it must be ensured that they are placed in one directory. Then in the loader’s mapping file, specify path as the directory.
Supported file formats include:
- TEXT
- CSV
- JSON
TEXT is a text file with custom delimiters, the first line is usually the header, and the name of each column is recorded, and no header line is allowed (specified in the mapping file). Each remaining row represents a record, which will be converted into a vertex/edge; each column of the row corresponds to a field, which will be converted into the id, label or attribute of the vertex/edge;
An example is as follows:
CSV is a TEXT file with commas , as delimiters. When a column value itself contains a comma, the column value needs to be enclosed in double quotes, for example:
The JSON file requires that each line is a JSON string, and the format of each line needs to be consistent.
3.2.1.2 HDFS file or directory
Users can also specify HDFS files or directories as data sources, all of the above requirements for local disk files or directories apply here. In addition, since HDFS usually stores compressed files, loader also provides support for compressed files, and local disk file or directory also supports compressed files.
Currently supported compressed file types include: GZIP, BZ2, XZ, LZMA, SNAPPY_RAW, SNAPPY_FRAMED, Z, DEFLATE, LZ4_BLOCK, LZ4_FRAMED, ORC, and PARQUET.
3.2.1.3 Mainstream relational database
The loader also supports some relational databases as data sources, and currently supports MySQL, PostgreSQL, Oracle and SQL Server.
However, the requirements for the table structure are relatively strict at present. If association query needs to be done during the import process, such a table structure is not allowed. The associated query means: after reading a row of the table, it is found that the value of a certain column cannot be used directly (such as a foreign key), and you need to do another query to determine the true value of the column.
For example: Suppose there are three tables, person, software and created
If the id strategy of person or software is specified as PRIMARY_KEY when modeling (schema), choose name as the primary key (note: this is the concept of vertex-label in hugegraph), when importing edge data, the source vertex and target need to be spliced out. For the id of the vertex, you must go to the person/software table with p_id/s_id to find the corresponding name. In the case of the schema that requires additional query, the loader does not support it temporarily. In this case, the following two methods can be used instead:
- The id strategy of person and software is still specified as PRIMARY_KEY, but the id column of the person table and software table is used as the primary key attribute of the vertex, so that the id can be generated by directly splicing p_id and s_id with the label of the vertex when importing an edge;
- Specify the id policy of person and software as CUSTOMIZE, and then directly use the id column of the person table and the software table as the vertex id, so that p_id and s_id can be used directly when importing edges;
The key point is to make the edge use p_id and s_id directly, don’t check it again.
3.2.2 Prepare vertex and edge data
3.2.2.1 Vertex Data
The vertex data file consists of data line by line. Generally, each line is used as a vertex, and each column is used as a vertex attribute. The following description uses CSV format as an example.
- person vertex data (the data itself does not contain a header)
- software vertex data (the data itself contains the header)
3.2.2.2 Edge data
The edge data file consists of data line by line. Generally, each line is used as an edge. Some columns are used as the IDs of the source and target vertices, and other columns are used as edge attributes. The following uses JSON format as an example.
- knows edge data
- created edge data
3.3 Write data source mapping file
3.3.1 Mapping file overview
The mapping file of the input source is used to describe how to establish the mapping relationship between the input source data and the vertex type/edge type of the graph. It is organized in JSON format and consists of multiple mapping blocks, each of which is responsible for mapping an input source. Mapped to vertices and edges.
Specifically, each mapping block contains an input source and multiple vertex mapping and edge mapping blocks, and the input source block corresponds to the local disk file or directory, HDFS file or directory and relational database are responsible for describing the basic information of the data source, such as where the data is, what format, what is the delimiter, etc. The vertex map/edge map is bound to the input source, which columns of the input source can be selected, which columns are used as ids, which columns are used as attributes, and what attributes are mapped to each column, the values of the columns are mapped to what values of attributes, and so on.
In the simplest terms, each mapping block describes: where is the file to be imported, which type of vertices/edges each line of the file is to be used as, which columns of the file need to be imported, and the corresponding vertices/edges of these columns. what properties etc.
Note: The format of the mapping file before version 0.11.0 and the format after 0.11.0 has changed greatly. For the convenience of expression, the mapping file (format) before 0.11.0 is called version 1.0, and the version after 0.11.0 is version 2.0 . And unless otherwise specified, the “map file” refers to version 2.0.
The skeleton of the map file for version 2.0 is:
Two versions of the mapping file are given directly here (the above graph model and data file are described)
Mapping file for version 2.0:
Mapping file for version 1.0:
The 1.0 version of the mapping file is centered on the vertex and edge, and sets the input source; while the 2.0 version is centered on the input source, and sets the vertex and edge mapping. Some input sources (such as a file) can generate both vertices and edges. If you write in the 1.0 format, you need to write an input block in each of the vertex and egde mapping blocks. The two input blocks are exactly the same ; and the 2.0 version only needs to write input once. Therefore, compared with version 1.0, version 2.0 can save some repetitive writing of input.
In the bin directory of hugegraph-loader-{version}, there is a script tool mapping-convert.sh that can directly convert the mapping file of version 1.0 to version 2.0. The usage is as follows:
A struct-v2.json will be generated in the same directory as struct.json.
3.3.2 Input Source
Input sources are currently divided into three categories: FILE, HDFS, and JDBC, which are distinguished by the type node. We call them local file input sources, HDFS input sources, and JDBC input sources, which are described below.
3.3.2.1 Local file input source
- id: The id of the input source. This field is used to support some internal functions. It is not required (it will be automatically generated if it is not filled in). It is strongly recommended to write it, which is very helpful for debugging;
- skip: whether to skip the input source, because the JSON file cannot add comments, if you do not want to import an input source during a certain import, but do not want to delete the configuration of the input source, you can set it to true to skip it, the default is false, not required;
- input: input source map block, composite structure
- type: input source type, file or FILE must be filled;
- path: the path of the local file or directory, the absolute path or the relative path relative to the mapping file, it is recommended to use the absolute path, required;
- file_filter: filter files with compound conditions from
path, compound structure, currently only supports configuration extensions, represented by child nodeextensions, the default is “*”, which means to keep all files; - format: the format of the local file, the optional values are CSV, TEXT and JSON, which must be uppercase and required;
- header: the column name of each column of the file, if not specified, the first line of the data file will be used as the header; when the file itself has a header and the header is specified, the first line of the file will be treated as a normal data line; JSON The file does not need to specify a header, optional;
- delimiter: The column delimiter of the file line, the default is comma
","as the delimiter, theJSONfile does not need to be specified, optional; - charset: the encoded character set of the file, the default is
UTF-8, optional; - date_format: custom date format, the default value is yyyy-MM-dd HH:mm:ss, optional; if the date is presented in the form of a timestamp, this item must be written as
timestamp(fixed writing); - time_zone: Set which time zone the date data is in, the default value is
GMT+8, optional; - skipped_line: The line to be skipped, compound structure, currently only the regular expression of the line to be skipped can be configured, described by the child node
regex, no line is skipped by default, optional; - compression: The compression format of the file, the optional values are NONE, GZIP, BZ2, XZ, LZMA, SNAPPY_RAW, SNAPPY_FRAMED, Z, DEFLATE, LZ4_BLOCK, LZ4_FRAMED, ORC and PARQUET, the default is NONE, which means a non-compressed file, optional;
- list_format: When a column of the file (non-JSON) is a collection structure (the Cardinality of the PropertyKey in the corresponding figure is Set or List), you can use this item to set the start character, separator, and end character of the column, compound structure :
- start_symbol: The start character of the collection structure column (the default value is
[, JSON format currently does not support specification) - elem_delimiter: the delimiter of the collection structure column (the default value is
|, JSON format currently only supports native,delimiter) - end_symbol: the end character of the collection structure column (the default value is
], the JSON format does not currently support specification)
- start_symbol: The start character of the collection structure column (the default value is
3.3.2.2 HDFS input source
The nodes and meanings of the above local file input source are basically applicable here. Only the different and unique nodes of the HDFS input source are listed below.
- type: input source type, must fill in hdfs or HDFS, required;
- path: the path of the HDFS file or directory, it must be the absolute path of HDFS, required;
- core_site_path: the path of the core-site.xml file of the HDFS cluster, the key point is to specify the address of the NameNode (
fs.default.name) and the implementation of the file system (fs.hdfs.impl);
3.3.2.3 JDBC input source
As mentioned above, it supports multiple relational databases, but because their mapping structures are very similar, they are collectively referred to as JDBC input sources, and then use the vendor node to distinguish different databases.
- type: input source type, must fill in jdbc or JDBC, required;
- vendor: database type, optional options are [MySQL, PostgreSQL, Oracle, SQLServer], case-insensitive, required;
- driver: the type of driver used by jdbc, required;
- url: the url of the database that jdbc wants to connect to, required;
- database: the name of the database to be connected, required;
- schema: The name of the schema to be connected, different databases have different requirements, and the details are explained below;
- table: the name of the table to be connected, at least one of
tableorcustom_sqlis required; - custom_sql: custom SQL statement, at least one of
tableorcustom_sqlis required; - username: username to connect to the database, required;
- password: password for connecting to the database, required;
- batch_size: The size of one page when obtaining table data by page, the default is 500, optional;
MYSQL
| Node | Fixed value or common value |
|---|---|
| vendor | MYSQL |
| driver | com.mysql.cj.jdbc.Driver |
| url | jdbc:mysql://127.0.0.1:3306 |
schema: nullable, if filled in, it must be the same as the value of database
POSTGRESQL
| Node | Fixed value or common value |
|---|---|
| vendor | POSTGRESQL |
| driver | org.postgresql.Driver |
| url | jdbc:postgresql://127.0.0.1:5432 |
schema: nullable, default is “public”
ORACLE
| Node | Fixed value or common value |
|---|---|
| vendor | ORACLE |
| driver | oracle.jdbc.driver.OracleDriver |
| url | jdbc:oracle:thin:@127.0.0.1:1521 |
schema: nullable, the default value is the same as the username
SQLSERVER
| Node | Fixed value or common value |
|---|---|
| vendor | SQLSERVER |
| driver | com.microsoft.sqlserver.jdbc.SQLServerDriver |
| url | jdbc:sqlserver://127.0.0.1:1433 |
schema: required
3.3.1 Vertex and Edge Mapping
The nodes of vertex and edge mapping (a key in the JSON file) have a lot of the same parts. The same parts are introduced first, and then the unique nodes of vertex map and edge map are introduced respectively.
Nodes of the same section
- label:
labelto which the vertex/edge data to be imported belongs, required; - field_mapping: Map the column name of the input source column to the attribute name of the vertex/edge, optional;
- value_mapping: map the data value of the input source to the attribute value of the vertex/edge, optional;
- selected: select some columns to insert, other unselected ones are not inserted, cannot exist at the same time as
ignored, optional; - ignored: ignore some columns so that they do not participate in insertion, cannot exist at the same time as
selected, optional; - null_values: You can specify some strings to represent null values, such as “NULL”. If the vertex/edge attribute corresponding to this column is also a nullable attribute, the value of this attribute will not be set when constructing the vertex/edge, optional ;
- update_strategies: If the data needs to be updated in batches in a specific way, you can specify a specific update strategy for each attribute (see below for details), optional;
- unfold: Whether to unfold the column, each unfolded column will form a row with other columns, which is equivalent to unfolding into multiple rows; for example, the value of a certain column (id column) of the file is
[1,2,3], The values of other columns are18,Beijing. When unfold is set, this row will become 3 rows, namely:1,18,Beijing,2,18,Beijingand3,18, Beijing. Note that this will only expand the column selected as id. Default false, optional;
Update strategy supports 8 types: (requires all uppercase)
- Value accumulation:
SUM - Take the greater of the two numbers/dates:
BIGGER - Take the smaller of two numbers/dates:
SMALLER - Set property takes union:
UNION - Set attribute intersection:
INTERSECTION - List attribute append element:
APPEND - List/Set attribute delete element:
ELIMINATE - Override an existing property:
OVERRIDE
Note: If the newly imported attribute value is empty, the existing old data will be used instead of the empty value. For the effect, please refer to the following example
Note : After adopting the batch update strategy, the number of disk read requests will increase significantly, and the import speed will be several times slower than that of pure write coverage (at this time HDD disk [IOPS](https://en.wikipedia .org/wiki/IOPS) will be the bottleneck, SSD is recommended for speed)
Unique Nodes for Vertex Maps
- id: Specify a column as the id column of the vertex. When the vertex id policy is
CUSTOMIZE, it is required; when the id policy isPRIMARY_KEY, it must be empty;
Unique Nodes for Edge Maps
- source: Select certain columns of the input source as the id column of source vertex. When the id policy of the source vertex is
CUSTOMIZE, a certain column must be specified as the id column of the vertex; when the id policy of the source vertex isWhen PRIMARY_KEY, one or more columns must be specified for splicing the id of the generated vertex, that is, no matter which id strategy is used, this item is required; - target: Specify certain columns as the id columns of target vertex, similar to source, so I won’t repeat them;
- unfold_source: Whether to unfold the source column of the file, the effect is similar to that in the vertex map, and will not be repeated;
- unfold_target: Whether to unfold the target column of the file, the effect is similar to that in the vertex mapping, and will not be repeated;
3.4 Execute command import
After preparing the graph model, data file, and input source mapping relationship file, the data file can be imported into the graph database.
The import process is controlled by commands submitted by the user, and the user can control the specific process of execution through different parameters.
3.4.1 Parameter description
| Parameter | Default value | Required or not | Description |
|---|---|---|---|
| -f or –file | Y | path to configure script | |
| -g or –graph | Y | graph space name | |
| -s or –schema | Y | schema file path | |
| -h or –host | localhost | address of HugeGraphServer | |
| -p or –port | 8080 | port number of HugeGraphServer | |
| –username | null | When HugeGraphServer enables permission authentication, the username of the current graph | |
| –token | null | When HugeGraphServer has enabled authorization authentication, the token of the current graph | |
| –protocol | http | Protocol for sending requests to the server, optional http or https | |
| –trust-store-file | When the request protocol is https, the client’s certificate file path | ||
| –trust-store-password | When the request protocol is https, the client certificate password | ||
| –clear-all-data | false | Whether to clear the original data on the server before importing data | |
| –clear-timeout | 240 | Timeout for clearing the original data on the server before importing data | |
| –incremental-mode | false | Whether to use the breakpoint resume mode, only the input source is FILE and HDFS support this mode, enabling this mode can start the import from the place where the last import stopped | |
| –failure-mode | false | When the failure mode is true, the data that failed before will be imported. Generally speaking, the failed data file needs to be manually corrected and edited, and then imported again | |
| –batch-insert-threads | CPUs | Batch insert thread pool size (CPUs is the number of logical cores available to the current OS) | |
| –single-insert-threads | 8 | Size of single insert thread pool | |
| –max-conn | 4 * CPUs | The maximum number of HTTP connections between HugeClient and HugeGraphServer, it is recommended to adjust this when adjusting threads | |
| –max-conn-per-route | 2 * CPUs | The maximum number of HTTP connections for each route between HugeClient and HugeGraphServer, it is recommended to adjust this item at the same time when adjusting the thread | |
| –batch-size | 500 | The number of data items in each batch when importing data | |
| –max-parse-errors | 1 | The maximum number of lines of data parsing errors allowed, and the program exits when this value is reached | |
| –max-insert-errors | 500 | The maximum number of rows of data insertion errors allowed, and the program exits when this value is reached | |
| –timeout | 60 | Timeout (seconds) for inserting results to return | |
| –shutdown-timeout | 10 | Waiting time for multithreading to stop (seconds) | |
| –retry-times | 0 | Number of retries when a specific exception occurs | |
| –retry-interval | 10 | interval before retry (seconds) | |
| –check-vertex | false | Whether to check whether the vertex connected by the edge exists when inserting the edge | |
| –print-progress | true | Whether to print the number of imported items in the console in real time | |
| –dry-run | false | Turn on this mode, only parsing but not importing, usually used for testing | |
| –help | false | print help information |
3.4.2 Breakpoint Continuation Mode
Usually, the Loader task takes a long time to execute. If the import interrupt process exits for some reason, and next time you want to continue the import from the interrupted point, this is the scenario of using breakpoint continuation.
The user sets the command line parameter –incremental-mode to true to open the breakpoint resume mode. The key to breakpoint continuation lies in the progress file. When the import process exits, the import progress at the time of exit will be recorded.
Recorded in the progress file, the progress file is located in the ${struct} directory, the file name is like load-progress ${date}, ${struct} is the prefix of the mapping file, and ${date} is the start of the import
moment. For example: for an import task started at 2019-10-10 12:30:30, the mapping file used is struct-example.json, then the path of the progress file is the same as struct-example.json
Sibling struct-example/load-progress 2019-10-10 12:30:30.
Note: The generation of progress files is independent of whether –incremental-mode is turned on or not, and a progress file is generated at the end of each import.
If the data file formats are all legal and the import task is stopped by the user (CTRL + C or kill, kill -9 is not supported), that is to say, if there is no error record, the next import only needs to be set Continue for the breakpoint.
But if the limit of –max-parse-errors or –max-insert-errors is reached because too much data is invalid or network abnormality is reached, Loader will record these original rows that failed to insert into In the failed file, after the user modifies the data lines in the failed file, set –reload-failure to true to import these “failed files” as input sources (does not affect the normal file import), Of course, if there is still a problem with the modified data line, it will be logged again to the failure file (don’t worry about duplicate lines).
Each vertex map or edge map will generate its own failure file when data insertion fails. The failure file is divided into a parsing failure file (suffix .parse-error) and an insertion failure file (suffix .insert-error).
They are stored in the ${struct}/current directory. For example, there is a vertex mapping person and an edge mapping knows in the mapping file, each of which has some error lines. When the Loader exits, you will see the following files in the ${struct}/current directory:
- person-b4cd32ab.parse-error: Vertex map person parses wrong data
- person-b4cd32ab.insert-error: Vertex map person inserts wrong data
- knows-eb6b2bac.parse-error: edge map knows parses wrong data
- knows-eb6b2bac.insert-error: edge map knows inserts wrong data
.parse-error and .insert-error do not always exist together. Only lines with parsing errors will have .parse-error files, and only lines with insertion errors will have .insert-error files.
3.4.3 logs directory file description
The log and error data during program execution will be written into hugegraph-loader.log file.
3.4.4 Execute command
Run bin/hugegraph-loader and pass in parameters
4 Complete example
Given below is an example in the example directory of the hugegraph-loader package.
4.1 Prepare data
Vertex file: example/file/vertex_person.csv
Vertex file: example/file/vertex_software.txt
Edge file: example/file/edge_knows.json
Edge file: example/file/edge_created.json
4.2 Write schema
schema file: example/file/schema.groovy
4.3 Write the input source mapping file example/file/struct.json
4.4 Command to import
After the import is complete, statistics similar to the following will appear:
4.5 Import data by spark-loader
Spark version: Spark 3+, other versions has not been tested.
HugeGraph Toolchain version: toolchain-1.0.0
The parameters of spark-loader are divided into two parts. Note: Because the abbreviations of
these two parameter names have overlapping parts, please use the full name of the parameter.
And there is no need to guarantee the order between the two parameters.
- hugegraph parameters (Reference: hugegraph-loader parameter description )
- Spark task submission parameters (Reference: Submitting Applications)
Example:
3.4.2 - HugeGraph-Tools Quick Start
1 HugeGraph-Tools概述
HugeGraph-Tools 是 HugeGraph 的自动化部署、管理和备份/还原组件。
2 获取 HugeGraph-Tools
有两种方式可以获取 HugeGraph-Tools:
- 下载二进制tar包
- 下载源码编译安装
2.1 下载二进制tar包
下载最新版本的 HugeGraph-Tools 包:
2.2 下载源码编译安装
下载最新版本的 HugeGraph-Tools 源码包:
编译生成 tar 包:
生成 tar 包 hugegraph-tools-${version}.tar.gz
3 使用
3.1 功能概览
解压后,进入 hugegraph-tools 目录,可以使用bin/hugegraph或者bin/hugegraph help来查看 usage 信息。主要分为:
- 图管理类,graph-mode-set、graph-mode-get、graph-list、graph-get 和 graph-clear
- 异步任务管理类,task-list、task-get、task-delete、task-cancel 和 task-clear
- Gremlin类,gremlin-execute 和 gremlin-schedule
- 备份/恢复类,backup、restore、migrate、schedule-backup 和 dump
- 安装部署类,deploy、clear、start-all 和 stop-all
3.2 [options]-全局变量
options是 HugeGraph-Tools 的全局变量,可以在 hugegraph-tools/bin/hugegraph 中配置,包括:
- –graph,HugeGraph-Tools 操作的图的名字,默认值是 hugegraph
- –url,HugeGraph-Server 的服务地址,默认是 http://127.0.0.1:8080
- –user,当 HugeGraph-Server 开启认证时,传递用户名
- –password,当 HugeGraph-Server 开启认证时,传递用户的密码
- –timeout,连接 HugeGraph-Server 时的超时时间,默认是 30s
- –trust-store-file,证书文件的路径,当 –url 使用 https 时,HugeGraph-Client 使用的 truststore 文件,默认为空,代表使用 hugegraph-tools 内置的 truststore 文件 conf/hugegraph.truststore
- –trust-store-password,证书文件的密码,当 –url 使用 https 时,HugeGraph-Client 使用的 truststore 的密码,默认为空,代表使用 hugegraph-tools 内置的 truststore 文件的密码
上述全局变量,也可以通过环境变量来设置。一种方式是在命令行使用 export 设置临时环境变量,在该命令行关闭之前均有效
| 全局变量 | 环境变量 | 示例 |
|---|---|---|
| –url | HUGEGRAPH_URL | export HUGEGRAPH_URL=http://127.0.0.1:8080 |
| –graph | HUGEGRAPH_GRAPH | export HUGEGRAPH_GRAPH=hugegraph |
| –user | HUGEGRAPH_USERNAME | export HUGEGRAPH_USERNAME=admin |
| –password | HUGEGRAPH_PASSWORD | export HUGEGRAPH_PASSWORD=test |
| –timeout | HUGEGRAPH_TIMEOUT | export HUGEGRAPH_TIMEOUT=30 |
| –trust-store-file | HUGEGRAPH_TRUST_STORE_FILE | export HUGEGRAPH_TRUST_STORE_FILE=/tmp/trust-store |
| –trust-store-password | HUGEGRAPH_TRUST_STORE_PASSWORD | export HUGEGRAPH_TRUST_STORE_PASSWORD=xxxx |
另一种方式是在 bin/hugegraph 脚本中设置环境变量:
3.3 图管理类,graph-mode-set、graph-mode-get、graph-list、graph-get和graph-clear
- graph-mode-set,设置图的 restore mode
- –graph-mode 或者 -m,必填项,指定将要设置的模式,合法值包括 [NONE, RESTORING, MERGING, LOADING]
- graph-mode-get,获取图的 restore mode
- graph-list,列出某个 HugeGraph-Server 中全部的图
- graph-get,获取某个图及其存储后端类型
- graph-clear,清除某个图的全部 schema 和 data
- –confirm-message 或者 -c,必填项,删除确认信息,需要手动输入,二次确认防止误删,“I’m sure to delete all data”,包括双引号
当需要把备份的图原样恢复到一个新的图中的时候,需要先将图模式设置为 RESTORING 模式;当需要将备份的图合并到已存在的图中时,需要先将图模式设置为 MERGING 模式。
3.4 异步任务管理类,task-list、task-get和task-delete
- task-list,列出某个图中的异步任务,可以根据任务的状态过滤
- –status,选填项,指定要查看的任务的状态,即按状态过滤任务
- –limit,选填项,指定要获取的任务的数目,默认为 -1,意思为获取全部符合条件的任务
- task-get,获取某个异步任务的详细信息
- –task-id,必填项,指定异步任务的 ID
- task-delete,删除某个异步任务的信息
- –task-id,必填项,指定异步任务的 ID
- task-cancel,取消某个异步任务的执行
- –task-id,要取消的异步任务的 ID
- task-clear,清理完成的异步任务
- –force,选填项,设置时,表示清理全部异步任务,未执行完成的先取消,然后清除所有异步任务。默认只清理已完成的异步任务
3.5 Gremlin类,gremlin-execute和gremlin-schedule
- gremlin-execute,发送 Gremlin 语句到 HugeGraph-Server 来执行查询或修改操作,同步执行,结束后返回结果
- –file 或者 -f,指定要执行的脚本文件,UTF-8编码,与 –script 互斥
- –script 或者 -s,指定要执行的脚本字符串,与 –file 互斥
- –aliases 或者 -a,Gremlin 别名设置,格式为:key1=value1,key2=value2,…
- –bindings 或者 -b,Gremlin 绑定设置,格式为:key1=value1,key2=value2,…
- –language 或者 -l,Gremlin 脚本的语言,默认为 gremlin-groovy
–file 和 –script 二者互斥,必须设置其中之一
- gremlin-schedule,发送 Gremlin 语句到 HugeGraph-Server 来执行查询或修改操作,异步执行,任务提交后立刻返回异步任务id
- –file 或者 -f,指定要执行的脚本文件,UTF-8编码,与 –script 互斥
- –script 或者 -s,指定要执行的脚本字符串,与 –file 互斥
- –bindings 或者 -b,Gremlin 绑定设置,格式为:key1=value1,key2=value2,…
- –language 或者 -l,Gremlin 脚本的语言,默认为 gremlin-groovy
–file 和 –script 二者互斥,必须设置其中之一
3.6 备份/恢复类
- backup,将某张图中的 schema 或者 data 备份到 HugeGraph 系统之外,以 JSON 形式存在本地磁盘或者 HDFS
- –format,备份的格式,可选值包括 [json, text],默认为 json
- –all-properties,是否备份顶点/边全部的属性,仅在 –format 为 text 是有效,默认 false
- –label,要备份的顶点/边的类型,仅在 –format 为 text 是有效,只有备份顶点或者边的时候有效
- –properties,要备份的顶点/边的属性,逗号分隔,仅在 –format 为 text 是有效,只有备份顶点或者边的时候有效
- –compress,备份时是否压缩数据,默认为 true
- –directory 或者 -d,存储 schema 或者 data 的目录,本地目录时,默认为’./{graphName}’,HDFS 时,默认为 ‘{fs.default.name}/{graphName}’
- –huge-types 或者 -t,要备份的数据类型,逗号分隔,可选值为 ‘all’ 或者 一个或多个 [vertex,edge,vertex_label,edge_label,property_key,index_label] 的组合,‘all’ 代表全部6种类型,即顶点、边和所有schema
- –log 或者 -l,指定日志目录,默认为当前目录
- –retry,指定失败重试次数,默认为 3
- –split-size 或者 -s,指定在备份时对顶点或者边分块的大小,默认为 1048576
- -D,用 -Dkey=value 的模式指定动态参数,用来备份数据到 HDFS 时,指定 HDFS 的配置项,例如:-Dfs.default.name=hdfs://localhost:9000
- restore,将 JSON 格式存储的 schema 或者 data 恢复到一个新图中(RESTORING 模式)或者合并到已存在的图中(MERGING 模式)
- –directory 或者 -d,存储 schema 或者 data 的目录,本地目录时,默认为’./{graphName}’,HDFS 时,默认为 ‘{fs.default.name}/{graphName}’
- –clean,是否在恢复图完成后删除 –directory 指定的目录,默认为 false
- –huge-types 或者 -t,要恢复的数据类型,逗号分隔,可选值为 ‘all’ 或者 一个或多个 [vertex,edge,vertex_label,edge_label,property_key,index_label] 的组合,‘all’ 代表全部6种类型,即顶点、边和所有schema
- –log 或者 -l,指定日志目录,默认为当前目录
- –retry,指定失败重试次数,默认为 3
- -D,用 -Dkey=value 的模式指定动态参数,用来从 HDFS 恢复图时,指定 HDFS 的配置项,例如:-Dfs.default.name=hdfs://localhost:9000
只有当 –format 为 json 执行 backup 时,才可以使用 restore 命令恢复
- migrate, 将当前连接的图迁移至另一个 HugeGraphServer 中
- –target-graph,目标图的名字,默认为 hugegraph
- –target-url,目标图所在的 HugeGraphServer,默认为 http://127.0.0.1:8081
- –target-username,访问目标图的用户名
- –target-password,访问目标图的密码
- –target-timeout,访问目标图的超时时间
- –target-trust-store-file,访问目标图使用的 truststore 文件
- –target-trust-store-password,访问目标图使用的 truststore 的密码
- –directory 或者 -d,迁移过程中,存储源图的 schema 或者 data 的目录,本地目录时,默认为’./{graphName}’,HDFS 时,默认为 ‘{fs.default.name}/{graphName}’
- –huge-types 或者 -t,要迁移的数据类型,逗号分隔,可选值为 ‘all’ 或者 一个或多个 [vertex,edge,vertex_label,edge_label,property_key,index_label] 的组合,‘all’ 代表全部6种类型,即顶点、边和所有schema
- –log 或者 -l,指定日志目录,默认为当前目录
- –retry,指定失败重试次数,默认为 3
- –split-size 或者 -s,指定迁移过程中对源图进行备份时顶点或者边分块的大小,默认为 1048576
- -D,用 -Dkey=value 的模式指定动态参数,用来在迁移图过程中需要备份数据到 HDFS 时,指定 HDFS 的配置项,例如:-Dfs.default.name=hdfs://localhost:9000
- –graph-mode 或者 -m,将源图恢复到目标图时将目标图设置的模式,合法值包括 [RESTORING, MERGING]
- –keep-local-data,是否保留在迁移图的过程中产生的源图的备份,默认为 false,即默认迁移图结束后不保留产生的源图备份
- schedule-backup,周期性对图执行备份操作,并保留一定数目的最新备份(目前仅支持本地文件系统)
- –directory 或者 -d,必填项,指定备份数据的目录
- –backup-num,选填项,指定保存的最新的备份的数目,默认为 3
- –interval,选填项,指定进行备份的周期,格式同 Linux crontab 格式
- dump,把整张图的顶点和边全部导出,默认以
vertex vertex-edge1 vertex-edge2...JSON格式存储。 用户也可以自定义存储格式,只需要在hugegraph-tools/src/main/java/com/baidu/hugegraph/formatter目录下实现一个继承自Formatter的类,例如CustomFormatter,使用时指定该类为formatter即可,例如bin/hugegraph dump -f CustomFormatter- –formatter 或者 -f,指定使用的 formatter,默认为 JsonFormatter
- –directory 或者 -d,存储 schema 或者 data 的目录,默认为当前目录
- –log 或者 -l,指定日志目录,默认为当前目录
- –retry,指定失败重试次数,默认为 3
- –split-size 或者 -s,指定在备份时对顶点或者边分块的大小,默认为 1048576
- -D,用 -Dkey=value 的模式指定动态参数,用来备份数据到 HDFS 时,指定 HDFS 的配置项,例如:-Dfs.default.name=hdfs://localhost:9000
3.7 安装部署类
- deploy,一键下载、安装和启动 HugeGraph-Server 和 HugeGraph-Studio
- -v,必填项,指明安装的 HugeGraph-Server 和 HugeGraph-Studio 的版本号,最新的是 0.9
- -p,必填项,指定安装的 HugeGraph-Server 和 HugeGraph-Studio 目录
- -u,选填项,指定下载 HugeGraph-Server 和 HugeGraph-Studio 压缩包的链接
- clear,清理 HugeGraph-Server 和 HugeGraph-Studio 目录和tar包
- -p,必填项,指定要清理的 HugeGraph-Server 和 HugeGraph-Studio 的目录
- start-all,一键启动 HugeGraph-Server 和 HugeGraph-Studio,并启动监控,服务死掉时自动拉起服务
- -v,必填项,指明要启动的 HugeGraph-Server 和 HugeGraph-Studio 的版本号,最新的是 0.9
- -p,必填项,指定安装了 HugeGraph-Server 和 HugeGraph-Studio 的目录
- stop-all,一键关闭 HugeGraph-Server 和 HugeGraph-Studio
deploy命令中有可选参数 -u,提供时会使用指定的下载地址替代默认下载地址下载 tar 包,并且将地址写入
~/hugegraph-download-url-prefix文件中;之后如果不指定地址时,会优先从~/hugegraph-download-url-prefix指定的地址下载 tar 包;如果 -u 和~/hugegraph-download-url-prefix都没有时,会从默认下载地址进行下载
3.8 具体命令参数
各子命令的具体参数如下:
3.9 具体命令示例
1. gremlin语句
2. 查看task情况
3. 图模式查看和设置
4. 清理图
5. 图备份
6. 周期性的备份
7. 图恢复
8. 图迁移
3.4.3 - HugeGraph-Hubble Quick Start
1 HugeGraph-Hubble Overview
HugeGraph is an analysis-oriented graph database system that supports batch operations, which fully supports Apache TinkerPop3 framework and Gremlin graph query language. It provides a complete tool chain ecology such as export, backup, and recovery, and effectively solve the storage, query and correlation analysis needs of massive graph data. HugeGraph is widely used in the fields of risk control, insurance claims, recommendation search, public security crime crackdown, knowledge graph, network security, IT operation and maintenance of bank securities companies, and is committed to allowing more industries, organizations and users to enjoy a wider range of data comprehensive value.
HugeGraph-Hubble is HugeGraph’s one-stop visual analysis platform. The platform covers the whole process from data modeling, to efficient data import, to real-time and offline analysis of data, and unified management of graphs, realizing the whole process wizard of graph application. It is designed to improve the user’s use fluency, lower the user’s use threshold, and provide a more efficient and easy-to-use user experience.
The platform mainly includes the following modules:
Graph Management
The graph management module realizes the unified management of multiple graphs and graph access, editing, deletion, and query by creating graph and connecting the platform and graph data.
Metadata Modeling
The metadata modeling module realizes the construction and management of graph models by creating attribute libraries, vertex types, edge types, and index types. The platform provides two modes, list mode and graph mode, which can display the metadata model in real time, which is more intuitive. At the same time, it also provides a metadata reuse function across graphs, which saves the tedious and repetitive creation process of the same metadata, greatly improves modeling efficiency and enhances ease of use.
Data Import
Data import is to convert the user’s business data into the vertices and edges of the graph and insert it into the graph database. The platform provides a wizard-style visual import module. By creating import tasks, the management of import tasks and the parallel operation of multiple import tasks are realized. Improve import performance. After entering the import task, you only need to follow the platform step prompts, upload files as needed, and fill in the content to easily implement the import process of graph data. At the same time, it supports breakpoint resuming, error retry mechanism, etc., which reduces import costs and improves efficiency.
Graph Analysis
By inputting the graph traversal language Gremlin, high-performance general analysis of graph data can be realized, and functions such as customized multidimensional path query of vertices can be provided, and three kinds of graph result display methods are provided, including: graph form, table form, Json form, and multidimensional display. The data form meets the needs of various scenarios used by users. It provides functions such as running records and collection of common statements, realizing the traceability of graph operations, and the reuse and sharing of query input, which is fast and efficient. It supports the export of graph data, and the export format is Json format.
Task Management
For Gremlin tasks that need to traverse the whole graph, index creation and reconstruction and other time-consuming asynchronous tasks, the platform provides corresponding task management functions to achieve unified management and result viewing of asynchronous tasks.
2 Platform Workflow
The module usage process of the platform is as follows:

3 Platform Instructions
3.1 Graph Management
3.1.1 Graph creation
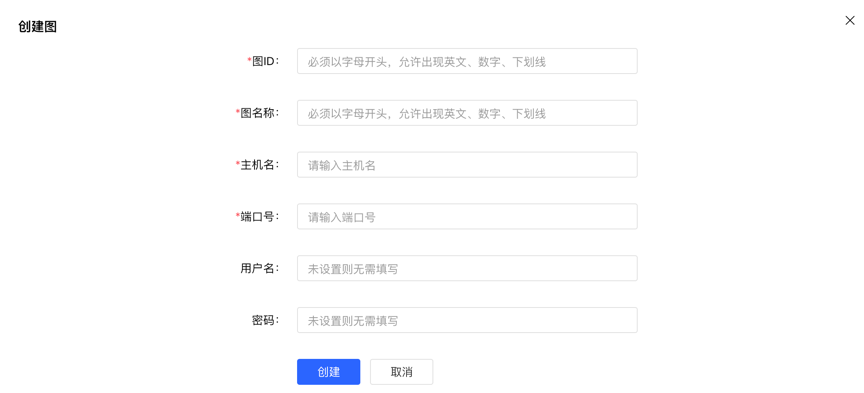
Under the graph management module, click [Create graph], and realize the connection of multiple graphs by filling in the graph ID, graph name, host name, port number, username, and password information.
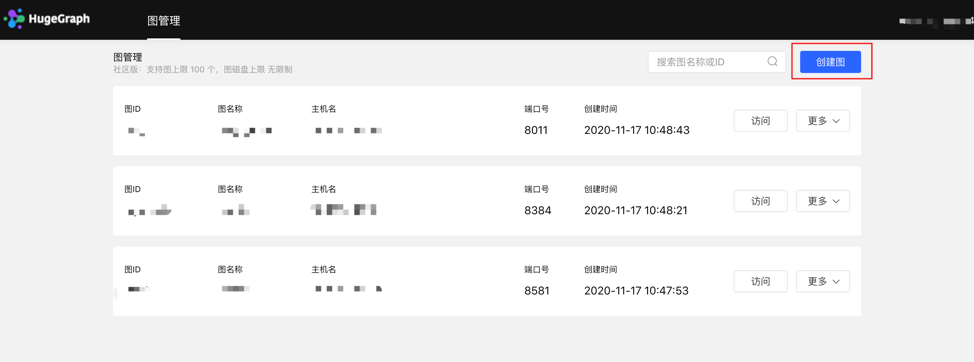
Create graph by filling in the content as follows::
3.1.2 Graph Access
Realize the information access of the graph space. After entering, you can perform operations such as multidimensional query analysis, metadata management, data import, and algorithm analysis of the graph.

3.1.3 Graph management
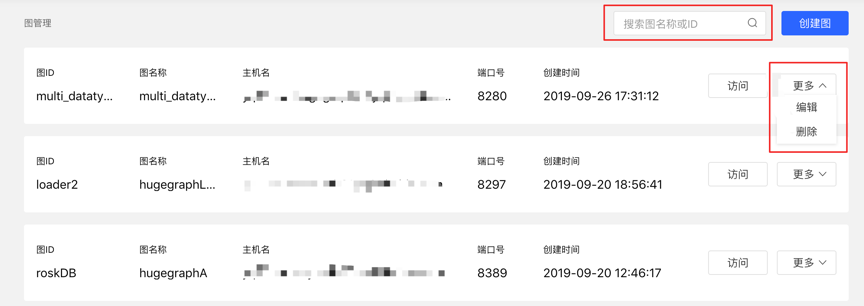
- Users can achieve unified management of graphs through overview, search, and information editing and deletion of single graphs.
- Search range: You can search for the graph name and ID.
3.2 Metadata Modeling (list + graph mode)
3.2.1 Module entry
Left navigation:

3.2.2 Property type
3.2.2.1 Create type
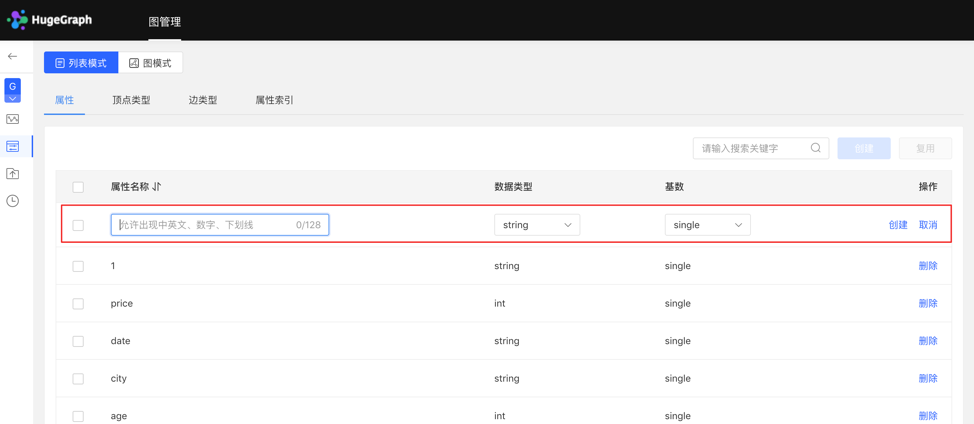
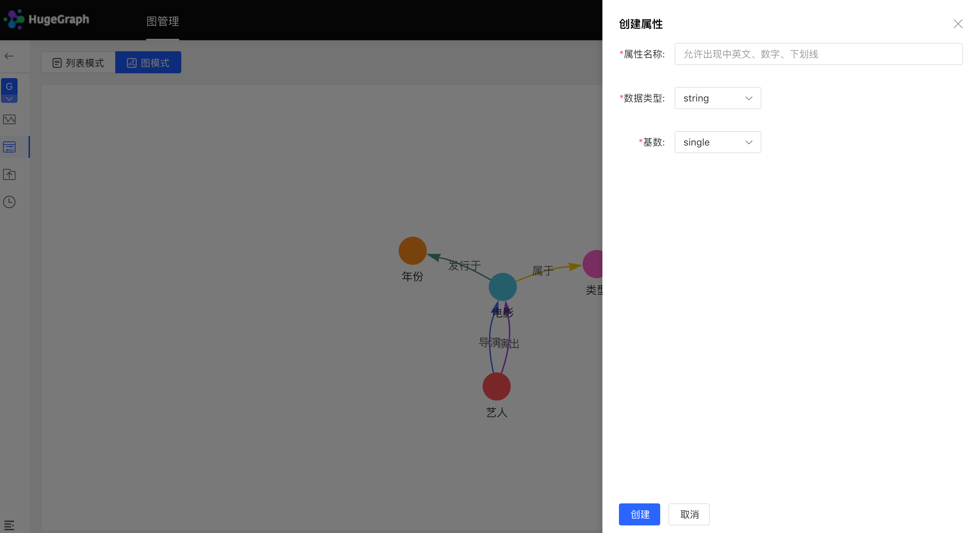
- Fill in or select the attribute name, data type, and cardinality to complete the creation of the attribute.
- Created attributes can be used as attributes of vertex type and edge type.
List mode:
Graph mode:
3.2.2.2 Reuse
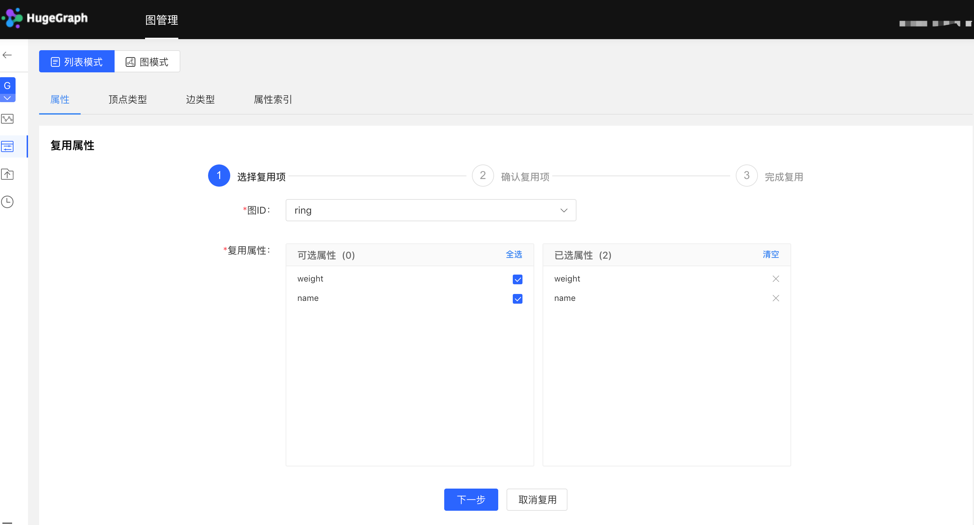
- The platform provides the [Reuse] function, which can directly reuse the metadata of other graphs.
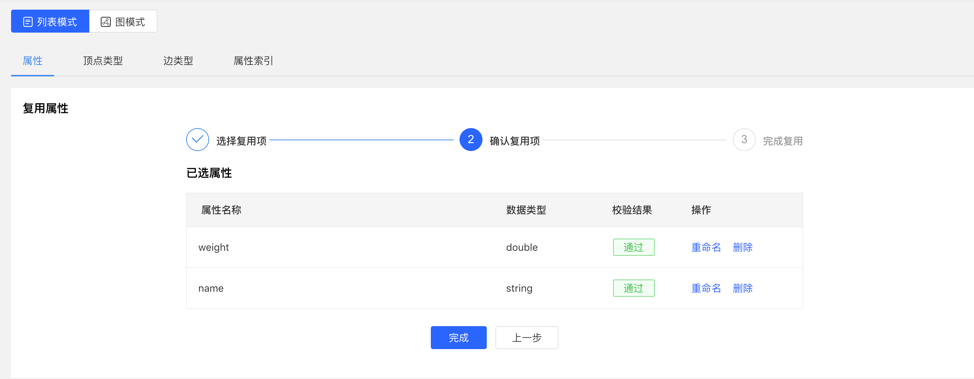
- Select the graph ID that needs to be reused, and continue to select the attributes that need to be reused. After that, the platform will check whether there is a conflict. After passing, the metadata can be reused.
Select reuse items:
Check reuse items:
3.2.2.3 Management
- You can delete a single item or delete it in batches in the attribute list.
3.2.3 Vertex type
3.2.3.1 Create type
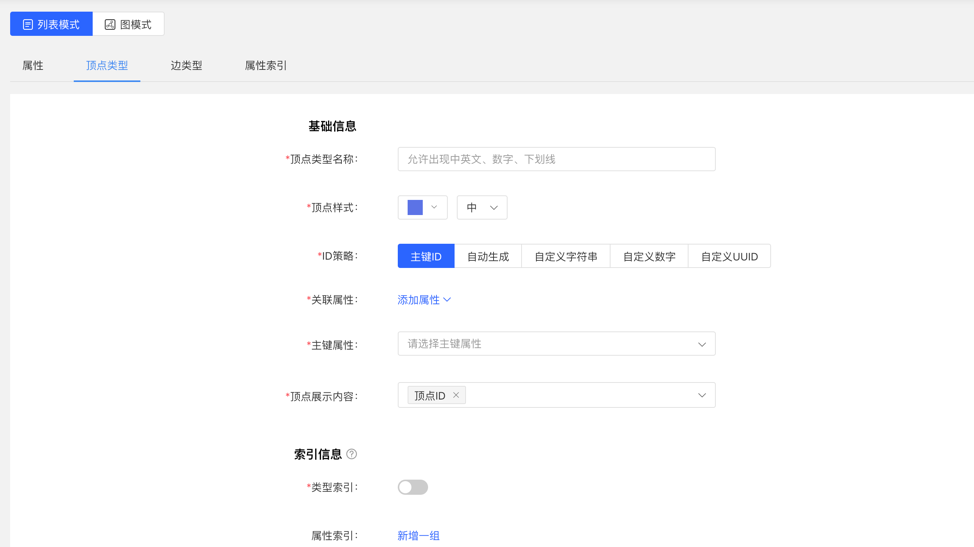
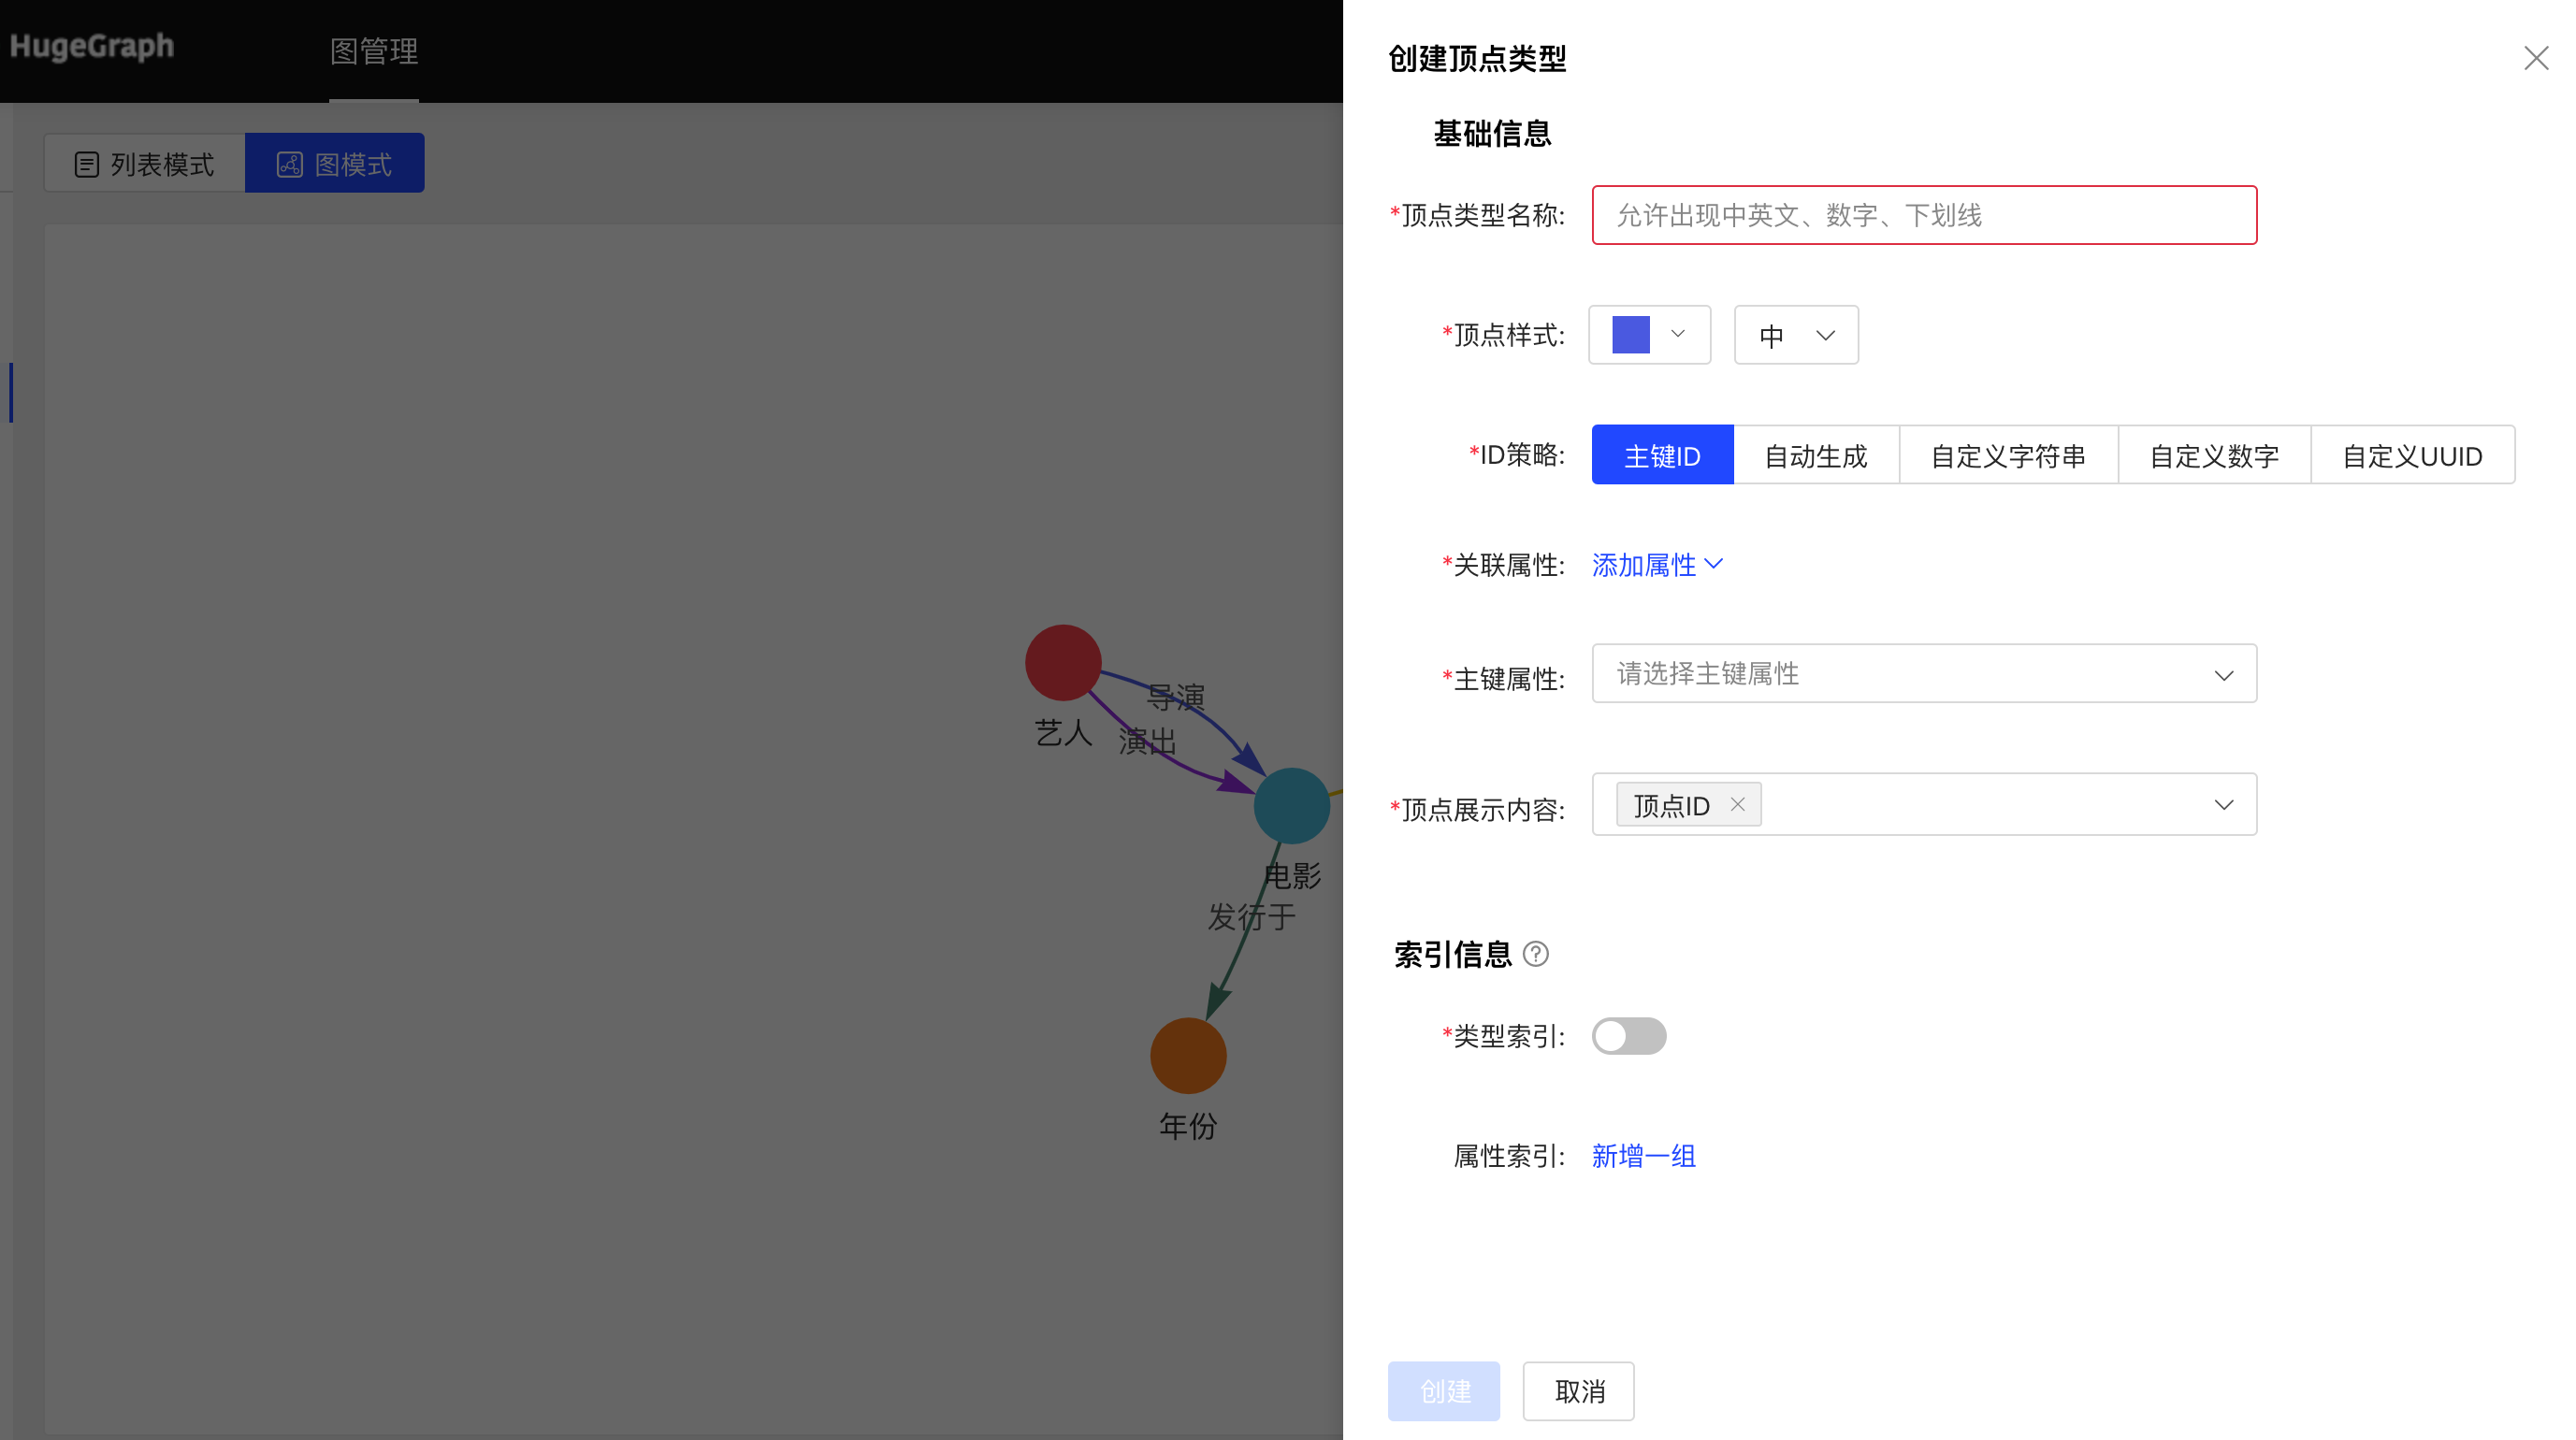
- Fill in or select the vertex type name, ID strategy, association attribute, primary key attribute, vertex style, content displayed below the vertex in the query result, and index information: including whether to create a type index, and the specific content of the attribute index, complete the vertex Type creation.
List mode:
Graph mode:
3.2.3.2 Reuse
- The multiplexing of vertex types will reuse the attributes and attribute indexes associated with this type together.
- The reuse method is similar to the property reuse, see 3.2.2.2.
3.2.3.3 Administration
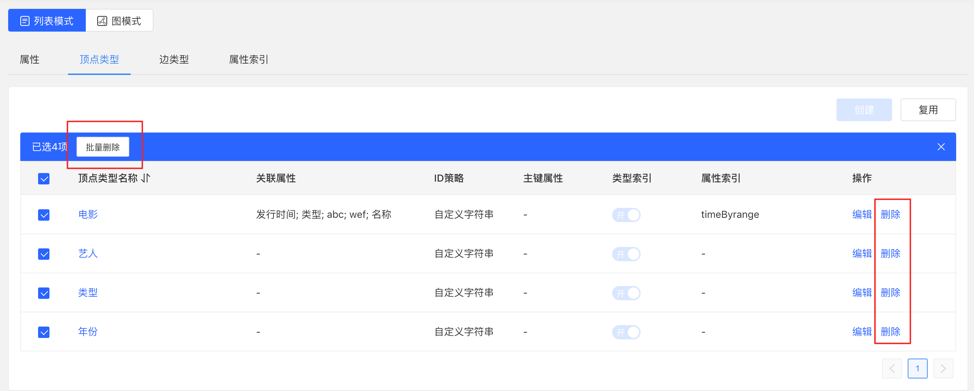
Editing operations are available. The vertex style, association type, vertex display content, and attribute index can be edited, and the rest cannot be edited.
You can delete a single item or delete it in batches.
3.2.4 Edge Types
3.2.4.1 Create
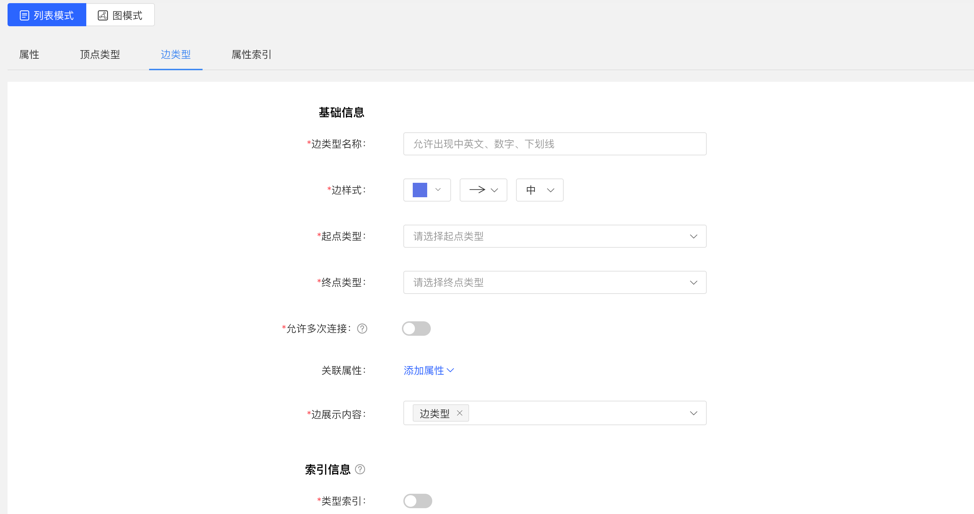
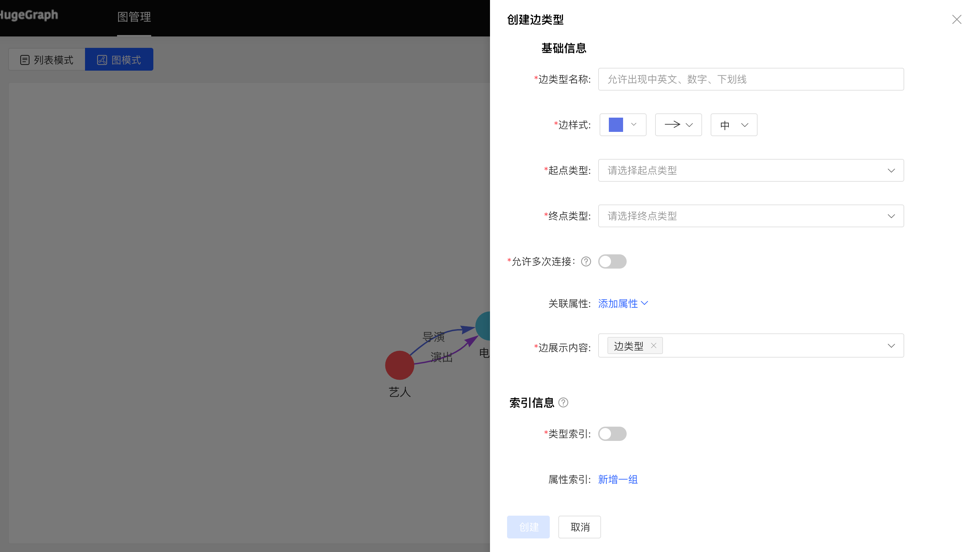
- Fill in or select the edge type name, start point type, end point type, associated attributes, whether to allow multiple connections, edge style, content displayed below the edge in the query result, and index information: including whether to create a type index, and attribute index The specific content, complete the creation of the edge type.
List mode:
Graph mode:
3.2.4.2 Reuse
- The reuse of the edge type will reuse the start point type, end point type, associated attribute and attribute index of this type.
- The reuse method is similar to the property reuse, see 3.2.2.2.
3.2.4.3 Administration
- Editing operations are available. Edge styles, associated attributes, edge display content, and attribute indexes can be edited, and the rest cannot be edited, the same as the vertex type.
- You can delete a single item or delete it in batches.
3.2.5 Index Types
Displays vertex and edge indices for vertex types and edge types.
3.3 Data Import
The usage process of data import is as follows:

3.3.1 Module entrance
Left navigation:

3.3.2 Create task
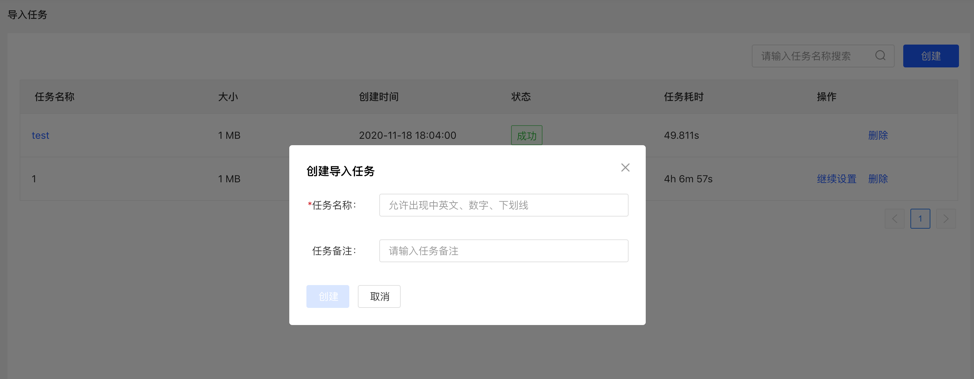
- Fill in the task name and remarks (optional) to create an import task.
- Multiple import tasks can be created and imported in parallel.
3.3.3 Uploading files
- Upload the file that needs to be composed. The currently supported format is CSV, which will be updated continuously in the future.
- Multiple files can be uploaded at the same time.
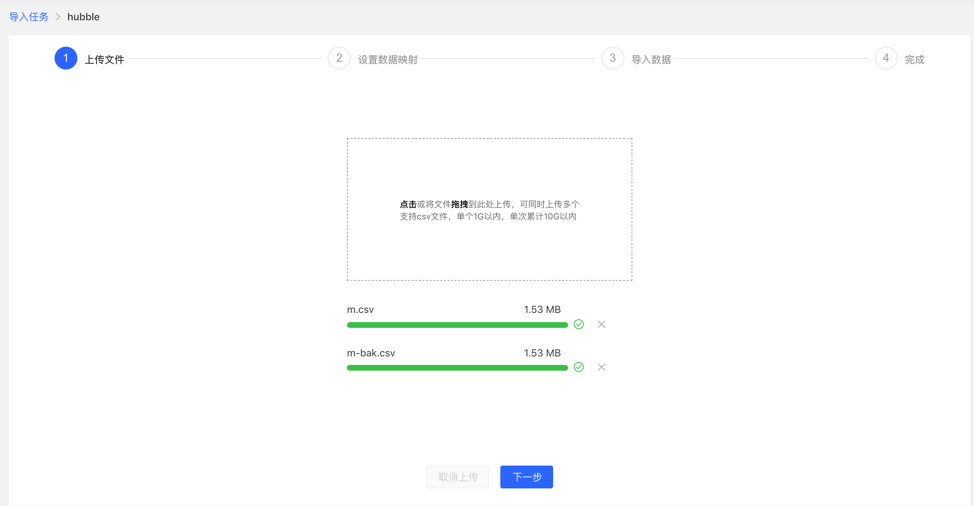
3.3.4 Setting up data mapping
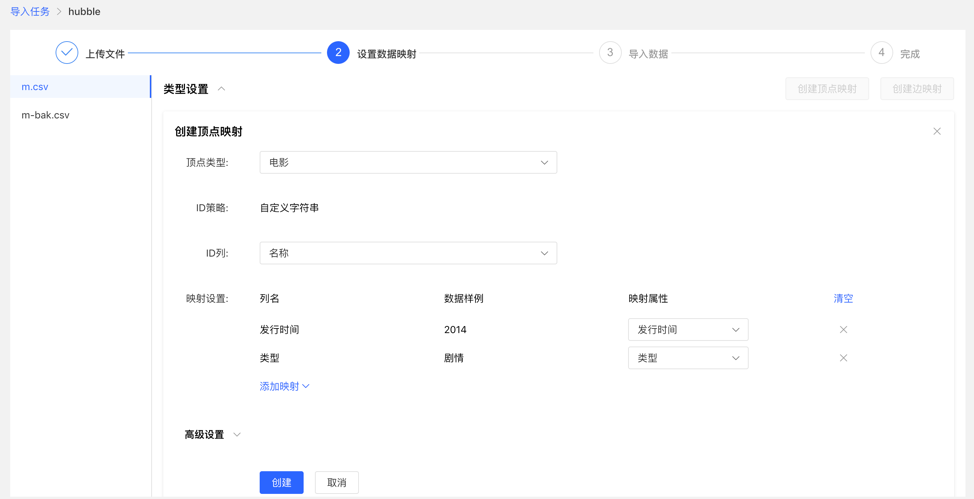
Set up data mapping for uploaded files, including file settings and type settings
File settings: Check or fill in whether to include the header, separator, encoding format and other settings of the file itself, all set the default values, no need to fill in manually
Type setting:
Vertex map and edge map:
【Vertex Type】: Select the vertex type, and upload the column data in the file for its ID mapping;
【Edge Type】: Select the edge type and map the column data of the uploaded file to the ID column of its start point type and end point type;
Mapping settings: upload the column data in the file for the attribute mapping of the selected vertex type. Here, if the attribute name is the same as the header name of the file, the mapping attribute can be automatically matched, and there is no need to manually fill in the selection.
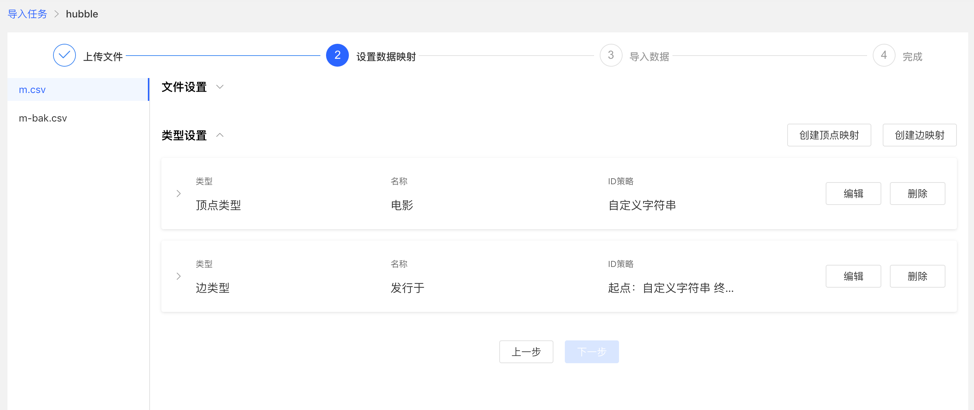
After completing the setting, the setting list will be displayed before proceeding to the next step. It supports the operations of adding, editing and deleting mappings.
Fill in the settings map:
Mapping list:
3.3.5 Import data
Before importing, you need to fill in the import setting parameters. After filling in, you can start importing data into the gallery.
- Import settings
- The import setting parameter items are as shown in the figure below, all set the default value, no need to fill in manually
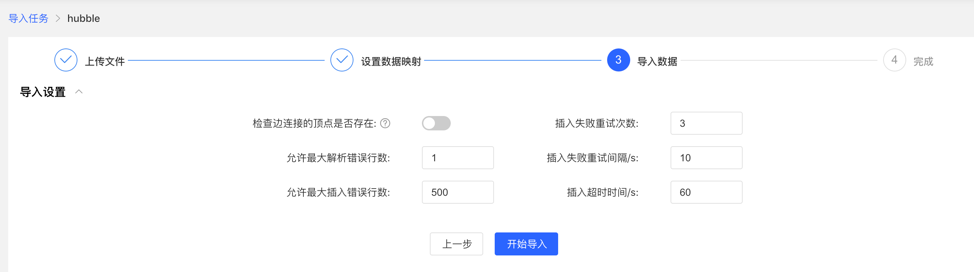
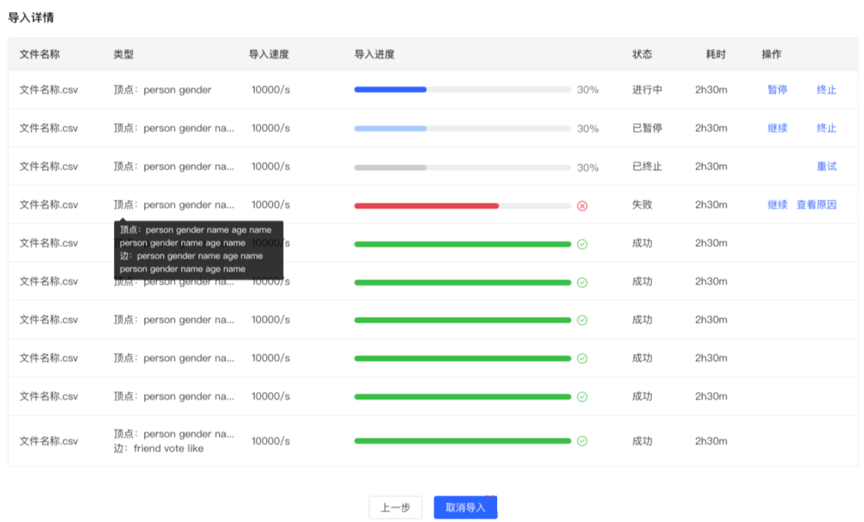
- Import details
- Click Start Import to start the file import task
- The import details provide the mapping type, import speed, import progress, time-consuming and the specific status of the current task set for each uploaded file, and can pause, resume, stop and other operations for each task
- If the import fails, you can view the specific reason
3.4 Data Analysis
3.4.1 Module entry
Left navigation:

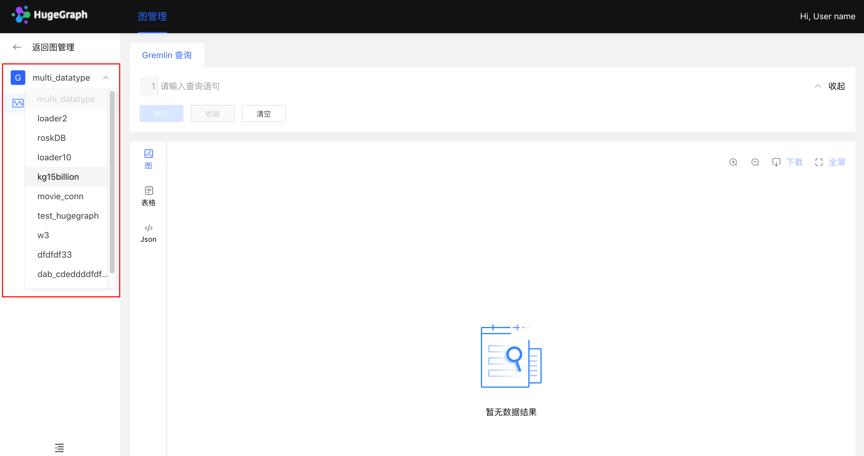
3.4.2 Multi-image switching
By switching the entrance on the left, flexibly switch the operation space of multiple graphs
3.4.3 Graph Analysis and Processing
HugeGraph supports Gremlin, a graph traversal query language of Apache TinkerPop3. Gremlin is a general graph database query language. By entering Gremlin statements and clicking execute, you can perform query and analysis operations on graph data, and create and delete vertices/edges. , vertex/edge attribute modification, etc.
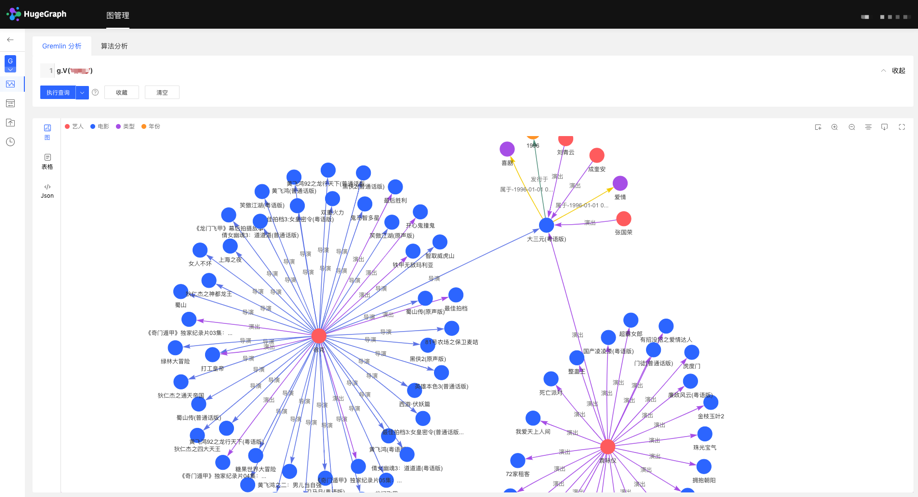
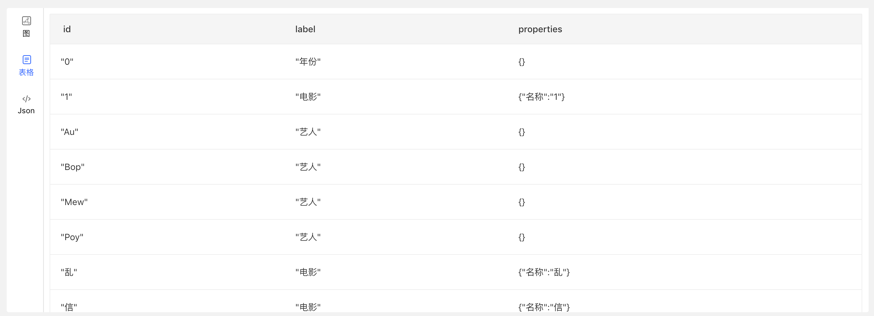
After Gremlin query, below is the graph result display area, which provides 3 kinds of graph result display modes: [Graph Mode], [Table Mode], [Json Mode].
Support zoom, center, full screen, export and other operations.
【Picture Mode】
【Table mode】
【Json mode】
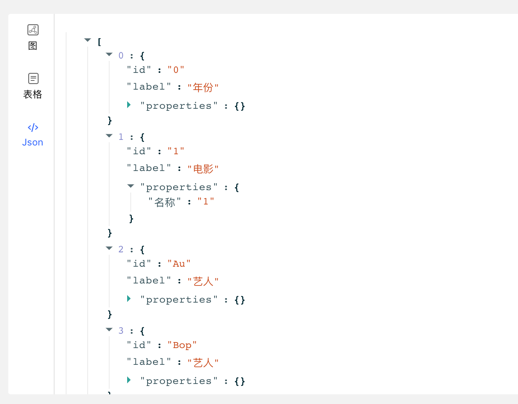
3.4.4 Data Details
Click the vertex/edge entity to view the data details of the vertex/edge, including: vertex/edge type, vertex ID, attribute and corresponding value, expand the information display dimension of the graph, and improve the usability.
3.4.5 Multidimensional Path Query of Graph Results
In addition to the global query, in-depth customized query and hidden operations can be performed for the vertices in the query result to realize customized mining of graph results.
Right-click a vertex, and the menu entry of the vertex appears, which can be displayed, inquired, hidden, etc.
- Expand: Click to display the vertices associated with the selected point.
- Query: By selecting the edge type and edge direction associated with the selected point, and then selecting its attributes and corresponding filtering rules under this condition, a customized path display can be realized.
- Hide: When clicked, hides the selected point and its associated edges.
Double-clicking a vertex also displays the vertex associated with the selected point.
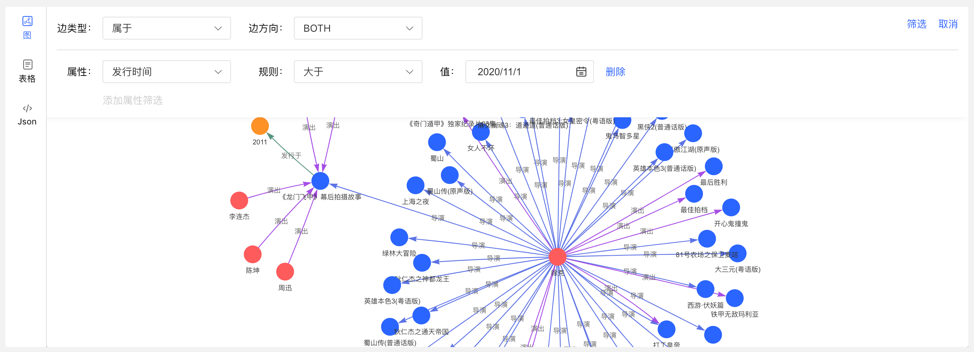
3.4.6 Add vertex/edge
3.4.6.1 Added vertex
In the graph area, two entries can be used to dynamically add vertices, as follows:
- Click on the graph area panel, the Add Vertex entry appears
- Click the first icon in the action bar in the upper right corner
Complete the addition of vertices by selecting or filling in the vertex type, ID value, and attribute information.
The entry is as follows:
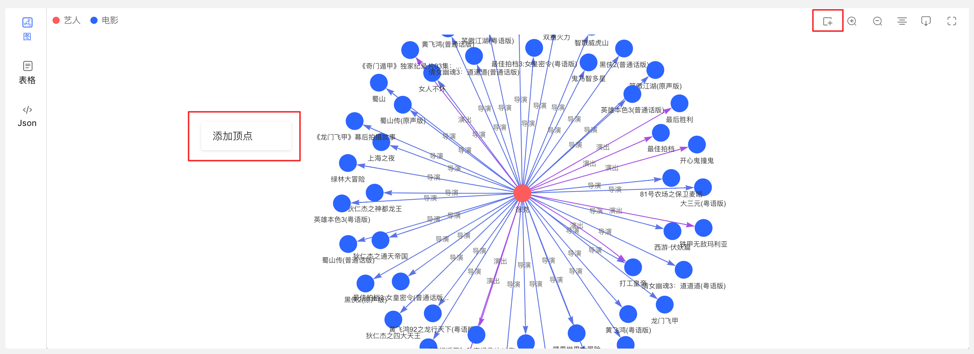
Add the vertex content as follows:
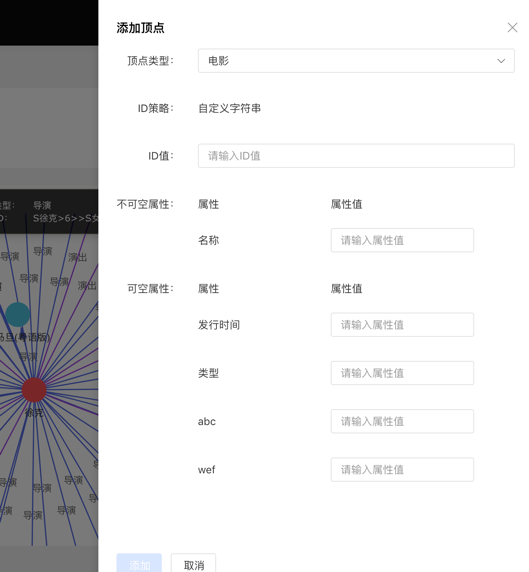
3.4.6.2 Add edge
Right-click a vertex in the graph result to add the outgoing or incoming edge of that point.
3.4.7 Execute the query of records and favorites
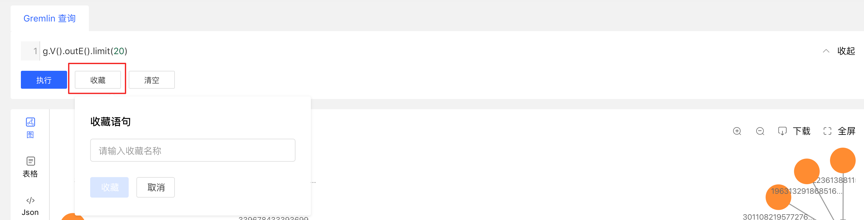
- Record each query record at the bottom of the graph area, including: query time, execution type, content, status, time-consuming, as well as [collection] and [load] operations, to achieve a comprehensive record of graph execution, with traces to follow, and Can quickly load and reuse execution content
- Provides the function of collecting sentences, which can be used to collect frequently used sentences, which is convenient for fast calling of high-frequency sentences.
3.5 Task Management
3.5.1 Module entry
Left navigation:

3.5.2 Task Management
- Provide unified management and result viewing of asynchronous tasks. There are 4 types of asynchronous tasks, namely:
- gremlin: Gremlin tasks
- algorithm: OLAP algorithm task
- remove_schema: remove metadata
- rebuild_index: rebuild the index
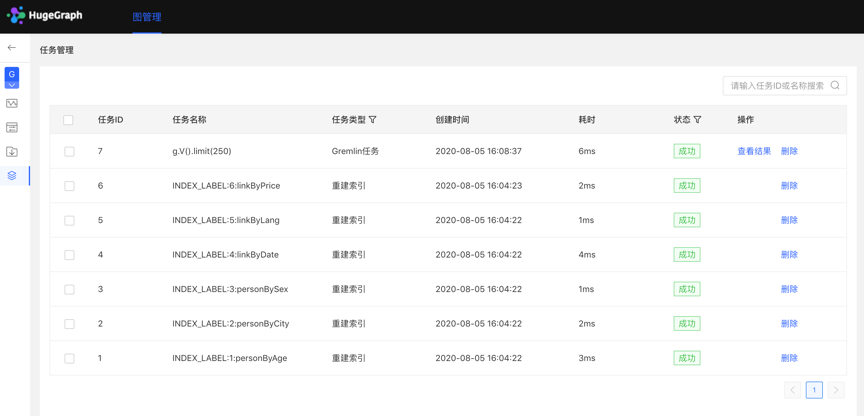
- The list displays the asynchronous task information of the current graph, including: task ID, task name, task type, creation time, time-consuming, status, operation, and realizes the management of asynchronous tasks.
- Support filtering by task type and status
- Support searching for task ID and task name
- Asynchronous tasks can be deleted or deleted in batches
3.5.3 Gremlin asynchronous tasks
- Create a task
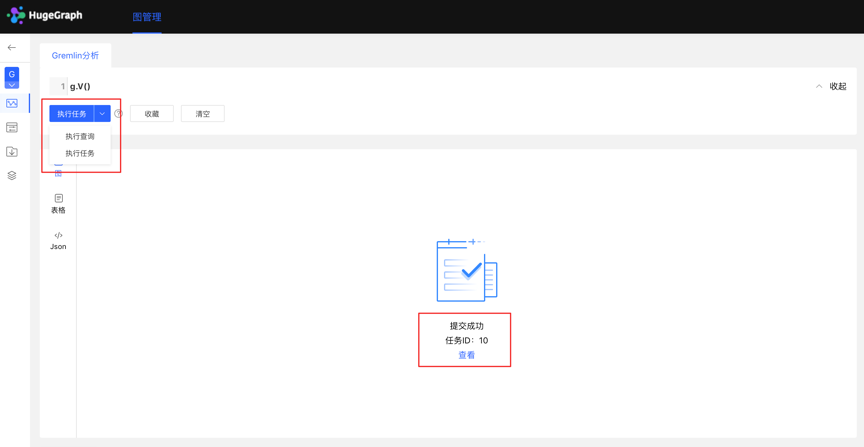
- The data analysis module currently supports two Gremlin operations, Gremlin query and Gremlin task; if the user switches to the Gremlin task, after clicking execute, an asynchronous task will be created in the asynchronous task center;
- Task submission
- After the task is submitted successfully, the graph area returns the submission result and task ID
- Mission details
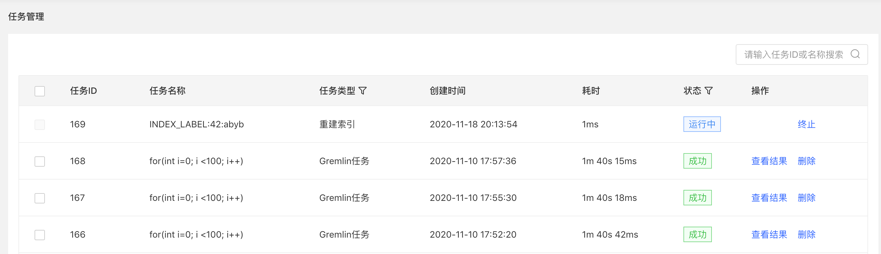
- Provide [View] entry, you can jump to the task details to view the specific execution of the current task After jumping to the task center, the currently executing task line will be displayed directly
Click to view the entry to jump to the task management list, as follows:
- View the results
- The results are displayed in the form of json
3.5.4 OLAP algorithm tasks
There is no visual OLAP algorithm execution on Hubble. You can call the RESTful API to perform OLAP algorithm tasks, find the corresponding tasks by ID in the task management, and view the progress and results.
3.5.5 Delete metadata, rebuild index
- Create a task
- In the metadata modeling module, when deleting metadata, an asynchronous task for deleting metadata can be created
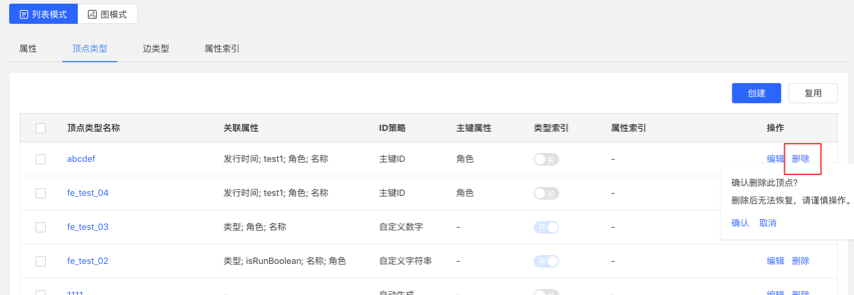
- When editing an existing vertex/edge type operation, when adding an index, an asynchronous task of creating an index can be created
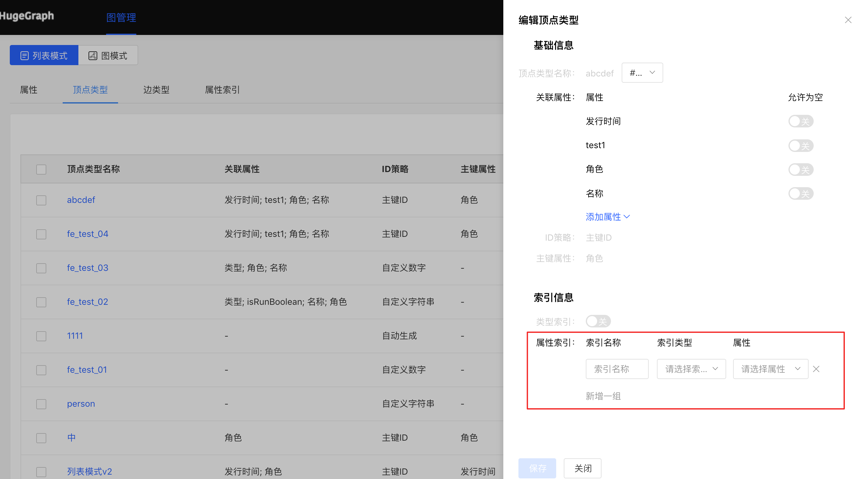
- Task details
- After confirming/saving, you can jump to the task center to view the details of the current task
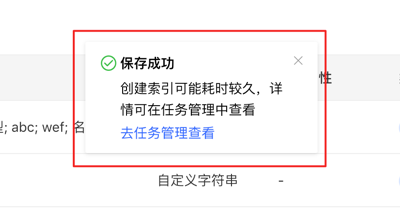
4 - Config
4.1 - HugeGraph 配置
1 概述
配置文件的目录为 hugegraph-release/conf,所有关于服务和图本身的配置都在此目录下。
主要的配置文件包括:gremlin-server.yaml、rest-server.properties 和 hugegraph.properties
HugeGraphServer 内部集成了 GremlinServer 和 RestServer,而 gremlin-server.yaml 和 rest-server.properties 就是用来配置这两个Server的。
- GremlinServer:GremlinServer接受用户的gremlin语句,解析后转而调用Core的代码。
- RestServer:提供RESTful API,根据不同的HTTP请求,调用对应的Core API,如果用户请求体是gremlin语句,则会转发给GremlinServer,实现对图数据的操作。
下面对这三个配置文件逐一介绍。
2 gremlin-server.yaml
gremlin-server.yaml 文件默认的内容如下:
上面的配置项很多,但目前只需要关注如下几个配置项:channelizer 和 graphs。
- graphs:GremlinServer 启动时需要打开的图,该项是一个 map 结构,key 是图的名字,value 是该图的配置文件路径;
- channelizer:GremlinServer 与客户端有两种通信方式,分别是 WebSocket 和 HTTP(默认)。如果选择 WebSocket, 用户可以通过 Gremlin-Console 快速体验 HugeGraph 的特性,但是不支持大规模数据导入, 推荐使用 HTTP 的通信方式,HugeGraph 的外围组件都是基于 HTTP 实现的;
默认GremlinServer是服务在 localhost:8182,如果需要修改,配置 host、port 即可
- host:部署 GremlinServer 机器的机器名或 IP,目前 HugeGraphServer 不支持分布式部署,且GremlinServer不直接暴露给用户;
- port:部署 GremlinServer 机器的端口;
同时需要在 rest-server.properties 中增加对应的配置项 gremlinserver.url=http://host:port
3 rest-server.properties
rest-server.properties 文件的默认内容如下:
- restserver.url:RestServer 提供服务的 url,根据实际环境修改;
- graphs:RestServer 启动时也需要打开图,该项为 map 结构,key 是图的名字,value 是该图的配置文件路径;
注意:gremlin-server.yaml 和 rest-server.properties 都包含 graphs 配置项,而
init-store命令是根据 gremlin-server.yaml 的 graphs 下的图进行初始化的。
配置项 gremlinserver.url 是 GremlinServer 为 RestServer 提供服务的 url,该配置项默认为 http://localhost:8182,如需修改,需要和 gremlin-server.yaml 中的 host 和 port 相匹配;
4 hugegraph.properties
hugegraph.properties 是一类文件,因为如果系统存在多个图,则会有多个相似的文件。该文件用来配置与图存储和查询相关的参数,文件的默认内容如下:
重点关注未注释的几项:
- gremlin.graph:GremlinServer 的启动入口,用户不要修改此项;
- backend:使用的后端存储,可选值有 memory、cassandra、scylladb 和 rocksdb;
- serializer:主要为内部使用,用于将 schema、vertex 和 edge 序列化到后端,对应的可选值为 text、cassandra、scylladb 和 binary;(注:rocksdb后端值需是binary,其他后端backend与serializer值需保持一致,如hbase后端该值为hbase)
- store:图存储到后端使用的数据库名,在 cassandra 和 scylladb 中就是 keyspace 名,此项的值与 GremlinServer 和 RestServer 中的图名并无关系,但是出于直观考虑,建议仍然使用相同的名字;
- cassandra.host:backend 为 cassandra 或 scylladb 时此项才有意义,cassandra/scylladb 集群的 seeds;
- cassandra.port:backend 为 cassandra 或 scylladb 时此项才有意义,cassandra/scylladb 集群的 native port;
- rocksdb.data_path:backend 为 rocksdb 时此项才有意义,rocksdb 的数据目录
- rocksdb.wal_path:backend 为 rocksdb 时此项才有意义,rocksdb 的日志目录
- admin.token: 通过一个token来获取服务器的配置信息,例如:http://localhost:8080/graphs/hugegraph/conf?token=162f7848-0b6d-4faf-b557-3a0797869c55
5 多图配置
我们的系统是可以存在多个图的,并且各个图的后端可以不一样,比如图 hugegraph 和 hugegraph1,其中 hugegraph 以 cassandra 作为后端,hugegraph1 以 rocksdb作为后端。
配置方法也很简单:
修改 gremlin-server.yaml
在 gremlin-server.yaml 的 graphs 域中添加一个键值对,键为图的名字,值为图的配置文件路径,比如:
修改 rest-server.properties
在 rest-server.properties 的 graphs 域中添加一个键值对,键为图的名字,值为图的配置文件路径,比如:
添加 hugegraph1.properties
拷贝 hugegraph.properties,命名为 hugegraph1.properties,修改图对应的数据库名以及关于后端部分的参数,比如:
停止 Server,初始化执行 init-store.sh(为新的图创建数据库),重新启动 Server
4.2 - HugeGraph Config Options
Gremlin Server Config Options
Corresponding configuration file gremlin-server.yaml
| config option | default value | description |
|---|---|---|
| host | 127.0.0.1 | The host or ip of Gremlin Server. |
| port | 8182 | The listening port of Gremlin Server. |
| graphs | hugegraph: conf/hugegraph.properties | The map of graphs with name and config file path. |
| scriptEvaluationTimeout | 30000 | The timeout for gremlin script execution(millisecond). |
| channelizer | org.apache.tinkerpop.gremlin.server.channel.HttpChannelizer | Indicates the protocol which the Gremlin Server provides service. |
| authentication | authenticator: com.baidu.hugegraph.auth.StandardAuthenticator, config: {tokens: conf/rest-server.properties} | The authenticator and config(contains tokens path) of authentication mechanism. |
Rest Server & API Config Options
Corresponding configuration file rest-server.properties
| config option | default value | description |
|---|---|---|
| graphs | [hugegraph:conf/hugegraph.properties] | The map of graphs’ name and config file. |
| server.id | server-1 | The id of rest server, used for license verification. |
| server.role | master | The role of nodes in the cluster, available types are [master, worker, computer] |
| restserver.url | http://127.0.0.1:8080 | The url for listening of rest server. |
| ssl.keystore_file | server.keystore | The path of server keystore file used when https protocol is enabled. |
| ssl.keystore_password | The password of the path of the server keystore file used when the https protocol is enabled. | |
| restserver.max_worker_threads | 2 * CPUs | The maximum worker threads of rest server. |
| restserver.min_free_memory | 64 | The minimum free memory(MB) of rest server, requests will be rejected when the available memory of system is lower than this value. |
| restserver.request_timeout | 30 | The time in seconds within which a request must complete, -1 means no timeout. |
| restserver.connection_idle_timeout | 30 | The time in seconds to keep an inactive connection alive, -1 means no timeout. |
| restserver.connection_max_requests | 256 | The max number of HTTP requests allowed to be processed on one keep-alive connection, -1 means unlimited. |
| gremlinserver.url | http://127.0.0.1:8182 | The url of gremlin server. |
| gremlinserver.max_route | 8 | The max route number for gremlin server. |
| gremlinserver.timeout | 30 | The timeout in seconds of waiting for gremlin server. |
| batch.max_edges_per_batch | 500 | The maximum number of edges submitted per batch. |
| batch.max_vertices_per_batch | 500 | The maximum number of vertices submitted per batch. |
| batch.max_write_ratio | 50 | The maximum thread ratio for batch writing, only take effect if the batch.max_write_threads is 0. |
| batch.max_write_threads | 0 | The maximum threads for batch writing, if the value is 0, the actual value will be set to batch.max_write_ratio * restserver.max_worker_threads. |
| auth.authenticator | The class path of authenticator implementation. e.g., com.baidu.hugegraph.auth.StandardAuthenticator, or com.baidu.hugegraph.auth.ConfigAuthenticator. | |
| auth.admin_token | 162f7848-0b6d-4faf-b557-3a0797869c55 | Token for administrator operations, only for com.baidu.hugegraph.auth.ConfigAuthenticator. |
| auth.graph_store | hugegraph | The name of graph used to store authentication information, like users, only for com.baidu.hugegraph.auth.StandardAuthenticator. |
| auth.user_tokens | [hugegraph:9fd95c9c-711b-415b-b85f-d4df46ba5c31] | The map of user tokens with name and password, only for com.baidu.hugegraph.auth.ConfigAuthenticator. |
| auth.audit_log_rate | 1000.0 | The max rate of audit log output per user, default value is 1000 records per second. |
| auth.cache_capacity | 10240 | The max cache capacity of each auth cache item. |
| auth.cache_expire | 600 | The expiration time in seconds of vertex cache. |
| auth.remote_url | If the address is empty, it provide auth service, otherwise it is auth client and also provide auth service through rpc forwarding. The remote url can be set to multiple addresses, which are concat by ‘,’. | |
| auth.token_expire | 86400 | The expiration time in seconds after token created |
| auth.token_secret | FXQXbJtbCLxODc6tGci732pkH1cyf8Qg | Secret key of HS256 algorithm. |
| exception.allow_trace | false | Whether to allow exception trace stack. |
Basic Config Options
Basic Config Options and Backend Config Options correspond to configuration files:{graph-name}.properties,such as hugegraph.properties
| config option | default value | description |
|---|---|---|
| gremlin.graph | com.baidu.hugegraph.HugeFactory | Gremlin entrance to create graph. |
| backend | rocksdb | The data store type, available values are [memory, rocksdb, cassandra, scylladb, hbase, mysql]. |
| serializer | binary | The serializer for backend store, available values are [text, binary, cassandra, hbase, mysql]. |
| store | hugegraph | The database name like Cassandra Keyspace. |
| store.connection_detect_interval | 600 | The interval in seconds for detecting connections, if the idle time of a connection exceeds this value, detect it and reconnect if needed before using, value 0 means detecting every time. |
| store.graph | g | The graph table name, which store vertex, edge and property. |
| store.schema | m | The schema table name, which store meta data. |
| store.system | s | The system table name, which store system data. |
| schema.illegal_name_regex | .\s+$|~. | The regex specified the illegal format for schema name. |
| schema.cache_capacity | 10000 | The max cache size(items) of schema cache. |
| vertex.cache_type | l2 | The type of vertex cache, allowed values are [l1, l2]. |
| vertex.cache_capacity | 10000000 | The max cache size(items) of vertex cache. |
| vertex.cache_expire | 600 | The expire time in seconds of vertex cache. |
| vertex.check_customized_id_exist | false | Whether to check the vertices exist for those using customized id strategy. |
| vertex.default_label | vertex | The default vertex label. |
| vertex.tx_capacity | 10000 | The max size(items) of vertices(uncommitted) in transaction. |
| vertex.check_adjacent_vertex_exist | false | Whether to check the adjacent vertices of edges exist. |
| vertex.lazy_load_adjacent_vertex | true | Whether to lazy load adjacent vertices of edges. |
| vertex.part_edge_commit_size | 5000 | Whether to enable the mode to commit part of edges of vertex, enabled if commit size > 0, 0 means disabled. |
| vertex.encode_primary_key_number | true | Whether to encode number value of primary key in vertex id. |
| vertex.remove_left_index_at_overwrite | false | Whether remove left index at overwrite. |
| edge.cache_type | l2 | The type of edge cache, allowed values are [l1, l2]. |
| edge.cache_capacity | 1000000 | The max cache size(items) of edge cache. |
| edge.cache_expire | 600 | The expiration time in seconds of edge cache. |
| edge.tx_capacity | 10000 | The max size(items) of edges(uncommitted) in transaction. |
| query.page_size | 500 | The size of each page when querying by paging. |
| query.batch_size | 1000 | The size of each batch when querying by batch. |
| query.ignore_invalid_data | true | Whether to ignore invalid data of vertex or edge. |
| query.index_intersect_threshold | 1000 | The maximum number of intermediate results to intersect indexes when querying by multiple single index properties. |
| query.ramtable_edges_capacity | 20000000 | The maximum number of edges in ramtable, include OUT and IN edges. |
| query.ramtable_enable | false | Whether to enable ramtable for query of adjacent edges. |
| query.ramtable_vertices_capacity | 10000000 | The maximum number of vertices in ramtable, generally the largest vertex id is used as capacity. |
| query.optimize_aggregate_by_index | false | Whether to optimize aggregate query(like count) by index. |
| oltp.concurrent_depth | 10 | The min depth to enable concurrent oltp algorithm. |
| oltp.concurrent_threads | 10 | Thread number to concurrently execute oltp algorithm. |
| oltp.collection_type | EC | The implementation type of collections used in oltp algorithm. |
| rate_limit.read | 0 | The max rate(times/s) to execute query of vertices/edges. |
| rate_limit.write | 0 | The max rate(items/s) to add/update/delete vertices/edges. |
| task.wait_timeout | 10 | Timeout in seconds for waiting for the task to complete,such as when truncating or clearing the backend. |
| task.input_size_limit | 16777216 | The job input size limit in bytes. |
| task.result_size_limit | 16777216 | The job result size limit in bytes. |
| task.sync_deletion | false | Whether to delete schema or expired data synchronously. |
| task.ttl_delete_batch | 1 | The batch size used to delete expired data. |
| computer.config | /conf/computer.yaml | The config file path of computer job. |
| search.text_analyzer | ikanalyzer | Choose a text analyzer for searching the vertex/edge properties, available type are [word, ansj, hanlp, smartcn, jieba, jcseg, mmseg4j, ikanalyzer]. |
| search.text_analyzer_mode | smart | Specify the mode for the text analyzer, the available mode of analyzer are {word: [MaximumMatching, ReverseMaximumMatching, MinimumMatching, ReverseMinimumMatching, BidirectionalMaximumMatching, BidirectionalMinimumMatching, BidirectionalMaximumMinimumMatching, FullSegmentation, MinimalWordCount, MaxNgramScore, PureEnglish], ansj: [BaseAnalysis, IndexAnalysis, ToAnalysis, NlpAnalysis], hanlp: [standard, nlp, index, nShort, shortest, speed], smartcn: [], jieba: [SEARCH, INDEX], jcseg: [Simple, Complex], mmseg4j: [Simple, Complex, MaxWord], ikanalyzer: [smart, max_word]}. |
| snowflake.datacenter_id | 0 | The datacenter id of snowflake id generator. |
| snowflake.force_string | false | Whether to force the snowflake long id to be a string. |
| snowflake.worker_id | 0 | The worker id of snowflake id generator. |
| raft.mode | false | Whether the backend storage works in raft mode. |
| raft.safe_read | false | Whether to use linearly consistent read. |
| raft.use_snapshot | false | Whether to use snapshot. |
| raft.endpoint | 127.0.0.1:8281 | The peerid of current raft node. |
| raft.group_peers | 127.0.0.1:8281,127.0.0.1:8282,127.0.0.1:8283 | The peers of current raft group. |
| raft.path | ./raft-log | The log path of current raft node. |
| raft.use_replicator_pipeline | true | Whether to use replicator line, when turned on it multiple logs can be sent in parallel, and the next log doesn’t have to wait for the ack message of the current log to be sent. |
| raft.election_timeout | 10000 | Timeout in milliseconds to launch a round of election. |
| raft.snapshot_interval | 3600 | The interval in seconds to trigger snapshot save. |
| raft.backend_threads | current CPU v-cores | The thread number used to apply task to backend. |
| raft.read_index_threads | 8 | The thread number used to execute reading index. |
| raft.apply_batch | 1 | The apply batch size to trigger disruptor event handler. |
| raft.queue_size | 16384 | The disruptor buffers size for jraft RaftNode, StateMachine and LogManager. |
| raft.queue_publish_timeout | 60 | The timeout in second when publish event into disruptor. |
| raft.rpc_threads | 80 | The rpc threads for jraft RPC layer. |
| raft.rpc_connect_timeout | 5000 | The rpc connect timeout for jraft rpc. |
| raft.rpc_timeout | 60000 | The rpc timeout for jraft rpc. |
| raft.rpc_buf_low_water_mark | 10485760 | The ChannelOutboundBuffer’s low water mark of netty, when buffer size less than this size, the method ChannelOutboundBuffer.isWritable() will return true, it means that low downstream pressure or good network. |
| raft.rpc_buf_high_water_mark | 20971520 | The ChannelOutboundBuffer’s high water mark of netty, only when buffer size exceed this size, the method ChannelOutboundBuffer.isWritable() will return false, it means that the downstream pressure is too great to process the request or network is very congestion, upstream needs to limit rate at this time. |
| raft.read_strategy | ReadOnlyLeaseBased | The linearizability of read strategy. |
RPC server Config Options
| config option | default value | description |
|---|---|---|
| rpc.client_connect_timeout | 20 | The timeout(in seconds) of rpc client connect to rpc server. |
| rpc.client_load_balancer | consistentHash | The rpc client uses a load-balancing algorithm to access multiple rpc servers in one cluster. Default value is ‘consistentHash’, means forwarding by request parameters. |
| rpc.client_read_timeout | 40 | The timeout(in seconds) of rpc client read from rpc server. |
| rpc.client_reconnect_period | 10 | The period(in seconds) of rpc client reconnect to rpc server. |
| rpc.client_retries | 3 | Failed retry number of rpc client calls to rpc server. |
| rpc.config_order | 999 | Sofa rpc configuration file loading order, the larger the more later loading. |
| rpc.logger_impl | com.alipay.sofa.rpc.log.SLF4JLoggerImpl | Sofa rpc log implementation class. |
| rpc.protocol | bolt | Rpc communication protocol, client and server need to be specified the same value. |
| rpc.remote_url | The remote urls of rpc peers, it can be set to multiple addresses, which are concat by ‘,’, empty value means not enabled. | |
| rpc.server_adaptive_port | false | Whether the bound port is adaptive, if it’s enabled, when the port is in use, automatically +1 to detect the next available port. Note that this process is not atomic, so there may still be port conflicts. |
| rpc.server_host | The hosts/ips bound by rpc server to provide services, empty value means not enabled. | |
| rpc.server_port | 8090 | The port bound by rpc server to provide services. |
| rpc.server_timeout | 30 | The timeout(in seconds) of rpc server execution. |
Cassandra Backend Config Options
| config option | default value | description |
|---|---|---|
| backend | Must be set to cassandra. | |
| serializer | Must be set to cassandra. | |
| cassandra.host | localhost | The seeds hostname or ip address of cassandra cluster. |
| cassandra.port | 9042 | The seeds port address of cassandra cluster. |
| cassandra.connect_timeout | 5 | The cassandra driver connect server timeout(seconds). |
| cassandra.read_timeout | 20 | The cassandra driver read from server timeout(seconds). |
| cassandra.keyspace.strategy | SimpleStrategy | The replication strategy of keyspace, valid value is SimpleStrategy or NetworkTopologyStrategy. |
| cassandra.keyspace.replication | [3] | The keyspace replication factor of SimpleStrategy, like ‘[3]’.Or replicas in each datacenter of NetworkTopologyStrategy, like ‘[dc1:2,dc2:1]’. |
| cassandra.username | The username to use to login to cassandra cluster. | |
| cassandra.password | The password corresponding to cassandra.username. | |
| cassandra.compression_type | none | The compression algorithm of cassandra transport: none/snappy/lz4. |
| cassandra.jmx_port=7199 | 7199 | The port of JMX API service for cassandra. |
| cassandra.aggregation_timeout | 43200 | The timeout in seconds of waiting for aggregation. |
ScyllaDB Backend Config Options
| config option | default value | description |
|---|---|---|
| backend | Must be set to scylladb. | |
| serializer | Must be set to scylladb. |
Other options are consistent with the Cassandra backend.
RocksDB Backend Config Options
| config option | default value | description |
|---|---|---|
| backend | Must be set to rocksdb. | |
| serializer | Must be set to binary. | |
| rocksdb.data_disks | [] | The optimized disks for storing data of RocksDB. The format of each element: STORE/TABLE: /path/disk.Allowed keys are [g/vertex, g/edge_out, g/edge_in, g/vertex_label_index, g/edge_label_index, g/range_int_index, g/range_float_index, g/range_long_index, g/range_double_index, g/secondary_index, g/search_index, g/shard_index, g/unique_index, g/olap] |
| rocksdb.data_path | rocksdb-data | The path for storing data of RocksDB. |
| rocksdb.wal_path | rocksdb-data | The path for storing WAL of RocksDB. |
| rocksdb.allow_mmap_reads | false | Allow the OS to mmap file for reading sst tables. |
| rocksdb.allow_mmap_writes | false | Allow the OS to mmap file for writing. |
| rocksdb.block_cache_capacity | 8388608 | The amount of block cache in bytes that will be used by RocksDB, 0 means no block cache. |
| rocksdb.bloom_filter_bits_per_key | -1 | The bits per key in bloom filter, a good value is 10, which yields a filter with ~ 1% false positive rate, -1 means no bloom filter. |
| rocksdb.bloom_filter_block_based_mode | false | Use block based filter rather than full filter. |
| rocksdb.bloom_filter_whole_key_filtering | true | True if place whole keys in the bloom filter, else place the prefix of keys. |
| rocksdb.bottommost_compression | NO_COMPRESSION | The compression algorithm for the bottommost level of RocksDB, allowed values are none/snappy/z/bzip2/lz4/lz4hc/xpress/zstd. |
| rocksdb.bulkload_mode | false | Switch to the mode to bulk load data into RocksDB. |
| rocksdb.cache_index_and_filter_blocks | false | Indicating if we’d put index/filter blocks to the block cache. |
| rocksdb.compaction_style | LEVEL | Set compaction style for RocksDB: LEVEL/UNIVERSAL/FIFO. |
| rocksdb.compression | SNAPPY_COMPRESSION | The compression algorithm for compressing blocks of RocksDB, allowed values are none/snappy/z/bzip2/lz4/lz4hc/xpress/zstd. |
| rocksdb.compression_per_level | [NO_COMPRESSION, NO_COMPRESSION, SNAPPY_COMPRESSION, SNAPPY_COMPRESSION, SNAPPY_COMPRESSION, SNAPPY_COMPRESSION, SNAPPY_COMPRESSION] | The compression algorithms for different levels of RocksDB, allowed values are none/snappy/z/bzip2/lz4/lz4hc/xpress/zstd. |
| rocksdb.delayed_write_rate | 16777216 | The rate limit in bytes/s of user write requests when need to slow down if the compaction gets behind. |
| rocksdb.log_level | INFO | The info log level of RocksDB. |
| rocksdb.max_background_jobs | 8 | Maximum number of concurrent background jobs, including flushes and compactions. |
| rocksdb.level_compaction_dynamic_level_bytes | false | Whether to enable level_compaction_dynamic_level_bytes, if it’s enabled we give max_bytes_for_level_multiplier a priority against max_bytes_for_level_base, the bytes of base level is dynamic for a more predictable LSM tree, it is useful to limit worse case space amplification. Turning this feature on/off for an existing DB can cause unexpected LSM tree structure so it’s not recommended. |
| rocksdb.max_bytes_for_level_base | 536870912 | The upper-bound of the total size of level-1 files in bytes. |
| rocksdb.max_bytes_for_level_multiplier | 10.0 | The ratio between the total size of level (L+1) files and the total size of level L files for all L. |
| rocksdb.max_open_files | -1 | The maximum number of open files that can be cached by RocksDB, -1 means no limit. |
| rocksdb.max_subcompactions | 4 | The value represents the maximum number of threads per compaction job. |
| rocksdb.max_write_buffer_number | 6 | The maximum number of write buffers that are built up in memory. |
| rocksdb.max_write_buffer_number_to_maintain | 0 | The total maximum number of write buffers to maintain in memory. |
| rocksdb.min_write_buffer_number_to_merge | 2 | The minimum number of write buffers that will be merged together. |
| rocksdb.num_levels | 7 | Set the number of levels for this database. |
| rocksdb.optimize_filters_for_hits | false | This flag allows us to not store filters for the last level. |
| rocksdb.optimize_mode | true | Optimize for heavy workloads and big datasets. |
| rocksdb.pin_l0_filter_and_index_blocks_in_cache | false | Indicating if we’d put index/filter blocks to the block cache. |
| rocksdb.sst_path | The path for ingesting SST file into RocksDB. | |
| rocksdb.target_file_size_base | 67108864 | The target file size for compaction in bytes. |
| rocksdb.target_file_size_multiplier | 1 | The size ratio between a level L file and a level (L+1) file. |
| rocksdb.use_direct_io_for_flush_and_compaction | false | Enable the OS to use direct read/writes in flush and compaction. |
| rocksdb.use_direct_reads | false | Enable the OS to use direct I/O for reading sst tables. |
| rocksdb.write_buffer_size | 134217728 | Amount of data in bytes to build up in memory. |
| rocksdb.max_manifest_file_size | 104857600 | The max size of manifest file in bytes. |
| rocksdb.skip_stats_update_on_db_open | false | Whether to skip statistics update when opening the database, setting this flag true allows us to not update statistics. |
| rocksdb.max_file_opening_threads | 16 | The max number of threads used to open files. |
| rocksdb.max_total_wal_size | 0 | Total size of WAL files in bytes. Once WALs exceed this size, we will start forcing the flush of column families related, 0 means no limit. |
| rocksdb.db_write_buffer_size | 0 | Total size of write buffers in bytes across all column families, 0 means no limit. |
| rocksdb.delete_obsolete_files_period | 21600 | The periodicity in seconds when obsolete files get deleted, 0 means always do full purge. |
| rocksdb.hard_pending_compaction_bytes_limit | 274877906944 | The hard limit to impose on pending compaction in bytes. |
| rocksdb.level0_file_num_compaction_trigger | 2 | Number of files to trigger level-0 compaction. |
| rocksdb.level0_slowdown_writes_trigger | 20 | Soft limit on number of level-0 files for slowing down writes. |
| rocksdb.level0_stop_writes_trigger | 36 | Hard limit on number of level-0 files for stopping writes. |
| rocksdb.soft_pending_compaction_bytes_limit | 68719476736 | The soft limit to impose on pending compaction in bytes. |
HBase Backend Config Options
| config option | default value | description |
|---|---|---|
| backend | Must be set to hbase. | |
| serializer | Must be set to hbase. | |
| hbase.hosts | localhost | The hostnames or ip addresses of HBase zookeeper, separated with commas. |
| hbase.port | 2181 | The port address of HBase zookeeper. |
| hbase.threads_max | 64 | The max threads num of hbase connections. |
| hbase.znode_parent | /hbase | The znode parent path of HBase zookeeper. |
| hbase.zk_retry | 3 | The recovery retry times of HBase zookeeper. |
| hbase.aggregation_timeout | 43200 | The timeout in seconds of waiting for aggregation. |
| hbase.kerberos_enable | false | Is Kerberos authentication enabled for HBase. |
| hbase.kerberos_keytab | The HBase’s key tab file for kerberos authentication. | |
| hbase.kerberos_principal | The HBase’s principal for kerberos authentication. | |
| hbase.krb5_conf | etc/krb5.conf | Kerberos configuration file, including KDC IP, default realm, etc. |
| hbase.hbase_site | /etc/hbase/conf/hbase-site.xml | The HBase’s configuration file |
| hbase.enable_partition | true | Is pre-split partitions enabled for HBase. |
| hbase.vertex_partitions | 10 | The number of partitions of the HBase vertex table. |
| hbase.edge_partitions | 30 | The number of partitions of the HBase edge table. |
MySQL & PostgreSQL Backend Config Options
| config option | default value | description |
|---|---|---|
| backend | Must be set to mysql. | |
| serializer | Must be set to mysql. | |
| jdbc.driver | com.mysql.jdbc.Driver | The JDBC driver class to connect database. |
| jdbc.url | jdbc:mysql://127.0.0.1:3306 | The url of database in JDBC format. |
| jdbc.username | root | The username to login database. |
| jdbc.password | ****** | The password corresponding to jdbc.username. |
| jdbc.ssl_mode | false | The SSL mode of connections with database. |
| jdbc.reconnect_interval | 3 | The interval(seconds) between reconnections when the database connection fails. |
| jdbc.reconnect_max_times | 3 | The reconnect times when the database connection fails. |
| jdbc.storage_engine | InnoDB | The storage engine of backend store database, like InnoDB/MyISAM/RocksDB for MySQL. |
| jdbc.postgresql.connect_database | template1 | The database used to connect when init store, drop store or check store exist. |
PostgreSQL Backend Config Options
| config option | default value | description |
|---|---|---|
| backend | Must be set to postgresql. | |
| serializer | Must be set to postgresql. |
Other options are consistent with the MySQL backend.
The driver and url of the PostgreSQL backend should be set to:
jdbc.driver=org.postgresql.Driverjdbc.url=jdbc:postgresql://localhost:5432/
4.3 - HugeGraph 内置用户权限与扩展权限配置及使用
概述
HugeGraph 为了方便不同用户场景下的鉴权使用,目前内置了两套权限模式:
- 简单的
ConfigAuthenticator模式,通过本地配置文件存储用户名和密码 (仅支持单 GraphServer) - 完备的
StandardAuthenticator模式,支持多用户认证、以及细粒度的权限访问控制,采用基于 “用户-用户组-操作-资源” 的 4 层设计,灵活控制用户角色与权限 (支持多 GraphServer)
其中 StandardAuthenticator 模式的几个核心设计:
- 初始化时创建超级管理员 (
admin) 用户,后续通过超级管理员创建其它用户,新创建的用户被分配足够权限后,可以创建或管理更多的用户 - 支持动态创建用户、用户组、资源,支持动态分配或取消权限
- 用户可以属于一个或多个用户组,每个用户组可以拥有对任意个资源的操作权限,操作类型包括:读、写、删除、执行等种类
- “资源” 描述了图数据库中的数据,比如符合某一类条件的顶点,每一个资源包括
type、label、properties三个要素,共有 18 种类型、任意 label、任意 properties 可组合形成的资源,一个资源的内部条件是且关系,多个资源之间的条件是或关系
举例说明:
配置用户认证
HugeGraph 默认不启用用户认证功能,需通过修改配置文件来启用该功能。内置实现了StandardAuthenticator和ConfigAuthenticator两种模式,StandardAuthenticator模式支持多用户认证与细粒度权限控制,ConfigAuthenticator模式支持简单的用户权限认证。此外,开发者可以自定义实现HugeAuthenticator接口来对接自身的权限系统。
用户认证方式均采用 HTTP Basic Authentication ,简单说就是在发送 HTTP 请求时在 Authentication 设置选择 Basic 然后输入对应的用户名和密码,对应 HTTP 明文如下所示 :
StandardAuthenticator模式
StandardAuthenticator模式是通过在数据库后端存储用户信息来支持用户认证和权限控制,该实现基于数据库存储的用户的名称与密码进行认证(密码已被加密),基于用户的角色来细粒度控制用户权限。下面是具体的配置流程(重启服务生效):
在配置文件gremlin-server.yaml中配置authenticator及其rest-server文件路径:
在配置文件rest-server.properties中配置authenticator及其graph_store信息:
其中,graph_store配置项是指使用哪一个图来存储用户信息,如果存在多个图的话,选取任意一个均可。
在配置文件hugegraph{n}.properties中配置gremlin.graph信息:
然后详细的权限 API 调用和说明请参考 Authentication-API 文档
ConfigAuthenticator模式
ConfigAuthenticator模式是通过预先在配置文件中设置用户信息来支持用户认证,该实现是基于配置好的静态tokens来验证用户是否合法。下面是具体的配置流程(重启服务生效):
在配置文件gremlin-server.yaml中配置authenticator及其rest-server文件路径:
在配置文件rest-server.properties中配置authenticator及其tokens信息:
在配置文件hugegraph{n}.properties中配置gremlin.graph信息:
自定义用户认证系统
如果需要支持更加灵活的用户系统,可自定义authenticator进行扩展,自定义authenticator实现接口com.baidu.hugegraph.auth.HugeAuthenticator即可,然后修改配置文件中authenticator配置项指向该实现。
4.4 - 配置 HugeGraphServer 使用 https 协议
概述
HugeGraphServer 默认使用的是 http 协议,如果用户对请求的安全性有要求,可以配置成 https。
服务端配置
修改 conf/rest-server.properties 配置文件,将 restserver.url 的 schema 部分改为 https。
服务端的 conf 目录下已经给出了一个 keystore 文件hugegraph-server.keystore,该文件的密码为hugegraph,
这两项都是在开启了 https 协议时的默认值,用户可以生成自己的 keystore 文件及密码,然后修改ssl.keystore_file和ssl.keystore_password的值。
客户端配置
在 HugeGraph-Client 中使用 https
在构造 HugeClient 时传入 https 相关的配置,代码示例:
注意:HugeGraph-Client 在 1.9.0 版本以前是直接以 new 的方式创建,并且不支持 https 协议,在 1.9.0 版本以后改成以 builder 的方式创建,并支持配置 https 协议。
在 HugeGraph-Loader 中使用 https
启动导入任务时,在命令行中添加如下选项:
hugegraph-loader 的 conf 目录下已经放了一个默认的客户端证书文件 hugegraph.truststore,其密码是 hugegraph。
在 HugeGraph-Tools 中使用 https
执行命令时,在命令行中添加如下选项:
hugegraph-tools 的 conf 目录下已经放了一个默认的客户端证书文件 hugegraph.truststore,其密码是 hugegraph。
如何生成证书文件
本部分给出生成证书的示例,如果默认的证书已经够用,或者已经知晓如何生成,可跳过。
服务端
- ⽣成服务端私钥,并且导⼊到服务端 keystore ⽂件中,server.keystore 是给服务端⽤的,其中保存着⾃⼰的私钥
过程中根据需求填写描述信息,默认证书的描述信息如下:
- 根据服务端私钥,导出服务端证书
server.crt 就是服务端的证书
客户端
client.truststore 是给客户端⽤的,其中保存着受信任的证书
4.5 - HugeGraph-Computer Config
Computer Config Options
| config option | default value | description |
|---|---|---|
| algorithm.message_class | org.apache.hugegraph.computer.core.config.Null | The class of message passed when compute vertex. |
| algorithm.params_class | org.apache.hugegraph.computer.core.config.Null | The class used to transfer algorithms’ parameters before algorithm been run. |
| algorithm.result_class | org.apache.hugegraph.computer.core.config.Null | The class of vertex’s value, the instance is used to store computation result for the vertex. |
| allocator.max_vertices_per_thread | 10000 | Maximum number of vertices per thread processed in each memory allocator |
| bsp.etcd_endpoints | http://localhost:2379 | The end points to access etcd. |
| bsp.log_interval | 30000 | The log interval(in ms) to print the log while waiting bsp event. |
| bsp.max_super_step | 10 | The max super step of the algorithm. |
| bsp.register_timeout | 300000 | The max timeout to wait for master and works to register. |
| bsp.wait_master_timeout | 86400000 | The max timeout(in ms) to wait for master bsp event. |
| bsp.wait_workers_timeout | 86400000 | The max timeout to wait for workers bsp event. |
| hgkv.max_data_block_size | 65536 | The max byte size of hgkv-file data block. |
| hgkv.max_file_size | 2147483648 | The max number of bytes in each hgkv-file. |
| hgkv.max_merge_files | 10 | The max number of files to merge at one time. |
| hgkv.temp_file_dir | /tmp/hgkv | This folder is used to store temporary files, temporary files will be generated during the file merging process. |
| hugegraph.name | hugegraph | The graph name to load data and write results back. |
| hugegraph.url | http://127.0.0.1:8080 | The hugegraph url to load data and write results back. |
| input.edge_direction | OUT | The data of the edge in which direction is loaded, when the value is BOTH, the edges in both OUT and IN direction will be loaded. |
| input.edge_freq | MULTIPLE | The frequency of edges can exist between a pair of vertices, allowed values: [SINGLE, SINGLE_PER_LABEL, MULTIPLE]. SINGLE means that only one edge can exist between a pair of vertices, use sourceId + targetId to identify it; SINGLE_PER_LABEL means that each edge label can exist one edge between a pair of vertices, use sourceId + edgelabel + targetId to identify it; MULTIPLE means that many edge can exist between a pair of vertices, use sourceId + edgelabel + sortValues + targetId to identify it. |
| input.filter_class | org.apache.hugegraph.computer.core.input.filter.DefaultInputFilter | The class to create input-filter object, input-filter is used to Filter vertex edges according to user needs. |
| input.loader_schema_path | The schema path of loader input, only takes effect when the input.source_type=loader is enabled | |
| input.loader_struct_path | The struct path of loader input, only takes effect when the input.source_type=loader is enabled | |
| input.max_edges_in_one_vertex | 200 | The maximum number of adjacent edges allowed to be attached to a vertex, the adjacent edges will be stored and transferred together as a batch unit. |
| input.source_type | hugegraph-server | The source type to load input data, allowed values: [‘hugegraph-server’, ‘hugegraph-loader’], the ‘hugegraph-loader’ means use hugegraph-loader load data from HDFS or file, if use ‘hugegraph-loader’ load data then please config ‘input.loader_struct_path’ and ‘input.loader_schema_path’. |
| input.split_fetch_timeout | 300 | The timeout in seconds to fetch input splits |
| input.split_max_splits | 10000000 | The maximum number of input splits |
| input.split_page_size | 500 | The page size for streamed load input split data |
| input.split_size | 1048576 | The input split size in bytes |
| job.id | local_0001 | The job id on Yarn cluster or K8s cluster. |
| job.partitions_count | 1 | The partitions count for computing one graph algorithm job. |
| job.partitions_thread_nums | 4 | The number of threads for partition parallel compute. |
| job.workers_count | 1 | The workers count for computing one graph algorithm job. |
| master.computation_class | org.apache.hugegraph.computer.core.master.DefaultMasterComputation | Master-computation is computation that can determine whether to continue next superstep. It runs at the end of each superstep on master. |
| output.batch_size | 500 | The batch size of output |
| output.batch_threads | 1 | The threads number used to batch output |
| output.hdfs_core_site_path | The hdfs core site path. | |
| output.hdfs_delimiter | , | The delimiter of hdfs output. |
| output.hdfs_kerberos_enable | false | Is Kerberos authentication enabled for Hdfs. |
| output.hdfs_kerberos_keytab | The Hdfs’s key tab file for kerberos authentication. | |
| output.hdfs_kerberos_principal | The Hdfs’s principal for kerberos authentication. | |
| output.hdfs_krb5_conf | /etc/krb5.conf | Kerberos configuration file. |
| output.hdfs_merge_partitions | true | Whether merge output files of multiple partitions. |
| output.hdfs_path_prefix | /hugegraph-computer/results | The directory of hdfs output result. |
| output.hdfs_replication | 3 | The replication number of hdfs. |
| output.hdfs_site_path | The hdfs site path. | |
| output.hdfs_url | hdfs://127.0.0.1:9000 | The hdfs url of output. |
| output.hdfs_user | hadoop | The hdfs user of output. |
| output.output_class | org.apache.hugegraph.computer.core.output.LogOutput | The class to output the computation result of each vertex. Be called after iteration computation. |
| output.result_name | value | The value is assigned dynamically by #name() of instance created by WORKER_COMPUTATION_CLASS. |
| output.result_write_type | OLAP_COMMON | The result write-type to output to hugegraph, allowed values are: [OLAP_COMMON, OLAP_SECONDARY, OLAP_RANGE]. |
| output.retry_interval | 10 | The retry interval when output failed |
| output.retry_times | 3 | The retry times when output failed |
| output.single_threads | 1 | The threads number used to single output |
| output.thread_pool_shutdown_timeout | 60 | The timeout seconds of output threads pool shutdown |
| output.with_adjacent_edges | false | Output the adjacent edges of the vertex or not |
| output.with_edge_properties | false | Output the properties of the edge or not |
| output.with_vertex_properties | false | Output the properties of the vertex or not |
| sort.thread_nums | 4 | The number of threads performing internal sorting. |
| transport.client_connect_timeout | 3000 | The timeout(in ms) of client connect to server. |
| transport.client_threads | 4 | The number of transport threads for client. |
| transport.close_timeout | 10000 | The timeout(in ms) of close server or close client. |
| transport.finish_session_timeout | 0 | The timeout(in ms) to finish session, 0 means using (transport.sync_request_timeout * transport.max_pending_requests). |
| transport.heartbeat_interval | 20000 | The minimum interval(in ms) between heartbeats on client side. |
| transport.io_mode | AUTO | The network IO Mode, either ‘NIO’, ‘EPOLL’, ‘AUTO’, the ‘AUTO’ means selecting the property mode automatically. |
| transport.max_pending_requests | 8 | The max number of client unreceived ack, it will trigger the sending unavailable if the number of unreceived ack >= max_pending_requests. |
| transport.max_syn_backlog | 511 | The capacity of SYN queue on server side, 0 means using system default value. |
| transport.max_timeout_heartbeat_count | 120 | The maximum times of timeout heartbeat on client side, if the number of timeouts waiting for heartbeat response continuously > max_heartbeat_timeouts the channel will be closed from client side. |
| transport.min_ack_interval | 200 | The minimum interval(in ms) of server reply ack. |
| transport.min_pending_requests | 6 | The minimum number of client unreceived ack, it will trigger the sending available if the number of unreceived ack < min_pending_requests. |
| transport.network_retries | 3 | The number of retry attempts for network communication,if network unstable. |
| transport.provider_class | org.apache.hugegraph.computer.core.network.netty.NettyTransportProvider | The transport provider, currently only supports Netty. |
| transport.receive_buffer_size | 0 | The size of socket receive-buffer in bytes, 0 means using system default value. |
| transport.recv_file_mode | true | Whether enable receive buffer-file mode, it will receive buffer write file from socket by zero-copy if enable. |
| transport.send_buffer_size | 0 | The size of socket send-buffer in bytes, 0 means using system default value. |
| transport.server_host | 127.0.0.1 | The server hostname or ip to listen on to transfer data. |
| transport.server_idle_timeout | 360000 | The max timeout(in ms) of server idle. |
| transport.server_port | 0 | The server port to listen on to transfer data. The system will assign a random port if it’s set to 0. |
| transport.server_threads | 4 | The number of transport threads for server. |
| transport.sync_request_timeout | 10000 | The timeout(in ms) to wait response after sending sync-request. |
| transport.tcp_keep_alive | true | Whether enable TCP keep-alive. |
| transport.transport_epoll_lt | false | Whether enable EPOLL level-trigger. |
| transport.write_buffer_high_mark | 67108864 | The high water mark for write buffer in bytes, it will trigger the sending unavailable if the number of queued bytes > write_buffer_high_mark. |
| transport.write_buffer_low_mark | 33554432 | The low water mark for write buffer in bytes, it will trigger the sending available if the number of queued bytes < write_buffer_low_mark.org.apache.hugegraph.config.OptionChecker$$Lambda$97/0x00000008001c8440@776a6d9b |
| transport.write_socket_timeout | 3000 | The timeout(in ms) to write data to socket buffer. |
| valuefile.max_segment_size | 1073741824 | The max number of bytes in each segment of value-file. |
| worker.combiner_class | org.apache.hugegraph.computer.core.config.Null | Combiner can combine messages into one value for a vertex, for example page-rank algorithm can combine messages of a vertex to a sum value. |
| worker.computation_class | org.apache.hugegraph.computer.core.config.Null | The class to create worker-computation object, worker-computation is used to compute each vertex in each superstep. |
| worker.data_dirs | [jobs] | The directories separated by ‘,’ that received vertices and messages can persist into. |
| worker.edge_properties_combiner_class | org.apache.hugegraph.computer.core.combiner.OverwritePropertiesCombiner | The combiner can combine several properties of the same edge into one properties at inputstep. |
| worker.partitioner | org.apache.hugegraph.computer.core.graph.partition.HashPartitioner | The partitioner that decides which partition a vertex should be in, and which worker a partition should be in. |
| worker.received_buffers_bytes_limit | 104857600 | The limit bytes of buffers of received data, the total size of all buffers can’t excess this limit. If received buffers reach this limit, they will be merged into a file. |
| worker.vertex_properties_combiner_class | org.apache.hugegraph.computer.core.combiner.OverwritePropertiesCombiner | The combiner can combine several properties of the same vertex into one properties at inputstep. |
| worker.wait_finish_messages_timeout | 86400000 | The max timeout(in ms) message-handler wait for finish-message of all workers. |
| worker.wait_sort_timeout | 600000 | The max timeout(in ms) message-handler wait for sort-thread to sort one batch of buffers. |
| worker.write_buffer_capacity | 52428800 | The initial size of write buffer that used to store vertex or message. |
| worker.write_buffer_threshold | 52428800 | The threshold of write buffer, exceeding it will trigger sorting, the write buffer is used to store vertex or message. |
K8s Operator Config Options
NOTE: Option needs to be converted through environment variable settings, e.g k8s.internal_etcd_url => INTERNAL_ETCD_URL
| config option | default value | description |
|---|---|---|
| k8s.auto_destroy_pod | true | Whether to automatically destroy all pods when the job is completed or failed. |
| k8s.close_reconciler_timeout | 120 | The max timeout(in ms) to close reconciler. |
| k8s.internal_etcd_url | http://127.0.0.1:2379 | The internal etcd url for operator system. |
| k8s.max_reconcile_retry | 3 | The max retry times of reconcile. |
| k8s.probe_backlog | 50 | The maximum backlog for serving health probes. |
| k8s.probe_port | 9892 | The value is the port that the controller bind to for serving health probes. |
| k8s.ready_check_internal | 1000 | The time interval(ms) of check ready. |
| k8s.ready_timeout | 30000 | The max timeout(in ms) of check ready. |
| k8s.reconciler_count | 10 | The max number of reconciler thread. |
| k8s.resync_period | 600000 | The minimum frequency at which watched resources are reconciled. |
| k8s.timezone | Asia/Shanghai | The timezone of computer job and operator. |
| k8s.watch_namespace | hugegraph-computer-system | The value is watch custom resources in the namespace, ignore other namespaces, the ‘*’ means is all namespaces will be watched. |
HugeGraph-Computer CRD
| spec | default value | description | required |
|---|---|---|---|
| algorithmName | The name of algorithm. | true | |
| jobId | The job id. | true | |
| image | The image of algorithm. | true | |
| computerConf | The map of computer config options. | true | |
| workerInstances | The number of worker instances, it will instead the ‘job.workers_count’ option. | true | |
| pullPolicy | Always | The pull-policy of image, detail please refer to: https://kubernetes.io/docs/concepts/containers/images/#image-pull-policy | false |
| pullSecrets | The pull-secrets of Image, detail please refer to: https://kubernetes.io/docs/concepts/containers/images/#specifying-imagepullsecrets-on-a-pod | false | |
| masterCpu | The cpu limit of master, the unit can be ’m’ or without unit detail please refer to:https://kubernetes.io/docs/concepts/configuration/manage-resources-containers/#meaning-of-cpu | false | |
| workerCpu | The cpu limit of worker, the unit can be ’m’ or without unit detail please refer to:https://kubernetes.io/docs/concepts/configuration/manage-resources-containers/#meaning-of-cpu | false | |
| masterMemory | The memory limit of master, the unit can be one of Ei、Pi、Ti、Gi、Mi、Ki detail please refer to:https://kubernetes.io/docs/concepts/configuration/manage-resources-containers/#meaning-of-memory | false | |
| workerMemory | The memory limit of worker, the unit can be one of Ei、Pi、Ti、Gi、Mi、Ki detail please refer to:https://kubernetes.io/docs/concepts/configuration/manage-resources-containers/#meaning-of-memory | false | |
| log4jXml | The content of log4j.xml for computer job. | false | |
| jarFile | The jar path of computer algorithm. | false | |
| remoteJarUri | The remote jar uri of computer algorithm, it will overlay algorithm image. | false | |
| jvmOptions | The java startup parameters of computer job. | false | |
| envVars | please refer to: https://kubernetes.io/docs/tasks/inject-data-application/define-interdependent-environment-variables/ | false | |
| envFrom | please refer to: https://kubernetes.io/docs/tasks/inject-data-application/define-environment-variable-container/ | false | |
| masterCommand | bin/start-computer.sh | The run command of master, equivalent to ‘Entrypoint’ field of Docker. | false |
| masterArgs | ["-r master", “-d k8s”] | The run args of master, equivalent to ‘Cmd’ field of Docker. | false |
| workerCommand | bin/start-computer.sh | The run command of worker, equivalent to ‘Entrypoint’ field of Docker. | false |
| workerArgs | ["-r worker", “-d k8s”] | The run args of worker, equivalent to ‘Cmd’ field of Docker. | false |
| volumes | Please refer to: https://kubernetes.io/docs/concepts/storage/volumes/ | false | |
| volumeMounts | Please refer to: https://kubernetes.io/docs/concepts/storage/volumes/ | false | |
| secretPaths | The map of k8s-secret name and mount path. | false | |
| configMapPaths | The map of k8s-configmap name and mount path. | false | |
| podTemplateSpec | Please refer to: https://kubernetes.io/docs/reference/kubernetes-api/workload-resources/pod-template-v1/#PodTemplateSpec | false | |
| securityContext | Please refer to: https://kubernetes.io/docs/tasks/configure-pod-container/security-context/ | false |
KubeDriver Config Options
| config option | default value | description |
|---|---|---|
| k8s.build_image_bash_path | The path of command used to build image. | |
| k8s.enable_internal_algorithm | true | Whether enable internal algorithm. |
| k8s.framework_image_url | hugegraph/hugegraph-computer:latest | The image url of computer framework. |
| k8s.image_repository_password | The password for login image repository. | |
| k8s.image_repository_registry | The address for login image repository. | |
| k8s.image_repository_url | hugegraph/hugegraph-computer | The url of image repository. |
| k8s.image_repository_username | The username for login image repository. | |
| k8s.internal_algorithm | [pageRank] | The name list of all internal algorithm. |
| k8s.internal_algorithm_image_url | hugegraph/hugegraph-computer:latest | The image url of internal algorithm. |
| k8s.jar_file_dir | /cache/jars/ | The directory where the algorithm jar to upload location. |
| k8s.kube_config | ~/.kube/config | The path of k8s config file. |
| k8s.log4j_xml_path | The log4j.xml path for computer job. | |
| k8s.namespace | hugegraph-computer-system | The namespace of hugegraph-computer system. |
| k8s.pull_secret_names | [] | The names of pull-secret for pulling image. |
5 - API
5.1 - HugeGraph RESTful API
HugeGraph-Server通过HugeGraph-API基于HTTP协议为Client提供操作图的接口,主要包括元数据和 图数据的增删改查,遍历算法,变量,图操作及其他操作。
5.1.1 - Schema API
1.1 Schema
HugeGraph 提供单一接口获取某个图的全部 Schema 信息,包括:PropertyKey、VertexLabel、EdgeLabel 和 IndexLabel。
Method & Url
Response Status
Response Body
5.1.2 - PropertyKey API
1.2 PropertyKey
Params说明:
- name:属性类型名称,必填
- data_type:属性类型数据类型,包括:bool、byte、int、long、float、double、string、date、uuid、blob,默认string类型
- cardinality:属性类型基数,包括:single、list、set,默认single
请求体字段说明:
- id:属性类型id值
- properties:属性的属性,对于属性而言,此项为空
- user_data:设置属性类型的通用信息,比如可设置age属性的取值范围,最小为0,最大为100;目前此项不做任何校验,只为后期拓展提供预留入口
1.2.1 创建一个 PropertyKey
Method & Url
Request Body
Response Status
Response Body
1.2.2 为已存在的 PropertyKey 添加或移除 userdata
Params
- action: 表示当前行为是添加还是移除,取值为
append(添加)和eliminate(移除)
Method & Url
Request Body
Response Status
Response Body
1.2.3 获取所有的 PropertyKey
Method & Url
Response Status
Response Body
1.2.4 根据name获取PropertyKey
Method & Url
其中,age为要获取的PropertyKey的名字
Response Status
Response Body
1.2.5 根据name删除PropertyKey
Method & Url
其中,age为要获取的PropertyKey的名字
Response Status
Response Body
5.1.3 - VertexLabel API
1.3 VertexLabel
假设已经创建好了1.1.3中列出来的 PropertyKeys
Params说明
- id:顶点类型id值
- name:顶点类型名称,必填
- id_strategy: 顶点类型的ID策略,主键ID、自动生成、自定义字符串、自定义数字、自定义UUID,默认主键ID
- properties: 顶点类型关联的属性类型
- primary_keys: 主键属性,当ID策略为PRIMARY_KEY时必须有值,其他ID策略时必须为空;
- enable_label_index: 是否开启类型索引,默认关闭
- index_names:顶点类型创建的索引,详情见3.4
- nullable_keys:可为空的属性
- user_data:设置顶点类型的通用信息,作用同属性类型
1.3.1 创建一个VertexLabel
Method & Url
Request Body
Response Status
Response Body
从 hugegraph-server v0.11.2 版本开始支持顶点的 TTL 功能。顶点的 TTL 是通过 VertexLabel 来设置的。比如希望 person 类型的顶点存活时间为一天,需要在创建 person VertexLabel 的时候将 TTL 字段设置为 86400000,即单位为毫秒。
另外,当顶点中带有"创建时间"的属性且希望以"创建时间"属性作为计算顶点存活时间的起点时,可以设置 VertexLabel 中的 ttl_start_time 字段。比如 person VertexLabel 有 createdTime 属性,且 createdTime 是 Date 类型的参数,希望 person 类型的顶点从创建开始存活一天的时间,那么创建 person VertexLabel 的 Request Body 如下:
1.3.2 为已存在的VertexLabel添加properties或userdata,或者移除userdata(目前不支持移除properties)
Params
- action: 表示当前行为是添加还是移除,取值为
append(添加)和eliminate(移除)
Method & Url
Request Body
Response Status
Response Body
1.3.3 获取所有的VertexLabel
Method & Url
Response Status
Response Body
1.3.4 根据name获取VertexLabel
Method & Url
Response Status
Response Body
1.3.5 根据name删除VertexLabel
删除 VertexLabel 会导致删除对应的顶点以及相关的索引数据,会产生一个异步任务
Method & Url
Response Status
Response Body
注:
可以通过
GET http://localhost:8080/graphs/hugegraph/tasks/1(其中"1"是task_id)来查询异步任务的执行状态,更多异步任务RESTful API
5.1.4 - EdgeLabel API
1.4 EdgeLabel
假设已经创建好了1.2.3中的 PropertyKeys 和 1.3.3中的 VertexLabels
Params说明
- name:顶点类型名称,必填
- source_label: 源顶点类型的名称,必填
- target_label: 目标顶点类型的名称,必填
- frequency:两个点之间是否可以有多条边,可以取值SINGLE和MULTIPLE,非必填,默认值SINGLE
- properties: 边类型关联的属性类型,选填
- sort_keys: 当允许关联多次时,指定区分键属性列表
- nullable_keys:可为空的属性,选填,默认可为空
- enable_label_index: 是否开启类型索引,默认关闭
1.4.1 创建一个EdgeLabel
Method & Url
Request Body
Response Status
Response Body
从 hugegraph-server v0.11.2 版本开始支持边的 TTL 功能。边的 TTL 是通过 EdgeLabel 来设置的。比如希望 knows 类型的边存活时间为一天,需要在创建 knows EdgeLabel 的时候将 TTL 字段设置为 86400000,即单位为毫秒。
另外,当边中带有"创建时间"的属性且希望以"创建时间"属性作为计算边存活时间的起点时,可以设置 EdgeLabel 中的 ttl_start_time 字段。比如 knows EdgeLabel 有 createdTime 属性,且 createdTime 是 Date 类型的参数,希望 knows 类型的边从创建开始存活一天的时间,那么创建 knows EdgeLabel 的 Request Body 如下:
1.4.2 为已存在的EdgeLabel添加properties或userdata,或者移除userdata(目前不支持移除properties)
Params
- action: 表示当前行为是添加还是移除,取值为
append(添加)和eliminate(移除)
Method & Url
Request Body
Response Status
Response Body
1.4.3 获取所有的EdgeLabel
Method & Url
Response Status
Response Body
1.4.4 根据name获取EdgeLabel
Method & Url
Response Status
Response Body
1.4.5 根据name删除EdgeLabel
删除 EdgeLabel 会导致删除对应的边以及相关的索引数据,会产生一个异步任务
Method & Url
Response Status
Response Body
注:
可以通过
GET http://localhost:8080/graphs/hugegraph/tasks/1(其中"1"是task_id)来查询异步任务的执行状态,更多异步任务RESTful API
5.1.5 - IndexLabel API
1.5 IndexLabel
假设已经创建好了1.1.3中的 PropertyKeys 、1.2.3中的 VertexLabels 以及 1.3.3中的 EdgeLabels
1.5.1 创建一个IndexLabel
Method & Url
Request Body
Response Status
Response Body
1.5.2 获取所有的IndexLabel
Method & Url
Response Status
Response Body
1.5.3 根据name获取IndexLabel
Method & Url
Response Status
Response Body
1.5.4 根据name删除IndexLabel
删除 IndexLabel 会导致删除相关的索引数据,会产生一个异步任务
Method & Url
Response Status
Response Body
注:
可以通过
GET http://localhost:8080/graphs/hugegraph/tasks/1(其中"1"是task_id)来查询异步任务的执行状态,更多异步任务RESTful API
5.1.6 - Rebuild API
1.6 Rebuild
1.6.1 Rebuild IndexLabel
Method & Url
Response Status
Response Body
Note:
You can get the asynchronous job status by
GET http://localhost:8080/graphs/hugegraph/tasks/${task_id}(the task_id here should be 1). See More AsyncJob RESTfull API
1.6.2 Rebulid all Indexs of VertexLabel
Method & Url
Response Status
Response Body
Note:
You can get the asynchronous job status by
GET http://localhost:8080/graphs/hugegraph/tasks/${task_id}(the task_id here should be 2). See More AsyncJob RESTfull API
1.6.3 Rebulid all Indexs of EdgeLabel
Method & Url
Response Status
Response Body
Note:
You can get the asynchronous job status by
GET http://localhost:8080/graphs/hugegraph/tasks/${task_id}(the task_id here should be 3). See More AsyncJob RESTfull API
5.1.7 - Vertex API
2.1 Vertex
顶点类型中的 Id 策略决定了顶点的 Id 类型,其对应关系如下:
| Id_Strategy | id type |
|---|---|
| AUTOMATIC | number |
| PRIMARY_KEY | string |
| CUSTOMIZE_STRING | string |
| CUSTOMIZE_NUMBER | number |
| CUSTOMIZE_UUID | uuid |
顶点的 GET/PUT/DELETE API 中 url 的 id 部分传入的应是带有类型信息的 id 值,这个类型信息用 json 串是否带引号表示,也就是说:
- 当 id 类型为 number 时,url 中的 id 不带引号,形如 xxx/vertices/123456
- 当 id 类型为 string 时,url 中的 id 带引号,形如 xxx/vertices/“123456”
接下来的示例均假设已经创建好了前述的各种 schema 信息
2.1.1 创建一个顶点
Method & Url
Request Body
Response Status
Response Body
2.1.2 创建多个顶点
Method & Url
Request Body
Response Status
Response Body
2.1.3 更新顶点属性
Method & Url
Request Body
注意:属性的取值是有三种类别的,分别是single、set和list。如果是single,表示增加或更新属性值;如果是set或list,则表示追加属性值。
Response Status
Response Body
2.1.4 批量更新顶点属性
功能说明
批量更新顶点的属性,并支持多种更新策略,包括
- SUM: 数值累加
- BIGGER: 两个数字/日期取更大的
- SMALLER: 两个数字/日期取更小的
- UNION: Set属性取并集
- INTERSECTION: Set属性取交集
- APPEND: List属性追加元素
- ELIMINATE: List/Set属性删除元素
- OVERRIDE: 覆盖已有属性,如果新属性为null,则仍然使用旧属性
假设原顶点及属性为:
Method & Url
Request Body
Response Status
Response Body
结果分析:
- lang 属性未指定更新策略,直接用新值覆盖旧值,无论新值是否为null;
- price 属性指定 BIGGER 的更新策略,旧属性值为328,新属性值为299,所以仍然保留了旧属性值328;
- age 属性指定 OVERRIDE 更新策略,而新属性值中未传入age,相当于age为null,所以仍然保留了原属性值32;
- city 属性也指定了 OVERRIDE 更新策略,且新属性值不为null,所以覆盖了旧值;
- weight 属性指定了 SUM 更新策略,旧属性值为0.1,新属性值为0.2,最后的值为0.3;
- hobby 属性(基数为Set)指定了 UNION 更新策略,所以新值与旧值取了并集;
其他的更新策略使用方式可以类推,不再赘述。
2.1.5 删除顶点属性
Method & Url
Request Body
注意:这里会直接删除属性(删除key和所有value),无论其属性的取值是single、set或list。
Response Status
Response Body
2.1.6 获取符合条件的顶点
Params
- label: 顶点类型
- properties: 属性键值对(根据属性查询的前提是预先建立了索引)
- limit: 查询最大数目
- page: 页号
以上参数都是可选的,如果提供page参数,必须提供limit参数,不允许带其他参数。label, properties和limit可以任意组合。
属性键值对由JSON格式的属性名称和属性值组成,允许多个属性键值对作为查询条件,属性值支持精确匹配和范围匹配,精确匹配时形如properties={"age":29},范围匹配时形如properties={"age":"P.gt(29)"},范围匹配支持的表达式如下:
| 表达式 | 说明 |
|---|---|
| P.eq(number) | 属性值等于number的顶点 |
| P.neq(number) | 属性值不等于number的顶点 |
| P.lt(number) | 属性值小于number的顶点 |
| P.lte(number) | 属性值小于等于number的顶点 |
| P.gt(number) | 属性值大于number的顶点 |
| P.gte(number) | 属性值大于等于number的顶点 |
| P.between(number1,number2) | 属性值大于等于number1且小于number2的顶点 |
| P.inside(number1,number2) | 属性值大于number1且小于number2的顶点 |
| P.outside(number1,number2) | 属性值小于number1且大于number2的顶点 |
| P.within(value1,value2,value3,…) | 属性值等于任何一个给定value的顶点 |
查询所有 age 为 20 且 label 为 person 的顶点
Method & Url
Response Status
Response Body
分页查询所有顶点,获取第一页(page不带参数值),限定3条
Method & Url
Response Status
Response Body
返回的body里面是带有下一页的页号信息的,"page": "001000100853313a706574657200f07ffffffc00e797c6349be736fffc8699e8a502efe10004",
在查询下一页的时候将该值赋给page参数。
分页查询所有顶点,获取下一页(page带上上一页返回的page值),限定3条
Method & Url
Response Status
Response Body
此时"page": null表示已经没有下一页了 (注: 后端为 Cassandra 时,为了性能考虑,返回页恰好为最后一页时,返回 page 值可能非空,通过该 page 再请求下一页数据时则返回 空数据 及 page = null,其他情况类似)
2.1.7 根据Id获取顶点
Method & Url
Response Status
Response Body
2.1.8 根据Id删除顶点
Params
- label: 顶点类型,可选参数
仅根据Id删除顶点
Method & Url
Response Status
根据Label+Id删除顶点
通过指定Label参数和Id来删除顶点时,一般来说其性能比仅根据Id删除会更好。
Method & Url
Response Status
5.1.8 - Edge API
2.2 Edge
顶点 id 格式的修改也影响到了边的 Id 以及源顶点和目标顶点 id 的格式。
EdgeId是由 src-vertex-id + direction + label + sort-values + tgt-vertex-id 拼接而成,
但是这里的顶点id类型不是通过引号区分的,而是根据前缀区分:
- 当 id 类型为 number 时,EdgeId 的顶点 id 前有一个前缀
L,形如 “L123456>1»L987654” - 当 id 类型为 string 时,EdgeId 的顶点 id 前有一个前缀
S,形如 “S1:peter>1»S2:lop”
接下来的示例均假设已经创建好了前述的各种schema和vertex信息
2.2.1 创建一条边
Params说明
- label:边类型名称,必填
- outV:源顶点id,必填
- inV:目标顶点id,必填
- outVLabel:源顶点类型。必填
- inVLabel:目标顶点类型。必填
- properties: 边关联的属性,对象内部结构为:
- name:属性名称
- value:属性值
Method & Url
Request Body
Response Status
Response Body
2.2.2 创建多条边
Params
- check_vertex: 是否检查顶点存在(true | false),当设置为 true 而待插入边的源顶点或目标顶点不存在时会报错。
Method & Url
Request Body
Response Status
Response Body
2.2.3 更新边属性
Method & Url
Request Body
注意:属性的取值是有三种类别的,分别是single、set和list。如果是single,表示增加或更新属性值;如果是set或list,则表示追加属性值。
Response Status
Response Body
2.2.4 批量更新边属性
功能说明
与批量更新顶点属性类似
假设原边及属性为:
Method & Url
Request Body
Response Status
Response Body
2.2.5 删除边属性
Method & Url
Request Body
注意:这里会直接删除属性(删除key和所有value),无论其属性的取值是single、set或list。
Response Status
Response Body
2.2.6 获取符合条件的边
Params
- vertex_id: 顶点id
- direction: 边的方向(OUT | IN | BOTH)
- label: 边的标签
- properties: 属性键值对(根据属性查询的前提是预先建立了索引)
- offset:偏移,默认为0
- limit: 查询数目,默认为100
- page: 页号
支持的查询有以下几种:
- 提供vertex_id参数时,不可以使用参数page,direction、label、properties可选,offset和limit可以 限制结果范围
- 不提供vertex_id参数时,label和properties可选
- 如果使用page参数,则:offset参数不可用(不填或者为0),direction不可用,properties最多只能有一个
- 如果不使用page参数,则:offset和limit可以用来限制结果范围,direction参数忽略
属性键值对由JSON格式的属性名称和属性值组成,允许多个属性键值对作为查询条件,属性值支持精确匹配和范围匹配,精确匹配时形如properties={"weight":0.8},范围匹配时形如properties={"age":"P.gt(0.8)"},范围匹配支持的表达式如下:
| 表达式 | 说明 |
|---|---|
| P.eq(number) | 属性值等于number的边 |
| P.neq(number) | 属性值不等于number的边 |
| P.lt(number) | 属性值小于number的边 |
| P.lte(number) | 属性值小于等于number的边 |
| P.gt(number) | 属性值大于number的边 |
| P.gte(number) | 属性值大于等于number的边 |
| P.between(number1,number2) | 属性值大于等于number1且小于number2的边 |
| P.inside(number1,number2) | 属性值大于number1且小于number2的边 |
| P.outside(number1,number2) | 属性值小于number1且大于number2的边 |
| P.within(value1,value2,value3,…) | 属性值等于任何一个给定value的边 |
查询与顶点 person:josh(vertex_id=“1:josh”) 相连且 label 为 created 的边
Method & Url
Response Status
Response Body
分页查询所有边,获取第一页(page不带参数值),限定3条
Method & Url
Response Status
Response Body
返回的body里面是带有下一页的页号信息的,"page": "002500100753313a6a6f73681210010004000000020953323a726970706c65f07ffffffcf07ffffffd8460d63f4b398dd2721ed4fdb7716b420004",
在查询下一页的时候将该值赋给page参数。
分页查询所有边,获取下一页(page带上上一页返回的page值),限定3条
Method & Url
Response Status
Response Body
此时"page": null表示已经没有下一页了 (注: 后端为 Cassandra 时,为了性能考虑,返回页恰好为最后一页时,返回 page 值可能非空,通过该 page 再请求下一页数据时则返回 空数据 及 page = null,其他情况类似)
2.2.7 根据Id获取边
Method & Url
Response Status
Response Body
2.2.8 根据Id删除边
Params
- label: 边类型,可选参数
仅根据Id删除边
Method & Url
Response Status
根据Label+Id删除边
通过指定Label参数和Id来删除边时,一般来说其性能比仅根据Id删除会更好。
Method & Url
Response Status
5.1.9 - Traverser API
3.1 traverser API概述
HugeGraphServer为HugeGraph图数据库提供了RESTful API接口。除了顶点和边的CRUD基本操作以外,还提供了一些遍历(traverser)方法,我们称为traverser API。这些遍历方法实现了一些复杂的图算法,方便用户对图进行分析和挖掘。
HugeGraph支持的Traverser API包括:
- K-out API,根据起始顶点,查找恰好N步可达的邻居,分为基础版和高级版:
- 基础版使用GET方法,根据起始顶点,查找恰好N步可达的邻居
- 高级版使用POST方法,根据起始顶点,查找恰好N步可达的邻居,与基础版的不同在于:
- 支持只统计邻居数量
- 支持边属性过滤
- 支持返回到达邻居的最短路径
- K-neighbor API,根据起始顶点,查找N步以内可达的所有邻居,分为基础版和高级版:
- 基础版使用GET方法,根据起始顶点,查找N步以内可达的所有邻居
- 高级版使用POST方法,根据起始顶点,查找N步以内可达的所有邻居,与基础版的不同在于:
- 支持只统计邻居数量
- 支持边属性过滤
- 支持返回到达邻居的最短路径
- Same Neighbors, 查询两个顶点的共同邻居
- Jaccard Similarity API,计算jaccard相似度,包括两种:
- 一种是使用GET方法,计算两个顶点的邻居的相似度(交并比)
- 一种是使用POST方法,在全图中查找与起点的jaccard similarity最高的N个点
- Shortest Path API,查找两个顶点之间的最短路径
- All Shortest Paths,查找两个顶点间的全部最短路径
- Weighted Shortest Path,查找起点到目标点的带权最短路径
- Single Source Shortest Path,查找一个点到其他各个点的加权最短路径
- Multi Node Shortest Path,查找指定顶点集之间两两最短路径
- Paths API,查找两个顶点间的全部路径,分为基础版和高级版:
- 基础版使用GET方法,根据起点和终点,查找两个顶点间的全部路径
- 高级版使用POST方法,根据一组起点和一组终点,查找两个集合间符合条件的全部路径
- Customized Paths API,从一批顶点出发,按(一种)模式遍历经过的全部路径
- Template Path API,指定起点和终点以及起点和终点间路径信息,查找符合的路径
- Crosspoints API,查找两个顶点的交点(共同祖先或者共同子孙)
- Customized Crosspoints API,从一批顶点出发,按多种模式遍历,最后一步到达的顶点的交点
- Rings API,从起始顶点出发,可到达的环路路径
- Rays API,从起始顶点出发,可到达边界的路径(即无环路径)
- Fusiform Similarity API,查找一个顶点的梭形相似点
- Vertices API
- 按ID批量查询顶点;
- 获取顶点的分区;
- 按分区查询顶点;
- Edges API
- 按ID批量查询边;
- 获取边的分区;
- 按分区查询边;
3.2. traverser API详解
使用方法中的例子,都是基于TinkerPop官网给出的图:
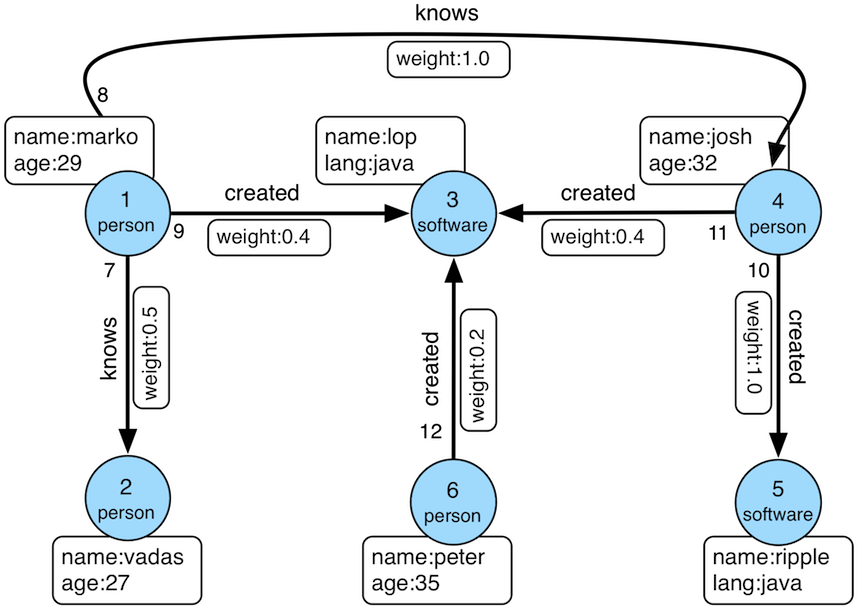
数据导入程序如下:
顶点ID为:
边ID为:
3.2.1 K-out API(GET,基础版)
3.2.1.1 功能介绍
根据起始顶点、方向、边的类型(可选)和深度depth,查找从起始顶点出发恰好depth步可达的顶点
Params
- source:起始顶点id,必填项
- direction:起始顶点向外发散的方向(OUT,IN,BOTH),选填项,默认是BOTH
- max_depth:步数,必填项
- label:边的类型,选填项,默认代表所有edge label
- nearest:nearest为true时,代表起始顶点到达结果顶点的最短路径长度为depth,不存在更短的路径;nearest为false时,代表起始顶点到结果顶点有一条长度为depth的路径(未必最短且可以有环),选填项,默认为true
- max_degree:查询过程中,单个顶点遍历的最大邻接边数目,选填项,默认为10000
- capacity:遍历过程中最大的访问的顶点数目,选填项,默认为10000000
- limit:返回的顶点的最大数目,选填项,默认为10000000
3.2.1.2 使用方法
Method & Url
Response Status
Response Body
3.2.1.3 适用场景
查找恰好N步关系可达的顶点。两个例子:
- 家族关系中,查找一个人的所有孙子,person A通过连续的两条“儿子”边到达的顶点集合。
- 社交关系中发现潜在好友,例如:与目标用户相隔两层朋友关系的用户,可以通过连续两条“朋友”边到达的顶点。
3.2.2 K-out API(POST,高级版)
3.2.2.1 功能介绍
根据起始顶点、步骤(包括方向、边类型和过滤属性)和深度depth,查找从起始顶点出发恰好depth步可达的顶点。
与K-out基础版的不同在于:
- 支持只统计邻居数量
- 支持边属性过滤
- 支持返回到达邻居的最短路径
Params
- source:起始顶点id,必填项
- 从起始点出发的Step,必填项,结构如下:
- direction:表示边的方向(OUT,IN,BOTH),默认是BOTH
- labels:边的类型列表
- properties:通过属性的值过滤边
- max_degree:查询过程中,单个顶点遍历的最大邻接边数目,默认为 10000 (注: 0.12版之前 step 内仅支持 degree 作为参数名, 0.12开始统一使用 max_degree, 并向下兼容 degree 写法)
- skip_degree:用于设置查询过程中舍弃超级顶点的最小边数,即当某个顶点的邻接边数目大于 skip_degree 时,完全舍弃该顶点。选填项,如果开启时,需满足
skip_degree >= max_degree约束,默认为0 (不启用),表示不跳过任何点 (注意: 开启此配置后,遍历时会尝试访问一个顶点的 skip_degree 条边,而不仅仅是 max_degree 条边,这样有额外的遍历开销,对查询性能影响可能有较大影响,请确认理解后再开启)
- max_depth:步数,必填项
- nearest:nearest为true时,代表起始顶点到达结果顶点的最短路径长度为depth,不存在更短的路径;nearest为false时,代表起始顶点到结果顶点有一条长度为depth的路径(未必最短且可以有环),选填项,默认为true
- count_only:Boolean值,true表示只统计结果的数目,不返回具体结果;false表示返回具体的结果,默认为false
- with_path:true表示返回起始点到每个邻居的最短路径,false表示不返回起始点到每个邻居的最短路径,选填项,默认为false
- with_vertex,选填项,默认为false:
- true表示返回结果包含完整的顶点信息(路径中的全部顶点)
- with_path为true时,返回所有路径中的顶点的完整信息
- with_path为false时,返回所有邻居的完整信息
- false时表示只返回顶点id
- true表示返回结果包含完整的顶点信息(路径中的全部顶点)
- capacity:遍历过程中最大的访问的顶点数目,选填项,默认为10000000
- limit:返回的顶点的最大数目,选填项,默认为10000000
3.2.2.2 使用方法
Method & Url
Request Body
Response Status
Response Body
3.2.2.3 适用场景
参见3.2.1.3
3.2.3 K-neighbor(GET,基础版)
3.2.3.1 功能介绍
根据起始顶点、方向、边的类型(可选)和深度depth,查找包括起始顶点在内、depth步之内可达的所有顶点
相当于:起始顶点、K-out(1)、K-out(2)、… 、K-out(max_depth)的并集
Params
- source: 起始顶点id,必填项
- direction:起始顶点向外发散的方向(OUT,IN,BOTH),选填项,默认是BOTH
- max_depth:步数,必填项
- label:边的类型,选填项,默认代表所有edge label
- max_degree:查询过程中,单个顶点遍历的最大邻接边数目,选填项,默认为10000
- limit:返回的顶点的最大数目,也即遍历过程中最大的访问的顶点数目,选填项,默认为10000000
3.2.3.2 使用方法
Method & Url
Response Status
Response Body
3.2.3.3 适用场景
查找N步以内可达的所有顶点,例如:
- 家族关系中,查找一个人五服以内所有子孙,person A通过连续的5条“亲子”边到达的顶点集合。
- 社交关系中发现好友圈子,例如目标用户通过1条、2条、3条“朋友”边可到达的用户可以组成目标用户的朋友圈子
3.2.4 K-neighbor API(POST,高级版)
3.2.4.1 功能介绍
根据起始顶点、步骤(包括方向、边类型和过滤属性)和深度depth,查找从起始顶点出发depth步内可达的所有顶点。
与K-neighbor基础版的不同在于:
- 支持只统计邻居数量
- 支持边属性过滤
- 支持返回到达邻居的最短路径
Params
- source:起始顶点id,必填项
- 从起始点出发的Step,必填项,结构如下:
- direction:表示边的方向(OUT,IN,BOTH),默认是BOTH
- labels:边的类型列表
- properties:通过属性的值过滤边
- max_degree:查询过程中,单个顶点遍历的最大邻接边数目,默认为 10000 (注: 0.12版之前 step 内仅支持 degree 作为参数名, 0.12开始统一使用 max_degree, 并向下兼容 degree 写法)
- skip_degree:用于设置查询过程中舍弃超级顶点的最小边数,即当某个顶点的邻接边数目大于 skip_degree 时,完全舍弃该顶点。选填项,如果开启时,需满足
skip_degree >= max_degree约束,默认为0 (不启用),表示不跳过任何点 (注意: 开启此配置后,遍历时会尝试访问一个顶点的 skip_degree 条边,而不仅仅是 max_degree 条边,这样有额外的遍历开销,对查询性能影响可能有较大影响,请确认理解后再开启)
- max_depth:步数,必填项
- count_only:Boolean值,true表示只统计结果的数目,不返回具体结果;false表示返回具体的结果,默认为false
- with_path:true表示返回起始点到每个邻居的最短路径,false表示不返回起始点到每个邻居的最短路径,选填项,默认为false
- with_vertex,选填项,默认为false:
- true表示返回结果包含完整的顶点信息(路径中的全部顶点)
- with_path为true时,返回所有路径中的顶点的完整信息
- with_path为false时,返回所有邻居的完整信息
- false时表示只返回顶点id
- true表示返回结果包含完整的顶点信息(路径中的全部顶点)
- limit:返回的顶点的最大数目,选填项,默认为10000000
3.2.4.2 使用方法
Method & Url
Request Body
Response Status
Response Body
3.2.4.3 适用场景
参见3.2.3.3
3.2.5 Same Neighbors
3.2.5.1 功能介绍
查询两个点的共同邻居
Params
- vertex:一个顶点id,必填项
- other:另一个顶点id,必填项
- direction:顶点向外发散的方向(OUT,IN,BOTH),选填项,默认是BOTH
- label:边的类型,选填项,默认代表所有edge label
- max_degree:查询过程中,单个顶点遍历的最大邻接边数目,选填项,默认为10000
- limit:返回的共同邻居的最大数目,选填项,默认为10000000
3.2.5.2 使用方法
Method & Url
Response Status
Response Body
3.2.5.3 适用场景
查找两个顶点的共同邻居:
- 社交关系中发现两个用户的共同粉丝或者共同关注用户
3.2.6 Jaccard Similarity(GET)
3.2.6.1 功能介绍
计算两个顶点的jaccard similarity(两个顶点邻居的交集比上两个顶点邻居的并集)
Params
- vertex:一个顶点id,必填项
- other:另一个顶点id,必填项
- direction:顶点向外发散的方向(OUT,IN,BOTH),选填项,默认是BOTH
- label:边的类型,选填项,默认代表所有edge label
- max_degree:查询过程中,单个顶点遍历的最大邻接边数目,选填项,默认为10000
3.2.6.2 使用方法
Method & Url
Response Status
Response Body
3.2.6.3 适用场景
用于评估两个点的相似性或者紧密度
3.2.7 Jaccard Similarity(POST)
3.2.7.1 功能介绍
计算与指定顶点的jaccard similarity最大的N个点
jaccard similarity的计算方式为:两个顶点邻居的交集比上两个顶点邻居的并集
Params
- vertex:一个顶点id,必填项
- 从起始点出发的Step,必填项,结构如下:
- direction:表示边的方向(OUT,IN,BOTH),默认是BOTH
- labels:边的类型列表
- properties:通过属性的值过滤边
- max_degree:查询过程中,单个顶点遍历的最大邻接边数目,默认为 10000 (注: 0.12版之前 step 内仅支持 degree 作为参数名, 0.12开始统一使用 max_degree, 并向下兼容 degree 写法)
- skip_degree:用于设置查询过程中舍弃超级顶点的最小边数,即当某个顶点的邻接边数目大于 skip_degree 时,完全舍弃该顶点。选填项,如果开启时,需满足
skip_degree >= max_degree约束,默认为0 (不启用),表示不跳过任何点 (注意: 开启此配置后,遍历时会尝试访问一个顶点的 skip_degree 条边,而不仅仅是 max_degree 条边,这样有额外的遍历开销,对查询性能影响可能有较大影响,请确认理解后再开启)
- top:返回一个起点的jaccard similarity中最大的top个,选填项,默认为100
- capacity:遍历过程中最大的访问的顶点数目,选填项,默认为10000000
3.2.7.2 使用方法
Method & Url
Request Body
Response Status
Response Body
3.2.7.3 适用场景
用于在图中找出与指定顶点相似性最高的顶点
3.2.8 Shortest Path
3.2.8.1 功能介绍
根据起始顶点、目的顶点、方向、边的类型(可选)和最大深度,查找一条最短路径
Params
- source:起始顶点id,必填项
- target:目的顶点id,必填项
- direction:起始顶点向外发散的方向(OUT,IN,BOTH),选填项,默认是BOTH
- max_depth:最大步数,必填项
- label:边的类型,选填项,默认代表所有edge label
- max_degree:查询过程中,单个顶点遍历的最大邻接边数目,选填项,默认为10000
- skip_degree:用于设置查询过程中舍弃超级顶点的最小边数,即当某个顶点的邻接边数目大于 skip_degree 时,完全舍弃该顶点。选填项,如果开启时,需满足
skip_degree >= max_degree约束,默认为0 (不启用),表示不跳过任何点 (注意: 开启此配置后,遍历时会尝试访问一个顶点的 skip_degree 条边,而不仅仅是 max_degree 条边,这样有额外的遍历开销,对查询性能影响可能有较大影响,请确认理解后再开启) - capacity:遍历过程中最大的访问的顶点数目,选填项,默认为10000000
3.2.8.2 使用方法
Method & Url
Response Status
Response Body
3.2.8.3 适用场景
查找两个顶点间的最短路径,例如:
- 社交关系网中,查找两个用户有关系的最短路径,即最近的朋友关系链
- 设备关联网络中,查找两个设备最短的关联关系
3.2.9 All Shortest Paths
3.2.9.1 功能介绍
根据起始顶点、目的顶点、方向、边的类型(可选)和最大深度,查找两点间所有的最短路径
Params
- source:起始顶点id,必填项
- target:目的顶点id,必填项
- direction:起始顶点向外发散的方向(OUT,IN,BOTH),选填项,默认是BOTH
- max_depth:最大步数,必填项
- label:边的类型,选填项,默认代表所有edge label
- max_degree:查询过程中,单个顶点遍历的最大邻接边数目,选填项,默认为10000
- skip_degree:用于设置查询过程中舍弃超级顶点的最小边数,即当某个顶点的邻接边数目大于 skip_degree 时,完全舍弃该顶点。选填项,如果开启时,需满足
skip_degree >= max_degree约束,默认为0 (不启用),表示不跳过任何点 (注意: 开启此配置后,遍历时会尝试访问一个顶点的 skip_degree 条边,而不仅仅是 max_degree 条边,这样有额外的遍历开销,对查询性能影响可能有较大影响,请确认理解后再开启) - capacity:遍历过程中最大的访问的顶点数目,选填项,默认为10000000
3.2.9.2 使用方法
Method & Url
Response Status
Response Body
3.2.9.3 适用场景
查找两个顶点间的所有最短路径,例如:
- 社交关系网中,查找两个用户有关系的全部最短路径,即最近的朋友关系链
- 设备关联网络中,查找两个设备全部的最短关联关系
3.2.10 Weighted Shortest Path
3.2.10.1 功能介绍
根据起始顶点、目的顶点、方向、边的类型(可选)和最大深度,查找一条带权最短路径
Params
- source:起始顶点id,必填项
- target:目的顶点id,必填项
- direction:起始顶点向外发散的方向(OUT,IN,BOTH),选填项,默认是BOTH
- label:边的类型,选填项,默认代表所有edge label
- weight:边的权重属性,必填项,必须是数字类型的属性
- max_degree:查询过程中,单个顶点遍历的最大邻接边数目,选填项,默认为10000
- skip_degree:用于设置查询过程中舍弃超级顶点的最小边数,即当某个顶点的邻接边数目大于 skip_degree 时,完全舍弃该顶点。选填项,如果开启时,需满足
skip_degree >= max_degree约束,默认为0 (不启用),表示不跳过任何点 (注意: 开启此配置后,遍历时会尝试访问一个顶点的 skip_degree 条边,而不仅仅是 max_degree 条边,这样有额外的遍历开销,对查询性能影响可能有较大影响,请确认理解后再开启) - capacity:遍历过程中最大的访问的顶点数目,选填项,默认为10000000
- with_vertex:true表示返回结果包含完整的顶点信息(路径中的全部顶点),false时表示只返回顶点id,选填项,默认为false
3.2.10.2 使用方法
Method & Url
Response Status
Response Body
3.2.10.3 适用场景
查找两个顶点间的带权最短路径,例如:
- 交通线路中查找从A城市到B城市花钱最少的交通方式
3.2.11 Single Source Shortest Path
3.2.11.1 功能介绍
从一个顶点出发,查找该点到图中其他顶点的最短路径(可选是否带权重)
Params
- source:起始顶点id,必填项
- direction:起始顶点向外发散的方向(OUT,IN,BOTH),选填项,默认是BOTH
- label:边的类型,选填项,默认代表所有edge label
- weight:边的权重属性,选填项,必须是数字类型的属性,如果不填或者虽然填了但是边没有该属性,则权重为1.0
- max_degree:查询过程中,单个顶点遍历的最大邻接边数目,选填项,默认为10000
- skip_degree:用于设置查询过程中舍弃超级顶点的最小边数,即当某个顶点的邻接边数目大于 skip_degree 时,完全舍弃该顶点。选填项,如果开启时,需满足
skip_degree >= max_degree约束,默认为0 (不启用),表示不跳过任何点 (注意: 开启此配置后,遍历时会尝试访问一个顶点的 skip_degree 条边,而不仅仅是 max_degree 条边,这样有额外的遍历开销,对查询性能影响可能有较大影响,请确认理解后再开启) - capacity:遍历过程中最大的访问的顶点数目,选填项,默认为10000000
- limit:查询到的目标顶点个数,也是返回的最短路径的条数,选填项,默认为10
- with_vertex:true表示返回结果包含完整的顶点信息(路径中的全部顶点),false时表示只返回顶点id,选填项,默认为false
3.2.11.2 使用方法
Method & Url
Response Status
Response Body
3.2.11.3 适用场景
查找从一个点出发到其他顶点的带权最短路径,比如:
- 查找从北京出发到全国其他所有城市的耗时最短的乘车方案
3.2.12 Multi Node Shortest Path
3.2.12.1 功能介绍
查找指定顶点集两两之间的最短路径
Params
- vertices:定义起始顶点,必填项,指定方式包括:
- ids:通过顶点id列表提供起始顶点
- label和properties:如果没有指定ids,则使用label和properties的联合条件查询起始顶点
- label:顶点的类型
- properties:通过属性的值查询起始顶点
注意:properties中的属性值可以是列表,表示只要key对应的value在列表中就可以
- step:表示从起始顶点到终止顶点走过的路径,必填项,Step的结构如下:
- direction:表示边的方向(OUT,IN,BOTH),默认是BOTH
- labels:边的类型列表
- properties:通过属性的值过滤边
- max_degree:查询过程中,单个顶点遍历的最大邻接边数目,默认为 10000 (注: 0.12版之前 step 内仅支持 degree 作为参数名, 0.12开始统一使用 max_degree, 并向下兼容 degree 写法)
- skip_degree:用于设置查询过程中舍弃超级顶点的最小边数,即当某个顶点的邻接边数目大于 skip_degree 时,完全舍弃该顶点。选填项,如果开启时,需满足
skip_degree >= max_degree约束,默认为0 (不启用),表示不跳过任何点 (注意: 开启此配置后,遍历时会尝试访问一个顶点的 skip_degree 条边,而不仅仅是 max_degree 条边,这样有额外的遍历开销,对查询性能影响可能有较大影响,请确认理解后再开启)
- max_depth:步数,必填项
- capacity:遍历过程中最大的访问的顶点数目,选填项,默认为10000000
- with_vertex:true表示返回结果包含完整的顶点信息(路径中的全部顶点),false时表示只返回顶点id,选填项,默认为false
3.2.12.2 使用方法
Method & Url
Request Body
Response Status
Response Body
3.2.12.3 适用场景
查找多个点之间的最短路径,比如:
- 查找多个公司和法人之间的最短路径
3.2.13 Paths (GET,基础版)
3.2.13.1 功能介绍
根据起始顶点、目的顶点、方向、边的类型(可选)和最大深度等条件查找所有路径
Params
- source:起始顶点id,必填项
- target:目的顶点id,必填项
- direction:起始顶点向外发散的方向(OUT,IN,BOTH),选填项,默认是BOTH
- label:边的类型,选填项,默认代表所有edge label
- max_depth:步数,必填项
- max_degree:查询过程中,单个顶点遍历的最大邻接边数目,选填项,默认为10000
- capacity:遍历过程中最大的访问的顶点数目,选填项,默认为10000000
- limit:返回的路径的最大数目,选填项,默认为10
3.2.13.2 使用方法
Method & Url
Response Status
Response Body
3.2.13.3 适用场景
查找两个顶点间的所有路径,例如:
- 社交网络中,查找两个用户所有可能的关系路径
- 设备关联网络中,查找两个设备之间所有的关联路径
3.2.14 Paths (POST,高级版)
3.2.14.1 功能介绍
根据起始顶点、目的顶点、步骤(step)和最大深度等条件查找所有路径
Params
- sources:定义起始顶点,必填项,指定方式包括:
- ids:通过顶点id列表提供起始顶点
- label和properties:如果没有指定ids,则使用label和properties的联合条件查询起始顶点
- label:顶点的类型
- properties:通过属性的值查询起始顶点
注意:properties中的属性值可以是列表,表示只要key对应的value在列表中就可以
- targets:定义终止顶点,必填项,指定方式包括:
- ids:通过顶点id列表提供终止顶点
- label和properties:如果没有指定ids,则使用label和properties的联合条件查询终止顶点
- label:顶点的类型
- properties:通过属性的值查询终止顶点
注意:properties中的属性值可以是列表,表示只要key对应的value在列表中就可以
- step:表示从起始顶点到终止顶点走过的路径,必填项,Step的结构如下:
- direction:表示边的方向(OUT,IN,BOTH),默认是BOTH
- labels:边的类型列表
- properties:通过属性的值过滤边
- max_degree:查询过程中,单个顶点遍历的最大邻接边数目,默认为 10000 (注: 0.12版之前 step 内仅支持 degree 作为参数名, 0.12开始统一使用 max_degree, 并向下兼容 degree 写法)
- skip_degree:用于设置查询过程中舍弃超级顶点的最小边数,即当某个顶点的邻接边数目大于 skip_degree 时,完全舍弃该顶点。选填项,如果开启时,需满足
skip_degree >= max_degree约束,默认为0 (不启用),表示不跳过任何点 (注意: 开启此配置后,遍历时会尝试访问一个顶点的 skip_degree 条边,而不仅仅是 max_degree 条边,这样有额外的遍历开销,对查询性能影响可能有较大影响,请确认理解后再开启)
- max_depth:步数,必填项
- nearest:nearest为true时,代表起始顶点到达结果顶点的最短路径长度为depth,不存在更短的路径;nearest为false时,代表起始顶点到结果顶点有一条长度为depth的路径(未必最短且可以有环),选填项,默认为true
- capacity:遍历过程中最大的访问的顶点数目,选填项,默认为10000000
- limit:返回的路径的最大数目,选填项,默认为10
- with_vertex:true表示返回结果包含完整的顶点信息(路径中的全部顶点),false时表示只返回顶点id,选填项,默认为false
3.2.14.2 使用方法
Method & Url
Request Body
Response Status
Response Body
3.2.14.3 适用场景
查找两个顶点间的所有路径,例如:
- 社交网络中,查找两个用户所有可能的关系路径
- 设备关联网络中,查找两个设备之间所有的关联路径
3.2.15 Customized Paths
3.2.15.1 功能介绍
根据一批起始顶点、边规则(包括方向、边的类型和属性过滤)和最大深度等条件查找符合条件的所有的路径
Params
- sources:定义起始顶点,必填项,指定方式包括:
- ids:通过顶点id列表提供起始顶点
- label和properties:如果没有指定ids,则使用label和properties的联合条件查询起始顶点
- label:顶点的类型
- properties:通过属性的值查询起始顶点
注意:properties中的属性值可以是列表,表示只要key对应的value在列表中就可以
- steps:表示从起始顶点走过的路径规则,是一组Step的列表。必填项。每个Step的结构如下:
- direction:表示边的方向(OUT,IN,BOTH),默认是BOTH
- labels:边的类型列表
- properties:通过属性的值过滤边
- weight_by:根据指定的属性计算边的权重,sort_by不为NONE时有效,与default_weight互斥
- default_weight:当边没有属性作为权重计算值时,采取的默认权重,sort_by不为NONE时有效,与weight_by互斥
- max_degree:查询过程中,单个顶点遍历的最大邻接边数目,默认为 10000 (注: 0.12版之前 step 内仅支持 degree 作为参数名, 0.12开始统一使用 max_degree, 并向下兼容 degree 写法)
- sample:当需要对某个step的符合条件的边进行采样时设置,-1表示不采样,默认为采样100
- sort_by:根据路径的权重排序,选填项,默认为NONE:
- NONE表示不排序,默认值
- INCR表示按照路径权重的升序排序
- DECR表示按照路径权重的降序排序
- capacity:遍历过程中最大的访问的顶点数目,选填项,默认为10000000
- limit:返回的路径的最大数目,选填项,默认为10
- with_vertex:true表示返回结果包含完整的顶点信息(路径中的全部顶点),false时表示只返回顶点id,选填项,默认为false
3.2.15.2 使用方法
Method & Url
Request Body
Response Status
Response Body
3.2.15.3 适用场景
适合查找各种复杂的路径集合,例如:
- 社交网络中,查找看过张艺谋所导演的电影的用户关注的大V的路径(张艺谋—>电影—->用户—>大V)
- 风控网络中,查找多个高风险用户的直系亲属的朋友的路径(高风险用户—>直系亲属—>朋友)
3.2.16 Template Paths
3.2.16.1 功能介绍
根据一批起始顶点、边规则(包括方向、边的类型和属性过滤)和最大深度等条件查找符合条件的所有的路径
Params
- sources:定义起始顶点,必填项,指定方式包括:
- ids:通过顶点id列表提供起始顶点
- label和properties:如果没有指定ids,则使用label和properties的联合条件查询起始顶点
- label:顶点的类型
- properties:通过属性的值查询起始顶点
注意:properties中的属性值可以是列表,表示只要key对应的value在列表中就可以
- targets:定义终止顶点,必填项,指定方式包括:
- ids:通过顶点id列表提供终止顶点
- label和properties:如果没有指定ids,则使用label和properties的联合条件查询终止顶点
- label:顶点的类型
- properties:通过属性的值查询终止顶点
注意:properties中的属性值可以是列表,表示只要key对应的value在列表中就可以
- steps:表示从起始顶点走过的路径规则,是一组Step的列表。必填项。每个Step的结构如下:
- direction:表示边的方向(OUT,IN,BOTH),默认是BOTH
- labels:边的类型列表
- properties:通过属性的值过滤边
- max_times:当前step可以重复的次数,当为N时,表示从起始顶点可以经过当前step 1-N 次
- max_degree:查询过程中,单个顶点遍历的最大邻接边数目,默认为 10000 (注: 0.12版之前 step 内仅支持 degree 作为参数名, 0.12开始统一使用 max_degree, 并向下兼容 degree 写法)
- skip_degree:用于设置查询过程中舍弃超级顶点的最小边数,即当某个顶点的邻接边数目大于 skip_degree 时,完全舍弃该顶点。选填项,如果开启时,需满足
skip_degree >= max_degree约束,默认为0 (不启用),表示不跳过任何点 (注意: 开启此配置后,遍历时会尝试访问一个顶点的 skip_degree 条边,而不仅仅是 max_degree 条边,这样有额外的遍历开销,对查询性能影响可能有较大影响,请确认理解后再开启)
- with_ring:Boolean值,true表示包含环路;false表示不包含环路,默认为false
- capacity:遍历过程中最大的访问的顶点数目,选填项,默认为10000000
- limit:返回的路径的最大数目,选填项,默认为10
- with_vertex:true表示返回结果包含完整的顶点信息(路径中的全部顶点),false时表示只返回顶点id,选填项,默认为false
3.2.16.2 使用方法
Method & Url
Request Body
Response Status
Response Body
3.2.16.3 适用场景
适合查找各种复杂的模板路径,比如personA -(朋友)-> personB -(同学)-> personC,其中"朋友"和"同学"边可以分别是最多3层和4层的情况
3.2.17 Crosspoints
3.2.17.1 功能介绍
根据起始顶点、目的顶点、方向、边的类型(可选)和最大深度等条件查找相交点
Params
- source:起始顶点id,必填项
- target:目的顶点id,必填项
- direction:起始顶点到目的顶点的方向, 目的点到起始点是反方向,BOTH时不考虑方向(OUT,IN,BOTH),选填项,默认是BOTH
- label:边的类型,选填项,默认代表所有edge label
- max_depth:步数,必填项
- max_degree:查询过程中,单个顶点遍历的最大邻接边数目,选填项,默认为10000
- capacity:遍历过程中最大的访问的顶点数目,选填项,默认为10000000
- limit:返回的交点的最大数目,选填项,默认为10
3.2.17.2 使用方法
Method & Url
Response Status
Response Body
3.2.17.3 适用场景
查找两个顶点的交点及其路径,例如:
- 社交网络中,查找两个用户共同关注的话题或者大V
- 家族关系中,查找共同的祖先
3.2.18 Customized Crosspoints
3.2.18.1 功能介绍
根据一批起始顶点、多种边规则(包括方向、边的类型和属性过滤)和最大深度等条件查找符合条件的所有的路径终点的交集
Params
sources:定义起始顶点,必填项,指定方式包括:
- ids:通过顶点id列表提供起始顶点
- label和properties:如果没有指定ids,则使用label和properties的联合条件查询起始顶点
- label:顶点的类型
- properties:通过属性的值查询起始顶点
注意:properties中的属性值可以是列表,表示只要key对应的value在列表中就可以
path_patterns:表示从起始顶点走过的路径规则,是一组规则的列表。必填项。每个规则是一个PathPattern
- 每个PathPattern是一组Step列表,每个Step结构如下:
- direction:表示边的方向(OUT,IN,BOTH),默认是BOTH
- labels:边的类型列表
- properties:通过属性的值过滤边
- max_degree:查询过程中,单个顶点遍历的最大邻接边数目,默认为 10000 (注: 0.12版之前 step 内仅支持 degree 作为参数名, 0.12开始统一使用 max_degree, 并向下兼容 degree 写法)
- skip_degree:用于设置查询过程中舍弃超级顶点的最小边数,即当某个顶点的邻接边数目大于 skip_degree 时,完全舍弃该顶点。选填项,如果开启时,需满足
skip_degree >= max_degree约束,默认为0 (不启用),表示不跳过任何点 (注意: 开启此配置后,遍历时会尝试访问一个顶点的 skip_degree 条边,而不仅仅是 max_degree 条边,这样有额外的遍历开销,对查询性能影响可能有较大影响,请确认理解后再开启)
- 每个PathPattern是一组Step列表,每个Step结构如下:
capacity:遍历过程中最大的访问的顶点数目,选填项,默认为10000000
limit:返回的路径的最大数目,选填项,默认为10
with_path:true表示返回交点所在的路径,false表示不返回交点所在的路径,选填项,默认为false
with_vertex,选填项,默认为false:
- true表示返回结果包含完整的顶点信息(路径中的全部顶点)
- with_path为true时,返回所有路径中的顶点的完整信息
- with_path为false时,返回所有交点的完整信息
- false时表示只返回顶点id
- true表示返回结果包含完整的顶点信息(路径中的全部顶点)
3.2.18.2 使用方法
Method & Url
Request Body
Response Status
Response Body
3.2.18.3 适用场景
查询一组顶点通过多种路径在终点有交集的情况。例如:
- 在商品图谱中,多款手机、学习机、游戏机通过不同的低级别的类目路径,最终都属于一级类目的电子设备
3.2.19 Rings
3.2.19.1 功能介绍
根据起始顶点、方向、边的类型(可选)和最大深度等条件查找可达的环路
例如:1 -> 25 -> 775 -> 14690 -> 25, 其中环路为 25 -> 775 -> 14690 -> 25
Params
- source:起始顶点id,必填项
- direction:起始顶点发出的边的方向(OUT,IN,BOTH),选填项,默认是BOTH
- label:边的类型,选填项,默认代表所有edge label
- max_depth:步数,必填项
- source_in_ring:环路是否包含起点,选填项,默认为true
- max_degree:查询过程中,单个顶点遍历的最大邻接边数目,选填项,默认为10000
- capacity:遍历过程中最大的访问的顶点数目,选填项,默认为10000000
- limit:返回的可达环路的最大数目,选填项,默认为10
3.2.19.2 使用方法
Method & Url
Response Status
Response Body
3.2.19.3 适用场景
查询起始顶点可达的环路,例如:
- 风控项目中,查询一个用户可达的循环担保的人或者设备
- 设备关联网络中,发现一个设备周围的循环引用的设备
3.2.20 Rays
3.2.20.1 功能介绍
根据起始顶点、方向、边的类型(可选)和最大深度等条件查找发散到边界顶点的路径
例如:1 -> 25 -> 775 -> 14690 -> 2289 -> 18379, 其中 18379 为边界顶点,即没有从 18379 发出的边
Params
- source:起始顶点id,必填项
- direction:起始顶点发出的边的方向(OUT,IN,BOTH),选填项,默认是BOTH
- label:边的类型,选填项,默认代表所有edge label
- max_depth:步数,必填项
- max_degree:查询过程中,单个顶点遍历的最大邻接边数目,选填项,默认为10000
- capacity:遍历过程中最大的访问的顶点数目,选填项,默认为10000000
- limit:返回的非环路的最大数目,选填项,默认为10
3.2.20.2 使用方法
Method & Url
Response Status
Response Body
3.2.20.3 适用场景
查找起始顶点到某种关系的边界顶点的路径,例如:
- 家族关系中,查找一个人到所有还没有孩子的子孙的路径
- 设备关联网络中,找到某个设备到终端设备的路径
3.2.21 Fusiform Similarity
3.2.21.1 功能介绍
按照条件查询一批顶点对应的"梭形相似点"。当两个顶点跟很多共同的顶点之间有某种关系的时候,我们认为这两个点为"梭形相似点"。举个例子说明"梭形相似点":“读者A"读了100本书,可以定义读过这100本书中的80本以上的读者,是"读者A"的"梭形相似点”
Params
sources:定义起始顶点,必填项,指定方式包括:
- ids:通过顶点id列表提供起始顶点
- label和properties:如果没有指定ids,则使用label和properties的联合条件查询起始顶点
- label:顶点的类型
- properties:通过属性的值查询起始顶点
注意:properties中的属性值可以是列表,表示只要key对应的value在列表中就可以
label:边的类型,选填项,默认代表所有edge label
direction:起始顶点向外发散的方向(OUT,IN,BOTH),选填项,默认是BOTH
min_neighbors:最少邻居数目,邻居数目少于这个阈值时,认为起点不具备"梭形相似点"。比如想要找一个"读者A"读过的书的"梭形相似点",那么
min_neighbors为100时,表示"读者A"至少要读过100本书才可以有"梭形相似点",必填项alpha:相似度,代表:起点与"梭形相似点"的共同邻居数目占起点的全部邻居数目的比例,必填项
min_similars:“梭形相似点"的最少个数,只有当起点的"梭形相似点"数目大于或等于该值时,才会返回起点及其"梭形相似点”,选填项,默认值为1
top:返回一个起点的"梭形相似点"中相似度最高的top个,必填项,0表示全部
group_property:与
min_groups一起使用,当起点跟其所有的"梭形相似点"某个属性的值有至少min_groups个不同值时,才会返回该起点及其"梭形相似点"。比如为"读者A"推荐"异地"书友时,需要设置group_property为读者的"城市"属性,min_group至少为2,选填项,不填代表不需要根据属性过滤min_groups:与
group_property一起使用,只有group_property设置时才有意义max_degree:查询过程中,单个顶点遍历的最大邻接边数目,选填项,默认为10000
capacity:遍历过程中最大的访问的顶点数目,选填项,默认为10000000
limit:返回的结果数目上限(一个起点及其"梭形相似点"算一个结果),选填项,默认为10
with_intermediary:是否返回起点及其"梭形相似点"共同关联的中间点,默认为false
with_vertex,选填项,默认为false:
- true表示返回结果包含完整的顶点信息
- false时表示只返回顶点id
3.2.21.2 使用方法
Method & Url
Request Body
Response Status
Response Body
3.2.21.3 适用场景
查询一组顶点相似度很高的顶点。例如:
- 跟一个读者有类似书单的读者
- 跟一个玩家玩类似游戏的玩家
3.2.22 Vertices
3.2.22.1 根据顶点的id列表,批量查询顶点
Params
- ids:要查询的顶点id列表
Method & Url
Response Status
Response Body
3.2.22.2 获取顶点 Shard 信息
通过指定的分片大小split_size,获取顶点分片信息(可以与 3.2.21.3 中的 Scan 配合使用来获取顶点)。
Params
- split_size:分片大小,必填项
Method & Url
Response Status
Response Body
3.2.22.3 根据Shard信息批量获取顶点
通过指定的分片信息批量查询顶点(Shard信息的获取参见 3.2.21.2 Shard)。
Params
- start:分片起始位置,必填项
- end:分片结束位置,必填项
- page:分页位置,选填项,默认为null,不分页;当page为“”时表示分页的第一页,从start指示的位置开始
- page_limit:分页获取顶点时,一页中顶点数目的上限,选填项,默认为100000
Method & Url
Response Status
Response Body
3.2.22.4 适用场景
- 按id列表查询顶点,可用于批量查询顶点,比如在path查询到多条路径之后,可以进一步查询某条路径的所有顶点属性。
- 获取分片和按分片查询顶点,可以用来遍历全部顶点
3.2.23 Edges
3.2.23.1 根据边的id列表,批量查询边
Params
- ids:要查询的边id列表
Method & Url
Response Status
Response Body
3.2.23.2 获取边 Shard 信息
通过指定的分片大小split_size,获取边分片信息(可以与 3.2.22.3 中的 Scan 配合使用来获取边)。
Params
- split_size:分片大小,必填项
Method & Url
Response Status
Response Body
3.2.23.3 根据 Shard 信息批量获取边
通过指定的分片信息批量查询边(Shard信息的获取参见 3.2.22.2)。
Params
- start:分片起始位置,必填项
- end:分片结束位置,必填项
- page:分页位置,选填项,默认为null,不分页;当page为“”时表示分页的第一页,从start指示的位置开始
- page_limit:分页获取边时,一页中边数目的上限,选填项,默认为100000
Method & Url
Response Status
Response Body
3.2.23.4 适用场景
- 按id列表查询边,可用于批量查询边
- 获取分片和按分片查询边,可以用来遍历全部边
5.1.10 - Rank API
4.1 Rank API overview
Not only the Graph iteration (traverser) method, HugeGraph-Server also provide Rank API for recommendation purpose.
You can use it to recommend some vertexes much closer to a vertex.
4.2 Details of Rank API
4.2.1 Personal Rank API
A typical scenario for Personal Rank algorithm is in recommendation application. According to the out edges of a vertex,
recommend some other vertices that having the same or similar edges.
Here is a use case: According to someone’s reading habit or reading history, we can recommend some books he may be interested or some book pal.
For Example:
- Suppose we have a vertex, Person type, and named tom.He like 5 books
a,b,c,d,e. If we want to recommend some book pal and books for tom, an easier idea is let’s check whoever also liked these books (common hobby based). - Now, we need someone else, like neo, he like three books
b,d,f. And Jay, he like 4 booksc,d,e,g, and Lee, he also like 4 booksa,d,e,f. - For we don’t need to recommend books tom already read, the recommend-list should only contain the books Tom’s book pal already read but tom haven’t read yet. Such as book “f” and “g”, and with priority f > g.
- Now, we recompute Tom’s personal rank value, we will get a sorted TopN book pal or book recommend-list. (Choose OTHER_LABEL,for Only Book purpose)
4.2.1.0 Data Preparation
The case above is simple. Here we also provide a public test dataset MovieLens for use case. You should download the dataset. The load it into HugeGraph with HugeGraph-Loader. To make it simple, we ignore all properties data of user and move. only field id is enough. we also ignore the value of edge rating.
The metadata for input file and mapping file as follows:
Note: modify the
input.pathto your local path.
4.2.1.1 Function Introduction
suitable for bipartite graph, will return all vertex or a list of its correlation which related to all source vertex.
Bipartite Graph is a special model in Graph Theory, as well as a special flow in network. The strongest feature is, it split all vertex in graph into two sets. The vertex in the set is not connected. However,the vertex in two sets may connect with each other.
Suppose we have one bipartite graph based on user and things. A random walk based PersonalRank algorithm should be likes this:
- Choose a user u as start vertex, let’s set the initial weight to be 1.0 . Go from Vu with probability alpha to a neighbor vertex, and (1-alpha) to stay.
- If we decide to go outside, we would like to choose an edge, such as
rating, to find a common judge.- Then choose the neighbors of current vertex randomly with uniform distribution, and reset the weights with uniform distribution.
- Compensate the source vertex’s weight with (1 - alpha)
- Repeat step 2;
- Convergence after reaching a certain number of steps or precision, then we got a recommend-list.
Params
Required:
- source: the id of source vertex
- label: edge label go from the source vertex, should connect two different type of vertex
Optional:
- alpha: the probability of going out for one vertex in each iteration,similar to the alpha of PageRank,required, value range is (0, 1], default 0.85.
- max_degree: in query process, the max iteration number of adjacency edge for a vertex, default
10000 - max_depth: iteration number,range [2, 50], default
5 - with_label:result filter,default
BOTH_LABEL,optional list as follows:- SAME_LABEL:Only keep vertex which has the same type as source vertex
- OTHER_LABEL:Only keep vertex which has different type as source vertex (the another part in bipartite graph)
- BOTH_LABEL:Keep both type vertex
- limit: max return vertex number,default
100 - max_diff: accuracy for convergence, default
0.0001(will implement soon) - sorted: whether sort the result by rank or not, true for descending sort, false for none, default
true
4.2.1.2 Usage
Method & Url
Request Body
Response Status
Response Body
4.2.1.3 Suitable Scenario
In a bipartite graph build by two different type of vertex, recommend other most related vertex to one vertex. for example:
- Reading recommendation: find out the books should be recommended to someone first, It is also possible to recommend book pal with the highest common preferences at the same time (just like: WeChat “your friend also read xx " function)
- Social recommendation: find out other Poster who interested in same topics, or other News/Messages you may be interested with (Such as : “Hot News” function in Weibo)
- Commodity recommendation: according to someone’s shopping habit,find out a commodity list should recommend first, some online salesman may also be good (Such as : “You May Like” function in TaoBao)
4.2.2 Neighbor Rank API
4.2.2.0 Data Preparation
4.2.2.1 Function Introduction
In a general graph structure,find the first N vertices of each layer with the highest correlation with a given starting point and their relevance.
In graph words: to go out from the starting point, get the probability of going to each vertex of each layer.
Params
- source: id of source vertex,required
- alpha:the probability of going out for one vertex in each iteration,similar to the alpha of PageRank,required, value range is (0, 1]
- steps: a path rule for source vertex visited,it’s a list of Step,each Step map to a layout in result,required.The structure of each Step as follows:
- direction:the direction of edge(OUT, IN, BOTH), BOTH for default.
- labels:a list of edge types, will union all edge types
- max_degree:in query process, the max iteration number of adjacency edge for a vertex, default
10000(Note: before v0.12 step only support degree as parameter name, from v0.12, use max_degree, compatible with degree) - top: retains only the top N results with the highest weight in each layer of the results, default 100, max 1000
- capacity: the maximum number of vertexes visited during the traversal, optional, default 10000000
4.2.2.2 Usage
Method & Url
Request Body
Response Status
Response Body
4.2.2.3 Suitable Scenario
Find the vertices in different layers for a given start point that should be most recommended
- For example, in the four-layered structure of the audience, friends, movies, and directors, according to the movies that a certain audience’s friends like, recommend movies for that audience, or recommend directors for those movies based on who made them.
5.1.11 - Variable API
5.1 Variables
Variables可以用来存储有关整个图的数据,数据按照键值对的方式存取
5.1.1 创建或者更新某个键值对
Method & Url
Request Body
Response Status
Response Body
5.1.2 列出全部键值对
Method & Url
Response Status
Response Body
5.1.3 列出某个键值对
Method & Url
Response Status
Response Body
5.1.4 删除某个键值对
Method & Url
Response Status
5.1.12 - Graphs API
6.1 Graphs
6.1.1 List all graphs
Method & Url
Response Status
Response Body
6.1.2 Get details of the graph
Method & Url
Response Status
Response Body
6.1.3 Clear all data of a graph,include: schema、vertex、edge and index .etc,This operation requires administrator privileges
Params
Since emptying the graph is a dangerous operation, we have added parameters for confirmation to the API to avoid false calls by users:
- confirm_message: default by
I'm sure to delete all data
Method & Url
Response Status
6.1.4 Clone graph,This operation requires administrator privileges
Params
- clone_graph_name: name of an exist graph. To clone from an existing graph, the user can choose to transfer the configuration file, which will replace the configuration in the existing graph
Method & Url
Request Body [Optional]
Response Status
Response Body
6.1.5 Create graph,This operation requires administrator privileges
Method & Url
Request Body
Response Status
Response Body
6.1.6 Delete graph and it’s data
Params
Since deleting a graph is a dangerous operation, we have added parameters for confirmation to the API to avoid false calls by users:
- confirm_message: default by
I'm sure to drop the graph
Method & Url
Response Status
6.2 Conf
6.2.1 Get configuration for a graph,This operation requires administrator privileges
Method & Url
Response Status
Response Body
6.3 Mode
Allowed graph mode values are:NONE,RESTORING,MERGING,LOADING
- None mode is regular mode
- Not allowed create schema with specified id
- Not support create vertex with id for AUTOMATIC id strategy
- LOADING mode used to load data via hugegraph-loader.
- When adding vertices / edges, it is not checked whether the required attributes are passed in
Restore has two different modes: Restoring and Merging
- Restoring mode is used to restore schema and graph data to an new graph.
- Support create schema with specified id
- Support create vertex with id for AUTOMATIC id strategy
- Merging mode is used to merge schema and graph data to an existing graph.
- Not allowed create schema with specified id
- Support create vertex with id for AUTOMATIC id strategy
Under normal circumstances, the graph mode is None. When you need to restore the graph, you need to temporarily modify the graph mode to Restoring or Merging as needed. When you complete the restore, change the graph mode to None.
6.3.1 Get graph mode.
Method & Url
Response Status
Response Body
Allowed graph mode values are:NONE,RESTORING,MERGING
6.3.2 Modify graph mode. This operation requires administrator privileges
Method & Url
Request Body
Allowed graph mode values are:NONE,RESTORING,MERGING
Response Status
Response Body
6.3.3 Get graph’s read mode.
Params
- name: name of a graph
Method & Url
Response Status
Response Body
6.3.4 Modify graph’s read mode. This operation requires administrator privileges
Params
- name: name of a graph
Method & Url
Request Body
Allowed read mode values are:ALL,OLTP_ONLY,OLAP_ONLY
Response Status
Response Body
6.4 Snapshot
6.4.1 Create a snapshot
Params
- name: name of a graph
Method & Url
Response Status
Response Body
6.4.2 Resume a snapshot
Params
- name: name of a graph
Method & Url
Response Status
Response Body
6.5 Compact
6.5.1 Manually compact graph,This operation requires administrator privileges
Params
- name: name of a graph
Method & Url
Response Status
Response Body
5.1.13 - Task API
7.1 Task
7.1.1 List all async tasks in graph
Params
- status: the status of asyncTasks
- limit:the max number of tasks to return
Method & Url
Response Status
Response Body
7.1.2 View the details of an async task
Method & Url
Response Status
Response Body
7.1.3 Delete task information of an async task,won’t delete the task itself
Method & Url
Response Status
7.1.4 Cancel an async task, the task should be able to be canceled
If you already created an async task via Gremlin API as follows:
Method & Url
cancel it in 10s. if more than 10s,the task may already be finished, then can’t be cancelled.
Response Status
Response Body
At this point, the number of vertices whose label is man must be less than 10.
5.1.14 - Gremlin API
8.1 Gremlin
8.1.1 向HugeGraphServer发送gremlin语句(GET),同步执行
Params
- gremlin: 要发送给
HugeGraphServer执行的gremlin语句 - bindings: 用来绑定参数,key是字符串,value是绑定的值(只能是字符串或者数字),功能类似于MySQL的 Prepared Statement,用于加速语句执行
- language: 发送语句的语言类型,默认为
gremlin-groovy - aliases: 为存在于图空间的已有变量添加别名
查询顶点
Method & Url
Response Status
Response Body
8.1.2 向HugeGraphServer发送gremlin语句(POST),同步执行
Method & Url
查询顶点
Request Body
Response Status
Response Body
注意:
这里是直接使用图对象(hugegraph),先获取其遍历器(traversal()),再获取顶点。 不能直接写成
graph.traversal().V()或g.V(),可以通过"aliases": {"graph": "hugegraph", "g": "__g_hugegraph"}为图和遍历器添加别名后使用别名操作。其中,hugegraph是原生存在的变量,__g_hugegraph是HugeGraphServer额外添加的变量, 每个图都会存在一个对应的这样格式(_g${graph})的遍历器对象。
响应体的结构与其他 Vertex 或 Edge 的 RESTful API的结构有区别,用户可能需要自行解析。
查询边
Request Body
Response Status
Response Body
8.1.3 向HugeGraphServer发送gremlin语句(POST),异步执行
Method & Url
查询顶点
Request Body
注意:
异步执行Gremlin语句暂不支持aliases,可以使用
graph代表要操作的图,也可以直接使用图的名字, 例如hugegraph; 另外g代表 traversal,等价于graph.traversal()或者hugegraph.traversal()
Response Status
Response Body
注:
可以通过
GET http://localhost:8080/graphs/hugegraph/tasks/1(其中"1"是task_id)来查询异步任务的执行状态,更多异步任务RESTful API
查询边
Request Body
Response Status
Response Body
注:
可以通过
GET http://localhost:8080/graphs/hugegraph/tasks/2(其中"2"是task_id)来查询异步任务的执行状态,更多异步任务RESTful API
5.1.15 - Authentication API
9.1 用户认证与权限控制
开启权限及相关配置请先参考 权限配置 文档
用户认证与权限控制概述:
HugeGraph支持多用户认证、以及细粒度的权限访问控制,采用基于“用户-用户组-操作-资源”的4层设计,灵活控制用户角色与权限。 资源描述了图数据库中的数据,比如符合某一类条件的顶点,每一个资源包括type、label、properties三个要素,共有18种type、 任意label、任意properties的组合形成的资源,一个资源的内部条件是且关系,多个资源之间的条件是或关系。用户可以属于一个或多个用户组, 每个用户组可以拥有对任意个资源的操作权限,操作类型包括:读、写、删除、执行等种类。 HugeGraph支持动态创建用户、用户组、资源, 支持动态分配或取消权限。初始化数据库时超级管理员用户被创建,后续可通过超级管理员创建各类角色用户,新创建的用户如果被分配足够权限后,可以由其创建或管理更多的用户。
举例说明:
user(name=boss) -belong-> group(name=all) -access(read)-> target(graph=graph1, resource={label: person,
city: Beijing})
描述:用户’boss’拥有对’graph1’图中北京人的读权限。
接口说明:
用户认证与权限控制接口包括5类:UserAPI、GroupAPI、TargetAPI、BelongAPI、AccessAPI。
9.2 用户(User)API
用户接口包括:创建用户,删除用户,修改用户,和查询用户相关信息接口。
9.2.1 创建用户
Params
- user_name: 用户名称
- user_password: 用户密码
- user_phone: 用户手机号
- user_email: 用户邮箱
其中 user_name 和 user_password 为必填。
Request Body
Method & Url
Response Status
Response Body
返回报文中,密码为加密后的密文
9.2.2 删除用户
Params
- id: 需要删除的用户 Id
Method & Url
Response Status
Response Body
9.2.3 修改用户
Params
- id: 需要修改的用户 Id
Method & Url
Request Body
修改user_name、user_password和user_phone
Response Status
Response Body
返回结果是包含修改过的内容在内的整个用户组对象
9.2.4 查询用户列表
Params
- limit: 返回结果条数的上限
Method & Url
Response Status
Response Body
9.2.5 查询某个用户
Params
- id: 需要查询的用户 Id
Method & Url
Response Status
Response Body
9.2.6 查询某个用户的角色
Method & Url
Response Status
Response Body
9.3 用户组(Group)API
用户组会赋予相应的资源权限,用户会被分配不同的用户组,即可拥有不同的资源权限。
用户组接口包括:创建用户组,删除用户组,修改用户组,和查询用户组相关信息接口。
9.3.1 创建用户组
Params
- group_name: 用户组名称
- group_description: 用户组描述
Request Body
Method & Url
Response Status
Response Body
9.3.2 删除用户组
Params
- id: 需要删除的用户组 Id
Method & Url
Response Status
Response Body
9.3.3 修改用户组
Params
- id: 需要修改的用户组 Id
Method & Url
Request Body
修改group_description
Response Status
Response Body
返回结果是包含修改过的内容在内的整个用户组对象
9.3.4 查询用户组列表
Params
- limit: 返回结果条数的上限
Method & Url
Response Status
Response Body
9.3.5 查询某个用户组
Params
- id: 需要查询的用户组 Id
Method & Url
Response Status
Response Body
9.4 资源(Target)API
资源描述了图数据库中的数据,比如符合某一类条件的顶点,每一个资源包括type、label、properties三个要素,共有18种type、
任意label、任意properties的组合形成的资源,一个资源的内部条件是且关系,多个资源之间的条件是或关系。
资源接口包括:资源的创建、删除、修改和查询。
9.4.1 创建资源
Params
- target_name: 资源名称
- target_graph: 资源图
- target_url: 资源地址
- target_resources: 资源定义(列表)
target_resources可以包括多个target_resource,以列表的形式存储。
每个target_resource包含:
- type:可选值 VERTEX, EDGE等, 可填ALL,则表示可以是顶点或边;
- label:可选值,⼀个顶点或边类型的名称,可填*,则表示任意类型;
- properties:map类型,可包含多个属性的键值对,必须匹配所有属性值,属性值⽀持填条件范围(age: P.gte(18)),properties如果为null表示任意属性均可,如果属性名和属性值均为‘*ʼ也表示任意属性均可。
如精细资源:“target_resources”: [{“type”:“VERTEX”,“label”:“person”,“properties”:{“city”:“Beijing”,“age”:“P.gte(20)”}}]**
资源定义含义:类型是’person’的顶点,且城市属性是’Beijing’,年龄属性大于等于20。
Request Body
Method & Url
Response Status
Response Body
9.4.2 删除资源
Params
- id: 需要删除的资源 Id
Method & Url
Response Status
Response Body
9.4.3 修改资源
Params
- id: 需要修改的资源 Id
Method & Url
Request Body
修改资源定义中的type
Response Status
Response Body
返回结果是包含修改过的内容在内的整个用户组对象
9.4.4 查询资源列表
Params
- limit: 返回结果条数的上限
Method & Url
Response Status
Response Body
9.4.5 查询某个资源
Params
- id: 需要查询的资源 Id
Method & Url
Response Status
Response Body
9.5 关联角色(Belong)API
关联用户和用户组的关系,一个用户可以关联一个或者多个用户组。用户组拥有相关资源的权限,不同用户组的资源权限可以理解为不同的角色。即给用户关联角色。
关联角色接口包括:用户关联角色的创建、删除、修改和查询。
9.5.1 创建用户的关联角色
Params
- user: 用户 Id
- group: 用户组 Id
- belong_description: 描述
Request Body
Method & Url
Response Status
Response Body
9.5.2 删除关联角色
Params
- id: 需要删除的关联角色 Id
Method & Url
Response Status
Response Body
9.5.3 修改关联角色
关联角色只能修改描述,不能修改 user 和 group 属性,如果需要修改关联角色,需要删除原来关联关系,新增关联角色。
Params
- id: 需要修改的关联角色 Id
Method & Url
Request Body
修改belong_description
Response Status
Response Body
返回结果是包含修改过的内容在内的整个用户组对象
9.5.4 查询关联角色列表
Params
- limit: 返回结果条数的上限
Method & Url
Response Status
Response Body
9.5.5 查看某个关联角色
Params
- id: 需要查询的关联角色 Id
Method & Url
Response Status
Response Body
9.6 赋权(Access)API
给用户组赋予资源的权限,主要包含:读操作(READ)、写操作(WRITE)、删除操作(DELETE)、执行操作(EXECUTE)等。
赋权接口包括:赋权的创建、删除、修改和查询。
9.6.1 创建赋权(用户组赋予资源的权限)
Params
- group: 用户组 Id
- target: 资源 Id
- access_permission: 权限许可
- access_description: 赋权描述
access_permission:
- READ:读操作,所有的查询,包括查询Schema、查顶点/边,查询顶点和边的数量VERTEX_AGGR/EDGE_AGGR,也包括读图的状态STATUS、变量VAR、任务TASK等;
- WRITE:写操作,所有的创建、更新操作,包括给Schema增加property key,给顶点增加或更新属性等;
- DELETE:删除操作,包括删除元数据、删除顶点/边;
- EXECUTE:执⾏操作,包括执⾏Gremlin语句、执⾏Task、执⾏metadata函数;
Request Body
Method & Url
Response Status
Response Body
9.6.2 删除赋权
Params
- id: 需要删除的赋权 Id
Method & Url
Response Status
Response Body
9.6.3 修改赋权
赋权只能修改描述,不能修改用户组、资源和权限许可,如果需要修改赋权的关系,可以删除原来的赋权关系,新增赋权。
Params
- id: 需要修改的赋权 Id
Method & Url
Request Body
修改access_description
Response Status
Response Body
返回结果是包含修改过的内容在内的整个用户组对象
9.6.4 查询赋权列表
Params
- limit: 返回结果条数的上限
Method & Url
Response Status
Response Body
9.6.5 查询某个赋权
Params
- id: 需要查询的赋权 Id
Method & Url
Response Status
Response Body
5.1.16 - Other API
10.1 Other
10.1.1 查看HugeGraph的版本信息
Method & Url
Response Status
Response Body
5.2 - HugeGraph Java Client
The code in this document is written in java, but its style is very similar to gremlin(groovy). The user only needs to replace the variable declaration in the code with def or remove it directly,
You can convert java code into groovy; in addition, each line of statement can be without a semicolon at the end, groovy considers a line to be a statement.
The gremlin(groovy) written by the user in HugeGraph-Studio can refer to the java code in this document, and some examples will be given below.
1 HugeGraph-Client
HugeGraph-Client is the general entry for operating graph. Users must first create a HugeGraph-Client object and establish a connection (pseudo connection) with HugeGraph-Server before they can obtain the operation entry objects of schema, graph and gremlin.
Currently, HugeGraph-Client only allows connections to existing graphs on the server, and cannot create custom graphs. Its creation method is as follows:
If the above process of creating HugeClient fails, an exception will be thrown, and the user needs to use try-catch. If successful, continue to get schema, graph and gremlin manager.
When operating through gremlin in HugeGraph-Hubble(or HugeGraph-Studio), HugeClient is not required and can be ignored.
2 Schema
2.1 SchemaManager
SchemaManager is used to manage four kinds of schema in HugeGraph, namely PropertyKey (property type), VertexLabel (vertex type), EdgeLabel (edge type) and IndexLabel (index label). A SchemaManager object can be created for schema information definition.
The user can obtain the SchemaManager object using the following methods:
Create a schema object via gremlin in HugeGraph-Hubble:
The definition process of the 4 kinds of schema is described below.
2.2 PropertyKey
2.2.1 Interface and parameter introduction
PropertyKey is used to standardize the property constraints of vertices and edges, and properties of properties are not currently supported.
The constraint information that PropertyKey allows to define includes: name, datatype, cardinality, and userdata, which are introduced one by one below.
- name: The name of the property, used to distinguish different PropertyKeys, PropertyKeys with the same name are not allowed.
| interface | param | must set |
|---|---|---|
| propertyKey(String name) | name | y |
- datatype: property value type, you must select an explicit setting from the following table that conforms to the specific business scenario:
| interface | Java Class |
|---|---|
| asText() | String |
| asInt() | Integer |
| asDate() | Date |
| asUuid() | UUID |
| asBoolean() | Boolean |
| asByte() | Byte |
| asBlob() | Byte[] |
| asDouble() | Double |
| asFloat() | Float |
| asLong() | Long |
- cardinality: Whether the property value is single-valued or multivalued, in the case of multivalued, it is divided into allowing-duplicate values and not-allowing-duplicate values. This item is single by default. If necessary, you can select a setting from the following table:
| interface | cardinality | description |
|---|---|---|
| valueSingle() | single | single value |
| valueList() | list | multi-values that allow duplicate value |
| valueSet() | set | multi-values that not allow duplicate value |
- userdata: Users can add some constraints or additional information by themselves, and then check whether the incoming properties satisfy the constraints, or extract additional information when necessary:
| interface | description |
|---|---|
| userdata(String key, Object value) | The same key, the latter will cover the former |
2.2.2 Create PropertyKey
The syntax of creating the above PropertyKey object through gremlin in HugeGraph-Hubble is exactly the same. If the user does not define the schema variable, it should be written like this:
In the following examples, the syntax of gremlin and java is exactly the same, so we won’t repeat them.
- ifNotExist(): Add a judgment mechanism for create, if the current PropertyKey already exists, it will not be created, otherwise the property will be created. If no ifNotExist() is added, an exception will be thrown if a property-key with the same name already exists. The same as below, and will not be repeated there.
2.2.3 Delete PropertyKey
2.2.4 Query PropertyKey
2.3 VertexLabel
2.3.1 Interface and parameter introduction
VertexLabel is used to define the vertex type and describe the constraint information of the vertex.
The constraint information that VertexLabel allows to define include: name, idStrategy, properties, primaryKeys and nullableKeys, which are introduced one by one below.
- name: The name of the VertexLabel, used to distinguish different VertexLabels, VertexLabels with the same name are not allowed.
| interface | param | must set |
|---|---|---|
| vertexLabel(String name) | name | y |
- idStrategy: Each VertexLabel can choose its own ID strategy. There are currently three strategies to choose from, namely Automatic (automatically generated), Customize (user input) and PrimaryKey (primary attribute key). Among them, Automatic uses the Snowflake algorithm to generate Id, Customize requires the user to pass in the Id of string or number type, and PrimaryKey allows the user to select several properties of VertexLabel as the basis for differentiation. HugeGraph will be spliced and generated ID according to the value of the primary properties. idStrategy uses Automatic by default, but if the user does not explicitly set idStrategy and calls the primaryKeys(…) method to set the primary property, then idStrategy will automatically use PrimaryKey.
| interface | idStrategy | description |
|---|---|---|
| useAutomaticId | AUTOMATIC | generate id automatically by Snowflake algorithm |
| useCustomizeStringId | CUSTOMIZE_STRING | passed id by user, must be string type |
| useCustomizeNumberId | CUSTOMIZE_NUMBER | passed id by user, must be number type |
| usePrimaryKeyId | PRIMARY_KEY | choose some important prop as primary key to splice id |
- properties: define the properties of the vertex, the incoming parameter is the name of the PropertyKey.
| interface | description |
|---|---|
| properties(String… properties) | allow to pass multi properties |
- primaryKeys: When the user selects the ID strategy of PrimaryKey, several primary properties need to be selected from the properties of VertexLabel as the basis for differentiation;
| interface | description |
|---|---|
| primaryKeys(String… keys) | allow to choose multi prop as primaryKeys |
Note that the selection of the ID strategy and the setting of primaryKeys have some mutual constraints, which cannot be called at will. The constraints are shown in the following table:
| useAutomaticId | useCustomizeStringId | useCustomizeNumberId | usePrimaryKeyId | |
|---|---|---|---|---|
| unset primaryKeys | AUTOMATIC | CUSTOMIZE_STRING | CUSTOMIZE_NUMBER | ERROR |
| set primaryKeys | ERROR | ERROR | ERROR | PRIMARY_KEY |
- nullableKeys: For properties set by the properties(…) method, all of them are non-nullable by default, that is, the property must be assigned a value when creating a vertex, which may impose too strict integrity requirements on user data. In order to avoid such strong constraints, the user can set some properties to be nullable through this method, so that the properties can be unassigned when adding vertices.
| interface | description |
|---|---|
| nullableKeys(String… properties) | allow to pass multi props |
Note: primaryKeys and nullableKeys cannot intersect, because a property cannot be both primary and nullable.
- enableLabelIndex: The user can specify whether to create an index for the label. If you don’t create it, you can’t globally search for the vertices and edges of the specified label. If you create it, you can search globally, like
g.V().hasLabel('person'), g.E().has('label', 'person')query, but the performance will be slower when inserting data, and it will take up more storage space. This defaults to true.
| interface | description |
|---|---|
| enableLabelIndex(boolean enable) | Whether to create a label index |
- userdata: Users can add some constraints or additional information by themselves, and then check whether the incoming properties meet the constraints, or extract additional information when necessary.
| interface | description |
|---|---|
| userdata(String key, Object value) | The same key, the latter will cover the former |
2.3.2 Create VertexLabel
2.3.3 Update VertexLabel
VertexLabel can append constraints, but only properties and nullableKeys, and the appended properties must also be added to the nullableKeys collection.
2.3.4 Delete VertexLabel
2.3.5 Query VertexLabel
2.4 EdgeLabel
2.4.1 Interface and parameter introduction
EdgeLabel is used to define the edge type and describe the constraint information of the edge.
The constraint information that EdgeLabel allows to define include: name, sourceLabel, targetLabel, frequency, properties, sortKeys and nullableKeys, which are introduced one by one below.
- name: The name of the EdgeLabel, used to distinguish different EdgeLabels, EdgeLabels with the same name are not allowed.
| interface | param | must set |
|---|---|---|
| edgeLabel(String name) | name | y |
sourceLabel: The name of the source vertex type of the edge link, only one is allowed;
targetLabel: The name of the target vertex type of the edge link, only one is allowed;
| interface | param | must set |
|---|---|---|
| sourceLabel(String label) | label | y |
| targetLabel(String label) | label | y |
- frequency: Indicating the number of times a relationship occurs between two specific vertices, which can be single (single) or multiple (frequency), the default is single.
| interface | frequency | description |
|---|---|---|
| singleTime() | single | a relationship can only occur once |
| multiTimes() | multiple | a relationship can occur many times |
- properties: Define the properties of the edge.
| interface | description |
|---|---|
| properties(String… properties) | allow to pass multi props |
- sortKeys: When the frequency of EdgeLabel is multiple, some properties are needed to distinguish the multiple relationships, so sortKeys (sorted keys) is introduced;
| interface | description |
|---|---|
| sortKeys(String… keys) | allow to choose multi prop as sortKeys |
- nullableKeys: Consistent with the concept of nullableKeys in vertices.
Note: sortKeys and nullableKeys also cannot intersect.
enableLabelIndex: It is consistent with the concept of enableLabelIndex in the vertex.
userdata: Users can add some constraints or additional information by themselves, and then check whether the incoming properties meet the constraints, or extract additional information when necessary.
| interface | description |
|---|---|
| userdata(String key, Object value) | The same key, the latter will cover the former |
2.4.2 Create EdgeLabel
2.4.3 Update EdgeLabel
2.4.4 Delete EdgeLabel
2.4.5 Query EdgeLabel
2.5 IndexLabel
2.5.1 Interface and parameter introduction
IndexLabel is used to define the index type and describe the constraint information of the index, mainly for the convenience of query.
The constraint information that IndexLabel allows to define include: name, baseType, baseValue, indexFields, indexType, which are introduced one by one below.
- name: The name of the IndexLabel, used to distinguish different IndexLabels, IndexLabels with the same name are not allowed.
| interface | param | must set |
|---|---|---|
| indexLabel(String name) | name | y |
baseType: Indicates whether to index VertexLabel or EdgeLabel, used in conjunction with the baseValue below.
baseValue: Specifies the name of the VertexLabel or EdgeLabel to be indexed.
| interface | param | description |
|---|---|---|
| onV(String baseValue) | baseValue | build index for VertexLabel: ‘baseValue’ |
| onE(String baseValue) | baseValue | build index for EdgeLabel: ‘baseValue’ |
- indexFields: on which fields to index, it can be a joint index for multiple columns.
| interface | param | description |
|---|---|---|
| by(String… fields) | files | allow to build index for multi fields for secondary index |
- indexType: There are currently five types of indexes established, namely Secondary, Range, Search, Shard and Unique.
- Secondary Index supports exact matching secondary index, allow to build joint index, joint index supports index prefix search
- Single Property Secondary Index, support equality query, for example: the secondary index of the city property of the person vertex, you can use
g.V().has("city", "Beijing")to query all the vertices with “city attribute value is Beijing” - Joint Secondary Index, supports prefix query and equality query, such as: joint index of city and street properties of person vertex, you can use
g.V().has("city", "Beijing").has('street', 'Zhongguancun street ')to query all vertices of “city property value is Beijing and street property value is ZhongGuanCun”, org.V().has("city", "Beijing")to query all vertices of “city property value is Beijing”.
The query of Secondary Index is based on the query condition of “yes” or “equal”, and does not support “partial matching”.
- Single Property Secondary Index, support equality query, for example: the secondary index of the city property of the person vertex, you can use
- Range Index supports for range queries of numeric types
- Must be a single number or date attribute, for example: the range index of the age property of the person vertex, you can use
g.V().has("age", P.gt(18))to query the vertices with “age property value greater than 18” . In addition toP.gt(), also supportsP.gte(),P.lte(),P.lt(),P.eq(),P.between(),P.inside()andP.outside()etc.
- Must be a single number or date attribute, for example: the range index of the age property of the person vertex, you can use
- Search Index supports full-text search
- It must be a single text property, such as: full-text index of the address property of the person vertex, you can use
g.V().has("address", Text.contains('building')to query all vertices whose “address property contains a ‘building’”
The query of the Search Index is based on the query condition of “is” or “contains”.
- It must be a single text property, such as: full-text index of the address property of the person vertex, you can use
- Shard Index supports prefix matching + numeric range query
- The shard index of N properties supports range queries with equal prefixes. For example, the shard index of the city and age properties of the person vertex can use
g.V().has("city", "Beijing").has ("age", P.between(18, 30))Query “city property is Beijing and all vertices whose age is greater than or equal to 18 and less than 30”. - When all N properties are text properties in a Shard Index, it is equivalent to Secondary Index.
- When there is only one single number or date property in a Shard Index, it is equivalent to the Range Index.
Shard Index can have any number or date property, but at most one range search condition can be provided when querying, and the prefix properties of the Shard Search conditions must be “equals”.
- The shard index of N properties supports range queries with equal prefixes. For example, the shard index of the city and age properties of the person vertex can use
- Unique Index supports properties uniqueness constraints, that is, the value of properties can be limited to not repeat, and joint indexing is allowed, but querying is not supported now
- The unique index of single or multiple properties cannot be used for query, only the value of the property can be limited, and an error will be reported when there is a duplicate value.
- Secondary Index supports exact matching secondary index, allow to build joint index, joint index supports index prefix search
| interface | indexType | description |
|---|---|---|
| secondary() | Secondary | support prefix search |
| range() | Range | support range(numeric or date type) search |
| search() | Search | support full text search |
| shard() | Shard | support prefix + range(numeric or date type) search |
| unique() | Unique | support unique props value, not support search |
2.5.2 Create IndexLabel
2.5.3 Delete IndexLabel
2.5.4 Query IndexLabel
3 Graph
3.1 Vertex
Vertices are the most basic elements of a graph, and there can be many vertices in a graph. Here is an example of adding vertices:
- The key to adding vertices is the vertex properties. The number of parameters of the vertex adding function must be an even number and satisfy the order of
key1 -> val1, key2 -> val2 ..., and the order between key-value pairs is free . - The parameter must contain a special key-value pair, namely
T.label -> "val", which is used to define the category of the vertex, so that the program can obtain the schema definition of the VertexLabel from the cache or backend, and then do subsequent constraint checks. The label in the example is defined as person. - If the vertex type’s ID policy is
AUTOMATIC, users are not allowed to pass in id key-value pairs. - If the ID policy of the vertex type is
CUSTOMIZE_STRING, the user needs to pass in the value of the id of the String type. The key-value pair is like:"T.id", "123456". - If the ID policy of the vertex type is
CUSTOMIZE_NUMBER, the user needs to pass in the value of the id of the Number type. The key-value pair is like:"T.id", 123456. - If the ID policy of the vertex type is
PRIMARY_KEY, the parameters must also contain the name and value of the properties corresponding to theprimaryKeys, if not set an exception will be thrown. For example, theprimaryKeysofpersonisname, in the example, the value ofnameis set tomarko. - For properties that are not nullableKeys, a value must be assigned.
- The remaining parameters are the settings of other properties of the vertex, but they are not required.
- After calling the
addVertexmethod, the vertices are inserted into the backend storage system immediately.
3.2 Edge
After added vertices, edges are also needed to form a complete graph. Here is an example of adding edges:
- The function
addEdge()of the (source) vertex is to add an edge(relationship) between itself and another vertex. The first parameter of the function is the label of the edge, and the second parameter is the target vertex. The position and order of these two parameters are fixed. The subsequent parameters are the order ofkey1 -> val1, key2 -> val2 ..., set the properties of the edge, and the key-value pair order is free. - The source and target vertices must conform to the definitions of source-label and target label in EdgeLabel, and cannot be added arbitrarily.
- For properties that are not nullableKeys, a value must be assigned.
Note: When frequency is multiple, the value of the property type corresponding to sortKeys must be set.
4 Examples
Simple examples can reference HugeGraph-Client
5.3 - Gremlin-Console
Gremlin-Console is an interactive client developed by TinkerPop. Users can use this client to perform various operations on Graph. There are two main usage modes:
- Stand-alone offline mode;
- Client/Server mode;
1 Stand-alone offline mode
Since the lib directory already contains the HugeCore jar package, and HugeGraph has been registered in the Console as a plug-in, the users can write a groovy script directly to call the code of HugeGraph-Core, and then hand it over to the parsing engine in Gremlin-Console for execution. As a result, the users can operate the graph without starting the Server.
This mode is convenient for users to get started quickly, but it is not suitable for scenarios where a large amount of data is inserted and queried. Here is an example:
There is a sample script in the script directory:example.groovy
In fact, this groovy script is almost Java code, the only difference is that the variable definition can be written without the type declaration, and the semicolon at the end of each line can be removed.
g.V()is to get all the vertices,g.E()is to get all the edges,toList()is to store the result in a List, refer toTinkerPop Terminal Steps。
Enter the gremlin-console below and pass in the script to execute it:
As you can see, 6 vertices and 6 edges are inserted and queried. After entering the console, you can continue to enter groovy statements to operate on the graph:
For more Gremlin statements, please refer to Tinkerpop Official Website
2 Client/Server mode
Because Gremlin-Console can only connect to HugeGraph-Server through WebSocket, HugeGraph-Server provides HTTP connections by default, so modify the configuration of gremlin-server first.
Note: After changing the connection method to WebSocket, HugeGraph-Client, HugeGraph-Loader, HugeGraph-Studio and other supporting tools cannot be used.
Modify channelizer: org.apache.tinkerpop.gremlin.server.channel.HttpChannelizer to channelizer: org.apache.tinkerpop.gremlin.server.channel.WebSocketChannelizer or comment directly, and then follow the steps to start the Server.
Then enter gremlin-console
To connect to the server, you need to specify the connection parameters in the configuration file, and there is a default remote.yaml file in the conf directory
After the connection is successful, the only variables that can be used in the context of the console are two graph objects, hugegraph and hugegraph1 (configured in gremlin-server.yaml), and if you want to have more variables, you can add them in scripts/empty-sample.groovy, such as:
In this way, the two objects schema and g can be directly used in the console for metadata management and graph query.
It doesn’t matter if it is not defined, because all objects are available through the graph, for example:
In Client/Server mode, all operations related to Server must be added with :> , if not, it means local operation in the console.
You can also put multiple statements in a string variable and send them to the server at once:
For more information on the use of gremlin-console, please refer to Tinkerpop Official Website
6 - GUIDES
6.1 - HugeGraph Architecture Overview
1 概述
作为一款通用的图数据库产品,HugeGraph需具备图数据的基本功能,如下图所示。HugeGraph包括三个层次的功能,分别是存储层、计算层和用户接口层。 HugeGraph支持OLTP和OLAP两种图计算类型,其中OLTP实现了Apache TinkerPop3框架,并支持Gremlin查询语言。 OLAP计算是基于SparkGraphX实现。
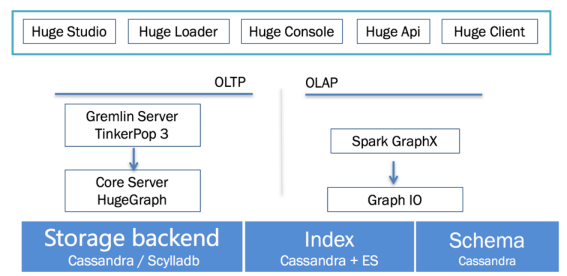
2 组件
HugeGraph的主要功能分为HugeCore、ApiServer、HugeGraph-Client、HugeGraph-Loader和HugeGraph-Studio等组件构成,各组件之间的通信关系如下图所示。
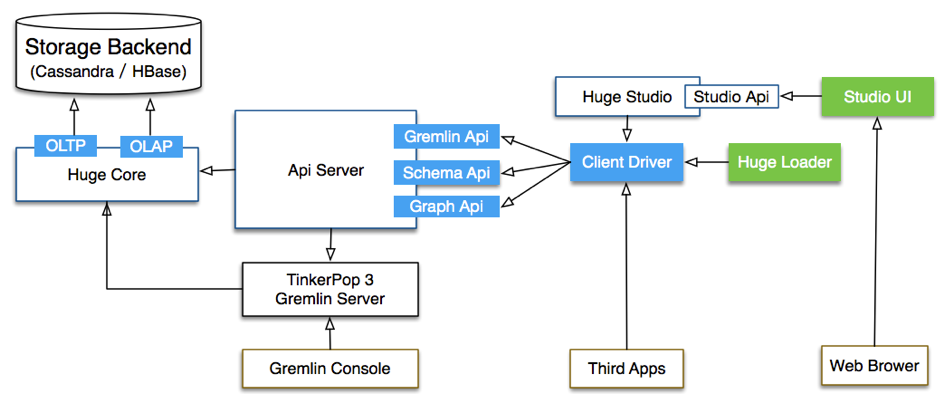
- HugeCore :HugeGraph的核心模块,TinkerPop的接口主要在该模块中实现。HugeCore的功能涵盖包括OLTP和OLAP两个部分。
- ApiServer :提供RESTFul Api接口,对外提供Graph Api、Schema Api和Gremlin Api等接口服务。
- HugeGraph-Client:基于Java客户端驱动程序。HugeGraph-Client是Java版本客户端驱动程序,后续可根据需要提供Python、Go、C++等多语言支持。
- HugeGraph-Loader:数据导入模块。HugeGraph-Loader可以扫描并分析现有数据,自动生成Graph Schema创建语言,通过批量方式快速导入数据。
- HugeGraph-Studio:基于Web的可视化IDE环境。以Notebook方式记录Gremlin查询,可视化展示Graph的关联关系。HugeGraph-Studio也是本系统推荐的工具。
- HugeGraph-Computer:HugeGraph-Computer是一个分布式图处理系统 (OLAP)。
6.2 - HugeGraph Design Concepts
1. Property Graph
常见的图数据表示模型有两种,分别是RDF(Resource Description Framework)模型和属性图(Property Graph)模型。 RDF和Property Graph都是最基础、最有名的图表示模式,都能够表示各种图的实体关系建模。 RDF是W3C标准,而Property Graph是工业标准,受到广大图数据库厂商的广泛支持。HugeGraph目前采用Property Graph。
HugeGraph对应的存储概念模型也是参考Property Graph而设计的,具体示例详见下图:(此图为旧版设计已过时,请忽略它,后续更新)
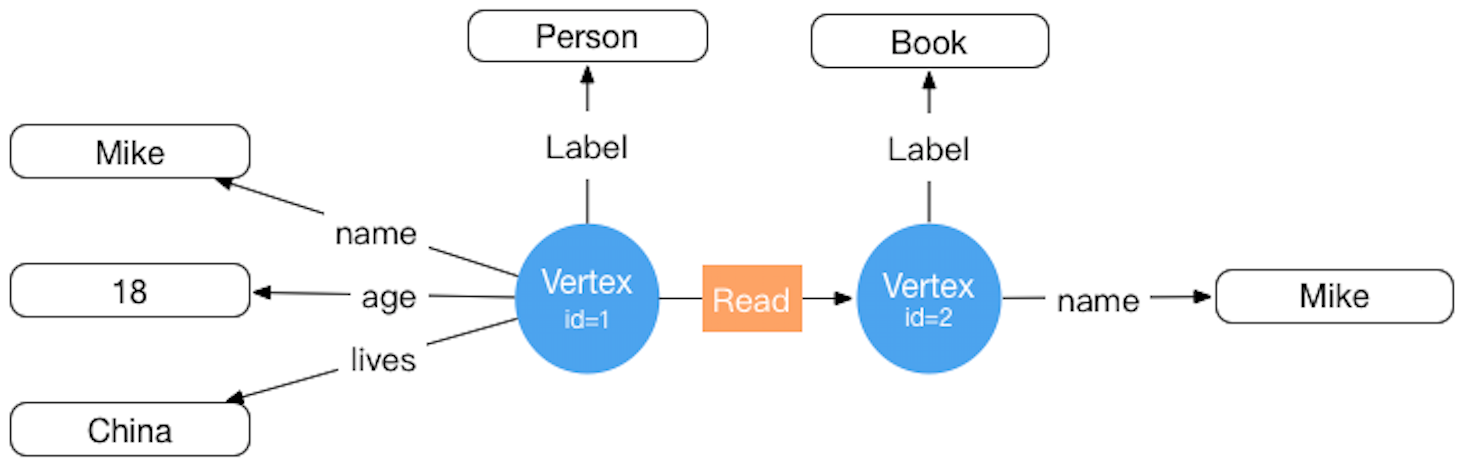
在HugeGraph内部,每个顶点 / 边由唯一的 VertexId / EdgeId 标识,属性存储在对应点 / 边内部。而顶点与顶点之间的关系 / 映射则是通过边来存储的。
顶点属性值通过边指针方式存储时,如果要更新一个顶点特定的属性值直接通过覆盖写入即可,其弊端是冗余存储了VertexId; 如果要更新关系的属性需要通过read-and-modify方式,先读取所有属性,修改部分属性,然后再写入存储系统,更新效率较低。 从经验来看顶点属性的修改需求较多,而边的属性修改需求较少,例如PageRank和Graph Cluster等计算都需要频繁修改顶点的属性值。
2. 图分区方案
对于分布式图数据库而言,图的分区存储方式有两种:分别是边分割存储(Edge Cut)和点分割存储(Vertex Cut),如下图所示。 使用Edge Cut方式存储图时,任何一个顶点只会出现在一台机器上,而边可能分布在不同机器上,这种存储方式有可能导致边多次存储。 使用Vertex Cut方式存储图时,任何一条边只会出现在一台机器上,而每相同的一个点可能分布到不同机器上,这种存储方式可能会导致顶点多次存储。
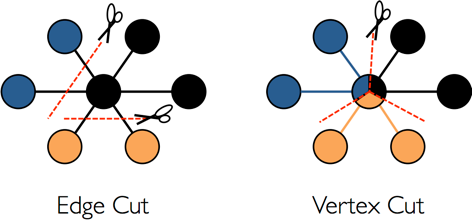
采用EdgeCut分区方案可以支持高性能的插入和更新操作,而VertexCut分区方案更适合静态图查询分析,因此EdgeCut适合OLTP图查询,VertexCut更适合OLAP的图查询。 HugeGraph目前采用EdgeCut的分区方案。
3. VertexId 策略
HugeGraph的Vertex支持三种ID策略,在同一个图数据库中不同的VertexLabel可以使用不同的Id策略,目前HugeGraph支持的Id策略分别是:
- 自动生成(AUTOMATIC):使用Snowflake算法自动生成全局唯一Id,Long类型;
- 主键(PRIMARY_KEY):通过VertexLabel+PrimaryKeyValues生成Id,String类型;
- 自定义(CUSTOMIZE_STRING|CUSTOMIZE_NUMBER):用户自定义Id,分为String和Long类型两种,需自己保证Id的唯一性;
默认的Id策略是AUTOMATIC,如果用户调用primaryKeys()方法并设置了正确的PrimaryKeys,则自动启用PRIMARY_KEY策略。 启用PRIMARY_KEY策略后HugeGraph能根据PrimaryKeys实现数据去重。
- AUTOMATIC ID策略
- PRIMARY_KEY ID策略
- CUSTOMIZE_STRING ID策略
- CUSTOMIZE_NUMBER ID策略
如果用户需要Vertex去重,有三种方案分别是:
- 采用PRIMARY_KEY策略,自动覆盖,适合大数据量批量插入,用户无法知道是否发生了覆盖行为
- 采用AUTOMATIC策略,read-and-modify,适合小数据量插入,用户可以明确知道是否发生覆盖
- 采用CUSTOMIZE_STRING或CUSTOMIZE_NUMBER策略,用户自己保证唯一
4. EdgeId 策略
HugeGraph的EdgeId是由srcVertexId+edgeLabel+sortKey+tgtVertexId四部分组合而成。其中sortKey是HugeGraph的一个重要概念。
在Edge中加入sortKey作为Edge的唯一标识的原因有两个:
- 如果两个顶点之间存在多条相同Label的边可通过
sortKey来区分 - 对于SuperNode的节点,可以通过
sortKey来排序截断。
由于EdgeId是由srcVertexId+edgeLabel+sortKey+tgtVertexId四部分组合,多次插入相同的Edge时HugeGraph会自动覆盖以实现去重。
需要注意的是如果批量插入模式下Edge的属性也将会覆盖。
另外由于HugeGraph的EdgeId采用自动去重策略,对于self-loop(一个顶点存在一条指向自身的边)的情况下HugeGraph认为仅有一条边,对于采用AUTOMATIC策略的图数据库(例如TitianDB )则会认为该图存在两条边。
HugeGraph的边仅支持有向边,无向边可以创建Out和In两条边来实现。
5. HugeGraph transaction overview
TinkerPop事务概述
TinkerPop transaction事务是指对数据库执行操作的工作单元,一个事务内的一组操作要么执行成功,要么全部失败。 详细介绍请参考TinkerPop官方文档:http://tinkerpop.apache.org/docs/current/reference/#transactions
TinkerPop事务操作接口
- open 打开事务
- commit 提交事务
- rollback 回滚事务
- close 关闭事务
TinkerPop事务规范
- 事务必须显式提交后才可生效(未提交时修改操作只有本事务内查询可看到)
- 事务必须打开之后才可提交或回滚
- 如果事务设置自动打开则无需显式打开(默认方式),如果设置手动打开则必须显式打开
- 可设置事务关闭时:自动提交、自动回滚(默认方式)、手动(禁止显式关闭)等3种模式
- 事务在提交或回滚后必须是关闭状态
- 事务在查询后必须是打开状态
- 事务(非threaded tx)必须线程隔离,多线程操作同一事务互不影响
更多事务规范用例见:Transaction Test
HugeGraph事务实现
- 一个事务中所有的操作要么成功要么失败
- 一个事务只能读取到另外一个事务已提交的内容(Read committed)
- 所有未提交的操作均能在本事务中查询出来,包括:
- 增加顶点能够查询出该顶点
- 删除顶点能够过滤掉该顶点
- 删除顶点能够过滤掉该顶点相关边
- 增加边能够查询出该边
- 删除边能够过滤掉该边
- 增加/修改(顶点、边)属性能够在查询时生效
- 删除(顶点、边)属性能够在查询时生效
- 所有未提交的操作在事务回滚后均失效,包括:
- 顶点、边的增加、删除
- 属性的增加/修改、删除
示例:一个事务无法读取另一个事务未提交的内容
事务实现原理
- 服务端内部通过将事务与线程绑定实现隔离(ThreadLocal)
- 本事务未提交的内容按照时间顺序覆盖老数据以供本事务查询最新版本数据
- 底层依赖后端数据库保证事务原子性操作(如Cassandra/RocksDB的batch接口均保证原子性)
注意
RESTful API暂时未暴露事务接口
TinkerPop API允许打开事务,请求完成时会自动关闭(Gremlin Server强制关闭)
6.3 - HugeGraph Plugin机制及插件扩展流程
背景
- HugeGraph不仅开源开放,而且要做到简单易用,一般用户无需更改源码也能轻松增加插件扩展功能。
- HugeGraph支持多种内置存储后端,也允许用户无需更改现有源码的情况下扩展自定义后端。
- HugeGraph支持全文检索,全文检索功能涉及到各语言分词,目前已内置8种中文分词器,也允许用户无需更改现有源码的情况下扩展自定义分词器。
可扩展维度
目前插件方式提供如下几个维度的扩展项:
- 后端存储
- 序列化器
- 自定义配置项
- 分词器
插件实现机制
- HugeGraph提供插件接口HugeGraphPlugin,通过Java SPI机制支持插件化
- HugeGraph提供了4个扩展项注册函数:
registerOptions()、registerBackend()、registerSerializer()、registerAnalyzer() - 插件实现者实现相应的Options、Backend、Serializer或Analyzer的接口
- 插件实现者实现HugeGraphPlugin接口的
register()方法,在该方法中注册上述第3点所列的具体实现类,并打成jar包 - 插件使用者将jar包放在HugeGraph Server安装目录的
plugins目录下,修改相关配置项为插件自定义值,重启即可生效
插件实现流程实例
1 新建一个maven项目
1.1 项目名称取名:hugegraph-plugin-demo
1.2 添加hugegraph-core Jar包依赖
maven pom.xml详细内容如下:
2 实现扩展功能
2.1 扩展自定义后端
2.1.1 实现接口BackendStoreProvider
- 可实现接口:
com.baidu.hugegraph.backend.store.BackendStoreProvider - 或者继承抽象类:
com.baidu.hugegraph.backend.store.AbstractBackendStoreProvider
以RocksDB后端RocksDBStoreProvider为例:
2.1.2 实现接口BackendStore
BackendStore接口定义如下:
2.1.3 扩展自定义序列化器
序列化器必须继承抽象类:com.baidu.hugegraph.backend.serializer.AbstractSerializer(implements GraphSerializer, SchemaSerializer)
主要接口的定义如下:
2.1.4 扩展自定义配置项
增加自定义后端时,可能需要增加新的配置项,实现流程主要包括:
- 增加配置项容器类,并实现接口
com.baidu.hugegraph.config.OptionHolder - 提供单例方法
public static OptionHolder instance(),并在对象初始化时调用方法OptionHolder.registerOptions() - 增加配置项声明,单值配置项类型为
ConfigOption、多值配置项类型为ConfigListOption
以RocksDB配置项定义为例:
2.2 扩展自定义分词器
分词器需要实现接口com.baidu.hugegraph.analyzer.Analyzer,以实现一个SpaceAnalyzer空格分词器为例。
3. 实现插件接口,并进行注册
插件注册入口为HugeGraphPlugin.register(),自定义插件必须实现该接口方法,在其内部注册上述定义好的扩展项。
接口com.baidu.hugegraph.plugin.HugeGraphPlugin定义如下:
并且HugeGraphPlugin提供了4个静态方法用于注册扩展项:
- registerOptions(String name, String classPath):注册配置项
- registerBackend(String name, String classPath):注册后端(BackendStoreProvider)
- registerSerializer(String name, String classPath):注册序列化器
- registerAnalyzer(String name, String classPath):注册分词器
下面以注册SpaceAnalyzer分词器为例:
4. 配置SPI入口
- 确保services目录存在:hugegraph-plugin-demo/resources/META-INF/services
- 在services目录下建立文本文件:com.baidu.hugegraph.plugin.HugeGraphPlugin
- 文件内容如下:com.baidu.hugegraph.plugin.DemoPlugin
5. 打Jar包
通过maven打包,在项目目录下执行命令mvn package,在target目录下会生成Jar包文件。
使用时将该Jar包拷到plugins目录,重启服务即可生效。
6.4 - Backup Restore
描述
Backup 和 Restore 是备份图和恢复图的功能。备份和恢复的数据包括元数据(schema)和图数据(vertex 和 edge)。
Backup
将 HugeGraph 系统中的一张图的元数据和图数据以 JSON 格式导出。
Restore
将 Backup 导出的JSON格式的数据,重新导入到 HugeGraph 系统中的一个图中。
Restore 有两种模式:
- Restoring 模式,将 Backup 导出的元数据和图数据原封不动的恢复到 HugeGraph 系统中。可用于图的备份和恢复,一般目标图是新图(没有元数据和图数据)。比如:
- 系统升级,先备份图,然后升级系统,最后将图恢复到新的系统中
- 图迁移,从一个 HugeGraph 系统中,使用 Backup 功能将图导出,然后使用 Restore 功能将图导入另一个 HugeGraph 系统中
- Merging 模式,将 Backup 导出的元数据和图数据导入到另一个已经存在元数据或者图数据的图中,过程中元数据的 ID 可能发生改变,顶点和边的 ID 也会发生相应变化。
- 可用于合并图
使用方法
可以使用hugegraph-tools进行图的备份和恢复。
Backup
该命令将 http://127.0.0.1 的 hugegraph 图的全部元数据和图数据备份到data目录下。
Backup 在三种图模式下都可以正常工作
Restore
Restore 有两种模式: RESTORING 和 MERGING,备份之前首先要根据需要设置图模式。
步骤1:查看并设置图模式
该命令用于查看当前图模式,包括:NONE、RESTORING、MERGING。
该命令用于设置图模式,Restore 之前可以设置成 RESTORING 或者 MERGING 模式,例子中设置成 RESTORING。
步骤2:Restore 数据
该命令将data目录下的全部元数据和图数据重新导入到 http://127.0.0.1 的 hugegraph 图中。
步骤3:恢复图模式
该命令用于恢复图模式为 NONE。
至此,一次完整的图备份和图恢复流程结束。
帮助
备份和恢复命令的详细使用方式可以参考hugegraph-tools文档。
Backup/Restore使用和实现的API说明
Backup
Backup 使用元数据和图数据的相应的 list(GET) API 导出,并未增加新的 API。
Restore
Restore 使用元数据和图数据的相应的 create(POST) API 导入,并未增加新的 API。
Restore 时存在两种不同的模式: Restoring 和 Merging,另外,还有常规模式 NONE(默认),区别如下:
- None 模式,元数据和图数据的写入属于正常状态,可参见功能说明。特别的:
- 元数据(schema)创建时不允许指定 ID
- 图数据(vertex)在 id strategy 为 Automatic 时,不允许指定 ID
- Restoring 模式,恢复到一个新图中,特别的:
- 元数据(schema)创建时允许指定 ID
- 图数据(vertex)在 id strategy 为 Automatic 时,允许指定 ID
- Merging 模式,合并到一个已存在元数据和图数据的图中,特别的:
- 元数据(schema)创建时不允许指定 ID
- 图数据(vertex)在 id strategy 为 Automatic 时,允许指定 ID
正常情况下,图模式为 None,当需要 Restore 图时,需要根据需要临时修改图模式为 Restoring 模式或者 Merging 模式,并在完成 Restore 时,恢复图模式为 None。
实现的设置图模式的 RESTful API 如下:
查看某个图的模式. 该操作需要管理员权限
Method & Url
Response Status
Response Body
合法的图模式包括:NONE,RESTORING,MERGING
设置某个图的模式. 该操作需要管理员权限
Method & Url
Request Body
合法的图模式包括:NONE,RESTORING,MERGING
Response Status
Response Body
6.5 - FAQ
如何选择后端存储? 选 RocksDB 还是 Cassandra 还是 Hbase 还是 Mysql?
根据你的具体需要来判断, 一般单机或数据量 < 100 亿推荐 RocksDB, 其他推荐使用分布式存储的后端集群
启动服务时提示:
xxx (core dumped) xxx请检查JDK版本是否为1.8
启动服务成功了,但是操作图时有类似于"无法连接到后端或连接未打开"的提示
第一次启动服务前,需要先使用
init-store初始化后端,后续版本会将提示得更清晰直接。所有的后端在使用前都需要执行
init-store吗,序列化的选择可以随意填写么?除了
memory不需要,其他后端均需要,如:cassandra、hbase和rocksdb等,序列化需一一对应不可随意填写。执行
init-store报错:Exception in thread "main" java.lang.UnsatisfiedLinkError: /tmp/librocksdbjni3226083071221514754.so: /usr/lib64/libstdc++.so.6: version `GLIBCXX_3.4.10' not found (required by /tmp/librocksdbjni3226083071221514754.so)RocksDB需要 gcc 4.3.0 (GLIBCXX_3.4.10) 及以上版本
执行
init-store.sh时报错:NoHostAvailableExceptionNoHostAvailableException是指无法连接到Cassandra服务,如果确定是要使用cassandra后端,请先安装并启动这个服务。至于这个提示本身可能不够直白,我们会更新到文档进行说明的。bin目录下包含start-hugegraph.sh、start-restserver.sh和start-gremlinserver.sh三个似乎与启动有关的脚本,到底该使用哪个自0.3.3版本以来,已经把 GremlinServer 和 RestServer 合并为 HugeGraphServer 了,使用
start-hugegraph.sh启动即可,后两个在后续版本会被删掉。配置了两个图,名字是
hugegraph和hugegraph1,而启动服务的命令是start-hugegraph.sh,是只打开了hugegraph这个图吗start-hugegraph.sh会打开所有gremlin-server.yaml的graphs下的图,这二者并无名字上的直接关系服务启动成功后,使用
curl查询所有顶点时返回乱码服务端返回的批量顶点/边是压缩(gzip)过的,可以使用管道重定向至
gunzip进行解压(curl http://example | gunzip),也可以用Firefox的postman或者Chrome浏览器的restlet插件发请求,会自动解压缩响应数据。使用顶点Id通过
RESTful API查询顶点时返回空,但是顶点确实是存在的检查顶点Id的类型,如果是字符串类型,
API的url中的id部分需要加上双引号,数字类型则不用加。已经根据需要给顶点Id加上了双引号,但是通过
RESTful API查询顶点时仍然返回空检查顶点id中是否包含
+、空格、/、?、%、&和=这些URL的保留字符,如果存在则需要进行编码。下表给出了编码值:查询某一类别的顶点或边(
query by label)时提示超时由于属于某一label的数据量可能比较多,请加上limit限制。
通过
RESTful API操作图是可以的,但是发送Gremlin语句就报错:Request Failed(500)可能是
GremlinServer的配置有误,检查gremlin-server.yaml的host、port是否与rest-server.properties的gremlinserver.url匹配,如不匹配则修改,然后重启服务。使用
Loader导数据出现Socket Timeout异常,然后导致Loader中断持续地导入数据会使
Server的压力过大,然后导致有些请求超时。可以通过调整Loader的参数来适当缓解Server压力(如:重试次数,重试间隔,错误容忍数等),降低该问题出现频率。如何删除全部的顶点和边,RESTful API中没有这样的接口,调用
gremlin的g.V().drop()会报错Vertices in transaction have reached capacity xxx目前确实没有好办法删除全部的数据,用户如果是自己部署的
Server和后端,可以直接清空数据库,重启Server。可以使用paging API或scan API先获取所有数据,再逐条删除。清空了数据库,并且执行了
init-store,但是添加schema时提示"xxx has existed"HugeGraphServer内是有缓存的,清空数据库的同时是需要重启Server的,否则残留的缓存会产生不一致。插入顶点或边的过程中报错:
Id max length is 128, but got xxx {yyy}或Big id max length is 32768, but got xxx为了保证查询性能,目前的后端存储对id列的长度做了限制,顶点id不能超过128字节,边id长度不能超过32768字节,索引id不能超过128字节。
是否支持嵌套属性,如果不支持,是否有什么替代方案
嵌套属性目前暂不支持。替代方案:可以把嵌套属性作为单独的顶点拿出来,然后用边连接起来。
一个
EdgeLabel是否可以连接多对VertexLabel,比如"投资"关系,可以是"个人"投资"企业",也可以是"企业"投资"企业"一个
EdgeLabel不支持连接多对VertexLabel,需要用户将EdgeLabel拆分得更细一点,如:“个人投资”,“企业投资”。通过
RestAPI发送请求时提示HTTP 415 Unsupported Media Type请求头中需要指定
Content-Type:application/json
其他问题可以在对应项目的 issue 区搜索,例如 Server-Issues / Loader Issues
7 - QUERY LANGUAGE
7.1 - HugeGraph Gremlin
概述
HugeGraph支持Apache TinkerPop3的图形遍历查询语言Gremlin。 SQL是关系型数据库查询语言,而Gremlin是一种通用的图数据库查询语言,Gremlin可用于创建图的实体(Vertex和Edge)、修改实体内部属性、删除实体,也可执行图的查询操作。
Gremlin可用于创建图的实体(Vertex和Edge)、修改实体内部属性、删除实体,更主要的是可用于执行图的查询及分析操作。
TinkerPop Features
HugeGraph实现了TinkerPop框架,但是并没有实现TinkerPop所有的特性。
下表列出HugeGraph对TinkerPop各种特性的支持情况:
Graph Features
| Name | Description | Support |
|---|---|---|
| Computer | Determines if the {@code Graph} implementation supports {@link GraphComputer} based processing | false |
| Transactions | Determines if the {@code Graph} implementations supports transactions. | true |
| Persistence | Determines if the {@code Graph} implementation supports persisting it’s contents natively to disk.This feature does not refer to every graph’s ability to write to disk via the Gremlin IO packages(.e.g. GraphML), unless the graph natively persists to disk via those options somehow. For example,TinkerGraph does not support this feature as it is a pure in-sideEffects graph. | true |
| ThreadedTransactions | Determines if the {@code Graph} implementation supports threaded transactions which allow a transaction be executed across multiple threads via {@link Transaction#createThreadedTx()}. | false |
| ConcurrentAccess | Determines if the {@code Graph} implementation supports more than one connection to the same instance at the same time. For example, Neo4j embedded does not support this feature because concurrent access to the same database files by multiple instances is not possible. However, Neo4j HA could support this feature as each new {@code Graph} instance coordinates with the Neo4j cluster allowing multiple instances to operate on the same database. | false |
Vertex Features
| Name | Description | Support |
|---|---|---|
| UserSuppliedIds | Determines if an {@link Element} can have a user defined identifier. Implementation that do not support this feature will be expected to auto-generate unique identifiers. In other words, if the {@link Graph} allows {@code graph.addVertex(id,x)} to work and thus set the identifier of the newly added {@link Vertex} to the value of {@code x} then this feature should return true. In this case, {@code x} is assumed to be an identifier data type that the {@link Graph} will accept. | false |
| NumericIds | Determines if an {@link Element} has numeric identifiers as their internal representation. In other words,if the value returned from {@link Element#id()} is a numeric value then this method should be return {@code true}. Note that this feature is most generally used for determining the appropriate tests to execute in the Gremlin Test Suite. | false |
| StringIds | Determines if an {@link Element} has string identifiers as their internal representation. In other words, if the value returned from {@link Element#id()} is a string value then this method should be return {@code true}. Note that this feature is most generally used for determining the appropriate tests to execute in the Gremlin Test Suite. | false |
| UuidIds | Determines if an {@link Element} has UUID identifiers as their internal representation. In other words,if the value returned from {@link Element#id()} is a {@link UUID} value then this method should be return {@code true}.Note that this feature is most generally used for determining the appropriate tests to execute in the Gremlin Test Suite. | false |
| CustomIds | Determines if an {@link Element} has a specific custom object as their internal representation.In other words, if the value returned from {@link Element#id()} is a type defined by the graph implementations, such as OrientDB’s {@code Rid}, then this method should be return {@code true}.Note that this feature is most generally used for determining the appropriate tests to execute in the Gremlin Test Suite. | false |
| AnyIds | Determines if an {@link Element} any Java object is a suitable identifier. TinkerGraph is a good example of a {@link Graph} that can support this feature, as it can use any {@link Object} as a value for the identifier. Note that this feature is most generally used for determining the appropriate tests to execute in the Gremlin Test Suite. This setting should only return {@code true} if {@link #supportsUserSuppliedIds()} is {@code true}. | false |
| AddProperty | Determines if an {@link Element} allows properties to be added. This feature is set independently from supporting “data types” and refers to support of calls to {@link Element#property(String, Object)}. | true |
| RemoveProperty | Determines if an {@link Element} allows properties to be removed. | true |
| AddVertices | Determines if a {@link Vertex} can be added to the {@code Graph}. | true |
| MultiProperties | Determines if a {@link Vertex} can support multiple properties with the same key. | false |
| DuplicateMultiProperties | Determines if a {@link Vertex} can support non-unique values on the same key. For this value to be {@code true}, then {@link #supportsMetaProperties()} must also return true. By default this method, just returns what {@link #supportsMultiProperties()} returns. | false |
| MetaProperties | Determines if a {@link Vertex} can support properties on vertex properties. It is assumed that a graph will support all the same data types for meta-properties that are supported for regular properties. | false |
| RemoveVertices | Determines if a {@link Vertex} can be removed from the {@code Graph}. | true |
Edge Features
| Name | Description | Support |
|---|---|---|
| UserSuppliedIds | Determines if an {@link Element} can have a user defined identifier. Implementation that do not support this feature will be expected to auto-generate unique identifiers. In other words, if the {@link Graph} allows {@code graph.addVertex(id,x)} to work and thus set the identifier of the newly added {@link Vertex} to the value of {@code x} then this feature should return true. In this case, {@code x} is assumed to be an identifier data type that the {@link Graph} will accept. | false |
| NumericIds | Determines if an {@link Element} has numeric identifiers as their internal representation. In other words,if the value returned from {@link Element#id()} is a numeric value then this method should be return {@code true}. Note that this feature is most generally used for determining the appropriate tests to execute in the Gremlin Test Suite. | false |
| StringIds | Determines if an {@link Element} has string identifiers as their internal representation. In other words, if the value returned from {@link Element#id()} is a string value then this method should be return {@code true}. Note that this feature is most generally used for determining the appropriate tests to execute in the Gremlin Test Suite. | false |
| UuidIds | Determines if an {@link Element} has UUID identifiers as their internal representation. In other words,if the value returned from {@link Element#id()} is a {@link UUID} value then this method should be return {@code true}.Note that this feature is most generally used for determining the appropriate tests to execute in the Gremlin Test Suite. | false |
| CustomIds | Determines if an {@link Element} has a specific custom object as their internal representation.In other words, if the value returned from {@link Element#id()} is a type defined by the graph implementations, such as OrientDB’s {@code Rid}, then this method should be return {@code true}.Note that this feature is most generally used for determining the appropriate tests to execute in the Gremlin Test Suite. | false |
| AnyIds | Determines if an {@link Element} any Java object is a suitable identifier. TinkerGraph is a good example of a {@link Graph} that can support this feature, as it can use any {@link Object} as a value for the identifier. Note that this feature is most generally used for determining the appropriate tests to execute in the Gremlin Test Suite. This setting should only return {@code true} if {@link #supportsUserSuppliedIds()} is {@code true}. | false |
| AddProperty | Determines if an {@link Element} allows properties to be added. This feature is set independently from supporting “data types” and refers to support of calls to {@link Element#property(String, Object)}. | true |
| RemoveProperty | Determines if an {@link Element} allows properties to be removed. | true |
| AddEdges | Determines if an {@link Edge} can be added to a {@code Vertex}. | true |
| RemoveEdges | Determines if an {@link Edge} can be removed from a {@code Vertex}. | true |
Data Type Features
| Name | Description | Support |
|---|---|---|
| BooleanValues | true | |
| ByteValues | true | |
| DoubleValues | true | |
| FloatValues | true | |
| IntegerValues | true | |
| LongValues | true | |
| MapValues | Supports setting of a {@code Map} value. The assumption is that the {@code Map} can contain arbitrary serializable values that may or may not be defined as a feature itself | false |
| MixedListValues | Supports setting of a {@code List} value. The assumption is that the {@code List} can contain arbitrary serializable values that may or may not be defined as a feature itself. As this{@code List} is “mixed” it does not need to contain objects of the same type. | false |
| BooleanArrayValues | false | |
| ByteArrayValues | true | |
| DoubleArrayValues | false | |
| FloatArrayValues | false | |
| IntegerArrayValues | false | |
| LongArrayValues | false | |
| SerializableValues | false | |
| StringArrayValues | false | |
| StringValues | true | |
| UniformListValues | Supports setting of a {@code List} value. The assumption is that the {@code List} can contain arbitrary serializable values that may or may not be defined as a feature itself. As this{@code List} is “uniform” it must contain objects of the same type. | false |
Gremlin的步骤
HugeGraph支持Gremlin的所有步骤。有关Gremlin的完整参考信息,请参与Gremlin官网。
| 步骤 | 说明 | 文档 |
|---|---|---|
| addE | 在两个顶点之间添加边 | addE step |
| addV | 将顶点添加到图形 | addV step |
| and | 确保所有遍历都返回值 | and step |
| as | 用于向步骤的输出分配变量的步骤调制器 | as step |
| by | 与group和order配合使用的步骤调制器 | by step |
| coalesce | 返回第一个返回结果的遍历 | coalesce step |
| constant | 返回常量值。 与coalesce配合使用 | constant step |
| count | 从遍历返回计数 | count step |
| dedup | 返回已删除重复内容的值 | dedup step |
| drop | 丢弃值(顶点/边缘) | drop step |
| fold | 充当用于计算结果聚合值的屏障 | fold step |
| group | 根据指定的标签将值分组 | group step |
| has | 用于筛选属性、顶点和边缘。 支持hasLabel、hasId、hasNot 和 has 变体 | has step |
| inject | 将值注入流中 | inject step |
| is | 用于通过布尔表达式执行筛选器 | is step |
| limit | 用于限制遍历中的项数 | limit step |
| local | 本地包装遍历的某个部分,类似于子查询 | local step |
| not | 用于生成筛选器的求反结果 | not step |
| optional | 如果生成了某个结果,则返回指定遍历的结果,否则返回调用元素 | optional step |
| or | 确保至少有一个遍历会返回值 | or step |
| order | 按指定的排序顺序返回结果 | order step |
| path | 返回遍历的完整路径 | path step |
| project | 将属性投影为映射 | project step |
| properties | 返回指定标签的属性 | properties step |
| range | 根据指定的值范围进行筛选 | range step |
| repeat | 将步骤重复指定的次数。 用于循环 | repeat step |
| sample | 用于对遍历返回的结果采样 | sample step |
| select | 用于投影遍历返回的结果 | select step |
| store | 用于遍历返回的非阻塞聚合 | store step |
| tree | 将顶点中的路径聚合到树中 | tree step |
| unfold | 将迭代器作为步骤展开 | unfold step |
| union | 合并多个遍历返回的结果 | union step |
| V | 包括顶点与边之间的遍历所需的步骤:V、E、out、in、both、outE、inE、bothE、outV、inV、bothV 和 otherV | order step |
| where | 用于筛选遍历返回的结果。 支持 eq、neq、lt、lte、gt、gte 和 between 运算符 | where step |
7.2 - HugeGraph Examples
1 概述
本示例将TitanDB Getting Started 为模板来演示HugeGraph的使用方法。通过对比HugeGraph和TitanDB,了解HugeGraph和TitanDB的差异。
1.1 HugeGraph与TitanDB的异同
HugeGraph和TitanDB都是基于Apache TinkerPop3框架的图数据库,均支持[Gremlin](https://tinkerpop.apache .org/gremlin.html)图查询语言,在使用方法和接口方面具有很多相似的地方。然而HugeGraph是全新设计开发的,其代码结构清晰,功能较为丰富,接口更为友好等特点。
HugeGraph相对于TitanDB而言,其主要特点如下:
- HugeGraph目前有HugeGraph-API、HugeGraph-Client、HugeGraph-Loader、HugeGraph-Studio、HugeGraph-Spark等完善的工具组件,可以完成系统集成、数据载入、图可视化查询、Spark 连接等功能;
- HugeGraph具有Server和Client的概念,第三方系统可以通过jar引用、client、api等多种方式接入,而TitanDB仅支持jar引用方式接入。
- HugeGraph的Schema需要显式定义,所有的插入和查询均需要通过严格的schema校验,目前暂不支持schema的隐式创建。
- HugeGraph充分利用后端存储系统的特点来实现数据高效存取,而TitanDB以统一的Kv结构无视后端的差异性。
- HugeGraph的更新操作可以实现按需操作(例如:更新某个属性)性能更好。TitanDB的更新是read and update方式。
- HugeGraph的VertexId和EdgeId均支持拼接,可实现自动去重,同时查询性能更好。TitanDB的所有Id均是自动生成,查询需要经索引。
1.2 人物关系图谱
本示例通过Property Graph Model图数据模型来描述希腊神话中各人物角色的关系(也被成为人物关系图谱),具体关系详见下图。
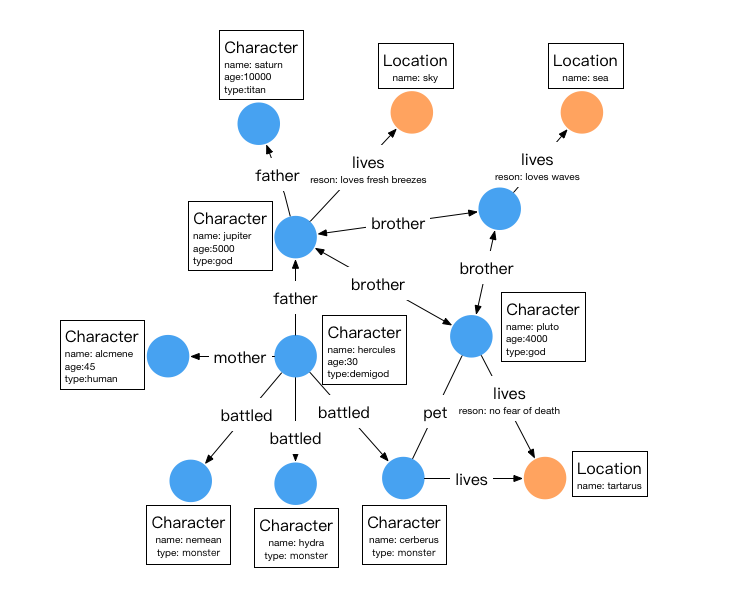
其中,圆形节点代表实体(Vertex),箭头代表关系(Edge),方框的内容为属性。
该关系图谱中有两类顶点,分别是人物(character)和位置(location)如下表:
| 名称 | 类型 | 属性 |
|---|---|---|
| character | vertex | name,age,type |
| location | vertex | name |
有六种关系,分别是父子(father)、母子(mother)、兄弟(brother)、战斗(battled)、居住(lives)、拥有宠物(pet) 关于关系图谱的具体信息如下:
| 名称 | 类型 | source vertex label | target vertex label | 属性 |
|---|---|---|---|---|
| father | edge | character | character | - |
| mother | edge | character | character | - |
| brother | edge | character | character | - |
| pet | edge | character | character | - |
| lives | edge | character | location | reason |
在HugeGraph中,每个edge label只能作用于一对source vertex label和target vertex label。也就是说,如果一个图内定义了一种关系father连接character和character,那farther就不能再连接其他的vertex labels。
因此本例子将原TitanDB中的monster, god, human, demigod均使用相同的vertex label: character来表示, 同时增加属性type来标识人物的类型。edge label与原TitanDB保持一致。当然为了满足edge label约束,也可以通过调整edge label的name来实现。
2 Graph Schema and Data Ingest Examples
HugeGraph需要显示创建Schema,因此需要依次创建PropertyKey、VertexLabel、EdgeLabel,如果有需要索引还需要创建IndexLabel。
2.1 Graph Schema
2.2 Graph Data
2.3 Indices
HugeGraph默认是自动生成Id,如果用户通过primaryKeys指定VertexLabel的primaryKeys字段列表后,VertexLabel的Id策略将会自动切换到primaryKeys策略。 启用primaryKeys策略后,HugeGraph通过vertexLabel+primaryKeys拼接生成VertexId ,可实现自动去重,同时无需额外创建索引即可以使用primaryKeys中的属性进行快速查询。 例如 “character” 和 “location” 都有primaryKeys("name")属性,因此在不额外创建索引的情况下可以通过g.V().hasLabel('character') .has('name','hercules')查询vertex 。
3 Graph Traversal Examples
3.1 Traversal Query
1. Find the grandfather of hercules
也可以通过repeat方式:
2. Find the name of hercules’s father
3. Find the characters with age > 100
4. Find who are pluto’s cohabitants
5. Find pluto can’t be his own cohabitant
6. Pluto’s Brothers
推荐使用HugeGraph-Studio 通过可视化的方式来执行上述代码。另外也可以通过HugeGraph-Client、HugeApi、GremlinConsole和GremlinDriver等多种方式执行上述代码。
3.2 总结
HugeGraph 目前支持 Gremlin 的语法,用户可以通过 Gremlin / REST-API 实现各种查询需求。
8 - PERFORMANCE
8.1 - HugeGraph BenchMark Performance
1 测试环境
1.1 硬件信息
| CPU | Memory | 网卡 | 磁盘 |
|---|---|---|---|
| 48 Intel(R) Xeon(R) CPU E5-2650 v4 @ 2.20GHz | 128G | 10000Mbps | 750GB SSD |
1.2 软件信息
1.2.1 测试用例
测试使用graphdb-benchmark,一个图数据库测试集。该测试集主要包含4类测试:
Massive Insertion,批量插入顶点和边,一定数量的顶点或边一次性提交
Single Insertion,单条插入,每个顶点或者每条边立即提交
Query,主要是图数据库的基本查询操作:
- Find Neighbors,查询所有顶点的邻居
- Find Adjacent Nodes,查询所有边的邻接顶点
- Find Shortest Path,查询第一个顶点到100个随机顶点的最短路径
Clustering,基于Louvain Method的社区发现算法
1.2.2 测试数据集
测试使用人造数据和真实数据
MIW、SIW和QW使用SNAP数据集
CW使用LFR-Benchmark generator生成的人造数据
本测试用到的数据集规模
| 名称 | vertex数目 | edge数目 | 文件大小 |
|---|---|---|---|
| email-enron.txt | 36,691 | 367,661 | 4MB |
| com-youtube.ungraph.txt | 1,157,806 | 2,987,624 | 38.7MB |
| amazon0601.txt | 403,393 | 3,387,388 | 47.9MB |
| com-lj.ungraph.txt | 3997961 | 34681189 | 479MB |
1.3 服务配置
HugeGraph版本:0.5.6,RestServer和Gremlin Server和backends都在同一台服务器上
- RocksDB版本:rocksdbjni-5.8.6
Titan版本:0.5.4, 使用thrift+Cassandra模式
- Cassandra版本:cassandra-3.10,commit-log 和 data 共用SSD
Neo4j版本:2.0.1
graphdb-benchmark适配的Titan版本为0.5.4
2 测试结果
2.1 Batch插入性能
| Backend | email-enron(30w) | amazon0601(300w) | com-youtube.ungraph(300w) | com-lj.ungraph(3000w) |
|---|---|---|---|---|
| HugeGraph | 0.629 | 5.711 | 5.243 | 67.033 |
| Titan | 10.15 | 108.569 | 150.266 | 1217.944 |
| Neo4j | 3.884 | 18.938 | 24.890 | 281.537 |
说明
- 表头"()“中数据是数据规模,以边为单位
- 表中数据是批量插入的时间,单位是s
- 例如,HugeGraph使用RocksDB插入amazon0601数据集的300w条边,花费5.711s
结论
- 批量插入性能 HugeGraph(RocksDB) > Neo4j > Titan(thrift+Cassandra)
2.2 遍历性能
2.2.1 术语说明
- FN(Find Neighbor), 遍历所有vertex, 根据vertex查邻接edge, 通过edge和vertex查other vertex
- FA(Find Adjacent), 遍历所有edge,根据edge获得source vertex和target vertex
2.2.2 FN性能
| Backend | email-enron(3.6w) | amazon0601(40w) | com-youtube.ungraph(120w) | com-lj.ungraph(400w) |
|---|---|---|---|---|
| HugeGraph | 4.072 | 45.118 | 66.006 | 609.083 |
| Titan | 8.084 | 92.507 | 184.543 | 1099.371 |
| Neo4j | 2.424 | 10.537 | 11.609 | 106.919 |
说明
- 表头”()“中数据是数据规模,以顶点为单位
- 表中数据是遍历顶点花费的时间,单位是s
- 例如,HugeGraph使用RocksDB后端遍历amazon0601的所有顶点,并查找邻接边和另一顶点,总共耗时45.118s
2.2.3 FA性能
| Backend | email-enron(30w) | amazon0601(300w) | com-youtube.ungraph(300w) | com-lj.ungraph(3000w) |
|---|---|---|---|---|
| HugeGraph | 1.540 | 10.764 | 11.243 | 151.271 |
| Titan | 7.361 | 93.344 | 169.218 | 1085.235 |
| Neo4j | 1.673 | 4.775 | 4.284 | 40.507 |
说明
- 表头”()“中数据是数据规模,以边为单位
- 表中数据是遍历边花费的时间,单位是s
- 例如,HugeGraph使用RocksDB后端遍历amazon0601的所有边,并查询每条边的两个顶点,总共耗时10.764s
结论
- 遍历性能 Neo4j > HugeGraph(RocksDB) > Titan(thrift+Cassandra)
2.3 HugeGraph-图常用分析方法性能
术语说明
- FS(Find Shortest Path), 寻找最短路径
- K-neighbor,从起始vertex出发,通过K跳边能够到达的所有顶点, 包括1, 2, 3…(K-1), K跳边可达vertex
- K-out, 从起始vertex出发,恰好经过K跳out边能够到达的顶点
FS性能
| Backend | email-enron(30w) | amazon0601(300w) | com-youtube.ungraph(300w) | com-lj.ungraph(3000w) |
|---|---|---|---|---|
| HugeGraph | 0.494 | 0.103 | 3.364 | 8.155 |
| Titan | 11.818 | 0.239 | 377.709 | 575.678 |
| Neo4j | 1.719 | 1.800 | 1.956 | 8.530 |
说明
- 表头”()“中数据是数据规模,以边为单位
- 表中数据是找到从第一个顶点出发到达随机选择的100个顶点的最短路径的时间,单位是s
- 例如,HugeGraph使用RocksDB后端在图amazon0601中查找第一个顶点到100个随机顶点的最短路径,总共耗时0.103s
结论
- 在数据规模小或者顶点关联关系少的场景下,HugeGraph性能优于Neo4j和Titan
- 随着数据规模增大且顶点的关联度增高,HugeGraph与Neo4j性能趋近,都远高于Titan
K-neighbor性能
| 顶点 | 深度 | 一度 | 二度 | 三度 | 四度 | 五度 | 六度 |
|---|---|---|---|---|---|---|---|
| v1 | 时间 | 0.031s | 0.033s | 0.048s | 0.500s | 11.27s | OOM |
| v111 | 时间 | 0.027s | 0.034s | 0.115 | 1.36s | OOM | – |
| v1111 | 时间 | 0.039s | 0.027s | 0.052s | 0.511s | 10.96s | OOM |
说明
- HugeGraph-Server的JVM内存设置为32GB,数据量过大时会出现OOM
K-out性能
| 顶点 | 深度 | 一度 | 二度 | 三度 | 四度 | 五度 | 六度 |
|---|---|---|---|---|---|---|---|
| v1 | 时间 | 0.054s | 0.057s | 0.109s | 0.526s | 3.77s | OOM |
| 度 | 10 | 133 | 2453 | 50,830 | 1,128,688 | ||
| v111 | 时间 | 0.032s | 0.042s | 0.136s | 1.25s | 20.62s | OOM |
| 度 | 10 | 211 | 4944 | 113150 | 2,629,970 | ||
| v1111 | 时间 | 0.039s | 0.045s | 0.053s | 1.10s | 2.92s | OOM |
| 度 | 10 | 140 | 2555 | 50825 | 1,070,230 |
说明
- HugeGraph-Server的JVM内存设置为32GB,数据量过大时会出现OOM
结论
- FS场景,HugeGraph性能优于Neo4j和Titan
- K-neighbor和K-out场景,HugeGraph能够实现在5度范围内秒级返回结果
2.4 图综合性能测试-CW
| 数据库 | 规模1000 | 规模5000 | 规模10000 | 规模20000 |
|---|---|---|---|---|
| HugeGraph(core) | 20.804 | 242.099 | 744.780 | 1700.547 |
| Titan | 45.790 | 820.633 | 2652.235 | 9568.623 |
| Neo4j | 5.913 | 50.267 | 142.354 | 460.880 |
说明
- “规模"以顶点为单位
- 表中数据是社区发现完成需要的时间,单位是s,例如HugeGraph使用RocksDB后端在规模10000的数据集,社区聚合不再变化,需要耗时744.780s
- CW测试是CRUD的综合评估
- 该测试中HugeGraph跟Titan一样,没有通过client,直接对core操作
结论
- 社区聚类算法性能 Neo4j > HugeGraph > Titan
8.2 - HugeGraph-API Performance
HugeGraph API性能测试主要测试HugeGraph-Server对RESTful API请求的并发处理能力,包括:
- 顶点/边的单条插入
- 顶点/边的批量插入
- 顶点/边的查询
HugeGraph的每个发布版本的RESTful API的性能测试情况可以参考:
之前的版本只提供HugeGraph所支持的后端种类中性能最好的API性能测试,从0.5.6版本开始,分别提供了单机和集群的性能情况
8.2.1 - v0.5.6 Stand-alone(RocksDB)
1 测试环境
被压机器信息
| CPU | Memory | 网卡 | 磁盘 |
|---|---|---|---|
| 48 Intel(R) Xeon(R) CPU E5-2650 v4 @ 2.20GHz | 128G | 10000Mbps | 750GB SSD,2.7T HDD |
- 起压力机器信息:与被压机器同配置
- 测试工具:apache-Jmeter-2.5.1
注:起压机器和被压机器在同一机房
2 测试说明
2.1 名词定义(时间的单位均为ms)
- Samples – 本次场景中一共完成了多少个线程
- Average – 平均响应时间
- Median – 统计意义上面的响应时间的中值
- 90% Line – 所有线程中90%的线程的响应时间都小于xx
- Min – 最小响应时间
- Max – 最大响应时间
- Error – 出错率
- Throughput – 吞吐量
- KB/sec – 以流量做衡量的吞吐量
2.2 底层存储
后端存储使用RocksDB,HugeGraph与RocksDB都在同一机器上启动,server相关的配置文件除主机和端口有修改外,其余均保持默认。
3 性能结果总结
- HugeGraph单条插入顶点和边的速度在每秒1w左右
- 顶点和边的批量插入速度远大于单条插入速度
- 按id查询顶点和边的并发度可达到13000以上,且请求的平均延时小于50ms
4 测试结果及分析
4.1 batch插入
4.1.1 压力上限测试
测试方法
不断提升并发量,测试server仍能正常提供服务的压力上限
压力参数
持续时间:5min
顶点的最大插入速度:

####### 结论:
- 并发2200,顶点的吞吐量是2026.8,每秒可处理的数据:2026.8*200=405360/s
边的最大插入速度

####### 结论:
- 并发900,边的吞吐量是776.9,每秒可处理的数据:776.9*500=388450/s
4.2 single插入
4.2.1 压力上限测试
测试方法
不断提升并发量,测试server仍能正常提供服务的压力上限
压力参数
- 持续时间:5min
- 服务异常标志:错误率大于0.00%
顶点的单条插入

####### 结论:
- 并发11500,吞吐量为10730,顶点的单条插入并发能力为11500
边的单条插入

####### 结论:
- 并发9000,吞吐量是8418,边的单条插入并发能力为9000
4.3 按id查询
4.3.1 压力上限测试
测试方法
不断提升并发量,测试server仍能正常提供服务的压力上限
压力参数
- 持续时间:5min
- 服务异常标志:错误率大于0.00%
顶点的按id查询

####### 结论:
- 并发14000,吞吐量是12663,顶点的按id查询的并发能力为14000,平均延时为44ms
边的按id查询

####### 结论:
- 并发13000,吞吐量是12225,边的按id查询的并发能力为13000,平均延时为12ms
8.2.2 - v0.5.6 Cluster(Cassandra)
1 测试环境
被压机器信息
| CPU | Memory | 网卡 | 磁盘 |
|---|---|---|---|
| 48 Intel(R) Xeon(R) CPU E5-2650 v4 @ 2.20GHz | 128G | 10000Mbps | 750GB SSD,2.7T HDD |
- 起压力机器信息:与被压机器同配置
- 测试工具:apache-Jmeter-2.5.1
注:起压机器和被压机器在同一机房
2 测试说明
2.1 名词定义(时间的单位均为ms)
- Samples – 本次场景中一共完成了多少个线程
- Average – 平均响应时间
- Median – 统计意义上面的响应时间的中值
- 90% Line – 所有线程中90%的线程的响应时间都小于xx
- Min – 最小响应时间
- Max – 最大响应时间
- Error – 出错率
- Throughput – 吞吐量
- KB/sec – 以流量做衡量的吞吐量
2.2 底层存储
后端存储使用15节点Cassandra集群,HugeGraph与Cassandra集群位于不同的服务器,server相关的配置文件除主机和端口有修改外,其余均保持默认。
3 性能结果总结
- HugeGraph单条插入顶点和边的速度分别为9000和4500
- 顶点和边的批量插入速度分别为5w/s和15w/s,远大于单条插入速度
- 按id查询顶点和边的并发度可达到12000以上,且请求的平均延时小于70ms
4 测试结果及分析
4.1 batch插入
4.1.1 压力上限测试
测试方法
不断提升并发量,测试server仍能正常提供服务的压力上限
压力参数
持续时间:5min
顶点的最大插入速度:

####### 结论:
- 并发3500,顶点的吞吐量是261,每秒可处理的数据:261*200=52200/s
边的最大插入速度

####### 结论:
- 并发1000,边的吞吐量是323,每秒可处理的数据:323*500=161500/s
4.2 single插入
4.2.1 压力上限测试
测试方法
不断提升并发量,测试server仍能正常提供服务的压力上限
压力参数
- 持续时间:5min
- 服务异常标志:错误率大于0.00%
顶点的单条插入

####### 结论:
- 并发9000,吞吐量为8400,顶点的单条插入并发能力为9000
边的单条插入

####### 结论:
- 并发4500,吞吐量是4160,边的单条插入并发能力为4500
4.3 按id查询
4.3.1 压力上限测试
测试方法
不断提升并发量,测试server仍能正常提供服务的压力上限
压力参数
- 持续时间:5min
- 服务异常标志:错误率大于0.00%
顶点的按id查询

####### 结论:
- 并发14500,吞吐量是13576,顶点的按id查询的并发能力为14500,平均延时为11ms
边的按id查询

####### 结论:
- 并发12000,吞吐量是10688,边的按id查询的并发能力为12000,平均延时为63ms
8.2.3 - v0.4.4
1 测试环境
被压机器信息
| 机器编号 | CPU | Memory | 网卡 | 磁盘 |
|---|---|---|---|---|
| 1 | 24 Intel(R) Xeon(R) CPU E5-2620 v2 @ 2.10GHz | 61G | 1000Mbps | 1.4T HDD |
| 2 | 48 Intel(R) Xeon(R) CPU E5-2650 v4 @ 2.20GHz | 128G | 10000Mbps | 750GB SSD,2.7T HDD |
- 起压力机器信息:与编号 1 机器同配置
- 测试工具:apache-Jmeter-2.5.1
注:起压机器和被压机器在同一机房
2 测试说明
2.1 名词定义(时间的单位均为ms)
- Samples – 本次场景中一共完成了多少个线程
- Average – 平均响应时间
- Median – 统计意义上面的响应时间的中值
- 90% Line – 所有线程中90%的线程的响应时间都小于xx
- Min – 最小响应时间
- Max – 最大响应时间
- Error – 出错率
- Throughput – 吞吐量
- KB/sec – 以流量做衡量的吞吐量
2.2 底层存储
后端存储使用RocksDB,HugeGraph与RocksDB都在同一机器上启动,server相关的配置文件除主机和端口有修改外,其余均保持默认。
3 性能结果总结
- HugeGraph每秒能够处理的请求数目上限是7000
- 批量插入速度远大于单条插入,在服务器上测试结果达到22w edges/s,37w vertices/s
- 后端是RocksDB,增大CPU数目和内存大小可以增大批量插入的性能。CPU和内存扩大一倍,性能增加45%-60%
- 批量插入场景,使用SSD替代HDD,性能提升较小,只有3%-5%
4 测试结果及分析
4.1 batch插入
4.1.1 压力上限测试
测试方法
不断提升并发量,测试server仍能正常提供服务的压力上限
压力参数
持续时间:5min
顶点和边的最大插入速度(高性能服务器,使用SSD存储RocksDB数据):

结论:
- 并发1000,边的吞吐量是是451,每秒可处理的数据:451*500条=225500/s
- 并发2000,顶点的吞吐量是1842.4,每秒可处理的数据:1842.4*200=368480/s
1. CPU和内存对插入性能的影响(服务器都使用HDD存储RocksDB数据,批量插入)

结论:
- 同样使用HDD硬盘,CPU和内存增加了1倍
- 边:吞吐量从268提升至426,性能提升了约60%
- 顶点:吞吐量从1263.8提升至1842.4,性能提升了约45%
2. SSD和HDD对插入性能的影响(高性能服务器,批量插入)

结论:
- 边:使用SSD吞吐量451.7,使用HDD吞吐量426.6,性能提升5%
- 顶点:使用SSD吞吐量1842.4,使用HDD吞吐量1794,性能提升约3%
3. 不同并发线程数对插入性能的影响(普通服务器,使用HDD存储RocksDB数据)
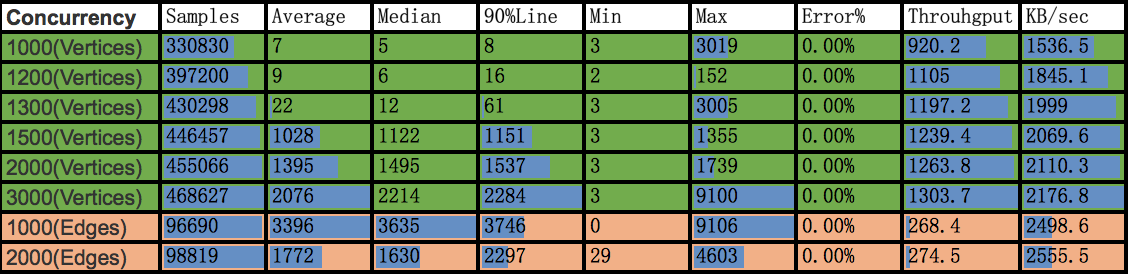
结论:
- 顶点:1000并发,响应时间7ms和1500并发响应时间1028ms差距悬殊,且吞吐量一直保持在1300左右,因此拐点数据应该在1300 ,且并发1300时,响应时间已达到22ms,在可控范围内,相比HugeGraph 0.2(1000并发:平均响应时间8959ms),处理能力出现质的飞跃;
- 边:从1000并发到2000并发,处理时间过长,超过3s,且吞吐量几乎在270左右浮动,因此继续增大并发线程数吞吐量不会再大幅增长,270 是一个拐点,跟HugeGraph 0.2版本(1000并发:平均响应时间31849ms)相比较,处理能力提升非常明显;
4.2 single插入
4.2.1 压力上限测试
测试方法
不断提升并发量,测试server仍能正常提供服务的压力上限
压力参数
- 持续时间:5min
- 服务异常标志:错误率大于0.00%
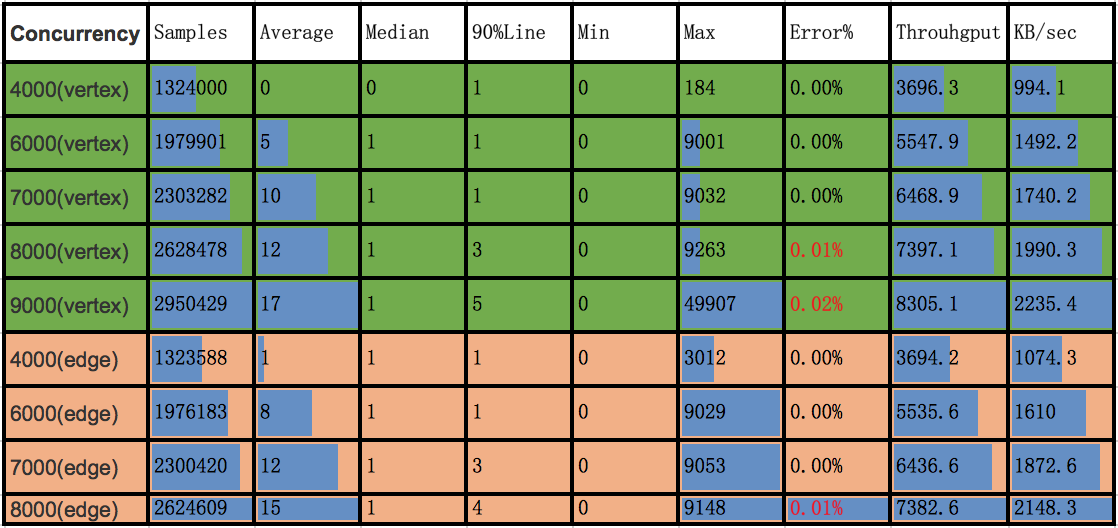
结论:
- 顶点:
- 4000并发:正常,无错误率,平均耗时小于1ms, 6000并发无错误,平均耗时5ms,在可接受范围内;
- 8000并发:存在0.01%的错误,已经无法处理,出现connection timeout错误,顶峰应该在7000左右
- 边:
- 4000并发:响应时间1ms,6000并发无任何异常,平均响应时间8ms,主要差异在于 IO network recv和send以及CPU);
- 8000并发:存在0.01%的错误率,平均耗15ms,拐点应该在7000左右,跟顶点结果匹配;
8.2.4 - v0.2
1 测试环境
1.1 软硬件信息
起压和被压机器配置相同,基本参数如下:
| CPU | Memory | 网卡 |
|---|---|---|
| 24 Intel(R) Xeon(R) CPU E5-2620 v2 @ 2.10GHz | 61G | 1000Mbps |
测试工具:apache-Jmeter-2.5.1
1.2 服务配置
- HugeGraph版本:0.2
- 后端存储:使用服务内嵌的cassandra-3.10,单点部署;
- 后端配置修改:修改了cassandra.yaml文件中的以下两个属性,其余选项均保持默认
- HugeGraphServer 与 HugeGremlinServer 与cassandra都在同一机器上启动,server 相关的配置文件除主机和端口有修改外,其余均保持默认。
1.3 名词解释
- Samples – 本次场景中一共完成了多少个线程
- Average – 平均响应时间
- Median – 统计意义上面的响应时间的中值
- 90% Line – 所有线程中90%的线程的响应时间都小于xx
- Min – 最小响应时间
- Max – 最大响应时间
- Error – 出错率
- Troughput – 吞吐量Â
- KB/sec – 以流量做衡量的吞吐量
注:时间的单位均为ms
2 测试结果
2.1 schema
| Label | Samples | Average | Median | 90%Line | Min | Max | Error% | Throughput | KB/sec |
|---|---|---|---|---|---|---|---|---|---|
| property_keys | 331000 | 1 | 1 | 2 | 0 | 172 | 0.00% | 920.7/sec | 178.1 |
| vertex_labels | 331000 | 1 | 2 | 2 | 1 | 126 | 0.00% | 920.7/sec | 193.4 |
| edge_labels | 331000 | 2 | 2 | 3 | 1 | 158 | 0.00% | 920.7/sec | 242.8 |
结论:schema的接口,在1000并发持续5分钟的压力下,平均响应时间1-2ms,无压力
2.2 single 插入
2.2.1 插入速率测试
压力参数
测试方法:固定并发量,测试server和后端的处理速率
- 并发量:1000
- 持续时间:5min
性能指标
| Label | Samples | Average | Median | 90%Line | Min | Max | Error% | Throughput | KB/sec |
|---|---|---|---|---|---|---|---|---|---|
| single_insert_vertices | 331000 | 0 | 1 | 1 | 0 | 21 | 0.00% | 920.7/sec | 234.4 |
| single_insert_edges | 331000 | 2 | 2 | 3 | 1 | 53 | 0.00% | 920.7/sec | 309.1 |
结论
- 顶点:平均响应时间1ms,每个请求插入一条数据,平均每秒处理920个请求,则每秒平均总共处理的数据为1*920约等于920条数据;
- 边:平均响应时间1ms,每个请求插入一条数据,平均每秒处理920个请求,则每秒平均总共处理的数据为1*920约等于920条数据;
2.2.2 压力上限测试
测试方法:不断提升并发量,测试server仍能正常提供服务的压力上限
压力参数
- 持续时间:5min
- 服务异常标志:错误率大于0.00%
性能指标
| Concurrency | Samples | Average | Median | 90%Line | Min | Max | Error% | Throughput | KB/sec |
|---|---|---|---|---|---|---|---|---|---|
| 2000(vertex) | 661916 | 1 | 1 | 1 | 0 | 3012 | 0.00% | 1842.9/sec | 469.1 |
| 4000(vertex) | 1316124 | 13 | 1 | 14 | 0 | 9023 | 0.00% | 3673.1/sec | 935.0 |
| 5000(vertex) | 1468121 | 1010 | 1135 | 1227 | 0 | 9223 | 0.06% | 4095.6/sec | 1046.0 |
| 7000(vertex) | 1378454 | 1617 | 1708 | 1886 | 0 | 9361 | 0.08% | 3860.3/sec | 987.1 |
| 2000(edge) | 629399 | 953 | 1043 | 1113 | 1 | 9001 | 0.00% | 1750.3/sec | 587.6 |
| 3000(edge) | 648364 | 2258 | 2404 | 2500 | 2 | 9001 | 0.00% | 1810.7/sec | 607.9 |
| 4000(edge) | 649904 | 1992 | 2112 | 2211 | 1 | 9001 | 0.06% | 1812.5/sec | 608.5 |
结论
- 顶点:
- 4000并发:正常,无错误率,平均耗时13ms;
- 5000并发:每秒处理5000个数据的插入,就会存在0.06%的错误,应该已经处理不了了,顶峰应该在4000
- 边:
- 1000并发:响应时间2ms,跟2000并发的响应时间相差较多,主要是 IO network rec和send以及CPU几乎增加了一倍);
- 2000并发:每秒处理2000个数据的插入,平均耗时953ms,平均每秒处理1750个请求;
- 3000并发:每秒处理3000个数据的插入,平均耗时2258ms,平均每秒处理1810个请求;
- 4000并发:每秒处理4000个数据的插入,平均每秒处理1812个请求;
2.3 batch 插入
2.3.1 插入速率测试
压力参数
测试方法:固定并发量,测试server和后端的处理速率
- 并发量:1000
- 持续时间:5min
性能指标
| Label | Samples | Average | Median | 90%Line | Min | Max | Error% | Throughput | KB/sec |
|---|---|---|---|---|---|---|---|---|---|
| batch_insert_vertices | 37162 | 8959 | 9595 | 9704 | 17 | 9852 | 0.00% | 103.4/sec | 393.3 |
| batch_insert_edges | 10800 | 31849 | 34544 | 35132 | 435 | 35747 | 0.00% | 28.8/sec | 814.9 |
结论
- 顶点:平均响应时间为8959ms,处理时间过长。每个请求插入199条数据,平均每秒处理103个请求,则每秒平均总共处理的数据为199*131约等于2w条数据;
- 边:平均响应时间31849ms,处理时间过长。每个请求插入499个数据,平均每秒处理28个请求,则每秒平均总共处理的数据为28*499约等于13900条数据;
8.3 - HugeGraph-Loader Performance
使用场景
当要批量插入的图数据(包括顶点和边)条数为billion级别及以下,或者总数据量小于TB时,可以采用HugeGraph-Loader工具持续、高速导入图数据
性能
测试均采用网址数据的边数据
RocksDB单机性能
- 关闭label index,22.8w edges/s
- 开启label index,15.3w edges/s
Cassandra集群性能
- 默认开启label index,6.3w edges/s
8.4 - HugeGraph 0.4.4 Benchmark
1 测试环境
1.1 硬件信息
| CPU | Memory | 网卡 | 磁盘 |
|---|---|---|---|
| 48 Intel(R) Xeon(R) CPU E5-2650 v4 @ 2.20GHz | 128G | 10000Mbps | 750GB SSD |
1.2 软件信息
1.2.1 测试用例
测试使用graphdb-benchmark,一个图数据库测试集。该测试集主要包含4类测试:
Massive Insertion,批量插入顶点和边,一定数量的顶点或边一次性提交
Single Insertion,单条插入,每个顶点或者每条边立即提交
Query,主要是图数据库的基本查询操作:
- Find Neighbors,查询所有顶点的邻居
- Find Adjacent Nodes,查询所有边的邻接顶点
- Find Shortest Path,查询第一个顶点到100个随机顶点的最短路径
Clustering,基于Louvain Method的社区发现算法
1.2.2 测试数据集
测试使用人造数据和真实数据
MIW、SIW和QW使用SNAP数据集
CW使用LFR-Benchmark generator生成的人造数据
本测试用到的数据集规模
| 名称 | vertex数目 | edge数目 | 文件大小 |
|---|---|---|---|
| email-enron.txt | 36,691 | 367,661 | 4MB |
| com-youtube.ungraph.txt | 1,157,806 | 2,987,624 | 38.7MB |
| amazon0601.txt | 403,393 | 3,387,388 | 47.9MB |
1.3 服务配置
- HugeGraph版本:0.4.4,RestServer和Gremlin Server和backends都在同一台服务器上
- Cassandra版本:cassandra-3.10,commit-log 和data共用SSD
- RocksDB版本:rocksdbjni-5.8.6
- Titan版本:0.5.4, 使用thrift+Cassandra模式
graphdb-benchmark适配的Titan版本为0.5.4
2 测试结果
2.1 Batch插入性能
| Backend | email-enron(30w) | amazon0601(300w) | com-youtube.ungraph(300w) |
|---|---|---|---|
| Titan | 9.516 | 88.123 | 111.586 |
| RocksDB | 2.345 | 14.076 | 16.636 |
| Cassandra | 11.930 | 108.709 | 101.959 |
| Memory | 3.077 | 15.204 | 13.841 |
说明
- 表头"()“中数据是数据规模,以边为单位
- 表中数据是批量插入的时间,单位是s
- 例如,HugeGraph使用RocksDB插入amazon0601数据集的300w条边,花费14.076s,速度约为21w edges/s
结论
- RocksDB和Memory后端插入性能优于Cassandra
- HugeGraph和Titan同样使用Cassandra作为后端的情况下,插入性能接近
2.2 遍历性能
2.2.1 术语说明
- FN(Find Neighbor), 遍历所有vertex, 根据vertex查邻接edge, 通过edge和vertex查other vertex
- FA(Find Adjacent), 遍历所有edge,根据edge获得source vertex和target vertex
2.2.2 FN性能
| Backend | email-enron(3.6w) | amazon0601(40w) | com-youtube.ungraph(120w) |
|---|---|---|---|
| Titan | 7.724 | 70.935 | 128.884 |
| RocksDB | 8.876 | 65.852 | 63.388 |
| Cassandra | 13.125 | 126.959 | 102.580 |
| Memory | 22.309 | 207.411 | 165.609 |
说明
- 表头”()“中数据是数据规模,以顶点为单位
- 表中数据是遍历顶点花费的时间,单位是s
- 例如,HugeGraph使用RocksDB后端遍历amazon0601的所有顶点,并查找邻接边和另一顶点,总共耗时65.852s
2.2.3 FA性能
| Backend | email-enron(30w) | amazon0601(300w) | com-youtube.ungraph(300w) |
|---|---|---|---|
| Titan | 7.119 | 63.353 | 115.633 |
| RocksDB | 6.032 | 64.526 | 52.721 |
| Cassandra | 9.410 | 102.766 | 94.197 |
| Memory | 12.340 | 195.444 | 140.89 |
说明
- 表头”()“中数据是数据规模,以边为单位
- 表中数据是遍历边花费的时间,单位是s
- 例如,HugeGraph使用RocksDB后端遍历amazon0601的所有边,并查询每条边的两个顶点,总共耗时64.526s
结论
- HugeGraph RocksDB > Titan thrift+Cassandra > HugeGraph Cassandra > HugeGraph Memory
2.3 HugeGraph-图常用分析方法性能
术语说明
- FS(Find Shortest Path), 寻找最短路径
- K-neighbor,从起始vertex出发,通过K跳边能够到达的所有顶点, 包括1, 2, 3…(K-1), K跳边可达vertex
- K-out, 从起始vertex出发,恰好经过K跳out边能够到达的顶点
FS性能
| Backend | email-enron(30w) | amazon0601(300w) | com-youtube.ungraph(300w) |
|---|---|---|---|
| Titan | 11.333 | 0.313 | 376.06 |
| RocksDB | 44.391 | 2.221 | 268.792 |
| Cassandra | 39.845 | 3.337 | 331.113 |
| Memory | 35.638 | 2.059 | 388.987 |
说明
- 表头”()“中数据是数据规模,以边为单位
- 表中数据是找到从第一个顶点出发到达随机选择的100个顶点的最短路径的时间,单位是s
- 例如,HugeGraph使用RocksDB查找第一个顶点到100个随机顶点的最短路径,总共耗时2.059s
结论
- 在数据规模小或者顶点关联关系少的场景下,Titan最短路径性能优于HugeGraph
- 随着数据规模增大且顶点的关联度增高,HugeGraph最短路径性能优于Titan
K-neighbor性能
| 顶点 | 深度 | 一度 | 二度 | 三度 | 四度 | 五度 | 六度 |
|---|---|---|---|---|---|---|---|
| v1 | 时间 | 0.031s | 0.033s | 0.048s | 0.500s | 11.27s | OOM |
| v111 | 时间 | 0.027s | 0.034s | 0.115 | 1.36s | OOM | – |
| v1111 | 时间 | 0.039s | 0.027s | 0.052s | 0.511s | 10.96s | OOM |
说明
- HugeGraph-Server的JVM内存设置为32GB,数据量过大时会出现OOM
K-out性能
| 顶点 | 深度 | 一度 | 二度 | 三度 | 四度 | 五度 | 六度 |
|---|---|---|---|---|---|---|---|
| v1 | 时间 | 0.054s | 0.057s | 0.109s | 0.526s | 3.77s | OOM |
| 度 | 10 | 133 | 2453 | 50,830 | 1,128,688 | ||
| v111 | 时间 | 0.032s | 0.042s | 0.136s | 1.25s | 20.62s | OOM |
| 度 | 10 | 211 | 4944 | 113150 | 2,629,970 | ||
| v1111 | 时间 | 0.039s | 0.045s | 0.053s | 1.10s | 2.92s | OOM |
| 度 | 10 | 140 | 2555 | 50825 | 1,070,230 |
说明
- HugeGraph-Server的JVM内存设置为32GB,数据量过大时会出现OOM
结论
- FS场景,HugeGraph性能优于Titan
- K-neighbor和K-out场景,HugeGraph能够实现在5度范围内秒级返回结果
2.4 图综合性能测试-CW
| 数据库 | 规模1000 | 规模5000 | 规模10000 | 规模20000 |
|---|---|---|---|---|
| Titan | 45.943 | 849.168 | 2737.117 | 9791.46 |
| Memory(core) | 41.077 | 1825.905 | * | * |
| Cassandra(core) | 39.783 | 862.744 | 2423.136 | 6564.191 |
| RocksDB(core) | 33.383 | 199.894 | 763.869 | 1677.813 |
说明
- “规模"以顶点为单位
- 表中数据是社区发现完成需要的时间,单位是s,例如HugeGraph使用RocksDB后端在规模10000的数据集,社区聚合不再变化,需要耗时763.869s
- “*“表示超过10000s未完成
- CW测试是CRUD的综合评估
- 后三者分别是HugeGraph的不同后端,该测试中HugeGraph跟Titan一样,没有通过client,直接对core操作
结论
- HugeGraph在使用Cassandra后端时,性能略优于Titan,随着数据规模的增大,优势越来越明显,数据规模20000时,比Titan快30%
- HugeGraph在使用RocksDB后端时,性能远高于Titan和HugeGraph的Cassandra后端,分别比两者快了6倍和4倍
9 - Contribution Guidelines
9.1 - How to Contribute to HugeGraph
Thanks for taking the time to contribute! As an open source project, HugeGraph is looking forward to be contributed from everyone, and we are also grateful to all the contributors.
The following is a contribution guide for HugeGraph:
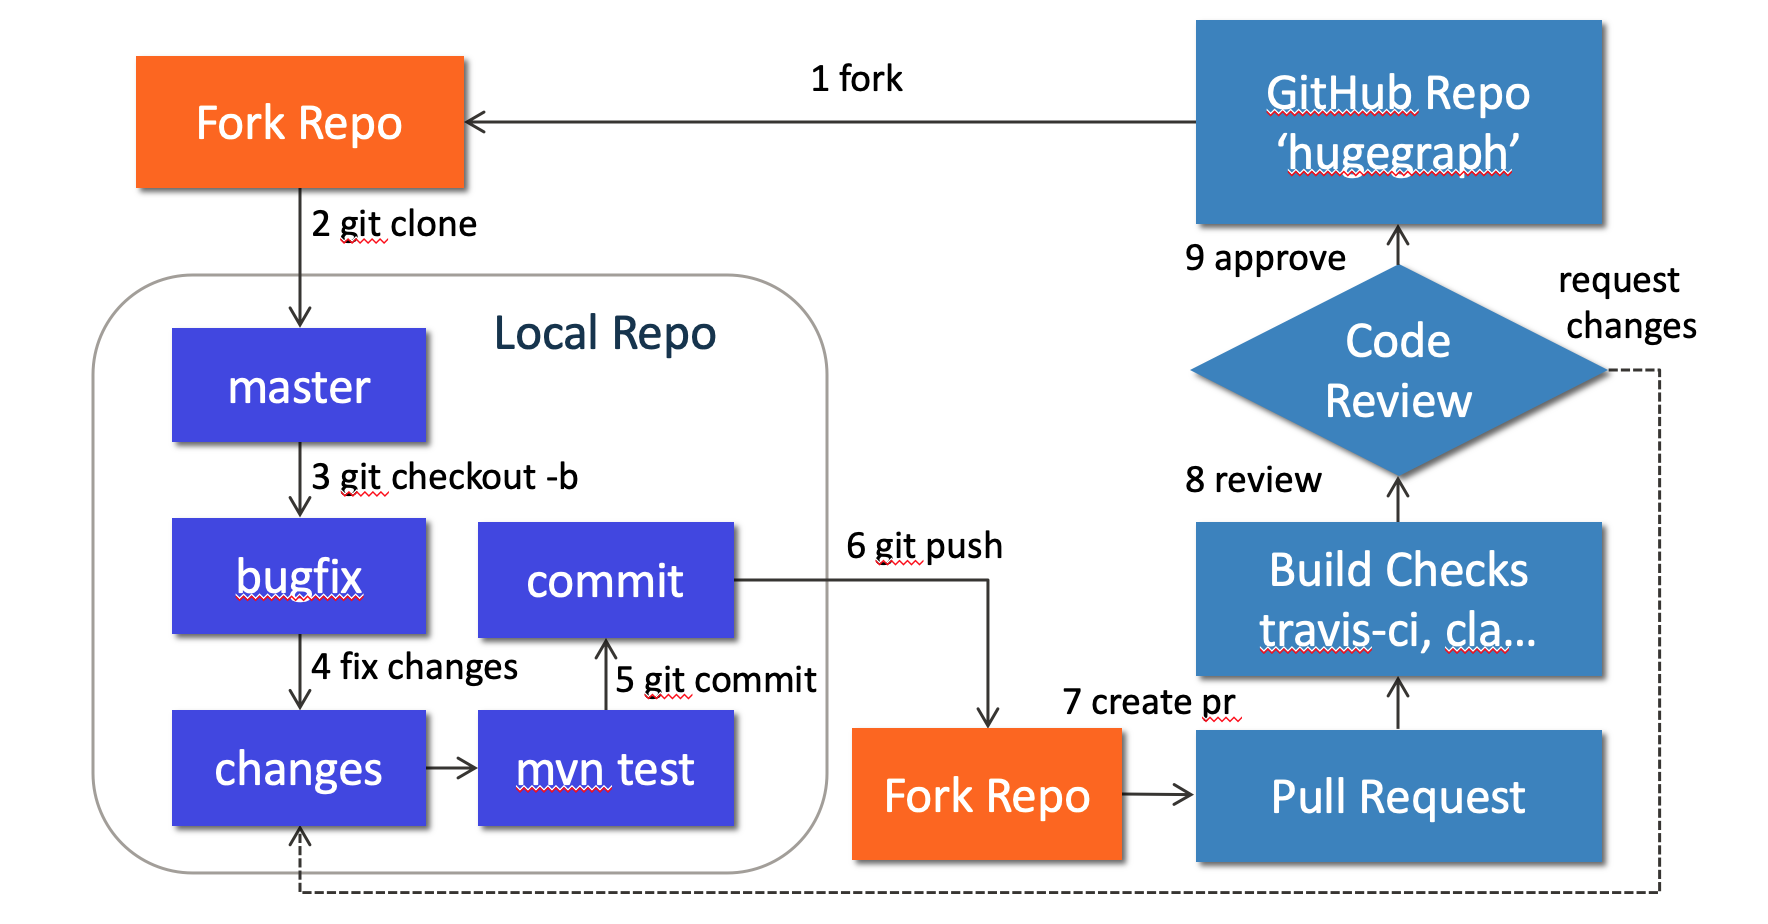 {width=“884” height=“462”}
1. Preparation
We can contribute by reporting issues, submitting code patches or any other feedback.
Before submitting the code, we need to do some preparation:
Sign up or login to GitHub: https://github.com
Fork HugeGraph repo from GitHub: https://github.com/apache/incubator-hugegraph/fork
Clone code from fork repo to local: https://github.com/${GITHUB_USER_NAME}/hugegraph
Configure local HugeGraph repo
Optional: You can use GitHub desktop to greatly simplify the commit and update process.
2. Create an Issue on GitHub
If you encounter bugs or have any questions, please go to GitHub Issues to report them and feel free to create an issue.
3. Make changes of code locally
3.1 Create a new branch
Please don’t use master branch for development. We should create a new branch instead:
3.2 Change the code
Assume that we need to modify some files like “HugeGraph.java” and “HugeFactory.java”:
Note: In order to be consistent with the code style easily, if you use IDEA as your IDE, you can directly import our code style configuration file.
3.3 Commit changes to git repo
After the code has been completed, we submit them to the local git repo:
Please edit the commit message after running git commit, we can explain what and how to fix a bug or implement a feature, the following is an example:
Please remember to fill in the issue id, which was generated by GitHub after issue creation.
3.4 Push commit to GitHub fork repo
Push the local commit to GitHub fork repo:
Note that since GitHub requires submitting code through username + token (instead of using username + password directly), you need to create a GitHub token from https://github.com/settings/tokens:
 {width=“1280” height=“422”}
4. Create a Pull Request
Go to the web page of GitHub fork repo, there would be a chance to create a Pull Request after pushing to a new branch, just click button “Compare & pull request” to do it. Then edit the description for proposed changes, which can just be copied from the commit message.
Please sign the HugeGraph CLA when contributing code for the first time. You can sign the CLA by just posting a Pull Request Comment same as the below format:
I have read the CLA Document and I hereby sign the CLA
Note: please make sure the email address you used to submit the code is bound to the GitHub account. For how to bind the email address, please refer to https://github.com/settings/emails:
 {width=“1280” height=“592”}
5. Code review
Maintainers will start the code review after all the automatic checks are passed:
- Check: Contributor License Agreement is signed
- Check: Travis CI builds is passed (automatically Test and Deploy)
The commit will be accepted and merged if there is no problem after review.
Please click on “Details” to find the problem if any check does not pass.
If there are checks not passed or changes requested, then continue to modify the code and push again.
6. More changes after review
If we have not passed the review, don’t be discouraged. Usually a commit needs to be reviewed several times before being accepted! Please follow the review comments and make further changes.
After the further changes, we submit them to the local repo:
If there are conflicts that prevent the code from being merged, we need to rebase on master branch:
And push it to GitHub fork repo again:
GitHub will automatically update the Pull Request after we push it, just wait for code review.
9.2 - Subscribe Mailing Lists
It is highly recommended to subscribe to the development mailing list to keep up-to-date with the community.
In the process of using HugeGraph, if you have any questions or ideas, suggestions, you can participate in the HugeGraph community building through the Apache mailing list. Sending a subscription email is also very simple, the steps are as follows:
Email dev-subscribe@hugegraph.apache.org with your own email address, subject and content are arbitrary.
Receive confirmation email and reply. After completing step 1, you will receive a confirmation email from dev-help@hugegraph.apache.org (if not received, please confirm whether the email is automatically classified as spam, promotion email, subscription email, etc.) . Then reply directly to the email, or click on the link in the email to reply quickly, the subject and content are arbitrary.
Receive a welcome email. After completing the above steps, you will receive a welcome email with the subject WELCOME to dev@hugegraph.apache.org, and you have successfully subscribed to the Apache HugeGraph mailing list.
Unsubscribe Mailing Lists
If you do not need to know what’s going on with HugeGraph, you can unsubscribe from the mailing list.
Unsubscribe from the mailing list steps are as follows:
Email dev-unsubscribe@hugegraph.apache.org with your subscribed email address, subject and content are arbitrary.
Receive confirmation email and reply. After completing step 1, you will receive a confirmation email from dev-help@hugegraph.apache.org (if not received, please confirm whether the email is automatically classified as spam, promotion email, subscription email, etc.) . Then reply directly to the email, or click on the link in the email to reply quickly, the subject and content are arbitrary.
Receive a goodbye email. After completing the above steps, you will receive a goodbye email with the subject GOODBYE from dev@hugegraph.apache.org, and you have successfully unsubscribed to the Apache HugeGraph mailing list, and you will not receive emails from dev@hugegraph.apache.org.
9.3 - Validate Apache Release
TODO: Translate this article to English!
验证阶段
当内部的临时发布和打包工作完成后, 其他的社区开发者(尤其是 PMC)需要参与到验证环节确保某个人发布版本的"正确性 + 完整性", 这里需要每个人都尽量参与, 然后后序邮件回复的时候说明自己已检查了哪些项. (下面是核心项)
1. 检查 hash 值
首先需要检查 source + binary 包的文件完整性, 通过 shasum 进行校验, 确保和发布到 apache/github 上的 hash 值一致 (一般是 sha512), 这里同0x02的最后一步检验.
2. 检查 gpg 签名
这个就是为了确保发布的包是由可信赖的人上传的, 假设 tom 签名后上传, 其他人应该下载 A 的公钥然后进行签名确认, 相关命令:
先确认了整体的完整性/一致性, 然后接下来确认具体的内容 (关键)
3. 检查压缩包内容
这里分源码包 + 二进制包两个方面, 源码包更为严格, 挑核心的部分说 (完整的列表参考官方 Wiki, 比较长)
首先我们需要从 apache 官方的 release-candidate 地址下载包到本地 (地址: dist.apache.org/repos/dist/dev/hugegraph/)
A. 源码包
解压 xxx-hugegraph-source.tar.gz后, 进行如下检查:
- 文件夹都带有
incubating, 且不存在空的文件/文件夹 - 存在
DISCLAIMER文件 - 存在
LICENSE+NOTICE文件并且内容正常 - 不存在任何二进制文件
- 源码文件都包含标准
ASF License头 (这个用插件跑一下为主) - 检查每个父/子模块的
pom.xml版本号是否一致 (且符合期望) - 检查前 3 ~ 5 个 commit 提交, 点进去看看是否修改处和源码文件一致
- 最后, 确保源码可以正常/正确编译 (然后看看测试和规范)
B. 二进制包
解压 xxx-hugegraph.tar.gz后, 进行如下检查:
- 文件夹都带有
incubating - 存在
LICENSE+NOTICE文件并且内容正常 - 通过 gpg 命令确认每个文件的签名正常
注: 如果二进制包里面引入了第三方依赖, 则需要更新 LICENSE, 加入第三方依赖的 LICENSE; 若第三方依赖 LICENSE 是 Apache 2.0, 且对应的项目中包含了 NOTICE, 则还需要更新我们的 NOTICE 文件
4. 检查官网以及 github 等页面
- 确保官网至少满足 apache website check, 以及没有死链等
- 更新下载链接以及版本更新说明
- …
10 - CHANGELOGS
10.1 - HugeGraph 0.12 Release Notes
API & Client
接口更新
- 支持 https + auth 模式连接图服务 (hugegraph-client #109 #110)
- 统一 kout/kneighbor 等 OLTP 接口的参数命名及默认值(hugegraph-client #122 #123)
- 支持 RESTful 接口利用 P.textcontains() 进行属性全文检索(hugegraph #1312)
- 增加 graph_read_mode API 接口,以切换 OLTP、OLAP 读模式(hugegraph #1332)
- 支持 list/set 类型的聚合属性 aggregate property(hugegraph #1332)
- 权限接口增加 METRICS 资源类型(hugegraph #1355、hugegraph-client #114)
- 权限接口增加 SCHEMA 资源类型(hugegraph #1362、hugegraph-client #117)
- 增加手动 compact API 接口,支持 rocksdb/cassandra/hbase 后端(hugegraph #1378)
- 权限接口增加 login/logout API,支持颁发或回收 Token(hugegraph #1500、hugegraph-client #125)
- 权限接口增加 project API(hugegraph #1504、hugegraph-client #127)
- 增加 OLAP 回写接口,支持 cassandra/rocksdb 后端(hugegraph #1506、hugegraph-client #129)
- 增加返回一个图的所有 Schema 的 API 接口(hugegraph #1567、hugegraph-client #134)
- 变更 property key 创建与更新 API 的 HTTP 返回码为 202(hugegraph #1584)
- 增强 Text.contains() 支持3种格式:“word”、"(word)"、"(word1|word2|word3)"(hugegraph #1652)
- 统一了属性中特殊字符的行为(hugegraph #1670 #1684)
- 支持动态创建图实例、克隆图实例、删除图实例(hugegraph-client #135)
其它修改
- 修复在恢复 index label 时 IndexLabelV56 id 丢失的问题(hugegraph-client #118)
- 为 Edge 类增加 name() 方法(hugegraph-client #121)
Core & Server
功能更新
- 支持动态创建图实例(hugegraph #1065)
- 支持通过 Gremlin 调用 OLTP 算法(hugegraph #1289)
- 支持多集群使用同一个图权限服务,以共享权限信息(hugegraph #1350)
- 支持跨多节点的 Cache 缓存同步(hugegraph #1357)
- 支持 OLTP 算法使用原生集合以降低 GC 压力提升性能(hugegraph #1409)
- 支持对新增的 Raft 节点打快照或恢复快照(hugegraph #1439)
- 支持对集合属性建立二级索引 Secondary Index(hugegraph #1474)
- 支持审计日志,及其压缩、限速等功能(hugegraph #1492 #1493)
- 支持 OLTP 算法使用高性能并行无锁原生集合以提升性能(hugegraph #1552)
BUG修复
- 修复带权最短路径算法(weighted shortest path)NPE问题 (hugegraph #1250)
- 增加 Raft 相关的安全操作白名单(hugegraph #1257)
- 修复 RocksDB 实例未正确关闭的问题(hugegraph #1264)
- 在清空数据 truncate 操作之后,显示的发起写快照 Raft Snapshot(hugegraph #1275)
- 修复 Raft Leader 在收到 Follower 转发请求时未更新缓存的问题(hugegraph #1279)
- 修复带权最短路径算法(weighted shortest path)结果不稳定的问题(hugegraph #1280)
- 修复 rays 算法 limit 参数不生效问题(hugegraph #1284)
- 修复 neighborrank 算法 capacity 参数未检查的问题(hugegraph #1290)
- 修复 PostgreSQL 因为不存在与用户同名的数据库而初始化失败的问题(hugegraph #1293)
- 修复 HBase 后端当启用 Kerberos 时初始化失败的问题(hugegraph #1294)
- 修复 HBase/RocksDB 后端 shard 结束判断错误问题(hugegraph #1306)
- 修复带权最短路径算法(weighted shortest path)未检查目标顶点存在的问题(hugegraph #1307)
- 修复 personalrank/neighborrank 算法中非 String 类型 id 的问题(hugegraph #1310)
- 检查必须是 master 节点才允许调度 gremlin job(hugegraph #1314)
- 修复 g.V().hasLabel().limit(n) 因为索引覆盖导致的部分结果不准确问题(hugegraph #1316)
- 修复 jaccardsimilarity 算法当并集为空时报 NaN 错误的问题(hugegraph #1324)
- 修复 Raft Follower 节点操作 Schema 多节点之间数据不同步问题(hugegraph #1325)
- 修复因为 tx 未关闭导致的 TTL 不生效问题(hugegraph #1330)
- 修复 gremlin job 的执行结果大于 Cassandra 限制但小于任务限制时的异常处理(hugegraph #1334)
- 检查权限接口 auth-delete 和 role-get API 操作时图必须存在(hugegraph #1338)
- 修复异步任务结果中包含 path/tree 时系列化不正常的问题(hugegraph #1351)
- 修复初始化 admin 用户时的 NPE 问题(hugegraph #1360)
- 修复异步任务原子性操作问题,确保 update/get fields 及 re-schedule 的原子性(hugegraph #1361)
- 修复权限 NONE 资源类型的问题(hugegraph #1362)
- 修复启用权限后,truncate 操作报错 SecurityException 及管理员信息丢失问题(hugegraph #1365)
- 修复启用权限后,解析数据忽略了权限异常的问题(hugegraph #1380)
- 修复 AuthManager 在初始化时会尝试连接其它节点的问题(hugegraph #1381)
- 修复特定的 shard 信息导致 base64 解码错误的问题(hugegraph #1383)
- 修复启用权限后,使用 consistent-hash LB 在校验权限时,creator 为空的问题(hugegraph #1385)
- 改进权限中 VAR 资源不再依赖于 VERTEX 资源(hugegraph #1386)
- 规范启用权限后,Schema 操作仅依赖具体的资源(hugegraph #1387)
- 规范启用权限后,部分操作由依赖 STATUS 资源改为依赖 ANY 资源(hugegraph #1391)
- 规范启用权限后,禁止初始化管理员密码为空(hugegraph #1400)
- 检查创建用户时 username/password 不允许为空(hugegraph #1402)
- 修复更新 Label 时,PrimaryKey 或 SortKey 被设置为可空属性的问题(hugegraph #1406)
- 修复 ScyllaDB 丢失分页结果问题(hugegraph #1407)
- 修复带权最短路径算法(weighted shortest path)权重属性强制转换为 double 的问题(hugegraph #1432)
- 统一 OLTP 算法中的 degree 参数命名(hugegraph #1433)
- 修复 fusiformsimilarity 算法当 similars 为空的时候返回所有的顶点问题(hugegraph #1434)
- 改进 paths 算法,当起始点与目标点相同时应该返回空路径(hugegraph #1435)
- 修改 kout/kneighbor 的 limit 参数默认值 10 为 10000000(hugegraph #1436)
- 修复分页信息中的 ‘+’ 被 URL 编码为空格的问题(hugegraph #1437)
- 改进边更新接口的错误提示信息(hugegraph #1443)
- 修复 kout 算法 degree 未在所有 label 范围生效的问题(hugegraph #1459)
- 改进 kneighbor/kout 算法,起始点不允许出现在结果集中(hugegraph #1459 #1463)
- 统一 kout/kneighbor 的 Get 和 Post 版本行为(hugegraph #1470)
- 改进创建边时顶点类型不匹配的错误提示信息(hugegraph #1477)
- 修复 Range Index 的残留索引问题(hugegraph #1498)
- 修复权限操作未失效缓存的问题(hugegraph #1528)
- 修复 sameneighbor 的 limit 参数默认值 10 为 10000000(hugegraph #1530)
- 修复 clear API 不应该所有后端都调用 create snapshot 的问题(hugegraph #1532)
- 修复当 loading 模式时创建 Index Label 阻塞问题(hugegraph #1548)
- 修复增加图到 project 或从 project 移除图的问题(hugegraph #1562)
- 改进权限操作的一些错误提示信息(hugegraph #1563)
- 支持浮点属性设置为 Infinity/NaN 的值(hugegraph #1578)
- 修复 Raft 启用 safe_read 时的 quorum read 问题(hugegraph #1618)
- 修复 token 过期时间配置的单位问题(hugegraph #1625)
- 修复 MySQL Statement 资源泄露问题(hugegraph #1627)
- 修复竞争条件下 Schema.getIndexLabel 获取不到数据的问题(hugegraph #1629)
- 修复 HugeVertex4Insert 无法系列化问题(hugegraph #1630)
- 修复 MySQL count Statement 未关闭问题(hugegraph #1640)
- 修复当删除 Index Label 异常时,导致状态不同步问题(hugegraph #1642)
- 修复 MySQL 执行 gremlin timeout 导致的 statement 未关闭问题(hugegraph #1643)
- 改进 Search Index 以兼容特殊 Unicode 字符:\u0000 to \u0003(hugegraph #1659)
- 修复 #1659 引入的 Char 未转化为 String 的问题(hugegraph #1664)
- 修复 has() + within() 查询时结果异常问题(hugegraph #1680)
- 升级 Log4j 版本到 2.17 以修复安全漏洞(hugegraph #1686 #1698 #1702)
- 修复 HBase 后端 shard scan 中 startkey 包含空串时 NPE 问题(hugegraph #1691)
- 修复 paths 算法在深层环路遍历时性能下降问题 (hugegraph #1694)
- 改进 personalrank 算法的参数默认值及错误检查(hugegraph #1695)
- 修复 RESTful 接口 P.within 条件不生效问题(hugegraph #1704)
- 修复启用权限时无法动态创建图的问题(hugegraph #1708)
配置项修改:
- 共享 SSL 相关配置项命名(hugegraph #1260)
- 支持 RocksDB 配置项 rocksdb.level_compaction_dynamic_level_bytes(hugegraph #1262)
- 去除 RESFful Server 服务协议配置项 restserver.protocol,自动提取 URL 中的 Schema(hugegraph #1272)
- 增加 PostgreSQL 配置项 jdbc.postgresql.connect_database(hugegraph #1293)
- 增加针对顶点主键是否编码的配置项 vertex.encode_primary_key_number(hugegraph #1323)
- 增加针对聚合查询是否启用索引优化的配置项 query.optimize_aggregate_by_index(hugegraph #1549)
- 修改 cache_type 的默认值 l1 为 l2(hugegraph #1681)
- 增加 JDBC 强制重连配置项 jdbc.forced_auto_reconnect(hugegraph #1710)
其它修改
- 增加默认的 SSL Certificate 文件(hugegraph #1254)
- OLTP 并行请求共享线程池,而非每个请求使用单独的线程池(hugegraph #1258)
- 修复 Example 的问题(hugegraph #1308)
- 使用 jraft 版本 1.3.5(hugegraph #1313)
- 如果启用了 Raft 模式时,关闭 RocksDB 的 WAL(hugegraph #1318)
- 使用 TarLz4Util 来提升快照 Snapshot 压缩的性能(hugegraph #1336)
- 升级存储的版本号(store version),因为 property key 增加了 read frequency(hugegraph #1341)
- 顶点/边 vertex/edge 的 Get API 使用 queryVertex/queryEdge 方法来替代 iterator 方法(hugegraph #1345)
- 支持 BFS 优化的多度查询(hugegraph #1359)
- 改进 RocksDB deleteRange() 带来的查询性能问题(hugegraph #1375)
- 修复 travis-ci cannot find symbol Namifiable 问题(hugegraph #1376)
- 确保 RocksDB 快照的磁盘与 data path 指定的一致(hugegraph #1392)
- 修复 MacOS 空闲内存 free_memory 计算不准确问题(hugegraph #1396)
- 增加 Raft onBusy 回调来配合限速(hugegraph #1401)
- 升级 netty-all 版本 4.1.13.Final 到 4.1.42.Final(hugegraph #1403)
- 支持 TaskScheduler 暂停当设置为 loading 模式时(hugegraph #1414)
- 修复 raft-tools 脚本的问题(hugegraph #1416)
- 修复 license params 问题(hugegraph #1420)
- 提升写权限日志的性能,通过 batch flush & async write 方式改进(hugegraph #1448)
- 增加 MySQL 连接 URL 的日志记录(hugegraph #1451)
- 提升用户信息校验性能(hugegraph# 1460)
- 修复 TTL 因为起始时间问题导致的错误(hugegraph #1478)
- 支持日志配置的热加载及对审计日志的压缩(hugegraph #1492)
- 支持针对用户级别的审计日志的限速(hugegraph #1493)
- 缓存 RamCache 支持用户自定义的过期时间(hugegraph #1494)
- 在 auth client 端缓存 login role 以避免重复的 RPC 调用(hugegraph #1507)
- 修复 IdSet.contains() 未复写 AbstractCollection.contains() 问题(hugegraph #1511)
- 修复当 commitPartOfEdgeDeletions() 失败时,未回滚 rollback 的问题(hugegraph #1513)
- 提升 Cache metrics 性能(hugegraph #1515)
- 当发生 license 操作错误时,增加打印异常日志(hugegraph #1522)
- 改进 SimilarsMap 实现(hugegraph #1523)
- 使用 tokenless 方式来更新 coverage(hugegraph #1529)
- 改进 project update 接口的代码(hugegraph #1537)
- 允许从 option() 访问 GRAPH_STORE(hugegraph #1546)
- 优化 kout/kneighbor 的 count 查询以避免拷贝集合(hugegraph #1550)
- 优化 shortestpath 遍历方式,以数据量少的一端优先遍历(hugegraph #1569)
- 完善 rocksdb.data_disks 配置项的 allowed keys 提示信息(hugegraph #1585)
- 为 number id 优化 OLTP 遍历中的 id2code 方法性能(hugegraph #1623)
- 优化 HugeElement.getProperties() 返回 Collection<Property>(hugegraph #1624)
- 增加 APACHE PROPOSAL 文件(hugegraph #1644)
- 改进 close tx 的流程(hugegraph #1655)
- 当 reset() 时为 MySQL close 捕获所有类型异常(hugegraph #1661)
- 改进 OLAP property 模块代码(hugegraph #1675)
- 改进查询模块的执行性能(hugegraph #1711)
Loader
- 支持导入 Parquet 格式文件(hugegraph-loader #174)
- 支持 HDFS Kerberos 权限验证(hugegraph-loader #176)
- 支持 HTTPS 协议连接到服务端导入数据(hugegraph-loader #183)
- 修复 trust store file 路径问题(hugegraph-loader #186)
- 处理 loading mode 重置的异常(hugegraph-loader #187)
- 增加在插入数据时对非空属性的检查(hugegraph-loader #190)
- 修复客户端与服务端时区不同导致的时间判断问题(hugegraph-loader #192)
- 优化数据解析性能(hugegraph-loader #194)
- 当用户指定了文件头时,检查其必须不为空(hugegraph-loader #195)
- 修复示例程序中 MySQL struct.json 格式问题(hugegraph-loader #198)
- 修复顶点边导入速度不精确的问题(hugegraph-loader #200 #205)
- 当导入启用 check-vertex 时,确保先导入顶点再导入边(hugegraph-loader #206)
- 修复边 Json 数据导入格式不统一时数组溢出的问题(hugegraph-loader #211)
- 修复因边 mapping 文件不存在导致的 NPE 问题(hugegraph-loader #213)
- 修复读取时间可能出现负数的问题(hugegraph-loader #215)
- 改进目录文件的日志打印(hugegraph-loader #223)
- 改进 loader 的的 Schema 处理流程(hugegraph-loader #230)
Tools
- 支持 HTTPS 协议(hugegraph-tools #71)
- 移除 –protocol 参数,直接从URL中自动提取(hugegraph-tools #72)
- 支持将数据 dump 到 HDFS 文件系统(hugegraph-tools #73)
- 修复 trust store file 路径问题(hugegraph-tools #75)
- 支持权限信息的备份恢复(hugegraph-tools #76)
- 支持无参数的 Printer 打印(hugegraph-tools #79)
- 修复 MacOS free_memory 计算问题(hugegraph-tools #82)
- 支持备份恢复时指定线程数hugegraph-tools #83)
- 支持动态创建图、克隆图、删除图等命令(hugegraph-tools #95)
10.2 - HugeGraph 1.0.0 Release Notes
Server (API & Client)
接口更新
- xx
- xx
其它修改
- xx
- xx
Core & Server
功能更新
- xx
- xx
BUG修复
- xx
- xx
配置项修改:
- xx
- xx
其它修改
- xx
- xx
Toolchain
- xx
- xx
Computer
- xx
- xx
Commons
- xx
- xx
11 - Contributor Agreement
Contributor Agreement
Individual Contributor exclusive License Agreement
(including the TRADITIONAL PATENT LICENSE OPTION)
Thank you for your interest in contributing to HugeGraph’s all projects (“We” or “Us”).
The purpose of this contributor agreement (“Agreement”) is to clarify and document the rights granted by contributors to Us. To make this document effective, please follow the comment of GitHub CLA-Assistant when submitting a new pull request.
How to use this Contributor Agreement
If You are an employee and have created the Contribution as part of your employment, You need to have Your employer approve this Agreement or sign the Entity version of this document. If You do not own the Copyright in the entire work of authorship, any other author of the Contribution should also sign this – in any event, please contact Us at hugegraph@googlegroups.com
1. Definitions
“You” means the individual Copyright owner who Submits a Contribution to Us.
“Contribution” means any original work of authorship, including any original modifications or additions to an existing work of authorship, Submitted by You to Us, in which You own the Copyright.
“Copyright” means all rights protecting works of authorship, including copyright, moral and neighboring rights, as appropriate, for the full term of their existence.
“Material” means the software or documentation made available by Us to third parties. When this Agreement covers more than one software project, the Material means the software or documentation to which the Contribution was Submitted. After You Submit the Contribution, it may be included in the Material.
“Submit” means any act by which a Contribution is transferred to Us by You by means of tangible or intangible media, including but not limited to electronic mailing lists, source code control systems, and issue tracking systems that are managed by, or on behalf of, Us, but excluding any transfer that is conspicuously marked or otherwise designated in writing by You as “Not a Contribution.”
“Documentation” means any non-software portion of a Contribution.
2. License grant
2.1 Copyright license to Us
Subject to the terms and conditions of this Agreement, You hereby grant to Us a worldwide, royalty-free, Exclusive, perpetual and irrevocable (except as stated in Section 8.2) license, with the right to transfer an unlimited number of non-exclusive licenses or to grant sublicenses to third parties, under the Copyright covering the Contribution to use the Contribution by all means, including, but not limited to:
- publish the Contribution,
- modify the Contribution,
- prepare derivative works based upon or containing the Contribution and/or to combine the Contribution with other Materials,
- reproduce the Contribution in original or modified form,
- distribute, to make the Contribution available to the public, display and publicly perform the Contribution in original or modified form.
2.2 Moral rights
Moral Rights remain unaffected to the extent they are recognized and not waivable by applicable law. Notwithstanding, You may add your name to the attribution mechanism customary used in the Materials you Contribute to, such as the header of the source code files of Your Contribution, and We will respect this attribution when using Your Contribution.
2.3 Copyright license back to You
Upon such grant of rights to Us, We immediately grant to You a worldwide, royalty-free, non-exclusive, perpetual and irrevocable license, with the right to transfer an unlimited number of non-exclusive licenses or to grant sublicenses to third parties, under the Copyright covering the Contribution to use the Contribution by all means, including, but not limited to:
- publish the Contribution,
- modify the Contribution,
- prepare derivative works based upon or containing the Contribution and/or to combine the Contribution with other Materials,
- reproduce the Contribution in original or modified form,
- distribute, to make the Contribution available to the public, display and publicly perform the Contribution in original or modified form.
This license back is limited to the Contribution and does not provide any rights to the Material.
3. Patents
3.1 Patent license
Subject to the terms and conditions of this Agreement You hereby grant to Us and to recipients of Materials distributed by Us a worldwide, royalty-free, non-exclusive, perpetual and irrevocable (except as stated in Section 3.2) patent license, with the right to transfer an unlimited number of non-exclusive licenses or to grant sublicenses to third parties, to make, have made, use, sell, offer for sale, import and otherwise transfer the Contribution and the Contribution in combination with any Material (and portions of such combination). This license applies to all patents owned or controlled by You, whether already acquired or hereafter acquired, that would be infringed by making, having made, using, selling, offering for sale, importing or otherwise transferring of Your Contribution(s) alone or by combination of Your Contribution(s) with any Material.
3.2 Revocation of patent license
You reserve the right to revoke the patent license stated in section 3.1 if We make any infringement claim that is targeted at your Contribution and not asserted for a Defensive Purpose. An assertion of claims of the Patents shall be considered for a “Defensive Purpose” if the claims are asserted against an entity that has filed, maintained, threatened, or voluntarily participated in a patent infringement lawsuit against Us or any of Our licensees.
4. License obligations by Us
We agree to (sub)license the Contribution or any Materials containing, based on or derived from your Contribution under the terms of any licenses the Free Software Foundation classifies as Free Software License and which are approved by the Open Source Initiative as Open Source licenses.
More specifically and in strict accordance with the above paragraph, we agree to (sub)license the Contribution or any Materials containing, based on or derived from the Contribution only in accordance with our licensing policy available at: http://www.apache.org/licenses/LICENSE-2.0.
In addition, We may use the following licenses for Documentation in the Contribution: GFDL-1.2 (including any right to adopt any future version of a license).
We agree to license patents owned or controlled by You only to the extent necessary to (sub)license Your Contribution(s) and the combination of Your Contribution(s) with the Material under the terms of any licenses the Free Software Foundation classifies as Free Software licenses and which are approved by the Open Source Initiative as Open Source licenses..
5. Disclaimer
THE CONTRIBUTION IS PROVIDED “AS IS”. MORE PARTICULARLY, ALL EXPRESS OR IMPLIED WARRANTIES INCLUDING, WITHOUT LIMITATION, ANY IMPLIED WARRANTY OF SATISFACTORY QUALITY, FITNESS FOR A PARTICULAR PURPOSE AND NON-INFRINGEMENT ARE EXPRESSLY DISCLAIMED BY YOU TO US AND BY US TO YOU. TO THE EXTENT THAT ANY SUCH WARRANTIES CANNOT BE DISCLAIMED, SUCH WARRANTY IS LIMITED IN DURATION AND EXTENT TO THE MINIMUM PERIOD AND EXTENT PERMITTED BY LAW.
6. Consequential damage waiver
TO THE MAXIMUM EXTENT PERMITTED BY APPLICABLE LAW, IN NO EVENT WILL YOU OR WE BE LIABLE FOR ANY LOSS OF PROFITS, LOSS OF ANTICIPATED SAVINGS, LOSS OF DATA, INDIRECT, SPECIAL, INCIDENTAL, CONSEQUENTIAL AND EXEMPLARY DAMAGES ARISING OUT OF THIS AGREEMENT REGARDLESS OF THE LEGAL OR EQUITABLE THEORY (CONTRACT, TORT OR OTHERWISE) UPON WHICH THE CLAIM IS BASED.
7. Approximation of disclaimer and damage waiver
IF THE DISCLAIMER AND DAMAGE WAIVER MENTIONED IN SECTION 5. AND SECTION 6. CANNOT BE GIVEN LEGAL EFFECT UNDER APPLICABLE LOCAL LAW, REVIEWING COURTS SHALL APPLY LOCAL LAW THAT MOST CLOSELY APPROXIMATES AN ABSOLUTE WAIVER OF ALL CIVIL OR CONTRACTUAL LIABILITY IN CONNECTION WITH THE CONTRIBUTION.
8. Term
8.1 This Agreement shall come into effect upon Your acceptance of the terms and conditions.
8.2 This Agreement shall apply for the term of the copyright and patents licensed here. However, You shall have the right to terminate the Agreement if We do not fulfill the obligations as set forth in Section 4. Such termination must be made in writing.
8.3 In the event of a termination of this Agreement Sections 5, 6, 7, 8 and 9 shall survive such termination and shall remain in full force thereafter. For the avoidance of doubt, Free and Open Source Software (sub)licenses that have already been granted for Contributions at the date of the termination shall remain in full force after the termination of this Agreement.
9 Miscellaneous
9.1 This Agreement and all disputes, claims, actions, suits or other proceedings arising out of this agreement or relating in any way to it shall be governed by the laws of China excluding its private international law provisions.
9.2 This Agreement sets out the entire agreement between You and Us for Your Contributions to Us and overrides all other agreements or understandings.
9.3 In case of Your death, this agreement shall continue with Your heirs. In case of more than one heir, all heirs must exercise their rights through a commonly authorized person.
9.4 If any provision of this Agreement is found void and unenforceable, such provision will be replaced to the extent possible with a provision that comes closest to the meaning of the original provision and that is enforceable. The terms and conditions set forth in this Agreement shall apply notwithstanding any failure of essential purpose of this Agreement or any limited remedy to the maximum extent possible under law.
9.5 You agree to notify Us of any facts or circumstances of which you become aware that would make this Agreement inaccurate in any respect.