This is the multi-page printable view of this section. .
Toolchain
1 - HugeGraph-Loader Quick Start
1 HugeGraph-Loader Overview
HugeGraph-Loader is the data import component of HugeGraph, which can convert data from various data sources into graph vertices and edges and import them into the graph database in batches.
Currently supported data sources include:
- Local disk file or directory, supports TEXT, CSV and JSON format files, supports compressed files
- HDFS file or directory, supports compressed files
- Mainstream relational databases, such as MySQL, PostgreSQL, Oracle, SQL Server
Local disk files and HDFS files support resumable uploads.
It will be explained in detail below.
Note: HugeGraph-Loader requires HugeGraph Server service, please refer to HugeGraph-Server Quick Start to download and start Server
2 Get HugeGraph-Loader
There are two ways to get HugeGraph-Loader:
- Download the compiled tarball
- Clone source code then compile and install
2.1 Download the compiled archive
Download the latest version of the HugeGraph-Loader release package:
2.2 Clone source code to compile and install
Clone the latest version of HugeGraph-Loader source package:
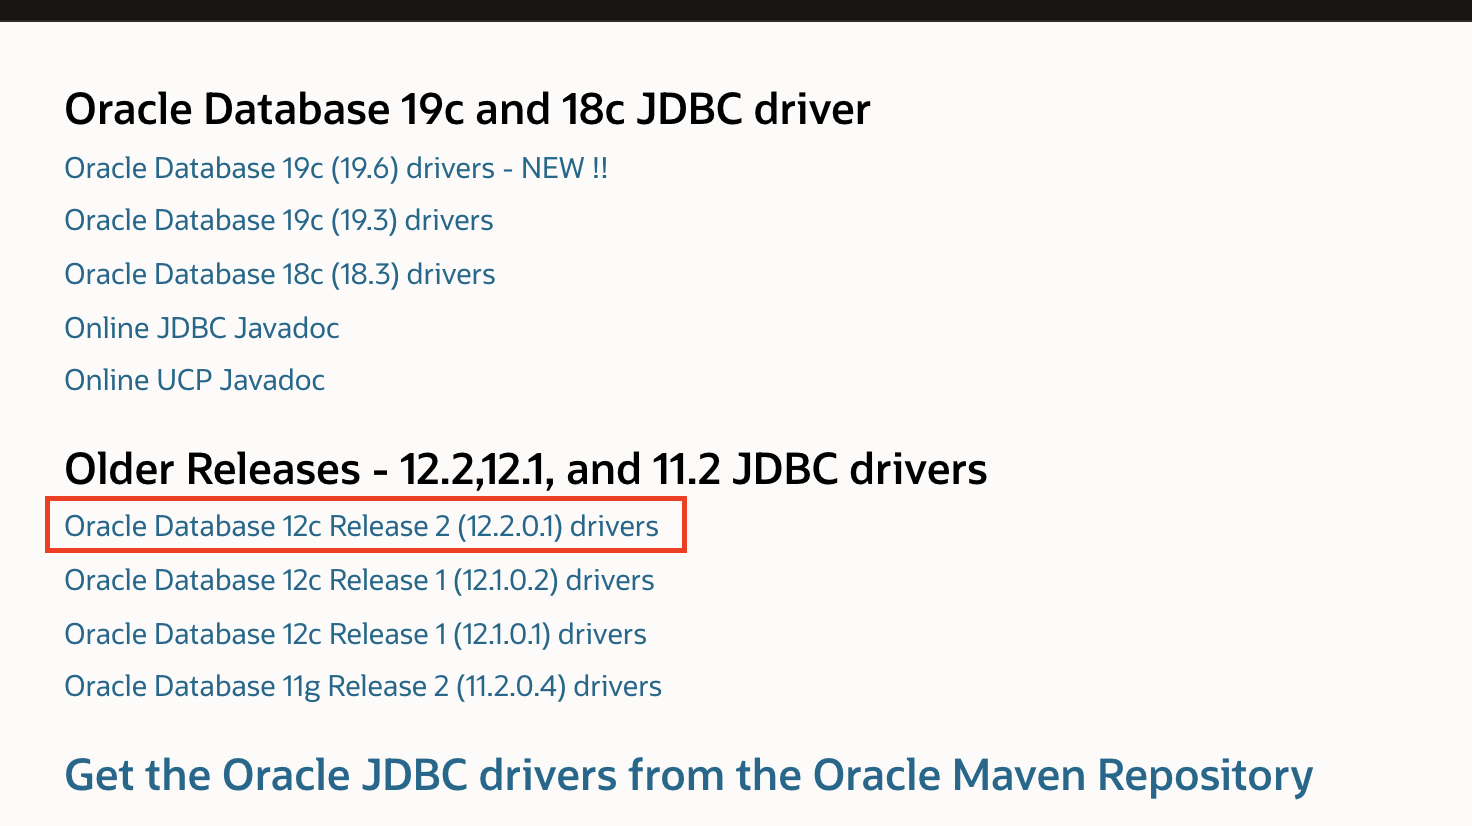
Due to the license limitation of the Oracle OJDBC, you need to manually install ojdbc to the local maven repository.
Visit the Oracle jdbc downloads page. Select Oracle Database 12c Release 2 (12.2.0.1) drivers, as shown in the following figure.
After opening the link, select “ojdbc8.jar” as shown below.
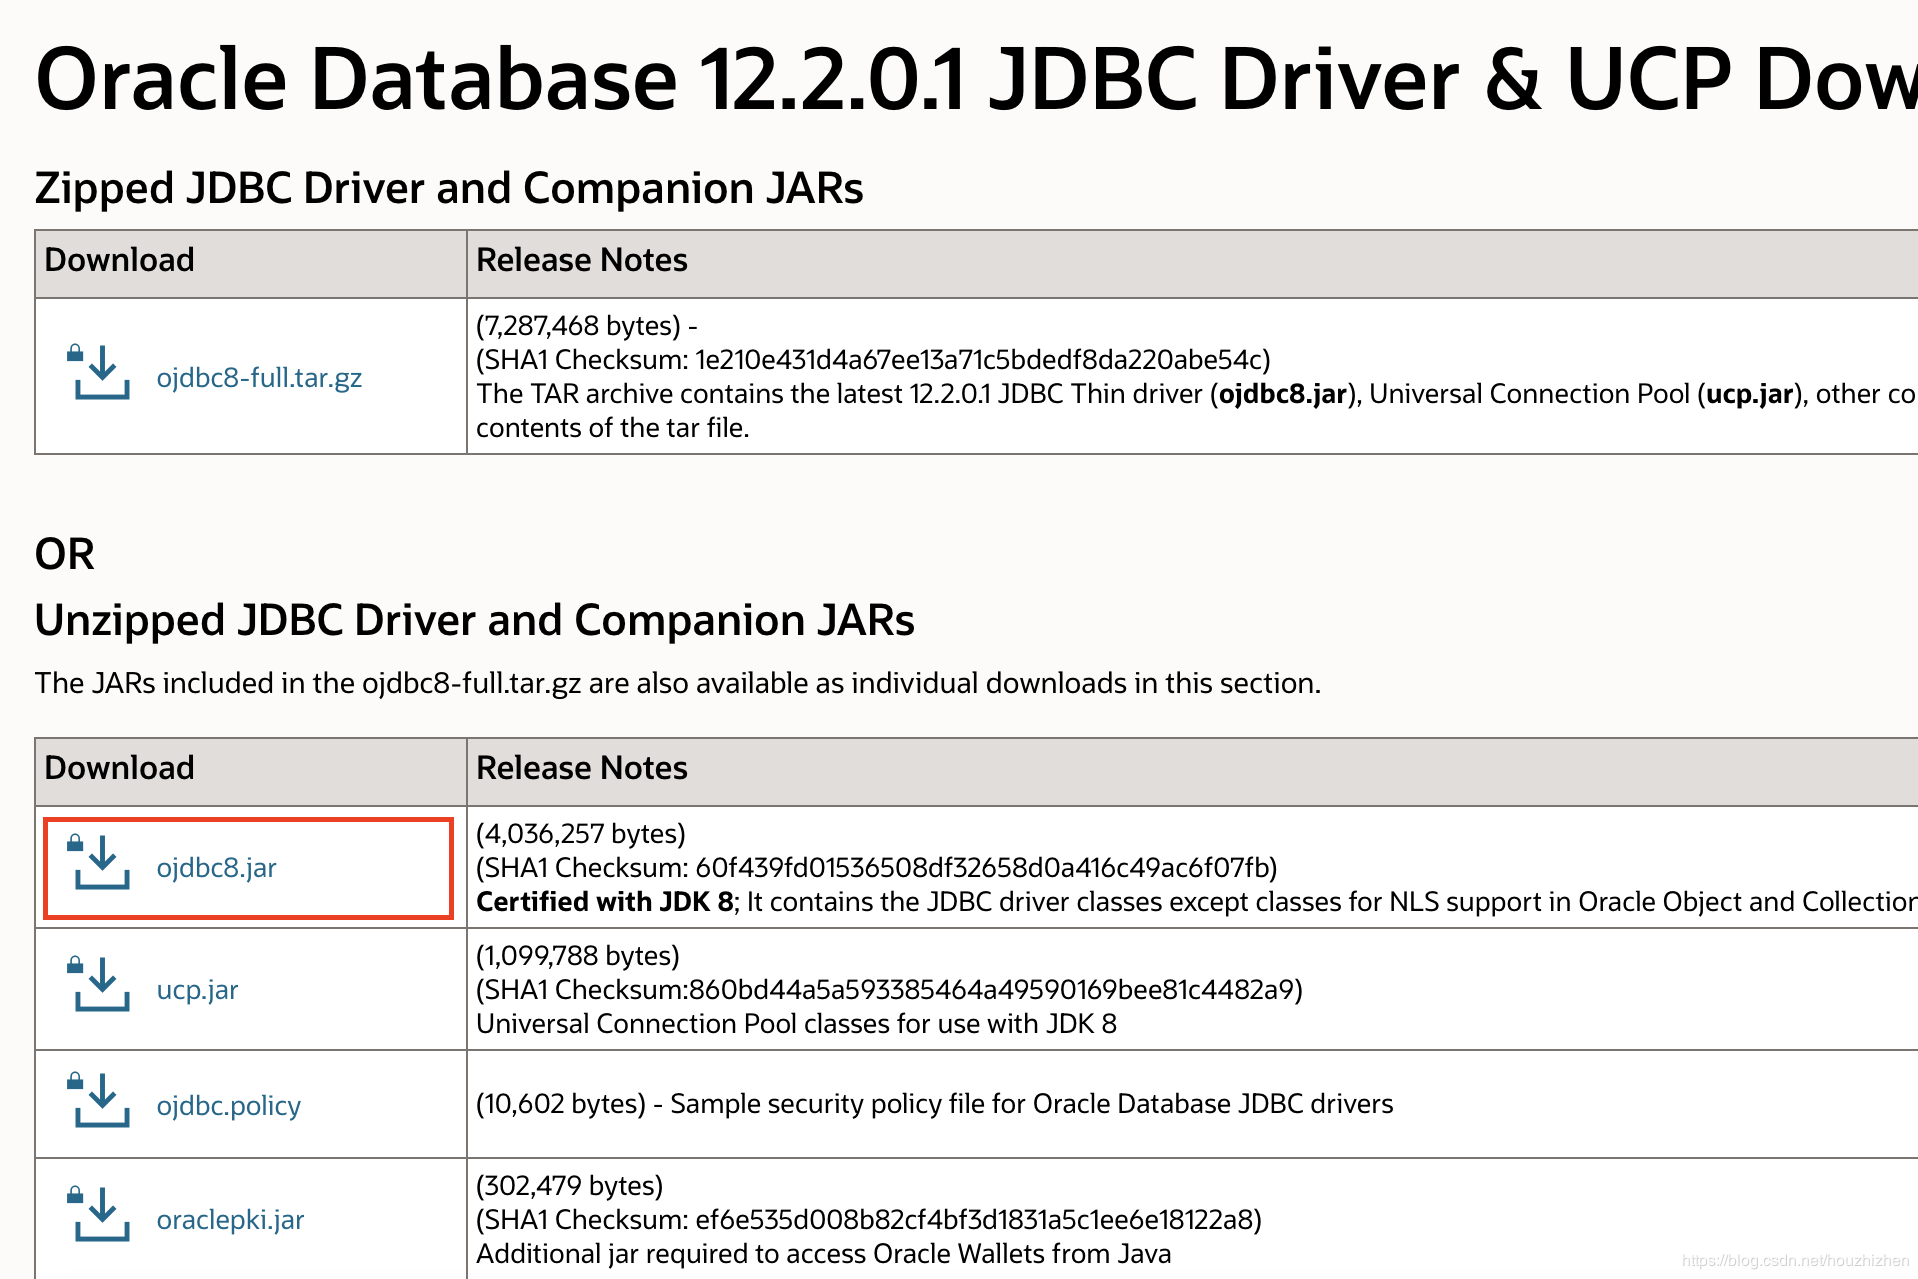
Install ojdbc8 to the local maven repository, enter the directory where ojdbc8.jar is located, and execute the following command.
Compile and generate tar package:
3 How to use
The basic process of using HugeGraph-Loader is divided into the following steps:
- Write graph schema
- Prepare data files
- Write input source map files
- Execute command import
3.1 Construct graph schema
This step is the modeling process. Users need to have a clear idea of their existing data and the graph model they want to create, and then write the schema to build the graph model.
For example, if you want to create a graph with two types of vertices and two types of edges, the vertices are “people” and “software”, the edges are “people know people” and “people create software”, and these vertices and edges have some attributes, For example, the vertex “person” has: “name”, “age” and other attributes, “Software” includes: “name”, “sale price” and other attributes; side “knowledge” includes: “date” attribute and so on.
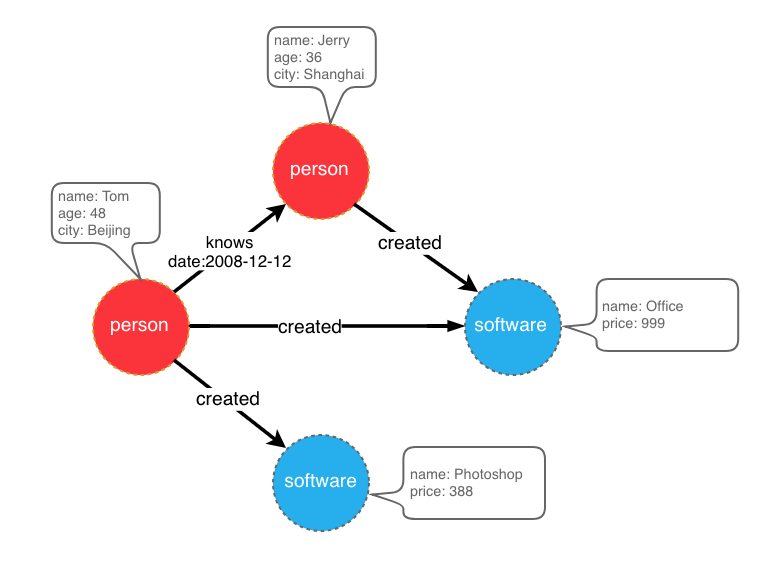
graph model example
After designing the graph model, we can use groovy to write the definition of schema and save it to a file, here named schema.groovy.
Please refer to the corresponding section in hugegraph-client for the detailed description of the schema.
3.2 Prepare data
The data sources currently supported by HugeGraph-Loader include:
- local disk file or directory
- HDFS file or directory
- Partial relational database
3.2.1 Data source structure
3.2.1.1 Local disk file or directory
The user can specify a local disk file as the data source. If the data is scattered in multiple files, a certain directory is also supported as the data source, but multiple directories are not supported as the data source for the time being.
For example: my data is scattered in multiple files, part-0, part-1 … part-n. To perform the import, it must be ensured that they are placed in one directory. Then in the loader’s mapping file, specify path as the directory.
Supported file formats include:
- TEXT
- CSV
- JSON
TEXT is a text file with custom delimiters, the first line is usually the header, and the name of each column is recorded, and no header line is allowed (specified in the mapping file). Each remaining row represents a record, which will be converted into a vertex/edge; each column of the row corresponds to a field, which will be converted into the id, label or attribute of the vertex/edge;
An example is as follows:
CSV is a TEXT file with commas , as delimiters. When a column value itself contains a comma, the column value needs to be enclosed in double quotes, for example:
The JSON file requires that each line is a JSON string, and the format of each line needs to be consistent.
3.2.1.2 HDFS file or directory
Users can also specify HDFS files or directories as data sources, all of the above requirements for local disk files or directories apply here. In addition, since HDFS usually stores compressed files, loader also provides support for compressed files, and local disk file or directory also supports compressed files.
Currently supported compressed file types include: GZIP, BZ2, XZ, LZMA, SNAPPY_RAW, SNAPPY_FRAMED, Z, DEFLATE, LZ4_BLOCK, LZ4_FRAMED, ORC, and PARQUET.
3.2.1.3 Mainstream relational database
The loader also supports some relational databases as data sources, and currently supports MySQL, PostgreSQL, Oracle and SQL Server.
However, the requirements for the table structure are relatively strict at present. If association query needs to be done during the import process, such a table structure is not allowed. The associated query means: after reading a row of the table, it is found that the value of a certain column cannot be used directly (such as a foreign key), and you need to do another query to determine the true value of the column.
For example: Suppose there are three tables, person, software and created
If the id strategy of person or software is specified as PRIMARY_KEY when modeling (schema), choose name as the primary key (note: this is the concept of vertex-label in hugegraph), when importing edge data, the source vertex and target need to be spliced out. For the id of the vertex, you must go to the person/software table with p_id/s_id to find the corresponding name. In the case of the schema that requires additional query, the loader does not support it temporarily. In this case, the following two methods can be used instead:
- The id strategy of person and software is still specified as PRIMARY_KEY, but the id column of the person table and software table is used as the primary key attribute of the vertex, so that the id can be generated by directly splicing p_id and s_id with the label of the vertex when importing an edge;
- Specify the id policy of person and software as CUSTOMIZE, and then directly use the id column of the person table and the software table as the vertex id, so that p_id and s_id can be used directly when importing edges;
The key point is to make the edge use p_id and s_id directly, don’t check it again.
3.2.2 Prepare vertex and edge data
3.2.2.1 Vertex Data
The vertex data file consists of data line by line. Generally, each line is used as a vertex, and each column is used as a vertex attribute. The following description uses CSV format as an example.
- person vertex data (the data itself does not contain a header)
- software vertex data (the data itself contains the header)
3.2.2.2 Edge data
The edge data file consists of data line by line. Generally, each line is used as an edge. Some columns are used as the IDs of the source and target vertices, and other columns are used as edge attributes. The following uses JSON format as an example.
- knows edge data
- created edge data
3.3 Write data source mapping file
3.3.1 Mapping file overview
The mapping file of the input source is used to describe how to establish the mapping relationship between the input source data and the vertex type/edge type of the graph. It is organized in JSON format and consists of multiple mapping blocks, each of which is responsible for mapping an input source. Mapped to vertices and edges.
Specifically, each mapping block contains an input source and multiple vertex mapping and edge mapping blocks, and the input source block corresponds to the local disk file or directory, HDFS file or directory and relational database are responsible for describing the basic information of the data source, such as where the data is, what format, what is the delimiter, etc. The vertex map/edge map is bound to the input source, which columns of the input source can be selected, which columns are used as ids, which columns are used as attributes, and what attributes are mapped to each column, the values of the columns are mapped to what values of attributes, and so on.
In the simplest terms, each mapping block describes: where is the file to be imported, which type of vertices/edges each line of the file is to be used as, which columns of the file need to be imported, and the corresponding vertices/edges of these columns. what properties etc.
Note: The format of the mapping file before version 0.11.0 and the format after 0.11.0 has changed greatly. For the convenience of expression, the mapping file (format) before 0.11.0 is called version 1.0, and the version after 0.11.0 is version 2.0 . And unless otherwise specified, the “map file” refers to version 2.0.
The skeleton of the map file for version 2.0 is:
Two versions of the mapping file are given directly here (the above graph model and data file are described)
Mapping file for version 2.0:
Mapping file for version 1.0:
The 1.0 version of the mapping file is centered on the vertex and edge, and sets the input source; while the 2.0 version is centered on the input source, and sets the vertex and edge mapping. Some input sources (such as a file) can generate both vertices and edges. If you write in the 1.0 format, you need to write an input block in each of the vertex and egde mapping blocks. The two input blocks are exactly the same ; and the 2.0 version only needs to write input once. Therefore, compared with version 1.0, version 2.0 can save some repetitive writing of input.
In the bin directory of hugegraph-loader-{version}, there is a script tool mapping-convert.sh that can directly convert the mapping file of version 1.0 to version 2.0. The usage is as follows:
A struct-v2.json will be generated in the same directory as struct.json.
3.3.2 Input Source
Input sources are currently divided into three categories: FILE, HDFS, and JDBC, which are distinguished by the type node. We call them local file input sources, HDFS input sources, and JDBC input sources, which are described below.
3.3.2.1 Local file input source
- id: The id of the input source. This field is used to support some internal functions. It is not required (it will be automatically generated if it is not filled in). It is strongly recommended to write it, which is very helpful for debugging;
- skip: whether to skip the input source, because the JSON file cannot add comments, if you do not want to import an input source during a certain import, but do not want to delete the configuration of the input source, you can set it to true to skip it, the default is false, not required;
- input: input source map block, composite structure
- type: input source type, file or FILE must be filled;
- path: the path of the local file or directory, the absolute path or the relative path relative to the mapping file, it is recommended to use the absolute path, required;
- file_filter: filter files with compound conditions from
path, compound structure, currently only supports configuration extensions, represented by child nodeextensions, the default is “*”, which means to keep all files; - format: the format of the local file, the optional values are CSV, TEXT and JSON, which must be uppercase and required;
- header: the column name of each column of the file, if not specified, the first line of the data file will be used as the header; when the file itself has a header and the header is specified, the first line of the file will be treated as a normal data line; JSON The file does not need to specify a header, optional;
- delimiter: The column delimiter of the file line, the default is comma
","as the delimiter, theJSONfile does not need to be specified, optional; - charset: the encoded character set of the file, the default is
UTF-8, optional; - date_format: custom date format, the default value is yyyy-MM-dd HH:mm:ss, optional; if the date is presented in the form of a timestamp, this item must be written as
timestamp(fixed writing); - time_zone: Set which time zone the date data is in, the default value is
GMT+8, optional; - skipped_line: The line to be skipped, compound structure, currently only the regular expression of the line to be skipped can be configured, described by the child node
regex, no line is skipped by default, optional; - compression: The compression format of the file, the optional values are NONE, GZIP, BZ2, XZ, LZMA, SNAPPY_RAW, SNAPPY_FRAMED, Z, DEFLATE, LZ4_BLOCK, LZ4_FRAMED, ORC and PARQUET, the default is NONE, which means a non-compressed file, optional;
- list_format: When a column of the file (non-JSON) is a collection structure (the Cardinality of the PropertyKey in the corresponding figure is Set or List), you can use this item to set the start character, separator, and end character of the column, compound structure :
- start_symbol: The start character of the collection structure column (the default value is
[, JSON format currently does not support specification) - elem_delimiter: the delimiter of the collection structure column (the default value is
|, JSON format currently only supports native,delimiter) - end_symbol: the end character of the collection structure column (the default value is
], the JSON format does not currently support specification)
- start_symbol: The start character of the collection structure column (the default value is
3.3.2.2 HDFS input source
The nodes and meanings of the above local file input source are basically applicable here. Only the different and unique nodes of the HDFS input source are listed below.
- type: input source type, must fill in hdfs or HDFS, required;
- path: the path of the HDFS file or directory, it must be the absolute path of HDFS, required;
- core_site_path: the path of the core-site.xml file of the HDFS cluster, the key point is to specify the address of the NameNode (
fs.default.name) and the implementation of the file system (fs.hdfs.impl);
3.3.2.3 JDBC input source
As mentioned above, it supports multiple relational databases, but because their mapping structures are very similar, they are collectively referred to as JDBC input sources, and then use the vendor node to distinguish different databases.
- type: input source type, must fill in jdbc or JDBC, required;
- vendor: database type, optional options are [MySQL, PostgreSQL, Oracle, SQLServer], case-insensitive, required;
- driver: the type of driver used by jdbc, required;
- url: the url of the database that jdbc wants to connect to, required;
- database: the name of the database to be connected, required;
- schema: The name of the schema to be connected, different databases have different requirements, and the details are explained below;
- table: the name of the table to be connected, at least one of
tableorcustom_sqlis required; - custom_sql: custom SQL statement, at least one of
tableorcustom_sqlis required; - username: username to connect to the database, required;
- password: password for connecting to the database, required;
- batch_size: The size of one page when obtaining table data by page, the default is 500, optional;
MYSQL
| Node | Fixed value or common value |
|---|---|
| vendor | MYSQL |
| driver | com.mysql.cj.jdbc.Driver |
| url | jdbc:mysql://127.0.0.1:3306 |
schema: nullable, if filled in, it must be the same as the value of database
POSTGRESQL
| Node | Fixed value or common value |
|---|---|
| vendor | POSTGRESQL |
| driver | org.postgresql.Driver |
| url | jdbc:postgresql://127.0.0.1:5432 |
schema: nullable, default is “public”
ORACLE
| Node | Fixed value or common value |
|---|---|
| vendor | ORACLE |
| driver | oracle.jdbc.driver.OracleDriver |
| url | jdbc:oracle:thin:@127.0.0.1:1521 |
schema: nullable, the default value is the same as the username
SQLSERVER
| Node | Fixed value or common value |
|---|---|
| vendor | SQLSERVER |
| driver | com.microsoft.sqlserver.jdbc.SQLServerDriver |
| url | jdbc:sqlserver://127.0.0.1:1433 |
schema: required
3.3.1 Vertex and Edge Mapping
The nodes of vertex and edge mapping (a key in the JSON file) have a lot of the same parts. The same parts are introduced first, and then the unique nodes of vertex map and edge map are introduced respectively.
Nodes of the same section
- label:
labelto which the vertex/edge data to be imported belongs, required; - field_mapping: Map the column name of the input source column to the attribute name of the vertex/edge, optional;
- value_mapping: map the data value of the input source to the attribute value of the vertex/edge, optional;
- selected: select some columns to insert, other unselected ones are not inserted, cannot exist at the same time as
ignored, optional; - ignored: ignore some columns so that they do not participate in insertion, cannot exist at the same time as
selected, optional; - null_values: You can specify some strings to represent null values, such as “NULL”. If the vertex/edge attribute corresponding to this column is also a nullable attribute, the value of this attribute will not be set when constructing the vertex/edge, optional ;
- update_strategies: If the data needs to be updated in batches in a specific way, you can specify a specific update strategy for each attribute (see below for details), optional;
- unfold: Whether to unfold the column, each unfolded column will form a row with other columns, which is equivalent to unfolding into multiple rows; for example, the value of a certain column (id column) of the file is
[1,2,3], The values of other columns are18,Beijing. When unfold is set, this row will become 3 rows, namely:1,18,Beijing,2,18,Beijingand3,18, Beijing. Note that this will only expand the column selected as id. Default false, optional;
Update strategy supports 8 types: (requires all uppercase)
- Value accumulation:
SUM - Take the greater of the two numbers/dates:
BIGGER - Take the smaller of two numbers/dates:
SMALLER - Set property takes union:
UNION - Set attribute intersection:
INTERSECTION - List attribute append element:
APPEND - List/Set attribute delete element:
ELIMINATE - Override an existing property:
OVERRIDE
Note: If the newly imported attribute value is empty, the existing old data will be used instead of the empty value. For the effect, please refer to the following example
Note : After adopting the batch update strategy, the number of disk read requests will increase significantly, and the import speed will be several times slower than that of pure write coverage (at this time HDD disk [IOPS](https://en.wikipedia .org/wiki/IOPS) will be the bottleneck, SSD is recommended for speed)
Unique Nodes for Vertex Maps
- id: Specify a column as the id column of the vertex. When the vertex id policy is
CUSTOMIZE, it is required; when the id policy isPRIMARY_KEY, it must be empty;
Unique Nodes for Edge Maps
- source: Select certain columns of the input source as the id column of source vertex. When the id policy of the source vertex is
CUSTOMIZE, a certain column must be specified as the id column of the vertex; when the id policy of the source vertex isWhen PRIMARY_KEY, one or more columns must be specified for splicing the id of the generated vertex, that is, no matter which id strategy is used, this item is required; - target: Specify certain columns as the id columns of target vertex, similar to source, so I won’t repeat them;
- unfold_source: Whether to unfold the source column of the file, the effect is similar to that in the vertex map, and will not be repeated;
- unfold_target: Whether to unfold the target column of the file, the effect is similar to that in the vertex mapping, and will not be repeated;
3.4 Execute command import
After preparing the graph model, data file, and input source mapping relationship file, the data file can be imported into the graph database.
The import process is controlled by commands submitted by the user, and the user can control the specific process of execution through different parameters.
3.4.1 Parameter description
| Parameter | Default value | Required or not | Description |
|---|---|---|---|
| -f or –file | Y | path to configure script | |
| -g or –graph | Y | graph space name | |
| -s or –schema | Y | schema file path | |
| -h or –host | localhost | address of HugeGraphServer | |
| -p or –port | 8080 | port number of HugeGraphServer | |
| –username | null | When HugeGraphServer enables permission authentication, the username of the current graph | |
| –token | null | When HugeGraphServer has enabled authorization authentication, the token of the current graph | |
| –protocol | http | Protocol for sending requests to the server, optional http or https | |
| –trust-store-file | When the request protocol is https, the client’s certificate file path | ||
| –trust-store-password | When the request protocol is https, the client certificate password | ||
| –clear-all-data | false | Whether to clear the original data on the server before importing data | |
| –clear-timeout | 240 | Timeout for clearing the original data on the server before importing data | |
| –incremental-mode | false | Whether to use the breakpoint resume mode, only the input source is FILE and HDFS support this mode, enabling this mode can start the import from the place where the last import stopped | |
| –failure-mode | false | When the failure mode is true, the data that failed before will be imported. Generally speaking, the failed data file needs to be manually corrected and edited, and then imported again | |
| –batch-insert-threads | CPUs | Batch insert thread pool size (CPUs is the number of logical cores available to the current OS) | |
| –single-insert-threads | 8 | Size of single insert thread pool | |
| –max-conn | 4 * CPUs | The maximum number of HTTP connections between HugeClient and HugeGraphServer, it is recommended to adjust this when adjusting threads | |
| –max-conn-per-route | 2 * CPUs | The maximum number of HTTP connections for each route between HugeClient and HugeGraphServer, it is recommended to adjust this item at the same time when adjusting the thread | |
| –batch-size | 500 | The number of data items in each batch when importing data | |
| –max-parse-errors | 1 | The maximum number of lines of data parsing errors allowed, and the program exits when this value is reached | |
| –max-insert-errors | 500 | The maximum number of rows of data insertion errors allowed, and the program exits when this value is reached | |
| –timeout | 60 | Timeout (seconds) for inserting results to return | |
| –shutdown-timeout | 10 | Waiting time for multithreading to stop (seconds) | |
| –retry-times | 0 | Number of retries when a specific exception occurs | |
| –retry-interval | 10 | interval before retry (seconds) | |
| –check-vertex | false | Whether to check whether the vertex connected by the edge exists when inserting the edge | |
| –print-progress | true | Whether to print the number of imported items in the console in real time | |
| –dry-run | false | Turn on this mode, only parsing but not importing, usually used for testing | |
| –help | false | print help information |
3.4.2 Breakpoint Continuation Mode
Usually, the Loader task takes a long time to execute. If the import interrupt process exits for some reason, and next time you want to continue the import from the interrupted point, this is the scenario of using breakpoint continuation.
The user sets the command line parameter –incremental-mode to true to open the breakpoint resume mode. The key to breakpoint continuation lies in the progress file. When the import process exits, the import progress at the time of exit will be recorded.
Recorded in the progress file, the progress file is located in the ${struct} directory, the file name is like load-progress ${date}, ${struct} is the prefix of the mapping file, and ${date} is the start of the import
moment. For example: for an import task started at 2019-10-10 12:30:30, the mapping file used is struct-example.json, then the path of the progress file is the same as struct-example.json
Sibling struct-example/load-progress 2019-10-10 12:30:30.
Note: The generation of progress files is independent of whether –incremental-mode is turned on or not, and a progress file is generated at the end of each import.
If the data file formats are all legal and the import task is stopped by the user (CTRL + C or kill, kill -9 is not supported), that is to say, if there is no error record, the next import only needs to be set Continue for the breakpoint.
But if the limit of –max-parse-errors or –max-insert-errors is reached because too much data is invalid or network abnormality is reached, Loader will record these original rows that failed to insert into In the failed file, after the user modifies the data lines in the failed file, set –reload-failure to true to import these “failed files” as input sources (does not affect the normal file import), Of course, if there is still a problem with the modified data line, it will be logged again to the failure file (don’t worry about duplicate lines).
Each vertex map or edge map will generate its own failure file when data insertion fails. The failure file is divided into a parsing failure file (suffix .parse-error) and an insertion failure file (suffix .insert-error).
They are stored in the ${struct}/current directory. For example, there is a vertex mapping person and an edge mapping knows in the mapping file, each of which has some error lines. When the Loader exits, you will see the following files in the ${struct}/current directory:
- person-b4cd32ab.parse-error: Vertex map person parses wrong data
- person-b4cd32ab.insert-error: Vertex map person inserts wrong data
- knows-eb6b2bac.parse-error: edge map knows parses wrong data
- knows-eb6b2bac.insert-error: edge map knows inserts wrong data
.parse-error and .insert-error do not always exist together. Only lines with parsing errors will have .parse-error files, and only lines with insertion errors will have .insert-error files.
3.4.3 logs directory file description
The log and error data during program execution will be written into hugegraph-loader.log file.
3.4.4 Execute command
Run bin/hugegraph-loader and pass in parameters
4 Complete example
Given below is an example in the example directory of the hugegraph-loader package.
4.1 Prepare data
Vertex file: example/file/vertex_person.csv
Vertex file: example/file/vertex_software.txt
Edge file: example/file/edge_knows.json
Edge file: example/file/edge_created.json
4.2 Write schema
schema file: example/file/schema.groovy
4.3 Write the input source mapping file example/file/struct.json
4.4 Command to import
After the import is complete, statistics similar to the following will appear:
4.5 Import data by spark-loader
Spark version: Spark 3+, other versions has not been tested.
HugeGraph Toolchain version: toolchain-1.0.0
The parameters of spark-loader are divided into two parts. Note: Because the abbreviations of
these two parameter names have overlapping parts, please use the full name of the parameter.
And there is no need to guarantee the order between the two parameters.
- hugegraph parameters (Reference: hugegraph-loader parameter description )
- Spark task submission parameters (Reference: Submitting Applications)
Example:
2 - HugeGraph-Tools Quick Start
1 HugeGraph-Tools概述
HugeGraph-Tools 是 HugeGraph 的自动化部署、管理和备份/还原组件。
2 获取 HugeGraph-Tools
有两种方式可以获取 HugeGraph-Tools:
- 下载二进制tar包
- 下载源码编译安装
2.1 下载二进制tar包
下载最新版本的 HugeGraph-Tools 包:
2.2 下载源码编译安装
下载最新版本的 HugeGraph-Tools 源码包:
编译生成 tar 包:
生成 tar 包 hugegraph-tools-${version}.tar.gz
3 使用
3.1 功能概览
解压后,进入 hugegraph-tools 目录,可以使用bin/hugegraph或者bin/hugegraph help来查看 usage 信息。主要分为:
- 图管理类,graph-mode-set、graph-mode-get、graph-list、graph-get 和 graph-clear
- 异步任务管理类,task-list、task-get、task-delete、task-cancel 和 task-clear
- Gremlin类,gremlin-execute 和 gremlin-schedule
- 备份/恢复类,backup、restore、migrate、schedule-backup 和 dump
- 安装部署类,deploy、clear、start-all 和 stop-all
3.2 [options]-全局变量
options是 HugeGraph-Tools 的全局变量,可以在 hugegraph-tools/bin/hugegraph 中配置,包括:
- –graph,HugeGraph-Tools 操作的图的名字,默认值是 hugegraph
- –url,HugeGraph-Server 的服务地址,默认是 http://127.0.0.1:8080
- –user,当 HugeGraph-Server 开启认证时,传递用户名
- –password,当 HugeGraph-Server 开启认证时,传递用户的密码
- –timeout,连接 HugeGraph-Server 时的超时时间,默认是 30s
- –trust-store-file,证书文件的路径,当 –url 使用 https 时,HugeGraph-Client 使用的 truststore 文件,默认为空,代表使用 hugegraph-tools 内置的 truststore 文件 conf/hugegraph.truststore
- –trust-store-password,证书文件的密码,当 –url 使用 https 时,HugeGraph-Client 使用的 truststore 的密码,默认为空,代表使用 hugegraph-tools 内置的 truststore 文件的密码
上述全局变量,也可以通过环境变量来设置。一种方式是在命令行使用 export 设置临时环境变量,在该命令行关闭之前均有效
| 全局变量 | 环境变量 | 示例 |
|---|---|---|
| –url | HUGEGRAPH_URL | export HUGEGRAPH_URL=http://127.0.0.1:8080 |
| –graph | HUGEGRAPH_GRAPH | export HUGEGRAPH_GRAPH=hugegraph |
| –user | HUGEGRAPH_USERNAME | export HUGEGRAPH_USERNAME=admin |
| –password | HUGEGRAPH_PASSWORD | export HUGEGRAPH_PASSWORD=test |
| –timeout | HUGEGRAPH_TIMEOUT | export HUGEGRAPH_TIMEOUT=30 |
| –trust-store-file | HUGEGRAPH_TRUST_STORE_FILE | export HUGEGRAPH_TRUST_STORE_FILE=/tmp/trust-store |
| –trust-store-password | HUGEGRAPH_TRUST_STORE_PASSWORD | export HUGEGRAPH_TRUST_STORE_PASSWORD=xxxx |
另一种方式是在 bin/hugegraph 脚本中设置环境变量:
3.3 图管理类,graph-mode-set、graph-mode-get、graph-list、graph-get和graph-clear
- graph-mode-set,设置图的 restore mode
- –graph-mode 或者 -m,必填项,指定将要设置的模式,合法值包括 [NONE, RESTORING, MERGING, LOADING]
- graph-mode-get,获取图的 restore mode
- graph-list,列出某个 HugeGraph-Server 中全部的图
- graph-get,获取某个图及其存储后端类型
- graph-clear,清除某个图的全部 schema 和 data
- –confirm-message 或者 -c,必填项,删除确认信息,需要手动输入,二次确认防止误删,“I’m sure to delete all data”,包括双引号
当需要把备份的图原样恢复到一个新的图中的时候,需要先将图模式设置为 RESTORING 模式;当需要将备份的图合并到已存在的图中时,需要先将图模式设置为 MERGING 模式。
3.4 异步任务管理类,task-list、task-get和task-delete
- task-list,列出某个图中的异步任务,可以根据任务的状态过滤
- –status,选填项,指定要查看的任务的状态,即按状态过滤任务
- –limit,选填项,指定要获取的任务的数目,默认为 -1,意思为获取全部符合条件的任务
- task-get,获取某个异步任务的详细信息
- –task-id,必填项,指定异步任务的 ID
- task-delete,删除某个异步任务的信息
- –task-id,必填项,指定异步任务的 ID
- task-cancel,取消某个异步任务的执行
- –task-id,要取消的异步任务的 ID
- task-clear,清理完成的异步任务
- –force,选填项,设置时,表示清理全部异步任务,未执行完成的先取消,然后清除所有异步任务。默认只清理已完成的异步任务
3.5 Gremlin类,gremlin-execute和gremlin-schedule
- gremlin-execute,发送 Gremlin 语句到 HugeGraph-Server 来执行查询或修改操作,同步执行,结束后返回结果
- –file 或者 -f,指定要执行的脚本文件,UTF-8编码,与 –script 互斥
- –script 或者 -s,指定要执行的脚本字符串,与 –file 互斥
- –aliases 或者 -a,Gremlin 别名设置,格式为:key1=value1,key2=value2,…
- –bindings 或者 -b,Gremlin 绑定设置,格式为:key1=value1,key2=value2,…
- –language 或者 -l,Gremlin 脚本的语言,默认为 gremlin-groovy
–file 和 –script 二者互斥,必须设置其中之一
- gremlin-schedule,发送 Gremlin 语句到 HugeGraph-Server 来执行查询或修改操作,异步执行,任务提交后立刻返回异步任务id
- –file 或者 -f,指定要执行的脚本文件,UTF-8编码,与 –script 互斥
- –script 或者 -s,指定要执行的脚本字符串,与 –file 互斥
- –bindings 或者 -b,Gremlin 绑定设置,格式为:key1=value1,key2=value2,…
- –language 或者 -l,Gremlin 脚本的语言,默认为 gremlin-groovy
–file 和 –script 二者互斥,必须设置其中之一
3.6 备份/恢复类
- backup,将某张图中的 schema 或者 data 备份到 HugeGraph 系统之外,以 JSON 形式存在本地磁盘或者 HDFS
- –format,备份的格式,可选值包括 [json, text],默认为 json
- –all-properties,是否备份顶点/边全部的属性,仅在 –format 为 text 是有效,默认 false
- –label,要备份的顶点/边的类型,仅在 –format 为 text 是有效,只有备份顶点或者边的时候有效
- –properties,要备份的顶点/边的属性,逗号分隔,仅在 –format 为 text 是有效,只有备份顶点或者边的时候有效
- –compress,备份时是否压缩数据,默认为 true
- –directory 或者 -d,存储 schema 或者 data 的目录,本地目录时,默认为’./{graphName}’,HDFS 时,默认为 ‘{fs.default.name}/{graphName}’
- –huge-types 或者 -t,要备份的数据类型,逗号分隔,可选值为 ‘all’ 或者 一个或多个 [vertex,edge,vertex_label,edge_label,property_key,index_label] 的组合,‘all’ 代表全部6种类型,即顶点、边和所有schema
- –log 或者 -l,指定日志目录,默认为当前目录
- –retry,指定失败重试次数,默认为 3
- –split-size 或者 -s,指定在备份时对顶点或者边分块的大小,默认为 1048576
- -D,用 -Dkey=value 的模式指定动态参数,用来备份数据到 HDFS 时,指定 HDFS 的配置项,例如:-Dfs.default.name=hdfs://localhost:9000
- restore,将 JSON 格式存储的 schema 或者 data 恢复到一个新图中(RESTORING 模式)或者合并到已存在的图中(MERGING 模式)
- –directory 或者 -d,存储 schema 或者 data 的目录,本地目录时,默认为’./{graphName}’,HDFS 时,默认为 ‘{fs.default.name}/{graphName}’
- –clean,是否在恢复图完成后删除 –directory 指定的目录,默认为 false
- –huge-types 或者 -t,要恢复的数据类型,逗号分隔,可选值为 ‘all’ 或者 一个或多个 [vertex,edge,vertex_label,edge_label,property_key,index_label] 的组合,‘all’ 代表全部6种类型,即顶点、边和所有schema
- –log 或者 -l,指定日志目录,默认为当前目录
- –retry,指定失败重试次数,默认为 3
- -D,用 -Dkey=value 的模式指定动态参数,用来从 HDFS 恢复图时,指定 HDFS 的配置项,例如:-Dfs.default.name=hdfs://localhost:9000
只有当 –format 为 json 执行 backup 时,才可以使用 restore 命令恢复
- migrate, 将当前连接的图迁移至另一个 HugeGraphServer 中
- –target-graph,目标图的名字,默认为 hugegraph
- –target-url,目标图所在的 HugeGraphServer,默认为 http://127.0.0.1:8081
- –target-username,访问目标图的用户名
- –target-password,访问目标图的密码
- –target-timeout,访问目标图的超时时间
- –target-trust-store-file,访问目标图使用的 truststore 文件
- –target-trust-store-password,访问目标图使用的 truststore 的密码
- –directory 或者 -d,迁移过程中,存储源图的 schema 或者 data 的目录,本地目录时,默认为’./{graphName}’,HDFS 时,默认为 ‘{fs.default.name}/{graphName}’
- –huge-types 或者 -t,要迁移的数据类型,逗号分隔,可选值为 ‘all’ 或者 一个或多个 [vertex,edge,vertex_label,edge_label,property_key,index_label] 的组合,‘all’ 代表全部6种类型,即顶点、边和所有schema
- –log 或者 -l,指定日志目录,默认为当前目录
- –retry,指定失败重试次数,默认为 3
- –split-size 或者 -s,指定迁移过程中对源图进行备份时顶点或者边分块的大小,默认为 1048576
- -D,用 -Dkey=value 的模式指定动态参数,用来在迁移图过程中需要备份数据到 HDFS 时,指定 HDFS 的配置项,例如:-Dfs.default.name=hdfs://localhost:9000
- –graph-mode 或者 -m,将源图恢复到目标图时将目标图设置的模式,合法值包括 [RESTORING, MERGING]
- –keep-local-data,是否保留在迁移图的过程中产生的源图的备份,默认为 false,即默认迁移图结束后不保留产生的源图备份
- schedule-backup,周期性对图执行备份操作,并保留一定数目的最新备份(目前仅支持本地文件系统)
- –directory 或者 -d,必填项,指定备份数据的目录
- –backup-num,选填项,指定保存的最新的备份的数目,默认为 3
- –interval,选填项,指定进行备份的周期,格式同 Linux crontab 格式
- dump,把整张图的顶点和边全部导出,默认以
vertex vertex-edge1 vertex-edge2...JSON格式存储。 用户也可以自定义存储格式,只需要在hugegraph-tools/src/main/java/com/baidu/hugegraph/formatter目录下实现一个继承自Formatter的类,例如CustomFormatter,使用时指定该类为formatter即可,例如bin/hugegraph dump -f CustomFormatter- –formatter 或者 -f,指定使用的 formatter,默认为 JsonFormatter
- –directory 或者 -d,存储 schema 或者 data 的目录,默认为当前目录
- –log 或者 -l,指定日志目录,默认为当前目录
- –retry,指定失败重试次数,默认为 3
- –split-size 或者 -s,指定在备份时对顶点或者边分块的大小,默认为 1048576
- -D,用 -Dkey=value 的模式指定动态参数,用来备份数据到 HDFS 时,指定 HDFS 的配置项,例如:-Dfs.default.name=hdfs://localhost:9000
3.7 安装部署类
- deploy,一键下载、安装和启动 HugeGraph-Server 和 HugeGraph-Studio
- -v,必填项,指明安装的 HugeGraph-Server 和 HugeGraph-Studio 的版本号,最新的是 0.9
- -p,必填项,指定安装的 HugeGraph-Server 和 HugeGraph-Studio 目录
- -u,选填项,指定下载 HugeGraph-Server 和 HugeGraph-Studio 压缩包的链接
- clear,清理 HugeGraph-Server 和 HugeGraph-Studio 目录和tar包
- -p,必填项,指定要清理的 HugeGraph-Server 和 HugeGraph-Studio 的目录
- start-all,一键启动 HugeGraph-Server 和 HugeGraph-Studio,并启动监控,服务死掉时自动拉起服务
- -v,必填项,指明要启动的 HugeGraph-Server 和 HugeGraph-Studio 的版本号,最新的是 0.9
- -p,必填项,指定安装了 HugeGraph-Server 和 HugeGraph-Studio 的目录
- stop-all,一键关闭 HugeGraph-Server 和 HugeGraph-Studio
deploy命令中有可选参数 -u,提供时会使用指定的下载地址替代默认下载地址下载 tar 包,并且将地址写入
~/hugegraph-download-url-prefix文件中;之后如果不指定地址时,会优先从~/hugegraph-download-url-prefix指定的地址下载 tar 包;如果 -u 和~/hugegraph-download-url-prefix都没有时,会从默认下载地址进行下载
3.8 具体命令参数
各子命令的具体参数如下:
3.9 具体命令示例
1. gremlin语句
2. 查看task情况
3. 图模式查看和设置
4. 清理图
5. 图备份
6. 周期性的备份
7. 图恢复
8. 图迁移
3 - HugeGraph-Hubble Quick Start
1 HugeGraph-Hubble Overview
HugeGraph is an analysis-oriented graph database system that supports batch operations, which fully supports Apache TinkerPop3 framework and Gremlin graph query language. It provides a complete tool chain ecology such as export, backup, and recovery, and effectively solve the storage, query and correlation analysis needs of massive graph data. HugeGraph is widely used in the fields of risk control, insurance claims, recommendation search, public security crime crackdown, knowledge graph, network security, IT operation and maintenance of bank securities companies, and is committed to allowing more industries, organizations and users to enjoy a wider range of data comprehensive value.
HugeGraph-Hubble is HugeGraph’s one-stop visual analysis platform. The platform covers the whole process from data modeling, to efficient data import, to real-time and offline analysis of data, and unified management of graphs, realizing the whole process wizard of graph application. It is designed to improve the user’s use fluency, lower the user’s use threshold, and provide a more efficient and easy-to-use user experience.
The platform mainly includes the following modules:
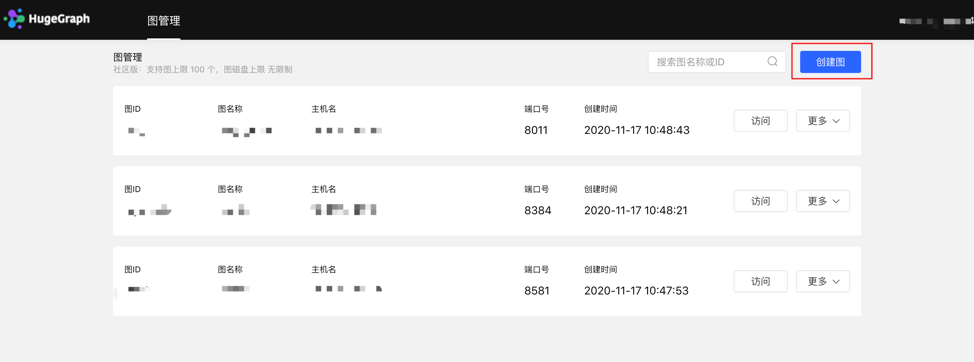
Graph Management
The graph management module realizes the unified management of multiple graphs and graph access, editing, deletion, and query by creating graph and connecting the platform and graph data.
Metadata Modeling
The metadata modeling module realizes the construction and management of graph models by creating attribute libraries, vertex types, edge types, and index types. The platform provides two modes, list mode and graph mode, which can display the metadata model in real time, which is more intuitive. At the same time, it also provides a metadata reuse function across graphs, which saves the tedious and repetitive creation process of the same metadata, greatly improves modeling efficiency and enhances ease of use.
Data Import
Data import is to convert the user’s business data into the vertices and edges of the graph and insert it into the graph database. The platform provides a wizard-style visual import module. By creating import tasks, the management of import tasks and the parallel operation of multiple import tasks are realized. Improve import performance. After entering the import task, you only need to follow the platform step prompts, upload files as needed, and fill in the content to easily implement the import process of graph data. At the same time, it supports breakpoint resuming, error retry mechanism, etc., which reduces import costs and improves efficiency.
Graph Analysis
By inputting the graph traversal language Gremlin, high-performance general analysis of graph data can be realized, and functions such as customized multidimensional path query of vertices can be provided, and three kinds of graph result display methods are provided, including: graph form, table form, Json form, and multidimensional display. The data form meets the needs of various scenarios used by users. It provides functions such as running records and collection of common statements, realizing the traceability of graph operations, and the reuse and sharing of query input, which is fast and efficient. It supports the export of graph data, and the export format is Json format.
Task Management
For Gremlin tasks that need to traverse the whole graph, index creation and reconstruction and other time-consuming asynchronous tasks, the platform provides corresponding task management functions to achieve unified management and result viewing of asynchronous tasks.
2 Platform Workflow
The module usage process of the platform is as follows:

3 Platform Instructions
3.1 Graph Management
3.1.1 Graph creation
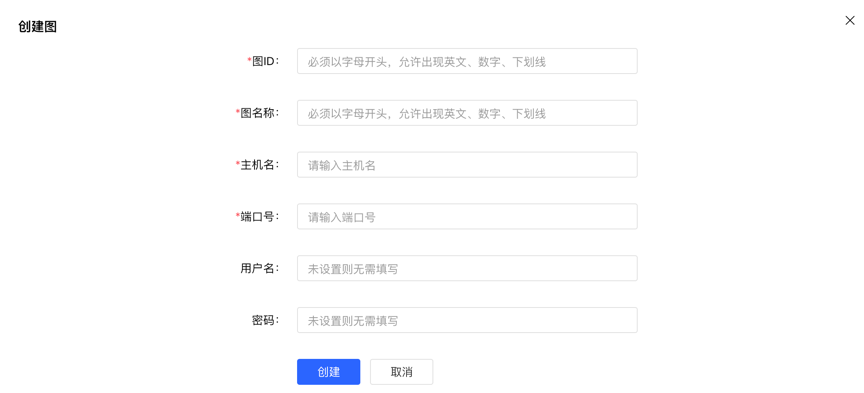
Under the graph management module, click [Create graph], and realize the connection of multiple graphs by filling in the graph ID, graph name, host name, port number, username, and password information.
Create graph by filling in the content as follows::
3.1.2 Graph Access
Realize the information access of the graph space. After entering, you can perform operations such as multidimensional query analysis, metadata management, data import, and algorithm analysis of the graph.

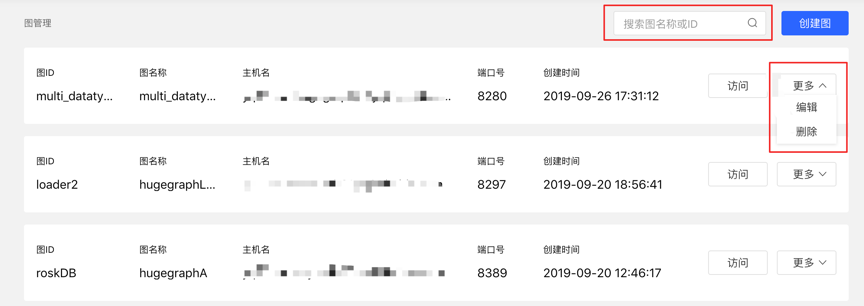
3.1.3 Graph management
- Users can achieve unified management of graphs through overview, search, and information editing and deletion of single graphs.
- Search range: You can search for the graph name and ID.
3.2 Metadata Modeling (list + graph mode)
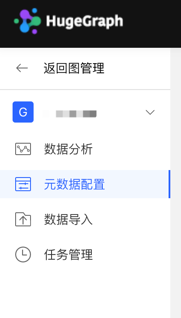
3.2.1 Module entry
Left navigation:
3.2.2 Property type
3.2.2.1 Create type
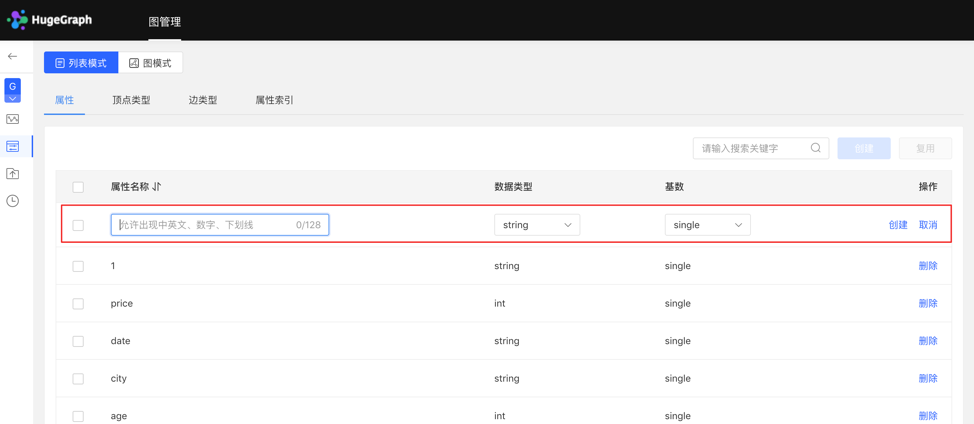
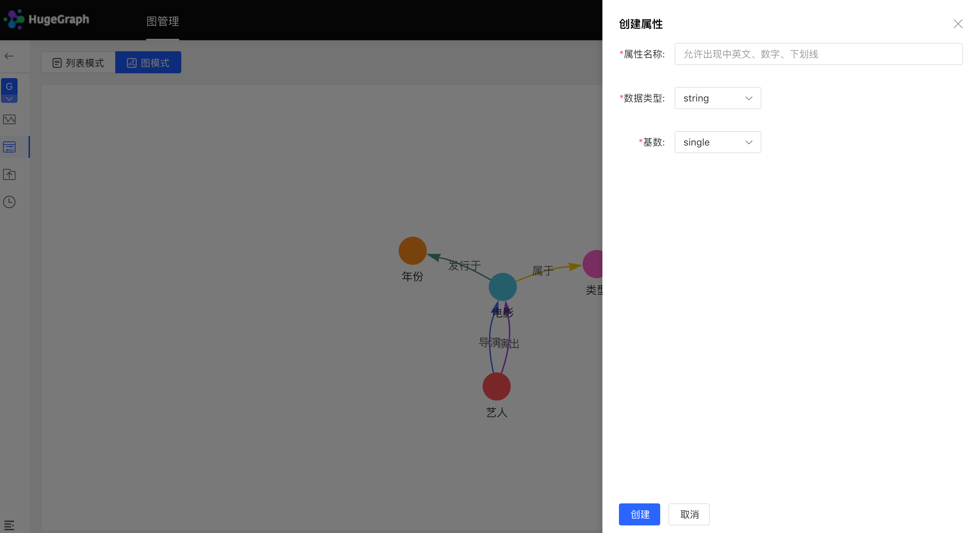
- Fill in or select the attribute name, data type, and cardinality to complete the creation of the attribute.
- Created attributes can be used as attributes of vertex type and edge type.
List mode:
Graph mode:
3.2.2.2 Reuse
- The platform provides the [Reuse] function, which can directly reuse the metadata of other graphs.
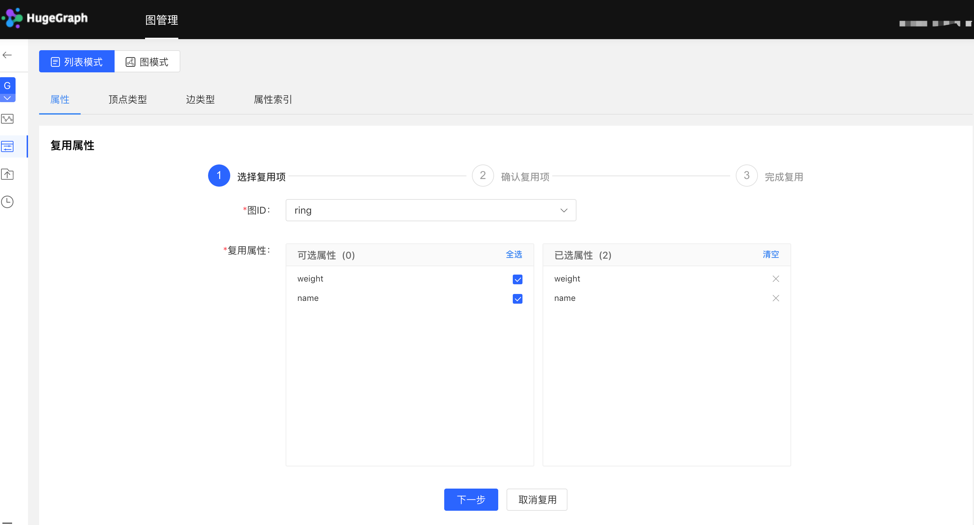
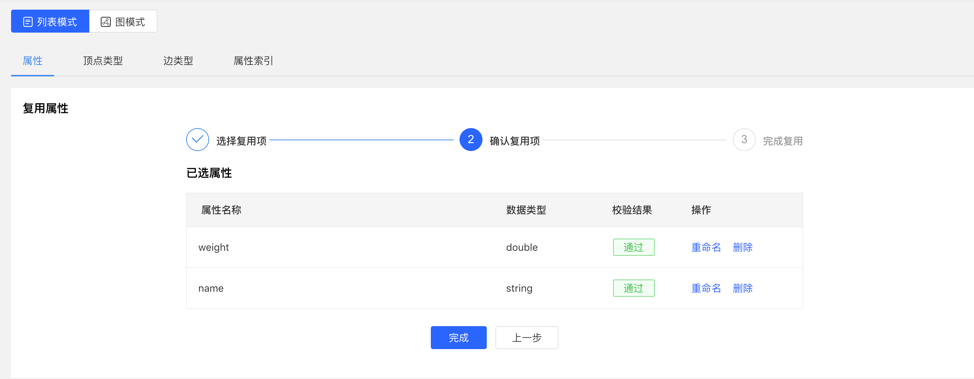
- Select the graph ID that needs to be reused, and continue to select the attributes that need to be reused. After that, the platform will check whether there is a conflict. After passing, the metadata can be reused.
Select reuse items:
Check reuse items:
3.2.2.3 Management
- You can delete a single item or delete it in batches in the attribute list.
3.2.3 Vertex type
3.2.3.1 Create type
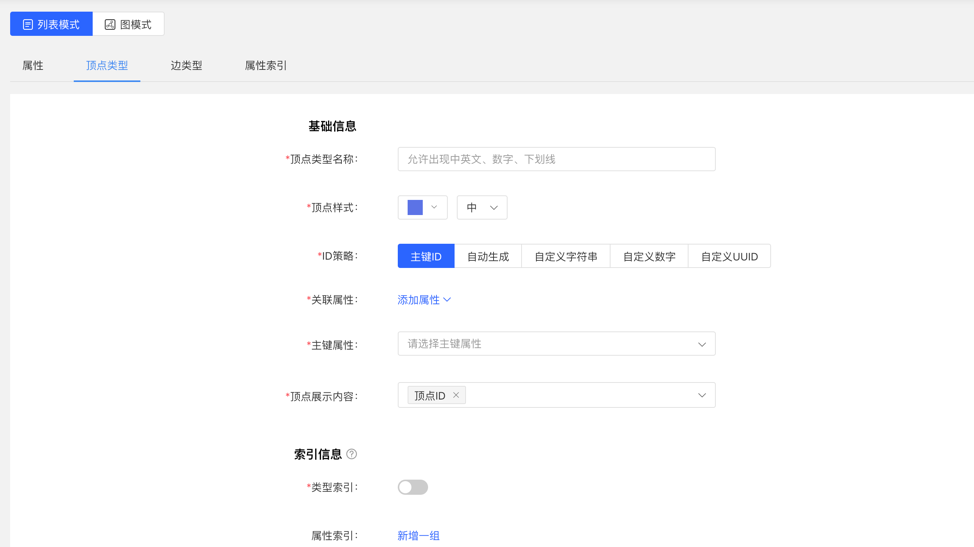
- Fill in or select the vertex type name, ID strategy, association attribute, primary key attribute, vertex style, content displayed below the vertex in the query result, and index information: including whether to create a type index, and the specific content of the attribute index, complete the vertex Type creation.
List mode:
Graph mode:
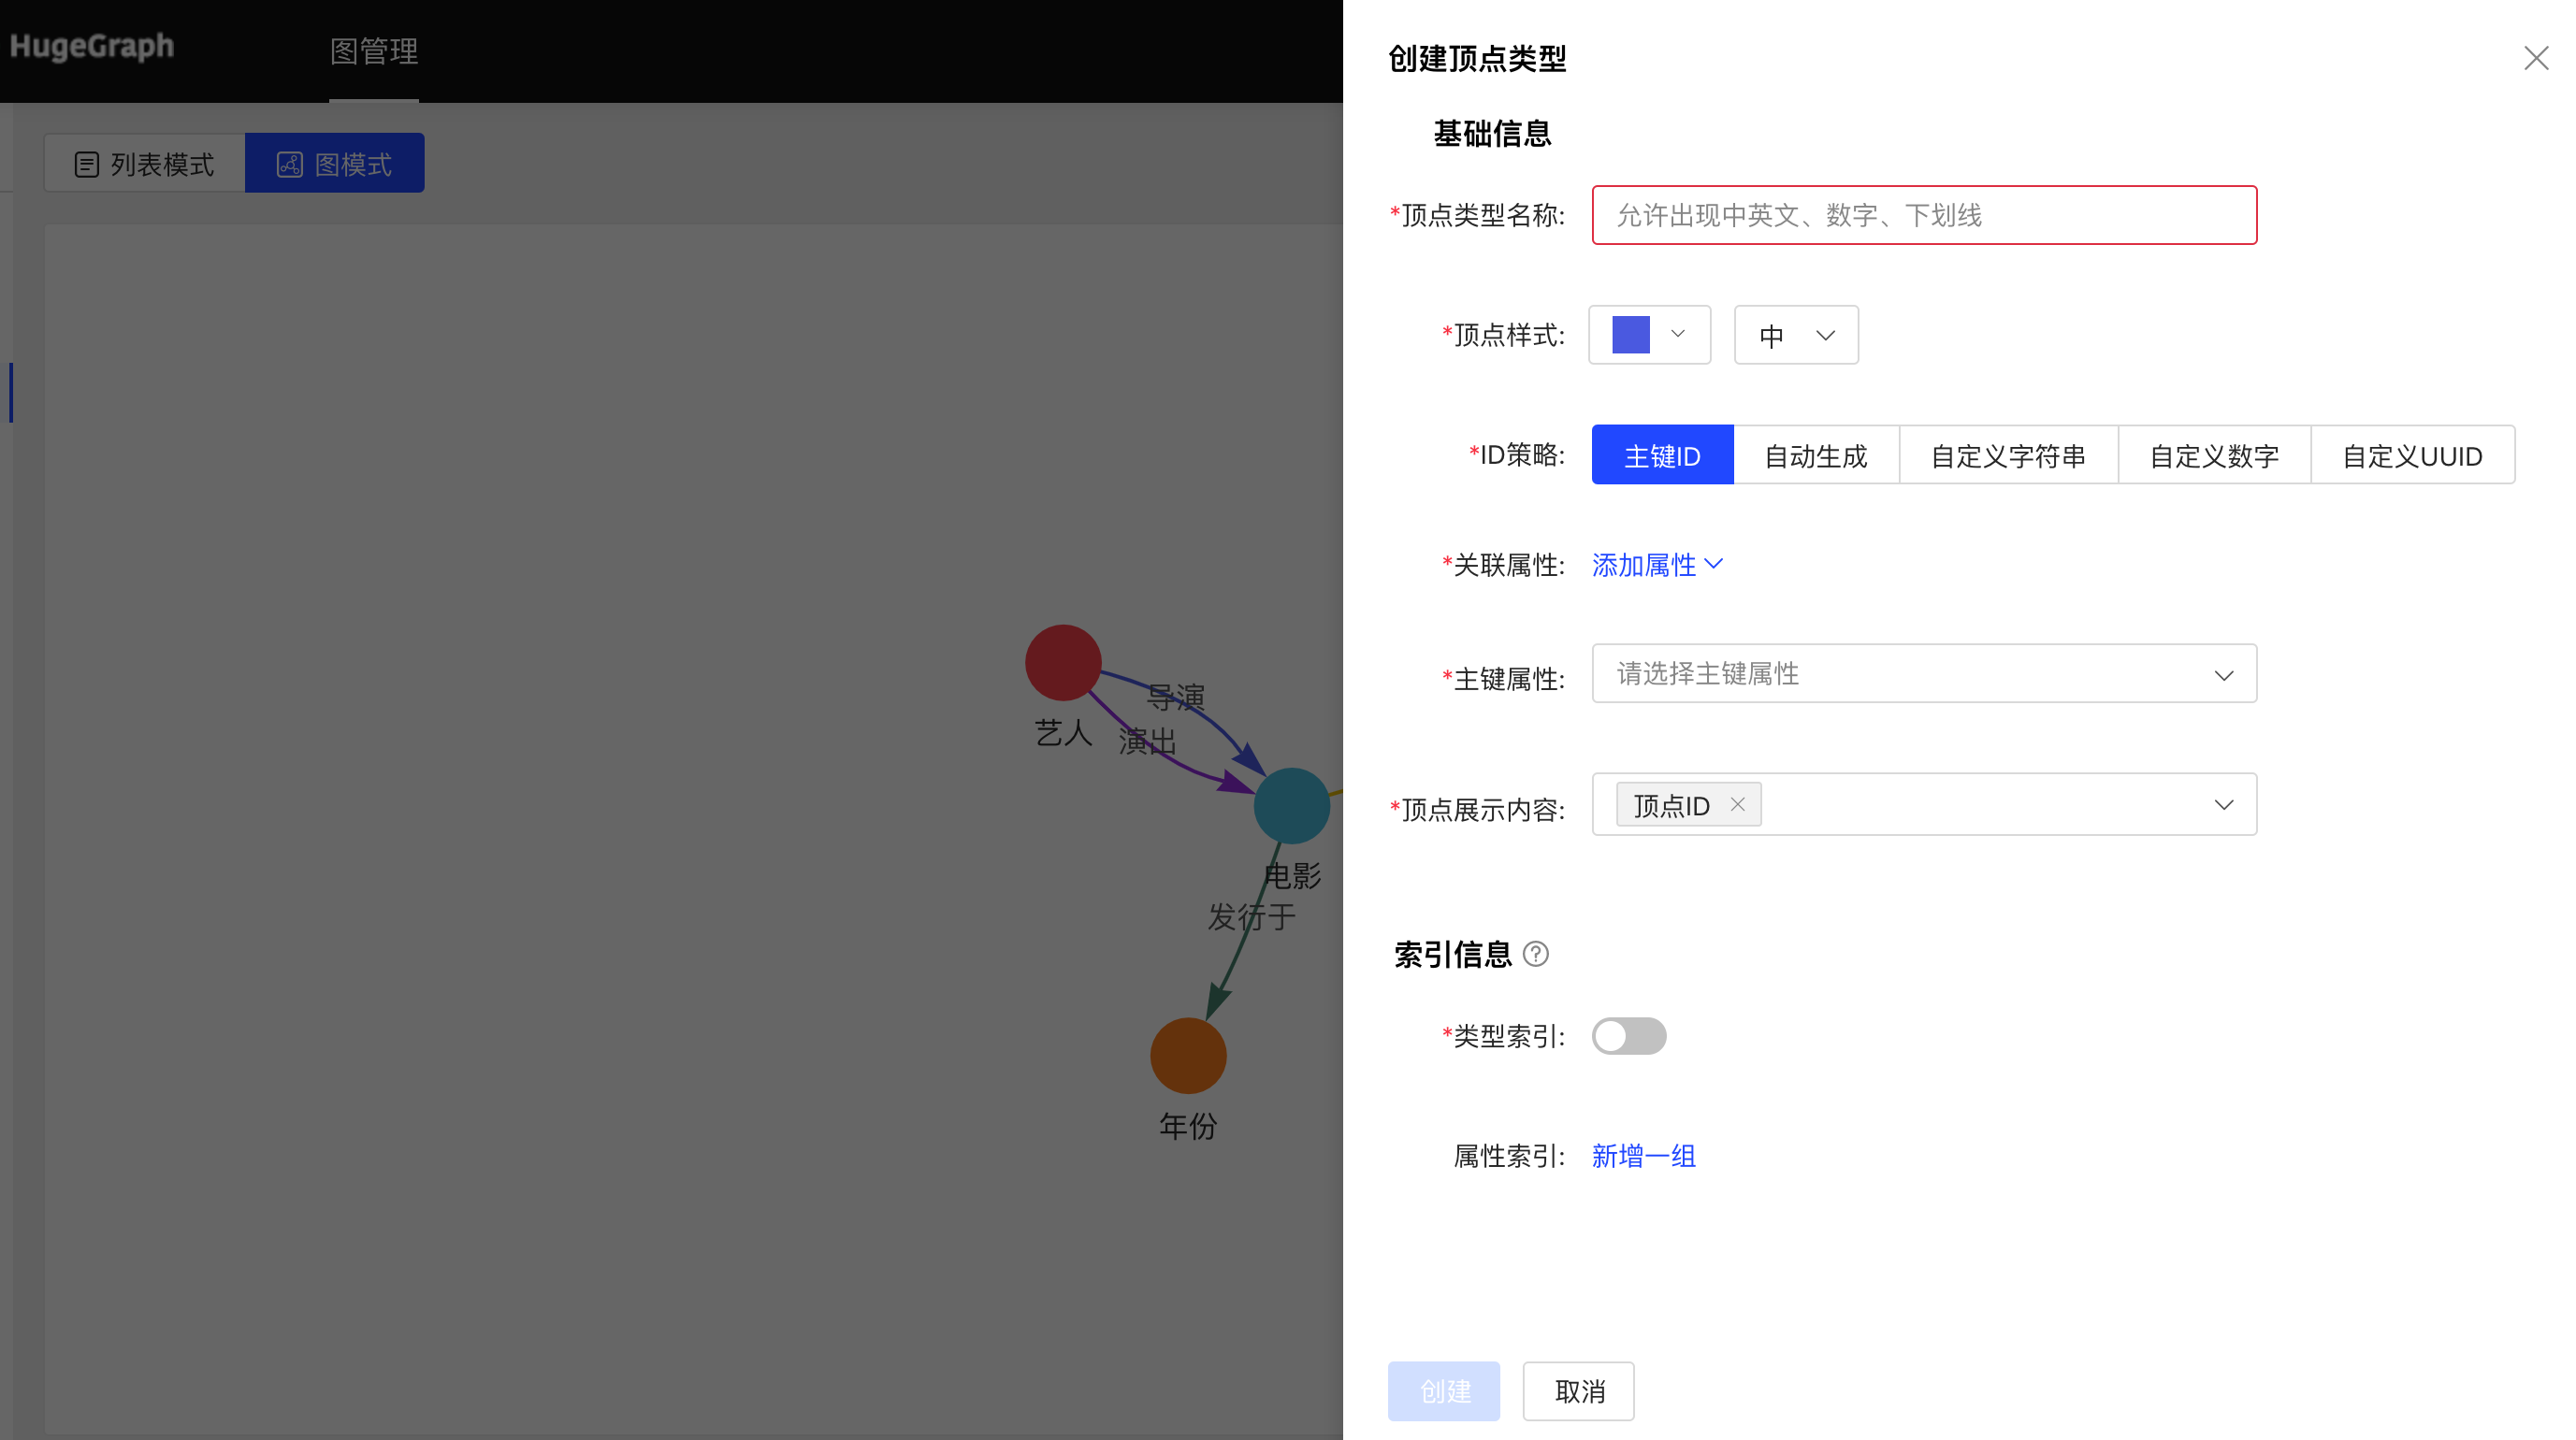
3.2.3.2 Reuse
- The multiplexing of vertex types will reuse the attributes and attribute indexes associated with this type together.
- The reuse method is similar to the property reuse, see 3.2.2.2.
3.2.3.3 Administration
Editing operations are available. The vertex style, association type, vertex display content, and attribute index can be edited, and the rest cannot be edited.
You can delete a single item or delete it in batches.
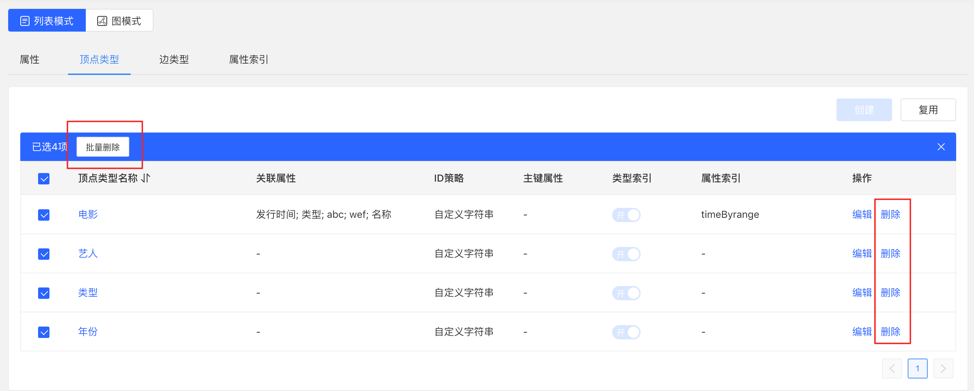
3.2.4 Edge Types
3.2.4.1 Create
- Fill in or select the edge type name, start point type, end point type, associated attributes, whether to allow multiple connections, edge style, content displayed below the edge in the query result, and index information: including whether to create a type index, and attribute index The specific content, complete the creation of the edge type.
List mode:
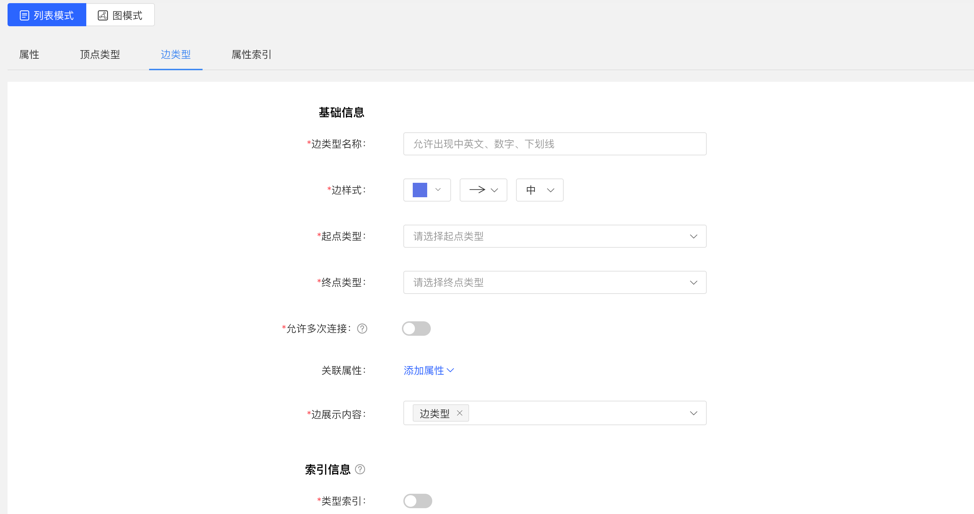
Graph mode:
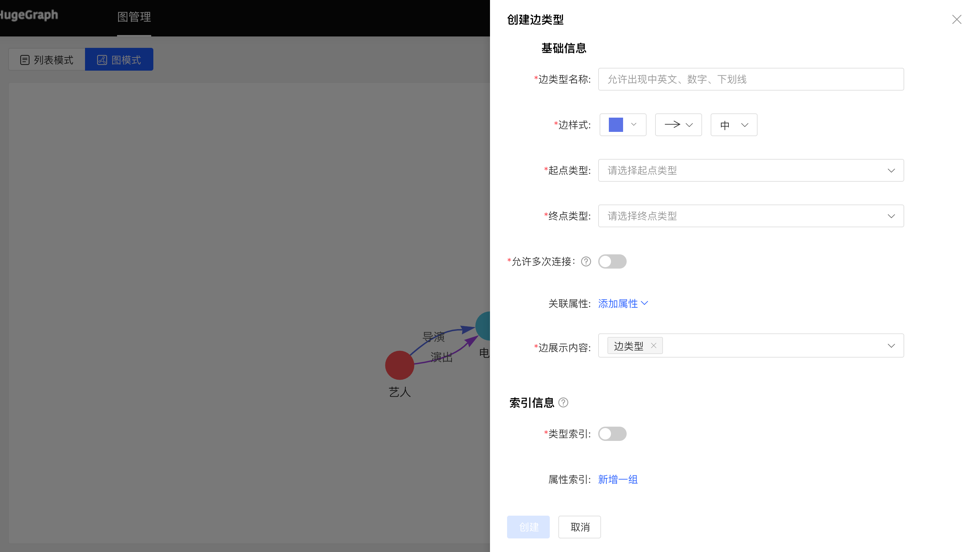
3.2.4.2 Reuse
- The reuse of the edge type will reuse the start point type, end point type, associated attribute and attribute index of this type.
- The reuse method is similar to the property reuse, see 3.2.2.2.
3.2.4.3 Administration
- Editing operations are available. Edge styles, associated attributes, edge display content, and attribute indexes can be edited, and the rest cannot be edited, the same as the vertex type.
- You can delete a single item or delete it in batches.
3.2.5 Index Types
Displays vertex and edge indices for vertex types and edge types.
3.3 Data Import
The usage process of data import is as follows:

3.3.1 Module entrance
Left navigation:

3.3.2 Create task
- Fill in the task name and remarks (optional) to create an import task.
- Multiple import tasks can be created and imported in parallel.
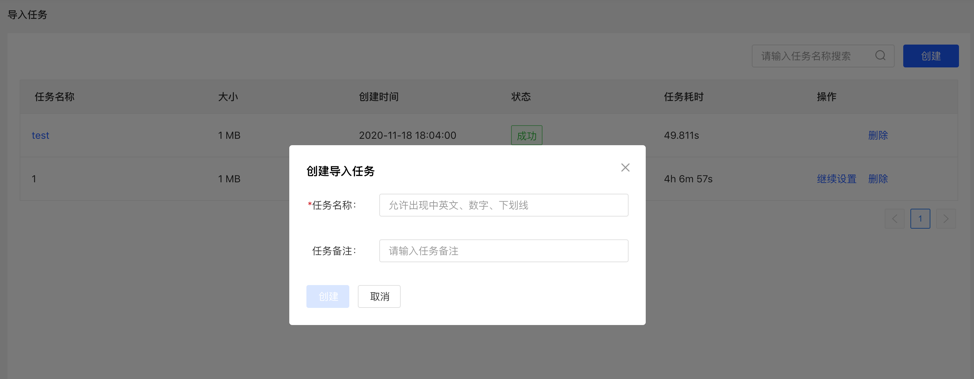
3.3.3 Uploading files
- Upload the file that needs to be composed. The currently supported format is CSV, which will be updated continuously in the future.
- Multiple files can be uploaded at the same time.
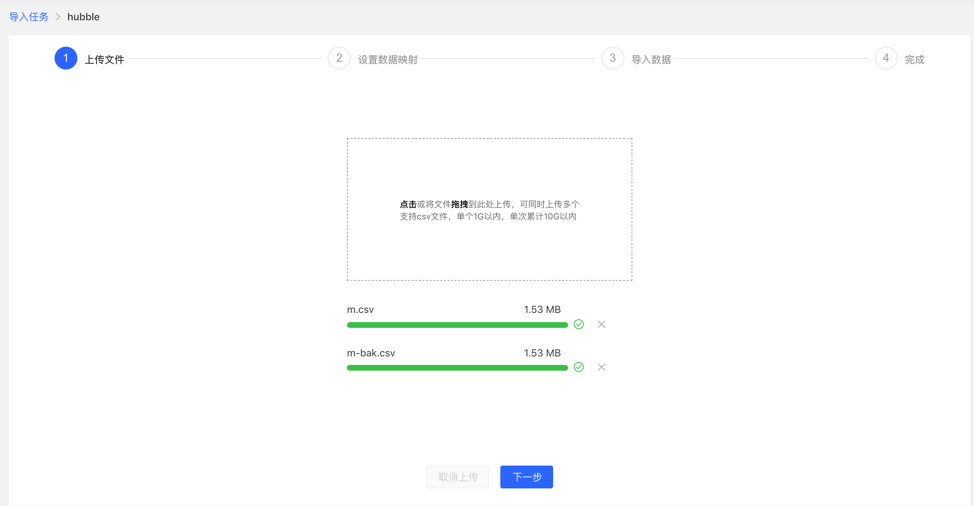
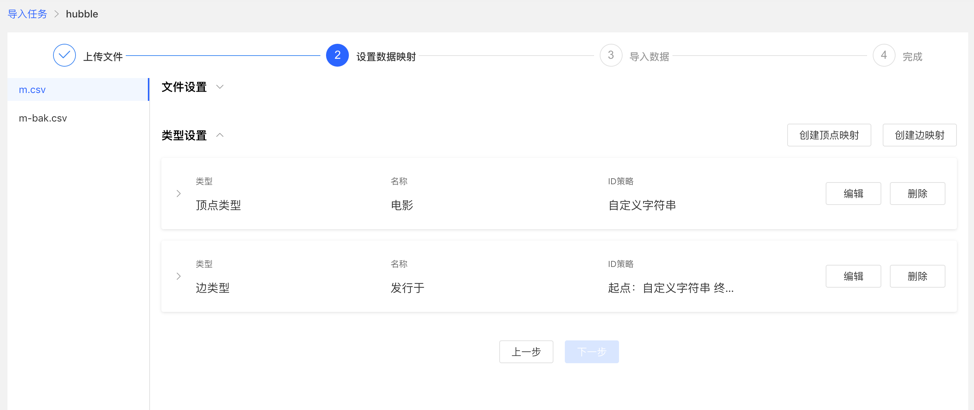
3.3.4 Setting up data mapping
Set up data mapping for uploaded files, including file settings and type settings
File settings: Check or fill in whether to include the header, separator, encoding format and other settings of the file itself, all set the default values, no need to fill in manually
Type setting:
Vertex map and edge map:
【Vertex Type】: Select the vertex type, and upload the column data in the file for its ID mapping;
【Edge Type】: Select the edge type and map the column data of the uploaded file to the ID column of its start point type and end point type;
Mapping settings: upload the column data in the file for the attribute mapping of the selected vertex type. Here, if the attribute name is the same as the header name of the file, the mapping attribute can be automatically matched, and there is no need to manually fill in the selection.
After completing the setting, the setting list will be displayed before proceeding to the next step. It supports the operations of adding, editing and deleting mappings.
Fill in the settings map:
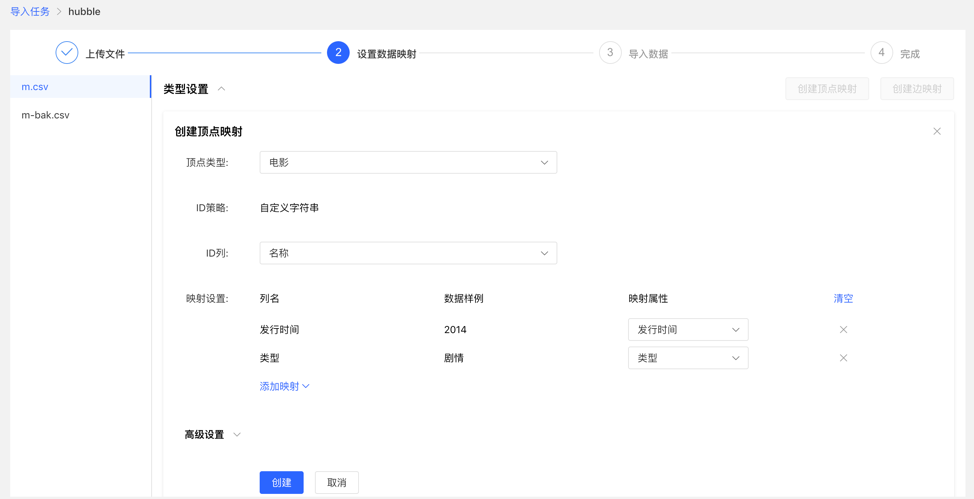
Mapping list:
3.3.5 Import data
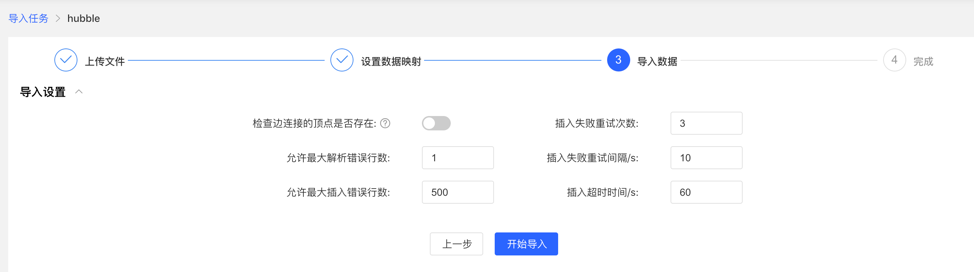
Before importing, you need to fill in the import setting parameters. After filling in, you can start importing data into the gallery.
- Import settings
- The import setting parameter items are as shown in the figure below, all set the default value, no need to fill in manually
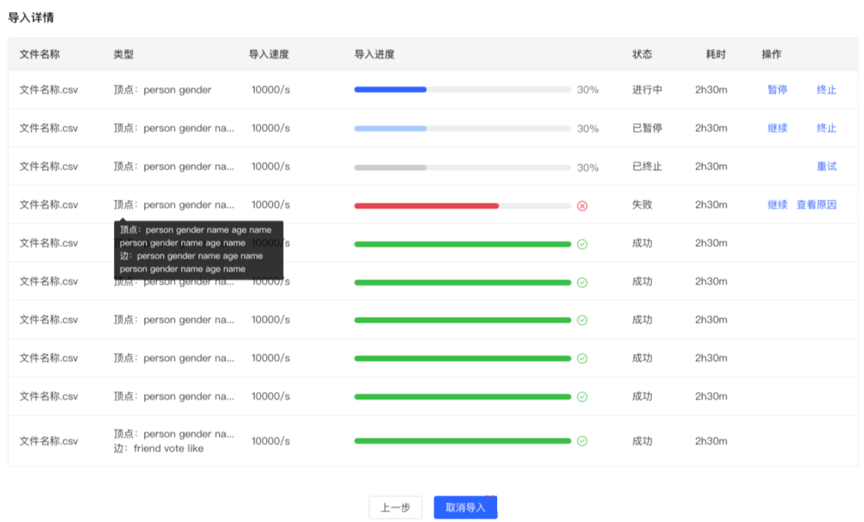
- Import details
- Click Start Import to start the file import task
- The import details provide the mapping type, import speed, import progress, time-consuming and the specific status of the current task set for each uploaded file, and can pause, resume, stop and other operations for each task
- If the import fails, you can view the specific reason
3.4 Data Analysis
3.4.1 Module entry
Left navigation:
3.4.2 Multi-image switching
By switching the entrance on the left, flexibly switch the operation space of multiple graphs
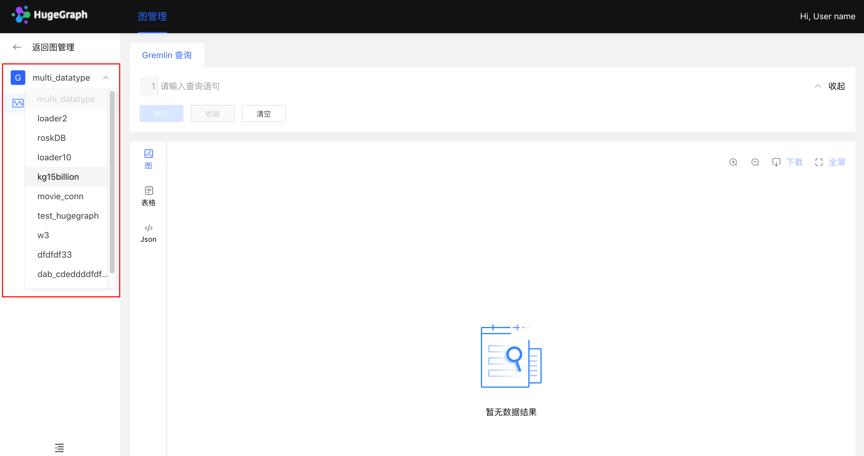
3.4.3 Graph Analysis and Processing
HugeGraph supports Gremlin, a graph traversal query language of Apache TinkerPop3. Gremlin is a general graph database query language. By entering Gremlin statements and clicking execute, you can perform query and analysis operations on graph data, and create and delete vertices/edges. , vertex/edge attribute modification, etc.
After Gremlin query, below is the graph result display area, which provides 3 kinds of graph result display modes: [Graph Mode], [Table Mode], [Json Mode].
Support zoom, center, full screen, export and other operations.
【Picture Mode】
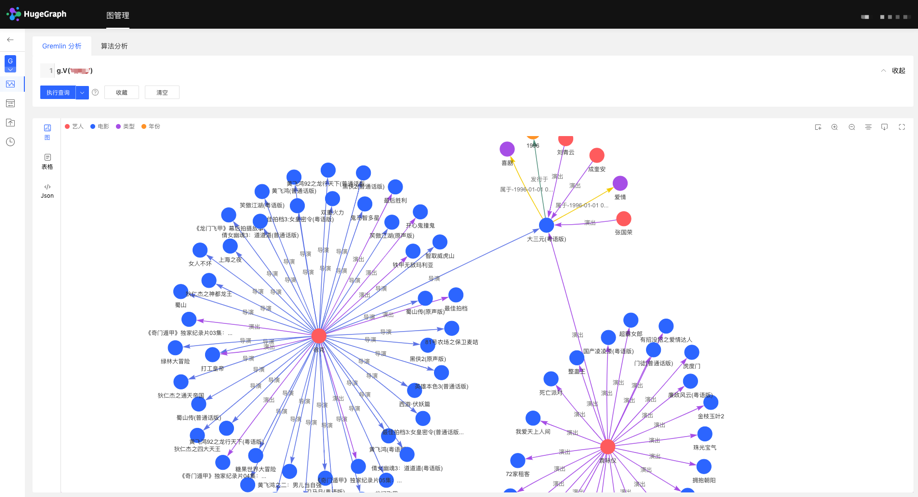
【Table mode】
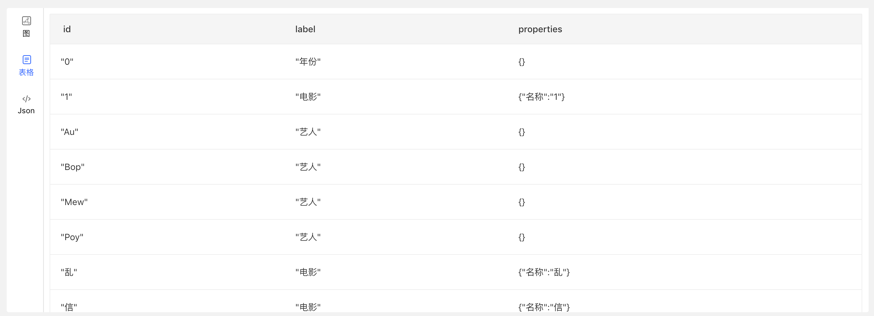
【Json mode】
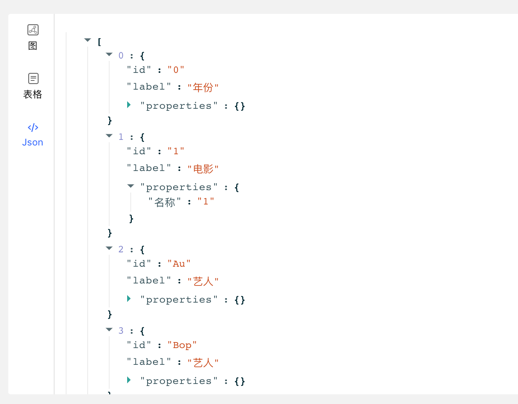
3.4.4 Data Details
Click the vertex/edge entity to view the data details of the vertex/edge, including: vertex/edge type, vertex ID, attribute and corresponding value, expand the information display dimension of the graph, and improve the usability.
3.4.5 Multidimensional Path Query of Graph Results
In addition to the global query, in-depth customized query and hidden operations can be performed for the vertices in the query result to realize customized mining of graph results.
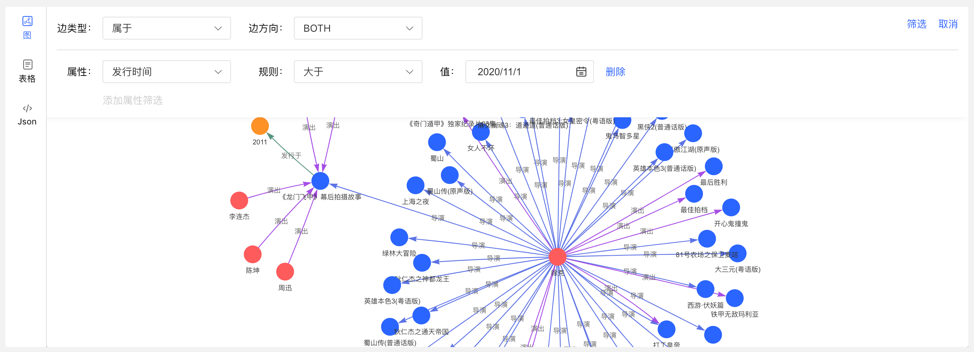
Right-click a vertex, and the menu entry of the vertex appears, which can be displayed, inquired, hidden, etc.
- Expand: Click to display the vertices associated with the selected point.
- Query: By selecting the edge type and edge direction associated with the selected point, and then selecting its attributes and corresponding filtering rules under this condition, a customized path display can be realized.
- Hide: When clicked, hides the selected point and its associated edges.
Double-clicking a vertex also displays the vertex associated with the selected point.
3.4.6 Add vertex/edge
3.4.6.1 Added vertex
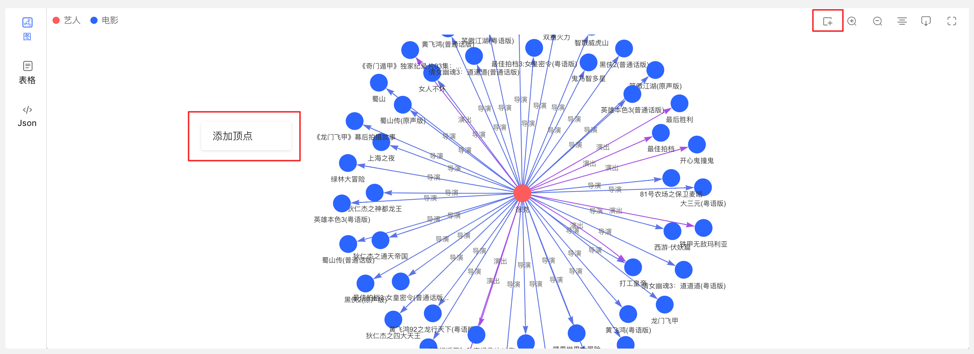
In the graph area, two entries can be used to dynamically add vertices, as follows:
- Click on the graph area panel, the Add Vertex entry appears
- Click the first icon in the action bar in the upper right corner
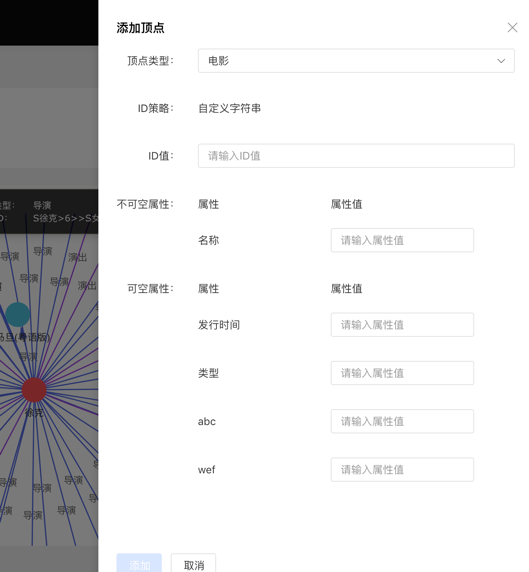
Complete the addition of vertices by selecting or filling in the vertex type, ID value, and attribute information.
The entry is as follows:
Add the vertex content as follows:
3.4.6.2 Add edge
Right-click a vertex in the graph result to add the outgoing or incoming edge of that point.
3.4.7 Execute the query of records and favorites
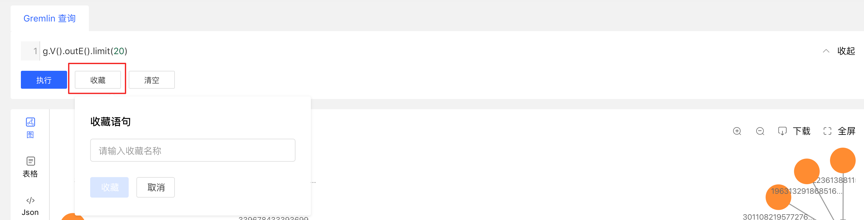
- Record each query record at the bottom of the graph area, including: query time, execution type, content, status, time-consuming, as well as [collection] and [load] operations, to achieve a comprehensive record of graph execution, with traces to follow, and Can quickly load and reuse execution content
- Provides the function of collecting sentences, which can be used to collect frequently used sentences, which is convenient for fast calling of high-frequency sentences.
3.5 Task Management
3.5.1 Module entry
Left navigation:
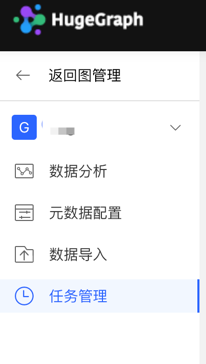
3.5.2 Task Management
- Provide unified management and result viewing of asynchronous tasks. There are 4 types of asynchronous tasks, namely:
- gremlin: Gremlin tasks
- algorithm: OLAP algorithm task
- remove_schema: remove metadata
- rebuild_index: rebuild the index
- The list displays the asynchronous task information of the current graph, including: task ID, task name, task type, creation time, time-consuming, status, operation, and realizes the management of asynchronous tasks.
- Support filtering by task type and status
- Support searching for task ID and task name
- Asynchronous tasks can be deleted or deleted in batches
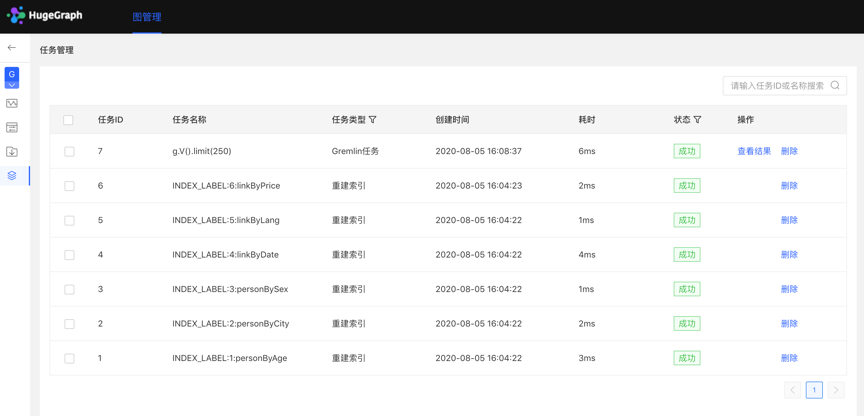
3.5.3 Gremlin asynchronous tasks
- Create a task
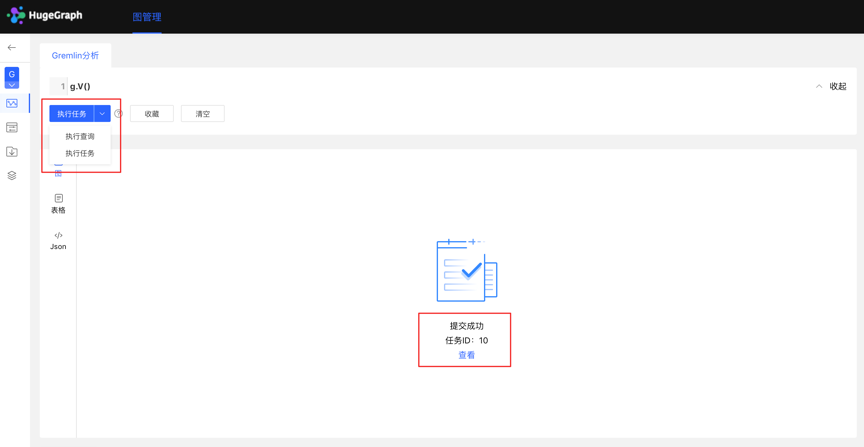
- The data analysis module currently supports two Gremlin operations, Gremlin query and Gremlin task; if the user switches to the Gremlin task, after clicking execute, an asynchronous task will be created in the asynchronous task center;
- Task submission
- After the task is submitted successfully, the graph area returns the submission result and task ID
- Mission details
- Provide [View] entry, you can jump to the task details to view the specific execution of the current task After jumping to the task center, the currently executing task line will be displayed directly
Click to view the entry to jump to the task management list, as follows:
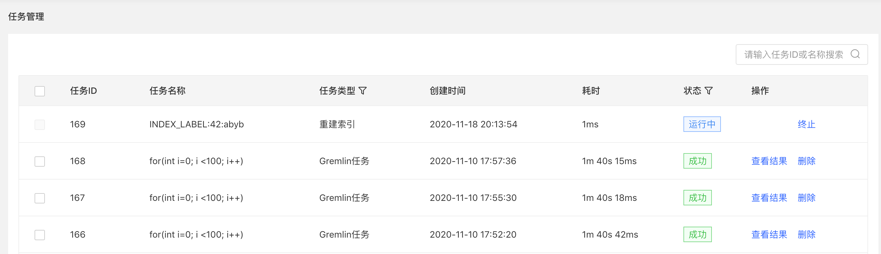
- View the results
- The results are displayed in the form of json
3.5.4 OLAP algorithm tasks
There is no visual OLAP algorithm execution on Hubble. You can call the RESTful API to perform OLAP algorithm tasks, find the corresponding tasks by ID in the task management, and view the progress and results.
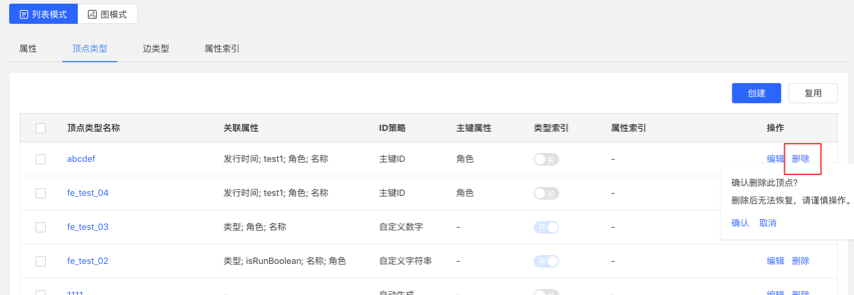
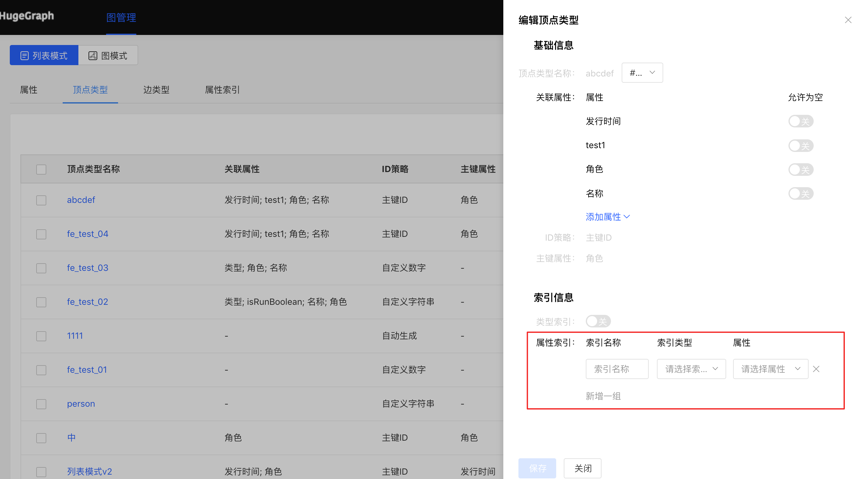
3.5.5 Delete metadata, rebuild index
- Create a task
- In the metadata modeling module, when deleting metadata, an asynchronous task for deleting metadata can be created
- When editing an existing vertex/edge type operation, when adding an index, an asynchronous task of creating an index can be created
- Task details
- After confirming/saving, you can jump to the task center to view the details of the current task