1.1 - HugeGraph-Server Quick Start
1 HugeGraph-Server概述
HugeGraph-Server 是 HugeGraph 项目的核心部分,包含Core、Backend、API等子模块。
Core模块是Tinkerpop接口的实现,Backend模块用于管理数据存储,目前支持的后端包括:Memory、Cassandra、ScyllaDB以及RocksDB,API模块提供HTTP Server,将Client的HTTP请求转化为对Core的调用。
文档中会大量出现HugeGraph-Server及HugeGraphServer这两种写法,其他组件也类似。这两种写法含义上并无大的差异,可以这么区分:HugeGraph-Server表示服务端相关组件代码,HugeGraphServer表示服务进程。
2 依赖
2.1 安装JDK-1.8
HugeGraph-Server 基于jdk-1.8开发,代码用到了较多jdk-1.8中的类和方法,请用户自行安装配置。
在往下阅读之前务必执行java -version命令查看jdk版本
2.2 安装GCC-4.3.0(GLIBCXX_3.4.10)或更新版本(可选)
如果使用的是RocksDB后端,请务必执行gcc --version命令查看gcc版本;若使用其他后端,则不需要。
3 部署
有三种方式可以部署HugeGraph-Server组件:
- 方式1:一键部署
- 方式2:下载tar包
- 方式3:源码编译
3.1 一键部署
HugeGraph-Tools提供了一键部署的命令行工具,用户可以使用该工具快速地一键下载、解压、配置并启动HugeGraphServer和HugeGraphStudio。
当然,还是得先下载HugeGraph-Tools的tar包。
wget https://github.com/hugegraph/hugegraph-tools/releases/download/v${version}/hugegraph-tools-${version}.tar.gz
tar -zxvf hugegraph-tools-${version}.tar.gz
cd hugegraph-tools-${version}
注:${version}为版本号,最新版本号可参考Download页面,或直接从Download页面点击链接下载
HugeGraph-Tools 的总入口脚本是bin/hugegraph,用户可以使用help子命令查看其用法,这里只介绍一键部署的命令。
bin/hugegraph deploy -v {hugegraph-version} -p {install-path} [-u {download-path-prefix}]
{hugegraph-version}表示要部署的HugeGraphServer及HugeGraphStudio的版本,用户可查看conf/version-mapping.yaml文件获取版本信息,{install-path}指定HugeGraphServer及HugeGraphStudio的安装目录,{download-path-prefix}可选,指定HugeGraphServer及HugeGraphStudio tar包的下载地址,不提供时使用默认下载地址,比如要启动 0.6 版本的HugeGraph-Server及HugeGraphStudio将上述命令写为bin/hugegraph deploy -v 0.6 -p services即可。
3.2 下载tar包
wget https://github.com/hugegraph/hugegraph/releases/download/v${version}/hugegraph-${version}.tar.gz
tar -zxvf hugegraph-${version}.tar.gz
3.3 源码编译
下载HugeGraph源代码
git clone https://github.com/hugegraph/hugegraph.git
编译打包生成tar包
cd hugegraph
mvn package -DskipTests
执行日志如下:
......
[INFO] Reactor Summary:
[INFO]
[INFO] hugegraph .......................................... SUCCESS [  0.003 s]
[INFO] hugegraph-core ..................................... SUCCESS [ 15.335 s]
[INFO] hugegraph-api ...................................... SUCCESS [  0.829 s]
[INFO] hugegraph-cassandra ................................ SUCCESS [  1.095 s]
[INFO] hugegraph-scylladb ................................. SUCCESS [  0.313 s]
[INFO] hugegraph-rocksdb .................................. SUCCESS [  0.506 s]
[INFO] hugegraph-mysql .................................... SUCCESS [  0.412 s]
[INFO] hugegraph-palo ..................................... SUCCESS [  0.359 s]
[INFO] hugegraph-dist ..................................... SUCCESS [  7.470 s]
[INFO] hugegraph-example .................................. SUCCESS [  0.403 s]
[INFO] hugegraph-test ..................................... SUCCESS [  1.509 s]
[INFO] ------------------------------------------------------------------------
[INFO] BUILD SUCCESS
[INFO] ------------------------------------------------------------------------
......
执行成功后,在hugegraph目录下生成 hugegraph-*.tar.gz 文件,就是编译生成的tar包。
4 配置
如果需要快速启动HugeGraph仅用于测试,那么只需要进行少数几个配置项的修改即可(见下一节)。
详细的配置介绍请参考配置文档及配置项介绍
5 启动
启动分为"首次启动"和"非首次启动",这么区分是因为在第一次启动前需要初始化后端数据库,然后启动服务。
而在人为停掉服务后,或者其他原因需要再次启动服务时,因为后端数据库是持久化存在的,直接启动服务即可。
HugeGraphServer启动时会连接后端存储并尝试检查后端存储版本号,如果未初始化后端或者后端已初始化但版本不匹配时(旧版本数据),HugeGraphServer会启动失败,并给出错误信息。
如果需要外部访问HugeGraphServer,请修改rest-server.properties的restserver.url配置项
(默认为http://127.0.0.1:8080),修改成机器名或IP地址。
由于各种后端所需的配置(hugegraph.properties)及启动步骤略有不同,下面逐一对各后端的配置及启动做介绍。
5.1 Memory
修改 hugegraph.properties
backend=memory
serializer=text
Memory后端的数据是保存在内存中无法持久化的,不需要初始化后端,这也是唯一一个不需要初始化的后端。
启动 server
bin/start-hugegraph.sh
Starting HugeGraphServer...
Connecting to HugeGraphServer (http://127.0.0.1:8080/graphs)....OK
提示的 url 与 rest-server.properties 中配置的 restserver.url 一致
5.2 RocksDB
RocksDB是一个嵌入式的数据库,不需要手动安装部署, 要求 GCC 版本 >= 4.3.0(GLIBCXX_3.4.10),如不满足,需要提前升级 GCC
修改 hugegraph.properties
backend=rocksdb
serializer=binary
rocksdb.data_path=.
rocksdb.wal_path=.
初始化数据库(仅第一次启动时需要)
cd hugegraph-${version}
bin/init-store.sh
启动server
bin/start-hugegraph.sh
Starting HugeGraphServer...
Connecting to HugeGraphServer (http://127.0.0.1:8080/graphs)....OK
5.3 Cassandra
用户需自行安装 Cassandra,要求版本 3.0 以上,下载地址
修改 hugegraph.properties
backend=cassandra
serializer=cassandra

# cassandra backend config
cassandra.host=localhost
cassandra.port=9042
cassandra.username=
cassandra.password=
#cassandra.connect_timeout=5
#cassandra.read_timeout=20

#cassandra.keyspace.strategy=SimpleStrategy
#cassandra.keyspace.replication=3
初始化数据库(仅第一次启动时需要)
cd hugegraph-${version}
bin/init-store.sh
Initing HugeGraph Store...
2017-12-01 11:26:51 1424  [main] [INFO ] com.baidu.hugegraph.HugeGraph [] - Opening backend store: 'cassandra'
2017-12-01 11:26:52 2389  [main] [INFO ] com.baidu.hugegraph.backend.store.cassandra.CassandraStore [] - Failed to connect keyspace: hugegraph, try init keyspace later
2017-12-01 11:26:52 2472  [main] [INFO ] com.baidu.hugegraph.backend.store.cassandra.CassandraStore [] - Failed to connect keyspace: hugegraph, try init keyspace later
2017-12-01 11:26:52 2557  [main] [INFO ] com.baidu.hugegraph.backend.store.cassandra.CassandraStore [] - Failed to connect keyspace: hugegraph, try init keyspace later
2017-12-01 11:26:53 2797  [main] [INFO ] com.baidu.hugegraph.backend.store.cassandra.CassandraStore [] - Store initialized: huge_graph
2017-12-01 11:26:53 2945  [main] [INFO ] com.baidu.hugegraph.backend.store.cassandra.CassandraStore [] - Store initialized: huge_schema
2017-12-01 11:26:53 3044  [main] [INFO ] com.baidu.hugegraph.backend.store.cassandra.CassandraStore [] - Store initialized: huge_index
2017-12-01 11:26:53 3046  [pool-3-thread-1] [INFO ] com.baidu.hugegraph.backend.Transaction [] - Clear cache on event 'store.init'
2017-12-01 11:26:59 9720  [main] [INFO ] com.baidu.hugegraph.HugeGraph [] - Opening backend store: 'cassandra'
2017-12-01 11:27:00 9805  [main] [INFO ] com.baidu.hugegraph.backend.store.cassandra.CassandraStore [] - Failed to connect keyspace: hugegraph1, try init keyspace later
2017-12-01 11:27:00 9886  [main] [INFO ] com.baidu.hugegraph.backend.store.cassandra.CassandraStore [] - Failed to connect keyspace: hugegraph1, try init keyspace later
2017-12-01 11:27:00 9955  [main] [INFO ] com.baidu.hugegraph.backend.store.cassandra.CassandraStore [] - Failed to connect keyspace: hugegraph1, try init keyspace later
2017-12-01 11:27:00 10175 [main] [INFO ] com.baidu.hugegraph.backend.store.cassandra.CassandraStore [] - Store initialized: huge_graph
2017-12-01 11:27:00 10321 [main] [INFO ] com.baidu.hugegraph.backend.store.cassandra.CassandraStore [] - Store initialized: huge_schema
2017-12-01 11:27:00 10413 [main] [INFO ] com.baidu.hugegraph.backend.store.cassandra.CassandraStore [] - Store initialized: huge_index
2017-12-01 11:27:00 10413 [pool-3-thread-1] [INFO ] com.baidu.hugegraph.backend.Transaction [] - Clear cache on event 'store.init'
启动server
bin/start-hugegraph.sh
Starting HugeGraphServer...
Connecting to HugeGraphServer (http://127.0.0.1:8080/graphs)....OK
5.4 ScyllaDB
用户需自行安装 ScyllaDB,推荐版本 2.1 以上,下载地址
修改 hugegraph.properties
backend=scylladb
serializer=scylladb

# cassandra backend config
cassandra.host=localhost
cassandra.port=9042
cassandra.username=
cassandra.password=
#cassandra.connect_timeout=5
#cassandra.read_timeout=20

#cassandra.keyspace.strategy=SimpleStrategy
#cassandra.keyspace.replication=3
由于 scylladb 数据库本身就是基于 cassandra 的"优化版",如果用户未安装 scylladb ,也可以直接使用 cassandra 作为后端存储,只需要把 backend 和 serializer 修改为 scylladb,host 和 post 指向 cassandra 集群的 seeds 和 port 即可,但是并不建议这样做,这样发挥不出 scylladb 本身的优势了。
初始化数据库(仅第一次启动时需要)
cd hugegraph-${version}
bin/init-store.sh
启动server
bin/start-hugegraph.sh
Starting HugeGraphServer...
Connecting to HugeGraphServer (http://127.0.0.1:8080/graphs)....OK
5.5 HBase
用户需自行安装 HBase,要求版本 2.0 以上,下载地址
修改 hugegraph.properties
backend=hbase
serializer=hbase

# hbase backend config
hbase.hosts=localhost
hbase.port=2181
# Note: recommend to modify the HBase partition number by the actual/env data amount & RS amount before init store
# it may influence the loading speed a lot
#hbase.enable_partition=true
#hbase.vertex_partitions=10
#hbase.edge_partitions=30
初始化数据库(仅第一次启动时需要)
cd hugegraph-${version}
bin/init-store.sh
启动server
bin/start-hugegraph.sh
Starting HugeGraphServer...
Connecting to HugeGraphServer (http://127.0.0.1:8080/graphs)....OK
更多其它后端配置可参考配置项介绍
6 访问Server
6.1 服务启动状态校验
jps查看服务进程
curl请求RESTfulAPI
echo `curl -o /dev/null -s -w %{http_code} "http://localhost:8080/graphs/hugegraph/graph/vertices"`
返回结果200,代表server启动正常
6.2 请求Server
HugeGraphServer的RESTful API包括多种类型的资源,典型的包括graph、schema、gremlin、traverser和task,
graph包含vertices、edgesschema 包含vertexlabels、 propertykeys、 edgelabels、indexlabelsgremlin包含各种Gremlin语句,如g.v(),可以同步或者异步执行traverser包含各种高级查询,包括最短路径、交叉点、N步可达邻居等task包含异步任务的查询和删除
6.2.1 获取hugegraph的顶点及相关属性
curl http://localhost:8080/graphs/hugegraph/graph/vertices
说明
由于图的点和边很多,对于 list 型的请求,比如获取所有顶点,获取所有边等,Server 会将数据压缩再返回,
所以使用 curl 时得到一堆乱码,可以重定向至 gunzip 进行解压。推荐使用 Chrome 浏览器 + Restlet 插件发送 HTTP 请求进行测试。
curl "http://localhost:8080/graphs/hugegraph/graph/vertices" | gunzip
当前HugeGraphServer的默认配置只能是本机访问,可以修改配置,使其能在其他机器访问。
vim conf/rest-server.properties

restserver.url=http://0.0.0.0:8080
响应体如下:
{
    "vertices": [
        {
            "id": "2lop",
            "label": "software",
            "type": "vertex",
            "properties": {
                "price": [
                    {
                        "id": "price",
                        "value": 328
                    }
                ],
                "name": [
                    {
                        "id": "name",
                        "value": "lop"
                    }
                ],
                "lang": [
                    {
                        "id": "lang",
                        "value": "java"
                    }
                ]
            }
        },
        {
            "id": "1josh",
            "label": "person",
            "type": "vertex",
            "properties": {
                "name": [
                    {
                        "id": "name",
                        "value": "josh"
                    }
                ],
                "age": [
                    {
                        "id": "age",
                        "value": 32
                    }
                ]
            }
        },
        ...
    ]
}
详细的API请参考RESTful-API文档
7 停止Server
$cd hugegraph-${version}
$bin/stop-hugegraph.sh
2.1 - HugeGraph-Loader Quick Start
1 HugeGraph-Loader概述
HugeGraph-Loader 是 HugeGraph 的数据导入组件,能够将多种数据源的数据转化为图的顶点和边并批量导入到图数据库中。
目前支持的数据源包括:
- 本地磁盘文件或目录,支持 TEXT、CSV 和 JSON 格式的文件,支持压缩文件
- HDFS 文件或目录,支持压缩文件
- 主流关系型数据库,如 MySQL、PostgreSQL、Oracle、SQL Server
本地磁盘文件和 HDFS 文件支持断点续传。
后面会具体说明。
注意:使用 HugeGraph-Loader 需要依赖 HugeGraph Server 服务,下载和启动 Server 请参考 HugeGraph-Server Quick Start
2 获取 HugeGraph-Loader
有两种方式可以获取 HugeGraph-Loader:
2.1 下载已编译的压缩包
下载最新版本的 HugeGraph-Loader release 包:
wget https://github.com/hugegraph/hugegraph-loader/releases/download/v${version}/hugegraph-loader-${version}.tar.gz
tar zxvf hugegraph-loader-${version}.tar.gz
2.2 克隆源码编译安装
克隆最新版本的 HugeGraph-Loader 源码包:
$ git clone https://github.com/hugegraph/hugegraph-loader.git
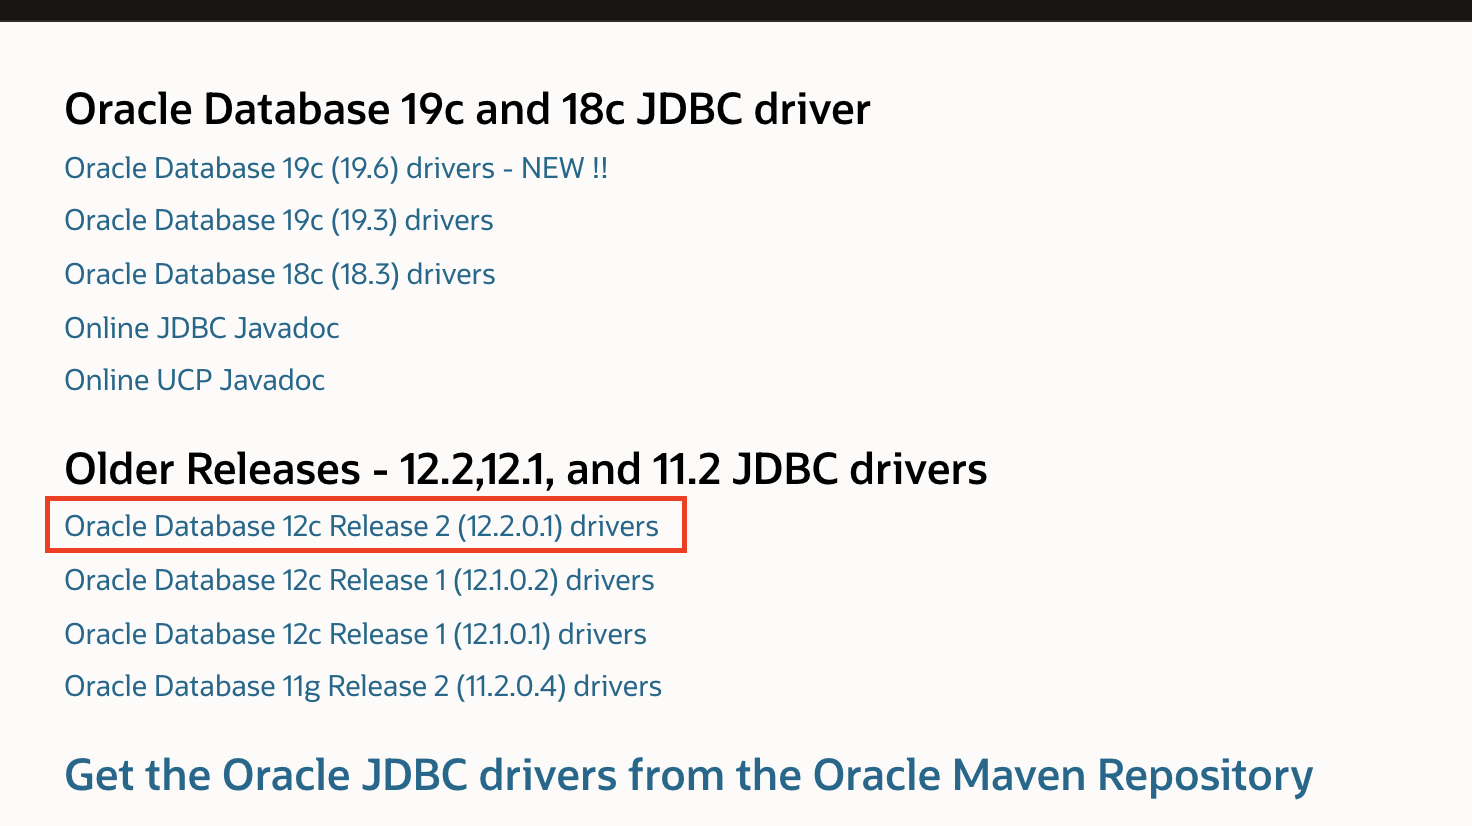
由于Oracle ojdbc license的限制,需要手动安装ojdbc到本地maven仓库。
访问Oracle jdbc 下载 页面。选择Oracle Database 12c Release 2 (12.2.0.1) drivers,如下图所示。
打开链接后,选择“ojdbc8.jar”, 如下图所示。
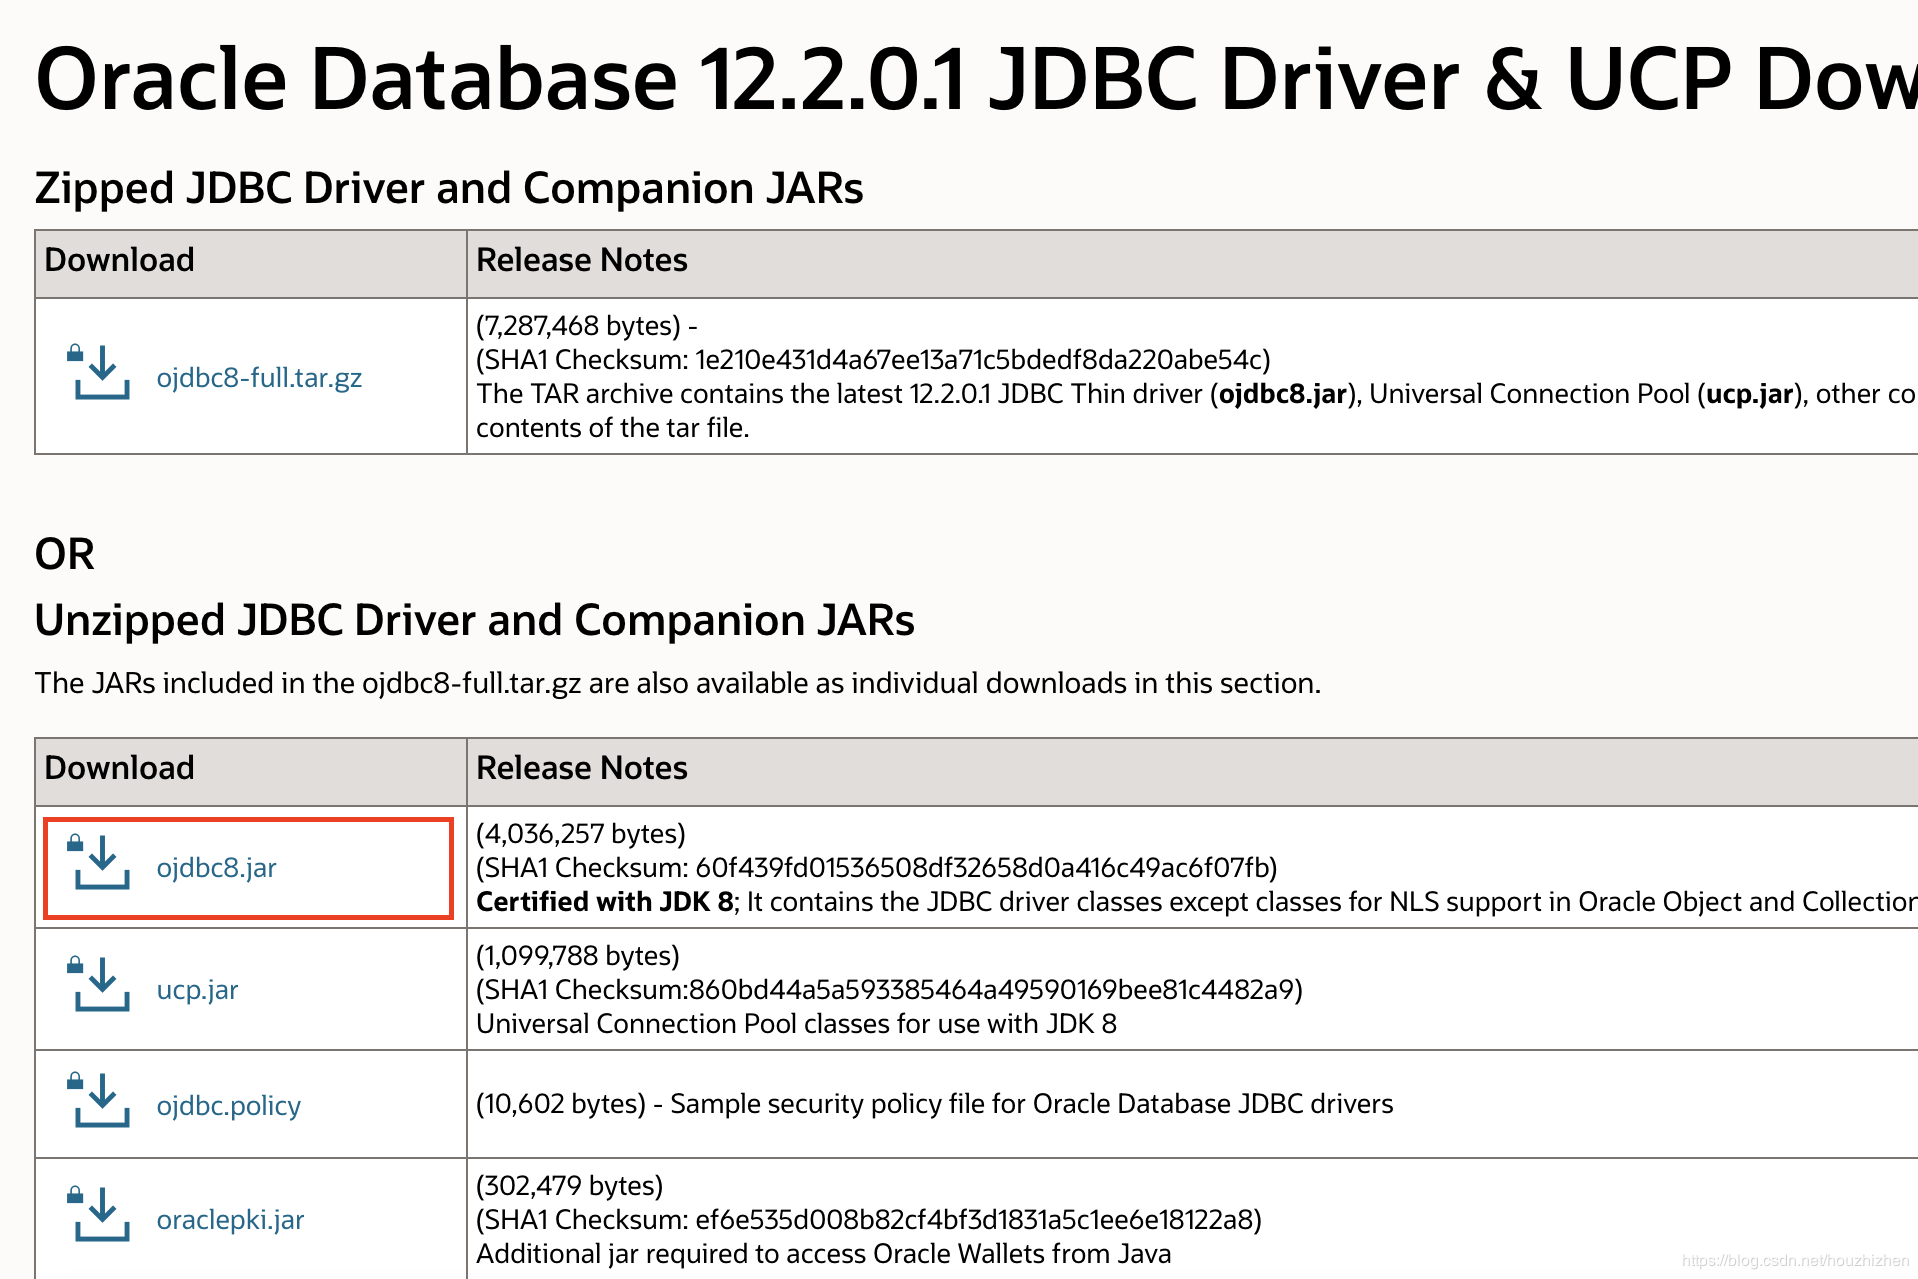
把ojdbc8安装到本地maven仓库,进入ojdbc8.jar所在目录,执行以下命令。
mvn install:install-file -Dfile=./ojdbc8.jar -DgroupId=com.oracle -DartifactId=ojdbc8 -Dversion=12.2.0.1 -Dpackaging=jar
编译生成 tar 包:
cd hugegraph-loader
mvn clean package -DskipTests
3 使用流程
使用 HugeGraph-Loader 的基本流程分为以下几步:
- 编写图模型
- 准备数据文件
- 编写输入源映射文件
- 执行命令导入
3.1 编写图模型
这一步是建模的过程,用户需要对自己已有的数据和想要创建的图模型有一个清晰的构想,然后编写 schema 建立图模型。
比如想创建一个拥有两类顶点及两类边的图,顶点是"人"和"软件",边是"人认识人"和"人创造软件",并且这些顶点和边都带有一些属性,比如顶点"人"有:“姓名”、“年龄"等属性,
“软件"有:“名字”、“售卖价格"等属性;边"认识"有: “日期"属性等。
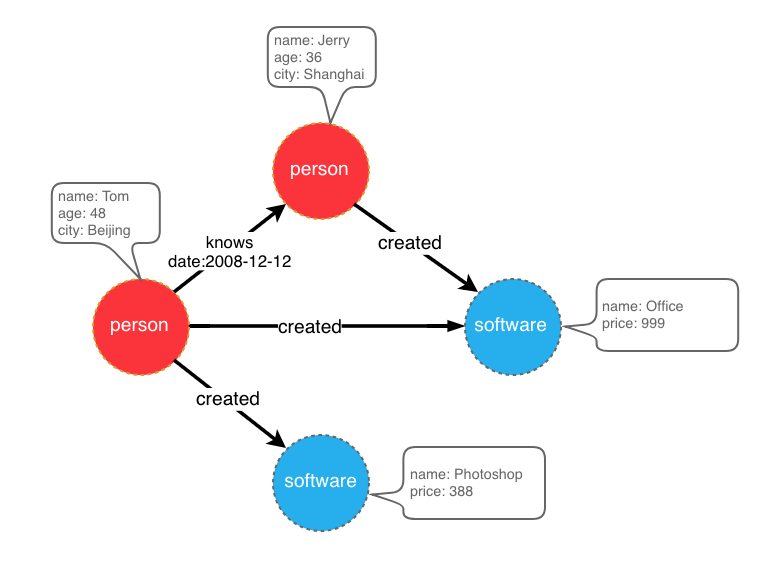
示例图模型
在设计好了图模型之后,我们可以用groovy编写出schema的定义,并保存至文件中,这里命名为schema.groovy。
// 创建一些属性
schema.propertyKey("name").asText().ifNotExist().create();
schema.propertyKey("age").asInt().ifNotExist().create();
schema.propertyKey("city").asText().ifNotExist().create();
schema.propertyKey("date").asText().ifNotExist().create();
schema.propertyKey("price").asDouble().ifNotExist().create();

// 创建 person 顶点类型,其拥有三个属性:name, age, city,主键是 name
schema.vertexLabel("person").properties("name", "age", "city").primaryKeys("name").ifNotExist().create();
// 创建 software 顶点类型,其拥有两个属性:name, price,主键是 name
schema.vertexLabel("software").properties("name", "price").primaryKeys("name").ifNotExist().create();

// 创建 knows 边类型,这类边是从 person 指向 person 的
schema.edgeLabel("knows").sourceLabel("person").targetLabel("person").ifNotExist().create();
// 创建 created 边类型,这类边是从 person 指向 software 的
schema.edgeLabel("created").sourceLabel("person").targetLabel("software").ifNotExist().create();
关于 schema 的详细说明请参考 hugegraph-client 中对应部分。
3.2 准备数据
目前 HugeGraph-Loader 支持的数据源包括:
- 本地磁盘文件或目录
- HDFS 文件或目录
- 部分关系型数据库
3.2.1 数据源结构
3.2.1.1 本地磁盘文件或目录
用户可以指定本地磁盘文件作为数据源,如果数据分散在多个文件中,也支持以某个目录作为数据源,但暂时不支持以多个目录作为数据源。
比如:我的数据分散在多个文件中,part-0、part-1 … part-n,要想执行导入,必须保证它们是放在一个目录下的。然后在 loader 的映射文件中,将path指定为该目录即可。
支持的文件格式包括:
TEXT 是自定义分隔符的文本文件,第一行通常是标题,记录了每一列的名称,也允许没有标题行(在映射文件中指定)。其余的每行代表一条记录,会被转化为一个顶点/边;行的每一列对应一个字段,会被转化为顶点/边的 id、label 或属性;
示例如下:
id|name|lang|price|ISBN
1|lop|java|328|ISBN978-7-107-18618-5
2|ripple|java|199|ISBN978-7-100-13678-5
CSV 是分隔符为逗号,的 TEXT 文件,当列值本身包含逗号时,该列值需要用双引号包起来,如:
marko,29,Beijing
"li,nary",26,"Wu,han"
JSON 文件要求每一行都是一个 JSON 串,且每行的格式需保持一致。
{"source_name": "marko", "target_name": "vadas", "date": "20160110", "weight": 0.5}
{"source_name": "marko", "target_name": "josh", "date": "20130220", "weight": 1.0}
3.2.1.2 HDFS 文件或目录
用户也可以指定 HDFS 文件或目录作为数据源,上面关于本地磁盘文件或目录的要求全部适用于这里。除此之外,鉴于 HDFS 上通常存储的都是压缩文件,loader 也提供了对压缩文件的支持,并且本地磁盘文件或目录同样支持压缩文件。
目前支持的压缩文件类型包括:GZIP、BZ2、XZ、LZMA、SNAPPY_RAW、SNAPPY_FRAMED、Z、DEFLATE、LZ4_BLOCK、LZ4_FRAMED、ORC 和 PARQUET。
3.2.1.3 主流关系型数据库
loader 还支持以部分关系型数据库作为数据源,目前支持 MySQL、PostgreSQL、Oracle 和 SQL Server。
但目前对表结构要求较为严格,如果导入过程中需要做关联查询,这样的表结构是不允许的。关联查询的意思是:在读到表的某行后,发现某列的值不能直接使用(比如外键),需要再去做一次查询才能确定该列的真实值。
举个例子:假设有三张表,person、software 和 created
// person 表结构
id | name | age | city
// software 表结构
id | name | lang | price
// created 表结构
id | p_id | s_id | date
如果在建模(schema)时指定 person 或 software 的 id 策略是 PRIMARY_KEY,选择以 name 作为 primary keys(注意:这是 hugegraph 中 vertexlabel 的概念),在导入边数据时,由于需要拼接出源顶点和目标顶点的 id,必须拿着 p_id/s_id 去 person/software 表中查到对应的 name,这种需要做额外查询的表结构的情况,loader 暂时是不支持的。这时可以采用以下两种方式替代:
- 仍然指定 person 和 software 的 id 策略为 PRIMARY_KEY,但是以 person 表和 software 表的 id 列作为顶点的主键属性,这样导入边时直接使用 p_id 和 s_id 和顶点的 label 拼接就能生成 id 了;
- 指定 person 和 software 的 id 策略为 CUSTOMIZE,然后直接以 person 表和 software 表的 id 列作为顶点 id,这样导入边时直接使用 p_id 和 s_id 即可;
关键点就是要让边能直接使用 p_id 和 s_id,不要再去查一次。
3.2.2 准备顶点和边数据
3.2.2.1 顶点数据
顶点数据文件由一行一行的数据组成,一般每一行作为一个顶点,每一列会作为顶点属性。下面以 CSV 格式作为示例进行说明。
- person 顶点数据(数据本身不包含 header)
Tom,48,Beijing
Jerry,36,Shanghai
- software 顶点数据(数据本身包含 header)
name,price
Photoshop,999
Office,388
3.2.2.2 边数据
边数据文件由一行一行的数据组成,一般每一行作为一条边,其中有部分列会作为源顶点和目标顶点的 id,其他列作为边属性。下面以 JSON 格式作为示例进行说明。
{"source_name": "Tom", "target_name": "Jerry", "date": "2008-12-12"}
{"source_name": "Tom", "target_name": "Photoshop"}
{"source_name": "Tom", "target_name": "Office"}
{"source_name": "Jerry", "target_name": "Office"}
3.3 编写数据源映射文件
3.3.1 映射文件概述
输入源的映射文件用于描述如何将输入源数据与图的顶点类型/边类型建立映射关系,以JSON格式组织,由多个映射块组成,其中每一个映射块都负责将一个输入源映射为顶点和边。
具体而言,每个映射块包含一个输入源和多个顶点映射与边映射块,输入源块对应上面介绍的本地磁盘文件或目录、HDFS 文件或目录和关系型数据库,负责描述数据源的基本信息,比如数据在哪,是什么格式的,分隔符是什么等。顶点映射/边映射与该输入源绑定,可以选择输入源的哪些列,哪些列作为id、哪些列作为属性,以及每一列映射成什么属性,列的值映射成属性的什么值等等。
以最通俗的话讲,每一个映射块描述了:要导入的文件在哪,文件的每一行要作为哪一类顶点/边,文件的哪些列是需要导入的,以及这些列对应顶点/边的什么属性等。
注意:0.11.0 版本以前的映射文件与 0.11.0 以后的格式变化较大,为表述方便,下面称 0.11.0 以前的映射文件(格式)为 1.0 版本,0.11.0 以后的为 2.0 版本。并且若无特殊说明,“映射文件”表示的是 2.0 版本的。
2.0 版本的映射文件的框架为:
{
  "version": "2.0",
  "structs": [
    {
      "id": "1",
      "input": {
      },
      "vertices": [
        {},
        {}
      ],
      "edges": [
        {},
        {}
      ]
    }
  ]
}
这里直接给出两个版本的映射文件(描述了上面图模型和数据文件)
2.0 版本的映射文件:
{
  "version": "2.0",
  "structs": [
    {
      "id": "1",
      "skip": false,
      "input": {
        "type": "FILE",
        "path": "vertex_person.csv",
        "file_filter": {
          "extensions": [
            "*"
          ]
        },
        "format": "CSV",
        "delimiter": ",",
        "date_format": "yyyy-MM-dd HH:mm:ss",
        "time_zone": "GMT+8",
        "skipped_line": {
          "regex": "(^#|^//).*|"
        },
        "compression": "NONE",
        "header": [
          "name",
          "age",
          "city"
        ],
        "charset": "UTF-8",
        "list_format": {
          "start_symbol": "[",
          "elem_delimiter": "|",
          "end_symbol": "]"
        }
      },
      "vertices": [
        {
          "label": "person",
          "skip": false,
          "id": null,
          "unfold": false,
          "field_mapping": {},
          "value_mapping": {},
          "selected": [],
          "ignored": [],
          "null_values": [
            ""
          ],
          "update_strategies": {}
        }
      ],
      "edges": []
    },
    {
      "id": "2",
      "skip": false,
      "input": {
        "type": "FILE",
        "path": "vertex_software.csv",
        "file_filter": {
          "extensions": [
            "*"
          ]
        },
        "format": "CSV",
        "delimiter": ",",
        "date_format": "yyyy-MM-dd HH:mm:ss",
        "time_zone": "GMT+8",
        "skipped_line": {
          "regex": "(^#|^//).*|"
        },
        "compression": "NONE",
        "header": null,
        "charset": "UTF-8",
        "list_format": {
          "start_symbol": "",
          "elem_delimiter": ",",
          "end_symbol": ""
        }
      },
      "vertices": [
        {
          "label": "software",
          "skip": false,
          "id": null,
          "unfold": false,
          "field_mapping": {},
          "value_mapping": {},
          "selected": [],
          "ignored": [],
          "null_values": [
            ""
          ],
          "update_strategies": {}
        }
      ],
      "edges": []
    },
    {
      "id": "3",
      "skip": false,
      "input": {
        "type": "FILE",
        "path": "edge_knows.json",
        "file_filter": {
          "extensions": [
            "*"
          ]
        },
        "format": "JSON",
        "delimiter": null,
        "date_format": "yyyy-MM-dd HH:mm:ss",
        "time_zone": "GMT+8",
        "skipped_line": {
          "regex": "(^#|^//).*|"
        },
        "compression": "NONE",
        "header": null,
        "charset": "UTF-8",
        "list_format": null
      },
      "vertices": [],
      "edges": [
        {
          "label": "knows",
          "skip": false,
          "source": [
            "source_name"
          ],
          "unfold_source": false,
          "target": [
            "target_name"
          ],
          "unfold_target": false,
          "field_mapping": {
            "source_name": "name",
            "target_name": "name"
          },
          "value_mapping": {},
          "selected": [],
          "ignored": [],
          "null_values": [
            ""
          ],
          "update_strategies": {}
        }
      ]
    },
    {
      "id": "4",
      "skip": false,
      "input": {
        "type": "FILE",
        "path": "edge_created.json",
        "file_filter": {
          "extensions": [
            "*"
          ]
        },
        "format": "JSON",
        "delimiter": null,
        "date_format": "yyyy-MM-dd HH:mm:ss",
        "time_zone": "GMT+8",
        "skipped_line": {
          "regex": "(^#|^//).*|"
        },
        "compression": "NONE",
        "header": null,
        "charset": "UTF-8",
        "list_format": null
      },
      "vertices": [],
      "edges": [
        {
          "label": "created",
          "skip": false,
          "source": [
            "source_name"
          ],
          "unfold_source": false,
          "target": [
            "target_name"
          ],
          "unfold_target": false,
          "field_mapping": {
            "source_name": "name",
            "target_name": "name"
          },
          "value_mapping": {},
          "selected": [],
          "ignored": [],
          "null_values": [
            ""
          ],
          "update_strategies": {}
        }
      ]
    }
  ]
}
1.0 版本的映射文件:
{
  "vertices": [
    {
      "label": "person",
      "input": {
        "type": "file",
        "path": "vertex_person.csv",
        "format": "CSV",
        "header": ["name", "age", "city"],
        "charset": "UTF-8"
      }
    },
    {
      "label": "software",
      "input": {
        "type": "file",
        "path": "vertex_software.csv",
        "format": "CSV"
      }
    }
  ],
  "edges": [
    {
      "label": "knows",
      "source": ["source_name"],
      "target": ["target_name"],
      "input": {
        "type": "file",
        "path": "edge_knows.json",
        "format": "JSON"
      },
      "field_mapping": {
        "source_name": "name",
        "target_name": "name"
      }
    },
    {
      "label": "created",
      "source": ["source_name"],
      "target": ["target_name"],
      "input": {
        "type": "file",
        "path": "edge_created.json",
        "format": "JSON"
      },
      "field_mapping": {
        "source_name": "name",
        "target_name": "name"
      }
    }
  ]
}
映射文件 1.0 版本是以顶点和边为中心,设置输入源;而 2.0 版本是以输入源为中心,设置顶点和边映射。有些输入源(比如一个文件)既能生成顶点,也能生成边,如果用 1.0 版的格式写,就需要在 vertex 和 egde 映射块中各写一次 input 块,这两次的 input 块是完全一样的;而 2.0 版本只需要写一次 input。所以 2.0 版相比于 1.0 版,能省掉一些 input 的重复书写。
在 hugegraph-loader-{version} 的 bin 目录下,有一个脚本工具 mapping-convert.sh 能直接将 1.0 版本的映射文件转换为 2.0 版本的,使用方式如下:
bin/mapping-convert.sh struct.json
会在 struct.json 的同级目录下生成一个 struct-v2.json。
3.3.2 输入源
输入源目前分为三类:FILE、HDFS、JDBC,由type节点区分,我们称为本地文件输入源、HDFS 输入源和 JDBC 输入源,下面分别介绍。
3.3.2.1 本地文件输入源
- id: 输入源的 id,该字段用于支持一些内部功能,非必填(未填时会自动生成),强烈建议写上,对于调试大有裨益;
- skip: 是否跳过该输入源,由于 JSON 文件无法添加注释,如果某次导入时不想导入某个输入源,但又不想删除该输入源的配置,则可以设置为 true 将其跳过,默认为 false,非必填;
- input: 输入源映射块,复合结构
- type: 输入源类型,必须填 file 或 FILE;
- path: 本地文件或目录的路径,绝对路径或相对于映射文件的相对路径,建议使用绝对路径,必填;
- file_filter: 从
path中筛选复合条件的文件,复合结构,目前只支持配置扩展名,用子节点extensions表示,默认为”*",表示保留所有文件; - format: 本地文件的格式,可选值为 CSV、TEXT 及 JSON,必须大写,必填;
- header: 文件各列的列名,如不指定则会以数据文件第一行作为 header;当文件本身有标题且又指定了 header,文件的第一行会被当作普通的数据行;JSON 文件不需要指定 header,选填;
- delimiter: 文件行的列分隔符,默认以逗号
","作为分隔符,JSON文件不需要指定,选填; - charset: 文件的编码字符集,默认
UTF-8,选填; - date_format: 自定义的日期格式,默认值为 yyyy-MM-dd HH:mm:ss,选填;如果日期是以时间戳的形式呈现的,此项须写为
timestamp(固定写法); - time_zone: 设置日期数据是处于哪个时区的,默认值为
GMT+8,选填; - skipped_line: 想跳过的行,复合结构,目前只能配置要跳过的行的正则表达式,用子节点
regex描述,默认不跳过任何行,选填; - compression: 文件的压缩格式,可选值为 NONE、GZIP、BZ2、XZ、LZMA、SNAPPY_RAW、SNAPPY_FRAMED、Z、DEFLATE、LZ4_BLOCK、LZ4_FRAMED、ORC 和 PARQUET,默认为 NONE,表示非压缩文件,选填;
- list_format: 当文件(非 JSON )的某列是集合结构时(对应图中的 PropertyKey 的 Cardinality 为 Set 或 List),可以用此项设置该列的起始符、分隔符、结束符,复合结构:
- start_symbol: 集合结构列的起始符 (默认值是
[, JSON 格式目前不支持指定) - elem_delimiter: 集合结构列的分隔符 (默认值是
|, JSON 格式目前只支持原生,分隔) - end_symbol: 集合结构列的结束符 (默认值是
], JSON 格式目前不支持指定)
3.3.2.2 HDFS 输入源
上述本地文件输入源的节点及含义这里基本都适用,下面仅列出 HDFS 输入源不一样的和特有的节点。
- type: 输入源类型,必须填 hdfs 或 HDFS,必填;
- path: HDFS 文件或目录的路径,必须是 HDFS 的绝对路径,必填;
- core_site_path: HDFS 集群的 core-site.xml 文件路径,重点要指明 NameNode 的地址(
fs.default.name),以及文件系统的实现(fs.hdfs.impl);
3.3.2.3 JDBC 输入源
前面说到过支持多种关系型数据库,但由于它们的映射结构非常相似,故统称为 JDBC 输入源,然后用vendor节点区分不同的数据库。
- type: 输入源类型,必须填 jdbc 或 JDBC,必填;
- vendor: 数据库类型,可选项为 [MySQL、PostgreSQL、Oracle、SQLServer],不区分大小写,必填;
- driver: jdbc 使用的 driver 类型,必填;
- url: jdbc 要连接的数据库的 url,必填;
- database: 要连接的数据库名,必填;
- schema: 要连接的 schema 名,不同的数据库要求不一样,下面详细说明;
- table: 要连接的表名,
custom_sql 和 table 参数必须填其中一个; - custom_sql: 自定义 SQL 语句,
custom_sql 和 table 参数必须填其中一个; - username: 连接数据库的用户名,必填;
- password: 连接数据库的密码,必填;
- batch_size: 按页获取表数据时的一页的大小,默认为 500,选填;
MYSQL
schema: 可空,若填写必须与database的值一样
POSTGRESQL
schema: 可空,默认值为“public”
ORACLE
schema: 可空,默认值与用户名相同
SQLSERVER
schema: 必填
3.3.1 顶点和边映射
顶点和边映射的节点(JSON 文件中的一个 key)有很多相同的部分,下面先介绍相同部分,再分别介绍顶点映射和边映射的特有节点。
相同部分的节点
- label: 待导入的顶点/边数据所属的
label,必填; - field_mapping: 将输入源列的列名映射为顶点/边的属性名,选填;
- value_mapping: 将输入源的数据值映射为顶点/边的属性值,选填;
- selected: 选择某些列插入,其他未选中的不插入,不能与
ignored同时存在,选填; - ignored: 忽略某些列,使其不参与插入,不能与
selected同时存在,选填; - null_values: 可以指定一些字符串代表空值,比如"NULL”,如果该列对应的顶点/边属性又是一个可空属性,那在构造顶点/边时不会设置该属性的值,选填;
- update_strategies: 如果数据需要按特定方式批量更新时可以对每个属性指定具体的更新策略 (具体见下),选填;
- unfold: 是否将列展开,展开的每一列都会与其他列一起组成一行,相当于是展开成了多行;比如文件的某一列(id 列)的值是
[1,2,3],其他列的值是18,Beijing,当设置了 unfold 之后,这一行就会变成 3 行,分别是:1,18,Beijing,2,18,Beijing和3,18,Beijing。需要注意的是此项只会展开被选作为 id 的列。默认 false,选填;
更新策略支持8种 : (需要全大写)
- 数值累加 :
SUM - 两个数字/日期取更大的:
BIGGER - 两个数字/日期取更小:
SMALLER - Set属性取并集:
UNION - Set属性取交集:
INTERSECTION - List属性追加元素:
APPEND - List/Set属性删除元素:
ELIMINATE - 覆盖已有属性:
OVERRIDE
注意: 如果新导入的属性值为空, 会采用已有的旧数据而不会采用空值, 效果可以参考如下示例
// JSON文件中以如下方式指定更新策略
{
  "vertices": [
    {
      "label": "person",
      "update_strategies": {
        "age": "SMALLER",
        "set": "UNION"
      },
      "input": {
        "type": "file",
        "path": "vertex_person.txt",
        "format": "TEXT",
        "header": ["name", "age", "set"]
      }
    }
  ]
}

// 1.写入一行带OVERRIDE更新策略的数据 (这里null代表空)
'a b null null'

// 2.再写一行
'null null c d'

// 3.最后可以得到
'a b c d'

// 如果没有更新策略, 则会得到
'null null c d'
注意 : 采用了批量更新的策略后, 磁盘读请求数会大幅上升, 导入速度相比纯写覆盖会慢数倍 (此时HDD磁盘IOPS会成为瓶颈, 建议采用SSD以保证速度)
顶点映射的特有节点
- id: 指定某一列作为顶点的 id 列,当顶点 id 策略为
CUSTOMIZE时,必填;当 id 策略为PRIMARY_KEY时,必须为空;
边映射的特有节点
- source: 选择输入源某几列作为源顶点的 id 列,当源顶点的 id 策略为
CUSTOMIZE时,必须指定某一列作为顶点的 id 列;当源顶点的 id 策略为 PRIMARY_KEY时,必须指定一列或多列用于拼接生成顶点的 id,也就是说,不管是哪种 id 策略,此项必填; - target: 指定某几列作为目标顶点的 id 列,与 source 类似,不再赘述;
- unfold_source: 是否展开文件的 source 列,效果与顶点映射中的类似,不再赘述;
- unfold_target: 是否展开文件的 target 列,效果与顶点映射中的类似,不再赘述;
3.4 执行命令导入
准备好图模型、数据文件以及输入源映射关系文件后,接下来就可以将数据文件导入到图数据库中。
导入过程由用户提交的命令控制,用户可以通过不同的参数控制执行的具体流程。
3.4.1 参数说明
3.4.2 断点续导模式
通常情况下,Loader 任务都需要较长时间执行,如果因为某些原因导致导入中断进程退出,而下次希望能从中断的点继续导,这就是使用断点续导的场景。
用户设置命令行参数 –incremental-mode 为 true 即打开了断点续导模式。断点续导的关键在于进度文件,导入进程退出的时候,会把退出时刻的导入进度
记录到进度文件中,进度文件位于 ${struct} 目录下,文件名形如 load-progress ${date} ,${struct} 为映射文件的前缀,${date} 为导入开始
的时刻。比如:在 2019-10-10 12:30:30 开始的一次导入任务,使用的映射文件为 struct-example.json,则进度文件的路径为与 struct-example.json
同级的 struct-example/load-progress 2019-10-10 12:30:30。
注意:进度文件的生成与 –incremental-mode 是否打开无关,每次导入结束都会生成一个进度文件。
如果数据文件格式都是合法的,是用户自己停止(CTRL + C 或 kill,kill -9 不支持)的导入任务,也就是说没有错误记录的情况下,下一次导入只需要设置
为断点续导即可。
但如果是因为太多数据不合法或者网络异常,达到了 –max-parse-errors 或 –max-insert-errors 的限制,Loader 会把这些插入失败的原始行记录到
失败文件中,用户对失败文件中的数据行修改后,设置 –reload-failure 为 true 即可把这些"失败文件"也当作输入源进行导入(不影响正常的文件的导入),
当然如果修改后的数据行仍然有问题,则会被再次记录到失败文件中(不用担心会有重复行)。
每个顶点映射或边映射有数据插入失败时都会产生自己的失败文件,失败文件又分为解析失败文件(后缀 .parse-error)和插入失败文件(后缀 .insert-error),
它们被保存在 ${struct}/current 目录下。比如映射文件中有一个顶点映射 person 和边映射 knows,它们各有一些错误行,当 Loader 退出后,在
${struct}/current 目录下会看到如下文件:
- person-b4cd32ab.parse-error: 顶点映射 person 解析错误的数据
- person-b4cd32ab.insert-error: 顶点映射 person 插入错误的数据
- knows-eb6b2bac.parse-error: 边映射 knows 解析错误的数据
- knows-eb6b2bac.insert-error: 边映射 knows 插入错误的数据
.parse-error 和 .insert-error 并不总是一起存在的,只有存在解析出错的行才会有 .parse-error 文件,只有存在插入出错的行才会有 .insert-error 文件。
3.4.3 logs 目录文件说明
程序执行过程中各日志及错误数据会写入 hugegraph-loader.log 文件中。
3.4.4 执行命令
运行 bin/hugegraph-loader 并传入参数
bin/hugegraph-loader -g {GRAPH_NAME} -f ${INPUT_DESC_FILE} -s ${SCHEMA_FILE} -h {HOST} -p {PORT}
4 完整示例
下面给出的是 hugegraph-loader 包中 example 目录下的例子。
4.1 准备数据
顶点文件:example/file/vertex_person.csv
marko,29,Beijing
vadas,27,Hongkong
josh,32,Beijing
peter,35,Shanghai
"li,nary",26,"Wu,han"
顶点文件:example/file/vertex_software.txt
name|lang|price
lop|java|328
ripple|java|199
边文件:example/file/edge_knows.json
{"source_name": "marko", "target_name": "vadas", "date": "20160110", "weight": 0.5}
{"source_name": "marko", "target_name": "josh", "date": "20130220", "weight": 1.0}
边文件:example/file/edge_created.json
{"aname": "marko", "bname": "lop", "date": "20171210", "weight": 0.4}
{"aname": "josh", "bname": "lop", "date": "20091111", "weight": 0.4}
{"aname": "josh", "bname": "ripple", "date": "20171210", "weight": 1.0}
{"aname": "peter", "bname": "lop", "date": "20170324", "weight": 0.2}
4.2 编写schema
schema文件:example/file/schema.groovy
schema.propertyKey("name").asText().ifNotExist().create();
schema.propertyKey("age").asInt().ifNotExist().create();
schema.propertyKey("city").asText().ifNotExist().create();
schema.propertyKey("weight").asDouble().ifNotExist().create();
schema.propertyKey("lang").asText().ifNotExist().create();
schema.propertyKey("date").asText().ifNotExist().create();
schema.propertyKey("price").asDouble().ifNotExist().create();

schema.vertexLabel("person").properties("name", "age", "city").primaryKeys("name").ifNotExist().create();
schema.vertexLabel("software").properties("name", "lang", "price").primaryKeys("name").ifNotExist().create();

schema.indexLabel("personByName").onV("person").by("name").secondary().ifNotExist().create();
schema.indexLabel("personByAge").onV("person").by("age").range().ifNotExist().create();
schema.indexLabel("personByCity").onV("person").by("city").secondary().ifNotExist().create();
schema.indexLabel("personByAgeAndCity").onV("person").by("age", "city").secondary().ifNotExist().create();
schema.indexLabel("softwareByPrice").onV("software").by("price").range().ifNotExist().create();

schema.edgeLabel("knows").sourceLabel("person").targetLabel("person").properties("date", "weight").ifNotExist().create();
schema.edgeLabel("created").sourceLabel("person").targetLabel("software").properties("date", "weight").ifNotExist().create();

schema.indexLabel("createdByDate").onE("created").by("date").secondary().ifNotExist().create();
schema.indexLabel("createdByWeight").onE("created").by("weight").range().ifNotExist().create();
schema.indexLabel("knowsByWeight").onE("knows").by("weight").range().ifNotExist().create();
4.3 编写输入源映射文件example/file/struct.json
{
  "vertices": [
    {
      "label": "person",
      "input": {
        "type": "file",
        "path": "example/vertex_person.csv",
        "format": "CSV",
        "header": ["name", "age", "city"],
        "charset": "UTF-8"
      },
      "mapping": {
        "name": "name",
        "age": "age",
        "city": "city"
      }
    },
    {
      "label": "software",
      "input": {
        "type": "file",
        "path": "example/vertex_software.text",
        "format": "TEXT",
        "delimiter": "|",
        "charset": "GBK"
      }
    }
  ],
  "edges": [
    {
      "label": "knows",
      "source": ["source_name"],
      "target": ["target_name"],
      "input": {
        "type": "file",
        "path": "example/edge_knows.json",
        "format": "JSON"
      },
      "mapping": {
        "source_name": "name",
        "target_name": "name"
      }
    },
    {
      "label": "created",
      "source": ["aname"],
      "target": ["bname"],
      "input": {
        "type": "file",
        "path": "example/edge_created.json",
        "format": "JSON"
      },
      "mapping": {
        "aname": "name",
        "bname": "name"
      }
    }
  ]
}
4.4 执行命令导入
sh bin/hugegraph-loader.sh -g hugegraph -f example/file/struct.json -s example/file/schema.groovy
导入结束后,会出现类似如下统计信息:
vertices/edges has been loaded this time : 8/6
--------------------------------------------------
count metrics
     input read success            : 14
     input read failure            : 0
     vertex parse success          : 8
     vertex parse failure          : 0
     vertex insert success         : 8
     vertex insert failure         : 0
     edge parse success            : 6
     edge parse failure            : 0
     edge insert success           : 6
     edge insert failure           : 0
4.5 使用 spark-loader 导入
Spark 版本:Spark 3+, 其他版本未测试。
HugeGraph Toolchain 版本: toolchain-1.0.0
spark-loader 的参数分为两部分,注意:因二者参数名缩写存在重合部分,请使用参数全称。两种参数之间无需保证先后顺序。
示例:
sh bin/hugegraph-spark-loader.sh --master yarn \
--deploy-mode cluster --name spark-hugegraph-loader --file ./hugegraph.json \
--username admin --token admin --host xx.xx.xx.xx --port 8093 \
--graph graph-test --num-executors 6 --executor-cores 16 --executor-memory 15g
2.2 - HugeGraph-Tools Quick Start
HugeGraph-Tools 是 HugeGraph 的自动化部署、管理和备份/还原组件。
有两种方式可以获取 HugeGraph-Tools:
2.1 下载二进制tar包
下载最新版本的 HugeGraph-Tools 包:
wget https://github.com/hugegraph/hugegraph-tools/releases/download/v${version}/hugegraph-tools-${version}.tar.gz
tar zxvf hugegraph-tools-${version}.tar.gz
2.2 下载源码编译安装
下载最新版本的 HugeGraph-Tools 源码包:
$ git clone https://github.com/hugegraph/hugegraph-tools.git
编译生成 tar 包:
cd hugegraph-tools
mvn package -DskipTests
生成 tar 包 hugegraph-tools-${version}.tar.gz
3 使用
3.1 功能概览
解压后,进入 hugegraph-tools 目录,可以使用bin/hugegraph或者bin/hugegraph help来查看 usage 信息。主要分为:
- 图管理类,graph-mode-set、graph-mode-get、graph-list、graph-get 和 graph-clear
- 异步任务管理类,task-list、task-get、task-delete、task-cancel 和 task-clear
- Gremlin类,gremlin-execute 和 gremlin-schedule
- 备份/恢复类,backup、restore、migrate、schedule-backup 和 dump
- 安装部署类,deploy、clear、start-all 和 stop-all
Usage: hugegraph [options] [command] [command options]
3.2 [options]-全局变量
options是 HugeGraph-Tools 的全局变量,可以在 hugegraph-tools/bin/hugegraph 中配置,包括:
- –graph,HugeGraph-Tools 操作的图的名字,默认值是 hugegraph
- –url,HugeGraph-Server 的服务地址,默认是 http://127.0.0.1:8080
- –user,当 HugeGraph-Server 开启认证时,传递用户名
- –password,当 HugeGraph-Server 开启认证时,传递用户的密码
- –timeout,连接 HugeGraph-Server 时的超时时间,默认是 30s
- –trust-store-file,证书文件的路径,当 –url 使用 https 时,HugeGraph-Client 使用的 truststore 文件,默认为空,代表使用 hugegraph-tools 内置的 truststore 文件 conf/hugegraph.truststore
- –trust-store-password,证书文件的密码,当 –url 使用 https 时,HugeGraph-Client 使用的 truststore 的密码,默认为空,代表使用 hugegraph-tools 内置的 truststore 文件的密码
上述全局变量,也可以通过环境变量来设置。一种方式是在命令行使用 export 设置临时环境变量,在该命令行关闭之前均有效
另一种方式是在 bin/hugegraph 脚本中设置环境变量:
#!/bin/bash

# Set environment here if needed
#export HUGEGRAPH_URL=
#export HUGEGRAPH_GRAPH=
#export HUGEGRAPH_USERNAME=
#export HUGEGRAPH_PASSWORD=
#export HUGEGRAPH_TIMEOUT=
#export HUGEGRAPH_TRUST_STORE_FILE=
#export HUGEGRAPH_TRUST_STORE_PASSWORD=
3.3 图管理类,graph-mode-set、graph-mode-get、graph-list、graph-get和graph-clear
- graph-mode-set,设置图的 restore mode
- –graph-mode 或者 -m,必填项,指定将要设置的模式,合法值包括 [NONE, RESTORING, MERGING, LOADING]
- graph-mode-get,获取图的 restore mode
- graph-list,列出某个 HugeGraph-Server 中全部的图
- graph-get,获取某个图及其存储后端类型
- graph-clear,清除某个图的全部 schema 和 data
- –confirm-message 或者 -c,必填项,删除确认信息,需要手动输入,二次确认防止误删,“I’m sure to delete all data”,包括双引号
当需要把备份的图原样恢复到一个新的图中的时候,需要先将图模式设置为 RESTORING 模式;当需要将备份的图合并到已存在的图中时,需要先将图模式设置为 MERGING 模式。
3.4 异步任务管理类,task-list、task-get和task-delete
- task-list,列出某个图中的异步任务,可以根据任务的状态过滤
- –status,选填项,指定要查看的任务的状态,即按状态过滤任务
- –limit,选填项,指定要获取的任务的数目,默认为 -1,意思为获取全部符合条件的任务
- task-get,获取某个异步任务的详细信息
- task-delete,删除某个异步任务的信息
- task-cancel,取消某个异步任务的执行
- task-clear,清理完成的异步任务
- –force,选填项,设置时,表示清理全部异步任务,未执行完成的先取消,然后清除所有异步任务。默认只清理已完成的异步任务
3.5 Gremlin类,gremlin-execute和gremlin-schedule
- gremlin-execute,发送 Gremlin 语句到 HugeGraph-Server 来执行查询或修改操作,同步执行,结束后返回结果
- –file 或者 -f,指定要执行的脚本文件,UTF-8编码,与 –script 互斥
- –script 或者 -s,指定要执行的脚本字符串,与 –file 互斥
- –aliases 或者 -a,Gremlin 别名设置,格式为:key1=value1,key2=value2,…
- –bindings 或者 -b,Gremlin 绑定设置,格式为:key1=value1,key2=value2,…
- –language 或者 -l,Gremlin 脚本的语言,默认为 gremlin-groovy
–file 和 –script 二者互斥,必须设置其中之一
- gremlin-schedule,发送 Gremlin 语句到 HugeGraph-Server 来执行查询或修改操作,异步执行,任务提交后立刻返回异步任务id
- –file 或者 -f,指定要执行的脚本文件,UTF-8编码,与 –script 互斥
- –script 或者 -s,指定要执行的脚本字符串,与 –file 互斥
- –bindings 或者 -b,Gremlin 绑定设置,格式为:key1=value1,key2=value2,…
- –language 或者 -l,Gremlin 脚本的语言,默认为 gremlin-groovy
–file 和 –script 二者互斥,必须设置其中之一
3.6 备份/恢复类
- backup,将某张图中的 schema 或者 data 备份到 HugeGraph 系统之外,以 JSON 形式存在本地磁盘或者 HDFS
- –format,备份的格式,可选值包括 [json, text],默认为 json
- –all-properties,是否备份顶点/边全部的属性,仅在 –format 为 text 是有效,默认 false
- –label,要备份的顶点/边的类型,仅在 –format 为 text 是有效,只有备份顶点或者边的时候有效
- –properties,要备份的顶点/边的属性,逗号分隔,仅在 –format 为 text 是有效,只有备份顶点或者边的时候有效
- –compress,备份时是否压缩数据,默认为 true
- –directory 或者 -d,存储 schema 或者 data 的目录,本地目录时,默认为’./{graphName}’,HDFS 时,默认为 ‘{fs.default.name}/{graphName}’
- –huge-types 或者 -t,要备份的数据类型,逗号分隔,可选值为 ‘all’ 或者 一个或多个 [vertex,edge,vertex_label,edge_label,property_key,index_label] 的组合,‘all’ 代表全部6种类型,即顶点、边和所有schema
- –log 或者 -l,指定日志目录,默认为当前目录
- –retry,指定失败重试次数,默认为 3
- –split-size 或者 -s,指定在备份时对顶点或者边分块的大小,默认为 1048576
- -D,用 -Dkey=value 的模式指定动态参数,用来备份数据到 HDFS 时,指定 HDFS 的配置项,例如:-Dfs.default.name=hdfs://localhost:9000
- restore,将 JSON 格式存储的 schema 或者 data 恢复到一个新图中(RESTORING 模式)或者合并到已存在的图中(MERGING 模式)
- –directory 或者 -d,存储 schema 或者 data 的目录,本地目录时,默认为’./{graphName}’,HDFS 时,默认为 ‘{fs.default.name}/{graphName}’
- –clean,是否在恢复图完成后删除 –directory 指定的目录,默认为 false
- –huge-types 或者 -t,要恢复的数据类型,逗号分隔,可选值为 ‘all’ 或者 一个或多个 [vertex,edge,vertex_label,edge_label,property_key,index_label] 的组合,‘all’ 代表全部6种类型,即顶点、边和所有schema
- –log 或者 -l,指定日志目录,默认为当前目录
- –retry,指定失败重试次数,默认为 3
- -D,用 -Dkey=value 的模式指定动态参数,用来从 HDFS 恢复图时,指定 HDFS 的配置项,例如:-Dfs.default.name=hdfs://localhost:9000
只有当 –format 为 json 执行 backup 时,才可以使用 restore 命令恢复
- migrate, 将当前连接的图迁移至另一个 HugeGraphServer 中
- –target-graph,目标图的名字,默认为 hugegraph
- –target-url,目标图所在的 HugeGraphServer,默认为 http://127.0.0.1:8081
- –target-username,访问目标图的用户名
- –target-password,访问目标图的密码
- –target-timeout,访问目标图的超时时间
- –target-trust-store-file,访问目标图使用的 truststore 文件
- –target-trust-store-password,访问目标图使用的 truststore 的密码
- –directory 或者 -d,迁移过程中,存储源图的 schema 或者 data 的目录,本地目录时,默认为’./{graphName}’,HDFS 时,默认为 ‘{fs.default.name}/{graphName}’
- –huge-types 或者 -t,要迁移的数据类型,逗号分隔,可选值为 ‘all’ 或者 一个或多个 [vertex,edge,vertex_label,edge_label,property_key,index_label] 的组合,‘all’ 代表全部6种类型,即顶点、边和所有schema
- –log 或者 -l,指定日志目录,默认为当前目录
- –retry,指定失败重试次数,默认为 3
- –split-size 或者 -s,指定迁移过程中对源图进行备份时顶点或者边分块的大小,默认为 1048576
- -D,用 -Dkey=value 的模式指定动态参数,用来在迁移图过程中需要备份数据到 HDFS 时,指定 HDFS 的配置项,例如:-Dfs.default.name=hdfs://localhost:9000
- –graph-mode 或者 -m,将源图恢复到目标图时将目标图设置的模式,合法值包括 [RESTORING, MERGING]
- –keep-local-data,是否保留在迁移图的过程中产生的源图的备份,默认为 false,即默认迁移图结束后不保留产生的源图备份
- schedule-backup,周期性对图执行备份操作,并保留一定数目的最新备份(目前仅支持本地文件系统)
- –directory 或者 -d,必填项,指定备份数据的目录
- –backup-num,选填项,指定保存的最新的备份的数目,默认为 3
- –interval,选填项,指定进行备份的周期,格式同 Linux crontab 格式
- dump,把整张图的顶点和边全部导出,默认以
vertex vertex-edge1 vertex-edge2...JSON格式存储。
用户也可以自定义存储格式,只需要在hugegraph-tools/src/main/java/com/baidu/hugegraph/formatter
目录下实现一个继承自Formatter的类,例如CustomFormatter,使用时指定该类为formatter即可,例如
bin/hugegraph dump -f CustomFormatter- –formatter 或者 -f,指定使用的 formatter,默认为 JsonFormatter
- –directory 或者 -d,存储 schema 或者 data 的目录,默认为当前目录
- –log 或者 -l,指定日志目录,默认为当前目录
- –retry,指定失败重试次数,默认为 3
- –split-size 或者 -s,指定在备份时对顶点或者边分块的大小,默认为 1048576
- -D,用 -Dkey=value 的模式指定动态参数,用来备份数据到 HDFS 时,指定 HDFS 的配置项,例如:-Dfs.default.name=hdfs://localhost:9000
3.7 安装部署类
- deploy,一键下载、安装和启动 HugeGraph-Server 和 HugeGraph-Studio
- -v,必填项,指明安装的 HugeGraph-Server 和 HugeGraph-Studio 的版本号,最新的是 0.9
- -p,必填项,指定安装的 HugeGraph-Server 和 HugeGraph-Studio 目录
- -u,选填项,指定下载 HugeGraph-Server 和 HugeGraph-Studio 压缩包的链接
- clear,清理 HugeGraph-Server 和 HugeGraph-Studio 目录和tar包
- -p,必填项,指定要清理的 HugeGraph-Server 和 HugeGraph-Studio 的目录
- start-all,一键启动 HugeGraph-Server 和 HugeGraph-Studio,并启动监控,服务死掉时自动拉起服务
- -v,必填项,指明要启动的 HugeGraph-Server 和 HugeGraph-Studio 的版本号,最新的是 0.9
- -p,必填项,指定安装了 HugeGraph-Server 和 HugeGraph-Studio 的目录
- stop-all,一键关闭 HugeGraph-Server 和 HugeGraph-Studio
deploy命令中有可选参数 -u,提供时会使用指定的下载地址替代默认下载地址下载 tar 包,并且将地址写入~/hugegraph-download-url-prefix文件中;之后如果不指定地址时,会优先从~/hugegraph-download-url-prefix指定的地址下载 tar 包;如果 -u 和~/hugegraph-download-url-prefix都没有时,会从默认下载地址进行下载
3.8 具体命令参数
各子命令的具体参数如下:
Usage: hugegraph [options] [command] [command options]
  Options:
    --graph
      Name of graph
      Default: hugegraph
    --password
      Password of user
    --timeout
      Connection timeout
      Default: 30
    --trust-store-file
      The path of client truststore file used when https protocol is enabled
    --trust-store-password
      The password of the client truststore file used when the https protocol
      is enabled
    --url
      The URL of HugeGraph-Server
      Default: http://127.0.0.1:8080
    --user
      Name of user
  Commands:
    graph-list      List all graphs
      Usage: graph-list

    graph-get      Get graph info
      Usage: graph-get

    graph-clear      Clear graph schema and data
      Usage: graph-clear [options]
        Options:
        * --confirm-message, -c
            Confirm message of graph clear is "I'm sure to delete all data".
            (Note: include "")

    graph-mode-set      Set graph mode
      Usage: graph-mode-set [options]
        Options:
        * --graph-mode, -m
            Graph mode, include: [NONE, RESTORING, MERGING]
            Possible Values: [NONE, RESTORING, MERGING, LOADING]

    graph-mode-get      Get graph mode
      Usage: graph-mode-get

    task-list      List tasks
      Usage: task-list [options]
        Options:
          --limit
            Limit number, no limit if not provided
            Default: -1
          --status
            Status of task

    task-get      Get task info
      Usage: task-get [options]
        Options:
        * --task-id
            Task id
            Default: 0

    task-delete      Delete task
      Usage: task-delete [options]
        Options:
        * --task-id
            Task id
            Default: 0

    task-cancel      Cancel task
      Usage: task-cancel [options]
        Options:
        * --task-id
            Task id
            Default: 0

    task-clear      Clear completed tasks
      Usage: task-clear [options]
        Options:
          --force
            Force to clear all tasks, cancel all uncompleted tasks firstly,
            and delete all completed tasks
            Default: false

    gremlin-execute      Execute Gremlin statements
      Usage: gremlin-execute [options]
        Options:
          --aliases, -a
            Gremlin aliases, valid format is: 'key1=value1,key2=value2...'
            Default: {}
          --bindings, -b
            Gremlin bindings, valid format is: 'key1=value1,key2=value2...'
            Default: {}
          --file, -f
            Gremlin Script file to be executed, UTF-8 encoded, exclusive to
            --script
          --language, -l
            Gremlin script language
            Default: gremlin-groovy
          --script, -s
            Gremlin script to be executed, exclusive to --file

    gremlin-schedule      Execute Gremlin statements as asynchronous job
      Usage: gremlin-schedule [options]
        Options:
          --bindings, -b
            Gremlin bindings, valid format is: 'key1=value1,key2=value2...'
            Default: {}
          --file, -f
            Gremlin Script file to be executed, UTF-8 encoded, exclusive to
            --script
          --language, -l
            Gremlin script language
            Default: gremlin-groovy
          --script, -s
            Gremlin script to be executed, exclusive to --file

    backup      Backup graph schema/data. If directory is on HDFS, use -D to
            set HDFS params. For exmaple:
            -Dfs.default.name=hdfs://localhost:9000
      Usage: backup [options]
        Options:
          --all-properties
            All properties to be backup flag
            Default: false
          --compress
            compress flag
            Default: true
          --directory, -d
            Directory of graph schema/data, default is './{graphname}' in
            local file system or '{fs.default.name}/{graphname}' in HDFS
          --format
            File format, valid is [json, text]
            Default: json
          --huge-types, -t
            Type of schema/data. Concat with ',' if more than one. 'all' means
            all vertices, edges and schema, in other words, 'all' equals with
            'vertex,edge,vertex_label,edge_label,property_key,index_label'
            Default: [PROPERTY_KEY, VERTEX_LABEL, EDGE_LABEL, INDEX_LABEL, VERTEX, EDGE]
          --label
            Vertex or edge label, only valid when type is vertex or edge
          --log, -l
            Directory of log
            Default: ./logs
          --properties
            Vertex or edge properties to backup, only valid when type is
            vertex or edge
            Default: []
          --retry
            Retry times, default is 3
            Default: 3
          --split-size, -s
            Split size of shard
            Default: 1048576
          -D
            HDFS config parameters
            Syntax: -Dkey=value
            Default: {}

    schedule-backup      Schedule backup task
      Usage: schedule-backup [options]
        Options:
          --backup-num
            The number of latest backups to keep
            Default: 3
        * --directory, -d
            The directory of backups stored
          --interval
            The interval of backup, format is: "a b c d e". 'a' means minute
            (0 - 59), 'b' means hour (0 - 23), 'c' means day of month (1 -
            31), 'd' means month (1 - 12), 'e' means day of week (0 - 6)
            (Sunday=0), "*" means all
            Default: "0 0 * * *"

    dump      Dump graph to files
      Usage: dump [options]
        Options:
          --directory, -d
            Directory of graph schema/data, default is './{graphname}' in
            local file system or '{fs.default.name}/{graphname}' in HDFS
          --formatter, -f
            Formatter to customize format of vertex/edge
            Default: JsonFormatter
          --log, -l
            Directory of log
            Default: ./logs
          --retry
            Retry times, default is 3
            Default: 3
          --split-size, -s
            Split size of shard
            Default: 1048576
          -D
            HDFS config parameters
            Syntax: -Dkey=value
            Default: {}

    restore      Restore graph schema/data. If directory is on HDFS, use -D to
            set HDFS params if needed. For
            exmaple:-Dfs.default.name=hdfs://localhost:9000
      Usage: restore [options]
        Options:
          --clean
            Whether to remove the directory of graph data after restored
            Default: false
          --directory, -d
            Directory of graph schema/data, default is './{graphname}' in
            local file system or '{fs.default.name}/{graphname}' in HDFS
          --huge-types, -t
            Type of schema/data. Concat with ',' if more than one. 'all' means
            all vertices, edges and schema, in other words, 'all' equals with
            'vertex,edge,vertex_label,edge_label,property_key,index_label'
            Default: [PROPERTY_KEY, VERTEX_LABEL, EDGE_LABEL, INDEX_LABEL, VERTEX, EDGE]
          --log, -l
            Directory of log
            Default: ./logs
          --retry
            Retry times, default is 3
            Default: 3
          -D
            HDFS config parameters
            Syntax: -Dkey=value
            Default: {}

    migrate      Migrate graph
      Usage: migrate [options]
        Options:
          --directory, -d
            Directory of graph schema/data, default is './{graphname}' in
            local file system or '{fs.default.name}/{graphname}' in HDFS
          --graph-mode, -m
            Mode used when migrating to target graph, include: [RESTORING,
            MERGING]
            Default: RESTORING
            Possible Values: [NONE, RESTORING, MERGING, LOADING]
          --huge-types, -t
            Type of schema/data. Concat with ',' if more than one. 'all' means
            all vertices, edges and schema, in other words, 'all' equals with
            'vertex,edge,vertex_label,edge_label,property_key,index_label'
            Default: [PROPERTY_KEY, VERTEX_LABEL, EDGE_LABEL, INDEX_LABEL, VERTEX, EDGE]
          --keep-local-data
            Whether to keep the local directory of graph data after restored
            Default: false
          --log, -l
            Directory of log
            Default: ./logs
          --retry
            Retry times, default is 3
            Default: 3
          --split-size, -s
            Split size of shard
            Default: 1048576
          --target-graph
            The name of target graph to migrate
            Default: hugegraph
          --target-password
            The password of target graph to migrate
          --target-timeout
            The timeout to connect target graph to migrate
            Default: 0
          --target-trust-store-file
            The trust store file of target graph to migrate
          --target-trust-store-password
            The trust store password of target graph to migrate
          --target-url
            The url of target graph to migrate
            Default: http://127.0.0.1:8081
          --target-user
            The username of target graph to migrate
          -D
            HDFS config parameters
            Syntax: -Dkey=value
            Default: {}

    deploy      Install HugeGraph-Server and HugeGraph-Studio
      Usage: deploy [options]
        Options:
        * -p
            Install path of HugeGraph-Server and HugeGraph-Studio
          -u
            Download url prefix path of HugeGraph-Server and HugeGraph-Studio
        * -v
            Version of HugeGraph-Server and HugeGraph-Studio

    start-all      Start HugeGraph-Server and HugeGraph-Studio
      Usage: start-all [options]
        Options:
        * -p
            Install path of HugeGraph-Server and HugeGraph-Studio
        * -v
            Version of HugeGraph-Server and HugeGraph-Studio

    clear      Clear HugeGraph-Server and HugeGraph-Studio
      Usage: clear [options]
        Options:
        * -p
            Install path of HugeGraph-Server and HugeGraph-Studio

    stop-all      Stop HugeGraph-Server and HugeGraph-Studio
      Usage: stop-all

    help      Print usage
      Usage: help
3.9 具体命令示例
1. gremlin语句
# 同步执行gremlin
./bin/hugegraph --url http://127.0.0.1:8080 --graph hugegraph gremlin-execute --script 'g.V().count()'

# 异步执行gremlin
./bin/hugegraph --url http://127.0.0.1:8080 --graph hugegraph gremlin-schedule --script 'g.V().count()'
2. 查看task情况
./bin/hugegraph --url http://127.0.0.1:8080 --graph hugegraph task-list

./bin/hugegraph --url http://127.0.0.1:8080 --graph hugegraph task-list --limit 5

./bin/hugegraph --url http://127.0.0.1:8080 --graph hugegraph task-list --status success
3. 图模式查看和设置
./bin/hugegraph --url http://127.0.0.1:8080 --graph hugegraph graph-mode-set -m RESTORING MERGING NONE

./bin/hugegraph --url http://127.0.0.1:8080 --graph hugegraph graph-mode-set -m RESTORING

./bin/hugegraph --url http://127.0.0.1:8080 --graph hugegraph graph-mode-get

./bin/hugegraph --url http://127.0.0.1:8080 --graph hugegraph graph-list
4. 清理图
./bin/hugegraph --url http://127.0.0.1:8080 --graph hugegraph graph-clear -c "I'm sure to delete all data"
5. 图备份
./bin/hugegraph --url http://127.0.0.1:8080 --graph hugegraph backup -t all --directory ./backup-test
6. 周期性的备份
./bin/hugegraph --url http://127.0.0.1:8080 --graph hugegraph --interval */2 * * * * schedule-backup -d ./backup-0.10.2
7. 图恢复
# 设置图模式
./bin/hugegraph --url http://127.0.0.1:8080 --graph hugegraph graph-mode-set -m RESTORING

# 恢复图
./bin/hugegraph --url http://127.0.0.1:8080 --graph hugegraph restore -t all --directory ./backup-test

# 恢复图模式
./bin/hugegraph --url http://127.0.0.1:8080 --graph hugegraph graph-mode-set -m NONE
8. 图迁移
./bin/hugegraph --url http://127.0.0.1:8080 --graph hugegraph migrate --target-url http://127.0.0.1:8090 --target-graph hugegraph
2.3 - HugeGraph-Hubble Quick Start
1 HugeGraph-Hubble概述
HugeGraph是一款面向分析型,支持批量操作的图数据库系统,它由百度安全团队自主研发,全面支持Apache TinkerPop3框架和Gremlin图查询语言,提供导出、备份、恢复等完善的工具链生态,有效解决海量图数据的存储、查询和关联分析需求。HugeGraph广泛应用于银行券商的风控打击、保险理赔、推荐搜索、公安犯罪打击、知识图谱构建、网络安全、IT运维等领域,致力于让更多行业、组织及用户享受到更广泛的数据综合价值。
HugeGraph-Hubble 是HugeGraph的一站式可视化分析平台,平台涵盖了从数据建模,到数据快速导入,再到数据的在线、离线分析、以及图的统一管理的全过程,实现了图应用的全流程向导式操作,旨在提升用户的使用流畅度,降低用户的使用门槛,提供更为高效易用的使用体验。
平台主要包括以下模块:
图管理
图管理模块通过图的创建,连接平台与图数据,实现多图的统一管理,并实现图的访问、编辑、删除、查询操作。
元数据建模
元数据建模模块通过创建属性库,顶点类型,边类型,索引类型,实现图模型的构建与管理,平台提供两种模式,列表模式和图模式,可实时展示元数据模型,更加直观。同时还提供了跨图的元数据复用功能,省去相同元数据繁琐的重复创建过程,极大地提升建模效率,增强易用性。
数据导入
数据导入是将用户的业务数据转化为图的顶点和边并插入图数据库中,平台提供了向导式的可视化导入模块,通过创建导入任务,实现导入任务的管理及多个导入任务的并行运行,提高导入效能。进入导入任务后,只需跟随平台步骤提示,按需上传文件,填写内容,就可轻松实现图数据的导入过程,同时支持断点续传,错误重试机制等,降低导入成本,提升效率。
图分析
通过输入图遍历语言Gremlin可实现图数据的高性能通用分析,并提供顶点的定制化多维路径查询等功能,提供3种图结果展示方式,包括:图形式、表格形式、Json形式,多维度展示数据形态,满足用户使用的多种场景需求。提供运行记录及常用语句收藏等功能,实现图操作的可追溯,以及查询输入的复用共享,快捷高效。支持图数据的导出,导出格式为Json格式。
任务管理
对于需要遍历全图的Gremlin任务,索引的创建与重建等耗时较长的异步任务,平台提供相应的任务管理功能,实现异步任务的统一的管理与结果查看。
2 平台使用流程
平台的模块使用流程如下:

3 平台使用说明
3.1 图管理
3.1.1 图创建
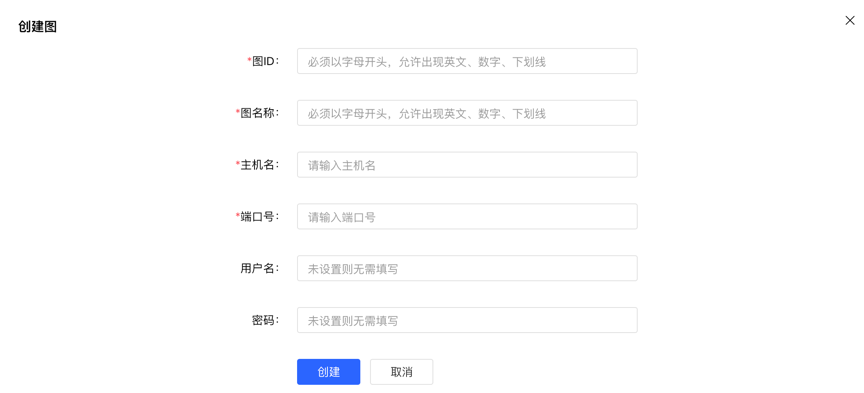
图管理模块下,点击【创建图】,通过填写图ID、图名称、主机名、端口号、用户名、密码的信息,实现多图的连接。
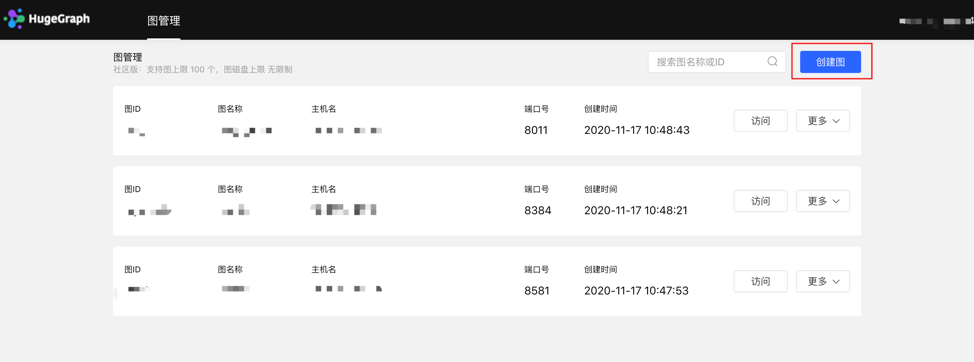
创建图填写内容如下:
3.1.2 图访问
实现图空间的信息访问,进入后,可进行图的多维查询分析、元数据管理、数据导入、算法分析等操作。

3.1.3 图管理
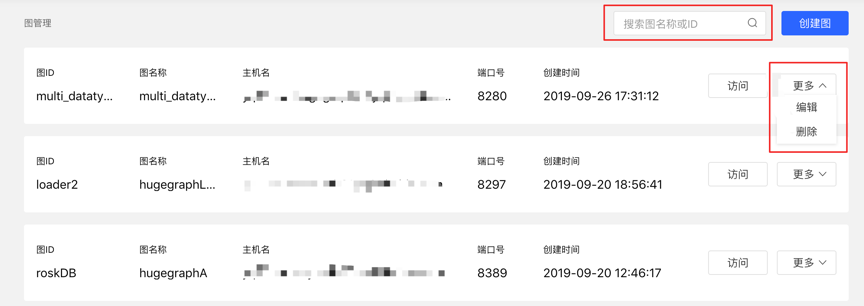
- 用户通过对图的概览、搜索以及单图的信息编辑与删除,实现图的统一管理。
- 搜索范围:可对图名称和ID进行搜索。
3.2 元数据建模(列表+图模式)
3.2.1 模块入口
左侧导航处:

3.2.2 属性类型
3.2.2.1 创建
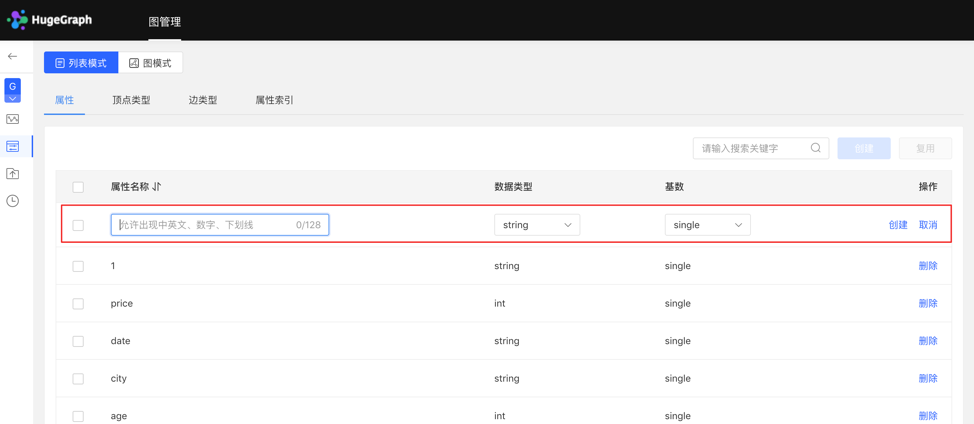
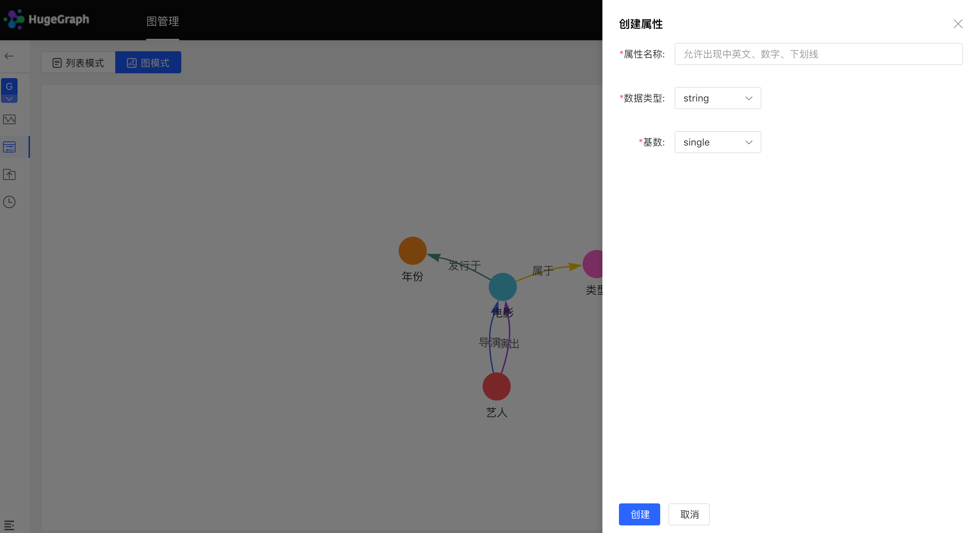
- 填写或选择属性名称、数据类型、基数,完成属性的创建。
- 创建的属性可作为顶点类型和边类型的属性。
列表模式:
图模式:
3.2.2.2 复用
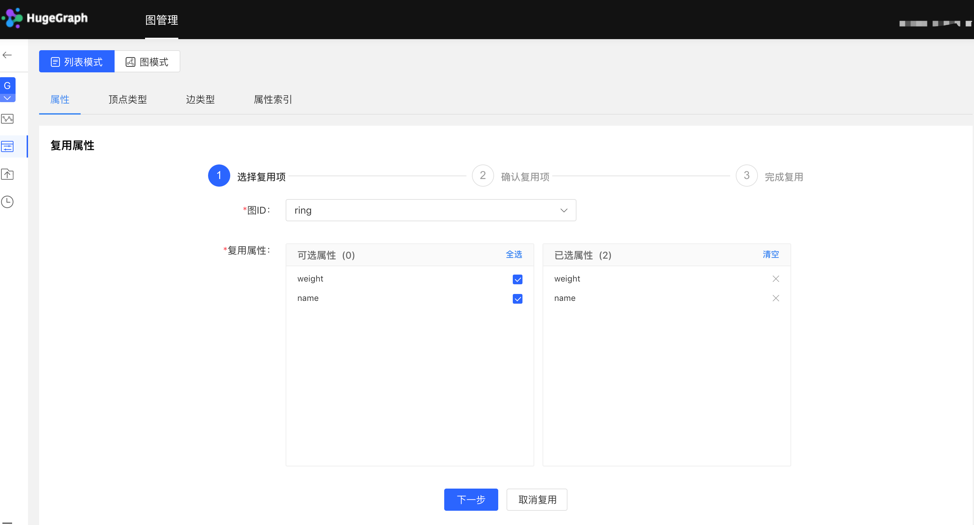
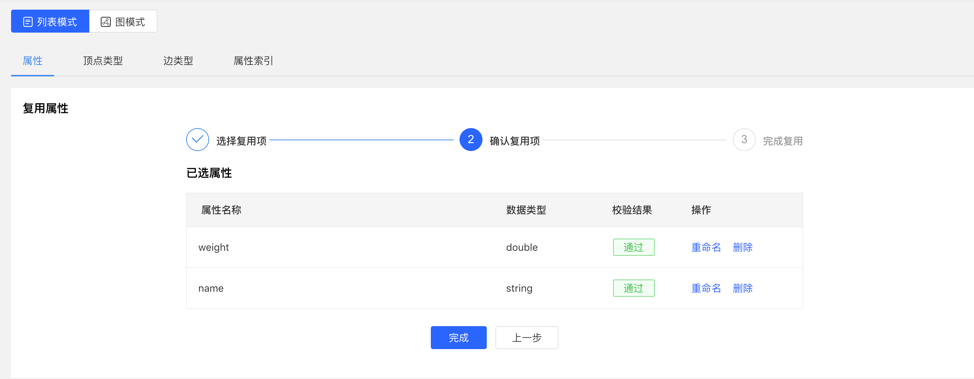
- 平台提供【复用】功能,可直接复用其他图的元数据。
- 选择需要复用的图ID,继续选择需要复用的属性,之后平台会进行是否冲突的校验,通过后,可实现元数据的复用。
选择复用项:
校验复用项:
3.2.2.3 管理
- 在属性列表中可进行单条删除或批量删除操作。
3.2.3 顶点类型
3.2.3.1 创建
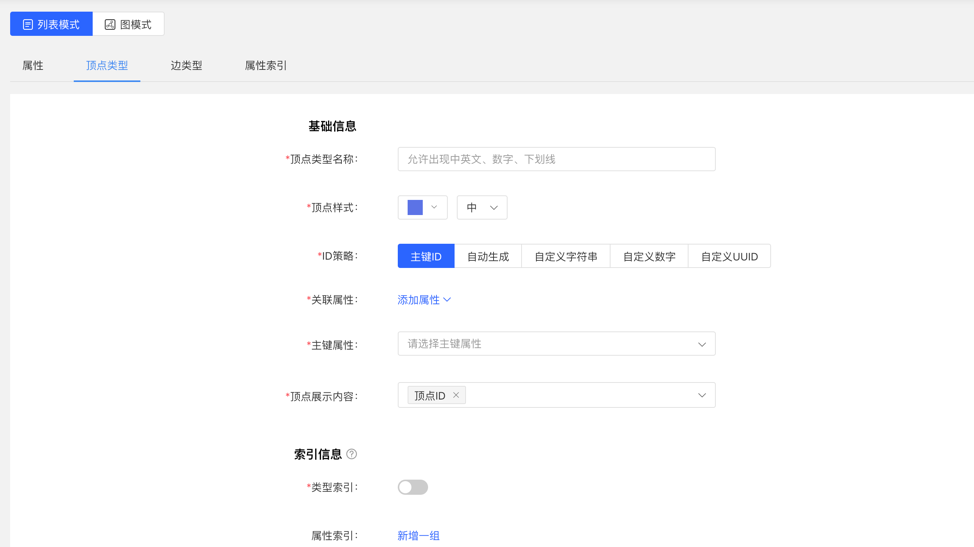
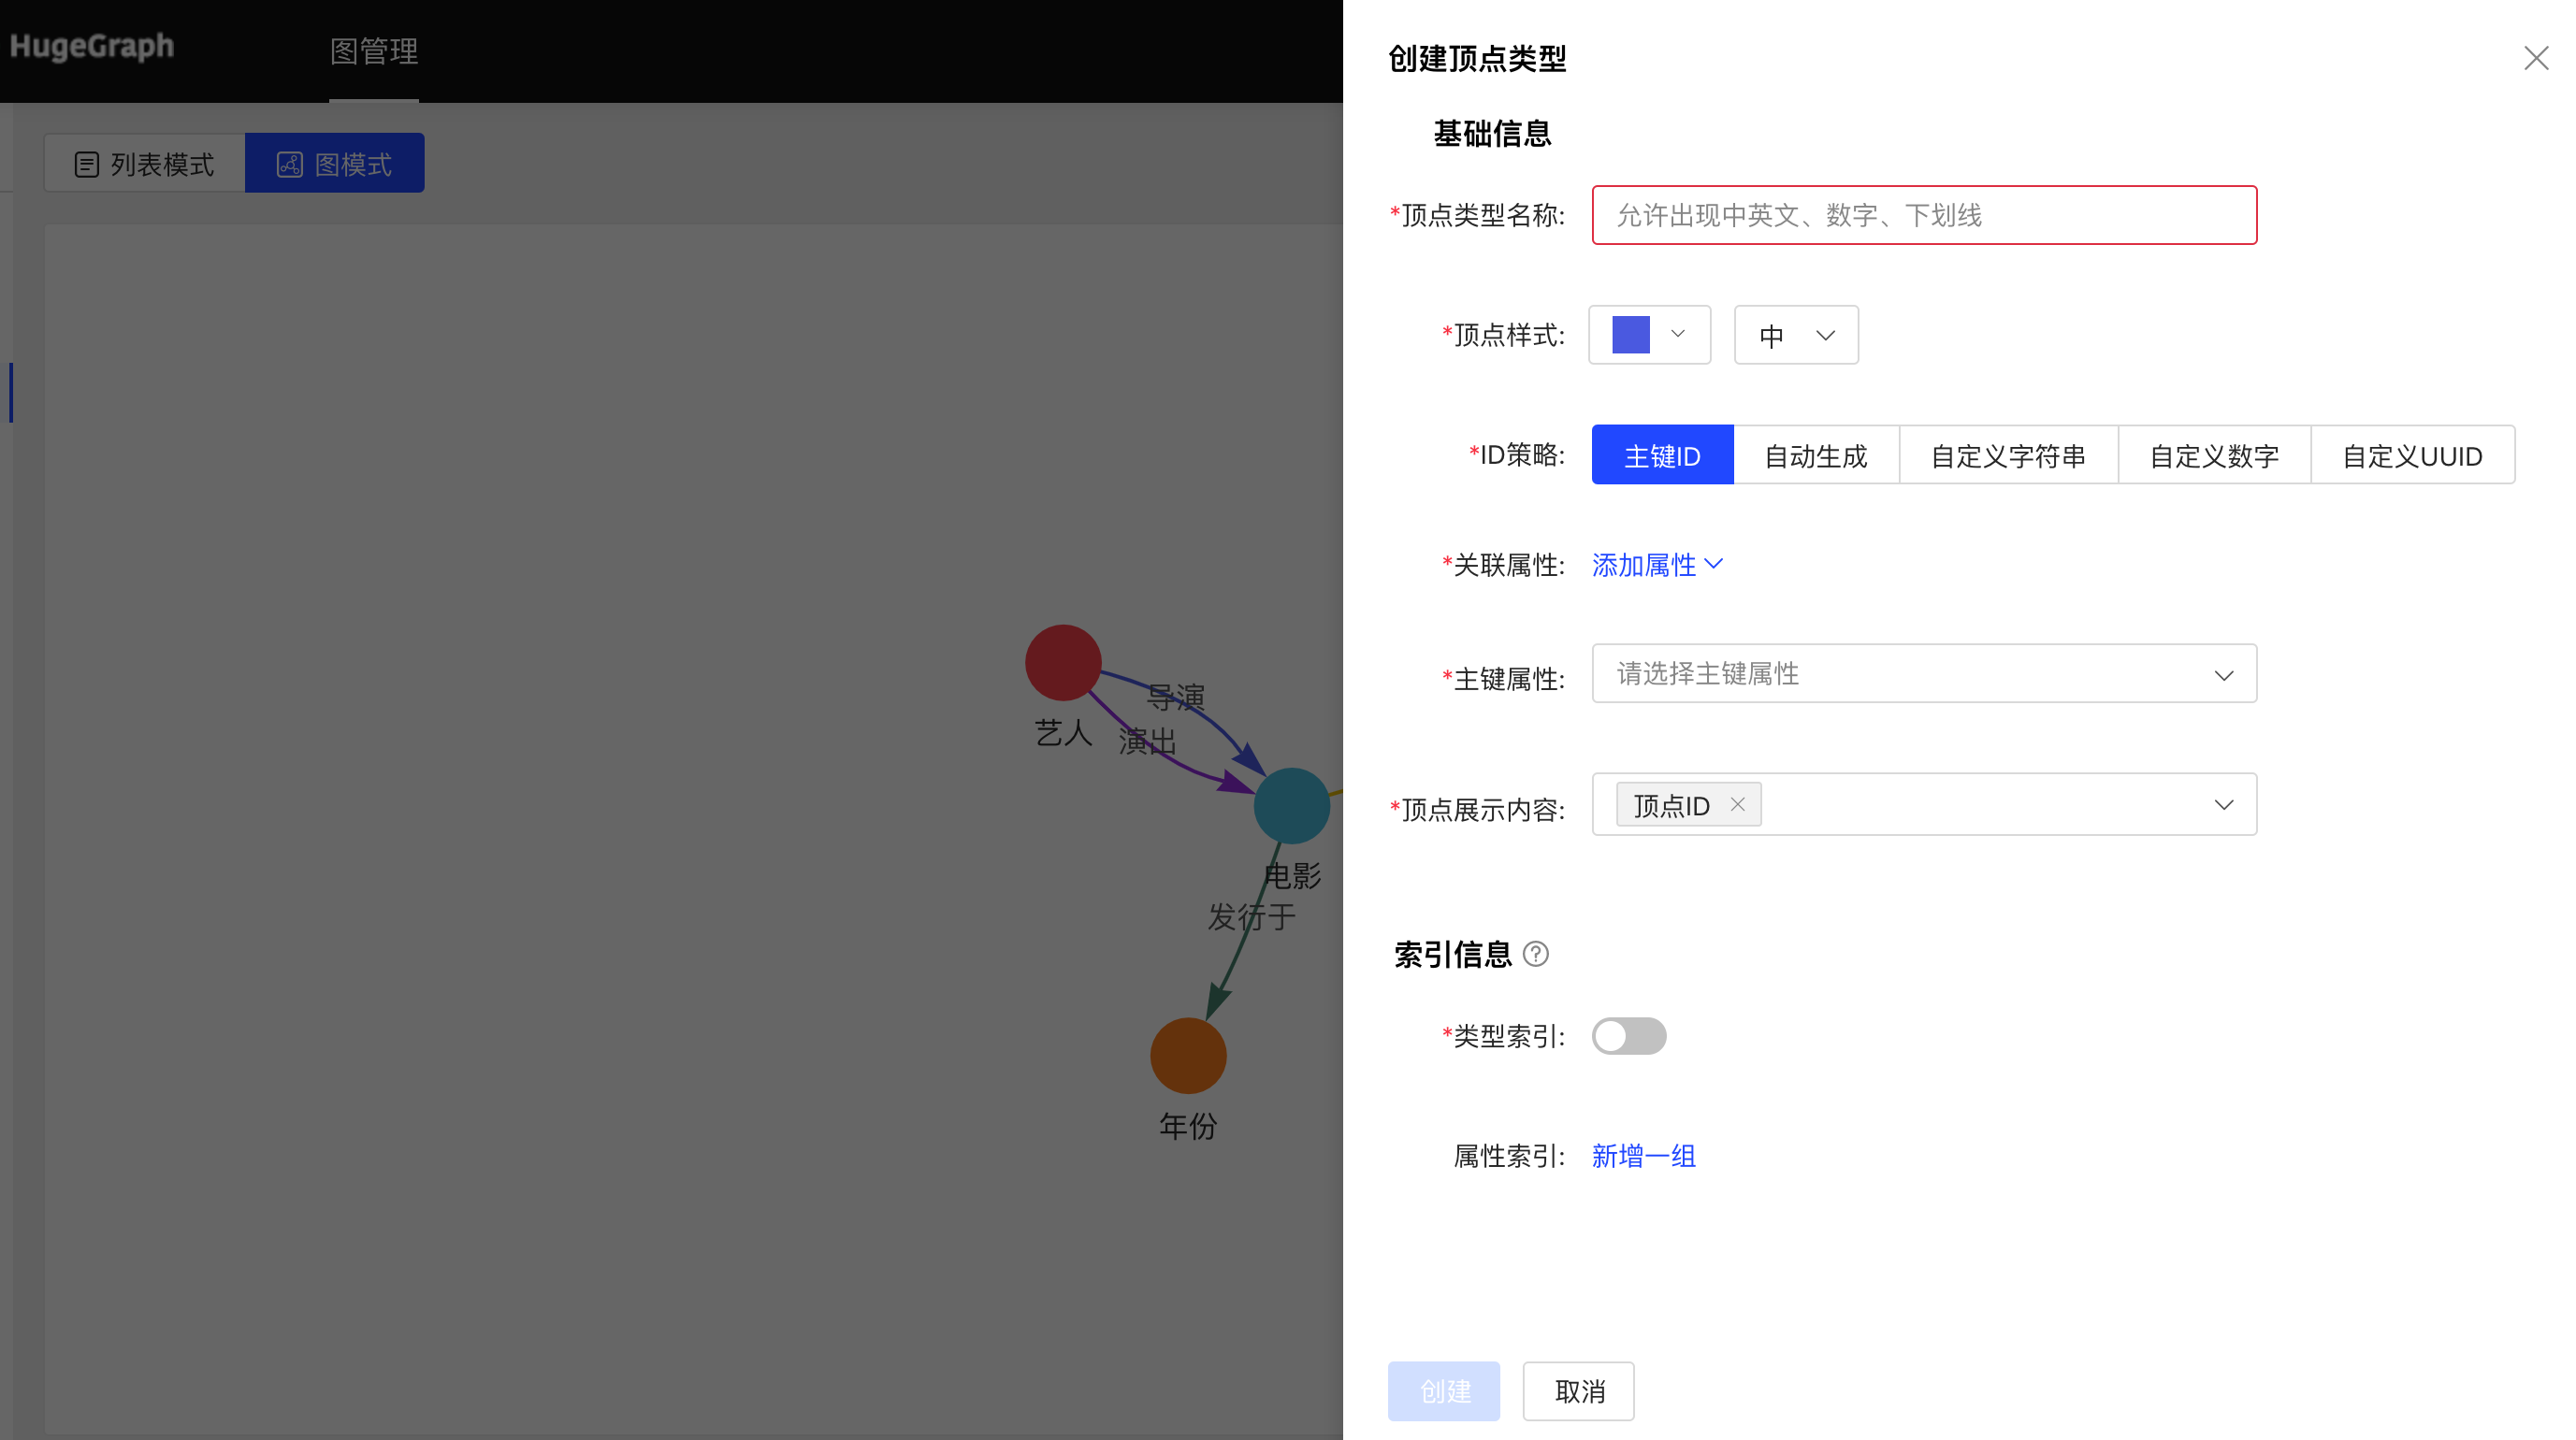
- 填写或选择顶点类型名称、ID策略、关联属性、主键属性,顶点样式、查询结果中顶点下方展示的内容,以及索引的信息:包括是否创建类型索引,及属性索引的具体内容,完成顶点类型的创建。
列表模式:
图模式:
3.2.3.2 复用
- 顶点类型的复用,会将此类型关联的属性和属性索引一并复用。
- 复用功能使用方法类似属性的复用,见3.2.2.2。
3.2.3.3 管理
可进行编辑操作,顶点样式、关联类型、顶点展示内容、属性索引可编辑,其余不可编辑。
可进行单条删除或批量删除操作。
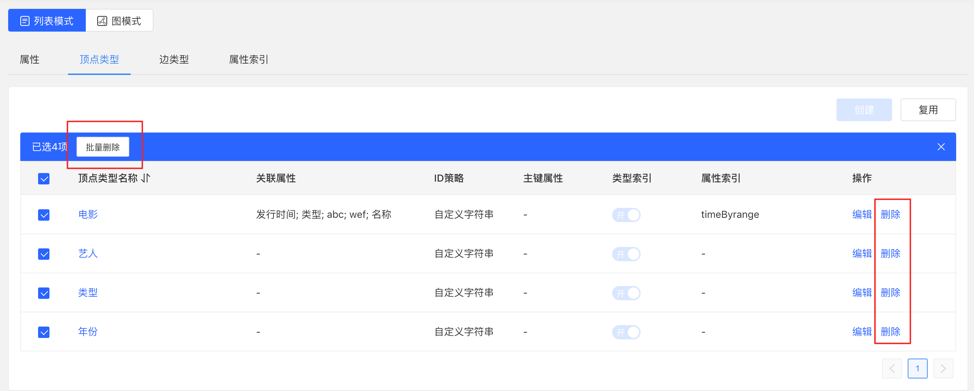
3.2.4 边类型
3.2.4.1 创建
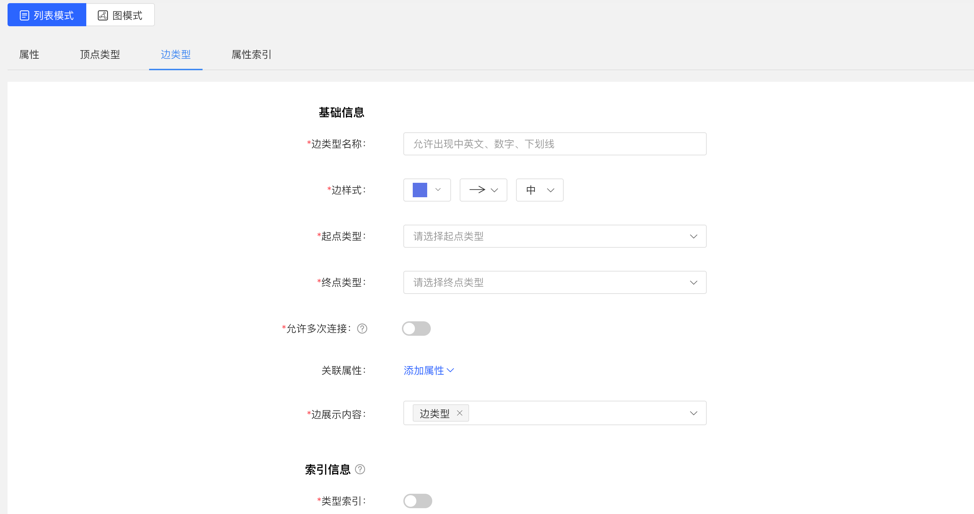
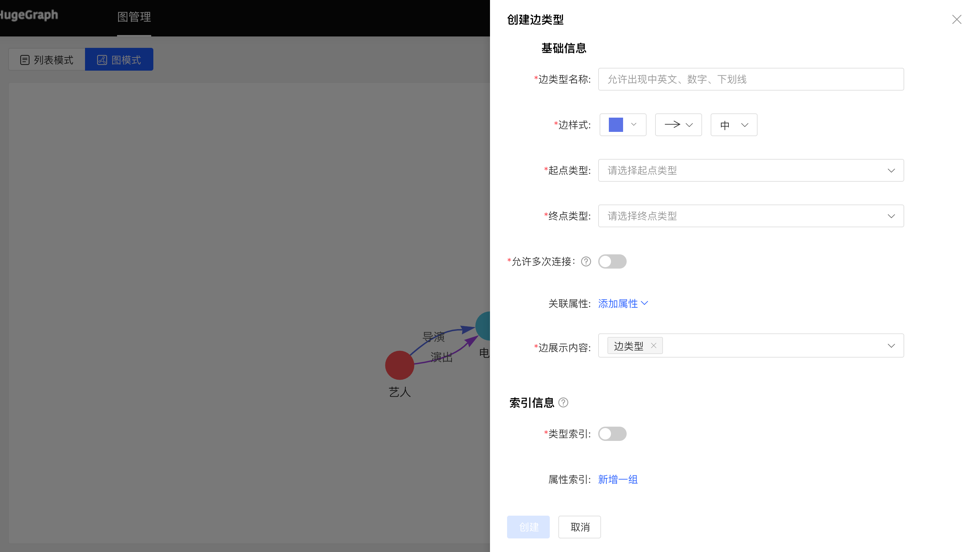
- 填写或选择边类型名称、起点类型、终点类型、关联属性、是否允许多次连接、边样式、查询结果中边下方展示的内容,以及索引的信息:包括是否创建类型索引,及属性索引的具体内容,完成边类型的创建。
列表模式:
图模式:
3.2.4.2 复用
- 边类型的复用,会将此类型的起点类型、终点类型、关联的属性和属性索引一并复用。
- 复用功能使用方法类似属性的复用,见3.2.2.2。
3.2.4.3 管理
- 可进行编辑操作,边样式、关联属性、边展示内容、属性索引可编辑,其余不可编辑,同顶点类型。
- 可进行单条删除或批量删除操作。
3.2.5 索引类型
展示顶点类型和边类型的顶点索引和边索引。
3.3 数据导入
数据导入的使用流程如下:

3.3.1 模块入口
左侧导航处:

3.3.2 创建任务
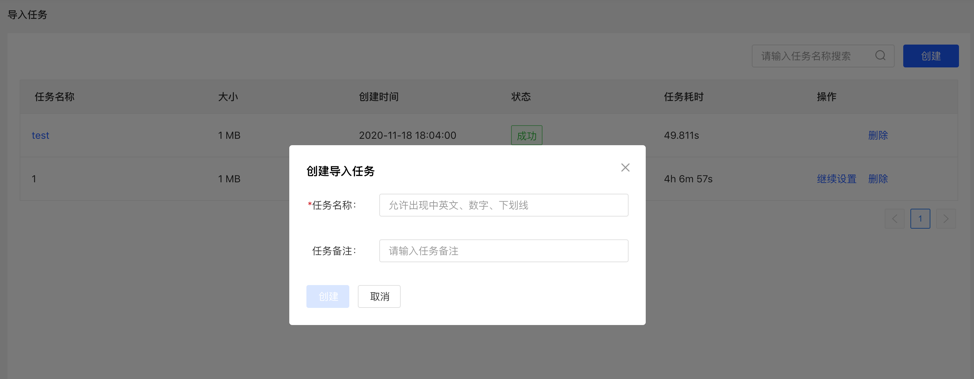
- 填写任务名称和备注(非必填),可以创建导入任务。
- 可创建多个导入任务,并行导入。
3.3.3 上传文件
- 上传需要构图的文件,目前支持的格式为CSV,后续会不断更新。
- 可同时上传多个文件。
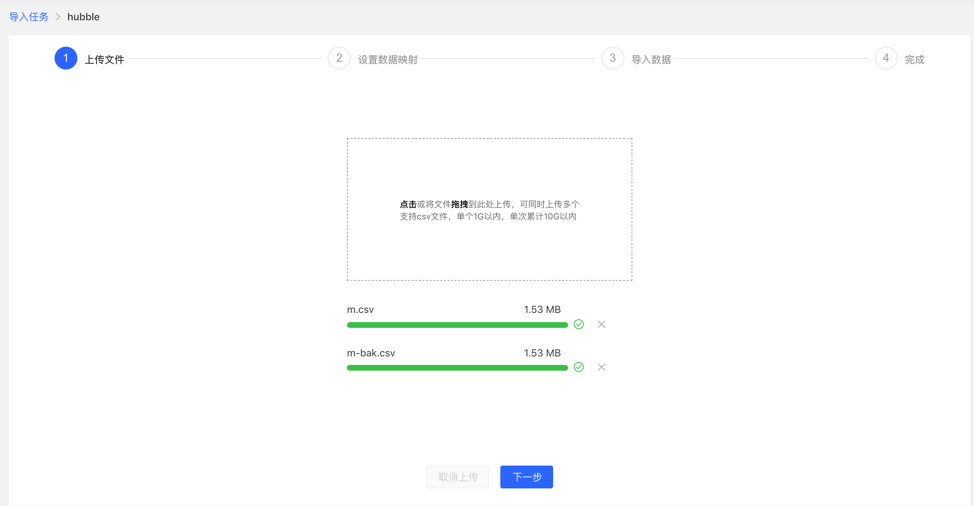
3.3.4 设置数据映射
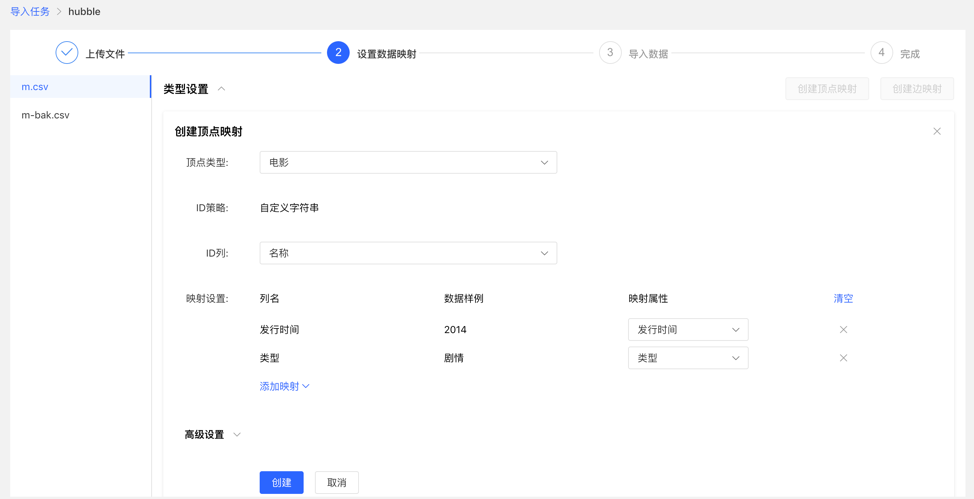
对上传的文件分别设置数据映射,包括文件设置和类型设置
文件设置:勾选或填写是否包含表头、分隔符、编码格式等文件本身的设置内容,均设置默认值,无需手动填写
类型设置:
顶点映射和边映射:
【顶点类型】 :选择顶点类型,并为其ID映射上传文件中列数据;
【边类型】:选择边类型,为其起点类型和终点类型的ID列映射上传文件的列数据;
映射设置:为选定的顶点类型的属性映射上传文件中的列数据,此处,若属性名称与文件的表头名称一致,可自动匹配映射属性,无需手动填选
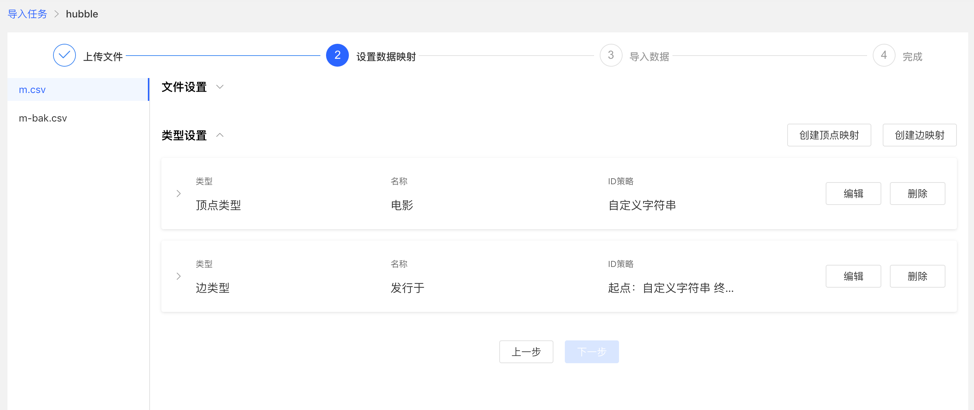
完成设置后,显示设置列表,方可进行下一步操作,支持映射的新增、编辑、删除操作
设置映射的填写内容:
映射列表:
3.3.5 导入数据
导入前需要填写导入设置参数,填写完成后,可开始向图库中导入数据
- 导入设置
- 导入设置参数项如下图所示,均设置默认值,无需手动填写
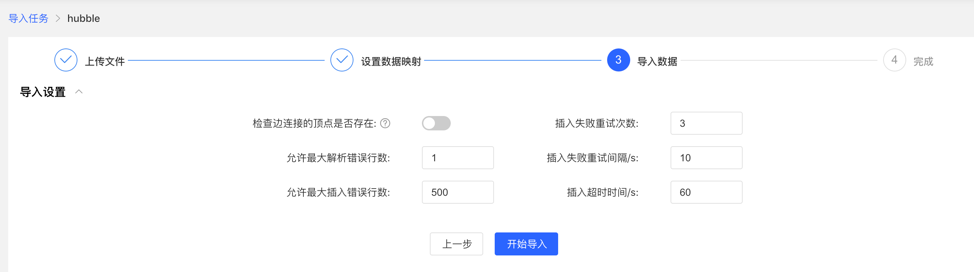
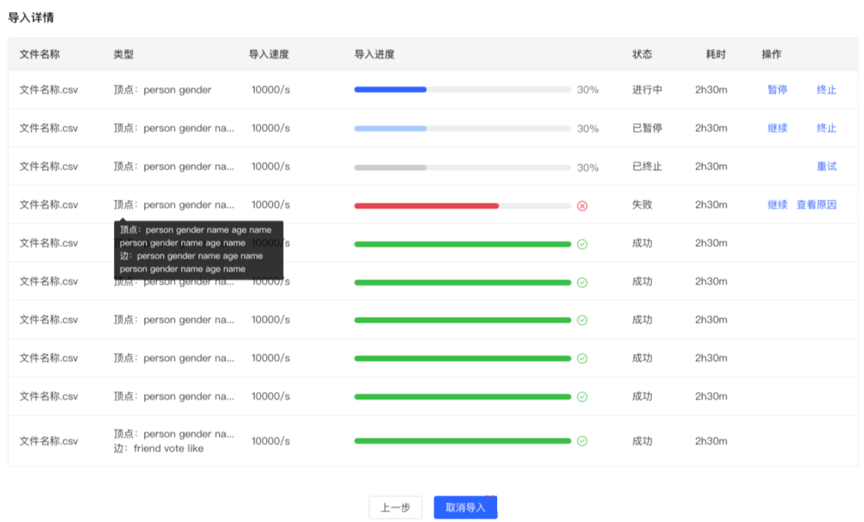
- 导入详情
- 点击开始导入,开始文件的导入任务
- 导入详情中提供每个上传文件设置的映射类型、导入速度、导入的进度、耗时以及当前任务的具体状态,并可对每个任务进行暂停、继续、停止等操作
- 若导入失败,可查看具体原因
3.4 数据分析
3.4.1 模块入口
左侧导航处:

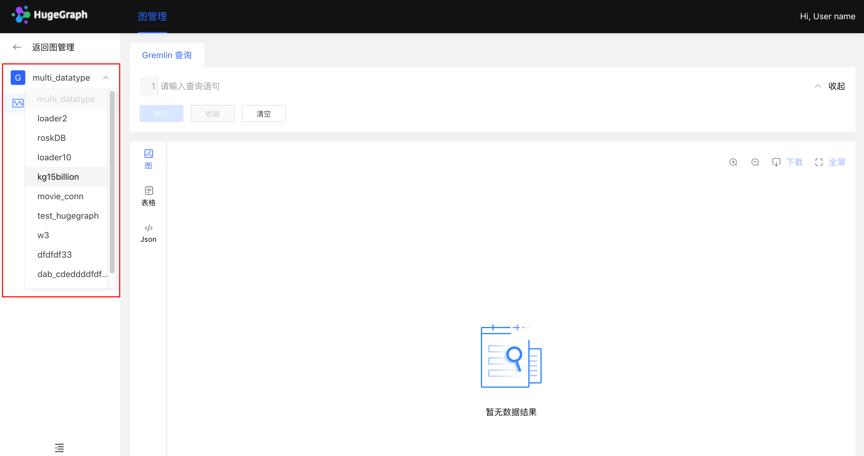
3.4.2 多图切换
通过左侧切换入口,灵活切换多图的操作空间
3.4.3 图分析与处理
HugeGraph支持Apache TinkerPop3的图遍历查询语言Gremlin,Gremlin是一种通用的图数据库查询语言,通过输入Gremlin语句,点击执行,即可执行图数据的查询分析操作,并可实现顶点/边的创建及删除、顶点/边的属性修改等。
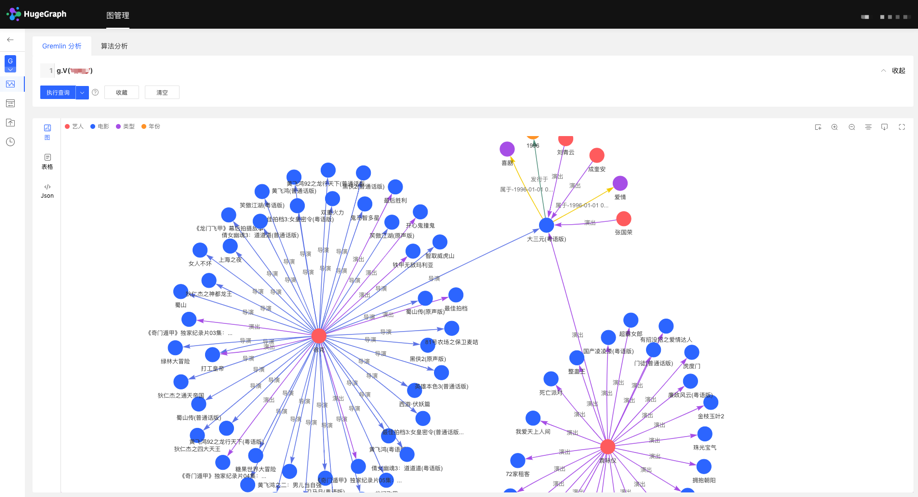
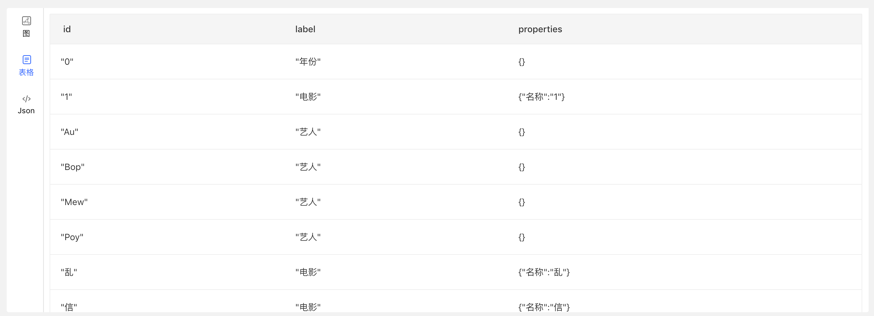
Gremlin查询后,下方为图结果展示区域,提供3种图结果展示方式,分别为:【图模式】、【表格模式】、【Json模式】。
支持缩放、居中、全屏、导出等操作。
【图模式】
【表格模式】
【Json模式】
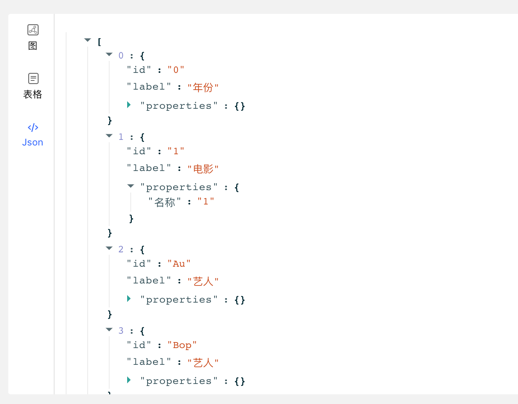
3.4.4 数据详情
点击顶点/边实体,可查看顶点/边的数据详情,包括:顶点/边类型,顶点ID,属性及对应值,拓展图的信息展示维度,提高易用性。
3.4.5 图结果的多维路径查询
除了全局的查询外,可针对查询结果中的顶点进行深度定制化查询以及隐藏操作,实现图结果的定制化挖掘。
右击顶点,出现顶点的菜单入口,可进行展示、查询、隐藏等操作。
- 展开:点击后,展示与选中点关联的顶点。
- 查询:通过选择与选中点关联的边类型及边方向,在此条件下,再选择其属性及相应筛选规则,可实现定制化的路径展示。
- 隐藏:点击后,隐藏选中点及与之关联的边。
双击顶点,也可展示与选中点关联的顶点。
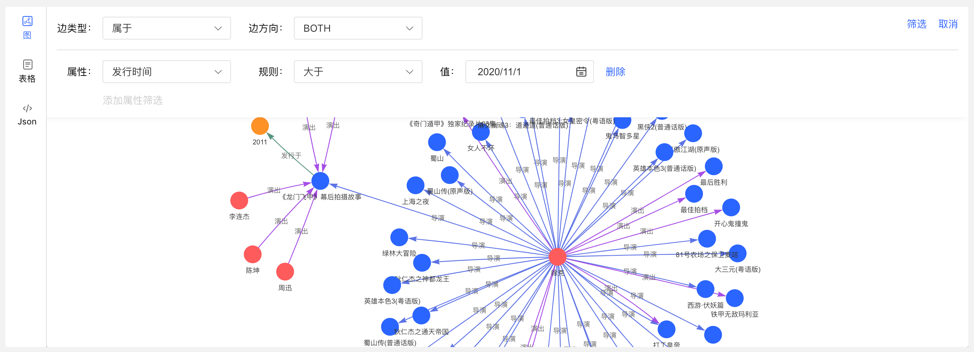
3.4.6 新增顶点/边
3.4.6.1 新增顶点
在图区可通过两个入口,动态新增顶点,如下:
- 点击图区面板,出现添加顶点入口
- 点击右上角的操作栏中的首个图标
通过选择或填写顶点类型、ID值、属性信息,完成顶点的增加。
入口如下:
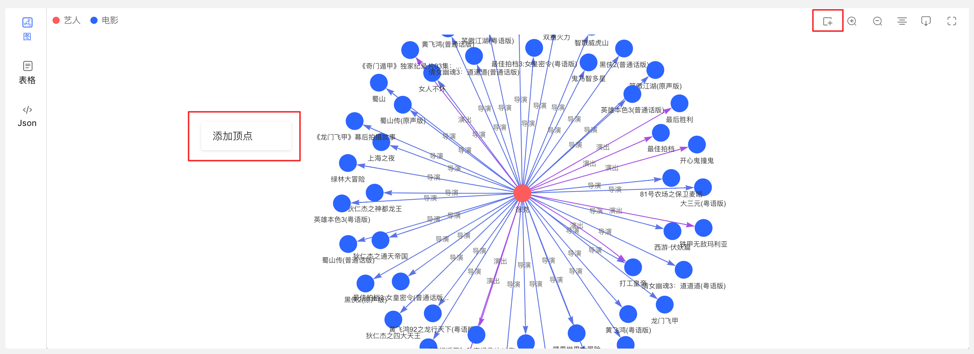
添加顶点内容如下:
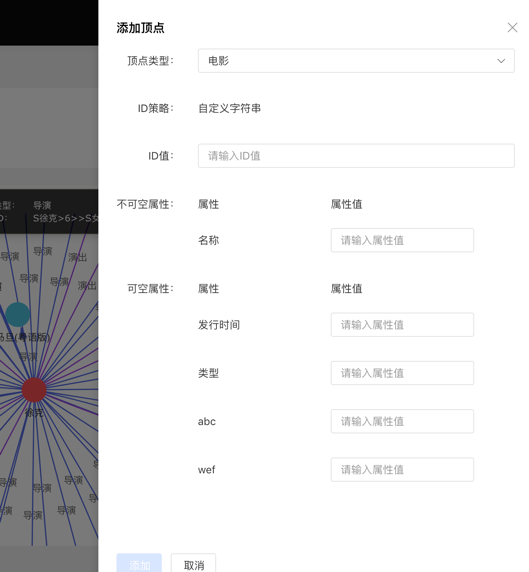
3.4.6.2 新增边
右击图结果中的顶点,可增加该点的出边或者入边。
3.4.7 执行记录与收藏的查询
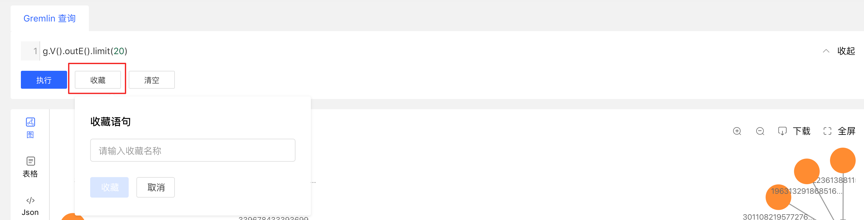
- 图区下方记载每次查询记录,包括:查询时间、执行类型、内容、状态、耗时、以及【收藏】和【加载】操作,实现图执行的全方位记录,有迹可循,并可对执行内容快速加载复用
- 提供语句的收藏功能,可对常用语句进行收藏操作,方便高频语句快速调用
3.5 任务管理
3.5.1 模块入口
左侧导航处:

3.5.2 任务管理
- 提供异步任务的统一的管理与结果查看,异步任务包括4类,分别为:
- gremlin:Gremlin任务
- algorithm:OLAP算法任务
- remove_schema:删除元数据
- rebuild_index:重建索引
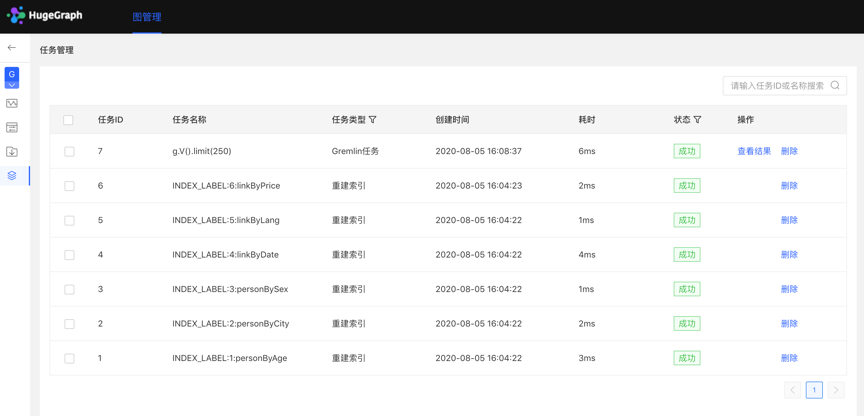
- 列表显示当前图的异步任务信息,包括:任务ID,任务名称,任务类型,创建时间,耗时,状态,操作,实现对异步任务的管理。
- 支持对任务类型和状态进行筛选
- 支持搜索任务ID和任务名称
- 可对异步任务进行删除或批量删除操作
3.5.3 Gremlin异步任务
1.创建任务
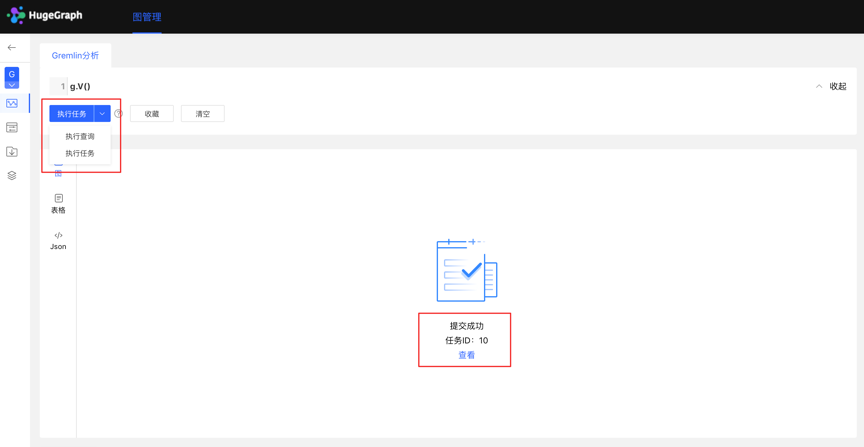
- 数据分析模块,目前支持两种Gremlin操作,Gremlin查询和Gremlin任务;若用户切换到Gremlin任务,点击执行后,在异步任务中心会建立一条异步任务;
2.任务提交
- 任务提交成功后,图区部分返回提交结果和任务ID
3.任务详情
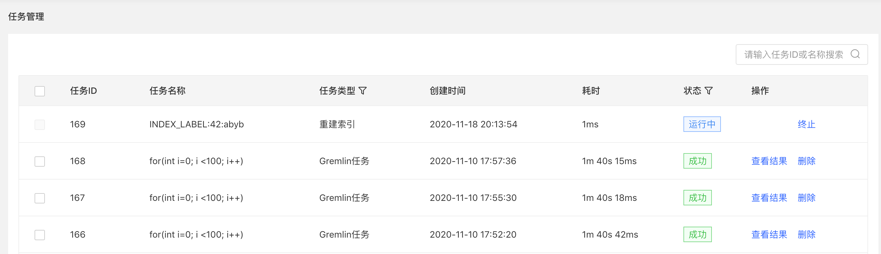
- 提供【查看】入口,可跳转到任务详情查看当前任务具体执行情况跳转到任务中心后,直接显示当前执行的任务行
点击查看入口,跳转到任务管理列表,如下:
4.查看结果
3.5.4 OLAP算法任务
Hubble上暂未提供可视化的OLAP算法执行,可调用RESTful API进行OLAP类算法任务,在任务管理中通过ID找到相应任务,查看进度与结果等。
3.5.5 删除元数据、重建索引
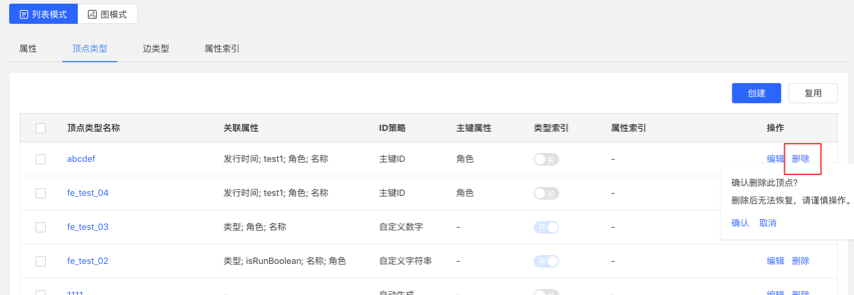
1.创建任务
- 在元数据建模模块中,删除元数据时,可建立删除元数据的异步任务
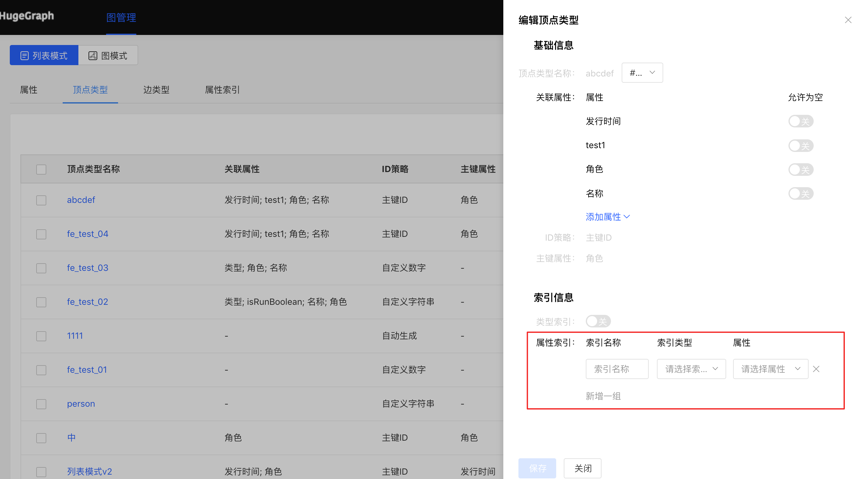
- 在编辑已有的顶点/边类型操作中,新增索引时,可建立创建索引的异步任务
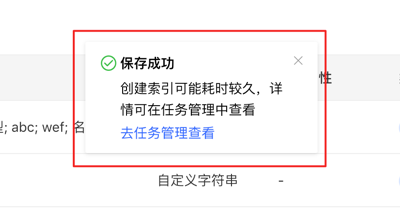
2.任务详情
3.1 - HugeGraph-Computer Quick Start
1 HugeGraph-Computer 概述
HugeGraph-Computer 是分布式图处理系统 (OLAP). 它是 Pregel 的一个实现. 它可以运行在 Kubernetes 上。
特性
- 支持分布式MPP图计算,集成HugeGraph作为图输入输出存储。
- 算法基于BSP(Bulk Synchronous Parallel)模型,通过多次并行迭代进行计算,每一次迭代都是一次超步。
- 自动内存管理。该框架永远不会出现 OOM(内存不足),因为如果它没有足够的内存来容纳所有数据,它会将一些数据拆分到磁盘。
- 边的部分或超级节点的消息可以在内存中,所以你永远不会丢失它。
- 您可以从 HDFS 或 HugeGraph 或任何其他系统加载数据。
- 您可以将结果输出到 HDFS 或 HugeGraph,或任何其他系统。
- 易于开发新算法。您只需要像在单个服务器中一样专注于仅顶点处理,而不必担心消息传输和内存存储管理。
2 开始
要使用 HugeGraph-Computer 运行算法,您需要安装 64 位 JREJDK 11 或更高版本。
还需要首先部署 HugeGraph-Server 和 Etcd.
有两种方式可以获取 HugeGraph-Computer:
2.1 Download the compiled archive
下载最新版本的 HugeGraph-Computer release 包:
wget https://github.com/apache/hugegraph-computer/releases/download/v${version}/hugegraph-loader-${version}.tar.gz
tar zxvf hugegraph-computer-${version}.tar.gz
2.2 Clone source code to compile and package
克隆最新版本的 HugeGraph-Computer 源码包:
$ git clone https://github.com/apache/hugegraph-computer.git
编译生成tar包:
cd hugegraph-computer
mvn clean package -DskipTests
2.3 启动 master 节点
您可以使用 -c 参数指定配置文件, 更多computer 配置请看: Computer Config Options
cd hugegraph-computer-${version}
bin/start-computer.sh -d local -r master
2.4 启动 worker 节点
bin/start-computer.sh -d local -r worker
2.5 查询算法结果
2.5.1 为 server 启用 OLAP 索引查询
如果没有启用OLAP索引,则需要启用, 更多参考: modify-graphs-read-mode
PUT http://localhost:8080/graphs/hugegraph/graph_read_mode

"ALL"
2.5.2 查询 page_rank 属性值:
curl "http://localhost:8080/graphs/hugegraph/graph/vertices?page&limit=3" | gunzip
要使用 HugeGraph-Computer 运行算法,您需要先部署 HugeGraph-Server
2.2.1 安装 HugeGraph-Computer CRD
# Kubernetes version >= v1.16
kubectl apply -f https://raw.githubusercontent.com/apache/hugegraph-computer/master/computer-k8s-operator/manifest/hugegraph-computer-crd.v1.yaml

# Kubernetes version < v1.16
kubectl apply -f https://raw.githubusercontent.com/apache/hugegraph-computer/master/computer-k8s-operator/manifest/hugegraph-computer-crd.v1beta1.yaml
2.2.2 显示 CRD
kubectl get crd

NAME                                        CREATED AT
hugegraphcomputerjobs.hugegraph.apache.org   2021-09-16T08:01:08Z
2.2.3 安装 hugegraph-computer-operator&etcd-server
kubectl apply -f https://raw.githubusercontent.com/apache/hugegraph-computer/master/computer-k8s-operator/manifest/hugegraph-computer-operator.yaml
2.2.4 等待 hugegraph-computer-operator&etcd-server 部署完成
kubectl get pod -n hugegraph-computer-operator-system

NAME                                                              READY   STATUS    RESTARTS   AGE
hugegraph-computer-operator-controller-manager-58c5545949-jqvzl   1/1     Running   0          15h
hugegraph-computer-operator-etcd-28lm67jxk5                       1/1     Running   0          15h
2.2.5 提交作业
更多 computer crd spec 请看: Computer CRD
更多 Computer 配置请看: Computer Config Options
cat <<EOF | kubectl apply --filename -
apiVersion: hugegraph.apache.org/v1
kind: HugeGraphComputerJob
metadata:
  namespace: hugegraph-computer-system
  name: &jobName pagerank-sample
spec:
  jobId: *jobName
  algorithmName: page_rank
  image: hugegraph/hugegraph-computer:latest # algorithm image url
  jarFile: /hugegraph/hugegraph-computer/algorithm/builtin-algorithm.jar # algorithm jar path
  pullPolicy: Always
  workerCpu: "4"
  workerMemory: "4Gi"
  workerInstances: 5
  computerConf:
    job.partitions_count: "20"
    algorithm.params_class: org.apache.hugegraph.computer.algorithm.centrality.pagerank.PageRankParams
    hugegraph.url: http://${hugegraph-server-host}:${hugegraph-server-port} # hugegraph server url
    hugegraph.name: hugegraph # hugegraph graph name
EOF
2.2.6 显示作业
kubectl get hcjob/pagerank-sample -n hugegraph-computer-system

NAME               JOBID              JOBSTATUS
pagerank-sample    pagerank-sample    RUNNING
2.2.7 显示节点日志
# Show the master log
kubectl logs -l component=pagerank-sample-master -n hugegraph-computer-system

# Show the worker log
kubectl logs -l component=pagerank-sample-worker -n hugegraph-computer-system

# Show diagnostic log of a job
# 注意: 诊断日志仅在作业失败时存在,并且只会保存一小时。
kubectl get event --field-selector reason=ComputerJobFailed --field-selector involvedObject.name=pagerank-sample -n hugegraph-computer-system
2.2.8 显示作业的成功事件
NOTE: it will only be saved for one hour
kubectl get event --field-selector reason=ComputerJobSucceed --field-selector involvedObject.name=pagerank-sample -n hugegraph-computer-system
2.2.9 查询算法结果
如果输出到 Hugegraph-Server 则与 Locally 模式一致,如果输出到 HDFS ,请检查 hugegraph-computerresults{jobId}目录下的结果文件。
3 内置算法文档
3.1 支持的算法列表:
中心性算法:
- PageRank
- BetweennessCentrality
- ClosenessCentrality
- DegreeCentrality
社区算法:
- ClusteringCoefficient
- Kcore
- Lpa
- TriangleCount
- Wcc
路径算法:
- RingsDetection
- RingsDetectionWithFilter
更多算法请看: Built-In algorithms
3.2 算法描述
TODO
4 算法开发指南
TODO
4.1 - HugeGraph-Client Quick Start
1 HugeGraph-Client概述
HugeGraph-Client向HugeGraph-Server发出HTTP请求,获取并解析Server的执行结果。目前仅提供了Java版,用户可以使用HugeGraph-Client编写Java代码操作HugeGraph,比如元数据和图数据的增删改查,或者执行gremlin语句。
2 环境要求
3 使用流程
使用HugeGraph-Client的基本步骤如下:
- 新建Eclipse/ IDEA Maven项目;
- 在pom文件中添加HugeGraph-Client依赖;
- 创建类,调用HugeGraph-Client接口;
详细使用过程见下节完整示例。
4 完整示例
4.1 新建Maven工程
可以选择Eclipse或者Intellij Idea创建工程:
4.2 添加hugegraph-client依赖
添加hugegraph-client依赖
<dependencies>
    <dependency>
        <groupId>com.baidu.hugegraph</groupId>
        <artifactId>hugegraph-client</artifactId>
        <version>${version}</version>
    </dependency>
</dependencies>
4.3 Example
4.3.1 SingleExample
import java.io.IOException;
import java.util.Iterator;
import java.util.List;

import com.baidu.hugegraph.driver.GraphManager;
import com.baidu.hugegraph.driver.GremlinManager;
import com.baidu.hugegraph.driver.HugeClient;
import com.baidu.hugegraph.driver.SchemaManager;
import com.baidu.hugegraph.structure.constant.T;
import com.baidu.hugegraph.structure.graph.Edge;
import com.baidu.hugegraph.structure.graph.Path;
import com.baidu.hugegraph.structure.graph.Vertex;
import com.baidu.hugegraph.structure.gremlin.Result;
import com.baidu.hugegraph.structure.gremlin.ResultSet;

public class SingleExample {

    public static void main(String[] args) throws IOException {
        // If connect failed will throw a exception.
        HugeClient hugeClient = HugeClient.builder("http://localhost:8080",
                                                   "hugegraph")
                                          .build();

        SchemaManager schema = hugeClient.schema();

        schema.propertyKey("name").asText().ifNotExist().create();
        schema.propertyKey("age").asInt().ifNotExist().create();
        schema.propertyKey("city").asText().ifNotExist().create();
        schema.propertyKey("weight").asDouble().ifNotExist().create();
        schema.propertyKey("lang").asText().ifNotExist().create();
        schema.propertyKey("date").asDate().ifNotExist().create();
        schema.propertyKey("price").asInt().ifNotExist().create();

        schema.vertexLabel("person")
              .properties("name", "age", "city")
              .primaryKeys("name")
              .ifNotExist()
              .create();

        schema.vertexLabel("software")
              .properties("name", "lang", "price")
              .primaryKeys("name")
              .ifNotExist()
              .create();

        schema.indexLabel("personByCity")
              .onV("person")
              .by("city")
              .secondary()
              .ifNotExist()
              .create();

        schema.indexLabel("personByAgeAndCity")
              .onV("person")
              .by("age", "city")
              .secondary()
              .ifNotExist()
              .create();

        schema.indexLabel("softwareByPrice")
              .onV("software")
              .by("price")
              .range()
              .ifNotExist()
              .create();

        schema.edgeLabel("knows")
              .sourceLabel("person")
              .targetLabel("person")
              .properties("date", "weight")
              .ifNotExist()
              .create();

        schema.edgeLabel("created")
              .sourceLabel("person").targetLabel("software")
              .properties("date", "weight")
              .ifNotExist()
              .create();

        schema.indexLabel("createdByDate")
              .onE("created")
              .by("date")
              .secondary()
              .ifNotExist()
              .create();

        schema.indexLabel("createdByWeight")
              .onE("created")
              .by("weight")
              .range()
              .ifNotExist()
              .create();

        schema.indexLabel("knowsByWeight")
              .onE("knows")
              .by("weight")
              .range()
              .ifNotExist()
              .create();

        GraphManager graph = hugeClient.graph();
        Vertex marko = graph.addVertex(T.label, "person", "name", "marko",
                                       "age", 29, "city", "Beijing");
        Vertex vadas = graph.addVertex(T.label, "person", "name", "vadas",
                                       "age", 27, "city", "Hongkong");
        Vertex lop = graph.addVertex(T.label, "software", "name", "lop",
                                     "lang", "java", "price", 328);
        Vertex josh = graph.addVertex(T.label, "person", "name", "josh",
                                      "age", 32, "city", "Beijing");
        Vertex ripple = graph.addVertex(T.label, "software", "name", "ripple",
                                        "lang", "java", "price", 199);
        Vertex peter = graph.addVertex(T.label, "person", "name", "peter",
                                       "age", 35, "city", "Shanghai");

        marko.addEdge("knows", vadas, "date", "2016-01-10", "weight", 0.5);
        marko.addEdge("knows", josh, "date", "2013-02-20", "weight", 1.0);
        marko.addEdge("created", lop, "date", "2017-12-10", "weight", 0.4);
        josh.addEdge("created", lop, "date", "2009-11-11", "weight", 0.4);
        josh.addEdge("created", ripple, "date", "2017-12-10", "weight", 1.0);
        peter.addEdge("created", lop, "date", "2017-03-24", "weight", 0.2);

        GremlinManager gremlin = hugeClient.gremlin();
        System.out.println("==== Path ====");
        ResultSet resultSet = gremlin.gremlin("g.V().outE().path()").execute();
        Iterator<Result> results = resultSet.iterator();
        results.forEachRemaining(result -> {
            System.out.println(result.getObject().getClass());
            Object object = result.getObject();
            if (object instanceof Vertex) {
                System.out.println(((Vertex) object).id());
            } else if (object instanceof Edge) {
                System.out.println(((Edge) object).id());
            } else if (object instanceof Path) {
                List<Object> elements = ((Path) object).objects();
                elements.forEach(element -> {
                    System.out.println(element.getClass());
                    System.out.println(element);
                });
            } else {
                System.out.println(object);
            }
        });

        hugeClient.close();
    }
}
4.3.2 BatchExample
import java.util.ArrayList;
import java.util.List;

import com.baidu.hugegraph.driver.GraphManager;
import com.baidu.hugegraph.driver.HugeClient;
import com.baidu.hugegraph.driver.SchemaManager;
import com.baidu.hugegraph.structure.graph.Edge;
import com.baidu.hugegraph.structure.graph.Vertex;

public class BatchExample {

    public static void main(String[] args) {
        // If connect failed will throw a exception.
        HugeClient hugeClient = HugeClient.builder("http://localhost:8080",
                                                   "hugegraph")
                                          .build();

        SchemaManager schema = hugeClient.schema();

        schema.propertyKey("name").asText().ifNotExist().create();
        schema.propertyKey("age").asInt().ifNotExist().create();
        schema.propertyKey("lang").asText().ifNotExist().create();
        schema.propertyKey("date").asDate().ifNotExist().create();
        schema.propertyKey("price").asInt().ifNotExist().create();

        schema.vertexLabel("person")
              .properties("name", "age")
              .primaryKeys("name")
              .ifNotExist()
              .create();

        schema.vertexLabel("person")
              .properties("price")
              .nullableKeys("price")
              .append();

        schema.vertexLabel("software")
              .properties("name", "lang", "price")
              .primaryKeys("name")
              .ifNotExist()
              .create();

        schema.indexLabel("softwareByPrice")
              .onV("software").by("price")
              .range()
              .ifNotExist()
              .create();

        schema.edgeLabel("knows")
              .link("person", "person")
              .properties("date")
              .ifNotExist()
              .create();

        schema.edgeLabel("created")
              .link("person", "software")
              .properties("date")
              .ifNotExist()
              .create();

        schema.indexLabel("createdByDate")
              .onE("created").by("date")
              .secondary()
              .ifNotExist()
              .create();

        // get schema object by name
        System.out.println(schema.getPropertyKey("name"));
        System.out.println(schema.getVertexLabel("person"));
        System.out.println(schema.getEdgeLabel("knows"));
        System.out.println(schema.getIndexLabel("createdByDate"));

        // list all schema objects
        System.out.println(schema.getPropertyKeys());
        System.out.println(schema.getVertexLabels());
        System.out.println(schema.getEdgeLabels());
        System.out.println(schema.getIndexLabels());

        GraphManager graph = hugeClient.graph();

        Vertex marko = new Vertex("person").property("name", "marko")
                                           .property("age", 29);
        Vertex vadas = new Vertex("person").property("name", "vadas")
                                           .property("age", 27);
        Vertex lop = new Vertex("software").property("name", "lop")
                                           .property("lang", "java")
                                           .property("price", 328);
        Vertex josh = new Vertex("person").property("name", "josh")
                                          .property("age", 32);
        Vertex ripple = new Vertex("software").property("name", "ripple")
                                              .property("lang", "java")
                                              .property("price", 199);
        Vertex peter = new Vertex("person").property("name", "peter")
                                           .property("age", 35);

        Edge markoKnowsVadas = new Edge("knows").source(marko).target(vadas)
                                                .property("date", "2016-01-10");
        Edge markoKnowsJosh = new Edge("knows").source(marko).target(josh)
                                               .property("date", "2013-02-20");
        Edge markoCreateLop = new Edge("created").source(marko).target(lop)
                                                 .property("date",
                                                           "2017-12-10");
        Edge joshCreateRipple = new Edge("created").source(josh).target(ripple)
                                                   .property("date",
                                                             "2017-12-10");
        Edge joshCreateLop = new Edge("created").source(josh).target(lop)
                                                .property("date", "2009-11-11");
        Edge peterCreateLop = new Edge("created").source(peter).target(lop)
                                                 .property("date",
                                                           "2017-03-24");

        List<Vertex> vertices = new ArrayList<>();
        vertices.add(marko);
        vertices.add(vadas);
        vertices.add(lop);
        vertices.add(josh);
        vertices.add(ripple);
        vertices.add(peter);

        List<Edge> edges = new ArrayList<>();
        edges.add(markoKnowsVadas);
        edges.add(markoKnowsJosh);
        edges.add(markoCreateLop);
        edges.add(joshCreateRipple);
        edges.add(joshCreateLop);
        edges.add(peterCreateLop);

        vertices = graph.addVertices(vertices);
        vertices.forEach(vertex -> System.out.println(vertex));

        edges = graph.addEdges(edges, false);
        edges.forEach(edge -> System.out.println(edge));

        hugeClient.close();
    }
}
4.4 运行Example
运行Example之前需要启动Server, 启动过程见HugeGraph-Server Quick Start
4.5 Example示例说明
示例说明见HugeGraph-Client基本API介绍