This is the multi-page printable view of this section. .
Contribution Guidelines
1 - How to Contribute to HugeGraph
Thanks for taking the time to contribute! As an open source project, HugeGraph is looking forward to be contributed from everyone, and we are also grateful to all the contributors.
The following is a contribution guide for HugeGraph:
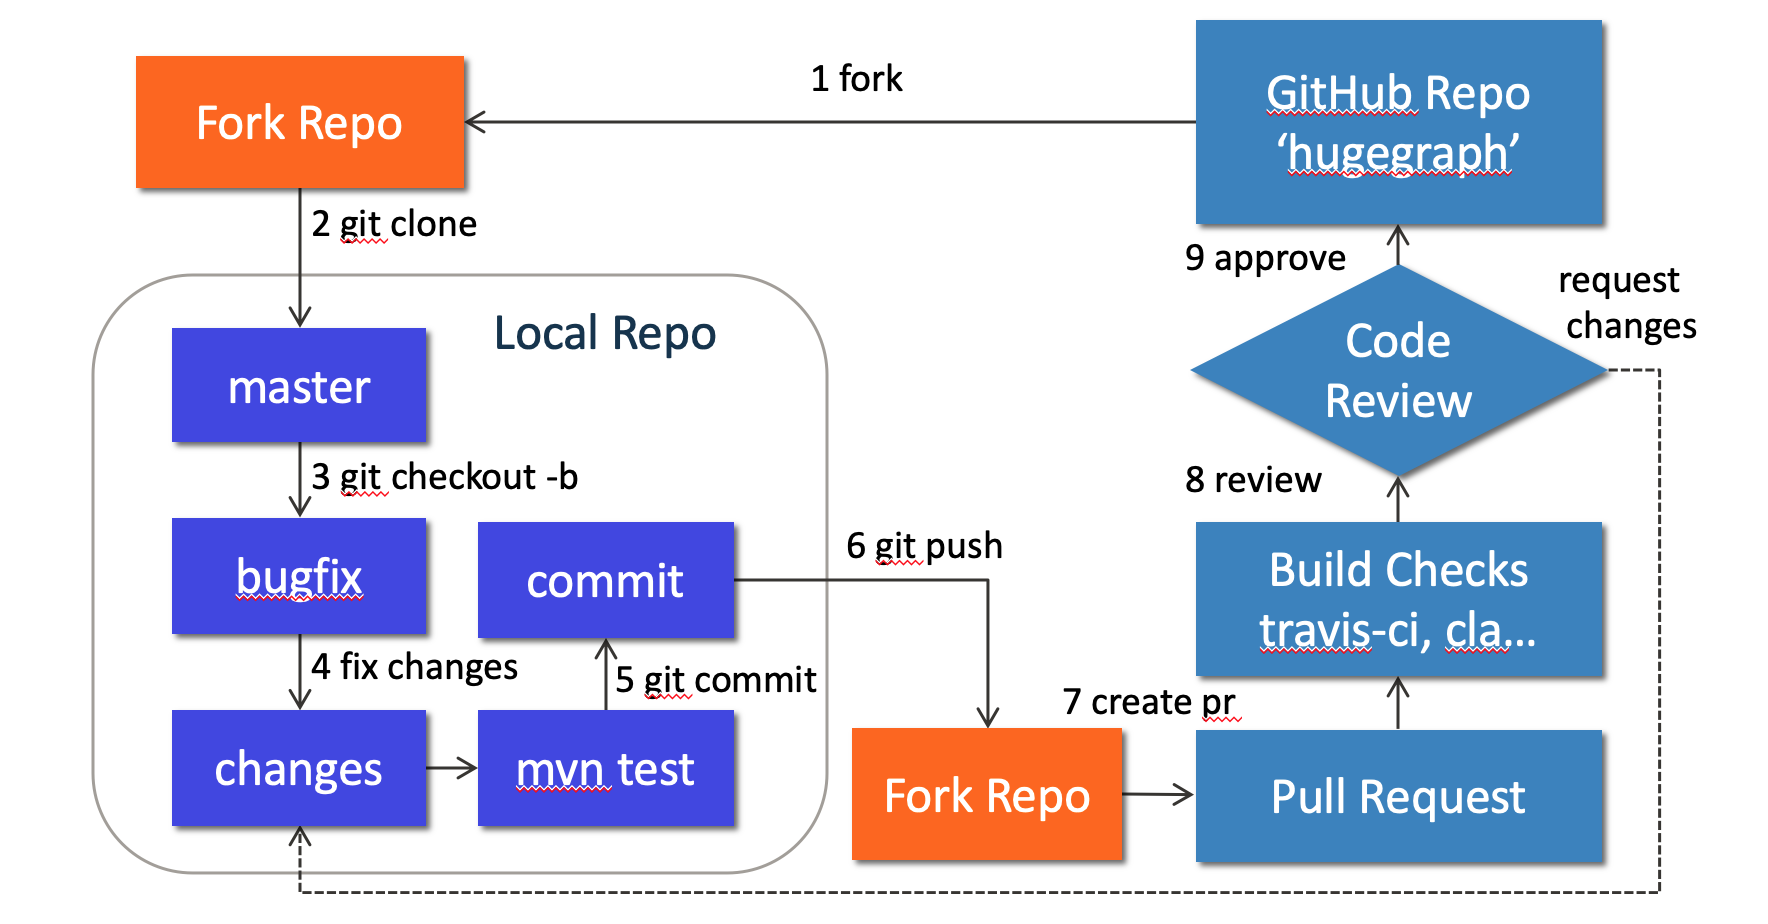 {width=“884” height=“462”}
1. Preparation
Optional: You can use GitHub desktop to greatly simplify the commit and update process.
We can contribute by reporting issues, submitting code patches or any other feedback.
Before submitting the code, we need to do some preparation:
Sign up or login to GitHub: https://github.com
Fork HugeGraph repo from GitHub: https://github.com/apache/incubator-hugegraph/fork
Clone code from fork repo to local: https://github.com/${GITHUB_USER_NAME}/hugegraph
Configure local HugeGraph repo
2. Create an Issue on GitHub
If you encounter bugs or have any questions, please go to GitHub Issues to report them and feel free to create an issue.
3. Make changes of code locally
3.1 Create a new branch
Please don’t use master branch for development. We should create a new branch instead:
3.2 Change the code
Assume that we need to modify some files like “HugeGraph.java” and “HugeFactory.java”:
Note: In order to be consistent with the code style easily, if you use IDEA as your IDE, you can directly import our code style configuration file.
3.2.1 Check licenses
If we want to add new third-party dependencies to the HugeGraph project, we need to do the following things:
- Find the third-party dependent repository, put the dependent
licensefile into ./hugegraph-dist/release-docs/licenses/ path. - Declare the dependency in ./hugegraph-dist/release-docs/LICENSE
LICENSEinformation. - Find the NOTICE file in the repository and append it to ./hugegraph-dist/release-docs/NOTICE file (skip this step if there is no NOTICE file).
- Execute locally ./hugegraph-dist/scripts/dependency/regenerate_known_dependencies.sh to update the dependency list known-dependencies.txt (or manually update) .
Example: A new third-party dependency is introduced into the project -> ant-1.9.1.jar
- The project source code is located at: https://github.com/apache/ant/tree/rel/1.9.1
- LICENSE file: https://github.com/apache/ant/blob/rel/1.9.1/LICENSE
- NOTICE file: https://github.com/apache/ant/blob/rel/1.9.1/NOTICE
The license information of ant-1.9.1.jar needs to be specified in the LICENSE file, and the notice information needs to be specified in the NOTICE file. The detailed LICENSE file corresponding to ant-1.9.1.jar needs to be copied to our licenses/ directory. Finally update the known-dependencies.txt file.
3.3 Commit changes to git repo
After the code has been completed, we submit them to the local git repo:
Please edit the commit message after running git commit, we can explain what and how to fix a bug or implement a feature, the following is an example:
Please remember to fill in the issue id, which was generated by GitHub after issue creation.
3.4 Push commit to GitHub fork repo
Push the local commit to GitHub fork repo:
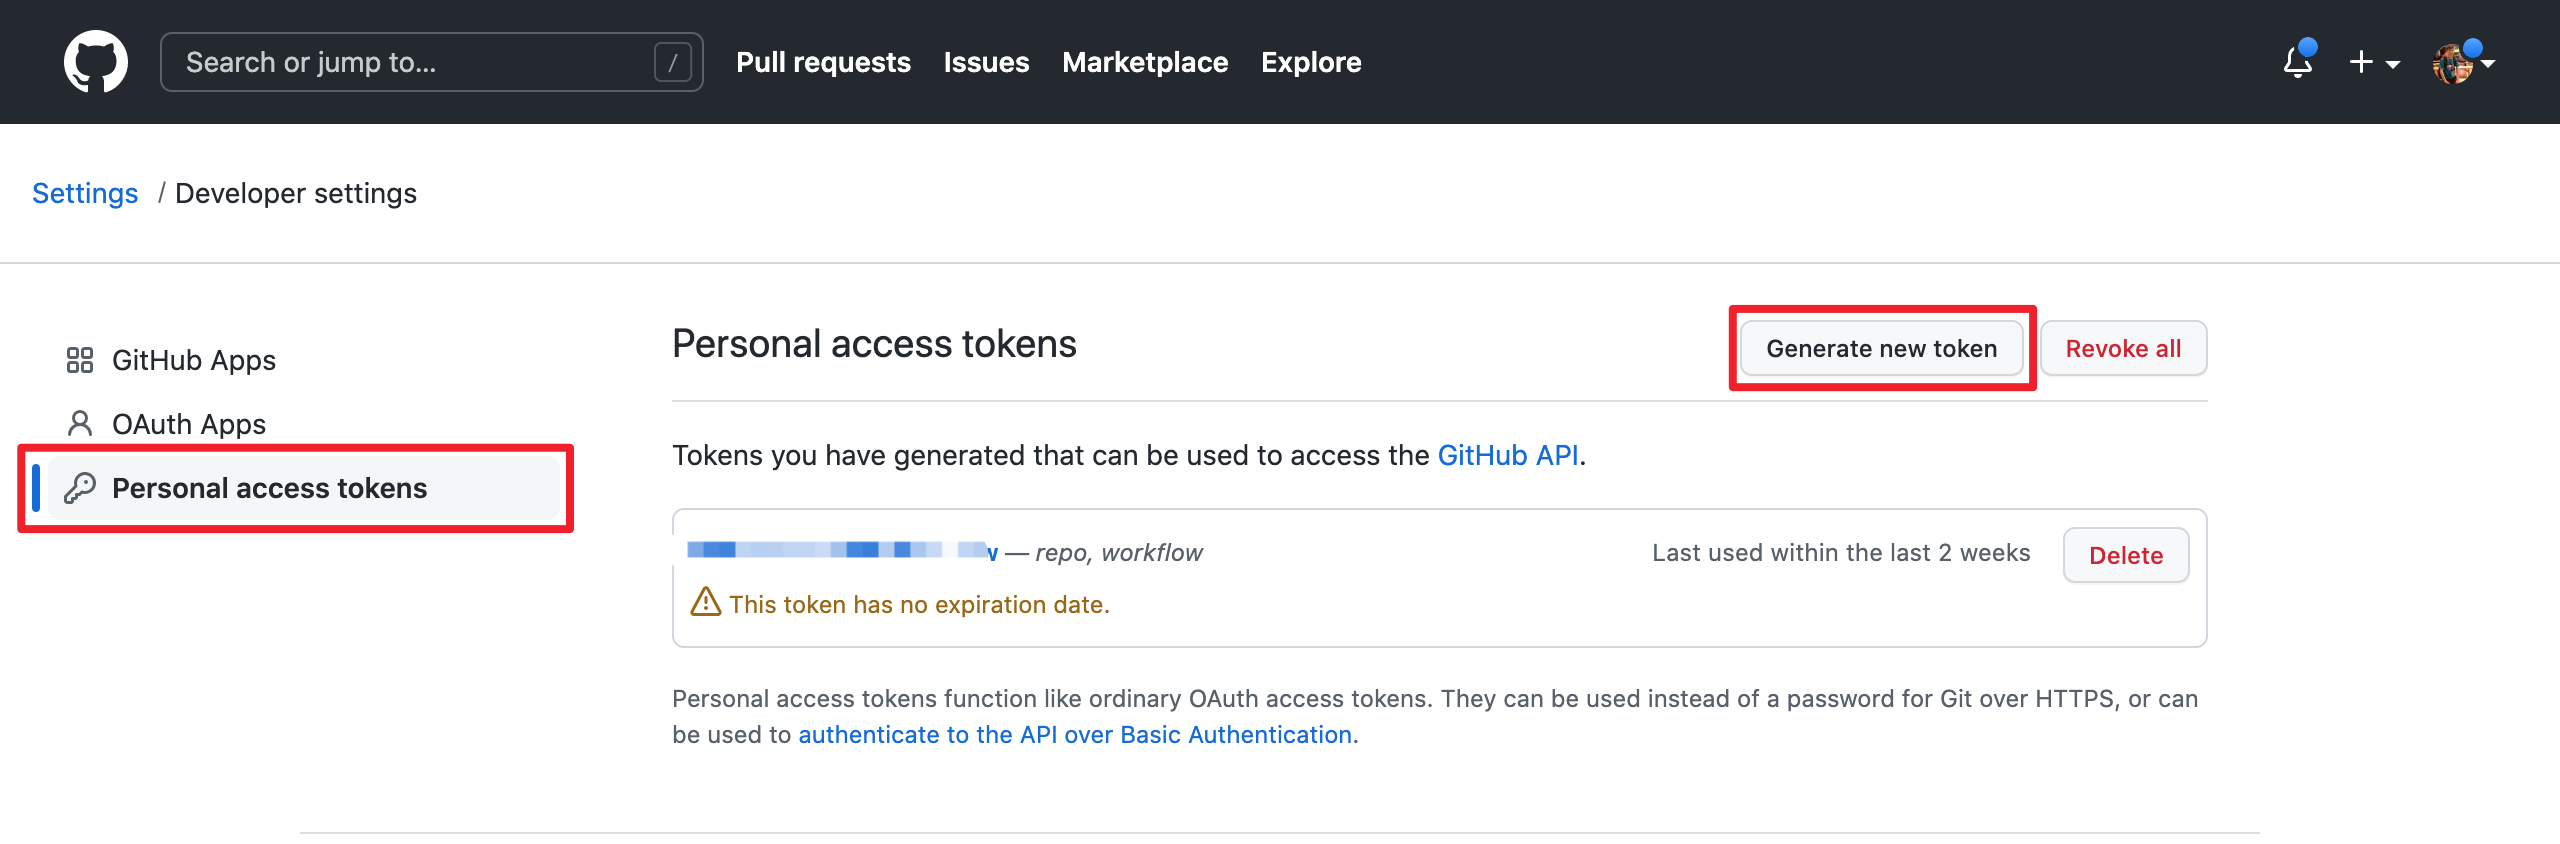
Note that since GitHub requires submitting code through username + token (instead of using username + password directly), you need to create a GitHub token from https://github.com/settings/tokens:
 {width=“1280” height=“422”}
4. Create a Pull Request
Go to the web page of GitHub fork repo, there would be a chance to create a Pull Request after pushing to a new branch, just click button “Compare & pull request” to do it. Then edit the description for proposed changes, which can just be copied from the commit message.
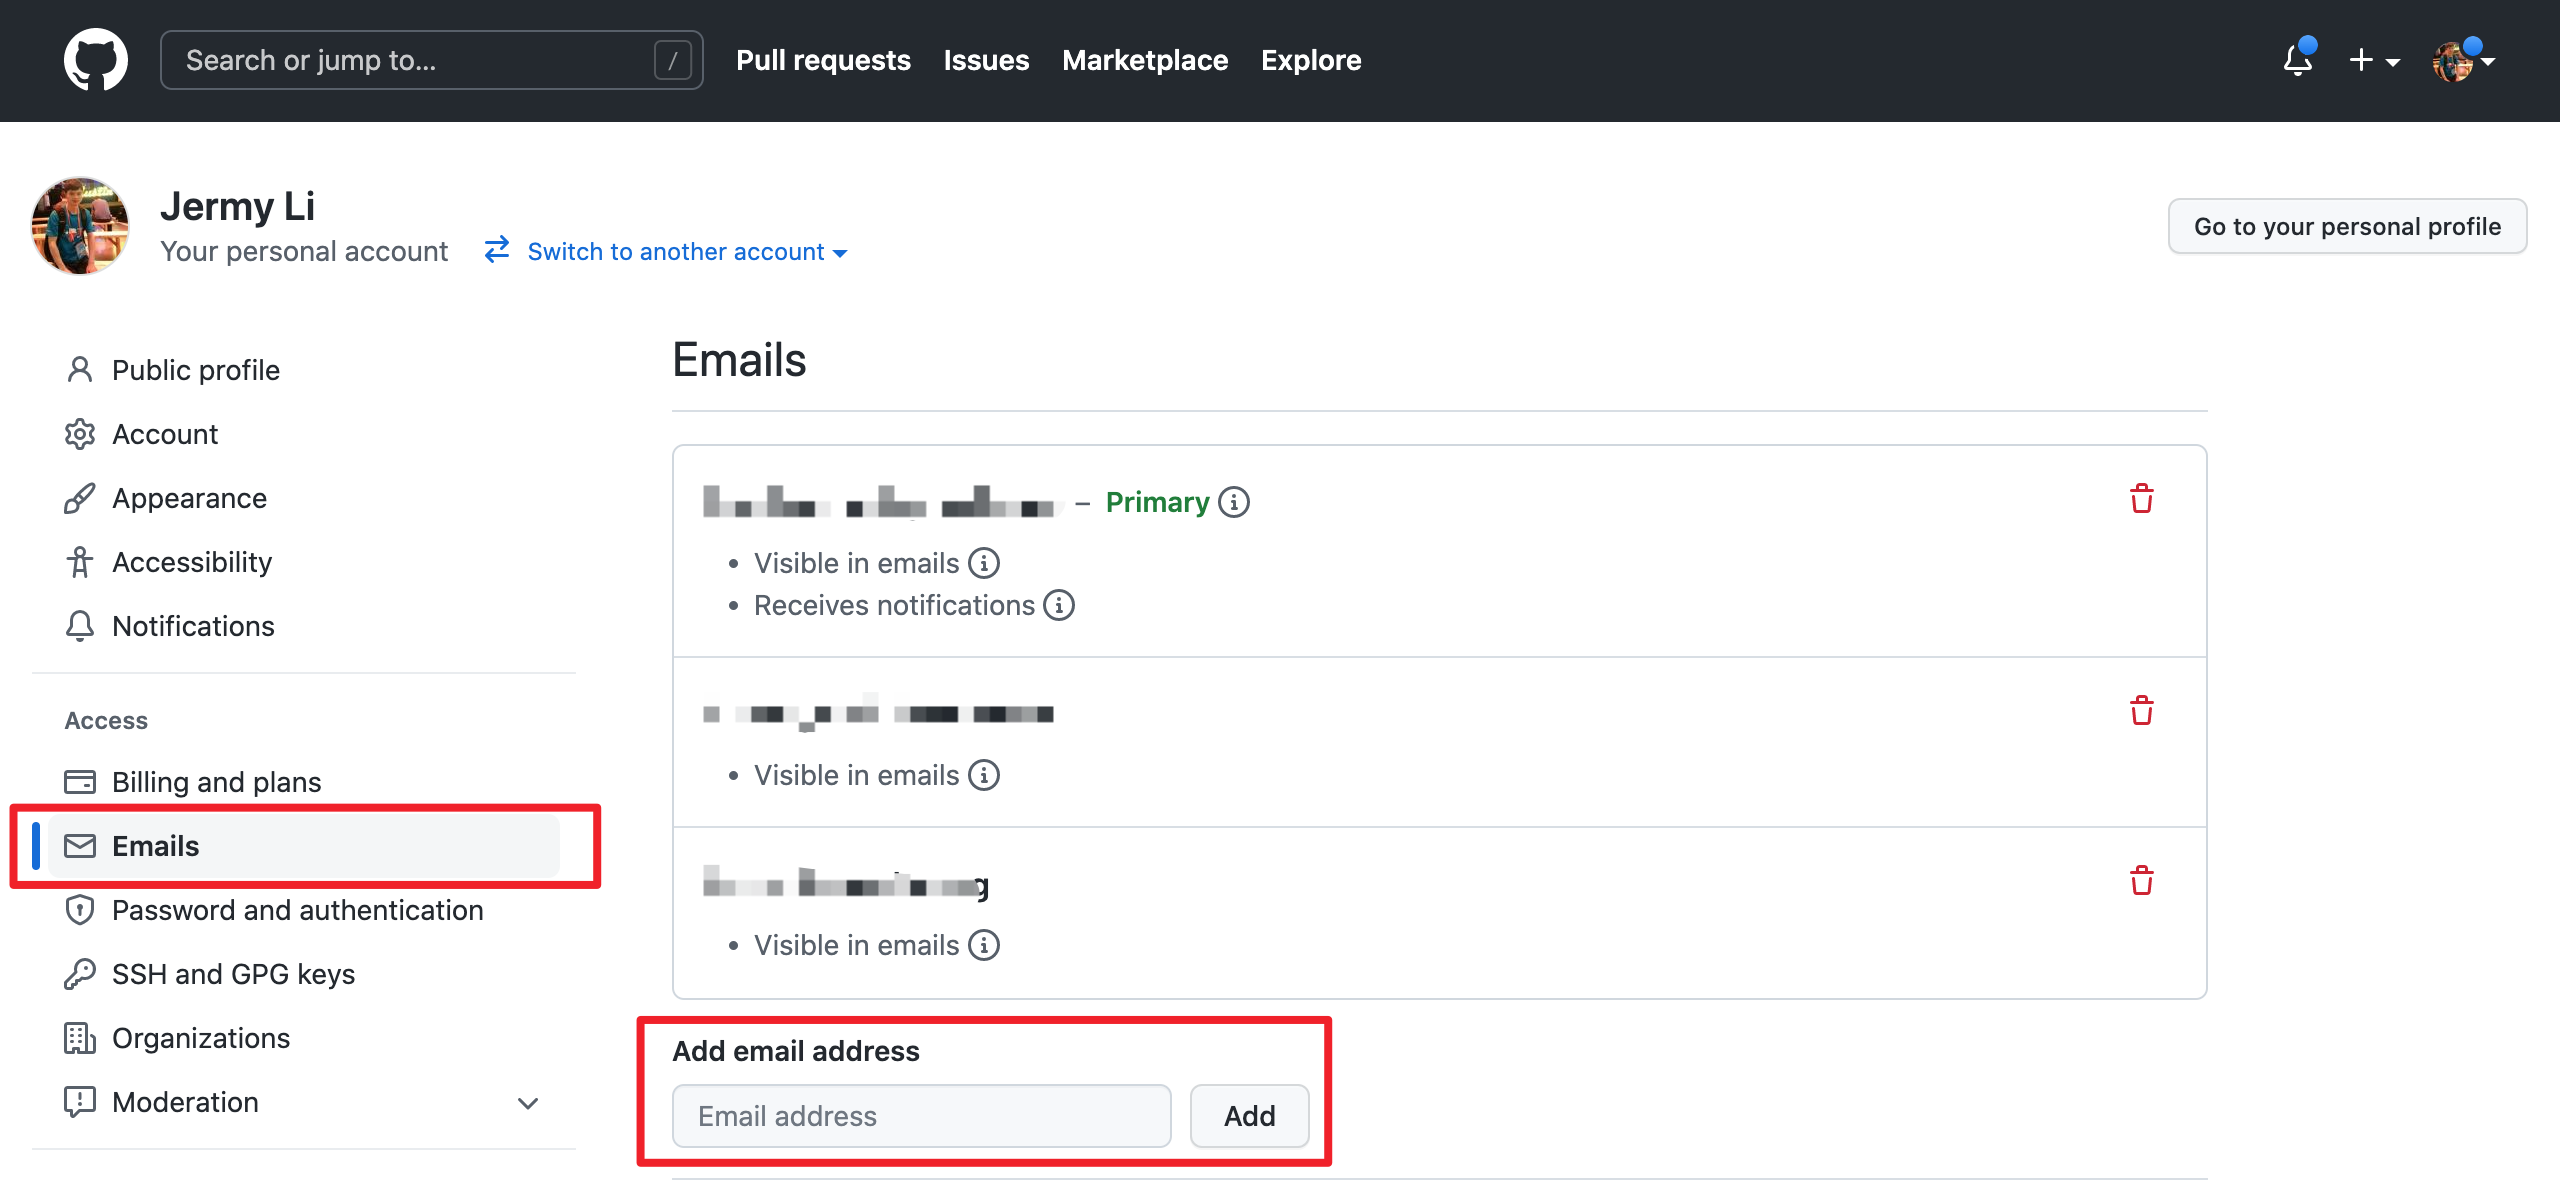
Note: please make sure the email address you used to submit the code is bound to the GitHub account. For how to bind the email address, please refer to https://github.com/settings/emails:
 {width=“1280” height=“592”}
5. Code review
Maintainers will start the code review after all the automatic checks are passed:
- Check: Contributor License Agreement is signed
- Check: Travis CI builds is passed (automatically Test and Deploy)
The commit will be accepted and merged if there is no problem after review.
Please click on “Details” to find the problem if any check does not pass.
If there are checks not passed or changes requested, then continue to modify the code and push again.
6. More changes after review
If we have not passed the review, don’t be discouraged. Usually a commit needs to be reviewed several times before being accepted! Please follow the review comments and make further changes.
After the further changes, we submit them to the local repo:
If there are conflicts that prevent the code from being merged, we need to rebase on master branch:
And push it to GitHub fork repo again:
GitHub will automatically update the Pull Request after we push it, just wait for code review.
2 - Subscribe Mailing Lists
Subscribe the mailing list
Subscribe to the mailing list by following steps:
- Email dev-subscribe@hugegraph.apache.org through your email account, and then you will receive a confirmation email.
- Reply to the confirmation email to confirm your subscription. Then, you will receive another confirmation email.
- Now you are a subscriber of the mailing list. If you have more questions, just email the mailing list and someone will reply to you soon.
You can subscribe to the mailing list anytime you want. Additionally, you can check historical emails / all emails easily (even if you are not subscribing to the list).
Some notes:
- If you don’t receive the confirmation email, please send it after 24 hours later.
- Don’t email to dev until you subscribe to the mailing list successfully (otherwise the mail will be banned).
HugeGraph offers an email list for development and user discussions.
- hugegraph-dev: dev@hugegraph.apache.org for both development and users discussions.
More information on mailing subscribe can be found at:
- https://lists.apache.org/list.html?dev@hugegraph.apache.org
- http://apache.org/foundation/mailinglists.html#subscribing
Unsubscribe Mailing Lists
If you do not need to know what’s going on with HugeGraph, you can unsubscribe from the mailing list.
Unsubscribe from the mailing list steps are as follows:
Email dev-unsubscribe@hugegraph.apache.org with your subscribed email address, subject and content are arbitrary.
Receive confirmation email and reply. After completing step 1, you will receive a confirmation email from dev-help@hugegraph.apache.org (if not received, please confirm whether the email is automatically classified as spam, promotion email, subscription email, etc.) . Then reply directly to the email, or click on the link in the email to reply quickly, the subject and content are arbitrary.
Receive a goodbye email. After completing the above steps, you will receive a goodbye email with the subject GOODBYE from dev@hugegraph.apache.org, and you have successfully unsubscribed to the Apache HugeGraph mailing list, and you will not receive emails from dev@hugegraph.apache.org.
3 - Validate Apache Release
Note: this doc will be updated continuously. You need to use Java11 in runtime verification, we will drop Java8 support from version 1.5.0 (And currently doesn’t support Java17)
Verification
When the internal temporary release and packaging work is completed, other community developers ( especially PMC) need to participate in the verification link To ensure the “correctness + completeness” of someone’s published version, here requires **everyone ** to participate as much as possible, and then explain which items you have checked in the subsequent email reply.(The following are the core items)
1. prepare
If there is no svn or gpg or wget environment locally, it is recommended to install it first
(windows recommend using WSL2 environment, or at least git-bash), also make sure to install java
(prefer Java 11) and maven software
2. check hash value
First you need to check the file integrity of the source + binary package, Verify by shasum to
ensure that it is consistent with the hash value published on apache/GitHub (Usually sha512), Here
is the same as the last step of 0x02 inspection.
3. check gpg signature
This is to ensure that the published package is uploaded by a reliable person. Assuming tom signs and uploads, others should download A’s public key and then perform signature confirmation.
Related commands:
First confirm the overall integrity/consistency, and then confirm the specific content (key)
4. Check the archive contents
Check the contents of the archive downloaded from preparation work. Divided into two aspects: source code package + binary package, The source code package is stricter, it can be said that the core part (Because it is longer, For a complete list refer to the official Wiki)
A. source package
After decompressing *hugegraph*src.tar.gz, Do the following checks:
- folders with
incubating, and no empty files/folders LICENSE+NOTICE+DISCLAIMfile exists and the content is normal- does not exist binaries (without LICENSE)
- The source code files all contain the standard
ASF Licenseheader (this could be done with theMaven-MATplugin) - Check whether the
pom.xmlversion number of each parent/child module is consistent (and meet expectations) - Finally, make sure the source code works/compiles correctly
B. binary package
After decompressing xxx-hugegraph.tar.gz, perform the following checks:
- folders with
incubating LICENSEandNOTICEfile exists and the content is normal- start server
Note: If a third-party dependency is introduced in the binary package, you need to update the LICENSE and add the third-party dependent LICENSE; if the third-party dependent LICENSE is Apache 2.0, and the corresponding project contains NOTICE, you also need to update Our NOTICE file
5. Check the official website and GitHub and other pages
- Make sure that the official website at least meets apache website check, and no circular links, etc.
- Update download link and release notes updated
- …
Mail Template
After the check & test, you should reply to the mail with the following content: (normal devs & PMC)
and the PMC members should reply with binding, it’s important for summary the valid votes:
4 - Setup Server in IDEA (Dev)
NOTE: The following configuration is for reference purposes only, and has been tested on Linux and macOS platforms based on this version.
Background
The Quick Start section provides instructions on how to start and stop HugeGraph-Server using scripts. In this guide, we will explain how to run and debug HugeGraph-Server on the Linux platform using IntelliJ IDEA.
The core steps for local startup are the same as starting with scripts:
- Initialize the database backend by executing the
InitStoreclass to initialize the graph. - Start HugeGraph-Server by executing the
HugeGraphServerclass to load the initialized graph information and start the server.
Before proceeding with the following process, make sure that you have cloned the source code of HugeGraph
and have configured the development environment, such as Java 11 & you could config your local environment
with this config-doc
Steps
1. Copy Configuration Files
To avoid the impact of configuration file changes on Git tracking, it is recommended to copy the required configuration files to a separate folder. Run the following command to copy the files:
Replace path-to-your-directory with the path to the directory where you want to copy the files.
2. Configure InitStore to initialize the graph
First, you need to configure the database backend in the configuration files. In this example, we will use RocksDB. Open path-to-your-directory/conf/graphs/hugegraph.properties and configure it as follows:
Next, open the Run/Debug Configurations panel in IntelliJ IDEA and create a new Application configuration. Follow these steps for the configuration:
- Select
hugegraph-distas theUse classpath of module. - Set the
Main classtoorg.apache.hugegraph.cmd.InitStore. - Set the program arguments to
conf/rest-server.properties. Note that the path here is relative to the working directory, so make sure to set the working directory topath-to-your-directory.
If user authentication (authenticator) is configured for HugeGraph-Server in the Java 11 environment, you need to refer to the script configuration in the binary package and add the following VM options:
Otherwise, an error will occur:
Once the configuration is completed, run it. If the execution is successful, the following runtime logs will be displayed:
3. Running HugeGraphServer
Similarly, open the Run/Debug Configurations panel in IntelliJ IDEA and create a new Application configuration. Follow these steps for the configuration:
- Select
hugegraph-distas theUse classpath of module. - Set the
Main classtoorg.apache.hugegraph.dist.HugeGraphServer. - Set the program arguments to
conf/gremlin-server.yaml conf/rest-server.properties. Similarly, note that the path here is relative to the working directory, so make sure to set the working directory topath-to-your-directory.
Similarly, if user authentication (authenticator) is configured for HugeGraph-Server in the Java 11 environment, you need to refer to the script configuration in the binary package and add the following VM options:
Otherwise, an error will occur:
Once the configuration is completed, run it. If you see the following logs, it means that HugeGraphServer has been successfully started:
4. Debugging HugeGraphServer (optional)
After completing the above configuration, you can try debugging HugeGraphServer. Run HugeGraphServer in debug mode and set a breakpoint at the following location:
Then use the RESTful API to request HugeGraphServer:
At this point, you can view detailed variable information in the debugger.
5. Log4j2 Configuration
By default, when running InitStore and HugeGraphServer, the Log4j2 configuration file path read is hugegraph-dist/src/main/resources/log4j2.xml, not path-to-your-directory/conf/log4j2.xml. This configuration file is read when starting HugeGraph-Server using the script.
To avoid maintaining two separate configuration files, you can modify the Log4j2 configuration file path when running and debugging HugeGraph-Server in IntelliJ IDEA:
- Open the previously created
Applicationconfiguration. - Click on
Modify options-Add VM options. - Set the VM options to
-Dlog4j.configurationFile=conf/log4j2.xml.
Possible Issues
1. java: package sun.misc does not exist
The reason may be that cross-compilation is triggered when using Java 11 to compile, causing the symbol of sun.misc.Unsafe used in the project to not be found. There are two possible solutions:
- In IntelliJ IDEA, go to
Preferences/Settingsand find theJava Compilerpanel. Then, disable the--releaseoption (recommended). - Set the Project SDK to 8 (Deprecated soon).
2. java: *.store.raft.rpc.RaftRequests does not exist (RPC Generated Files)
The reason is that the source code didn’t include the RPC-generated files. You could try 2 ways to fix it:
- [CMD]
mvn clean compilein the root directory (Recommend) - [UI] right click on the
hugegraphrepo and selectMaven->Generate Sources and Update Folders. This will rebuild the repo and correctly generate the required files.
3. Unable to Print Location Information (%l) in Log4j2
This is because Log4j2 uses asynchronous loggers. You can refer to the official documentation for configuration details.
References
5 - Apache HugeGraph Committer Guide
This document outlines the requirements and process for becoming an Apache Committer. The corresponding ASF official document can be found at: https://community.apache.org/newcommitter.html
Candidate Requirements
- Candidates must adhere to the Apache Code of Conduct.
- PMC members will assess candidates’ interactions with others and contributions through mailing lists, issues, pull requests, and official documentation.
- Considerations for evaluating candidates as potential Committers include:
- Ability to collaborate with community members
- Mentorship capabilities
- Community involvement
- Level of contribution
- Personal skills/abilities
Nomination Process
Discussion → Vote → Invitation → Announcement
Initiate Community Discussion (DISCUSS)
Any (P)PMC member of HugeGraph can initiate a voting discussion. After identifying valuable contributions from a community contributor and obtaining the candidate’s consent, a discussion can be initiated via private@hugegraph.apache.org. The initiator of the discussion should clearly state the candidate’s contributions in the discussion email and provide URLs or other information for confirming the contributions, facilitating discussion and analysis.
Below is a template for HugeGraph emails: (For reference only)
Note: The term
xxxwill be used to refer to the candidate. Typically,xxxrepresents an easily readable name (e.g.,Simon Jay).ASF-INFRA recommends avoiding the use of less readable
IDdirectly as a reference to the person in emails (e.g., avoidsimon321orwh0isSim0n😄).In addition, it is best to choose the “pure text” mode, otherwise the typesetting may be chaotic in the ASF Mailing-list UI
For contribution links in discussion emails, you can use the statistical feature of GitHub Search by entering corresponding keywords as needed. You can also adjust parameters and add new repositories such as repo:apache/incubator-hugegraph-computer. Pay special attention to adjusting the time range (below is a template reference, please adjust the parameters accordingly):
- Number of PR submissions
is:pr author:xxx repo:apache/incubator-hugegraph repo:apache/incubator-hugegraph-doc created:>2023-06-01 updated:<2023-12-25
- Lines of code submissions/changes
- Number of PR submissions associated with issues
linked:issue involves:xxx repo:apache/incubator-hugegraph repo:apache/incubator-hugegraph-doc created:>2023-06-01 updated:<2023-12-25
- Number of PR reviews
type:pr reviewed-by:xxx repo:apache/incubator-hugegraph repo:apache/incubator-hugegraph-doc created:>2023-06-01 updated:<2023-12-25
- Number of merge commits
type:pr author:xxx repo:apache/incubator-hugegraph repo:apache/incubator-hugegraph-doc created:>2023-06-01 updated:<2023-12-25
- Effective lines merged
- Number of issue submissions
type:issue author:xxx repo:apache/incubator-hugegraph repo:apache/incubator-hugegraph-doc created:>2023-06-01 updated:<2023-12-25
- Number of issue fixes
- Based on the number of issue submissions, select those with a closed status.
- Number of issue participations
type:issue involves:xxx repo:apache/incubator-hugegraph repo:apache/incubator-hugegraph-doc created:>2023-06-01 updated:<2023-12-25
- Number of issue comments
type:issue commenter:xxx repo:apache/incubator-hugegraph repo:apache/incubator-hugegraph-doc created:>2023-06-01 updated:<2023-12-25
- Number of PR comments
type:pr commenter:xxx repo:apache/incubator-hugegraph repo:apache/incubator-hugegraph-doc created:>2023-06-01 updated:<2023-12-25
For participation in mailing lists, you can use https://lists.apache.org/list?dev@hugegraph.apache.org:lte=10M:xxx.
Initiate Community Voting Email (VOTE)
If there are no dissenting opinions within the specified time frame of the discussion email, the initiator of the discussion needs to initiate a voting email for the committer election at private@hugegraph.apache.org.
Below is the corresponding email template:
Then, (P)PMC members reply to the email with +1 or -1 to express their opinions. Generally, at least 3 votes of +1 are needed to conclude the vote.
Announcement of Voting Results (RESULT)
After the voting email concludes, the initiator of the vote needs to remind the end of the voting in the email. Additionally, the initiator needs to announce the voting results via email to private@hugegraph.apache.org. The email template can be as follows:
Send Invitation Email to Candidate (INVITE)
After the announcement of the voting results email is sent, the initiator of the vote should send an invitation email to the candidate. The invitation email is addressed to the candidate and cc’d to private@hugegraph.apache.org. The invited candidate must reply to the specified email address to accept or reject the invitation.
Below is a template for reference:
Candidate Accepts Invitation (ACCEPT)
The candidate should reply to the aforementioned email (select reply all) to indicate acceptance of the invitation. Below is a template for the email:
Of course, the candidate may also choose to decline the invitation, in which case there is no template:)
Once the invitation is accepted, the candidate needs to complete the following tasks:
- Subscribe to dev@hugegraph.apache.org, for specific steps/filtering configurations, please refer to the documentation
- Sign the ICLA, follow the steps below↓
ICLA Signing Process
- Download the ICLA
- Open the PDF and fill in the required information. All fields must be filled in English. It is recommended to use a PDF tool to edit and sign.
- Full name: First name followed by last name
- Public name: Optional, defaults to the same as
Full name - Check the box only if you entered names with your family name first
- Postal Address: English address, starting from small to large, including detailed street address
- Country: Country of residence in English
- E-mail: Email address, preferably the same as the one used in the invitation email
- (optional) preferred Apache id(s): Choose an SVN ID that is not listed on the Apache committer page
- (optional) notify project: Apache HugeGraph(incubating)
- Signature: Must be handwritten using a PDF tool
- Date: Format as xxxx-xx-xx
- After signing, rename
icla.pdftoname-pinyin-icla.pdf - Send the following email and attach
name-pinyin-icla.pdfas a reference.
For more details, please refer to https://github.com/apache/hugegraph/issues/1732.
PMC members will await confirmation of the ICLA record from the Apache secretary team. Candidates and PMC members will receive the following email:
Setting Up Apache Account and Development Environment (CONFIG)
After the record is completed, the candidate will receive an email from root@apache.org with the subject Welcome to the Apache Software Foundation. At this point, the candidate needs to follow the steps in the email to set up the Apache account and development environment:
- Reset the password at https://id.apache.org/reset/enter.
- Configure personal information at https://whimsy.apache.org/roster/committer/xxx.
- Associate GitHub account at https://gitbox.apache.org/boxer.
- This step requires configuring GitHub Two-Factor Authentication (2FA).
- The nominating PMC member must add the new Committer to the official list of committers via the Roster page. (Important, otherwise repository permissions will not take effect).
- After this step, the candidate becomes a new Committer and gains write access to the GitHub HugeGraph repository.
- (Optional) The new Committer can apply for free use of JetBrains’ full range of products with their Apache account here.
Announcing via Email (ANNOUNCE)
After the candidate completes the above steps, they will officially become a Committer of HugeGraph. At this point, they need to send an announcement email to dev@hugegraph.apache.org. Below is a template for the email:
Update clutch status information
PMC members responsible for nominations need to download clutch status information and update it. Once effective, it can be viewed on the clutch and projects pages. The process is as follows:
References
- https://community.apache.org/newcommitter.html (ASF official documentation)
- https://infra.apache.org/new-committers-guide.html
- https://www.apache.org/dev/pmc.html#newcommitter
- https://linkis.apache.org/zh-CN/community/how-to-vote-a-committer-pmc
- https://www.apache.org/licenses/contributor-agreements.html#submitting
- https://www.apache.org/licenses/cla-faq.html#printer
- https://linkis.apache.org/zh-CN/community/how-to-sign-apache-icla
- https://github.com/apache/hugegraph/issues/1732 (HugeGraph ICLA related issue)