Version 1.7 of the documentation is no longer actively maintained. The site that you are currently viewing is an archived snapshot. For up-to-date documentation, see the latest version.
HugeGraph-Hubble Quick Start
1 HugeGraph-Hubble Overview
⚠️ Security notice: As of the 1.7.0 release, Hubble does not provide Auth/Login protection. This feature is planned for the 1.8.0 release. Do not expose Hubble to the public Internet or untrusted networks; restrict access with IP/port allowlists and HTTPS.
Testing Guide: For running HugeGraph-Hubble tests locally, please refer to HugeGraph Toolchain Local Testing Guide
HugeGraph-Hubble is HugeGraph’s web management interface. It manages graph connections and schemas, imports data, runs Gremlin queries, and visualizes query results.
The platform mainly includes the following modules:
Graph Management
Graph Management creates and maintains connections, switches between graphs, and provides access, editing, deletion, and query operations.
Metadata Modeling
Metadata Modeling manages PropertyKeys, VertexLabels, EdgeLabels, and IndexLabels. It provides list and graph views and supports reusing metadata across graphs.
Graph Analysis
Graph Analysis runs Gremlin and path queries and displays results as a graph, table, or JSON. It also keeps execution history and saved statements, and exports query results as JSON.
Task Management
Task Management displays background tasks such as asynchronous Gremlin jobs and index creation or rebuilding.
Data Import
The data import page is intended for small-scale trials. For bulk or production imports, use HugeGraph Loader.
The data import page guides you through creating a task, uploading files, and mapping fields. Multiple import tasks can run in parallel, with resumable uploads and error retries.
2 Deploy
There are three ways to deploy hugegraph-hubble
- Use Docker (Convenient for Test/Dev)
- Download the Toolchain binary package
- Source code compilation
2.1 Use docker (Convenient for Test/Dev)
Special Note: If you are starting
hubblewith Docker, andhubbleand the server are on the same host. When configuring the hostname for the graph on the Hubble web page, please do not directly set it tolocalhost/127.0.0.1. This will refer to thehubblecontainer internally rather than the host machine, resulting in a connection failure to the server.If
hubbleandserveris in the same docker network, we recommend using thecontainer_name(in our example, it isserver) as the hostname, and8080as the port. Or you can use the host IP as the hostname, and the port is configured by the host for the server.
We can use docker run -itd --name=hubble -p 8088:8088 hugegraph/hubble:1.5.0 to quick start hubble.
Alternatively, you can use Docker Compose to start hubble. Additionally, if hubble and the graph is in the same Docker network, you can access the graph using the container name of the graph, eliminating the need for the host machine’s IP address.
Use docker-compose up -d,docker-compose.yml is following:
Note:
The docker image of hugegraph-hubble is a convenience release to start hugegraph-hubble quickly, but not official distribution artifacts. You can find more details from ASF Release Distribution Policy.
Recommend to use
release tag(like1.5.0) for the stable version. Uselatesttag to experience the newest functions in development.
2.2 Download the Toolchain binary package
hubble is in the toolchain project. First, download the binary tar tarball
Run hubble
After startup, open http://<host>:8088. Run bin/stop-hubble.sh to stop the service.
2.3 Source code compilation
Hubble’s build uses frontend-maven-plugin in hugegraph-hubble/hubble-dist/pom.xml to install Node.js 18.20.8 and Yarn 1.22.21, so neither tool needs to be installed beforehand.
Download the toolchain source code.
Compile hubble. It depends on the loader and client, so you need to build these dependencies in advance during the compilation process (you can skip this step later).
Run hubble
3 Platform Workflows
The module usage process of the platform is as follows:

4 Platform Instructions
4.1 Graph Management
4.1.1 Graph creation
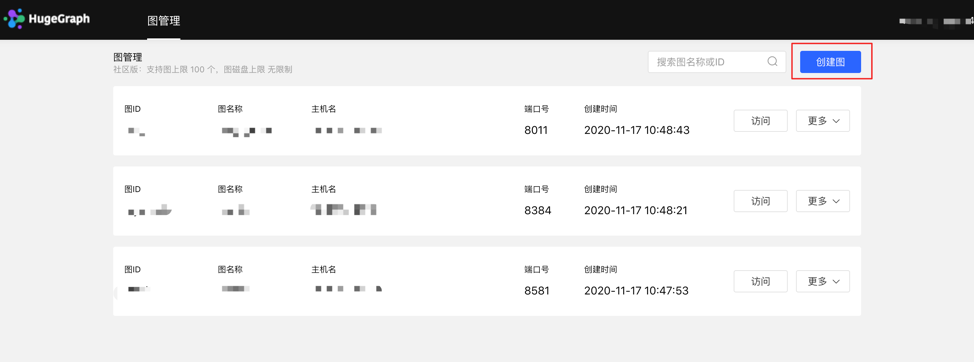
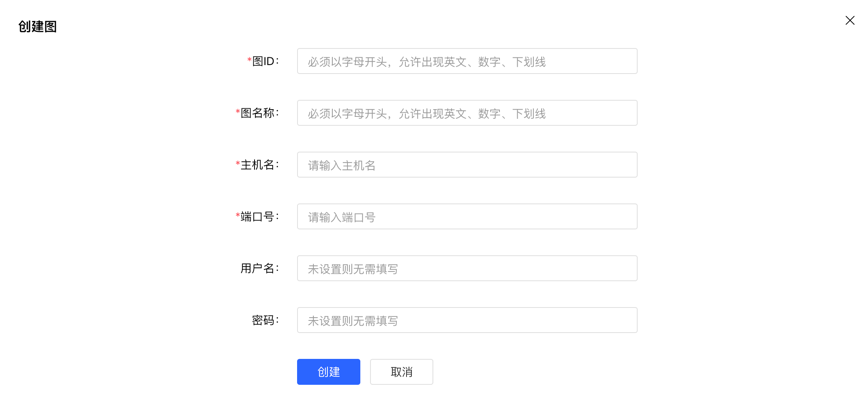
Under the graph management module, click [Create graph], and realize the connection of multiple graphs by filling in the graph ID, graph name, host name, port number, username, and password information.
Create graph by filling in the content as follows:
Special Note: If you are starting
hubblewith Docker, andhubbleand the server are on the same host. When configuring the hostname for the graph on the Hubble web page, please do not directly set it tolocalhost/127.0.0.1. Ifhubbleandserveris in the same docker network, we recommend using thecontainer_name(in our example, it isgraph) as the hostname, and8080as the port. Or you can use the host IP as the hostname, and the port is configured by the host for the server.
4.1.2 Graph Access
Realize the information access to the graph space. After entering, you can perform operations such as multidimensional query analysis, metadata management, data import, and algorithm analysis of the graph.

4.1.3 Graph management
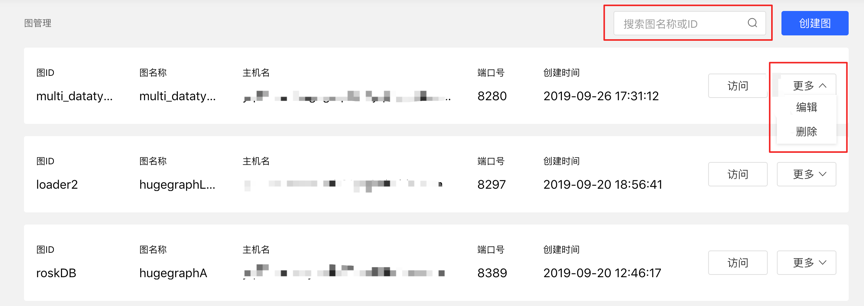
- Users can achieve unified management of graphs through overview, search, and information editing and deletion of single graphs.
- Search range: You can search for the graph name and ID.
4.2 Metadata Modeling (list + graph mode)
4.2.1 Module entry
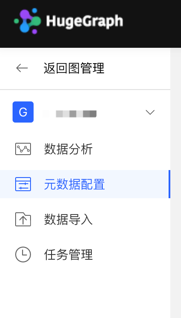
Left navigation:
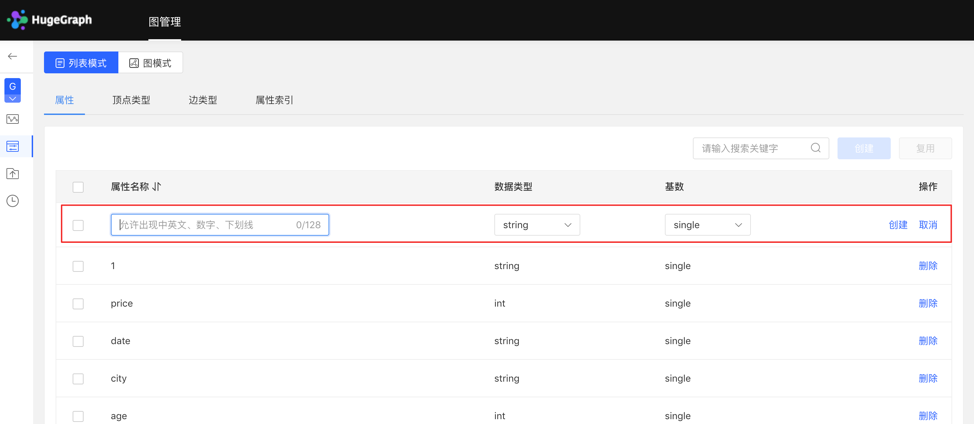
4.2.2 Property type
4.2.2.1 Create type
- Fill in or select the attribute name, data type, and cardinality to complete the creation of the attribute.
- Created attributes can be used as attributes of vertex type and edge type.
List mode:
Graph mode:
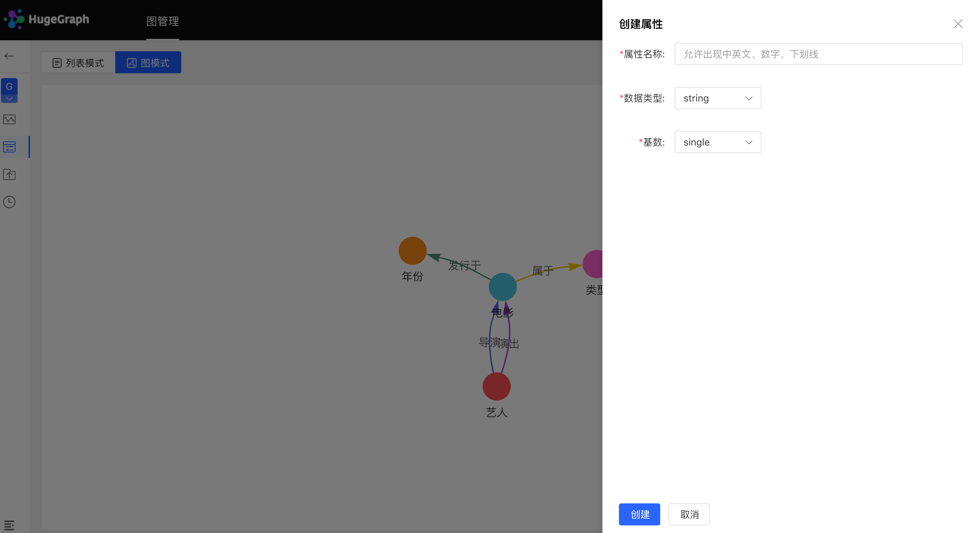
4.2.2.2 Reuse
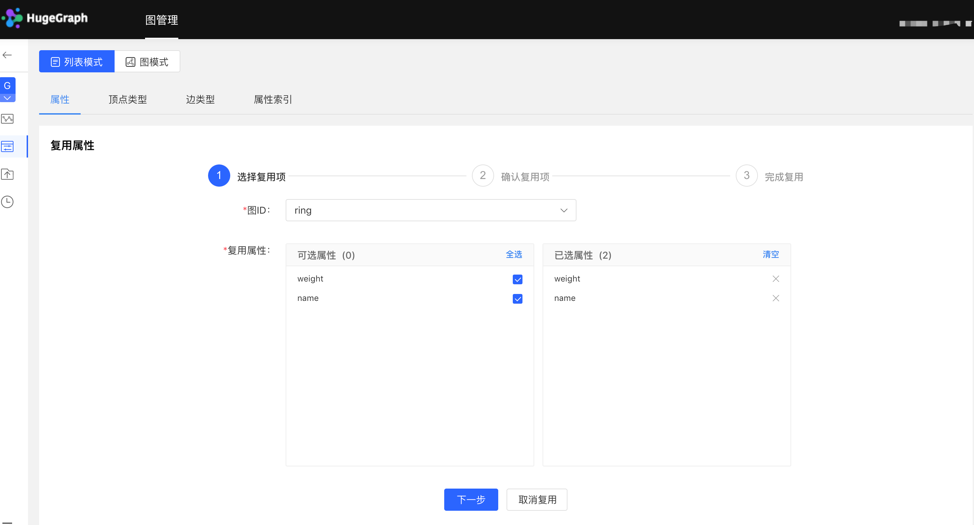
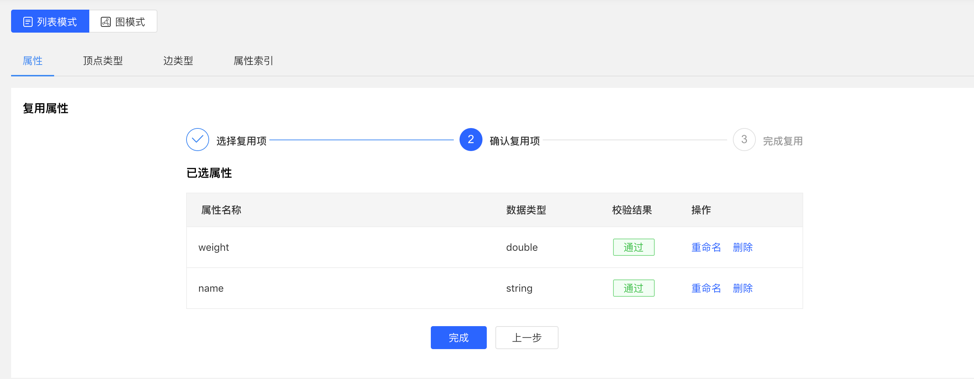
- The platform provides the [Reuse] function, which can directly reuse the metadata of other graphs.
- Select the graph ID that needs to be reused, and continue to select the attributes that need to be reused. After that, the platform will check whether there is a conflict. After passing, the metadata can be reused.
Select reuse items:
Check reuse items:
4.2.2.3 Management
- You can delete a single item or delete it in batches in the attribute list.
4.2.3 Vertex type
4.2.3.1 Create type
- Fill in or select the vertex type name, ID strategy, association attribute, primary key attribute, vertex style, content displayed below the vertex in the query result, and index information: including whether to create a type index, and the specific content of the attribute index, complete the vertex Type creation.
List mode:
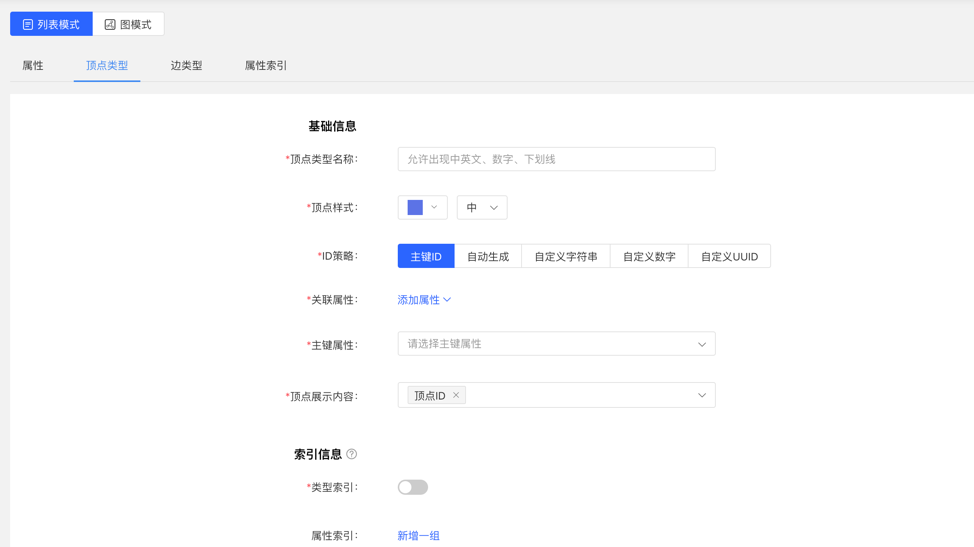
Graph mode:
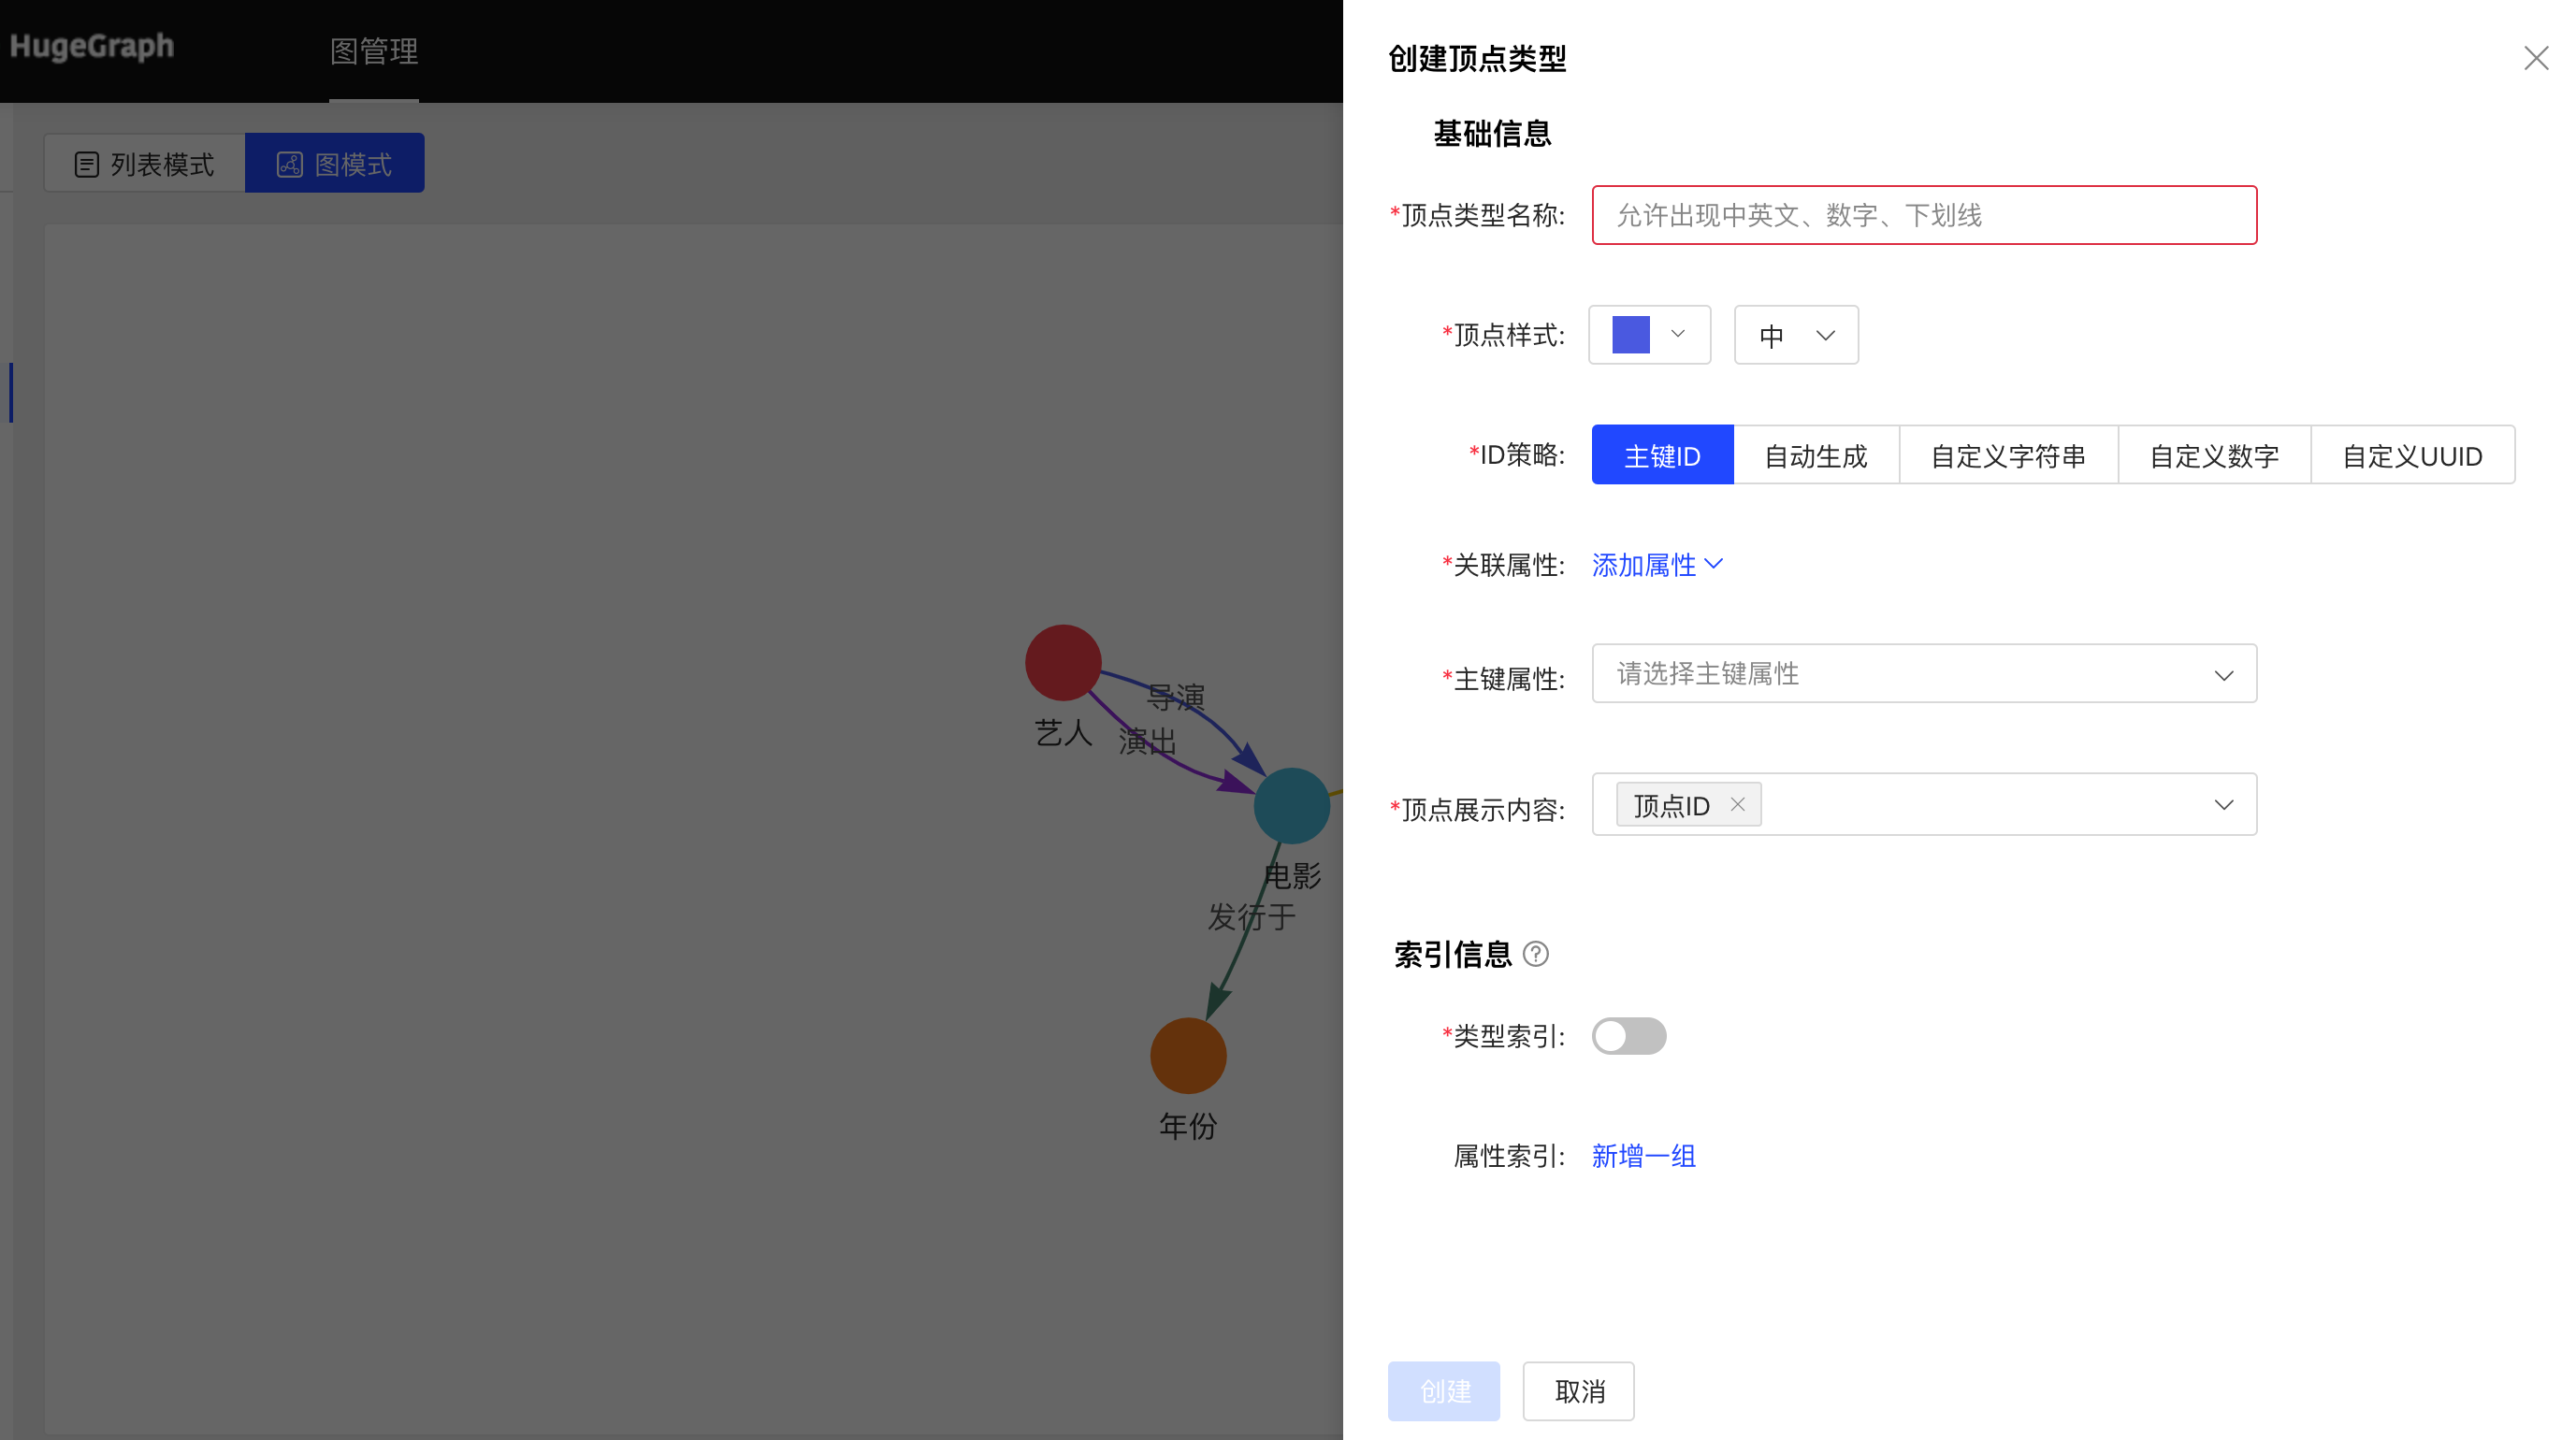
4.2.3.2 Reuse
- The multiplexing of vertex types will reuse the attributes and attribute indexes associated with this type together.
- The reuse method is similar to the property reuse, see 3.2.2.2.
4.2.3.3 Administration
Editing operations are available. The vertex style, association type, vertex display content, and attribute index can be edited, and the rest cannot be edited.
You can delete a single item or delete it in batches.
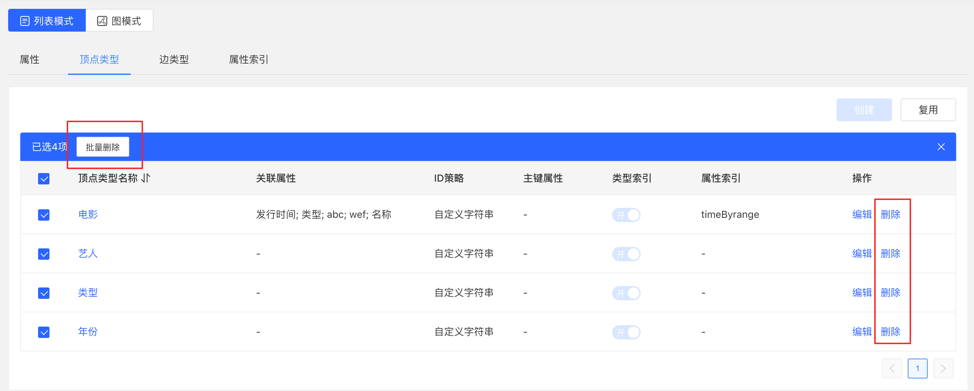
4.2.4 Edge Types
4.2.4.1 Create
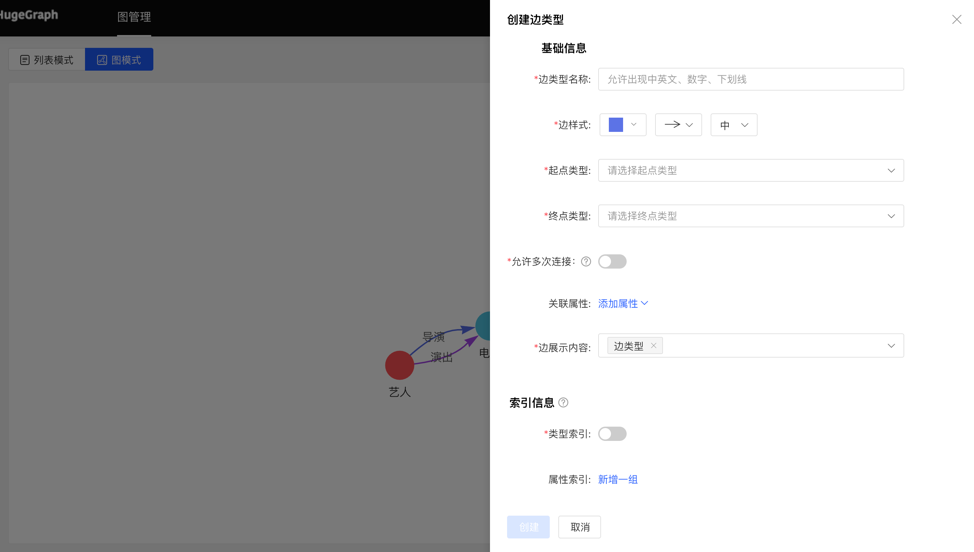
- Fill in or select the edge type name, start point type, end point type, associated attributes, whether to allow multiple connections, edge style, content displayed below the edge in the query result, and index information: including whether to create a type index, and attribute index The specific content, complete the creation of the edge type.
List mode:
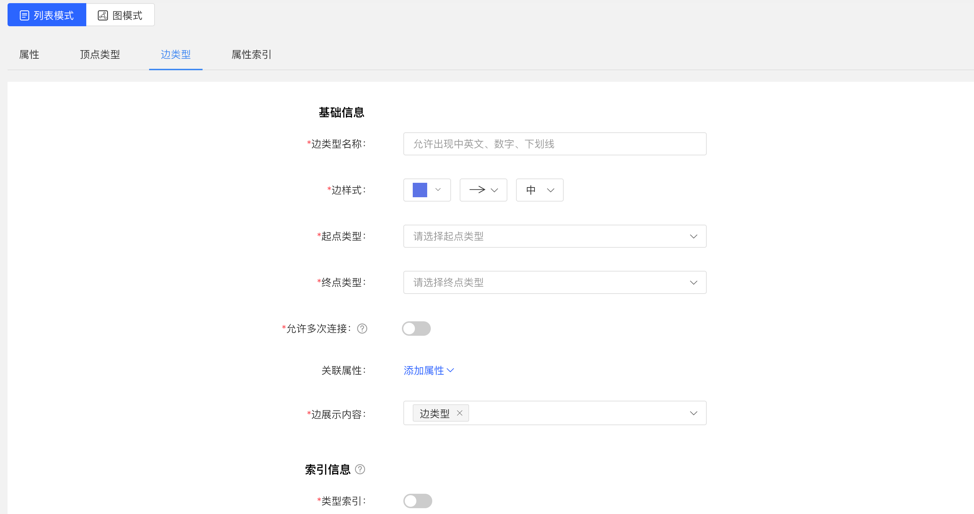
Graph mode:
4.2.4.2 Reuse
- The reuse of the edge type will reuse the start point type, end point type, associated attribute and attribute index of this type.
- The reuse method is similar to the property reuse, see 3.2.2.2.
4.2.4.3 Administration
- Editing operations are available. Edge styles, associated attributes, edge display content, and attribute indexes can be edited, and the rest cannot be edited, the same as the vertex type.
- You can delete a single item or delete it in batches.
4.2.5 Index Types
Displays vertex and edge indices for vertex types and edge types.
4.3 Data Import
Note:currently, we recommend to use hugegraph-loader to import data formally. The built-in import of
hubbleis used for testing and getting started.
The usage process of data import is as follows:

4.3.1 Module entrance
Left navigation:

4.3.2 Create task
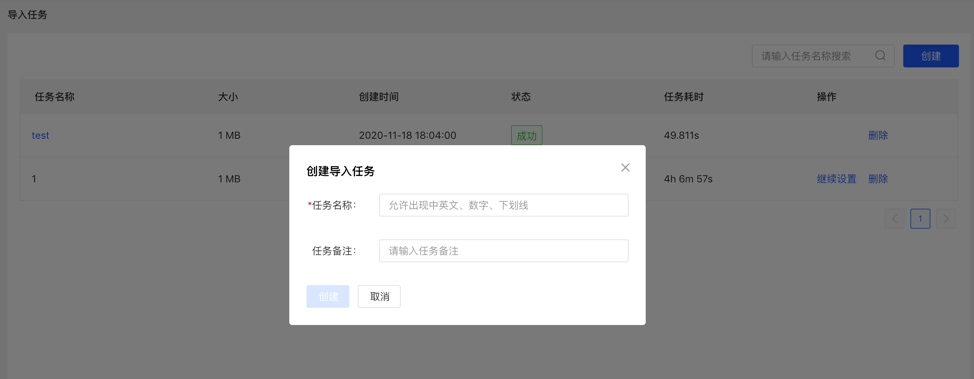
- Fill in the task name and remarks (optional) to create an import task.
- Multiple import tasks can be created and imported in parallel.
4.3.3 Uploading files
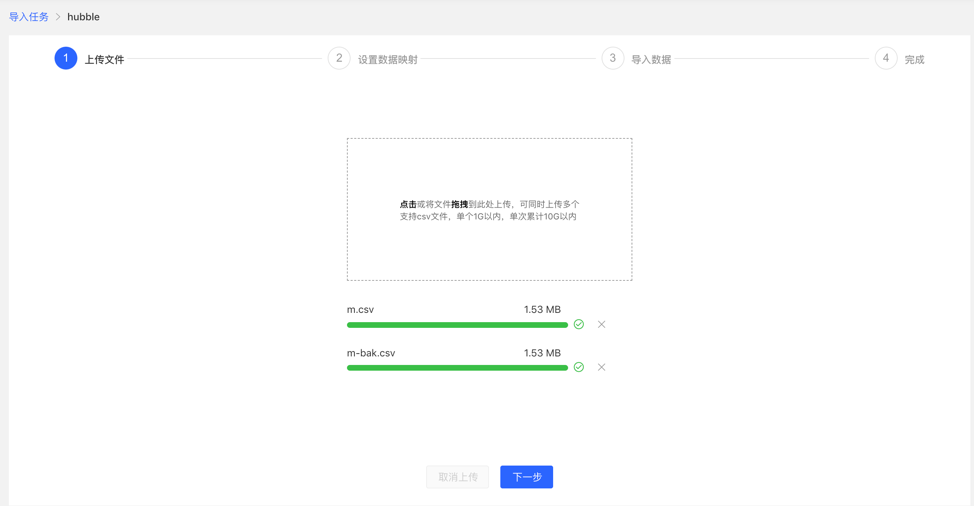
- Upload the file that needs to be composed. The currently supported format is CSV, which will be updated continuously in the future.
- Multiple files can be uploaded at the same time.
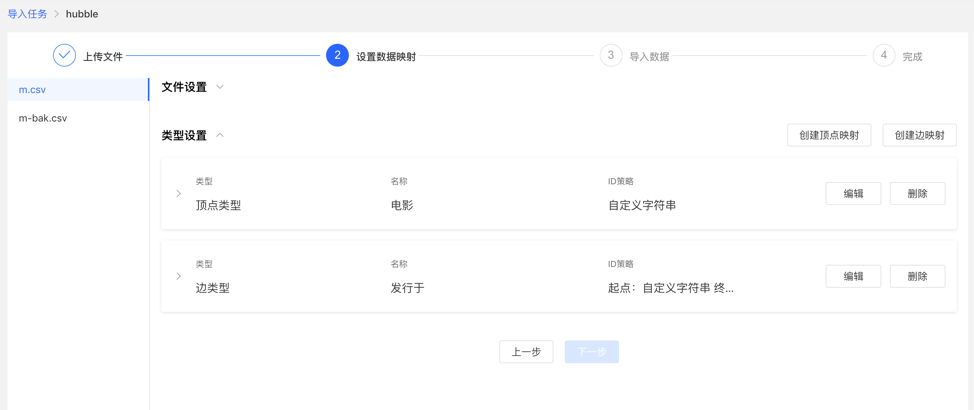
4.3.4 Setting up data mapping
Set up data mapping for uploaded files, including file settings and type settings
File settings: Check or fill in whether to include the header, separator, encoding format and other settings of the file itself, all set the default values, no need to fill in manually
Type setting:
Vertex map and edge map:
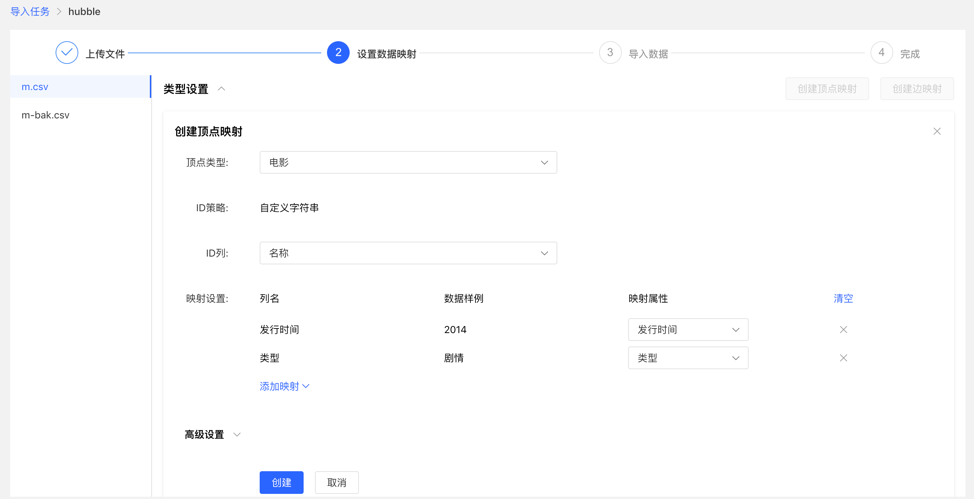
【Vertex Type】: Select the vertex type, and upload the column data in the file for its ID mapping;
【Edge Type】: Select the edge type and map the column data of the uploaded file to the ID column of its start point type and end point type;
Mapping settings: upload the column data in the file for the attribute mapping of the selected vertex type. Here, if the attribute name is the same as the header name of the file, the mapping attribute can be automatically matched, and there is no need to manually fill in the selection.
After completing the setting, the setting list will be displayed before proceeding to the next step. It supports the operations of adding, editing and deleting mappings.
Fill in the settings map:
Mapping list:
4.3.5 Import data
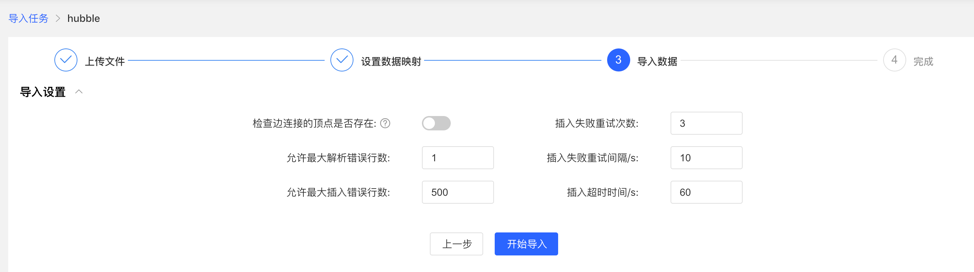
Before importing, you need to fill in the import setting parameters. After filling in, you can start importing data into the gallery.
- Import settings
- The import setting parameter items are as shown in the figure below, all set the default value, no need to fill in manually
- Import details
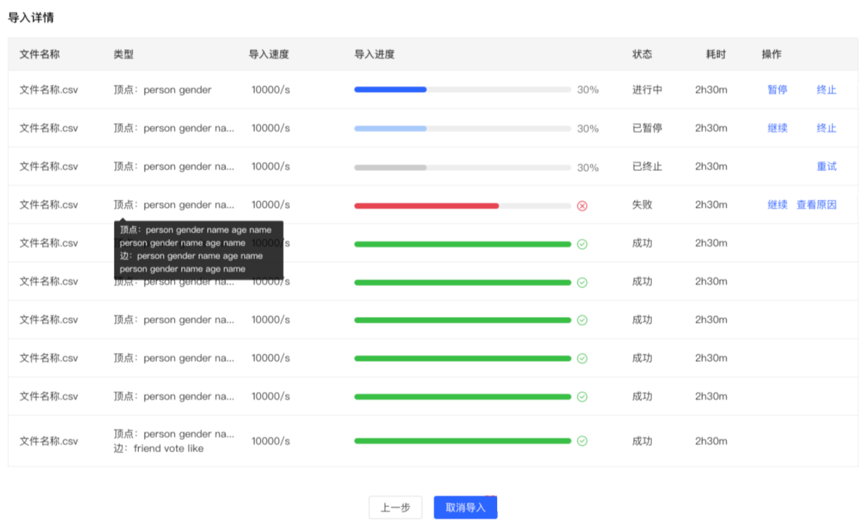
- Click Start Import to start the file import task
- The import details provide the mapping type, import speed, import progress, time-consuming and the specific status of the current task set for each uploaded file, and can pause, resume, stop and other operations for each task
- If the import fails, you can view the specific reason
4.4 Data Analysis
4.4.1 Module entry
Left navigation:
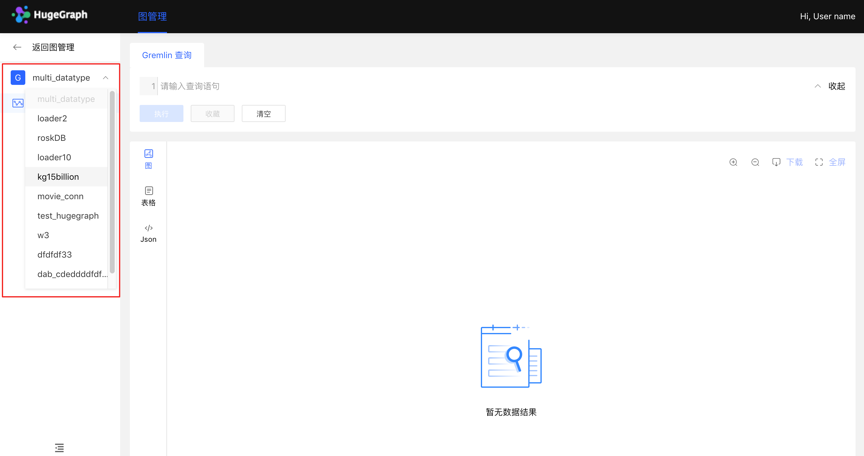
4.4.2 Multi-graphs switching
By switching the entrance on the left, flexibly switch the operation space of multiple graphs
4.4.3 Graph Analysis and Processing
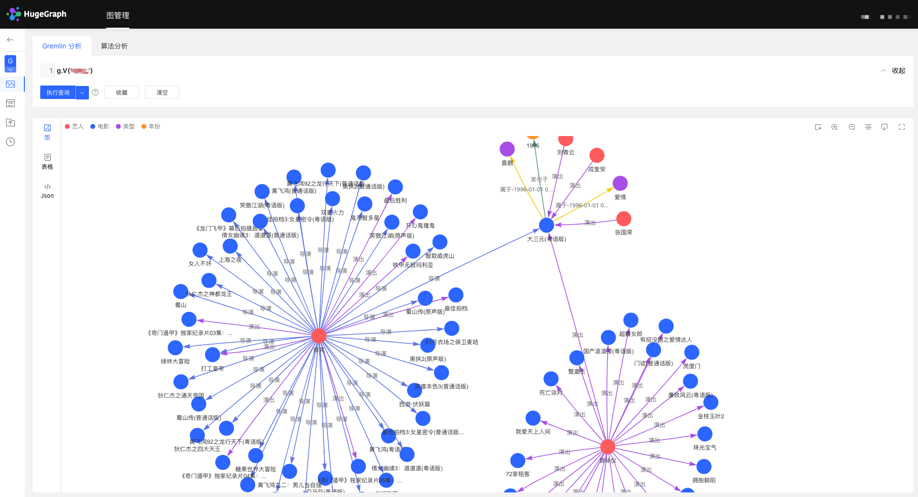
HugeGraph supports Gremlin, a graph traversal query language of Apache TinkerPop3. Gremlin is a general graph database query language. By entering Gremlin statements and clicking execute, you can perform query and analysis operations on graph data, and create and delete vertices/edges. vertex/edge attribute modification, etc.
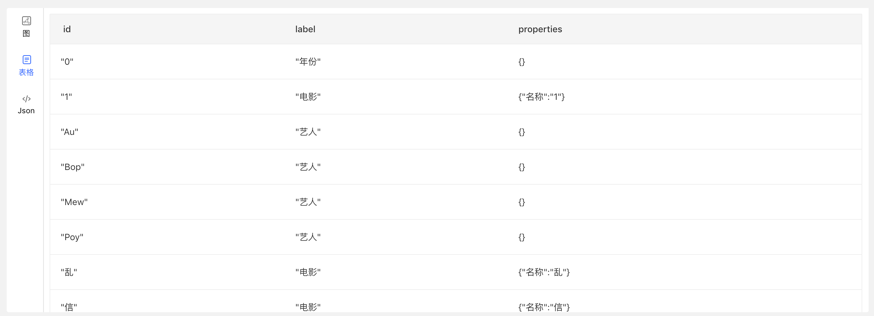
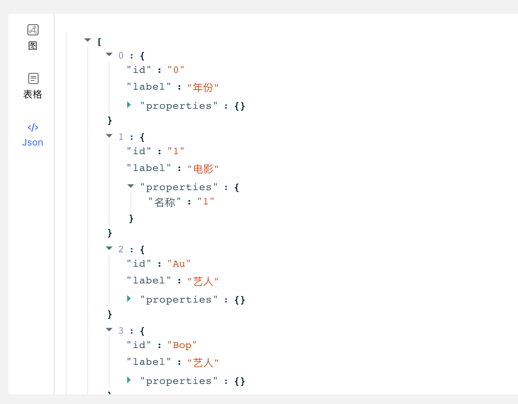
After Gremlin query, below is the graph result display area, which provides 3 kinds of graph result display modes: [Graph Mode], [Table Mode], [Json Mode].
⚠️ SEC Reminder: Hubble allows the direct input and execution of native Gremlin query statements on the web interface, which grants users relatively high operational privileges. Please avoid exposing the Hubble service to public network environments. It is recommended to ensure that the graph database server has enabled the Authentication System (Auth) combined with an IP Whitelist for strict permission control when in use, preventing unauthorized access or malware execution risks.
Support zoom, center, full screen, export and other operations.
【Picture Mode】
【Table mode】
【Json mode】
4.4.4 Data Details
Click the vertex/edge entity to view the data details of the vertex/edge, including vertex/edge type, vertex ID, attribute and corresponding value, expand the information display dimension of the graph, and improve the usability.
4.4.5 Multidimensional Path Query of Graph Results
In addition to the global query, an in-depth customized query and hidden operations can be performed for the vertices in the query result to realize customized mining of graph results.
Right-click a vertex, and the menu entry of the vertex appears, which can be displayed, inquired, hidden, etc.
- Expand: Click to display the vertices associated with the selected point.
- Query: By selecting the edge type and edge direction associated with the selected point, and then selecting its attributes and corresponding filtering rules under this condition, a customized path display can be realized.
- Hide: When clicked, hides the selected point and its associated edges.
Double-clicking a vertex also displays the vertex associated with the selected point.
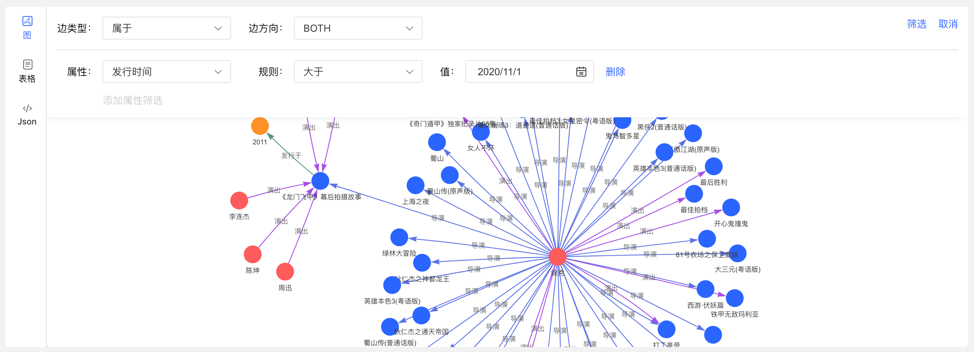
4.4.6 Add vertex/edge
4.4.6.1 Added vertex
In the graph area, two entries can be used to dynamically add vertices, as follows:
- Click on the graph area panel, the Add Vertex entry appears
- Click the first icon in the action bar in the upper right corner
Complete the addition of vertices by selecting or filling in the vertex type, ID value, and attribute information.
The entry is as follows:
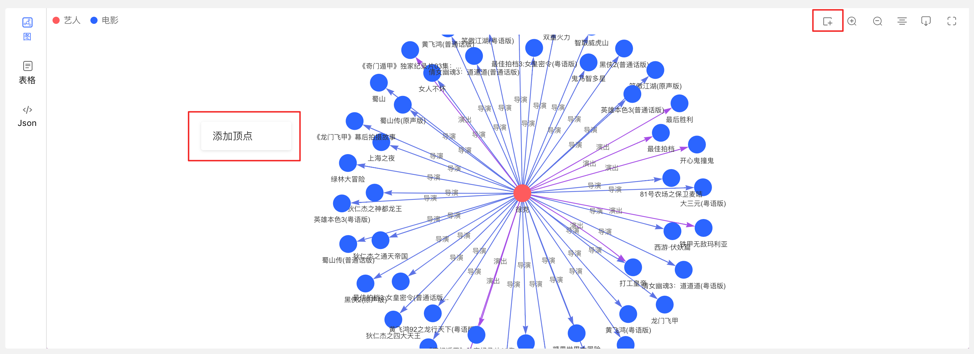
Add the vertex content as follows:
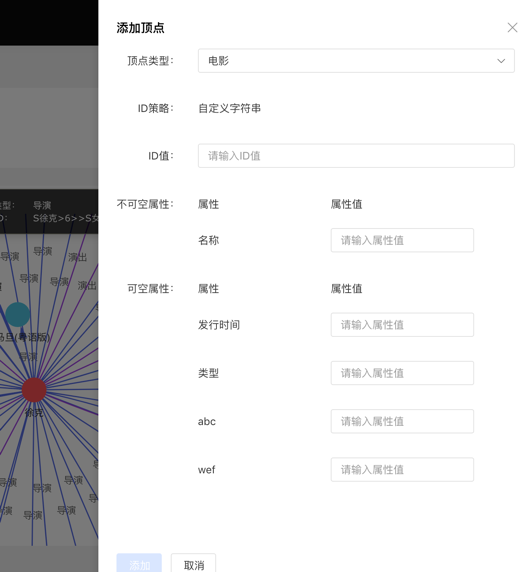
4.4.6.2 Add edge
Right-click a vertex in the graph result to add the outgoing or incoming edge of that point.
4.4.7 Execute the query of records and favorites
- Record each query record at the bottom of the graph area, including: query time, execution type, content, status, time-consuming, as well as [collection] and [load] operations, to achieve a comprehensive record of graph execution, with traces to follow, and Can quickly load and reuse execution content
- Provides the function of collecting sentences, which can be used to collect frequently used sentences, which is convenient for fast calling of high-frequency sentences.
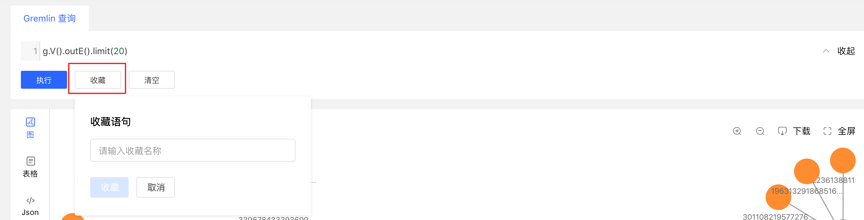
4.5 Task Management
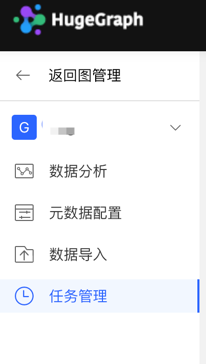
4.5.1 Module entry
Left navigation:
4.5.2 Task Management
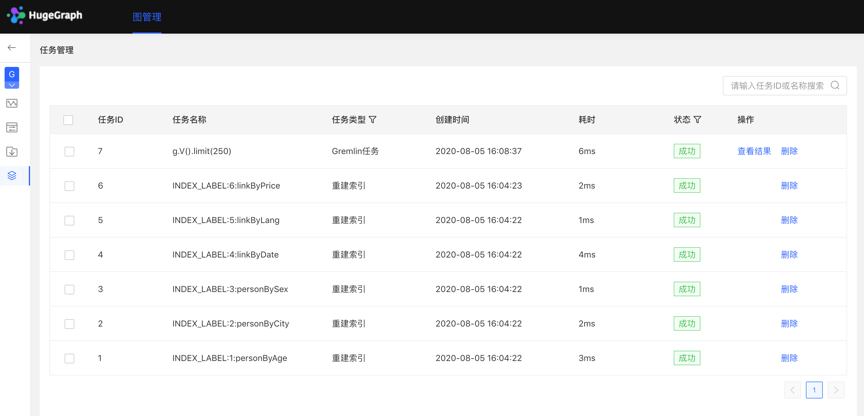
- Provide unified management and result viewing of asynchronous tasks. There are 4 types of asynchronous tasks, namely:
- gremlin: Gremlin tasks
- algorithm: OLAP algorithm task
- remove_schema: remove metadata
- rebuild_index: rebuild the index
- The list displays the asynchronous task information of the current graph, including task ID, task name, task type, creation time, time-consuming, status, operation, and realizes the management of asynchronous tasks.
- Support filtering by task type and status
- Support searching for task ID and task name
- Asynchronous tasks can be deleted or deleted in batches
4.5.3 Gremlin asynchronous tasks
- Create a task
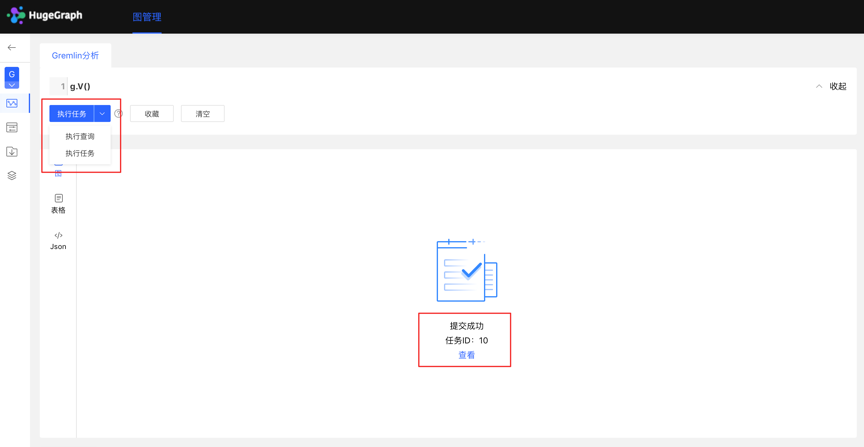
- The data analysis module currently supports two Gremlin operations, Gremlin query and Gremlin task; if the user switches to the Gremlin task, after clicking execute, an asynchronous task will be created in the asynchronous task center;
- Task submission
- After the task is submitted successfully, the graph area returns the submission result and task ID
- Mission details
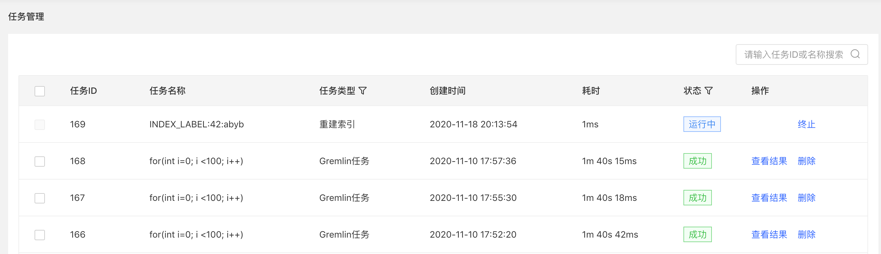
- Provide [View] entry, you can jump to the task details to view the specific execution of the current task After jumping to the task center, the currently executing task line will be displayed directly
Click to view the entry to jump to the task management list, as follows:
- View the results
- The results are displayed in the form of JSON
4.5.4 OLAP algorithm tasks
There is no visual OLAP algorithm execution on Hubble. You can call the RESTful API to perform OLAP algorithm tasks, find the corresponding tasks by ID in the task management, and view the progress and results.
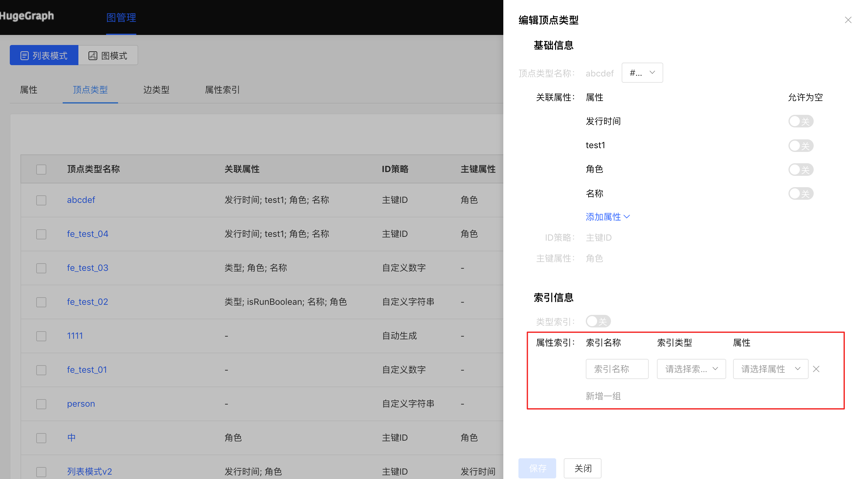
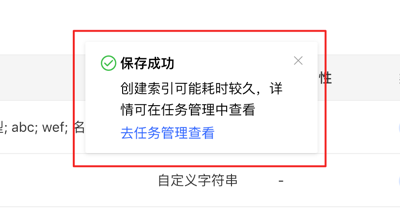
4.5.5 Delete metadata, rebuild index
- Create a task
- In the metadata modeling module, when deleting metadata, an asynchronous task for deleting metadata can be created
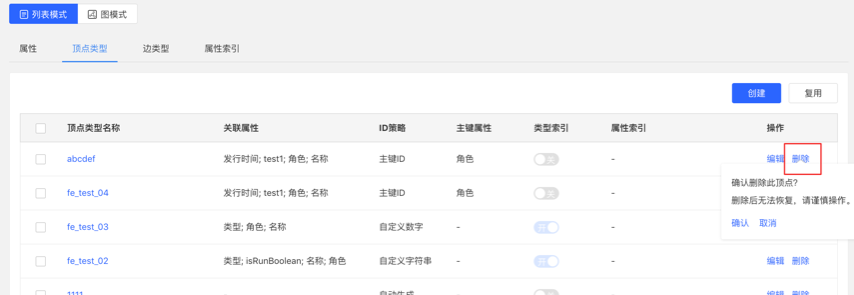
- When editing an existing vertex/edge type operation, when adding an index, an asynchronous task of creating an index can be created
- Task details
- After confirming/saving, you can jump to the task center to view the details of the current task
5 Configuration
HugeGraph-Hubble can be configured through the conf/hugegraph-hubble.properties file.
5.1 Server Configuration
| Configuration Item | Default Value | Description |
|---|---|---|
hubble.host | 0.0.0.0 | The address that Hubble service binds to |
hubble.port | 8088 | The port that Hubble service listens on |
5.2 Server and PD
| Configuration | Default | Description |
|---|---|---|
pd.enabled | false | Whether to discover services through PD; keep false for a standalone Server |
server.direct_url | http://127.0.0.1:8080 | Server address used when pd.enabled=false |
pd.peers | 127.0.0.1:8686 | PD node address |
pd.server | 127.0.0.1:8620 | PD service address |
route.type | NODE_PORT | Service routing mode: NODE_PORT, DDS, or BOTH |
5.3 Gremlin Query Limits
These settings control query result limits to prevent memory issues:
| Configuration Item | Default Value | Description |
|---|---|---|
gremlin.suffix_limit | 250 | Maximum query suffix length |
gremlin.vertex_degree_limit | 100 | Maximum vertex degree to display |
gremlin.edges_total_limit | 500 | Maximum number of edges returned |
gremlin.batch_query_ids | 100 | ID batch query size |